Label manager Android application
- First things to do
- Installing the application
- Device registration
- Setting printers
- Application screens
First things to do
Datetime and Security
Let's make sure that the device is running the latest version of Android (this can usually be done in the last menu option under System Updates in the Android settings).
In the Android settings, find Date and Time and verify that the time zone is set correctly (Europe/Amsterdam or Europe/Budapest), and that automatic time synchronization is enabled.
![Screenshot_20230720-210740[1].png](https://book.traxpire.cloud/uploads/images/gallery/2023-07/OJmgBHlBidRfcDV2-screenshot-20230720-2107401.png)
For certain tablets, it is necessary to enable the option for Unknown Sources, which can be found under the Android settings, in the Security section.
Wireless connection
The client device needs to be able to reach the server over the Internet. In the case of WiFi printing, client isolation should not be enabled on the network. Brother printers typically only support the 2.4GHz band.
Sunmi mobile printers
Sunmi V2s devices are initially set up for handling normal (non-adhesive) paper by default. In the Android device settings, this needs to be set to "Label mode."
![Screenshot_20230720-210039[1].png](https://book.traxpire.cloud/uploads/images/gallery/2023-07/HmeMiNQu7M0cUF8f-screenshot-20230720-2100391.png)
Zebra printers
For Zebra printers, the printer needs to be initially configured for the correct paper size, gap setting, and final output. (Later on, using a USB connection, the application will be able to do this automatically.)
Installing the application
The application can be downloaded from the URL corresponding to the country and brand using the following path: /app.apk. For example: srbkfc.traxpire.cloud/app.apk
- Download the apk file
![Screenshot_20230720-211336[1].png](data:image/png;base64,iVBORw0KGgoAAAANSUhEUgAAAtAAAAWgCAIAAAD4sOOEAAABDWVYSWZNTQAqAAAACAAFAQAAAwAAAAEC0AAAAQEAAwAAAAEFoAAAATEAAgAAACQAAABKh2kABAAAAAEAAABuARIAAwAAAAEAAAAAAAAAAEFuZHJvaWQgU1AzMTE1LVN1bm1pLTIwMjIwODMwMTIyNDU0AAAEkAMAAgAAABQAAACkkpEAAgAAAAQyOTEAkBEAAgAAAAcAAAC4kggABAAAAAEAAAAAAAAAADIwMjM6MDc6MjAgMjE6MTM6MzYAKzAyOjAwAAADAQAAAwAAAAEC0AAAATEAAgAAACQAAADpAQEAAwAAAAEFoAAAAAAAAEFuZHJvaWQgU1AzMTE1LVN1bm1pLTIwMjIwODMwMTIyNDU0ALHtGLgAAAABc1JHQgCuzhzpAAAAA3NCSVQICAjb4U/gAAAgAElEQVR4nOzdd0ATZxsA8CeLsPeW6UDcuCeuat1aR7VaP8VRrXVvq1ZptVbrAPdE0YpW67buiqPiRAUREZAte4SZhITkvj9eek2TAJeQgLbP7y9yufHevVze5951AAghhBBCCCGEEEIIIYQQQgghhBBCCCGEEEIIIYQQQgghhBBCCCGEEEIIIYQQQgghvWPVdwI+esbGxr179/72228bNWokk8mYb8jlcgUCwalTp4KCgt6/f6+/FCKEEKovvXv3vnPnjuKSPn363L17t56SU5+49Z2Aj56rq+uCBQtMTU23bdtWVlbGfEMzM7N+/fqNGzcuOzt73759+kshQgghhD56vr6+2dnZixcv1mLb8ePHx8TE7N27l8fj6TxhCCGE6oufn9+dO3fu3Lnz8uVL6p9evnxJvvLz86vvZNYpPdZwkLYGZ2dnsVgcERHx+vVrJls1btz43bt32h2x+m1tbGx69uxpa2tbXFz86NGj1NRU7Y6ipGHDhkKhMCIiQott09PTU1JSzMzM3NzcEhISdJIehBBCmvLx8WndurWHhwe9pKioKCIi4t69e9rtMDAw0MLCQnGJn5/f0aNHe/fuff78eUtLS3LQ4ODg6vejUUnas2fPxo0bi8Xip0+fVlUaduzYsV27dqWlpTdv3szNzdXsrD5AxsbG+/fvLykpUYzpIiMjBw8eXNUmDg4Oy5Yte/ToUUVFhaaHq3FbBweHkJAQkUhEJ6aiouL27dsdOnTQ9Fiq5s6dGx8f365dOy227dix47lz5y5evNivX7/apwQhhJBGSPEvEAioqp0/f37y5Mma7plsGxwc7O/v7+/v/9lnn9FfffbZZ8HBwWSFavagUUn61VdfJScn06vJZLI7d+60adNGabUzZ87I5XKyjkAgmDhxoqbn9WHh8Xj3799Xm21CoXDQoEFKK0+cOPHy5ctlZWX0aswPxGRbOzu7169fq01Pbm5u+/bta3m+gYGB2lVvAIC7u/vu3bsfPHiwcOHCWiYDIYQQc5MnT05MTKRL37t3737//ff+/v4jR44cOXIkiRIuXLhQWFhIUZRcLk9MTFy7di3z/ZPd9u7dW3EhXYPSu3fv6ss7jUrSRYsW0SeiKCsrq2nTpvRqq1atoigqPz9/165dV69eJYWgi4sLvcKkSZOYn+AH4fvvvyenmpaW9r///c/BwcHX1/fJkydk4dOnT+k1LSwssrKyVK8Rk6Mw33bnzp3kq/j4+M8//9zKyqpHjx50Rl68eLGW57t///4HDx5ot62lpeX69eufPn3q7+9fy2QghBBiwsPDIzQ0lJTQERERU6ZMYbFYLJaaMZtk+WeffXbhwgVSZLx48cLHx4fJUVQDDhsbG/pjjQEH85LUwcGhqKiIoiipVLpmzRobG5s2bdrcunWLrHn+/Hl6zUePHlEUtWDBAvIxMjKSoqgZM2aQjytXrqQoateuXUzO7kMRGxtL4sGhQ4fSCxs1aiQUCimKqqiooJu17Ozs6AsaFBSUm5vLPOBgvm1MTIxqxru5uUkkEhLf1epsAe7cuXP48GHttmWxWIsXL37//n1oaGgtk4EQQoiJgIAAuVyenJzcp08fpTjDw8OjV69evXr1UooqWCyWp6fn3bt3SYyiNjpRolru7Nmzh3nAwbwkXbJkCdnVyZMn6TWtrKzy8vIoihIKhVZWVmRhUlISRVGffPIJ+UiiqPXr1wNA48aNBQJBSUlJq1atajy1D4WhoaFMJqMoKicnR+mrt2/fkotC1ylZWFgcP358xIgR5GNqampVGdCsWbP4+HixWPzzzz9ruu2iRYvWrFmzatUqpeWZmZkURUkkEi1P9S+RkZE//vgjALDZbGtr627durVs2ZLNZpNvnZycOnbs6OjoyOVW9s91cXHp2LGjk5MT+Thjxozk5GTsMYoQQnWDxWL5+fnRxbClpeW8efNInYeSO3fuzJ8/ny6zlDasnlLAYWtrq/ix+oBDo5L05MmTZIlSRxPSaEJRFB2ykCqNcePGkY+3b9+mKGrp0qUAcOnSJYqi1q1bx+TUPhQ8Hq9r165du3ZVrXQilRBFRUVVbVtN0EBaniiKSk9P13RbtTw8PKRSKUVRtS/pU1JSZs+eDQCWlpZ79+7NycnJyspq3LgxiTlu3ryZmZkZERFBOqh6eXn9+uuv2dnZJ06c6NSpEwB88cUX8fHxWnSVRQghVEv+/v4FBQWKPTlodO8NuVx+5MgRMq6EObLDHj16kI9BQUFK8Qepb1C7rUYl6Z9//kmO1bVrV8U19+/fT5bTbSiHDx+mKCo8PLx///7ffPONWCyWSqWdO3eeMGGCXC6PiorS9wQNOh4WK5VKHz16pLp89uzZtra2AKA04RpDoaGhRUVFFhYW2m2uxMvLKygoiFQ5aN0aQsvPzx83blxCQoKHh4elpeX06dPNzc0DAgK2bNnSu3fv6Ojo4ODgBg0a9OzZ09raetCgQUlJSRcvXvT29iZjdH19fcvKyi5dulT780IIIcTcixcv2rZtCwDHjh0LDg5Wnf3Tx8dn8uTJfn5+fn5+I0aMaNSokUAg0OgQZBZpT0/PqVOnKi7Py8sLDAwMDAxUu5VGJamJiQn5Q+l5XigUkj/Mzc3JH2vWrOnXr1/79u1v3rxJluzbt+/t27enTp2SyWSLFy+WSqUand2HyMvLKzs7m6IosVhMh3uqqq+lsLGxadmypXbbEitWrEhKSsrIyCBVVRUVFfv372d+FlUZN25cUlJSUlLSu3fvNm/ebGxs7OXllZaWlpCQkJubO2/ePEdHx/79+9+/fz8pKSk9PX3BggX29vZffPHFH3/8kZyc/O7du4CAgObNm9c+JQghhJjz8fG5e/eup6dnNX0yWCyWlZVVYGDglClTNNo5RVECgYA82ZLOH7RevXoBwPz585nXykPVJWlUVBTZbbNmzRTX37p1K1m+YcMGeqGLi8umTZsuXrz466+/Tp8+HQD27t1LUVSN04F8HCwsLF68eEFOe+PGjdWsqWmziKbbbtq0STHLY2NjFQdGa61Ro0a//vprWlpa7969XV1dAYDP57dv337ChAk9evRwcHDgcDjm5uatW7ceNWpU3759HR0dORyOtbV1165dt2/ffvXq1XHjxnE4nNqnBCGEkEboUMPDw2PNmjWhoaGJiYkFBQWhoaEBAQF0CwiTXqJKKIoiw2gbNWqkWPTQ3TKqaVJRVU1JqlHAocTX17e8vDw9Pd3Ozk6z0/sA8Xi8GzdukHO+evVq9SvrO+AYNGjQpk2bdu7cefXq1fLycoqipFLp119/rcXhFLm4uOzduzcuLo7uFkqYmJgo/Y8aGRkprsPlcqdNm3b8+PEhQ4bUMg0IIYS0Y2lpee7cObXzWJB+owzHwSqhKGr+/PkAYGpqamlp+dlnn5F9tmjRAgAcHR2Zl3fVl6Q1BhxkWINaz549oyhq2rRpNjY2mzZtun379u3btzdt2mRjY6PxCde7X3/9lZzws2fPlCZ5VaXvgEPR4MGDybDYrKwsY2NjLY5IIwFHbGysFttOmjTpl19+wYADIYTq0ZEjRwoLC7///vu2bduSuTc8PT39/PySk5MjIiIYDktRQlHUnTt3DA0NyUcyLCUyMpJ87NKlC/Myq/qS9Pnz5+RbpV4HAQEBZPnq1avV7pZMvHHz5k0ejxceHq4YaYWHh39kb/giLUMURUVHRzdo0KDG9esy4AAAegaVAQMGaHFEGgYcCCH0UbO0tLSyslJtNyEdOLTbJylflMbB0pUQNc7DQauxJKU7iPTs2VNx+cGDB8nyefPmqW5FJt4oLi5u2bLlsmXLKIpKSkrq3r27r69vSkoKRVGLFi3S9JRrxNb5Hol169aR1ork5OQRI0ZUNZxV3ywsLM6cOXPmzJm9e/cqfUV36LW2tq7zdCGEEPpQFBYWktepAMDkyZPpEpqiKE2HpSgJCAgg02M4Ojo+e/YsJibGxMTk8uXLAQEBTDZnUpKmpKSQP0hjDc3d3Z38ERMTo7rVtm3bLC0tAwICXr9+TV7x8euvv4aFhf3555+nTp0CAJ28a6wu0PO6Z2RkMG/90lMNB3nzTXl5ueJrbKysrMjEXxRFkWFRWsMaDoQQ+nfw8fEhhVft329FN0+QrqN+fn7kp37t2rWKjRfV7IFhSTpr1iyyqytXrtALnZycyHznhYWFqt0Gxo8fL5fLIyMjSbvJlStXKIqip8cks6rX/r0fqnT/eno/P7+NGzeyWCyZTHb06NHOnTt37txZcYWCgoLffvtNo302a9bs0qVLrq6uO3bsWLZsmUbb3rlzZ9iwYQYGBr/99tv69evDw8ObNGmyZMkSR0dHAIiIiHj58qVGO0QIIfSvlJycXFRUxGKxtH4lZ1Xevn37+PFjCwsLehqu6jEvSY8ePbp27VoHB4dBgwbt2LHj4MGDdnZ2P/74I5l+49KlS/SEHASPx9uwYYNMJluyZAmZeINMFkJXkDRp0oRe+KGj+0ZUJSoqSu2GeppptFmzZmT0kaqCggKlV/lpoTY1HDNmzDhz5gzWcCCE0Aeiqhe5aYouaBRbT5SqN6qp4dCoJJ00aRIZeqkkISFBbbePMWPGfP/99/THPn36SCQSmUx24cKFM2fOSKVSiUSi1CPkA/X06VOdBxxdu3Yls8weP35c020BwMXF5ejRo2QPhFAovHTpkk7eUuPg4LB+/fqEhARNxzGbmpp+//33ly9f9vX1rX0yEEIIfTjo4iYpKYk06Ldp04b0FGEScGhako4cOTIyMpIe3CsWi8+fP+/p6ckwtd9++21paSnZtqysbOXKlbU596roII6rGzY2Nk5OTq9fv9Z6Dzwer3v37nZ2dkVFRY8ePSopKdFJwoyNjfv3779ly5Zffvnl/v375eXlTLbicrne3t6jRo1KTEz88ccfMzIydJIYhBBCHwJ/f3/Se4O4e/euaoX6999/7+/vr8ODNm/evGnTpmKxODw8XNN3odvZ2ZGn37CwsOzsbB2mivbRBBwfMkdHxyVLlvTq1SsjI4PhnKFyudzc3DwrK+vIkSM3btzQdwoRQggh9NHjcDhNmjQ5efIk3bJTo4KCgjt37kyYMMHIyKi+k48QQgghhBBCCCGEEEIIIYQQQgghhBBCCCGEEEIIIYQQQgghhBBCCCGEEEIIIYTqAKuoqMjU1LS+k4EQQgihfye5XJ6VlcWSy+U6eTMeQgghhJBaMpmMVc3b6hBCCCGEdIJd3wlACCGE0L8fBhwIIYQQ0jsMOBBCCCGkdxhwIIQQQkjvMOBACCGEkN5hwIEQQgghvcOAAyGEEEJ6hwEHQgghhPQOAw6EEEII6R0GHAghhBDSOww4EEIIIaR3GHAghBBCSO8w4EAIIYSQ3mHAgRBCCCG9w4ADIYQQQnqHAQdCCCGE9A4DDoQQQgjpHQYcCCGEENI7DDgQQgghpHcYcCCEEEJI7zDgQAghhJDeYcCBEEIIIb3DgAMhhBBCeocBB0IIIYT0DgMOhBBCCOkdBhwIIYQQ0jtufSfgA/XJhjLyx+2VJvWbEoQQQuhfAAMOhBBC6N9MLBanp6dnZ2eXlZWVlZWVl5cbGBiYmJiYmJjY29u7uroaGhrWQTIw4EAIIYT+hSiKys7OfvLkSVxcXG5urkgkkkqlEolEJpNxOBwej8fj8YyNjW1sbJo0adK5c2cnJyc2W48dLVgURelv7x8vbFJBCCH08ZJIJJcuXbp7925ZWZlcLpfL5VWtyWKxOByOsbFxjx49Ro0axefz9ZQkDDjUw4ADIYTQx0gmk0VHRwcHB+fm5mq6rYWFxbRp01q3bs3hcHSeMBylghBCCP1LlJSUhIaGHjp0KC8vT4vNi4qKDh48eOPGjeLiYp2nDftwIIQQQv8GJSUl165du3fvXm3ChZKSksuXLwsEgiFDhlhaWuoweVjDgRBCCH30ZDLZ48ePaxltEKWlpQ8ePAgLC5NIJDpJG1GrGg6JRPLu3TsAcHV1NTMzY7hVQUHBy5cvc3Nzzc3N27dv7+DgUJs0aKq8vDwhIQEA3NzcTE1N6/LQSK3Y2FiZTGZra2tvb1+PycB/DIa0u+sRQvoWHR19+fJlXTWFlJaWXrt2zd7evmPHjjrZIdSyhkMgEEyaNGnSpElv375luMnvv/8+bNiw5cuXb9myZc2aNcw31JX8/HyS5ri4uDo+dP1KTEy8efNmWVlZfSdE2dy5cydNmnTr1q36TQbDf4yMjIzExEShUFhnCfvQaHHXI4T0TSKRBAcHFxYW6nCfxcXFISEhYrFYVzus0z4ckZGR/v7+AODs7Ny7d28ej+fq6lqXCfjPEovFU6ZMKSsrGzt27LJly+o7OR8rsVg8ceJEkUh0/fr1+k4LQghVoijq0qVLqmNSWCyWoaGhkZFReXm5UChUOyiVxWIZGRkZGRmJRCKRSKS4DkVR+fn5Z8+eHT9+vE7m56jTgOPcuXMA4OzsHBIS8lFXxiYnJ+/btw8AFi9ebGdnV9/JqRmbzTYyMiorKzM2Nq7vtHzEwsLCiouLhw8fbmFhUd9pQQihStnZ2Xfv3lVdbmhoOGrUqB49erx69er8+fPZ2dmqMYe1tfXIkSM7dOjw+PHjc+fOqbbIhIaG9unTx9nZufbprNNOo69fvwaAgQMHftTRBgCUlJT88ccff/zxhw7rmvTKwMAgJCTk8OHDX3/9dX2n5SN26dIlABgyZEh9JwQhhP725MkTtc3lRkZGPXr0MDU17dKly+jRo1V7TNrY2IwePdrX19fExKRr165qH6UkEsmDBw90ks46DThKS0sBwNraui4PiggbG5vWrVtzuTgQWksZGRlhYWENGjTw8fGp77QghFAlsVgcFxendiJRiUQSExMDAGw2u3Pnzv/73/8UYw5bW9vJkyd3796dNJfExcVV1ckvJiZGJBLVPql6KX5kMllMTAxFUTwez9vbWywWx8fHA4BUKgWAjIyMqKgoALC3t1c8eblc/u7du/j4+OLiYhMTEy8vr6ZNm7JYLNX9FxUVRUREZGVlkZ20bt3axsZGcQWJRBIbGwsADRs2NDAwePbsWWpqqru7e9euXZV2FR8fHxMTIxQKbW1t27VrV2MwFBcXV15enpiYSH8sLCw0NDRs0qQJk+NKpdLo6Ojk5GShUGhubu7t7d24cWPF/YtEIjIEwNbW1snJSfGr0tLSpKQk+qvy8nLSvbFZs2YcDic+Pv7t27dCodDOzq5du3ZWVlZKKX/z5o1MJlO85gyvUnZ2dlRUVF5enqmpqbe3d6NGjdRmilrM87Qq6enp0dHRBQUFxsbGHh4ezZs3V4qZ6P+uhg0bmpj8Y1rYgoKC9PR0AGjRooVSA2R5eXlERERqaiqHw/Hw8GjVqlWNKbl58yYAjBo1SnUCvhqzlRyReX5pmrnV0HnaqqJ01zNPIUKoNtLT03Nzc9UGHEKh8Ny5cwYGBm3atGGxWK1atZo6dWpQUFBOTo6tre2kSZN8fHzID/KbN2/OnTtXVFSk9hACgSA1NbVp06a1TKruAw65XP7zzz+fPXuWy+Vu374dADIyMqZMmUKvcOLEiRMnTgDAvHnzJk2aRBYmJSWtX78+MjJScVdt27Zds2aNYsdSiqJOnTq1e/duxWiLy+X6+flNnz6dLooEAgE54tatWw8fPhwdHQ0Affv2VSxKCwsLly5deufOHXoJj8dbsGDBuHHjqjm71atX09EGACxfvhwAWrduffjw4RqP++jRo59++ikjI0Nxh127dl21apWjoyP5yOfzDx48+PDhQ1dX1xMnThgZGdFrbt++/fz583w+/9dffwWA/Px8cqzg4OADBw48fPiQXtPAwGDRokVjxoxRPNCCBQsKCgoWLlz45ZdfMrxKQqFw586dZ8+eVfxX7t69++rVq5n0XGGYp1UpKCgICAi4du2a4kJ3d/eVK1e2b9+eXpKdnU3O4tixY82bN1dcOTw8fOXKlQDw6NEjxYDj9evX3333XVpaGr2kSZMm1Tc2yWQy0gPp008/VfqKSbaChvmlaeZWRR9pU0v1rkcI1Y3s7Oyqqh/kcnlGRsbZs2dNTU3Js6K3t/eECRMuX7786aeftmrVikQbaWlpZ86cSUlJqep9K+Xl5RkZGR9cwEFRFCmiAGDDhg2dO3cGAHNzcxJYnDp1qry8vEOHDqRgoB+D0tPTZ86cWVBQYGpqOnz4cCcnp4yMjEuXLr18+XLGjBnBwcH0Q/mJEycCAgIAoFu3bqTUefToUXh4+KFDh4RC4aJFi5TSs379eoFAYGFh4eLiolQL8sMPP5SWlvbu3dvLy0skEoWGhqanp2/evNnIyGj48OFVneDQoUMLCwvz8vKuXr0KACNHjjQzM1OdQEL1uPfu3Vu6dKlcLm/atGn//v1NTU3j4+PPnz//6NGj2bNnh4SEkLcDs9nsFStWjBs3Li0tLSQkZPr06WSHkZGR58+fB4AFCxYoldbz5s0TCoWDBg1yd3cvKCi4deuWQCDYuHGjoaHh0KFDmeSa2qskFApnz54dFRVlbGw8cuRIZ2fnrKysixcvhoWFLViw4PDhw9W/4Id5nqpVVFQ0e/bs+Ph4Pp8/dOjQhg0bFhUV3bp1KykpadasWVu3bvX19WVyaqoSExO/+eYboVBoZGQ0YMAAkrDr16+T2LEqL168yMjI6NGjh1K1E8NsVaRRftUmc/WdNpraux4hVDfKyspI64Facrk8KSnp+PHjU6ZMcXV1ZbPZ7dq1a9OmDZvNJo9hWVlZx44dI/XEVamoqCgpKal9UnUccBw8ePCXX34BgDVr1vTt25cstLW1nTdvHgD8/vvv5eXlvXv3/uKLLxS32rJlS0FBgbu7+/79+21tbcnCCRMmfPXVV1lZWbt37/7hhx8AoLS0dPfu3QDg5+c3Z84cstr//ve/Xbt2HTt27MSJE2PGjHFzc1Pcc2lp6fr16/v3769aDS6Tyfbv308/K8+cOXPlypX379/ftm1br169qroyJHKKiooiAcekSZPUPqwrHVcsFq9fv14ul48YMWLlypV0Yvr27Tt79uyUlJTQ0NDBgweThc7OzgsXLtywYUNQUNCAAQNcXV2lUummTZsAoGPHjqNGjVI6lpGR0aFDhxo2bEg+Tp8+fe7cubGxsdu2bevZs6e5ubnaE6nxKu3evTsqKsrGxiYoKMjFxYUsHDVq1MSJE2NjYy9cuFB9VRDDPK3K9u3b4+PjraysDhw44OnpSRZOnjx5/fr1165dW7t27alTp7QbH7Rx40bSWHDgwAE677766quFCxdWc8tduXIFAJQiUY2ylaZRfmmduXWQNpraux4hVDfKyspqnA/03bt3R48e/fLLLxs2bMhisejWgLS0tOPHj9c4p05FRQXpgllLuuw0GhIScuDAAQBYvHhxNZUESuLj4//8808A+Pbbb+mSCQCcnJxIjcX169fJqaanp5PL+sknn9CrsdlsPz8/BwcHe3t70sVB0Zw5cwYOHKj2rXcLFixQrJk3NDScP38+AJSWlqodX6QRpeMKBAJfX9/hw4f7+fkpJqZz586kkor066F99tlnnTp1kkqlgYGBAHDmzJm4uDgDA4Nvv/1W9VwWL15MlxAAYG1tvXjxYgAoLi5m2LVY9SplZ2efOnWK7JyONgDA1dWVBItnzpypZofM81St1NRUMh5k7ty5dLQBAHw+f9myZRYWFsXFxeR5WlMxMTEvXrwAgNmzZytGio6OjqTxRa3CwsLr16+bm5t369ZNcbmm2UpolF9aZ24dpI3Q7q5HCOlKeXm5TCarcbW4uLj79+8rLbx3757anwIlcrm8vLxcy/Qp0FnAcfnyZdLYMWPGjPHjxzPf8PHjxwBgbW3drl07pa/atWv3xRdfjB07lkzsSL9F5tGjR4qrmZubX7ly5erVq7169VLaQ7Nmzao6rmJJRri7u7du3RoAnj9/zjz9aikd18nJac2aNWr7LpDiXKm2is1mf/vtt3w+/969eydOnNizZw8AzJ8/X6n+hlB9uY6Pjw85O1K4appaACD/lwYGBqqXtHv37gCQlJSUk5NT1Q6Z56lapA+BiYmJYmRJmJmZjRw5EgCU+nYw9PLlSwDg8/l9+vRR+kqpxU1RaGhoRUXFiBEjlNogNM1WQqP80jpz6yBtUIu7HiGkKwYGBkxeJd+oUaMuXbooLezatSsZ8VA9NptdfRs6Q7ppUnn8+DGpUx0wYMBXX32l0bbkBRatW7dWncjM0tJyyZIl9EcHB4ehQ4f+/vvve/bsefr06YABA9q0aePh4aGTGdAIb2/vV69eJSQkQAtd7fIfCgoKnj9/npKSUlxcTFrdSHSpOhmLq6vr/Pnzf/75523btgFAu3btGPYTBAA2m92yZcukpCTF/q0aIXVFDg4OqjOO09PCZGdnV/X2E+Z5qhYZMeHt7a006oQgI0rS09MFAoFG4zXgr/Nq1KiR2j1X5cKFCwAwcODAqlZgnq1qaZRfmmau/tJWm7seIaQrJiYmPB6vmm4cAODp6Tlx4sRGjRoBAEVRcrmczWazWKxGjRpNnjw5ODi4+j4cXC5XJ2+Y0k3AcfToUfLHs2fPcnNzNXoLF5n7neE7cFetWtWwYcPg4ODw8PDw8HAAsLW1HTJkyMiRIxVr/rVGUq7b6egJsVi8d+/ekydPVtUNWNXo0aOvXLlCBo+obUypBhmDUNUYpxrl5eUBQFpaGpmKXq1qhmVrlKdVbd6gQQO139JDl4uLizUNOEg7TlV7Vis2NvbNmzfNmzdX20Nbi2xVS6P8YriyvtNWm7seIaQrJOCoZoUGDRpMnDiRjIenKCo6OvrcuXODBg3q0KEDi8Vyc3ObNGlSUFBQcnJyVXvgcDgfUMABAP369YuIiMjLy/P399+xYwfzCabImkyaoACAx+NNmjRp9OjR4eHhz549e/jwYWpq6tGjR0NCQpYuXTp69GjtT8jEuLkAACAASURBVAAA/popRKOinQm5XE56pFpZWU2fPr1Dhw62trbkxP39/RWH5irKycmhe6VERkaqtgFVo5YnQjb38vLq379/VesojddQpFGeVrV5VQE73ZSoxSRmZAxY9Y8CSkjbDWnHUaJdtqqlUX4xWblu0qb1XY8Q0hV7e3tjY2O1TyAsFsvBwWHMmDFeXl4AQFFUUlLS0aNHs7KyCgsLTUxMmjVrxmKxPDw8Pv/885MnT2ZkZKh9PuHz+YoD6bWmmx+Ivn37rlu37tWrVzNnznz69GlwcDA9nrNG5IGVPFIzZGJi0qtXL9K9ICkpae/evaGhoT/99FOzZs2UZmLQVHZ2NgDY2trq9p2qERERpFfErl27lB6Uqyo25HI5GU/h4OCQnZ29bdu2Tp06MZ/NPjMzEwAUO2xqhFRO2NjYKE6gwpwWeaqIdKdITU1V+y09q4QWLzQheyazgTEhFosvXbrE5XJV+3yAVtlaFY3yi8nKdZC22tz1CCFdcXV1tbGxycrKUm0nJZMadOjQAQAoioqLiwsKCiJzZubm5h4+fHjq1Kkk5mjdunV5efkvv/wiEAhUD2FlZeXh4VH7pOqm98Pnn3/O4/Hat28/a9YsANi3bx9p72CChAiRkZGqA3tKS0tDQkJCQkIKCgoA4MWLFzdv3lTq0enp6env709qe0hfRa3JZLKnT5+CwgQhukIGHdnb2zOfOOX3338PCwvj8Xh79+7t1q2bUCjcuHEjw7rx8vLyZ8+eAYDW87SQKxAeHq76Ih8mmOepWi1btgSAmJgYtf1SSS43a9aMZDpdl1hRUVFjwkiYn5CQUE2PV0XkbW0DBw5U2zykRbaqpVF+MVy5DtJWm7seIaQrZKprtQ8ShoaGbdq0AQCKol6+fBkcHEyeH4js7OygoKBnz56RSKVFixZVtZs0bdpUJy/+1PG7VCZPnkz6wa5evZrhA263bt3YbLZQKPzjjz+Uvnr48GFAQMDu3btJ/9g///xz5cqVq1evVip3jY2Nmcw2oUT1cE+ePCFPz2QgRjXorGUYAZDszMvLUxoLmp2dTX7NlSLTzMzMLVu2AMDXX3/t5ua2ePFiLpf78OFDMlhUiWpNwL1790hxrjSMkzlfX182my2VSsmcsEru3LlTfTcX5nmqVvfu3fl8vlwuJ5N7KkpOTiZTjNMjMC0tLUnXVNUGSNWBFZ07d2az2XK5nEyjoujVq1eqKan+bW2aZiuhUX5pnbl1kDaaFnc9QkiHOnfurDYgEIlEjx8/FgqF4eHhv/32m9KkwwCQk5Nz+vTpR48ekXXUPmEaGBjUWCYypOOAg8vlrlmzxtraOi8v74cffmDSim9vbz9x4kQA2LRpE6lgIJ4+fbpx40YAGD9+PBlTMGDAAADIzc3dvHkzfV1kMtmpU6fIdSShHEOnT5/es2cP/a6aN2/ebNiwAQCaNGnSqVMnerWrV6+uWrWK/EbT6DCQ9OisERlYQaZ/Ji1tMpns4cOHX331FfmoWCrQjSkNGzYkk164u7vPmDEDALZt26b6H7N58+bQ0FA69Hnz5g0JVpo3b646KpUhZ2dnkimHDh0KCQmhOz2IRKIjR44sXbp09uzZdOaqXiLmeaqWpaXlzJkzAeDw4cNXrlyhTy01NZXMltGwYUM6CDA2NibzqRw5coQeSVFUVLR3717VyULs7e3Hjh0LAPv27fvjjz/InmUy2c2bN9etW6e0Mnlbm7Ozc1WXUaNspWmUXwxXVs2COkgbTYu7HiGkQ05OTj169FBdLhKJzp07t379+l9++aWq/hk5OTknT55cv3796dOn1Y6W9/X11cmYDNDHu1Ts7e3XrVs3e/bshw8fHjt2jEkngGnTpr1+/frFixfffPONu7u7q6trWlpaSkoKAPj6+tIj7ry9vRcuXBgQEPDbb79dvHixVatWfD7/3bt3pHp81KhRihN51ahr166HDx8OCQlp2LBhWVkZebbj8/nfffcdj8cDkAAAJRP7+/vL5fL4+PjTp0/T2zZo0IAkcs2aNb/88ouJicmhQ4eqOVbr1q0HDx589erVq1evXr9+3dHRMS8vTyKR8Pl8Ly+vuLg40qhGkMYUAFi2bBldDTBhwoQrV66kpKRs3LgxMDBQcbiplZXVsmXLnJ2dGzdunJeX9+bNGwAwNjZevXp1bXq/zpw5Mz09/fbt2wEBAcHBwS1atJBIJNHR0WVlZSYmJosWLaInUVV7iRjmaVUmTJiQmJj4+++/r127du/evV5eXoWFhaQSws7ObuPGjYrh/PTp0589e5aWljZ27Fgyb1VqampFRYWzs7NqfDZz5szIyMiYmJgVK1bY2Ng4Ojq+f/++qKioefPm5NLRSFXKyJEjq7qMGmUrTaP8YrKy2iyog7Qp0uKuRwjpCpvNHjVqVFhYmFLXUYqiiouLq28ZpyiqsLCwqkprMzOzcePG6WruCb28nr5z587kiXzv3r1M5p4yMTEJDAycMWOGlZVVSkrKgwcPUlJSbG1tlyxZsnnzZsXZlr788suAgABS+D1//vzhw4c5OTlubm7fffdd9e/CULVq1arly5ebmZnFxMSQaKNNmzaHDh1S7HbKYvPJg13Hjh0Vt+VwOD/++CMp2+Lj46vpjkBbvXr1zJkzjY2Nydt0JBKJr6/vL7/8QqYqj4uLy8/PB4XGlGHDhpGePoShoeGyZcsAQLVhZfXq1XPmzCktLb1//z4pIdq2bXvo0CHSX0FrfD5/w4YNq1evdnNzEwgEDx48ePr0qUgkGjx48LFjx+jYjs9Xf4mY56laXC73u+++W7NmjZubW1ZW1v3791+9esXn80ePHn306FHF2TABoH379jt27HB3dweAxMTExMREMzOzBQsWfPvtt6p7NjMz27Vr1+jRo7lcbn5+fnR0tFgsnjBhwp49exRbeap5W5sihtmqtAnz/GKyclVZoO+0KdH0rkcI6RCfz582bZqZmZkO92liYjJp0iTFd4jWEovh/D91QyaTZWRklJaWmpiYuLi4VBNVFRQU5OXlyWQya2tre3t7jd54rnTE9PR0oVBoZWWl+DqxTzZUNrXcXG5YWFhobW2tegiZTPb+/XuxWOzo6MhwxIREInn//r1UKrWzs6Pnk9BORkYG6cdw4MCBdu3aVVRUkMSQC1KbPavKzs4uLCw0NDS0tbVVbQqRyWRVXSLQJE/VoiiKHJ3P5zs5OVUTqZBitbi42NTUtEGDBjXW7pSUlGRlZbHZbGdnZ9U76tmzZ7NmzerWrduOHTtqTCSTbNUovzTN3GqyQOdpQwh9mGQy2Y0bNy5fvqyT954YGxsPGjRo0KBBOpljlPiwxs1zOBwmLy4HAGtr61oW2PQR1c4XrrhCVZNeczgc8lTNnIGBgdLTua5wuVydDFtSy8HBoZqXu1ZziUCTPFWLxWI5OjoyGQLOZrM1amg0MzOr5mmgsLDwiy++YPgqMi2yVaP8qnHlarJA32lDCH0gOBxO9+7dCwoKwsLCahlzGBsbd+nSpWfPnjqMNuBDCzgQ+kD079+/mknPEELoA2RhYTF06FArK6tr164VFxdr14JhYmIycODAnj176uSpXhEGHAghhNC/hKWlZf/+/e3t7UNCQlT7adXIzMxs0qRJbdu21W3dBoEBB0IIIfTvYWBg0LFjx1atWp09ezY0NFR1AsaqtvL19R03bpwOe4kqwYDjY2Vubk4G5mj0KjJUXzTKrzrOXPxfQujfx9DQcPz48X369Hnw4EFMTIxAICgvL6+oqKioqCBvi+VyuRwOh8/nW1lZNW3atHv37lr069fIhzVK5cNBj1K5vVKD95gjhBBCHxqRSJSSkpKZmVlSUlJaWlpeXs7n801NTU1NTR0dHT08PHQyc3mNsIYDIYQQ+jczMjLy9vbW+WvCNIU1HAghhBDSOz221iCEEEIIERhwIIQQQkjvMOBACCGEkN5hwIEQQgghvcOAAyGEEEJ6hwEHQgghhPQOAw6EEEII6R0GHAghhBDSOww4EEIIIaR3GHAghBBCSO8w4EAIIYSQ3mHAgRBCCCG9w4ADIYQQQnqHAQdCCCGE9A4DDoQQQgjpHQYcCCGEENI7DDgQQgghpHcYcCCEEEJI7zDgQAghhJDeYcCBEEIIIb3DgAMhhBBCeocBB0IIIYT0DgMOhBBCCOkdBhwIIYQQ0jsMOBBCCCGkdxhwIIQQQkjv2BRF1XcaEEIIIfRvJpfL2WKxuL6TgRBCCKF/LblcXlBQwA0MDGSzsWEFIYQQQvoilVZw27TxqaiQ1ndKEEIIIfRvxTIyMuQ2btz4r24c2JkDIYQQQrrFAgA2m801MzPDfqMIIYQQ0h8Wi8XFDhwIIYQQ0jcui8Wq7zQghBBC6F8OAw6EEEII6R02qSCEEEJI77CGAyGEEEJ6hwEHQgghhPQOAw6EEEII6R324UAIIYSQ3mENB0IIIYT0DgMOhBBCCOkdBhwIIYQQ0jvswIEQQgghvcMaDoQQQgjpHdZwIIQQQkjvMOBACCGEkN5hwIEQQgghvcOAAyGEEEJ6hwEHQgghhPQOAw6EEEII6R0GHAghhBDSO652m0ml0oSEBABwcXExNTVluJVAIIiMjMzLyzMzM2vXrq2dnb12R9eORCJJTEwEAFdXFxMTpmlG+hMfHyeTyW1sbOzs7OoxGfiPwZB2dz1CCBGssjKhFpvl5OSMGTMaAAIDA9u1a89kk+vXr23durW8vJx8/Omnn7p376HFobWWlZU1duznALBjx04fH5+6PHT9SkpKSkpK7Ny5i4mJSX2n5R9GjBguEAjmzJkzduy4ekwGw3+MrKwssVjs4OBgZGRUh6n7gGhx1yOEEE3LGg5NRUVFbdiwAQAcHR19fXvyeDxn5wZ1c+j/OLFY/M03s8rKykaNGrVgwcL6Ts7HSiwWT5s2VSwWnz9/4T8bcCCEUG3UUcBx+fIlAHBycgoKOvxRV8ampKQcPhwEAHPnzrO1ta3v5NSMw+EYGhqWlZUZGRnXd1o+Yo8fPy4pKRkyZIi5uXl9pwUhhD5KdRRwvHnzBgD69+//UUcbAFBaWnrnzh0A+OqrGfWdFkZ4PF5Q0OGMjAxvb+/6TstH7OrVqwDw6acD6jshCCH0saqjgKO0tBQALC2t6uZwSJG1tbW1tXV9p+IjlpmZ+fjxI2dn5zZt2tR3WhBC6GOl44BDJpPFxsZSFMXj8by8vMRiMenWLpVKASAzMzM6OhoA7Ozs7O3/HqIil8sTExPfvXtXUlJiYmLSuHHjJk2aqH2NbXFxcVTUq+zsbIoCOzu7li1bKhWlUqk0Li4OADw9PXk83osXL9LS0tzc3Dp16qS0q4SEhNjYWKFQaGNj4+PjY2VVQzAUHx8vkUiSk5PIx3fv3hUVFRkaGjZq1IjJcaVSaUxMTGpqikgkMjMz8/Jq2rBhQ8X9i0QiMlbCxsbG0dFR8auystLk5BT6K4lEEh8fDwBNmzblcDjv3r2Lj48XCoW2trY+Pj6WlpZKKX/79q1MJrO3t6OHBTG8Sjk5OdHR0fn5+aamJl5eTT09PZm/W5h5nlYlIyMjJiZGIBAYGRm5u7t7e3tzuf/4d6X/uzw8PJT6wwoEgoyMDABo1qwZm/2Psd8SiSQyMvL9+/ccDtvNzb1FixY1piQ09DYADB8+QmlXwCBbyRGZ55emmVsNnaetKkp3PfMUIoT+U3QZcMjl8sDAgIsXL3K53E2bfgaArKysWbO+plf47bfTv/12GgBmzZo1fvwEsjAlJfnnn3+OiopS3FXr1m1WrFjh4uJCL6Eo6uzZswcO7BeLxX+nnsv98suJkydPposigUBAjvjTTz8dO3YsJiYGAHr16qVYlBYXF61ever+/fv0Eh6PN3v27FGjRldzduvXr0tKSqI/rlnzHQC0bNlyz569NR736dOnW7duyczMVNxhp06dli5d5uDgQD7y+fzg4CNPnjxp0MDl8OHDij0T9+zZe/nyJT6ff+RIMAAUFBSQY+3bt//IkSNPnjym1zQwMJgzZ+5nn32meKDly5cpDQap8SqJRKK9e/deunRRLpfT++nSpeuyZcuY9FxhmKdVEQgEu3btunXrpuJCNze3xYuXtG3bll6Sk5NDzuLAgYNKDUYvX77w9/cHgNu3QxWjhDdv3qxbty49/T29pFGjRtOnT68mMXK5/NKlSwDQt29fpa+YZCtomF+aZm5V9JE2tVTveoQQUktnAQdFUfv27bt48SIA+Pv7d+zYEQDMzMwmTJgAAGfPni0vL2/btl2zZt4A0KRJ5WNQRkbGvHnzBAKBiYnJkCFDHBwcMzMzr127+upV5Lx5c/ft209XhJw+fXr37l0A0LlzFzJ28enTpy9fvjh6NFgkEs6ZM1cpPZs2bSosLDQ3N2/QoIG1tY3iVz/99FNZWZmvr2/jxk1EItH9+/cyMjICAwP5fMMhQ4ZUdYIDBw4sKirKy8u7efMmAAwbNszMzMzWVnkCCdXjhoU9WLlyJUVRTZo06du3r4mJaULCu8uXLz99+nTx4kWHDgUZGhoCAJvNXrRo8eTJk9LT358+fWryZD+yw6ioKNLl9ptvZiuV1suWLRUKhf37f+rm5ioQCEJDQwsLC7dt22poyB84cBCTXFN7lUQi0aJFC6Ojo42MjIYPH+7k5JSVlX3lyu+PHz9avnzZnj17+Xx+NftknqdqFRcXL1q0MCEhgc/nDxw40MPDs7i4ODT0dkpKysKFCzZs+Klbt25MTk1VUlLSwoULRCKRoaFhv379HB0dMzOz/vjj1nfffVfNVhERLzMzM7t27apU7cQwWxVplF+1yVx9p42m9q5HCCG1dBZwBAcH//rrSQBYseLbnj17kYU2NjZffz0LAK5du1ZeXu7r6ztmzBjFrXbs2C4QCNzc3LZv32FjU1ngjR07du7cOdnZ2QcPHli1ajUAlJWVHjx4AAC+/HLizJkzyWrjx4/fv3/fyZMnT58+/dlnI5UK47Kysu++W9O3b18Oh6OUVJlMtn37DvpZeerUqd9/7x8WFrZr184ePXpYWFioPUFSJRMdHU0CjvHjJ6h9WFc6rlgs3rRpE0VRQ4YMXbp0Kf203bNnr8WLF6Wmpt6/f//TTz8lC52cnObMmbtly+Zjx4598kk/FxcXqVQaGBgAAO3atRsxYoTSsQwNDXft2u3h4UE+Tp7st2TJ4vj4+F27dnXv3sPMzEztidR4lQ4c2B8dHW1tbb17954GDSpHLw8fPvyrr6bHx8dfufJ79VVBDPO0Knv37klISLC0tNy5c6e7e+Wpffnll5s2bbp16+aPP64/evSYduODAgK2iUQiW1vbHTt20nnn5+e3YsVy0jSj1vXrNwBg8ODBigs1ylaaRvmldebWQdpoau96hBBSSzdTm586derIkcMAMHfuPKWf5mokJCQ8fPgQABYtWkyXTADg6Og4Z84cALh161ZZWSkAZGRkSCQSAOjdu/ffSWezJ078n729vZ2dHd21gjZjxsz+/furRhsAMHv2bMWaeUNDw1mzvgGAsrKyBw/+ZJj4qigdt7CwsHv37kOGDPnyyy8V6/Y7duzYpEkTAHj79q3i5kOHDu3QoYNUKt2zZzcAXLhwIT4+3sDAYMmSpaodCObOnUuXEABgZWU1d+48ACguLiYXVtPUAkBubs7Zs2cBYN68eXS0AQAuLi6jR48BgPPnz1ezQ+Z5qtb79++vXLkCADNnfk1HGwBgYGCwcOFCc3PzkpIS8jytqdjY2IiICACYMWOGYqTo4OCwZMnSqrYqKir6449b5ubmnTt3UVyuabYSGuWX1plbB2kjtLvrEUL/WToIOK5du0YaO6ZMmfL5558z3/DZs6cAYGVlpTq9o49P2zFjxowaNUooFAGAhUVl57UnT54ormZmZnbmzNmzZ8/16OGrtIemTZtWdVzFkoxwc3Nr2bIlAJAyqTaUjuvo6Lh8+Yrly9X0XSDFORm/QyMNK3w+/8GDB7/9dprU68ya9Y3a2hT6stBat27t7u4OAJGRjE5E9So9eBAGAAYGBqqXtGvXLgCQkpKSm5tb1Q6Z56lajx8/BgATE5M+ffoofWVqajps2HAAUOrbwdCrV5EAwOfzfX17Kn2lGBgpuXfvXkVFxeDBQ5TaIDTNVkKj/NI6c+sgbVCLux4h9J9V2yaVp0+fkTrVfv36+flN0WjbxMQkAGjZsqXqs7uFhcW8efPpj/b29gMHDrp+/dqhQwefP3/er1+/li1buru7q26oNS8vr9evX5NxIvogEAgiIl6mpqYWF5eQMTuxsbEAAEApreni4jJr1jeBgQE7d+4EAB8fH4b9BAGAzWY3b948JSUlOTlZu3SmpCQDgJ2dPRmaoaikpIT8kZOTU9XbT5jnqVoJCe8AwMvLy9hYzTRlLVu2AICMjIzCwkKNxmsAABnm4+nZUKP53X///TIA9O/fr6oVmGerWhrll6aZq7+01eauRwj9Z9U24DhxIoT88fz587y8PI3ewlVUVAgAVfWZULJ06VJPT4+QkJCXL1+8fPkCAGxsbAYMGDhs2DDFmn+tkZQXFRXVfldKxGJxUNCh3377TXHER/U+++yzGzeuk8EjixcvVtswVBUyBqG4uFiLpAJAXl4+AKSnvydT0aslElVZRaFRnqoqLCwEAGdnZ7Xf0vO4lJSUaBpwkMd6Jycn5pvEx8e9ffvW27sZ3cdZkRbZqpZG+cVwZX2nrTZ3PULoP0sHnUb79Onz6tWr/Pz8n37a8PPPm5UmS6ju2FwuAMhkMiYr83i88eMnDB8+IiLi5fPnzx8/fvz+/fsTJ0JOnz41f/78ESOY1gFURSqtAACNinYm5HI56ZFqaWnp5+fn49PW1taWnPiGDT8qDs1VlJOTQz9WRkVFqbYBVaOWJ1JRIQWAJk2aqDZq0JTGayjSKE9VcThcAJBIpGq/pd/8p8XZsdks+OvsGLp58xYADBs2TPUr7bJVLY3yi8nKdZM2re96hNB/Vm1/Jnr16rV69XevX7+eP39eeHh4SMhxejxnjaysrAEgPz+f+eFMTEy6d+/RvXuPefPmp6QkHzx46P79e1u3bm3atKm3dzMt0k/LycmGapvztfPq1auwsDAA2Lp1q9KDclXFhlwu37Ztm0gksre3z8nJ2blzZ4cOHasp45VkZ2cBgNZTi5KaAysrq4kT/6fF5lrkqSKS7Pfv09R+m5WVRf6wsND4hSYkYWQ2MCbEYvHVq1e4XG7Pnsp9PkCrbK2KRvnFZOU6SFtt7nqE0H9WbftAjBw5ksfjtW3blsyeFBQU9OLFC4bbens3BYCoqCjSwKyorKz09OlTp0+fEggEABAZGREaevvly5eK67i7e6xatYo0yT97Fl6bs5DJZOHh4QCg83kS4+PjAMDOzk5ttbxa165de/z4EY/HCwzc3rlzF5FItHXrFoZ14xKJ5Pnz56Aw04mmyIYvX76ke2xohHmeqtW8eXMAiI2NVdsvlfRIbdq0qYmJKQAYGBiQ5RUVFTUmjAzQSExMrKbHqyLytrZ+/fqrbR7SIlvV0ii/GK5cB2mrzV2PEPrP0lmnywkTviTT/qxb9wPDB9zOnbuw2WyRSEReh6boyZMnu3btOnDgAClUwsIe+vv7r1v3g1K5a2RkRN7eSVGM+sERd+8qHy48PJw8PXfp0rX6bTmcyivGMAIgCcvPz1caC5qTk0N+zZVSnpWVtWPHdgCYOnWai4vLvHnzuFzukydPrl69orpz1ZqABw/+JMV5ly6dmSRPVbdu3VgsllQqPX36tOq39+/fr76bC/M8Vatr1658Pp+e3FNRSkrK7du3AWDw4MrJ2SwsLMhc6SkpKUorq4426tChA4vFoijq5s0bSl8pzYhKkLe1DRyo/m1tmmYroVF+aZ25dZA2mhZ3PULoP0tnAQeXy12x4lsrK6v8/PyNG39i0opvZ2c3btw4AAgI2EYqGIjw8PCtW7cCwJgxn5MKjH79+gFAXl5eYGAg/eQtk8nOnj1LJm9u1aoV86SeO3fu0KGDZWVl5OPbt2+3bNkMAI0aNWrfvj292o0bN3744fsXL54rbmtqWjkDEunRWaPmzVtA5fTPgaTznVwuf/Lkydy5c8hHxTGKdGOKh4cHmSHN1dWVjALYuXMn3aBA2759+717d+nQ5+3bmO3btwOAt3ezNm2UR6Uy5OTk9MUXXwDA0aPBp0+foisqRCLR8eO/rF69atGihfQRVS8R8zxVy8LCYurUqQBw7NjR69ev0wd6//79Dz98DwAeHh4DBw4kC42MjMh8KsePH6e7vBQXFx86dOjChQtKe7azsxs9ejQABAUF3blzh+xZJpOFht7++edNSiuTt7U5Ojr6+LQFdTTKVppG+cVwZdUsqIO00bS46xFC/1m67OplZ2e3evV3ixcvevLkycmTJ5h0Apg82S8mJiYiImLRooVubm4NGjRIT09PTU0FgG7duvn5+ZHVvLy85syZs2vXrgsXzl+9eqVFixYGBvzExARSPT58+AjFibxq1KlTp2PHjp06dcrDw6OsrOz9+/cAwOfzly9fwePxyDpisXjDhh8pinr37t2xY7/Q2zo7Ozdo4JKe/v7HH9f/+utJExOTXbt2V3Osli1bDhgw4MaNGzdu3Lh586aDg0NBQYFEIuHz+Y0bN3737l12dja9MmlMAYAFCxbS04ePHTv25s0bqampW7du2bTpZ8XhppaWlt99952Tk1PDhg3z8/PJhE5GRkbLli2rTe/XadOmZ2Zm3r17d9euXcePH2/WrJlEInn79m1ZWZmJicmcOXNJGqq6RAzztCqffz42KSn5+vVrGzb8GBR0qHHjxkVFRa9fvwYAW1vbH35Yp/iWmcmT/V68eJGe/n7SpP95enoCQFpaWkVFhZOTk9JrRABg6tRpUVFRsbGxa9eusba2dnBwSE9PLy4u9vZu9vbtP8LHv97WNryqcdcaZStNo/xi6gKYlAAAIABJREFUsrLaLKiDtCnS4q5HCP036ayGg+jYseOUKVMA4ODBg0wm0TI2Nt606ecpU6ZaWlqmpqY+evQoNTXVxsZm3rz569f/qDjb0tix4zZu3EQKv5cvXz558jg3N9fFxWX58uWLFi3SKJFLly5buHCRqalpbGwsiTZatWq1a9duxReA8fl88nSrWOcBAGw2e+3ataRsS0hIqKY7Am3ZsuVTp04zMjKiKCorK0sikXTr1u3gwUPDh48AgHfv3hUUFIBCY8qgQYPatWtHb25oaDh//gIAUG1YWbZs2cyZM8vKysLCwkgJ0bp1m9279zRu3FijC6LEwMBg7Vr/ZcuWubq6FhYWPnr06Pnz50KhcMCAAfv3H6Bju6ouEfM8VYvL5a5YsWLFim9dXV2zs7PDwsJev37N5/NHjBixf/8BxdkwAaBt27abN29xc3MDgKSkpKSkJFNT02++mb148RLVPZuamm7ZsnXEiBFcLregoCAmJqa8vHzs2LEBAdsU3w6j8La2T6pJJ8Ns/ecmGuQXk5WrygJ9p02Jpnc9Qui/iVVWJqzvNAAAyGSyzMxM8gzt7OxczYxeAoEgPz9fJpNZWVnZ2dlp9MZz1SMKhUIrK0v6ve2K5HJ5YWGhlZWV6iFkMllGRoZYLHJwcCSdSGoklUrfv39fUSG1tbWzsrLSLs1EVlbW2LGfA8COHTt9fHwqKirS09PLy8vJBanNnlXl5OQUFRXy+YY2NjaqTSHVXCLQJE/VoigqJyenqKiIzzdwcHCsJlKRy+WZmZklJSWmpqZMDlRaWpqdnc1isZycnBTrS4gXL54vWLCgc+cumzdvrjGRTLJVo/zSNHOryQKdpw0hhGrjQxk9z+FwmLy4HACsrKxqWWAzPCKbza5q/CGHw3F1ddXocDwej9SL6ByXyyVTUOuDvb19NS93reYSgSZ5qhaLxXJwcFB8l3o1ydBo8jdTU1NTU9Oqvi0qKhozZgzDV5Fpka0a5VeNK1eTBfpOG0IIaeRDCTgQ+kD06dO3T5++9Z0KhBD6t9FxHw6EEEIIIVUYcCCEEEJI77BJ5eNjZma6cOEiqPolZ+iDolF+1XHm4v8SQqjOfCijVBBCCCH0L4ZNKgghhBDSOww4EEIIIaR3GHAghBBCSO8w4EAIIYSQ3mHAgRBCCCG9w4ADIYQQQnqHAQdCCCGE9A4DDoQQQgjpnZYzjVIUyCkAADYLmLwfvkjEyilhGfEoB3OKx9HumAj9R2l6uyGE0AdIy4BjeygvIo0DAK0ayBf3l1SzZmYR68hDXlx2ZVVKzyayqd2l2h2Uoa23DKLS2UzS9nEpLYdzL3nFIujXTObtKK+vZPz2nHsligsAlsZU4NjyujloYh77h98NyN9rhkoa2iqfvkgCcgq4HOD/GyfrZ367IYTQB0u/P8/FYtZP1w2KRX8/lLHx+Uxbvz3n3YvjAEB0Jnv3+HK8krRiMWvBKb6cgtHtKoa1rqjv5CCEEFJDvwHHHzEcOtrwdpR72srdrSm9HrGW5BSsuVT5JD3Sp6K9e71VJKiS/ZUWuRwoCgADjr88TWKTFocunrL6TgtCCCH19BtwJOZVtqR42shXDPwIqoIpCt4LKtNcJvmwivQx7Soq5FAsYg1oUcHBzr4KniVzAMDTRm5n9kGHswgh9F+m34BD/FdvDSdLLAlqy9KY+rqnfru/fIwKRay4HDYAdPT4gKqjEEIIKdFlwHEhgpucX1krYGEERSLILKz8+DaTHXibBwB+3SosjSgAyCxi3XzDjctmlZazDHngaSvv5y1rbP93mSGTw904zrNkTk4JSy4HC2OqqYO8fzMZ/RRLH66Du9zWlDr3gptXyhrZ9h9N+DFZ7N9fcTMKWQYcaGwvH9amwtG8ytAnKIyn2N3kVgznRSq7g7u8R2NZVcfybSKLSGM/eMdJE7BFUjA2gMZ28v7NKtxtKACISmfffls5Jmd02wpXawoA5BQcesATSgAAGtpSw9tU0Dvv2lBuyqeuvuZmFLIMuOBlLx/epoI+34cJnKfJbAAw5cP0HtJqroBvExkAlJXDjTfc1+nsAiGLx4YGVvKeTWTt3GoulWvMGrWKRKwb0Zw3mexCEYvHBidLqmtDWRdPGT2q4lQ4N7OIBQDejvKBLSrbPrKLWSefVf4TTuhUYf/XyYYlcO7FcXJLWIY8aOcma9mgyqM/TWJTFLAAOjf8R3tKNfmieOmqv+YMV6uGTpKhluLtNqCFrFn99SNGCCEmdBZw3HrDuRBRubdujWRCCZB+9USBkFUg5ACAWFoBRvAkiXPgTx7dKaFIBNnFnCdJnLHtKwa1rAAAsRS23jKIz/m75aBQxErJZ9+L43zTW9rGRQ4ACblsMhqlrJyVlMeukAMAFIv/jhiS81mbbxjI//rRzi7hhKewvx0k8bBR/zv+JoOdX/b35mkF7LQCIAGK2mMViVj77vEeJ/19msUiyCriPEzgfNlZ+om3zNtRHvyQR/ZZIWct6S8BgNC3nIcJHABgAQxvI1HceVYxO7uYRdEJLq5MsJs1BQDphSxySS2NK9eo5gqkFrC23jIoUoifcks5EWmcXl6yKd2qqyapMWvUisli77jNE0kVD8d69Z4dlsCZ10diwAUAiM9mv8tlA4CxAQBUBgdlEhb9fzLSp3L/xx7zQt/+fVWvRHHDEqosep8mcwCgkZ3cxqRyHTkFB+5Xly/A+JozXE0tHSZDldLthtEGQujDp5u+ABFp7JPPeORvb0f5tO5SO1PK3VrO51b+XJrwKXdrubu1nMeBzCLWoQeVRRqPAw5mFJcNAEBRcDqc+zaLDQDnXnJJtGHAhd5esgHNK6xNKAAor2Dtv88r++dgzPicyrIW/tmTskTMklNgbUyZG1Ymo7yCdfBPHlVFGdHAinK3/vuH28aEcreWW5v8Y23FY8VmsenixNtR3sVTRg4kp+DEU152MYvHgS86Vhair9PZbzLZIgnQ5UT3xjKl4Z1ZRSyKAhsTypRfeVCRlHWg6gRXdQXKylkBf1RGGywAGxPKyKByF/fiOHdiq5wIhUnWqMovY+0IrYw2WAAOZn+n/3U6+9hjXg2p/6eINDYdbbBZYGdGGXChUKi+P01BGSshhw0AHTz+rt64EsWtPl8U98DwmmuRNfpIBn2JlG63KhOBEEIfDB3UcKQWsPbe45GKBEcLam4fCYcNYztUAMD6KwbvclkA0MZFPsO38mdx3z2eVAYAYGdGrR4ssTCiikSsjdcNMotYFMDttxxvR/nzlMpf6jHtpJ82lwFAX2/Z8nN8ABBKWFHpnC7/rD93sZJ38pAb8ahG9lTMX+Uilw0L+klaOsspCi5GcklJn17IfpPJbuGs5olwUT+JTA7TjhmSjyN8Kno2UTPqgT7WzZjKq9fZUzarlxQA8kpZK87xK+Qgk8OLVM6glhUdPWTejhxSVJ8K5zZ1kJeWswDAkEd93l65woDPpRb3l3o5yCkKQp7y/ojhAMB7ATs6k91SXYKrugJXX3MEQha5Aks+lXg7ymVyCH7I+/MdBwB+f8Xt7SVTO3/UxQhujVmjutWFCK5IwgIAIwPq24ESN2uKouDkM+7NN1wACHvHGdiiwsWKaSeeG9GVV9WUT60aLHGyoMRS2Hefp1hhRnuSxKEAWCzo4vl3wh4nVv4DVJMv9MoMr7kWWaOPZEAVtxtCCH34ahtwCCWw/bZBeQULAMwMqcX9JCb86taXU/AyrfIH0rexzMKIAgALI+rT5hVHH/EAIE3ABgD6wS4pjy2VyXgccDCn1o8oJ8ut/lnr4GhO+Q+TcFV+dr2d5OTHmsWCoa0rrr3mkHS+zlAfcDCheKyOHnIZBQBg/Ff9ga0pZWNCZZewAEAgrNzky07StZf5cgpS8tmp+ZWpHNa68twVeTlQXg6VCR7dTno/jiORAQBEZ9QQcChdgb33Kh9/uzeunCKMw4Yx7StIwJFfxsooYjVQ6cbLMGuUUBSEJ1cu79FITpoAWCz4vH3F/XiOWMqiAB4ncsaoRFdqSWUQ91c7mm8TmZMFBQCGPBjWWqY24HiWzAaAJnZyupkJAJZ+KmWSLwTDa65F1ugjGZrebggh9OGobcCRkPt3ITSlm7TGbnTZxSzycwkAngoNCr28ZF0bygAqZ272cZOTevVHiZxX79lNHeUtnOVtXOS2pmr2b/dXzb8SxWd4Lhvcbai4bBYA5BSrr59nQvFYlsYURUF0JjvqPef/7N15YBvVnTjwr27Jkg/ZluVbvq84iXPfB0cILeVoS2mB7kLpbikt0ALl2G3Z3lDa0nKktFw92J7wY9tCIdyEJHYS57bj+7ZlyZIsy5KsW5r5/fGSx6DLI1mKE/L9/GVLo5k382befOddY3IKvAEBw4DtTOV/iDn9R1kuu70+RHaHpF6bxV6+ZJ4bsEIC5XnMoFkIAKb5EsxNlccPFufp5c1Owf9yWjQEgtORnMkRJeDgmTVhzE4B7bqxpPjDCiGJCGoL2M5JAQCMR4tUorI4BbT7CLc2JeqmLU4BGXe95qPTb/DMl0g8jznPxdKRjEQvN4QQOnekcpTKnn7xyvJ5Jttwcya3oM3VACAUgJzT1v+F1QGPHw4Oi1gAl19wbFx0bFz0RwGsLA99YTWv0QGRlJzW8SR+HsnpFTz+nmTQPP/d9PIlQW4vyEsaeE2kkXnm4dWbSIJJkw3RYxT2GKMsE/UI8MyaOJvLVnzkK9p1xs17AnRuwrLk8yx8aEREkrf2owNi+edLJJ7HnM9i6U4Gn8sNIYTOHSkIOARnHtw79MJ9A6It0fo9UFLRh3eyQIj+NGIxMdy6NXD5kmDrkKhDL5pyCACAZeHomGjIInzoGl+GNOF00rI7VW+Pe3bf6duJQsJesTRUmc9IxfD0Xsn0XPhNgvRmoPb0iS9pCM0bc7jP3E2k4gQCLO5qC7NYbuhAZUb7kGfWhJFx0ub9aK2N60z6JbzPMgknDb75GmEOjwkBoE7LhDVO8c+XSDyPOZ/F0pSMhC43hBA6dyw04BAK4Natgb0Doi6DEAD+fFi8pDh8ZAdXfibLrdiv057+3OwUkDUoJLCmIkS6LhZmszesDd6wNmhzC97pEZF3hs26BccnRJuqEy5naUuKOiMFFdFOL5ABjQBw3ergRfWn0yONiGYMs4KwgSEGu+CdHtHOJfF2gWWBzFoBALnKBBKWrWClIiA9AFbpQpFdU2PhkzVhfXUBIF/FCgWn32U6ZhU0Fn741eSZlhQtqZE6c59lYndHyePs6eSsoKEw5pImh2DMKgSAtRUfSRL/fInE85jzWSxNyUj0ckMIoXPHQju4NxUz6ypDN28IkCddj1/w27Z4wyAVEqg+0z+AO0XBG13iPxyQ/OGA5K0eUZdB+NU/yb/6J/nX/ywnc5WqM9jPrQrmngkUnF5eaZucFdABtIPmD+fYqNacTkCXQfhap3hiJvq75dxxq6vtHgEt5mmJ7/HDXETzwZ/bTw801Wax2+pO33heOSmOXHLKLqBzsx4dF9I5Req1CXRxFQlhScnprbzTI9LbPtwlo13w6zNDhCBi9/lkTeTm5BKoO5O8vf1iuvKTeqHlzKP8stIQnJ5+AwBgwvbhhBND5o887itlbPGZziX7B0R0DpUeY/iJSttT1nw04OCfLwTPYz7vYmEHM03JSPRyQwihc8dCazhIuajJZD+9IvjXwxIAODUp/KBfRO+skXYuCQ3uEQJAl0H4kzeklfmM3iakj4NrdExjEZMlZx1eQZCBX74j/URzUCmDLoOQdrjTxZi5K8yMS/DgP2Ut5QzDQPuZkRQKCbtaFwKADr3wF+9IAeCfJ8Q/+YyP3BUEAlDKWJdPAACvdYqNdmGpmtnRGGVf8lWsWAhk9os/HpKYHMFASLCnX0RvFeSrExPCU4bTm/786kCdljk8KnT7BS6/4OVjkps2fGQGBcuc4MF/ylaUh3xBwYGh03f3LDm7sjyx6pxrlgc79KIQA76g4Pv/kq0sD+UqWbND0DEpCoTAF4RvXBzonIyy+/NmTdTNXbks2DslBQCDXfDdV2TLSkMun+DQmZClTM2sKGMAQJfLdOiFADA5K3xot7Qyn5myf7hyamvt6RNpxCr8/r+kDVrG5BScjBiiQjK0sYjJ/GhXD575QvE85vEXizyX0pSMJC43hBA6R6Ss0+jOptChEdHItBAA/npY3Fzy4cyPYdZUhDbXCPcPigCgd0rInU6qoZC5rCkoEsKXNweeeE8aYqDPJOwzfaS/xrpKvvMqKqTsjFvA7a0JAJ9ZEVRIAQDGZk5v1x8Co11AH0OXlzJkJlCnV/BBv2hNBUQNOOQS2NEU3H1KDAAWp+DP7acfNGn7gs0lCDFAJ2iq1zJkWvGrlp++VXzQL7q4/vR854QAwDInCOvwccPaYKKdTnR57BfXBf73oIRhIRCCQyMf+b1GBQJB9N2fN2uibm5JMfOpZcF/dYgBwGAXGOwfpj9Tzn51W4CMMdleF3qr+/TI5AGzkEzsJhOzdGgMsaMxdHBYNGoVAsCYVUjaTRRS1sPp02qYFZB37IW1pwC/fOEuz/OYx18s8mCmKRkU/8sNIYTOESmbM0gggFs2BkiPRU9A8Pz+eDW9X94UuG5VkDt3QoaU/dTS4LcuOz2L0fJS5v6d/pqCj4wdzM1gP7cqeCvvF5hdszy4sylIx4sqZewNawM7mk7fotZXhshdtkbD1HEqrm9YG+A+Vgo/cl/4iOtWBT/dEpRLTu+FRASfaA5+cunpu3KfSbD7lJgMaxQAXL/2dLJ3NIa0WadnnPxT+0eOUlMxcxknwVkK9j82ByK7TfBxUX3o3p3+ugKGO6C0PJf5+vbAjesCcXZ/3qyJ6tqVwa9sCXDfUyMWwqry0INX+On42zwVe8+OAJlag6jMZ+7bGZ6bIiHcs8O/WheiR74kh7nvMj+39ysJocRCIJVVYebNF27tAs9jHn+xqAczHcmgErrcEELoXCBwudzzL5U2JofA6RXIJWxxDhv11u7yCcxOCDGCnAw26iQc8/IEYMoulIjYomw27JbJsuD0CejoTa45H1icQqmYLcqOnjAqyIBhVhBioCibjTN8NI5H35aSloWlJcw9O/yeABjtQqko5jFJiNsPFqeAYSFXCWGjOeLsPvDImqhmXAKbWyARsQWZMY8GWbNaycZ/KHd6wTInzJCyke/b+++/ywx2wbIS5u4dMTvaxM8Xnsecf9bEOpgpSQZCCH0MpPf19PPSZrHa2K9vBQCljK2UAc8hmlEpJB+ZxopLIIBYt1uVDFQyXg03YiHEeYNXEhQSqIqR4CRkSGN2eYmz+8Aja6LKVbLzDprgueZMOWTKoxwHf/D0YJmmonhHKaF84XnM4ywW62CmIxkIIXQ+WuSAA6FEScVw1XK+Y30RQgidI/C9TwghhBBKO6zhWHzZitO9GSJf54bShOcxT3fWYNYjhC4ci9xpFCGEEEIXAmxSQQghhFDaYcCBEEIIobTDgAMhhBBCaYcBB0IIIYTSDgMOhBBCCKUdBhwIIYQQSjsMOBBCCCGUdhhwIIQQQijtMOBACCGEUNphwIEQQgihtMOAAyGEEEJphwEHQgghhNIOAw6EEEIIpR0GHAghhBBKOww4EEIIIZR2GHAghBBCKO0w4EAIIYRQ2mHAgRBCCKG0w4ADIYQQQmmHAQdCCCGE0g4DDoQQQgilHQYcCCGEEEo7DDgQQgghlHYYcCCEEEIo7TDgQAghhFDaYcCBEEIIobTDgAMhhBBCaYcBB0IIIYTSDgMOhBBCCKUdBhwIIYQQSjsMOBBCCCGUdhhwIIQQQijtMOBACCGEUNphwIEQQgihtMOAAyGEEEJphwEHQgghhNIOAw6EEEIIpR0GHAghhBBKOww4EEIIIZR2GHAghBBCKO0w4EAIIYRQ2mHAgRBCCKG0w4ADIYQQQmmHAQdCCCGE0g4DDoQQQgilHQYcCCGEEEo7DDgQQgghlHYYcCCEEEIo7TDgQAghhFDaYcCBEEIIobTDgAMhhBBCaYcBB0IIIYTSDgMOhBBCCKUdBhwIIYQQSjtxcj8LBAJDQ0MAUFpaqlKpeP7KZrOdPHlyeno6MzNz5coVGk1BcltPjt/vHx4eBoCyslKlkm+aUfoMDPSHQkxeXp5Go1nEZOCJwVNyVz1CCBECl8udxM/MZvO1134WAB577LGVK1fx+ckbb+x+9NFHfT4f+ffhhx/etGlzEptO2tTU1HXXfQ4AnnjiyZaWlrO56cU1MjIyMjK8bt16pVK52Gn5iKuvvspms91+++3XXff5RUwGzxNjamrK6/VqtVqFQnEWU3cOSeKqRwghKskajkR1dnY+9NBDAFBYWLhly1aJRFJcXHJ2Nn2B83q9X/vabS6X6zOf+cw3v3nXYifnfOX1er/85Vu8Xu/f//6PCzbgQAihhThLAcerr74CAEVFRc8//9vzujJ2bGzst799HgDuuOPO/Pz8xU7O/EQikVwud7lcCkXGYqflPHbw4EGn03nFFVdkZWUtdloQQui8dJYCju7ubgDYsWPHeR1tAMDc3Nz7778PAP/5n19Z7LTwIpFInn/+twaDoaGhYbHTch57/fXXAeCyy3YudkIQQuh8dZYCjrm5OQDIyVGfnc0hrtzc3Nzc3MVOxXnMaDQePHiguLh4+fLli50WhBA6X6U44AiFQn19fSzLSiSSuro6r9dLurUHAgEAMBqNXV1dAKDRaAoKPhyiwjDM8PDw4OCg0+lUKpU1NTW1tbUCgSBy/Q6Ho7Ozw2QysSxoNJrm5uawW2kgEOjv7weAyspKiURy7NixiYmJ8vLytWvXhq1qaGior6/P7Xbn5eW1tLSo1fMEQwMDA36/f3R0hPw7ODhot9vlcnl1dTWf7QYCgZ6envHxMY/Hk5mZWVdXX1VVxV2/x+MhYyXy8vIKCwu5X7lcc6OjY/Qrv98/MDAAAPX19SKRaHBwcGBgwO125+fnt7S05OTkhKW8t7c3FAoVFGjosCCeR8lsNnd1dVmtVpVKWVdXX1lZGTVTouKfp7EYDIaenh6bzaZQKHQ6XUNDg1j8kdOVnl0VFRVh/WFtNpvBYACAxsZGofAjY7/9fv/Jkyf1er1IJCwv1y1ZsmTelLz33rsAcNVVV4etCnhkK9ki//xKNHPjSHnaYgm76vmnECF0QUllwMEwzGOP/fKf//ynWCx+5JGfAsDU1NRtt32VLvDSSy++9NKLAHDbbbddf/0N5MOxsdGf/vSnnZ2d3FUtW7b8gQceKC0tpZ+wLPvyyy8/88zTXq/3w9SLxTfe+MWbbrqJ3opsNhvZ4sMPP/zCCy/09PQAwLZt27i3UofD/p3vfHvv3r30E4lE8vWvf/0zn/lsnL370Y9+ODIyQv/9n/95EACam5ufeurX8263vb390Ud/bjQauStcu3btvffep9Vqyb8ymez3v//doUOHSkpKf/vb33J7Jj711K9fffUVmUz2u9/9HgBmZmbItn7zm6d/97vfHTp0kC4plUpvv/2Oa665hruh+++/L2wwyLxHyePx/PrXv37llX8yDEPXs379hvvuu49PzxWeeRqLzWbbtWvX22+/xf2wvLz8nnu+tWLFCvqJ2Wwme/HMM8+GNRgdP37se9/7HgC8++573Cihu7v7hz/84eSknn5SXV39H//xH3ESwzDMK6+8AgAXX3xx2Fd8shUSzK9EMzeWdKQtqsirHiGEokpZwMGy7G9+85t//vOfAPC9731vzZo1AJCZmXnDDTcAwMsvv+zz+VasWNnY2AAAtbWnH4MMBsOdd95ps9mUSuUVV1yh1RYajcbdu1/v6Dh55513/OY3T9OKkBdffPFXv9oFAOvWrSdjF9vb248fP/aHP/ze43HffvsdYel55JFHZmdns7KySkpKcnPzuF89/PDDLpdry5YtNTW1Ho9n794PDAbDY489JpPJr7jiilg7ePnll9vt9unp6bfeegsArrzyyszMzPz88AkkIrfb2rr/v//7v1mWra2tvfjii5VK1dDQ4Kuvvtre3n7PPXc/99zzcrkcAIRC4d1333PTTf8+Oal/8cW/3XTTzWSFnZ2dpMvt17729bC79X333et2u3fsuKy8vMxms7333nuzs7O/+MWjcrns8ss/wSfXoh4lj8dz9913dXV1KRSKq666qqioaGrK9Npr/zp48MD999/31FO/lslkcdbJP0+jcjgcd99919DQkEwmu/zyyysqKh0Ox3vvvTs2NnbXXd986KGHN27cyGfXIo2MjNx11zc9Ho9cLr/00ksLCwuNxql33nn7wQcfjPOrEyeOG43GDRs2hFU78cxWroTyayGZm+60UVGveoQQiiplAcfvf//7v/71LwDwwAP/tXXrNvJhXl7eV796GwDs3r3b5/Nt2bLl2muv5f7qiScet9ls5eXljz/+RF7e6Rveddddd8cdt5tMpmeffebb3/4OALhcc88++wwA3HjjF2+99Vay2PXXX//007/5y1/+8uKLL15zzafDbsYul+vBB//n4osvFolEYUkNhUKPP/4EfVa+5ZZbvv/977W2tu7a9eTmzZuzs7Oj7iCpkunq6iIBx/XX3xD1YT1su16v95FHHmFZ9oorPnXvvffSp+2tW7fdc8/d4+Pje/fuveyyy8iHRUVFt99+x89//rMXXnjhkksuLS0tDQQCjz32SwBYuXLl1VdfHbYtuVy+a9evKioqyL833XTzt751z8DAwK5duzZt2pyZmRl1R+Y9Ss8883RXV1dubu6vfvVUScnp0ctXXXXVf/7nfwwMDLz22r/iVwXxzNNYfv3rp4aGhnJycp588kmd7vSu3XjjjY888sjbb7/14x//6A9/eCG58UG//OUvPB5Pfn7+E088SfPu5ptvfuCB+0nTTFRvvPEmAHzyk5/kfphQtlIJ5VfSmXsW0kZFveoRQiiq1Ext/re//e13v/stANxxx52KmB/CAAAgAElEQVRhRXMcQ0NDbW1tAHD33ffQOxMAFBYW3n777QDw9ttvu1xzAGAwGPx+PwBs3779w6QLhV/84r8VFBRoNBratYL6yldu3bFjR2S0AQBf//rXuTXzcrn8ttu+BgAul2v//n08Ex9L2HZnZ2c3bdp0xRVX3Hjjjdy6/TVr1tTW1gJAb28v9+ef+tSnVq9eHQgEnnrqVwDwj3/8Y2BgQCqVfutb90Z2ILjjjjvoHQIA1Gr1HXfcCQAOh4Mc2ERTCwAWi/nll18GgDvvvJNGGwBQWlr62c9eCwB///vf46yQf55GpdfrX3vtNQC49dav0mgDAKRS6V133ZWVleV0OsnzdKL6+vpOnDgBAF/5yle4kaJWq/3Wt+6N9Su73f7OO29nZWWtW7ee+3mi2UoklF9JZ+5ZSBuR3FWPELpgpSDg2L17N2ns+NKXvvS5z32O/w8PH24HALVaHTm9Y0vLimuvvfYzn/mM2+0BgOzs053XDh06xF0sMzPz//2/l19++f82b94Stob6+vpY2+XeyYjy8vLm5mYAIPekhQjbbmFh4f33P3D//VH6LpDbORm/Q5GGFZlMtn///pdeepHU69x229ei1qbQw0ItW7ZMp9MBwMmTvHYk8ijt398KAFKpNPKQbtiwHgDGxsYsFkusFfLP06gOHjwIAEql8qKLLgr7SqVSXXnlVQAQ1reDp46OkwAgk8m2bNka9hU3MArzwQcfBIPBT37yirA2iESzlUgov5LO3LOQNljAVY8QumAttEmlvf0wqVO99NJLb775Swn9dnh4BACam5sjn92zs7PvvPMb9N+CgoLLL//EG2/sfu65Z48ePXrppZc2NzfrdLrIHyatrq7u1KlTZJxIOthsthMnjo+PjzscTjJmp6+vDwAA2LAlS0tLb7vta4899ssnn3wSAFpaWnj2EwQAoVDY1NQ0NjY2OjqaXDrHxkYBQKMpIEMzuJxOJ/nDbDbHevsJ/zyNamhoEADq6uoyMqJMU9bcvAQADAbD7OxsQuM1AIAM86msrEpofvd//etVANix49JYC/DP1qgSyq9EMzd9aVvIVY8QumAtNOD485//RP44evTo9PR0Qm/hsttnASBWn4kw9957b2VlxZ/+9Kfjx48dP34MAPLy8nbuvPzKK6/k1vwnjaTcbrcvfFVhvF7v888/99JLL3FHfMR3zTXXvPnmG2TwyD333BO1YSgWMgbB4XAkkVQAmJ62AsDkpJ5MRR+VxxOziiKhPI00OzsLAMXFxVG/pfO4OJ3ORAMO8lhfVFTE/ycDA/29vb0NDY20jzNXEtkaVUL5xXPhdKdtIVc9QuiClYJOoxdddFFHR4fVan344Yd++tOfhU2WEG/bYjEAhEIhPgtLJJLrr7/hqquuPnHi+NGjRw8ePKjX6//85z+9+OLfvvGNb1x9Nd86gFgCgSAAJHRr54NhGNIjNScn5+abb25pWZGfn092/KGHfswdmstlNpvpY2VnZ2dkG1AcC9yRYDAAALW1tZGNGlTYeA2uhPI0kkgkBgC/PxD1W/rmvyT2TigUwJm94+mtt94GgCuvvDLyq+SyNaqE8ovPwmcnbUlf9QihC9ZCi4lt27Z95zsPnjp16hvfuPPIkSN/+tMf6XjOeanVuQBgtVr5b06pVG7atHnTps133vmNsbHRZ599bu/eDx599NH6+vqGhsYk0k+ZzSaI25yfnI6OjtbWVgB49NFHwx6UY902GIb5xS9+4fF4CgoKzGbzk08+uXr1mjj3+DAm0xQAJD21KKk5UKvVX/zivyXx8yTylIskW6+fiPrt1NQU+SM7O+EXmpCEkdnA+PB6va+//ppYLN66NbzPBySVrbEklF98Fj4LaVvIVY8QumAttA/Epz/9aYlEsmLFCjJ70vPPP3/s2DGev21oqAeAzs5O0sDM5XLNvfji31588W82mw0ATp488d577x4/fpy7jE5X8e1vf5s0yR8+fGQhexEKhY4cOQIAKZ8ncWCgHwA0Gk3Uavmodu/effDgAYlE8thjj69bt97j8Tz66M951o37/f6jR48CZ6aTRJEfHj9+nPbYSAj/PI2qqakJAPr6+qL2SyU9Uuvr65VKFQBIpVLyeTAYnDdhZIDG8PBwnB6vXORtbZdeuiNq81AS2RpVQvnFc+GzkLaFXPUIoQtWyjpd3nDDjWTanx/+8Ac8H3DXrVsvFAo9Hg95HRrXoUOHdu3a9cwzz5CbSmtr2/e+970f/vAHYfddhUJB3t7Jsrz6wRF79oRv7siRI+Tpef36DfF/KxKdPmI8IwCSMKvVGjYW1Gw2k9I8LOVTU1NPPPE4ANxyy5dLS0vvvPNOsVh86NCh119/LXLlkTUB+/fvI7fz9evX8UlepI0bNwoEgkAg8OKLL0Z+u3fv3vjdXPjnaVQbNmyQyWR0ck+usbGxd999FwA++cnTk7NlZ2eTudLHxsbCFo4cbbR69WqBQMCy7FtvvRn2VdiMqAR5W9vll0d/W1ui2UoklF9JZ+5ZSBuVxFWPELpgpSzgEIvFDzzwX2q12mq1/uQnD/NpxddoNJ///OcB4Je//AWpYCCOHDny6KOPAsC1136OVGBceumlADA9Pf3YY4/RJ+9QKPTyyy+TyZuXLl3KP6n/93//99xzz7pcLvJvb2/vz3/+MwCorq5etWoVXezNN9/8wQ++f+zYUe5vVarTMyCRHp3zampaAqenf36MdL5jGObQoUN33HE7+Zc7RpE2plRUVJAZ0srKysgogCeffJI2KFCPP/74Bx/soaFPb2/P448/DgANDY3Ll4ePSuWpqKjoC1/4AgD84Q+/f/HFv9GKCo/H88c//u93vvPtu+++i24x8hDxz9OosrOzb7nlFgB44YU/vPHGG3RDer3+Bz/4PgBUVFRcfvnl5EOFQkHmU/njH/9Iu7w4HI7nnnvuH//4R9iaNRrNZz/7WQB4/vnn33//fbLmUCj03nvv/vSnj4QtTN7WVlhY2NKyAqJJKFuphPKL58KRWXAW0kYlcdUjhC5YqezqpdFovvOdB++55+5Dhw795S9/5tMJ4Kabbu7p6Tlx4sTdd99VXl5eUlIyOTk5Pj4OABs3brz55pvJYnV1dbfffvuuXbv+8Y+/v/76a0uWLJFKZcPDQ6R6/KqrruZO5DWvtWvXvvDCC3/7298qKipcLpderwcAmUx2//0PSCQSsozX633ooR+zLDs4OPjCC/9Lf1tcXFxSUjo5qf/xj3/017/+RalU7tr1qzjbam5u3rlz55tvvvnmm2++9dZbWq12ZmbG7/fLZLKamprBwUGTyUQXJo0pAPDNb95Fpw+/7rrr3nrrzfHx8Ucf/fkjj/yUO9w0JyfnwQcfLCoqqqqqslqtZEInhUJx3333LaT365e//B9Go3HPnj27du364x//2NjY6Pf7e3t7XS6XUqm8/fY7SBpiHSKeeRrL5z533cjI6Btv7H7ooR8///xzNTU1drv91KlTAJCfn/+DH/yQ+5aZm266+dixY5OT+n//93+rrKwEgImJiWAwWFRUFPYaEQC45ZYvd3Z29vX1ffe7/5Obm6vVaicnJx0OR0NDY2/vR8LHM29ruyrWuOuEspVKKL/4LBw1C85C2riSuOoRQhemlNVwEGvWrPnSl74EAM8++yyfSbQyMjIeeeSnX/rSLTk5OePj4wcOHBgfH8/Ly7vzzm/86Ec/5s62dN11n//JTx4hN7/jx48fOnTQYrGUlpbef//9d999d0KJvPfe++66626VStXX10eijaVLl+7a9SvuC8BkMhl5uuXWeQCAUCj87ne/S+5tQ0NDcbojUPfdd/8tt3xZoVCwLDs1NeX3+zdu3Pjss89dddXVADA4ODgzMwOcxpRPfOITK1eupD+Xy+Xf+MY3ASCyYeW+++679dZbXS5Xa2sruUMsW7b8V796qqamJqEDEkYqlX73u9+77777ysrKZmdnDxw4cPToUbfbvXPnzqeffobGdrEOEf88jUosFj/wwAMPPPBfZWVlJpOptbX11KlTMpns6quvfvrpZ7izYQLAihUrfvazn5eXlwPAyMjIyMiISqX62te+fs8934pcs0ql+vnPH7366qvFYvHMzExPT4/P57vuuut++ctfcN8Ow3lb2yVx0skzWz/6kwTyi8/CsbIg3WkLk+hVjxC6MAlcLvdipwEAIBQKGY1G8gxdXFwcZ0Yvm81mtVpDoZBardZoNAm98Txyi263W63Ooe9t52IYZnZ2Vq1WR24iFAoZDAav16PVFpJOJPMKBAJ6vT4YDOTna9RqdXJpJqampq677nMA8MQTT7a0tASDwcnJSZ/PRw7IQtYcyWw22+2zMpk8Ly8vsikkziGCRPI0KpZlzWaz3W6XyaRabWGcSIVhGKPR6HQ6VSoVnw3Nzc2ZTCaBQFBUVMStLyGOHTv6zW9+c9269T/72c/mTSSfbE0ovxLN3DhZkPK0IYTQQpwro+dFIhGfF5cDgFqtXuANm+cWhUJhrPGHIpGorKwsoc1JJBJSL5JyYrGYTEGdDgUFBXFe7hrnEEEieRqVQCDQarXcd6nHSUZCk7+pVCqVShXrW7vdfu211/J8FVkS2ZpQfs27cJwsSHfaEEIoIedKwIHQOeKiiy6+6KKLFzsVCCH0cZPiPhwIIYQQQpEw4EAIIYRQ2mGTyvknM1N11113Q+yXnKFzSkL5dZYzF88lhNBZc66MUkEIIYTQxxg2qSCEEEIo7TDgQAghhFDaYcCBEEIIobTDgAMhhBBCaYcBB0IIIYTSDgMOhBBCCKUdBhwIIYQQSjsMOBBCCCGUdhhwIIQQQijtMOBACCGEUNphwIEQQgihtMOAAyGEEEJphwEHQgghhNIOAw6EEEIIpR0GHAghhBBKOww4EEIIIZR2GHAghBBCKO0w4EAIIYRQ2mHAgRBCCKG0w4ADIYQQQmmHAQdCCCGE0g4DDoQQQgilHQYcCCGEEEo7DDgQQgghlHYYcCCEEEIo7TDgQAghhFDaYcCBEEIIobTDgAMhhBBCaYcBB0IIIYTSDgMOhBBCCKUdBhwIIYQQSjsMOBBCCCGUdhhwIIQQQijtMOBACCGEUNphwIEQQgihtMOAAyGEEEJphwEHQgghhNJOcP311y92GhBCCCH0MYc1HAghhBBKO/FiJwAh9LEyNTW1Z88elmUBoKqqat26dYudIoTQOSE1AcfExERrayspYgDgC1/4gkAgCFsmFArp9frJyUmbzeb1ejMzMzUaTXl5eV5eXqo2EWb37t2zs7Pzrjk3N3fnzp180vAxo9fr9+/fTw8pJRQKlUqlSqXSaDSlpaXZ2dmLkryFcLvdr7zyCt21LVu2lJaWRi7W2dl56tQp8ndzc/PSpUvPWgpjHfxIn//854XC86wmks9+IYQuNCkIOHw+34kTJ+IXMU6n88CBA1arlX5itVqtVmtvb29jY+OyZcviF6l8NoGSEPWQMgzjdDqdTqfRaOzo6Kivr1+2bJlYfJ5VhnF37cSJE1qtViKRpG9z7777rtlsJn9/4hOfyMnJmfcneD4jhC4oKXhy6u7unpubi7OAz+f74IMPuNEGV09PT0dHxwI3gdKnr6/v0KFDDMMsdkKS53Q6+/v7FzsVCCF0QVvoY+v09HRvb2/8ZXp6epxOJ/lbpVI1NDQoFAqLxUJ/2NPTU1pamp+fn/Qm5lVbW5uVlRX1q7Q++J4vVCpVfX09/dfn8+n1etogNT4+rtVqa2pqFil1KdDV1VVWVhbrHFhcYQc/zLxNhwghdF5YUMARCoWOHz8ef5lAIDA0NET+FolEW7duJX0CSktLFQoF/fnY2FjUgIPPJvgoKSkpKipa+Ho+rhQKRV1dHfeTpqamAwcOTExMkH+7urqqqqrOu84EVCgU6ujo2LRp0zl4/448+Agh9PGzoIBjaGhoenoaADIyMtxud9RlZmdn/X4/+busrIzbA7GyspIGEwaDYeXKlZE3Az6bSJXXXnvN4XAAgFwuv+aaayYmJgYHB61Wq06nW7t2rcvlevXVV0m7e01NzcqVK/v7+8fGxmw22/r16ysrK8lKSN9Yg8Fgs9k8Hk9GRkZubm5xcXFpaWnY3sXfXFr3lA+RSLR06VIacLjdbofDwe2aYLVa9Xq9xWJxOp0sy2ZlZWm1Wp1OF7UWgWGYsbGxiYkJm80GAHl5eTqdrqSk5KWXXiKNNRUVFRs2bOD+hGXZycnJycnJmZkZt9udkZGRl5dXUlJSXFycXNAwMTFhMBhKSkr4/8RkMpF9dLlcMpksOzu7qKiovLxcKpWSBXw+39///vew3hi7d+8GAK1We/HFFyeRzjj4n11tbW1jY2Pk70suuaSgoIB+xe0qu27duqqqKgAYGho6fPgw2ZFt27ZptdqRkRG9Xm+z2UQikUajqamp0Wg0YelhWXZ8fJxcBUKhUKvV1tbWpnaXEUIfG8kHHHNzc7TvRUtLS1tbW9TFyD2VUKvV3K9ICW6328navF6vQqFIYhMp5/V6e3t7T5w4EfY5va94vd5Dhw7RAp1yOp2tra3knkr4/f7Z2dnh4eGCgoKNGzeG7WD8zS267OxsmUzm8/nIv16vl/zBMMyJEyf6+vq4C1ssFovF0t3dvWrVqrDGF7/f39raOjU1RT9xu90TExM6nS5W1xCv13vw4EGj0chdyezs7NDQUGlp6bp16+gtPyEnTpwoKCjg04gWCAQOHz7MzWK/3+90OvV6fU9Pz4YNG2iF3Fnr+5nc2cU/hXQxm83W1dVFAn3C5XKNjo5yA2sACAaDBw4c0Ov19JO5ubmRkRGdTpfQfiGELhDJ15CfPHkyEAgAgE6nKy4ujrUYrd4AAJlMFvYtt4gka0tiE+nAvf1HPk/r9frIaMPj8ezZs4d7P+Aym8179+7lHg3+m1ssLMtyAwKasMhog2IY5vDhw5OTk9wPDx8+zI02qMhjSASDwX379nGjDS69Xk+fxXmiY2IdDsfAwMC8y7Mse/DgwVjJm5ub27NnD58R1ym0kLMrUR0dHdxogzp8+LDH46H/dnZ2cqMNgmGYkZGRlCQDIfQxk2QNx8TExPj4OABIJJLly5fHuUcGg0H6d+RiIpEo6pIJbYKP6enpUCgU+XlWVta8HQnn3TRZ4OTJk3QojUqlqqury8jImJub6+npIZUEMzMzvb29y5YtW8jmbDYb/wE7JSUlC+l1YbFYuFFgRkYGADidThptSCSSdevW5eXlBYPBwcFB+nl3dzdtuTAajSQfaZLKysoEAoHRaBwdHY263Z6eHnrDUygUDQ0NGRkZLpeLHsnx8fHKykr+MejSpUunp6dJDc2pU6fKysoyMzPjLD88PExvpSKRqKGhQa1W+3y+wcFBcssPBAJHjhy5+OKLZTLZtddeCwAffPCBxWIhP9mxY0d2dnZq+7uk6uziKT8/v7KyUiKRTE9P0wE+oVDIZDJVVFQAgN1u53blLioqIhUbk5OTtBkOIYS4kgk4/H4/fSJftmyZUqkMixW4+D+JcpdMaBN80EbrMGvXro0acGRkZLS0tOTn53NDIi6NRrN06VLyW7FY7HA46IOdSCTavn07vaVpNJq3336b/N3b21tXVyeXyxPdHDU5OdnZ2Rl/Geqzn/1sck0PgUDAarUePXqUfpKXl6dSqQDA5/PROvPc3NyysjLy9/Lly0dGRshDNrm7k93kRhU6nW79+vXkTlxRUZGZmRm5Lz6fjxvQXHLJJfRIarXaN998k/w9MjLCP+BQKBTLli1rb2+HM71HN27cGCuwYxiGeytdv359eXk5+busrOztt98mQ64sFovZbC4sLCQNNNy1icXihIY+WSyWv/zlL1G/IhPcLfDsSlRBQcHWrVvJLpC8pjEHbSHlVmJptdotW7aQU7eiouLYsWM4CBkhFCmZgKOrq4s8bOXn51dXV6c6SWdpE0SseGj9+vVarTbWr2Qy2ebNm7klO7f6ndxK6b/5+flFRUWkgSAUClmt1sh+i/E3dxbEuecRS5cuJffU/Pz8qOOJRCJRVlYWrZnw+/1yuZxhGO6dqb6+nvvcH3U909PTtFqlpqaGeyRzc3PVajWpYzAajQzD8K9FqKysHBkZIZUQ4+PjVVVVsUYtzc7O0tuqUqnkTlEqk8mqq6tpKGwymQoLC3kmYCHolGKQ1NmVKBpFERqNhgYQtNWGm6Tq6moaKAsEgpKSEgw4EEKREg44uLNirFixYt4n8iSchU3MizzNxyKTycKeI7kt+twRAURxcTHtkTA7Oxt5S4i/uUW3evXqsNszwzBGo3FqampmZsblcnGb9gkSyXk8Hho9yGSy3NzcebfFPZITExO0nYKgzQqBQMDn88XqJhlJKBQuX778nXfeIf8eP348cswFwe3mXFxcHBbTcH8Vay67lFvg2bVA3OCDtkty951PtiKEUGIBB8MwdCBrQ0NDrKm6uPj3vSBLJrEJPrZv357WeTjoUA4AiKzT5n6ywJ59zc3Nzc3NC1lDQkpKShobG8PuzU6n8+DBg1H7FYbhdgHJzs7mczJwj+Tc3FycDiuJtrJpNJra2lrSadRut8fqPcrNoPhZGRlmJSczMzPWxF/kiJ21s4snhmG4G0qu2Q4hdKFJLOAYHh6mt5ne3t5YE4D+9a9/BYCLLrqosLCQ+w6OyPYLbkdOsmQSm0hoF9KEu2uRt9Vz/60Z3HueQCAQi8Vk0DLpKMoVCAT27dtHBjMDQF5eXnl5Oalp6OzspFPKRuIZeqZ1DvUlS5aMj4+T+3dnZ+e8MWhkk006kieXy+NPX3GunV1hWzx3xlUhhM5liQUcLpeL/8KkVOI+/XAf1AjuXF5kySQ2cS7gjviN3E3uJ+fm4+C89zxKr9fTaKOkpGTz5s30rtzf3x8WcHDDTW5TRRzc49PS0tLY2MjnVzyR3qOHDx+GM5NoxU8AnXqE4j7Z82/QWaBz7ewSiURSqZQeikAgcG6e1Qihc0piI/eSKFa4Y0BmZma4X3m9XnoTUqlUpFQ9T0su7hSc3P50BHdKifPxbe9c3Eycd7LzjIwM2gPA4/HEmkaCi3vC6PX6yBqFqMOb+auqqorfTsftkmkwGMISwG1IOmt9F5I4u7g9nxZ4xKLKy8ujf4dd1wghFFViNRylpaVR75ehUGj//v30323btsGZUjInJ4c+DE1MTMzOztLSkztBEJ2vOolNnAu4XflGR0cbGhpoP9CZmRmDwUD+FolEqeqVsli4PSe4dzKPxxNZOyUUCktKSujI2IGBgTVr1tAa+Mh7JwAUFBQIhUJymyfdhxsbG+lP/H5/e3t7cXExmZA7CUKhsKWlhfYejaRWqzMzM0lVjdPpNBgMdKCK3++nLwYCAG5zHrdZIeUdKZI4u7iBu9VqpUOIA4FA1EnYEqXVammgMzQ0RGd8YVk2ar0RQgglFnBkZmZGnTEprPteUVERLX8lEklNTU13dzcAMAzzwQcfNDY2KhSKsHfAktmEktsEHwaDIVZjjUgk4k7YnJzs7GydTkcGxwYCgT179tTV1SkUCjJdFV2svr5+4dMkLC5u7nR2dorF4oyMDIfD0dXVFbUTZWVlJQ04hoaGfD4fuX8bDAbuhGBURkZGfX09PWgnT54k90upVOpwOIaHh+fm5iYnJzMyMpLuvkPeDDI4OBj1W6FQ2NDQQJpdAKCtra2xsTEnJ4dEG7ROLj8/nxsHcLO1o6OjoqKCYZhUvZItibOLG4t3d3eHQiG1Wu31eoeHh1MyR2pJSQkdHmw0Gvfv319WVkaijbB5ZhFCiFjo6+n5aGho0Ov1pKR2u93c6aToAtwa2nSIMzFAVlbWwgMOAFixYsX09DQJa5xOZ+RuqtXq1PZIWBTl5eWnTp0idRtOp3Pv3r1RF6PjUwoLC+nNEgD0ev28T8BLliyxWCy08SLyJwzDLPBNfqT3aKyqiKqqKoPBQG6coVAoctY4iUSyevVqbnOSRqOh+0heKwMAKXwHbKJnF+mvTcJ0hmG4cUlKZGVlNTU1kQcJACCv2UvtJhBCHzNn423jMpls27ZtsUKKhoaGVM3HvLgUCsX27dvDXlBHaTSarVu3nqc9VLhUKtWmTZu4vUEJuVzOHT3L7W65evXqqLURdAbPMBKJZOvWrdwZt8K+3bBhQ9JNKkRGRkacs04oFHInGI387bZt28IyWqfTxcr6lEj07FIoFFHfOaxQKMJerZe05uZmOs8s19KlS1OyfoTQx8zZqOEAAJVKdckll5Dq1pmZGa/Xq1KpCgoKysvLz/c+DVxZWVk7duwgr0GnLxBXq9WlpaULfK3JOaWkpGTnzp1DQ0NGo9HtdqtUquLi4urqavpkDwAWi4VGDFKpdOvWrePj4+Pj4zabTSAQkPeYezwe2qoSNr0bmcvVbDZPTk6St8NLJJLMzEzydviUDA+prq4eGRmJNXmXVCrduHFjdXU1TYBUKiWvp9fpdJGBo1Qq3b59+8DAwOTk5NzcnEKhSPmJnejZpdPpMjMzh4aGTCaT1+vNysoqKiqqqamxWq2xmpMSIhKJNm7cSLJ1ZmaGZGtNTU1ubi5pxFn4JhBCHyeC66+/frHTgC5QPT09tB/AkiVLPh4VXQghhKL6mDxzo3NZKBRqa2sL67Tr8Xi477hPa3sEQgihRXeWmlTQhay7u3tsbMxoNJK56oVCocPh6O7upqNalErl4r67DiGEULphwIHSy+PxkCESfr+/o6Mj6jKrV6/+GHSnRQghFAc2qaD0UigU27Ztizq3CpwZ8UGnpUIIIfRxhZ1G0dkQDAYnJyenpqasVqvb7VYoFGq1urCwsLS0FOs2EELoQoBNKuhsEIvFOp1Op9MtdkIQQggtDmxSQQghhFDaYcCBEEIIobTDgAMhhBBCaYcBB0IIIYTSDgMOhBBCCKUdBhwIIYQQSjsMOBBCCCGUdhhwIIQQQijtMOBACCGEUNphwIEQQgihtMOAA/zfqagAACAASURBVCGEEEJphwEHQgghhNIOAw6EEEIIpR0GHAghhBBKOww4EEIIIZR2GHAghBBCKO0w4EAIIYRQ2mHAgRBCCKG0w4ADIYQQQmmHAQdCCCGE0g4DDoQQQgilHQYcCCGEEEo7DDgQQgghlHYYcCCEEEIo7TDgQAghhFDaYcCBEEIIobTDgAMhhBBCaYcBB0IIIYTSDgMOhBBCCKUdBhwIIYQQSjsMOBBCCCGUdhhwIIQQQijtMOBACCGEUNphwIEQQgihtMOAAyGEEEJphwEHQgghhNIOAw6EEEIIpR0GHAghhBBKOww4EEIIIZR2GHAghBBCKO0w4EAIIYRQ2okXOwEIIZR2LMu6XK5gMCiVSuVyuVCIz1oInW0YcCRpZGTk1KlTAHDZZZfJZLLFTg66IAwODvb09ADAzp07pVLpWdvukSNHjEZjZmbm9u3bz9pGU4Vl2bGxsf7+fp/PRz5Zt25dQUHB4qYKnU0HDhyYnp7OycnZsmVLcmuw2Wytra0sy65du1ar1Z6djX78JB9wOJ3OyclJq9XqcrkCgYBcLs/Ozi4oKCgpKRGJRClMIkKIYFl2sZMwv6GhoYGBgbKysiVLlix2WgAA+vv7+/v7uZ+IxWfpQYtl2aNHj05PTy9btqy4uPjsbPQCl77Tj1x958U1eM5K5sJjWbavr29gYID7odvtdrvdRqOxv79/9erVOTk5KUrhYgoGg2+88QbLsg0NDbW1tYudHITOA0NDQ4FAYHh4uK6uTiKRLG5ivF4vKamUSmVLS0t2djbLsmetPcXlchmNRgAYHR097wKOtrY2q9Wan5+/YcOGxU5LAs6p0w+FSebC6+rqotdwY2Pj2rVr169fv2rVKp1OJxAIPB7PgQMHHA5HqpO6ODCeRSghZWVlAFBSUnIuFPc2m41cwk1NTbm5uSKRSCwWn7WAIyMjIy8vTyAQlJSUnJ0tonPq9ENhEq7hmJ2dHRkZAYD8/Pw1a9ZwKyeLi4vLy8vb2tqCwWBHR8emTZsEAkEqE4sQOuc1NjbW19efI70yA4EA+SMzM/Psb10oFG7cuJFhmHPkaFwIzqnTD4VJOFfMZjP5o6mpKbIpNCcnp76+HgBsNtvMzMzC04cQOu+cO8U9raFcxIefc+doXCDwgJ+zEq7h8Hq95A+lUhl1AY1GQ/5wOBx5eXncrxwOx8TEhMVicbvdEokkKyursLCwtLQ0spPpv/71L5Zl6+vrKyoqBgYGpqam3G73qlWriouLZ2dn9+/fz7Lshg0bpFLp4ODg9PS0z+e75JJLTCYTGTkStRd6b28vaQnavn37vI87e/bscTqd3N/29vYCAElD2MI+n290dHRqasrlckml0ry8vKqqquzs7KhrnpmZGR8fn5mZ8Xq9GRkZGo2mvLycz+MX7SZ98cUXi0Si0dFRk8lEtpibm6vT6cKONkUO+/T0tNvtBoDMzEytVlteXh5rcI3ZbB4fH7fZbMFgUKVSFRUV6XS6mZmZ9vZ2APjkJz8Zll8Mw5hMpomJCbvdHgqFVCqVVqvV6XTxh1GEQqG33347EAio1erNmzeHfev3+9966y2WZUtLS1esWMHd1uTkpMFgcDgcgUAgIyMjPz+/rKws8mj39/f39fUBwOWXXx5Wuer1et955x2WZZubmysrK+MkkibVYDAYjUa73e73+2UyWW5ubmlpaeQ5RkZz5OXlrV+/fmxsbHx8fG5urry8fOnSpdxdI7vgdDpFIlFWVlZxcXFJScnCS0mz2Tw5OUlOLblcrlarS0pK4vSo9/l8ExMTU1NTc3NzAKBSqQoKCnQ6Hf9RVwaD4ejRowBQWFi4atUqsgtRO+eTK3rp0qUVFRXkbLHZbIFAICsrq6SkRKfTRd39RE9Frvfee8/lctF/3333XfJH5CXM87jFKXkyMjKipiEUCu3evZtl2dra2oaGBu5X9Ey22+2BQEChUOTl5ZWWlsa6isNSsm/fPgDYunVrZmbmxMSEXq8n5ZVardbpdIWFhVF/yCfHu7q6hoeH6b/T09OvvvoqAFRUVHBP41j4lDZ79+612+15eXkbN26MXAPpOxJ2/pCUm0wmp9PJMAy58MvLy7OyssJ+nujYkESLR4go8OMXv1ElV2Z+DCQccNAj4na7IzMbAFQq1bZt27hLEkNDQz09PfSBIxQKeb1es9k8PDy8du3asPCFLOb1eltbW8m1Efmt1WodHBxkGIZ8KBAItFotCThMJlPkzYD03srKylpI5Wpkl46ZmZmTJ0/SmluPx6PX6w0Gw+rVq8PKLIZhuru7SYMU4XQ6nU7n6OjoypUri4qKeG7dZDL19fUFg0G6xcnJycnJyaampurq6rCfhB12ALDZbDabbXh4eM2aNbm5uWHLd3d3Dw0N0X9nZ2dnZ2fHx8dLS0ujJsnn8x09etRqtYatf3R0dMOGDSqVKta+iESikpKS0dFRm83mdrvDimyr1UrSzD0sHo+nvb2d2z2IHMCRkZH6+vq6urpY24rEv2uO2+0+fPgwd6P0gJeVlS1btizyThkKhU6ePKnX68m/3Gfr2dnZI0eOeDwe8m8gECBXwcTExJo1a5JudQ6FQidOnDAYDNxku93uycnJwsLCFStWRFZGWiyWo0eP0vMWzmTc0NDQypUr+Qz8s1gsx44dA4Dc3NyWlpb4ARM54IFA4OTJk+Pj42EbnZqaWrduXdgaEj0VeeJmfaLHLVbJw3NzlM/na29vn52dpZ+4XC6XyzU+Pl5TU9PY2MhzX9xud0dHB3c9ZrPZbDZHxjeQihyfF8/SprS01G63W61Wj8ejUCi4a/B6vaQw4fZ6iUw5LTmbm5srKirSnWAuu93e0dFBh1jT0qCxsbGmpobPRpMuMz8GEg44CgoKSD1BZ2fn6tWrI8NAoVAYGYiMjo52d3cDQHZ2dlVVlUqlCgaDFotlaGhobm7uwIEDW7ZsiVzV2NgYACiVyvz8fJFIFHZqkqFuarU6JyeH9DyXyWR5eXlWq3VycnLJkiXc8svpdJLAhWdptXnzZpZlyVM4ANTV1VVVVQFA5BPVsWPHRCJRQ0NDTk5OKBQymUzj4+MMw5w8efKSSy7hLn/q1CmyRyUlJWVlZRKJxOVyDQwMOJ3OY8eOkYcVPmnr6uqSyWS1tbXksX5mZoYUf93d3VlZWbSGCQAmJibIYSeVLhkZGcFgcGZmpr+/3+/3Hzly5KKLLuLe5MbHx0kRr1AoqqurMzMzQ6GQxWIZHR0ltQVhQqHQwYMHHQ6HQCCoqakpKCgQCAQ2m62vr8/r9ba3t2/bti3OM2hRUdHo6CgAmM3msFLDZDKRo013x+/3t7W1ud1ugUBQVVVVUFAgFotdLtfw8PDs7GxfX59IJIqMtxYoGAweOnRobm5OJBLV1NTk5+eLxWKPxzM0NGS1WicmJjIzMyM3Sm6NYrG4sLBQJpPRbJ2bm2trawuFQjKZrK6uLicnJxgMmkym4eFhq9Xa3d29fPny5NJJ75pFRUVlZWUymczn85HAd2pq6tixY2vWrAmLe9rb2xmGkUqltbW1ZEyZ3W4fGBjw+XyHDx/euHFj1NKWu4YjR46wLKtSqVavXs0zVBoYGAiFQgUFBWVlZVKplJz/Ho9nenp6YmJCp9PRJRM9FSNt3bqVZVm9Xk8eQrZt20YKEO4JmehxIyJLHj7p4Tpx4gSJErhncn9/v8vlGhwcVKlUpOfjvI4fP84wTEVFRUFBgVAotNlsAwMDDMMMDAwUFxdzy2H+Od7Y2Ehi9/b29pmZmby8vDVr1kC0oi8M/9KmsLCwq6sLAKanp8P2dHp6mvxBK2kcDgdJuVKprKmpycrKEggEDoejv7/f7XZ3dnZmZWXFP1cXnmCu/v5+kUhUW1urVqtFIpHD4RgYGPD7/T09PVlZWfPO77LAMvN8l3DAQaqPxsbGZmZm9uzZU11dXVJSEhYKhHG73eT0ys/PX7t2LT2a+fn5eXl57e3tHo+np6enpaUl8rd1dXW1tbVRL2mhULhq1aqwysPS0lKr1RoIBGZmZvLz8+nnkedxfOTJhpY1QqEwVpEql8s3bNhAH9DJPYZcxjabjabBbDaTaKOuro50cwGAnJyc/Pz8Dz74wOfzDQwMrFy5kk/aMjIyNm7cSI+5RqPRaDRtbW0sy/b09NA7NMuypBmI1PDTY5ibm5uRkXH06FGfz2cymWgEFgwGyeUnl8s3b94sl8vJ51qttrCw8ODBg5HPagMDA+TRf+3atfRKU6vV2dnZbW1tLpdLr9dz7yJhcnNz5XK51+udnJzkBhwMw5DqKO6cLqR8AYA1a9bQp7GcnJzCwsLDhw9bLJaenp6CgoLU9g00Go0kTl29ejXdwaysrPz8/NbWVrvdPjIyUlVVFXlPKigoWLlyJfecYVn2xIkTJNrYvHkzPWHy8/OlUmlvb+/4+HhlZWXUWsP4DAYDuWuGPddqtVqVStXf328ymfR6PS3ZSUoYhglLSW5urlarbW1t9Xq9J06c2L59e6xbqcvlam9vDwaDMpls7dq1/JtgQqEQty4qPz9fq9W+//77wWDQYDDQUyWJUzESuYTpLojF4rBLONHjRkUtefhzOBykJxy3KFCr1QUFBfv27XO73QMDA6WlpXw6nTAMw730NBpNTk7OoUOHAMBkMtFzKaEcJ+BM6ScQCPhEkwmVNhkZGbm5uTMzM0ajMezwTk1NkZXQRA4PDzMMIxaLN2zYQAu97Ozs3NzcPXv2MAyj1+uTCDgSLR4psVi8ceNG2oZLzuG9e/eSk1aj0cTPuAWWmee7ZJqNly5d2tDQIBAISFj3zjvvtLa2Dg8PR7Z9EGNjY6T6cenSpWGxW0FBQXl5OQBMTEyQ2wlXXl5eXV1drFKvpqYm8prXarUkv8mJS5F/c3JyYnU9Sdry5cvDmgNoCzG3CZk8rimVyrD5PGQyGbnXGgwGWk0XX0NDQ1iER7oUAIDdbqeV/yzLNjY2rlixIqyyBzhHidtPxWKxkErL2tpaWsQT+fn5kfWWZLA7AJSXl4fF9Xl5eaRFk1t5HkkoFJJkz8zM0FYG8i9pMKLtKV6vl4RrZWVlYXW/IpFo6dKlAoGAZVlSX5JCmZmZK1asWLFiBbfeiGyUpM3j8fj9/rBficXilpaWsGJ6ZmbGZrMBQFNTU9gJo9PpyHXBrdvnb3BwEACUSmVko1JtbS2poR0YGKA3abPZTPK9sbExLCUZGRlNTU0A4HK5wq4gyufzHTp0yOfziUSidevWJXRB5efnh53/crmcZCg5OESip2JyEj1uVNSShz96qoe1+kul0urq6pycHIlEQhtM46urqwu79DQaDTnxuJf2AnOcD1raNDc38yltyIVvNpu5l08gECBVm9z2lKKiohUrVqxatSqs0FMqlSTOsNvtC0kwz+KRamhoCOsxplQqyTnpdDrjJ2bhZeb5LpmAQyAQ1NbWXnTRRRUVFSSrZmZmurq63n///YMHD3KbpghSjBYUFERtnSIBBwBE/jAnJydOtBi1V6ZMJiNlweTkJG1k9fl8pIYjHaPhIx+p6QMft2MHSUBZWVlk/ETOPJZleU5eErXCjT4o0AZdcjsvLS2NPFAikYgkg1uu0VFFUXuTRPZmmp6eDoVCEOOokpXMzs5yW15jLQac0U8AYLFYAEAsFtMSeWZmhuQmPVu4lEoluWkZjcbUzpuSk5NDjmHkeUgPCDkIXBkZGZEP/aQ0Jz2NIldFzgFaD8ef2+0mZVx5eXnkqSUUCklR6HK56PMAOdQ0ZgpTWFhI7lik6A8TDAYPHz7scrkEAsGaNWti9YyOJTs7O/JIkhtJKBSiF2yip2ISkjhuVKJ7HYbeOCNP14qKii1btmzZsoVnE1VkfZhAICAhBfe6W0iO80RLm8gkRS1tyFXAsiz3nKeXOfca0Wq1UTtow5mSNjLiTyjBPItHKmp1Pj2w3P40kVJSZp7Xkp/iV6lULl26tL6+fnp6empqymg0MgxjsVgsFktFRQUNG/1+P6m6iFXrlZWVJRQKGYax2+08Wy7jKy4uNhqNfr+ftqrQUGYhzyX80SKVlia08kYikURGzXQxl8sV9iTNH417uNUq9BOj0Tg7O0smoScfRt4mScKi3iyjohsSCASRO0ULcbfbHaeAJnVOLpeLW6Me2Z5CQ7FYq8rLy5uamvL5fF6vN34DXxIYhjGbzRaLxeFw+Hw+UiYmWiiQXVAqlV6vlw71oshNNIlnNXrk1Wp11AXonL9zc3PkJCFlYm5ubtQZvkUiUW5urslk4lY5ECzLdnZ20nqapM/VMJHXS6KnYhKSOG6pQkbnTU1NjY6Ozs7OlpWV5ebmZmZmpmrgLlkPjd5gATmeBJ6ljVwuLygoMJvNU1NTtEqYRDwFBQVh1VoA4Pf7p6amrFbr3Nyc3+8npwrPKuGUJDg+Ws8XWfyGbYv8sZAy87y20HcKSKXS4uLi4uLiQCAwNTU1MDDgcrlGR0dZll22bBlwyuVYZYdQKJTL5W63OyVnDwBoNBqRSET6b5KAg5zHpHEuJZtIFI3BOzs74yzGsx41KqlUSvaauxKGYXp7e4eHh/k895Oc4l9DTu+abW1tcRabd6fKy8t7enqmp6fJoESn00kuS+7TGDmAZB+jroSeXX6/P7UBx+zs7PHjx2M1F/JHKtLn5ub27NkTaxmGYUKhUEJdxuj1Feu5nx4Zen2RjIss0ylyALmNXMTc3Bw9DkajkVZwplyip2LSm4BEjlsKrVy5sq+vj/R3JtGATCYrKioqLS2NFQAtRNI5npCEShsAKCkpMZvNRqMxGAyKxWKGYUhdeOS8A3q9vrOzcyHFY0oSHIdEIhGLxcFgMP5zSKrKzPNXyl5iJJFIysrKSJeu2dnZsbGxiooKbvXaWZt4RyKRFBcXT0xMkKFKLMuS2uxFnF2YZ7zMfShJGvfi6enpIU2GVVVVJSUlSqVSLBaTjHj99dcTjeLDpGqnCgsLyRtQzWZzeXk5qWKVSCTcFm6yU3xOodSeZm63+8CBA2QSiPr6erVaLZPJyF12bGyso6OD/6r4H67k+qiftesrOzvbbreTsVEJDUU+Ny3KhGAikaipqamqqmpqaspkMpH5PEZHR0dHR4uKipYvX34+TsudaGlDBmgwDGO1WrVaLZmXRSAQhLWeTE1NHT9+nCxfXV2dlZUlkUjIao8dOzY5OXnWEhwfnxPpbN4Izk2JBRy0fSQjIyPqk4FEImloaDh48CAATE9PZ2Vl0Uq8WA8KDMOQuC+F1ack4CDjRFiWJQFjSgaaJ4cehC1btqTptXZ+v5+czbSo8ng85HLiOUcFydDIrruxkA0JBIIrrrhiIaW2SqVSq9U2m81gMJSXl5P2lNLSUu7TM0mbz+eLVQFA65BSW1IPDw8Hg0GJRLJx48YFnp9SqdTr9RYWFpJBhqlC99fn80XtI0WPDL1gycigyGYdinwVtaJIp9M1Nze3t7dbLJa+vj7a0y21Ej0Vk5DEcUs5uVxeUVFRUVERCoXIFCN6vZ507EjtSbKQHOcp0dIGAKRSaWFhodFoNJlMWq2W9NzSarVhFxp5GiEjHFMYHSaR4DgCgQCp24hf/qSqzDx/JVYj6nA49u3bt2/fvjjdi2hFKIkwZDIZaciINdM5mTkOonWAShoZaggAJpOJdJjKz89PedM+f7QpJ2q355Sgdd30+NPuSzx7rpBi1+128+yERTbEsuzCmxtIl3WLxUKmA4KINNNzI1YvB3J2SaVSWm+cktp+Ut1SUFCw8GiY9AOg7xJLFdq9IFZvNfo5va3S6VuiPm+RJ07gdGKgFAoFGYNAH8GPHz+eXJe9+BI9FZOQxHFLFdLuyT34IpEoLy9vxYoVpE80mVg5hVtMOsf5S7S0IUits8FgiNWe4vV6SfFSXFyc2jt0cgmOhXbOiN8OmMIy8zyVWKFMJl2BM936oqKXCi2jSWM8mYc7cvmJiQnyRwofleh4SzJ5MCxqewoAZGZmknBnbGws6v0moTq0qAvTeS1pqUELl8gWQbfbHbkScvxZlo2auZEVVHSKEbppPumMil7zpI8LmTs8LG3kxIu6LY/HQ9JcVFRESyXuI2zY8vxvY+SpJWq7bKLvQyZdLH0+H3c8Dldy9agZGRkkGqODz7lYlqWz59FbLKmyDoVCUTPaZDKR/Y2sEaTvWVUoFGSOMo/HQ6bVSq1ET8UkJHHcUqWtrW337t2kGjgMbU1IbaSVdI7zl2hpQ5AZHQOBwMjIiMvlEgqFYe0pcVbLMMxCnt+SSzDEqHijA9rjd8FJYZl5nkos4JBKpWQogclk6u/vj4yXfT4fqQEDzsGlL0ro7OwM+8n09DSZO6G0tDS1fcRIlOP1eklPqHkngIuKPiUvsIwjk8oBgM1mI9MUcvn9/kOHDnV3d/M82/r6+sLSY7fbSdymVqtpZQCtVhkfH+dGOV6v9+jRo+QT7hY1Gg2pHiCzlnHXbzabI6e4UCqV5CAPDg5G3kQdDsf777/Ps4WVdFmHM5MxhLWnkAXIiTc2Nha2LYZhOjs7ye5wZ2ig94mwyS0CgQD/eyQ5mGR8CvfzsbExekB45lpxcTE5vJ2dnZFllsFg2LNnT/wxdbGQmS3IrJ1hXw0NDZGU19TU0FCMDlDv7u4OS4nX6yVz9GVkZMR/8isqKiJHe3JyMlbpmTTuqRjWEBD1VExOosctVUjoSedl4aLj6eJ08ExCcjlOGoJ59iRNtLQhJBIJKUPIHFx0gC4ll8tplylu3E+uepJHyfVFSy7BJKlhGUcmWQeA7Ozs+PX0SZSZUWf6OX8l3Gm0oaHB5XKRFtzR0VGdTpeZmSmVSv1+v8PhGBkZIQEjd85EpVLZ1NR06tQpi8XS2tpaXV2tVCrJRMVDQ0Msy8pkMjL5TAqp1eqMjAxydYWNsyIjBUhDafxSlUzT7nA4xsbGMjMz5XK5QqFIrumH9E6Ynp7u7++32+3l5eVkJl273T40NOTxeDweT3V1NZ+q+7m5uX379tXU1NCa0v7+fnJtcN/CQIIP8moiv99fWFhIJuIdHR2lQT33VCYd2Y4dO+bxePbt20fmkyYz0JOnvUjNzc0zMzPkxRAVFRWFhYXkTLBYLGR+QKPRyLMulHRZJ39HzZT6+nqz2ex2u9vb2+mE0G63e3h4mFz/DQ0N3KxRq9VkwC2ZM5hM5kOKBv711eXl5WazmWXZtrY2ct76/X6DwcCdM4Znl3KRSNTS0nLw4EGPx7N3796amprc3FyRSEQmWiWljM1mS6Jau6ioqKioyGg09vf3O51OMkW33+/X6/VktWQqcbq8UChsaWlpa2vz+Xz79+8Pm+ia3OCXL18+b9/VxsbG6enpubm5jo4OcrQTTXks3FNx//79fE7FJCR63FKlsrJyfHzc5/MdOHBAp9NpNBqpVOrz+YxGI3lsKCkpSW3AkVyOq1QqUi3d09OTl5cnFAq5czeHSbS0oYqLi/V6PSm+IseniEQinU5H6j9aW1vJe+Y8Hg/3Kvb5fCzLJhoXJp3gUCjU1tZWWVlJjgmZ2pwEPU1NTfMmI6Eyk7wcUSgUbtr0/9m70/cmjrR/9NXd2iXL2qxdtmy8EDCbwWYJhMnyZJJn5pz3+Q/P6zNzMr9rMs+TjRAwhkDMZuN902Lte0vq7vOiQqWRZFuSLWzg+7l4YWS5u9Wqrr676q6qj3uU/PeWdRxwaLXa6enply9frq6uiqLY/LxOCBkbG2tIwxkeHpYk6cWLF9lsli74xJjN5o5mR24Tx3GhUIguu9BcjmkA205v+vDw8JMnT2RZpkMSzp8/313AwfP8lStXHj9+TPPSG5JgbDbb5cuX2zwJ4XB4c3OzeYTt5OSkuluK47ipqalff/2VztGr3uPExEQsFstkMtlsVn2tBgKBQqGwuLjY0FRuNpvtdnvzg6zBYLhx48bs7GyxWFxdXVWvS0cICYVCk5OTbVYEHo+HTsdCl+tsfoNOp7t+/frs7Gw+n19eXlYv60UIGR8fb1g5ieM4eoOXJGl9fV19o6Jz87dzVD6fb2RkZGVlpVar0YcwymKxDA4O0um3C4VCm3XBwMDA9PT0o0eParUaawhkzp49287Stc04jqML6kZeU/+WTrLe8C3Y7faZmZm5uTlRFBvaewRBmJqa2ufWwmg0mkuXLt25c4cugXb9+vUjHCW7T1G02WyHGZvAdHHejoRer7969eqDBw9o3qJ6aVZCiMvlamdR1k518Y0Hg8HV1VVZlpeWlpaWlvx+/z6loovahnK5XFqttlarqRdOUpuYmKCjovL5vPrIvV6vwWCgTQulUqnTeLfrA75w4cLLly+bq6CzZ8+2c9V0VGfSBxtZlrt7FDmBuhkWKwjC2bNnw+FwNBrd3d0tFAqiKGq1WovF4nQ6A4FAyzQrulDN5uZmPB4vl8sajYZOgBMKhXq0Vg3LA2joT2FxRjv7HRwcFARhdXU1m83q9frDBEZarfbKlSu7u7vqtbD7+vr8fr/P52v/JAwMDIyOjqqXp3c6neFwuHlqtb6+vk8++YStpKzX6+nM0DabzWAw0K+JrrfO/mRiYsLhcNC1cur1el9fH10TnF0YDZcfXRx4e3s7Go1mMpl6vW4ymfr7+0OhEEu8aPPk2O32ZDK5zyoSJpPp1q1b29vbdKV4uqj3wMBAKBRqeTU6HI7bt2+vrKzEYjFRFGlqCD2w9h+Uz54963Q6NzY26DSIdDX5oaGher1OW3Q76nb1er2ff/75xsZGLBajiWN0hubBwcHD5AoIgnD58mV10dLr9WyZ9Zbnc2Bg4LPPPmNHQpdho0sNtJ9ebbPZzpw58+zZs1Qq9erVK7YyyJHotCh2oYvzdiT6+/s/+eSTra2tWCyWy+VqtRrdL60KerTflt+4x+MJhUItv3Gr1frxxx8vLi6mUimO4w5Mnu2itiGqVaP9fn/Lecm0Wu21a9foNAfZbJbneXoVe73edDpNYZE2XwAAIABJREFUWyNEUeyiga27A3Y6nbdv32Z/pdVqHQ5HOBxuPwex/TozEAjEYjGNRtNdSsAJxH3zzTfHfQy9srCwsLi46PF4ZmZm1K/H43G6vtGnn376Dq0FnE6n79y5Qwg5sCeoF+bn59fW1jQazddff92L7Ver1X//+9+Koty8ebMXcx/Be6PXRREAeqQnEwWeBLIs01VwmvtT6IDvvr6+dyjaeGtaDtZXFIWetO6WgW4HnX7AZDK9Hy2HcHjHVRQBoEfe24BjbW2tUqlotdqGsV6iKNJApGHVSiCErK+v//zzz80DPldWVpqnGz9CoijSpTvD4fCHOR8ONDiuoggAvXNkU5ufEHRJjmQySaOKU6dONYyzoh3ngUCgueXjA6coyvb2dqVS+fnnn8PhsNvtppNjsjEUdrudzm5yVCqVSjqdZjnndHb8I9w+vKPeflEEgLfgfQs4FhcX2ZBFp9N56tSphjfQlB+9Xo8n6QYcx125cuW3336Lx+PNyfNOp3NqaupoF+sqFApzc3Psv1NTU72bRhreIW+/KALAW/C+BRwWi4UOJwkEAqOjoy1rpeNaM/bk0+l0V69eTSQS0Wg0kUjQITB2u53OWHDkVbxWqzWbzeVy2eVyjY+PI1cUmLdcFAHgLXifR6kAAADACYEHBQAAAOg5BBwAAADQcwg4AAAAoOcQcAAAAEDPIeAAAACAnkPAAQAAAD2HgAMAAAB6DgEHAAAA9BwCDgAAAOg5BBwAAADQcwg4AAAAoOcQcAAAAEDPIeAAAACAnkPAAQAAAD2HgAMAAAB6DgEHAAAA9BwCDgAAAOg5BBwAAADQcwg4AAAAoOcQcAAAAEDPIeAAAACAntMc9wEAwAEkSSoWi7IsGwwGg8Fw3IcDANCN9zDgSKfTv/zyi6IoMzMzHo/nuA8HoHu1Wm1xcXFtbU2WZfrKX//6V51Od7xHBUdlbm4uEolYrdbbt28f97EA9FzHAYcoit99952iKISQ0dHRjz766MA/SSaTv/76K/2Ty5cv+/3+Lg60I3RfAO80WZYfPHiQTCbVL2o07+FDArSvXq9vbW1FIpFsNivLstlsdrlc4XDYbDYf96EBHKCbyovdztfX18fHxwVB2P/9W1tb7E8QCkBL9Xr9X//6FyHk9OnTY2Nj7fzJ4uLiwsICIeS///u/DyyE76J4PE6jDa/Xe+bMGaPRKEkSzyPv6sNVKBRmZ2eLxSJ7JZfL5XK5tbW1K1euoEEXTrhDVV61Wi0ej+//nmq1urW1dZi9AHyYWNvG+fPnzWYzz/NarfZ4DwmOkSRJLNrw+XwXL16cmpoaHh4mhMiy/PDhw3K5fNzHCLCfwzbPbmxs+Hy+fd4QjUZZ9zMAtK9arRJCDAaDXq8/7mOB4xeLxWi0cebMmVOnTtEXA4FAf3//48ePJUna3t4eHR091mME2E/3LRwOh4MQEo/H1e17zdbX19mbAaB9tP8RfShApdNp+sPg4KD69WAwSDN7MpnMMRwWQNu6b+EIBAKZTEaW5e3t7fHx8ZbvyWQy9BoIhUKpVGqvTcXj8e3t7VQqValUtFptf3+/z+cLBoOsqmUDT8bHxycmJpr//P79+4SQCxcuNFyKoiiura1Fo9FisajT6RwOx9DQkNPpbHkYsizHYrHNzc1sNitJksVi8Xg8Q0ND+w8KkCTpu+++q9Vqdrv95s2bDb+tVqv//ve/FUUJBoOXLl1S72t7e3tnZyeXy9VqNZPJ5HK5QqFQf39/wxZYpsLXX3/dkDBYqVT+85//KIoyOTlJW1Zb2icT/s6dO+l0emJiouEbZFs+f/780NAQe10UxY2NjXg8ns/nZVmmhz04OGi1Whu2/M9//lNRlHPnzoXDYXpW0+l0rVazWq2BQGBoaIh9uT/88EM+n2d/+PLly5cvX5K984uj0eiDBw/Ur3z77beEEJPJ9Pnnn6tfF0Vxc3MzGo0WCgVCiMVicbvdQ0NDbTYYrKysPHv2zGg0fvHFF5lMZn19PZFIiKJoMBg8Hs/w8LDJZGr5h9VqlX65+XxeEASr1er3+wOBQEPoQE/RxMREOBx+9epVNBotlUqXL1+22+3/8z//w7KdSqXSP/7xD/rz559/rt5p+6VodXX16dOnhJCvv/46mUyurKxkMhmdTkfP2P379+PxuN/vn5qaisfjW1tb9Msym80+ny8cDtOunGKxuL6+Ho/HS6USvZrC4XBHzxIHXukHYh85m83WajWj0ehwOEKh0F4XdZvfBZXL5TY3NxOJRKlUIoT09fV5PJ7BwcGGApPJZO7cuaMoyvXr13U63dLSEi0YX3zxhdFoVB9nJBLJ5XKiKBqNRnql2Gy2vT5aNptdX1/f3d2tVComk8nj8YyMjKhHQY+Pj9OGjYaeNY7jTCZTLper1+ttnkaAY9F9wKHRaEKh0Pr6+vr6+ujoaMsLmGZv6PV6l8vVciOSJD158mR7e5u9IopiPB6Px+Nra2szMzP0erPZbCaTqVgs0uCG4zj1RlgeSUPOVCaTefLkiSiK9L/lcnl7e3t7e/ujjz5qbngURfHhw4fqEQHpdDqdTq+trV2/ft1isex1HgRBCAQCa2tr6XS6VCo13ISSySS9c6g7nsrl8uzsbC6XY6/k8/l8Pr+6utp8799fO0m4AwMDrOJTV52VSoU+M0UikYadZjIZumV1Pb67u/vw4cNardZw2Gtra5OTk+FwuPnAarXakydPNjY22Ov0rEaj0atXr+5/mzlkfnHz0dJdLy8vT01NtZ9eJ4oiu1tTxWJxZWVlfX19ZmamuWBnMpm5uTnWm16r1SqVSjwe39zcnJ6eVt8q6AesVCq//PILDYkafrW/7krRysoKjV8JIQ33UfplbW5usley2Ww2m93a2vr4449TqdSjR48kSWJ7p1fTxYsXQ6HQgUfb5pW+P1EUZ2dn1c/xxWKxWCxubm62HDHX/ndBCFleXn7x4oX6zNMCs7KyMj093RBX0bclk8mlpaXmLuNKpTI7O5vNZhuOc319vWXlQwhZW1t7+vQp23uhUCgUCtvb2x9//DGrUrRabcskHkVRaITEwh2Ak6n7gEOWZRpwVCqVRCLhdrsb3lCr1WjlNTQ01BAiMPPz87QOGhwcDAQCer1eFMWdnZ319fVsNvv777/PzMwQQjiOC4VCL1++LBaLuVxO/QCnKEokEiGEeDyehgp0cXFREISxsTG73S4IQi6Xe/XqVbVaffHihdVqVR+wJEn37t3L5XIcx42NjQ0MDHAcl06nFxYWaN1x+/btfcZB+Hy+tbU1Qkg8Hm+478ZiMUKIIAgDAwP0lWq1evfu3VKpxHHcyMiI2+3WaDSFQmF1dTWTySwsLAiCwDpojwSrK9PptNfrZa8nEgn6Qy6XKxaL6mF1NBAxGo0s0srlcrOzs3QY3ujoqNVq5Tgul8stLi6WSqX5+Xmr1dr8sPvq1StJktxudygU0ul0xWLx1atX5XI5kUhsbm7StpObN28qikIbiggh4+PjIyMj9KS1/Dhut/urr74ihCwvL7969YoQ8uWXX/I8ry5jmUyGHq1OpxsbG6OPldls9tWrV6IoPnjw4MaNG20+msuy/PTpU6vVSps06vV6JBLZ2tqSJGlubu7TTz9Vl7pCoXD37l1JkvR6/fj4uM1mq9frsVhsZWUlmUw+f/78woULDdunfY50cKMgCEaj0WAw0A/45MmTSCRiNBpZ0xRr4mpZimgktH8potGGx+Mxm80NZ3h3d5cQEggEfD6fVqstl8vLy8v5fL5QKDx8+DCVSvE8/9FHH/X398uynEgkVldXFUV58uTJwMDAgeFCm1f6/h4/fkyjDfVHXlxcLBaLS0tLFotFHfp09F1sbm4+f/6cEOJ0OkdGRugXnUqlFhcXq9Uq/aKbb/aLi4uEELvdbrPZFEWh55MOZqbRxtDQkMfjoSV/aWkpn8+/ePFCr9c3hGj5fH5+ft5isYyMjJjNZlEU19fXk8lkpVJ58eLF5cuX9z8t29vbtG0Do1TghDtUwGGz2axWay6X29jYaA44YrEYvQyCwWDLvNF8Pk8jkrGxsdOnT9MX+/r6XC4Xx3Fra2s0SYreCL1eL21pj8Vi6oAjm81WKhVCSHPzu0ajuXHjBnuzy+XyeDw//fRTvV5//vw5jSror169ekWfFGdmZtgHsdvt/f39d+/eLRaLW1tb6p6FBg6Hw2AwVCqV7e1tdcAhyzINhgKBAKvc6R2aEDI9Pc0qCJvN5vP5Hjx4sLu7++LFC7fb3dfXt9fuOtXX12cymUqlUiqVUgccNBiiksmkOuCgsYj6zcvLy7IsazSa69evswep/v5+h8Pxww8/yLK8tbXVfAuXJEn9tE2/gu+//75er+/s7NBTSm+i7Ls4cCwGz/O0aYQ1kGg0GvW9U1GUx48fy7Ks1+tv3rzJHhAdDofH4/nll18qlcrjx4//8pe/tNmS7/V6p6am2C68Xq/Van3+/HmtVltZWWEP1nS/9A6n3q/L5dLpdC9fvtzY2BgeHm7ufhofHx8bG1MfDD0D9BWO41re6lqWIq/Xu38pMplMMzMze5Wus2fP0miP8vv9v/zySzabTSQSgiDcunWLBaAej8dmsz169EhRlHg83tCV2aCjK30vuVyOtmWq+1Xtdrvb7f75559LpdKrV6+CwSAtSB19F4qi0LrF6XReu3aNfREOh8NkMj18+FAUxVgsFgwGGw6J5/nLly+rLxNCyObmJo2K1D28drvd5/PdvXs3k8k8e/bM7/c3lFiPx3P58mX2os/n+/XXX1Op1M7OzoULF/aZfCWdTv/+++/k9cW1zwkEOHbd56PJssxxHL2/RiKR5hFZtCHd7XabzeaWAYdGo7l06dKlS5caWgWIKnpgTc19fX30OVU9qwd5/VjGcVxzxEOfxtSvmM1muq98Ps8aPOltgxAyODjYsBGn00n7FNSdAs14nqeVUSqVUp+HVCpFQy7Wn1KpVOgTbSgUaqgdBEE4d+4cIURRFNpecoTovtRjmCVJikajhBCa/KEOPqrVKq0x1f0Ffr//0qVLly9fbmi2NZvNNM5QNyAzLperYVINmgBBVBlwR46mmBBCPvroo4YeLpPJdObMGUJIsVikH78dZ8+ebWgMGB4epudhfX2dle1UKkU/1JkzZxr2OzQ0RLews7PTsHGn0zk+Pt5RZuiBpYjjuL1K0fnz5/eKNoxGY0MmkCAI7JY5Ojra0LHo9Xrp3V3drdNSR1f6XtiV1ZCuodPpTp06ZbPZtFotS2Lo6LtQFOWjjz66dOnS5ORkwxfh8XjoZ1SnGTGjo6MN0YaiKLQycTgcDUGYIAi07NVqtYbCr9VqL1y4oC5jPM+zVhAaWbaUz+fv378vSZLRaLx06dJeDckAJ8ShAg5CiM/no5cofZRn8vk8zYegVx3r+lUzGo3BYDAYDDa3x7JHOvUf0pt6sVhUX/ysP6U5tbNljya797Oe4EQiQfcSCAT2en8mk1FnA+yzWfVNnbYTaDQaVkWmUil63lo+EZrNZlp/RSKRo50hjXbo5PN52hrEjsRut9Nmhlgsxj4gOzPqFguPxxMMBpujOvI6FYCO4WzQ39/fXAnS70WSpB6Nl6ZfgSAILQdse71eWrrUMdb+mjt3eJ6n985arcZGadEIhuO45gdNnU5HTx3rxmJsNlun94kDSxE9gJalqLl9hdFqtXt9WaTVQDNBEOhFt/+lQTq/0vfaCP2h+XOFw+Fbt27dunWLba2j74I+MASDweaTIwgCrd9a5mM2J+eWSiUaObWsTGw229jY2NjYWEOJMhqNzYnM7JW9Tm+5XL5//36tVtNqtW0mwQAcr0N1qRBCdDodzeRYW1sbHh5mFRbtr9Xr9fSC3//WkkqlYrFYJpMRRZFe2Oz96prF6/XS3L1YLEarhlKpRB+s258unTXbsvsE+4HjuObnGPbEUyqVmusXxmazWSyWQqHAegrI60codX8Kexbca1NOpzMajYqiWKlUjjAFzG6306feTCZDYxp6V/Z6vX19fX19ffl8PpVK0S+LBhxOp7M5hqtWq9FoNJlMFgqFarVKvx2WltsmVkh6NO0sPX6Hw9GyIVoQBIfDEYvFDtnEwtoJSqUS/Zl+uWazuVKpsMCOoSezZTtQp95mKWJfVsuUGnp1tP89tnmlt2S1Wr1ebzQaXVtby2QyoVDI4XD09fW1DNe6+y6KxWIkEslkMsVikd3mD4yE1NQtss2/FQSB9SgdaP/LhPYZlctlQRCuXbu2TxwJcHJ0H3Cw6zAYDK6vrxeLxWQySRvhJUmiTb5s9ONeAYcoio8fPz5wulLKaDQODAzs7u5ub2/Thnr6jMJxHEvJPJBWq9VoNPV6nVUorD66e/fuPn944JCzUCj04sWLRCJRLpeNRmM+n2dzArL30GYAnU63V0ak+rHmCAMOOogxmUwmk0mv18sybel58/l8+Xw+Ho/TgIP2UjU3Zmxtbc3Pz5/8oXf0C93ngY+e2ENOy8i2z04I3WChUPjhhx/2+itZliVJOuRE7O2Xomq1ekJGLnR0pe9lampqYWGBJsbSsFKv19OBtXa7Xf3OTr8LWZZfvny5srJyyCCYFYZeL7AXj8dp7XfmzJl9htoCnCjdBxzsynQ4HDR1dGtriwYcu7u7tE5sTrNSk2WZDnLTaDSnT592u90Gg4Fe/7lc7scff2z+k0AgsLu7m8/nc7mc1WqlDader7ejy7vhkajNJ5gD2/+9Xu+LFy8IIbu7u4ODg7Q60Gq16i5netKOpavV4/Ekk0kaTOTzeRoV0Qcjt9u9uLgYiUQmJyclSaKP/g0DPiORyG+//Ua3MzIyYrVaWQv8o0eP1MMdPxDND6DtF6RDBhztl6IT0qnfxZXeEk2DGBkZiUajsViMzn6xtra2trbm8/kuXLjQfgcNOzB6GC9evKC5FyMjI4FAwGw2azQaeva+/fbbjho53g7W77n/RM8AJ8rRrDw5NDREh7199NFHer1enS66z1/RxlVCyPT09F4TdTTweDw8z8uyHI/HjUYjvX12tPxsrVajbRusbqI/cBz3t7/97TAVtMVisdvt6XR6Z2dncHCQNiE0TGpEAyNRFPd6zGWZEEe+agaNe2iowQah0M9rs9noMMVsNluv1xVF0Wq1DY20NJZyuVzT09Mn5Da2FzpiqLkhnaG/OuSjP9s++6Z0Ol2lUvF6vdPT04fZ8oGOsRR1p4srfR8GgyEcDofDYUmSMpnMxsYGXT1VURR25jv6LsrlMo02Op0FpxnrxTswr+WQqtUqx3GCIGDae3iHHM2syX6/n8YBdLZEmo63zzhSis49qs6pPJBOp6MpCNvb28lkUpZlnufb708hqowNFgzRHxRFOTBP/kC0RWd3dzebzbJ1PtVvYHfxvfry6V/pdDrWYs/ilUM29vb399MbVSaTocEQ6zThOI4+JyUSCXpj8Hq96jipUqnQ8+b3+094tEFeZzakUqmWD6ayLNOTfMiGaJbuwwZB0G77dDrd6yWRDyxF9MpSl6Lj1cWV3kySpHq9rv5OBUFwOp2XLl2iybO08qG/6ui7YK0FDVdrF9hAnpaVCa1kaP7TIXd07ty5v//9719//fUhtwPwNh1NwKHT6ei9dm1tjc0u2nJEg/p2ResOSZKaK4V97v20PSOXyy0tLdH/7vUY13KRFzYWjnX6skeuvVa1bX8wBauw5ufnCSF6vb4ht9/pdNIz0HJf5XKZdhL5fD52otina87N7KjaYhn7W1tbdBKnhkEohJBoNEobPxpiOFbLNydwyLLccsTgMaIFT5KkhpFTFBuP0/6kBc0FQFEUmqWk1+tZ5EpPGp1As83tdOfAUkQ/uLoUHa/urvQGd+/e/de//nXv3r3mX7Gqhl0RHX0X+xTvUqnU0bdmMplozNHyq8nn899///3333+/zzoPAO+xI1sXio4ap7N5ElW66D7oo6GiKA0ZAKlUik5lQ1rV0XSGQfJ6Iod9ujBfvnzZMBKBzsNNCOnv72ePiXTBCELI0tJSc/WUy+W+//77NnMUDAYDrfvofpuXbDAYDLThh65Jof6VLMvz8/O0RlZPV8DS3RumcKjVaur5tttBa2Ea03g8HvUgDqfTKQhCOp2mAUdDnGQwGOgHWV9fV1fK9JjpiIBD9nOzE9X+mBfWm9AQeLndblrpP3/+vGEOg0ql8uzZM0KIyWRq/3H25cuXDeVwY2ODhrODg4PsyP1+P21RmJ+fb547YWdn54cffjiS5bW6KEXHq7srvQEtvWyCDTW2IgFr0enou2BtVBsbG+qQqFKpPHz4kL7SZthBJ36lh9QQc8iyTGcmpeOk2tna/rAKN7xzjiaHgxBit9vp6Ep6GeyfLkoFAoGFhQVZlumMxQ6HgzZ3q1dzaH7moGuX0OdLQRD26RKWJOnu3bvDw8NOp5PneRoM0fvimTNn1A9/k5OTqVSKrtQQDodpFmq1Wt3d3V1ZWaEThrbZmxAIBNg9oGUwNDExQZe/mp2dZTM0l0qllZUVWpOePn1anT9ht9vNZnOxWKTzrNOZiGjktM+MQC2pG7SbJ4zyeDw7OzuKolit1ob8BkEQhoaGVldXi8XinTt36PpnpVJpfX2dHYMoioqidP1IzfM8LT/r6+t9fX0Gg4HltO6FNS08ffp0cHBQkiTa+sXz/MWLF+/evSuK4p07dxqmNqe5Fw3zLO1va2urVCqxqc2j0ejq6iohRKfTqWfKEgTh4sWL9+7dK5fLP/300+joqMPhEASBTkFL77XpdPpIxhR0WoqOV3dXeoPh4eGNjQ1RFH/99dehoaGBgQGdTieKYiQSodsJBAIs4Ojou7Db7TTtfXNzs1qter1euhLC2toaO6r2WxNDodDGxkYmk3n8+HE6nWZTm9PBNYSQycnJw49h2dzcfPLkSX9//40bNw6Zgwzw1hxZwEFnHaVdCQemi1J0djw6OzJNNaevC4IwOTn55MkTsscEf36/nwYcfr9/n0l/L1y48PLly+Xl5eXlZfXrZ8+ebQhTDAbD9evXHzx4UCwWV1dX6e2ECYVCk5OTbd5KWVqrwWBoGKpH6XS669evz87O5vP55mMbHx9vWNuJ4zhaddLBxvSDU0NDQ+r/HshgMPT399OO/+ZAzev10kaUln0NExMT2Ww2lUrl83l1y4rX6zUYDPS7K5VK7XzvexkZGXny5Iksy/Sp9/z58/vfMgcGBuiU7dFoNBqNCoLA0oftdvvMzMzc3Jwoig3tQIIgTE1NdZS6ODIysrKy0tAMrtFopqenG1L2BgYGpqenHz16VKvVaJqt2tmzZ/dZ1LcjnZai49X1la6m1+uvXr364MEDmuNJ0zwZl8s1OTmpfqX974LjuKmpqV9//ZVOYa6eEW5iYoJmvGaz2TbjaZ7np6en6eJt6g9Ld3T27Nn9p4FvE02SzWQy+Xwew2LhXXFkAQchxOfzPXv2TJblA9NFGb/fbzab19bWdnd3RVGkDd3hcJjOY1GtVlsG7+wC239ImNPpvH37Nlueno5Q3Wt5+r6+vtu3b29vb0ej0UwmU6/XTSZTf38/Xfm6/Qd3rVZrt9uTySRb1qGZyWS6desWXb2arbI9MDAQCoVa1h0Oh+P27dsrKyuxWIyu+MqW5O4o4CCEeDyebDZrt9ubx2iwe3DLm7FWq7127drm5ub29nY2m6UpIKFQyOv1ptNp+iAoiuJhAo7BwUFBEFZXV7PZrF6vPzD9XhCEGzduLC4uxuPxWq3WEN4NDAx89tlnGxsbsVisUCgoikKXpx8cHOx0fMro6ChtVKOl1Gg0ut1uusRX85u9Xu/nn3/O9ktez/4+ODh4hOvjkM5L0fHq7kpv0N/f/8knn2xtbcVisVwuV6vV9Hq93W73+/0tE1ba/y76+vo++eQTVlfQBa7D4bDNZjMYDLSHrlqttjkkxGAw3Lx5k301dDYUt9s9NDR0VGUgFAqlUinarnwkGwR4C7hvvvnmuI+hY7u7u/fu3dNoNF9++eVJa06sVqvfffedLMs3b95s2cIB74qVlRWa8PHll19i8CEAwCEdWdLo28S6bE9atEEIiUQisiybTKYT+JQJAABwXN69gCOVStGcr3byUt8yURTpYN1wOHxCRiQCAACcBEeZw9FTuVyuUCjk83maLOZyuY5kaNmRqFQq6XS6Uqmsrq6WSiWtVsuWlgYAAADyDgUcsVjs5cuX9Ge9Xn/x4sXjPR61QqEwNzfH/js1NdXrpZsAAADeLe9MwGEwGPR6vSzLXq93YmLihKyBSWm1WrPZXC6XXS7X+Pg4ckUBAAAavJOjVAAAAODd8u4ljQIAAMA7BwEHAAAA9BwCDgAAAOg5BBwAAADQcwg4AAAAoOcQcAAAAEDPIeAAAACAnkPAAQAAAD2HgAMAAAB6DgEHAAAA9BwCDgAAAOg5BBwAAADQcwg4AAAAoOcQcAAAAEDPIeAAAACAnkPAAQAAAD2HgAMAAAB6DgEHAAAA9BwCDgAAAOg5BBwAAADQcwg4AAAAoOcQcAAAAEDPIeAAAACAnkPAAQAAAD2HgAMAAAB6DgEHAAAA9BwCDgAAAOg5BBwAAADQcwg4AAAAoOcQcAAAAEDPIeAAAACAnkPAAQAAAD2HgAMAAAB6DgEHAAAA9BwCDgAAAOg5BBwAAADQcwg4AAAAoOcQcAAAAEDPIeAAAACAntO0+T5Jkur1ek8PBQAADkOj0QiCcNxH0ShdlWsyqcpKpiqz/xJCYhX5mI/s/aLjiV3HE0JsOl7HEy3Pqf97ErQbcCiKoigKx3Ecx/X0gAAAoFPKa8d9IH/aLklbJSlekQv1E3RU77Gq/EcM1xzJ2XXcsEXjNvD2Yw092g04KK1Wy/MnI1ICAIDXZFmuVqvHfRSkKtM4o75VQuvFCZKuKulUjRBi0XABkxA0CW7DMdzKOws4AAAAmsUr8tNMDb0kJ1yhrizk6gu5uo65BjB/AAAgAElEQVQnE1bNuFX7Nps8EHAAAED3inXlUaqKJo13S1Um85n6Qq7+NsMOBBwAANCNYl15mqmtFKTjPhDoEg07VgvSpE07bOl5ujECDgAA6ExVJou52nwGQxffB4W6ci9RfZrheh12IOAAAIAOpKvy/0bFKrpQ3i807IhXhEsOXY96WBBwAABAu1YL0r1klWCg63tqpSClq5Vbbr1Zc/RTYGCMKwAAtOVRqnYvgWjjPZeuKv9np5LuQRMWAg4AADhAVSY/x8WFHJI2PghVmfyfHXH1qNOB0aUCAAD7SVfl+8lqWkTLxoflXqKarmqmHNqj2iACDgAA2FOxriBF9IO1kKvXZOWqS3ckW0OXCgAAtFaVyc+7iDY+aCsF6ai60hBwAABAa7+l0JMC5FGqFj+KSesRcAAAQAuYRRSYn+Pi4cetIOAAAIBGqwUJE4kCU5XJ/UT1kCEHAg4AAHhDuio/Sh3/YvdwoqSrys9x8TBbQMABAABvuBM/7LMsvJfiFXk+U+v6zxFwAADAn1YLUqGORFFobTFX7zoYRcABAAB/qMoEnSmwj6pMFnJdNnIg4AAAgD8s5mroTIH9Lebqxa7awBBwAAAAIX88vGJkChygKpPuMjkQcAAAACFo3oC2rRakLho5EHAAAAAp1hVMvAHt66KRAwEHAACgMwU600UjBwIOAAAg2yXMYg6d2eqwzGB5egCAD126KmPujbdvxCLMuHQcIYSQYl35f7cqx3xAHVot1CesHUQRCDgAAD50R7IWaE/peDLap/EaBauW0/Ecx5G6TAp1OVGRF/P1fO2djJY4QrjjPobDSFeVqkx0bfeUIOAAAPjQrRZOdALHkFm45NAahTfuzjqeOHS8Q8eP9GmeZWrPsyf6I7yvtkvSsEVo883I4QAA+KAV60q6enJbCMIW4ZpL1xBtqGk4csGunbTh+fkYbJU6iPPwDQEAfNBOcn+KwJGLdi2vCjYyVTlbU2SFWDTcgOHPZ+Yz/dpIWUqKJzdyei91VHgQcAAAfNA6ekh9y4ImQd228Txbe5L+82iHzMK1gT9SCASOjFg0SbH7tUyhC1WZbJWkoKmtXhUEHAAAH7TMCe5PsWj/jDbqCmmYmmy9KA1bJJ/xj7udrSl90Wvkx/o0Dj2v5zlCiCgrSVF+lavHWj2Xn+oTBs2afpqUSogoK5mqvJyvb5beePPnXr37dcvKL7tVHU/Grdo+Dcdx5P9ZK7O3BU38iEXj0PM61a4Xc/V9mgR4jpzp1wyZNWYNRwgp1JWNYv3piZ+NLV2VEXAAAMDBTvKA2Jr857HxhFg0XO7NASmLuXpC/OMWLkpv/OqyUzvWp1GnfpgEzmQSgibhebb2u6qlxCiQjwf06g4aQohR4IxGwWsU1grSvUTrFXQHzULQ9EcLjHrfV126YYvQvOuAUXierbWc0ZXjyF88eo/qGPq13Dmb1qXnf4i9J+v3IuAAAIATKlqW5dejG3iO3HLrn6SrW6omh52yvFNu0WYw5dCO97W+wXGEnO3XluvKq/wf81Y1RxvqNw9bhJKkUQcoTEj1ZK+8jjguObQjewzc4DkyadNWpD93zZgEztQqMdZnFMatmsUTPA9s+2kcGKUCAPDhOskZo4SQXE1ZL/x5b7ZquVtu/Vd+/Tmb5s3Gize4DfyYakKqTFVezNVf5evq1pFJm5ZuIGjiWbShEPI8W/vfqHgnLu6Kf56ZU5Z2H87tOm5MFeikq/JCrr6cr1dUrS9nbNqWf1tXyEZRWsjVd8pvtNWE2uuwOPnQwgEAACfXg2RV4HSD5j9vunYdb9fxZ2zapCivFurLTa0FE1YNe5iOV+TvYyLtmRG42pc+PU31MAjckEVYzktGgcu+zmLJ1GSWlJoQxf87ZKTbMQicU8+1HAKzWZLWC/WSpNCxNGN9GtZOka7K/478sWtrrv5fPgNNMjEJnM/IR95smJEU8mNMZPHfFaeWBS5W7YmeHqz9FVUQcAAAfLi6WGT8LZMU8studbMknLNp1bdenpABPT+g1433yb+la1HV/dtt+DM6eZb9Mw9EUsh2WWK5pS69sJyXXuWl5g4OQkhZIlVJMbwOH4wC92aeBiGEbJWkO3GWYKEQQgZUu94uSWzXuZoSq0isrcKqbQw4KpKibm2KliUWcLwxLPjkQcABAAAHK9ZPdJcKs1GUtkrSsFkIWzQDhjfuwDYd/4lb/zBZXS5IhBC7jlOPVrnu0qm3I3B//ql6wK1RIKNWjdcgWDSclueasyl4rsVdP19rPHsWVUdPQnzjtw8S1SevD7wiH3CTrqhCoJMdb3QAAQcAwIfrpLdvqMgKWS5IywXJquXCFiFk0rAGD4Ejl526ZLWSqSqmN3M7DPtMUfo6LgmY+Bmnbp93tskovBEcVN4cNSPKRDwoznhHpauyvY0lVZA0CgAA75JcTfk9Xf//titP0n9mgQococNSWjZF7MOq5a659CzaEGVloygt5uovc/VDdjdJ72d00T20cAAAwAn1td/A4oenmdpG8Y1ki+fZutvAs4m/6EN2w2wc3+5UsvvObDZu1bCH83xN+U+0wrozwmZB00mzR1kisvJnI4dRaJw15H3VTvMGQcABAPAha/NWcVyMGqJ/fQMf0PMNAQd5M9dBw3OEkHRVlhTC4oQhs/B7tXESC7OGY6mO6vlJN0r1Sov80Q4U6grr6HEZePWUpmf6NZ7XKaXLhXrzZ3nvneiiBgAAPaU72RmJKdVI1LBFEzC9cc/q13E+45+v0JyJmkzUU2hMWLVe4xt/dd6u+dKnt+v+zP9g1CmlbgPfxfCQXVXAEjD+OWJFz5PRPo3XyNN/J/qkd8ima/fToIUDAODDpT3ZT50LuZrHqKfHqOPJLbc+U5VzNaUmKyYN5zYI6gzR2Oub/ctszWPQ099oOHLbrY+UpXxN0fBkwCD0azlCyMcD+v+NVkoSKdYVx+uBLKcsGklR8jXFruOHLR11p/xhqVAPv/5Dp57/yq+PVWSBI36jYNb8mSayXXp/mjfaj1kRcAAAfLhOeJdKpCw/TtUuOv6Ii7g/Zv1q8c5MVX6RrbO/WszVJ15PNspzJNA0WadOIHqBK0nKaqHO1kPR8uRsf+tpQNs8TylRWcr/uWs6R1nDe55lDpuOeqK0X4JOdFEDAIAP3EKufn+3uv8Kc/GK/GO8qs4WfZSqvczu+Te5mnInXk1XFULIdkl+nm2R2ykrRD3DuGnvmdQbPErVVgutGzBkhcxnagsneGGULjQv0rsXtHAAAHzQ1BmUJ9NaUdosSaf6BK9BsOl4Hc9peCIppFxXMjV5oyi1TMD8LV3bLEljVo1Txxs1nMARUVKKdWWrJC3l61XVpFy/p+tpUR63au06XsOTqqykROVlrhYwCuOv2yoG9AIh7QYK9xLVrRJ/qk9j1/E06bUiK4mKvJiv757sxWt6ivvmm2/aeV+9Xq/X6zqdjufRKAIAcLLIslytVjUajUbT8WPkvUR1rydygAN95de32TGH6AEA4IMWfF8WI4W3T8t3kAaEgAMA4IOmXuoMoCMdRasIOAAAPmg6ngRNuBdANxBwAABAB9DIAd1BwAEAAB1AGgd0IdBhwxgCDgCAD51Zw9nbnqAagAqaOhsShYADAADIsAXTMkFnPAa0cAAAQIeGLZqTPcs5nCzjVo257dlXKZQvAAAgOp5M2lovIwLQQMuTc52XFgQcAABACCETnT+zwodpwtpNexgCDgAA+EMXj63wodHyZMLaTTlBwAEAAH8Ytgho5ID9nbNpu0v3QcABAAB/uubSHfchwMll1nAT1i4HNCHgAACAP7kNvLvD4Y7w4ZhydN/phlIFAABvuOXWo2MFmo1bNYeZlBYBBwAAvEHHk1tuHablADW3gb98iOYNgoADAACa2XX8lAPJHPAHm4675dYfciMIOAAAoIVhizBpw3znQLQ8ueY6ghYvBBwAANDaOZt22IKFZD90t9x6+1F0sCHgAACAPU05dFhI9kN21aXrdJG2vSDgAACAPel48pnXEDThZvHB0fLkqks3cnRNXChDAACwHx1Pbrn1yOf4oGh58rlXf4TRBiEEBQgAAA52zqa1aPiHqWpNPu5DgR6z6bjPvYYjHxeNFg4AAGjLsEX43KvH/Bzvt2GL0ItogyDgAACA9tl1/P8VNCKN9H015dAeyQjYltClAgAAHdDx5Cu/YbUgzWdqxbpy3IcDR2PYIpyzaXs6pT0CDgAA6NiwRRi2CKsFCVkd7zq3gZ+0aY9q7Os+EHAAAECXhi1CwGRcyNUWcnWEHe+ctxZqUAg4AACgezqenLNpJ6zahVxttSChk+Wd4DbwwxbN0Y56PRACDgAAOCwadpyzadNVOV6RVwr1TBWRx8mi5UnQJLgNQtAkHMtQo84Cjmq12qPjAACA94Bdx9t1/IRVU6wr8Yq8VapvldDXcpzMGi5gEjwGPmg65mVx2g04OI7jeYyhBQA4uTjuBI1WNWs4mlhK/5uuylWZ1GQlXZUJIcW6gs6XI2fT8Tqe6HjOpuMJIXYdf6ImTWk34BAEQRCwZiAAAHSDLTd67M/ZcFxOUvADAAAA7ykEHAAAANBzCDgAAACg5xBwAAAAQM8h4AAAAICeQ8ABAAAAPYeAAwAAAHoOAQcAAAD0HAIOAAAA6DkEHAAAANBzCDgAAACg5xBwAAAAQM8h4AAAAICeQ8ABAAAAPYeAAwAAAHoOAQcAAAD0HAIOAAAA6DkEHAAAANBzCDgAAACg5xBwAAAAQM8h4AAAAICeQ8ABAAAAPYeAAwAAAHoOAQcAAAD0HAIOAAAA6DkEHAAAANBzCDgAAACg5xBwAAAAQM8h4AAAAICeQ8ABAAAAPYeAAwAAAHoOAQcAAAD0HAIOAAAA6DkEHAAAANBzCDgAAACg5xBwAAAAQM8h4AAAAICeQ8ABAAAAPYeAAwAAAHoOAQcAAAD0nOa4D+AIbG9vP3r0iP48NDR0/vz54z0eIISk0+lffvlFURRCiN1uv3nz5nEfUc/99ttvW1tb9OfLly/7/f7jPZ6jsri4uLa2ptPpJicnXS7XkW8/FovNzs7Sn30+35UrV7rbzvEWOUVRYrHY1tZWJpMRRVGv1586dWp4eLjT7eTz+R9//JF+CpPJ9Pnnn9PXT0jpqtVq8/Pz8Xi8v7//woULJpPpWA4D3lEdBxzz8/Nra2sHvs3tdl+9erWbI+ocvTjhpPmQv5f35rMnEomFhQVCiCiKc3NzX375Jc+f3GbR4zrtsiw/evQoEomwV8rlcrFY7G5rB36KYyxda2tr29vbhJBEIvHixYvLly8f15HAu+h9aOE4aX766adsNkt//uSTT/r7+4/3eOB4HdUT/LGo1Wrqn2VZPt6AQxTF7777jt5xeZ7/29/+dowHw6yurqqjDYrjuGM5mJ6qVqvsZ1EUj/FI4F2EgAMA9uRyufr6+vL5PCFkZGREozn+GoM935+cZqT19XX2s8ViGRoa0ul0RqPxGA+pR4LB4MbGRr1e5ziuiw4j+MAdqvpwOBwej6flr97Liw3gQ6PVam/dupXJZDQaDdrqWpJlWd17MjMzYzabj/F4eqq/v/+zzz7L5/MmkwkJHNCpQwUcdrt9dHT0qA4FAE4gQRCcTudxH8XJJcuy+r8Gg+G4juTt0Ov1er3+uI8C3klvqYFUFMXNzc1YLFYsFuv1utFodDqdfr+/Iem9WCx+//33tKU0EAhcuHBheXl5c3OzVCqdO3cuHA63s69KpbKyshKNRiuVitFodLvdw8PDLYNxRVEikcjOzk42m61UKgaDwWaz+f1+r9fb3P9aq9W2t7djsVg2m63Vajqdrr+/3+v1+v1+2s6s7l1mfvrpJ0KIzWa7devW/oddKpU2Nzfj8XixWJRl2WAw2O12v9/vdrtbdgYXi8XNzc3d3V36dGU2m91u9+DgYMu2pVQqtbOzk0wmS6WSoihms9nlcg0ODvb19anf9vvvv7PG4du3b9fr9VevXqVSKVmW1Z3l+Xx+a2trd3e3VCoduGuK5vCvr6+n02lCiN1uHxoa8nq9+58TQsh//vOfcrlMCNFoNF999dX29vbq6moul/N6veqEtY7ORjqd3traSiQS5XKZ53mTyeRwOILBoM1mU79nryEPlUrlP//5TztpBC9evFhaWlK/EolE/vGPfxBCrl696na76YsHFq1OqcdtXbhwIRAIbGxs7Ozs5PN5nudtNls4HKZ7L5fLa2trsVisVCrpdDq32z0yMmKxWNim9ho0MTc3x7IWvvjiC0JIw3ZOnTrV/KAvy/LW1tbW1lYul+N53ul0joyMtPmh1KkwlKIo9GSOjY2dPn264f0dFblUKrW9vb27u1upVLRabV9fn8fjCYVC+5//eDx+//79hhe//fZb+sNf//pXnU6nfnMkEkkmk3QXFovF4/EEg0H1e7omSdLOzk4kEsnlcqIoGgyG/v5+n8/n8/lYzo0sy//+979pUo5er/+v//ovVrGsrq4+ffqUNOUYPXnyZGNjg/5M09E2NzcfP35MXwmHw+fOnaM///Of/6SFpK+v7y9/+Us6nd7Y2EgkEqIoms1mn883PDys1WobDluW5c3Nze3t7VwuRwix2WyhUMjn83377bd0a16vd3p6+vDnB06ItxFwRKPR3377rV6vs1cKhUKhUFhfXw8GgxcuXFCnobEbtiiKDx8+jMViHe0rn8///PPPlUpFvaONjY2rV686HA71OyuVytzcHK2MqFKpVCqVdnZ2XC7XlStX1JdHPp+fnZ2l91f255VKJRaLLS0tXblyxWq1kkN0Kkej0UePHkmSxF4pFovFYnFra2tgYGBqaqqhVlpfX3/69Kn60SqTyWQymaWlpUuXLqmHzMmyPD8/z2oNKpfL5XK51dXVM2fO7FXjRyKRV69esdsqe311dfXZs2fqT0p3vby8fOnSJZ/P17wpRVHm5+fV/dzxeDwej4+MjJw9e/agc/MHGv3QERMN2j8biqIsLCy8evWKvSJJUjabzWazq6urp06d+uijj1gtvM+32WYaQTtbaLNodaTh21lZWaFJGFQsFovFYhcuXDCbzbOzs+zCLJfL6+vrW1tb165dU18sB5bqaDT64sULVnrpdra3t69fv66O4er1+oMHDxKJBHuF3iPbiTs71X6Rk2X56dOn6ndKklSpVHZ3d5eXl2dmZro4/w1qtdpvv/2mrsroLhKJxNLS0tTU1CEHG+fz+QcPHqi7dWhVFolE+vv7p6enadjN87zL5aJhoiiK9HmMvn93d5f+EIvFJEkSBIH+N5lM0h8EQaAPJ3sVBvZ6pVJZXl5+/vw5+xWtbXZ2dm7cuKGux6rV6v379zOZDHtld3d3d3fX4/GcnOwcOFo9TziPx+Nzc3PqaENta2vr8ePHLYtXIpFQX6JtpnynUikWbTC0plPnV9dqtXv37qmjjYZdP3r0iB1VrVa7f/+++pagViwW7927d5iE7UwmMzc3p4421HZ3d3/77Tf1Kdrc3Pz9998bGnIpWZYfPnzIqglCSHO0wSiK8uzZs52dnZa/XVxcZDtlJ39zc/Pp06ctvy9Jkhp2rf6A6gqdWVlZUd9+DqSONtSH1P7ZWFtbU0cbDZaXl5eXl9s/nsPrddEihKyvr6ujDebp06cPHjxovjAlSdrrktzL06dPm0tvvV5/8uSJejvPnz9v/rppK2P7+2pT+0WuIS5RK5fL9+/fP+T5l2V5bm5urwcnURTv37/PBrV1oVwu//rrr3sNwc1ms7/++isbaqTuGmOlQpIkFnDIsswigGq1yjY7MDDQ5uikWq2mjjbUu1O39imK8ttvv6mjDabTh0x4h/S2haNWq6krnf7+/sHBQY1Gk0wm2V1we3ubNv3tv6n2x5iZTKahoSG9Xp/L5VZWVuiL1Wp1fX19bGyM/ndxcZFdb1qtdmRkxGg0lkql5eVlWnXG4/FoNEqPant7m7bqE0I8Hs+5c+f0en2hUHj06BHdCO0wGh0d/eqrrwghd+/epS2EhJAbN25Yrdb9r9WlpSV2isbHx0dGRnieTyaTLAqJx+OpVIpWFuVyeX5+nv2tx+Pxer2yLEejUVZrzM/P3759m+O4fD7PzjPP8xcvXrTb7ZIkrayssNcXFxcPnESInnxRFJ89e8Ze9Hq9Xq+3Xq+zW5qiKM+fP2/ZeaTX64eHhw0GQz6fX11dZfEBbU/af+/7HFJHZ0OWZRaycBx3+fJlj8cjSdL6+vqLFy/o6wsLC0NDQ81tv905ffr02NjY7u7uw4cP6Ster/fixYuEENpW337ROsxhmM3mcDis0Whoqz59UZIkSZLokAqNRhOLxaLRKP1VsVjMZrPqxokDud1un88nyzLtuaMv5nK5fD5PWwhyuZz6vk77sAghkUiEfVMH7uKrr76qVqv/+7//S1/hOO6vf/0rIYQ9kau1U+Si0ag6HA+HwzabrVarra2t0XttpVJZWlraqx1uYGDgq6++kiTpu+++Yy+yqUpoKVpfX2chDh3Z0d/fX61W2S5kWX78+PGtW7e6G2/87NkzFhLRj2w0GovFIqvKisXi4uIi/Qh2u539YS6Xo91q6XRaHa8nk0la1RQKBfZip0k8Q0NDdrudfkwWT29sbLAWxFgsFo/H1dsPBALkdcXb0b7gHXKogGOvJ0KPxzMzM0MIiUQirL2hr6/vxo0btJ4NBoNms5nV8ktLSy0Djv7+/tOnT9OmvDY7s41G482bN1lOk9lsZjekjY2N0dFRjuNEUWRzl/E8//HHH7NUBrfbfefOHfZ+elTq54/R0VHaDmm1WicmJubm5ujrtLGEVjHq2Eij0Rx490qlUuznsbExWu+43e6hoSEWMOVyOXrNr6+vs6fJoaGhc+fO0d0NDQ3Nzc3RazWfz6fTaYfDIYoiG0Zks9noJU0IOXfu3Pb2Nt1OPp+nEyM2H9j4+LjP59Pr9fSdOzs77FHJ5/NdvnyZ7joYDP7444/0xpnJZIrFYkPnPR3pwNpvzWbz77//3vzZD6TVas+cOeN0OtkNpqOzUS6X2fEPDAzQL5fn+dHR0a2tLXqDpyMOOrrX7oPneZ7n1bdDjuPU5aH9otU1s9l869YtutPBwcHZ2Vn2BGk0Gj/++GPayh0Khe7evcu+jkKh0P5JUJ/5UCj0448/sifjYrFIAw51Q5rNZrt+/Tot54ODg0+ePNnc3DxwL/TUNTRl7XVxtVnk1M1dly5dojEQeV2kad21trZ2+vTpljENPaSGZyGNRsPeLMuy+rH+4sWLbBeBQOCnn36iu8jlcrQr4aBz0CiXy7EIkuO4GzdusPwbl8t19+5d+vPq6uro6Kher7darYIg0EuGtS40tErGYrHx8XG6cfaiOlI5kPpMejye77//nv5cq9VYP446zvN4PFeuXKHlYWho6Pnz52+5oRHemt62cKhjVfqMxf47ODi4sLBAq49MJlMqlRryOgVBuHr1aqfp0AMDA+o/8fv9rAugVCrR4p5MJlm1FQqF1ImTdrvdbDbT6jKRSNBpjtSHHYlEbDYbvTZ8Pt/f//73jg6vJa1Wy55RIpEICwvOnDlz5syZhjfTaf4oGj/RnzmOCwQC7IRnMhmHw+FyuVq2H9BMSdbGU61Wm8/z2NjYxMSE+hV1U2cgEGC71mq1oVBocXGR/rdUKjUEHBaLRZ28qc4PaO7/2sfU1BRLtKQ6Ohvqe0Y6nc7lcqx7/vbt2+xXb3O+pl4XLUKI0+lU35UdDgf7HgOBAOtT5zjObrezm7F6vq8DeTwedtLokBYWcLDtqO9qQ0ND7Gme4zifz9dOwNGRdopcuVxmN12TycSuO0KITqfzer30sUSW5Vwu19Edl6HZ6Gyb6qZEvV4/NDTEmtzi8XgXAYe6e8jn86mzfZ1Op8PhoF+ooijJZNLv99M0DloA2Hfd0IWRyWRoBj2Lhnme7yiRRX2RWiwWvV7P6rdarWY0GmVZVjdrjY6Oqlt3nE4nAo73VW8DDvXDREOjnE6nczqdrNgVCoWGgEOr1XYx+KrhbkET/lm1UiqVjEajOnKPRqMND9msiVuWZVEUjUajx+NhLQ0rKys7Ozter9fhcDidziMZAhcIBFi98+jRo6WlJbfb7XQ67XZ7wwOcKIrq/v6GpH11fzz7FPSD0DxBWpU030tadtirKy9K/ajdUAGNjY2x5NMD26LUH2qvzJWWGuKYTs+GwWBwOp30zler1X788ceBgQGXy+V0Ovv7+49lAs1eFy3SdEU0NLfs9auOvpcG6gLAInt1b313N+/DaFnk1PWAKIo//vij+k/UoXBHYbGaOnvG7XY3lDF1ldgym+FA6haygYGBht96PB5WueVyORrusIBDFMVyucxxHN0IrZBpe0kqlfL7/ex6d7lcLRt42qTT6VjAQauacrnMCoYgCG+/PMBxOVTA4XQ61Q83DK0rZVlW39uaR3+pH0HUGZ1HS11x05uQOgtMFMV9ksJo3eRyuU6fPv3y5Uv6YqVSWVtbo08/TqdzdHR0YGDgMI/Fp06dUjeN0qTupaUl+ph+6tQpdndvSPFrmQzY8M5CoTA3N7fPO9sky7J67w2REO076GKzh0lH7+JsXLx48f79+6xzmmbFE0K0Wu3w8HA4HH7LEwz0umidELIsq7tCjmQgaNdYkVPXOZIktVN+OqXeRXMEqX6lu5hGvf3moqvePnun+u6ez+fZR/N6vSzgSCQSAwMD7IQc+Sws6vuCxWJ5D0o4tOlQAYfNZjt16tRev224lzSXqpYjC47ckex3bGzM4/EsLS3t7OyoP1cymUwmkz6fb2pqqutHZEEQLl++vLu7Sye9YK8rikInLTh79ixtP2j/uZMeJB2Mw1o7LBZLIBAwGAwcx7148eIw6fcnoY7o9GwQQkwm0yeffLK5ubmysqJO7K/VaouLiysrK9PT071YEHUfPS1aJ0RDVXBCPs5bHnvZ/KkPXwGqt//evQwAACAASURBVNBmRUdz2OmvcrkcayN0u90saycajbIkDNLjFqmTUJPAW9PDLhVBEDQaDYugq9Vqw5ONOqg/qnEBzdS3VdrYq97X+Ph4Q6bCXqxW69TU1Llz51KpVDKZjEQi7FqNRCKbm5tDQ0NdHyTHcW632+12VyqVZDKZSCR2dnbYqXv27JnL5bJarQ1nqWFmoWY7Ozss2nA6ndeuXWO13vLyckcBB81lYYdUq9V695W1qdOzQQmCEA6Hh4aGCoVCMpnc3d1lqR71ev3Ro0dffPHFW74j9rRonQSCILCbHCGkWq0ee+Ehb5Yfh8Nx48aNI7/5qQtkcxvG/u0f7VC3ajRfzurtsw8rCILL5aIjRNLpNOs3cTgcer3eZrNlMhlRFFlSJ8dxRz6lvfrMq8fCwHuvtxWrOlerIdm+Wq2qn+Ybprw8KpIkqTtHaZqIel+RSKT5OUD96Mwmhspms6VSSavVejyeM2fOfPrppzSXm1IP8eqIKIps+3SKQDrF6hdffKFOIqOZBwaDQV2FtZzEQn3w6nMeDocPeR9taIxV/yoejz99Td013lOdno1SqcROtSzLfX194XB4enr6s88+Y717oijS41ffe7puUd9fr4vWiaIe89JdvsKRU6cEpVIpddoTpSjKYXJZyJuJUPF4vKGqUSfSdjcwSh0KNJd/dTaoOumKdZFEo1EapjidThq7sDqHpfE6HI4jX7HPaDSyuqher5+Q8gBvQW8DDvUcgisrK+qrd2tri11+/f39R7UOUDweV0f66njCaDTSxwh1v3g+n2fzaVLVanV2dpaNm63X6z+9Njs7y97J87y61VHdK6m+Vx2Ym5LJZNj21SPotFqteqgw3T7HcepE96dPnzZM+LOzs/Pzzz+zM9AQObGfy+VyF33G6gBoa2uL/SzL8qtXr1Zf63SzXev0bKyvr7NTrb6Lm81mdcIdDS8aHsLUd6NOIwB1eVAXzi6K1rtL3VG1trbGrkpFUfaaeq4l9clUFOUwJ6evr08dEMzPz6sjS1mWX7x40TB3WadsNhtrhKhUKuopzqrVqnpoaMPwqzapy+3Ozo66/KfTafZEx3GcOg+juYuEXdrNmae96GHkeV79eZeXl9UnuaPJAOHd0ttRKn6/f2FhgVayuVzul19+GRwc1Gq1yWRSPQvQEa4AVy6X79y5MzQ0RCf8YUMACCGDg4O0tqIzg7GQYnFxMZVKeb1erVZL50EXRTGRSNDxKXq93uVy0Wsgn88/ffr01KlTBoOhWq2qN65+gFC3cz579mxwcFCW5b0+I32AoDXdysqKxWLx+XwajaZYLKrrI9YqMzIysrGxQetrURR/+umncDjc19dXr9fZXDqPHj2amZkRBEFdn758+VIQBJPJlMvlFhcXu6ip/X7/y5cv6aHShAOPx0NXx2BVm9ls7lFjVUsdnQ23281CuqdPnwqC4HA4OI5Lp9PqOwF98DWZTOx7URTl3r17tIkomUyqx+K2Qx27pFKpp0+fms3m/v5+Om65/aKlXt7l008/bR5GdJL5/X42cDqVSt27dy8QCNBoo+XstHvRaDTq3pnHjx+7XC69Xn/g5HXNOI6bmJhgc7LF4/GffvqJrr9TqVTogi+EEJPJ1LxQS5voLC9sujw6t6bNZqMzYrEotq+vr/lO3w6r1erxeGhLhizLv/zyC53DkE78xd5G60P2X5vNxnGc+h7Poor+/n6tVquuHHqUwDE4OMi6Mnd2dqrVqt/vp8vfvB9NetBSbwMOrVZLxwXQ/2azWfW8kJTf7z9wmtGOlEolNqWY+kjUHeGnT59OJpOsXyCRSDSH1aw6OHv27M8//0zrODaIQI3nefXCck6nkzVm5vN5Wt3sFXBotdqzZ88+efKE/vf3339nMxQxfX197IHAbDafP3+erZ9Ur9cblgejR16v1wVBCAaDrP2mUqmwurVBm8GHXq+fnJxku45EIs2TUrMJoN6Ojs6G0+kMBoO0baZSqTQvu0UIGRoaot0rHMcNDg6yG3+hUKCrW3Whr69Pnf5CG4EmJycdDkenRat5svl3Be3AYh+QpsR2sR06kwS7J0Wj0Wg0She662Jrfr8/Ho+z7oNisdhcdRSLRUVRuj7h4XA4Go3SD6soijqUpOgUwF13d547dy6dTtOWVFEUm4/fbDY3pKnRa4HVeAaDgQW1PM97vV71tChHNQleA4/Hw0IlskcNDO+fnifHud3uK1eu7DWMOxAIXLx48QhrTzpPc8OLgiBMT0+rGx60Wu3169f3ai3kef7ChQusordarTMzM3uluen1+qtXr6ofN0OhUEc9RIODg80TfDE2m+3q1avqExgKhS5durRXDeVyua5fv04/rNlsbjnGQaPRqJtk2s8eDYVCex2qRqOZnp7u7kHtMNo/G4SQ8+fPq+d3ahAMBtWTWI+Pj7dMlwsGgx1NS6DRaPZ6RO60aL3Tzpw507J47DPSraXx8fEjzOo9f/78PivWDg8PH7KC4nl+enp6rx4TrVZ79erVw9zUjUbjjRs3mhfmpaxW67Vr15qTqdVVX8Pi2OpDbZ4K6AjRlRaaX++udwneCW9jtVifz2e32+na64VCgS1PHwgEjryD0OfzjY6OrqysxGIx9fL0zRekXq+/du3a7u4uWzNao9HQZc2DwWDDsuYDAwOffvop/Qj5fJ6tIT4wMNC8wLROp/v444+Xl5djsVi5XNbpdAc2S546dWpgYICumc6Wp7fZbF6vV73ANBMMBl0uF10jnh6PyWSyWq3BYLBhmSW/32+xWNbW1mh2Cz0hIyMjiUSCNaskEon2HxBPnTrldrvpWvB0MAVdaDsUCu2zPH1PtX82BEG4dOlSKBSiLfl04iO6PH0gEGiYb4BGpXRh91wuR7tggsGgz+dLpVJ7rbjWEl3hYm1tjabxWiwWViDbL1rqlMOTMMqjU4IgzMzMsOXpCSEul2t4eNhut6+srLSfKmG322/evLm8vJxIJOjMlYdp9ud5/uzZs6FQiF59pVJJURSz2Wy320Oh0JE832u12pmZGbqQDc1OZcvTh0Khw89K0tfXd/v27e3t7Wg0Spenp+NNaMNPy+BMfcYaokD1VdDTIeI6ne7GjRsbGxt0eXqO42h5EEWRtWCdkBHUcFS4b7755riPAQAOtrOzQzvFdDrdl19++c71qgC0Y3Fxkc28PDw8PDk5ebzHA0cI8SPAu4GtAxAMBhFtwLtOkqTZ2dmGkWWVSkWd5tKjDBI4Lm+jSwUADqlcLtN0V5rNetyHA3BYCwsLsVgskUgMDw87nU6e5+kkBSyHXafTIZ/jPYOAA+AdsL29TXM4RkdH3+bAY4BeKJfLtCVDkqSlpaXmwWWEkPPnzx/vsjtw5IRz584d9zEAwAHsdrvFYjEYDKdPn0Z/CrzrtFqtzWZLJBIt53LVarVTU1NHO10CnARIGgUAgGNQr9cjkUgsFqMLuOj1eqvV6na7/X4/2jbeS+hSAQCAY6DRaEKhUCgUOu4DgbcEo1QAAOD/Z+++49o67/7/X0eLPQRmGhsM2GBjsI33Homd5bRpmr2cnV+aJum4296Pto6bNkn7u9u7zWjvJHea1aw2zbibpNmxY8cL7wG2wYDBYLM3EgKt7x/HPVFZZh0dSbyef12SDtLng7H01jnXuQ6gOgIHAABQHYEDAACojsABAABUR+AAAACqI3AAAADVETgAAIDqCBwAAEB1BA4AAKA6AgcAAFAdgQMAAKiOwAEAAFRH4AAAAKojcAAAANUROAAAgOoIHAAAQHUEDgAAoDoCBwAAUB2BAwAAqI7AAQAAVEfgAAAAqiNwAAAA1Rm0LmC8sNvtR48era+vj4qKmjVrVmhoqNYVAQDgPezh8JKKioozZ87Y7fbGxsbjx49rXQ4AAF7FHo6xdPz48dLSUnmcm5ublpamPNTT06OMu7u7vVwYAADaYg/HWHK73QM9lJKSYjAYhBCSJE2ZMsWLRQEAoD32cHhJVFTUmjVrOjo6QkNDmcABABhvCBzeExQUFBQUpHUVAABoQLr++utH8GMtLS3V1dWNjY1dXV06nS40NDQmJiYlJSU6Otpzmx07dshHGcxm87Jly5SHbDbb559/Lj+k0+kuu+wyzyfv7u6uqKiora21WCxGozE2NjYtLU2SJOXZZs6c2euoRF1dXVVVVUtLi91uj4iISEpKSk1NPXjwYF1dnbzB5Zdf3quF5ubmM2fONDQ02Gw2o9EYERGRkJAwadIk+cCHJ7vdfubMmbq6ura2NrvdbjKZoqKiEhMTk5OTlY23bdvW1tbW7+/qoosuMplMVVVVhw4dku9JS0vLzc3ttVl9fX1NTU1TU5NcT3h4eEJCQkpKislk8txs3759NTU18vjCCy8UQlRUVNTV1VmtVpPJFB8fn5GRERYWNoIWZMXFxZWVlUFBQTk5ORMmTOi3IwAAhmvYezjcbndxcfHJkyeVe5xOZ1tbW1tb26lTpzIyMqZPny5JkrLxIM/T7zatra0FBQXKFEun03nmzJkzZ84kJCT0+2xut/vo0aOVlZWez9Da2nr27FnPeZqeXC5XYWGh5484nU6bzdbQ0FBWVrZgwYLIyEjloY6Ojj179litVuUem81ms9nq6upKS0vnzZvnufEgBvlV2O12z2yk1NPY2FhaWpqfnz/QB39tbe3x48edTqd8s6urq7Ky8syZM4sXL/ZMfkNvob6+vqSkRAjR3d29b9++devW6XTM8gEAjIFhf5xUVFR4po1eysrKysrKRlxNd3f3nj17+g0Knp/HvV7RMzoo2traurq6+v2RXgHFU1dXV0FBgXIWid1uLygo8Pyo9mSxWHbv3j3KU05cLte+ffsG6q67u7ugoGCgfSeFhYVK2lA4HI7Dhw8r+WZYLXj2YrfbHQ7HsHoBAGAgw9vD4XK5iouL5bEkSXPnzk1ISHA6nZWVlcraEsXFxampqUajcQTVlJWVeX7mTZo0KTY21m63V1VVtbe3992+q6tLqUcIERoampaWZjKZ2traKioq+t2pUFtbe/r0aeVmWlpadHS03W6vqKiwWCxCCJvNVlpampOTI4Q4c+aMkloSEhJyc3ODgoI6OzsPHDjQ0dEhhOju7q6qqsrMzFy6dKnL5SopKSkvL5e3nzFjxuTJk4UQg/8qKisrGxsb5bF8AktUVFRPT49Sj8vlOnTo0PLly/vd2RAfH5+UlORyuc6ePdvU1CTf2d7e3tHRIe+3GHoLQoi4uDij0Wi324UQycnJvY7mAAAwYsMLHF1dXfKnkRAiLi4uKSlJCKHT6TIzM6urq+UPMJfLZbFYPHfpD5EcXJSb06dPlz8FhRCpqam7d+9ubm7u9SO1tbUul0seBwcHL1u2TJ6VOWnSpAkTJuzdu7fvq3junpkzZ05KSoo8TklJ2bp1q81mE0JUVFRkZ2fr9XrPXQuZmZkhISFCiMjIyKysrH379sn3t7S0CCH0er1er1eOJcn3nDd1uVwuZd0OIcTs2bOVeiZOnLht2za5nvb29oaGhoSEhF4/npqampubK7/opEmTtm7dKmcUIYTFYpEDx9BbkH+Hq1atamxsNBgM8fHxgxcPAMDQDS9w6PV6ZdzS0tLe3q4c/l+5cqXykOfn7tC1t7cr+/ANBkNqaqrn65rN5r6Bo6GhQRmnp6d7ngNiNpv7vkRXV1dra6s8Dg0NnThxovKQyWRKTEysqKgQQrhcrvb2drPZ7DmhsqamJjo6Wt7NkJSUtH79+hH02EtbW5scKeQCkpOTlYeCgoJSU1OV/Tf19fV9A0dCQoLyq9br9bGxsUrgUHLhcFsIDg5WQg8AAGNleIEjODg4NjZW3nVvt9u3bt0aFxc3YcKE2NjYqKioUU4wVD4shRDx8fFDOSjj+fU9Li7uvNt7Hpfp7u7eunWr56PKZ78yTkhIUA6RlJeXnz17NjExMSYmJjY2Njg4+Lwvd17yPiFZfHx8r19gbGysMlZy0iA8s4Wy40ftFgAAGIphn6Uye/bsgoKCzs5O+WZDQ4O8m8FoNE6ZMiUtLW3ES00oX8qFEPKe//PynPAxlNf1nI7qdDo9P+97kfe1TJgwITs7+8SJE/KdNputoqJC3gsSGxubmZkZFxc3st05fevp+/HveY9nGBoWtVsAAGAohr1PIjQ0dMWKFbm5ub0We7Db7SUlJZs3b1amQI6GSh+Bg5ybOpCpU6euXLly4sSJvUpqamoqKCjYv3+/si9hlPruHxqrZ/ZaCwAADGQkK43q9fq0tLTU1NTOzs6mpqaGhoba2lr5IYfDceDAgQsvvHAEh1c8j6EM8Qt9UFCQsmV3d/d5d3J4vkRMTMySJUuGkmwiIyPz8/Nzc3Obm5ubmppqamqUs0xramqqqqo8p5sMi+dpIH1bHnz/x7Co1wIAAEMxvMBhtVqVAx/h4eERERERERFpaWkWi2XXrl3y6Zfd3d3t7e3R0dGen+VDWdHBc5dJXV2d0+n0nKPar6ioKOVzuqmp6bxrcHm+RHNzc1dXV6/LmrjdbpfLJb+u0+lUjhwZjcbQ0NCEhISEhITs7OyTJ0/KC2QJIerr60f8aR0eHq6M6+vrXS6XZ1BTTnMVQozgrB/hlRYAABiK4e2HqKys3PYv9fX1yv1hYWGeczbleOG5O6Gzs9NzGS7Pn1VERkYqPyKvvaE85HQ6+56iIoTwXIKzvLzcc5dAv9tHRER4fsYfPXrUMwm5XK7jx48rq2Y5HA6l2T179iiHY3Q6ned5HJ5TTzzjwkDrnHqKjo5W9srYbDZlzXL5xz3XCxnZSaojaKG7u1teBH0Eh58AABjI8PZwxMfHK+tGFBYW6vX6mJgYSZJaWlo8PyzlHQmhoaEGg0H+RHe73bt3705LS9PpdE1NTWfOnOn75Hq9PjU1VXn+o0ePtrW1xcTE9PT0VFVV9TvBMzk5+fjx4/IUBKvVun37dnnNsdbWVs9Pa4UkSVlZWfv375dv1tfXb9u2bfLkySEhITabrbq6Wj6NJTQ0NDs7OygoaMKECfKUlI6OjsLCwoyMjODg4J6eHuW8DyGE524Vz0Mk5eXlkiTp9fqkpKSB5sDKS5gUFRXJNw8ePNja2hodHS0v/KVEtIiIiKGcg9PXcFuw2Wzbtm2Tp+JOnDgxPz9/BC8KAEBfwwscsbGxKSkp1dXVQgibzVZQUNB3m9TUVPnzVZKkyZMnKx9snZ2dhYWFgz9/RkZGdXW1cpTk9OnT/eYGRXBwcHZ29rFjx+SbFotFGQ8kOTm5vr5e2X1isViUNVIVFovF7XZLkpSTk/PVV1/JgUY5ucOTTqdLS0tTbnoe+LDb7fK5ITExMYOcdJOWllZbWysfPXG73Z45QHmJ2bNnj/iU42G10NDQoJz4c+bMmZkzZ7LYKABgTAz7YywvL89zvaxeUlJS5EXBZdOmTYuKiup3s37nZ5hMpgULFvSd+ylfM7bfV0xPT/f8yFcMcgwiLy8vPT19oEenTJkye/ZseQJKZGTkggULBloRJCgoaOHChZ7HaGJiYuTVV4dOp9PNnz9/oGqNRuPChQtHNoFDNqwWPH/zRqOx74VzAQAYGX3f66QPTqfTyStH6XQ6h8PhdDp1Ol14eHhSUlJOTk56errnd3G9Xi9fksNut/f09BgMhri4uOzs7KlTp1ZVVclTByRJmjZtmvIj8kqXer2+p6fH4XDIN+fMmWOxWJTFrxISEpTPYEmS5JtOp1N+wpiYmOzs7NTU1FOnTik1e76EJEnyJUgMBoPL5ZKnasoXtc/NzZ08ebJnC2FhYZMmTTKZTG632+l0ulyuoKCg2NjYtLS0vLy8iIiIXr+fxMREk8nU09Njt9sNBkNMTMzEiRONRmNbW5tyhbbo6GjPZUP1ev3EiRPlNUCdTqfT6TSZTNHR0XL06fUSZ8+eVeaBTpw40TPuNDQ0KIuUe/6Kht5CaGio2+22WCyhoaGzZs3yfHIAAEZDuv7667WuYUh27NihzAOdN2/eeXckNDQ07N69Wx6HhYWtWbNG3foAAMDARrUYuRo6Ojr279/ved6EEKK+vt7zrJNep78ePXq012kvLpfL8yJtniezAAAA7/Otg/Qul+vw4cMtLS2tra1TpkyJjIx0Op0tLS2el1SNj4/3XE6jtrZWnguZkpIiH86wWq0VFRWeFx/hamQAAGjLtwJHfX29PAvBarUqJ4t6MhqNnpNS3W63cj3V6upq+fSZXqZMmRITE6NOvQAAYEiGPWlUVeHh4Xq9vrm5ud9Vp+QTLjwnOUqSFBcX19LSMtBS6FlZWdnZ2VycDAAAbfnipNGurq6zZ8/W19d3dHTY7faQkBCz2ZyYmJiQkNDvchRut7u+vr6urq6pqclqtRoMhoiICHnJkF5XmAMAAJrwxcABAAACjM+dpQIAAAIPgQMAAKiOwAEAAFRH4AAAAKojcAAAANUROAAAgOoIHAAAQHUEDgAAoDoCBwAAUB2BAwAAqI7AAQAAVEfgAAAAqiNwAAAA1RE4AACA6ggcAABAdQQOAACgOgIHAABQHYEDAACojsABAABUR+AAAACqI3AAAADVETgAAIDqCBwAAEB1BA4AAKA6AgcAAFAdgQMAAKiOwAEAAFQnFRaVaF0DAAAIcOzhAAAAqiNwAAAA1RE4AACA6ggcAABAdQQOAACgOgIHAABQHYEDAACojsABAABUR+AAAACqI3AAAADVETgAAIDqCBwAAEB1BA4AAKA6AgcAAFAdgQMAAKiOwAEAAFRn0LoAAAAwWjab7fTpSqvV2tzc3NPTPbInMRqMsRMmhIaETpo8OSQkZGwrJHAAAODHbDbbju1f7dy5o7GpyWG322w2p9M1sqfS6aSQkBCDwRATE7t48eLlK1aOYeyQCotKxuq5AACAN9XX1T3xxB8qKirsdrvZbM7Kyp4QF2fQ60f2bE6Xs6mxqbi4uKmp0Wg0JiQm/vjHP0lMTBqTUgkcAAD4pbq62j/98Y8lJcVxcfG3bNgwf/6CsXrmgwcPvPrKX6qrz6Smpn7/Bz9ISkoe/XPqv3Pf/aN/FgAA4E0dHR1vvP76oUMHFy9e8oMf/jA9PWMMnzwpKWnRosVtbS3HjhW1d7RnZ08PDg4e5XNylgoAAH7G6XQWFh49fPhQRkbmbbffERUVPeYvERUVdedd90ydOu3I4SOFR4+6XCOcF6IgcAAA4Ge6uqylpaVWq/Wiiy8ODw9X6VWCgoIuW7++q8taXFLc2WkZ5bMROAAA8DPtbe2lJ0+mpKRMmZKu06n4UZ6WNiU1La2stLSpqXGUT8VpsQAA+Jkeu72trTUuLt5kMvV99Dv33mO1dk2YELvh1tsKdhds3/6VEGLjxofa2tuffOJxIcTtt9++YuWqWzfcIoRYtmz50mXLXnrxhbq6usmTJ//yV494PpXBYIiKjKyqqu7uHuHaHl8/1Sh/HgAAeJnb7RZCJCUlhoWF9n3Uau2yWi1dXaEOh6Onp9tqtQghHE6n0+k4N3Y4hBDyuKen2+V0dnVZrVaLzdbV66mCg0NSUiZVVVXLrzgaBA4AAALKhAmxXV2hsbGxQSZTeEREXFycEMJoNAaZguRxcHCIEEIeh0dEGIzGmJhYp9MZbTarVxWBAwCAgLLh1tscDkeQyZQyaXJ4eHhubq4QIiEhITY25s677hZCTJ48WQghj2NjYswxsdded53NZgsN6Wd/yVghcAAAEFByc/PsdvuRI0c3b/48PDxi8eLF1dVnPvvsE6MxaPr07ODgkD179nR32yZOTElPT9+3b39XlyUtbcqcOfmqVkXgAAAg0PT09Ozft+err7YlJyfn5uaWlJx4+623IiIiTCZjjDnmw39+0NraunDhoqjIyI8/+rCxsWHNBRfOnj1H1ZIIHAAABB63w2Hv7u7u7u52udwOh6O7u9tkMjkcDqfLId9vd/Q4Xe6enu7u7m673a52QQQOAAACjcFgyMiY2t3THWOODQkJSUmZtHjJ4pDg0OSk5PDw8Hnz5lusndOmTY+KjMzPn9ve0ZYxpiuj91+S2i8AAAC8LCgo+KKLL16ydGltbW1tbW1EROQll6yXH7I7HCtWrpLH7R0dS5ctT0lJUW+5UgWBAwCAwHTyZMmbf/tbR0f74Jvdc8+9ebNmqV0MgQMAAL/U2Wmx2x2DbNDd3d3U1NTW1jr483T3DLiKqNPpOG9eGSICBwAAfqnT0mm39wyyQXh4RGpqamdnzODPExYaNtBDDoejo6NzhPX9OwIHAAB+JjIyIj09vehYUUd7R1xc/ECb5ebmyqt+jZjVaikvL5uSnm42R4/meQRXiwUAwO+Eh4enpqa1tbYVHSt0Ogc7qjJK+/fva2pqnjRpUlQUgQMAgHEmKCh4+oycyZMnv//eeyUlJ1V6lVOnyj/44P3k5KTcmXkhISGjfDb9d+67f0zKAgAAXhMeHu52i6KiwmPHj4WGhsbHxxuNxrF6cpvNtnPnjtdfe7Wttf2SSy5dsHChwTDaORhSYVHJmBQHAAC8yWLp/PzzL/7219fDw8Ozp0+fmTMzZdKk8PCI0Tyn1Wo9fbry+LFjR48eaW9vv/ba69dddHFExBis0kHgAADAX3V1dR05fPitt96sqqoKDQ0NDg4e5a4Ip9Nps9msVmvyxORvf/uq2bPzQ0PH5hKyBA4AAPyb0+k8cuTwtq1ba2trzpypttkGXFdjcEajadKklITExGXLls+Zkz/6wyieCBwAAEB1nKUCAABUx8JfAAAErPLysqNHjvQMsCCpwWDMycnJzJyq06m+A4LAAQBAwIqIiKg8fXrXzh1Op7PXQ3q9fs6cOQsWLJAkyQuVEDgAAAhYcXHxd9xxhySJr7Zt6/XQtKysO+68KyYm1juBgzkcAAAEsrCw8Pvvf3Dq1Kmed6ampv74x/8ZGzvBO2lDEDgAABgPHnjwB1lZWXq9XpKk3Nzch3/5SFjYgBeJVQOnxQIAEPjcbvepBJtXuAAAIABJREFUU6f+/ubfurq67r77nuSJE71cAIEDAIBxweVy1dScdTqdEyem6PV6L786k0YBABgXdDrdxIkpmr26Vi8MAADGDwIHAABQHYEDAACojsABAABUR+AAAACqI3AAAADVETgAAIDqCBwAAEB1BA4AAKA6AgcAAFAdgQMAAKiOwAEAAFRH4AAAAKojcAAAANUROAAAgOoIHAAAQHUGi8Wi3JAkyfMxSUjC445ej/az/eA3hRCDbtD3BQZ6Qs+aAQCA7zOEhYVpXcOw+WPNAACMZxxSAQAAqiNwAAAA1RE4AACA6ggcAABAdQQOAACgOgIHAABQHYEDAACojsABAABUR+AAAACqI3AAAADVETgAAIDqCBwAAEB1BA4AAKA6AgcAAFAdgQMAAKiOwAEAAFRH4AAAAKojcAAAANUROAAAgOoIHAAAQHUEDgAAoDoCBwAAUB2BAwAAqI7AAQAAVEfgAAAAqiNwAAAA1RE4AACA6ggcAABAdQQOAACgOgIHAABQHYEDAACojsABAABUR+AAAACqI3AAAADVETgAAIDqCBwAAEB1BA4AAKA6AgcAAFAdgQMAAKiOwAEAAFRH4AAAAKojcAAAANUROAAAgOoIHAAAQHUEDgAAoDoCBwAAUB2BAwAAqI7AAQAAVEfgAAAAqiNwAAAA1RE4AACA6ggcAABAdQQOAACgOgIHAABQHYEDAACojsABAABUR+AAAACqI3AAAADVETgAAIDqCBwAAEB1BA4AAKA6AgcAAFAdgQMAAKiOwAEAAFRH4AAAAKojcAAAANUROAAAgOoIHAAAQHUEDgAAoDoCBwAAUB2BAwAAqI7AAQAAVEfgAAAAqiNwAAAA1RE4AACA6ggcAABAdQQOAACgOgIHAABQHYEDAACojsABAABUR+AAAACqI3AAAADVETgAAIDqDBaLRbkhSZLnY5KQhMcdvR7tZ/vBbwohBt2g7wsM9ISeNQMAAN9nCAsL07qGYfPHmgEAGM84pAIAAFRH4AAAAKojcAAAANUROAAAgOoIHAAAQHUEDgAAoDoCBwAAUB2BAwAAqI7AAQAAVEfgAAAAqiNwAAAA1RE4AACA6ggcAABAdQQOAACgOgIHAABQnWEEP2M0GmLM0RERYSaTUZKkMa9pxNxud0+PvaPD0tzSarc7hvhTPtuOoKN/oSNvoiOZz3YUYO0IOvqXwOuoF6mwqGRYP2COjkpKivO130Uvbre7pqahpbXtvFv6RTuCjuhIC3Tk4x0FWDuCjgKro77037nv/qFvbY6OSk6O9/3fiCRJERFhDrvTZuseZDN/aUfQER1pgY68VtjIBFg7go4CqKN+DWMOh9FoSEqKG+4LaCgpKc5oHPCYkd+1I+jIH9CR7wuwjgKsHUFH/mDwjgYyjMARY472i/ylkCQpxhw90KN+146gI39AR74vwDoKsHYEHfmDwTsayDACR0RE2HCfXXOD1OyP7Qg68gd05PsCrKMAa0fQkT8YQdnDCBwmk3G4z665QWr2x3YEHfkDOvJ9AdZRgLUj6MgfjKDsYQQOv9vnIwat2R/bEXTkD+jI9wVYRwHWjqAjfzCCsln4CwAAqI7AAQAAVEfgAAAAqiNwAAAA1RE4AACA6ggcAABAdQQOAACgOgIHAABQHYEDAACojsABAABUN+zLywIAxrmmpqYXXnjp2LFj2dlZt99+W1ycn11dHZpgDwcAYHheffX1vXv3WiyW/fsP/OUvr2hdDvwDezgA/+Z2u9vb24UQkiRFRkZqXQ7GhdOnK5VxRUXlIFsCCgIH4N+am5vvvfc+IUR4ePgLL/xZ63IwLuTl5VVVVcvj2bNnaVsM/AWBA/BvVmuX1iVg3Ln22mtCQ0PLysqmTJnyjW9crnU58A8EDsC/Wa0WrUvAuBMcHHz11VdpXQX8DJNGAf9msVi1LgEAzo/AAfg3i4U9HAD8gDaHVBwOx6FDh3ft2n3q1KmGhgaz2ZyaOnn+/PkLFy4ICgrSpCT0q7i4pKCg4Pjx4zU1tUFBQfHxcXl5eYsWLZw0aZLWpY2NhoaGDz/86NixY/X1DTNmTL/99ttiY2O1Lmp4CBzAaJSWlu7ff6CwsLCurr6npycxMXHq1My5c/Nzc3P1er3W1Y1cS0tLQcGe/fsPVFdX9fTYExISZsyYvnjxooyMDK1K0iBwlJaWPvfcn0+dqlDuqa2tra2tLSjY89Zbb9955+15eXn33ntfU1OTEOIvf3kpODjY+0X29eijvz58+LAQYsKECX/601OSJA2w2WOHDx8RQhgMhhdffH6g/PTmm39/6623hRAZGRm//vWjqlU9cg0NDS+//Jc9e/Yq91it1paWluLikr///a316y+79tpr/CsdHjly5JFHHhNCLF++/P777xNCfPXVV08//azD4ZA32Lt3X35+/gUXrNGyyiH77W9/V1NT29HRIZ8TK4To7Oy85prrPLfJysr61a8e1qK6oTpx4sRDD/1CHt9++20XX3zR4Nvv2LHziSeelMdPP/0n30yHr732+j/+8Z48fv31Vw2G/t9m3W73tddeL48vv3z9zTff5KX6xoLyv0kIsWnTxpycHG3rGZna2tpXX33N811OCFFeXl5eXv7JJ5+mp6ffeust2dnZWpU3dMo/x8KFC3/4w+87nc5PPvn0tddet9vtyjYdHR2lpaXvvff+hRdecNNNN4aGhnq/Tm8fUjlw4ODGjZs804an2traRx557JVXXpXThk+ZM2e2PGhsbKyrq+t3m66ursLCInnscDhKS8sGerajR4/2elqfcupUxU9/+nPP/4fBwcGeGeuDD/755JNP9fT0aFHdaLW2tgghtm376qmn/qSkDdm0adM0KmrYystPVVdXt7W1ud1urWsZuaysrMmTJ8vjzZu3nHd75W9y1qxZvpk24C+Ki0t6vcv1Ul5evmnTw1u2fOnFokarsrLy9OnTmzY9/NJLL3umDU+ff/7F7373393d3V6uTXh5D8fJk6X/9V+/dblc8s2MjPT169enp08JCgpqamo+dOjQP//5odVqff/9D7xZ1RBNnz5dGZeUnExMTOy7TWlpmdPpVG4eO3YsJ2dG3806OzuLi0vk8YwZ0/tuoK3a2tqHH/6l1XpuKuLVV1+1Zs3q2NjYrq6uqqqqzz77fOvWbUKIvXv3/eMf7/njTPWmpuYzZ84+88yzQgiTyXTppZdkZKRLkq6qqiolZaLW1Q2VyWSSd/719PQo/6d67Q40Gn39NDRJktatW/vnPz8vhKioqKisrExNTR1o466urr17z308LFu21EslIhBVVp7+5S9/pXwkz58/b926dZMnTzIYDLW1ddu3b//oo4+FEG63++mnnzGZjEuX+sffW21t7Y9+9BP5S0hmZuall17yr0/YpoKCPf/854fye0VhYdHrr79x2223erk8770fdXd3P/30M8o748UXX3TzzTcZjUb5ZkxMzNSpmevWrX3xxZd27tzltaqGLjV1cmRkpLz7+tixYytWLO+7zfHjx4UQQUFBkiTZbLZDhw73+3lcVnZuz4der9fwcFq/HA7Hn/70tJw2IiIivve9B3Jzc+WHQkJCpk2bNnXq1MTExL/97U0hxNtvv7NixfKEhAQtKx6+xsbGZ5551uFwTJs27cEH71cuA7FgwXxtCxuWJ574gzx45pln5X0Dfrrw1+LFi1566WV5V9POnbsGCRyFhYXyZjqdLj9/jvdKRGCx2WxPPvmkkjZuu23DxRdfrOzBjYiImDo1c/78eb/5zX/JO3Gfffa5jIyMfr9k+iC32200Gm+99ZYLL7xQaSo2NnbatGnz58/71a8elRv/6KOP16xZk5o62Zu1ee+QyrZt26qrz61MN3fu3Ftv3aCkDUVUVNSDDz6wevUqr1U1dDqdbu7cufL44MFD/e7HPnjwkBAiP3+OvOXJkyfb2tr6bnbiRLE8yM2dGRISolbFI7Jjx87i4nPl3XXXnUraUEiSdOWV30pPTxdCuFyu7dt3eLvEUevp6SkuLk5MTPyP//gBF53SXERExMqVK+Txli1f9jrI5Wnv3n3yYOHCBREREd4oDoHoyy+3KsukXnbZpZdccknfOXkzZ878znfulcc2m+3tt9/xaomjEBkZ+fDDm9auXdu3qezs7A0bblFubt682buleStwuFyuDz74ULl5zTVX6XT9v7QkSSkpKd6parjy8mbKg5aWlrNna3o92tbWJu+6yM7Oys7Oku8sKTnZ93mOHDk3gWPWLN9aEtjlcr333rnJbrNmzVq4cEG/m0mSpKwt6F8HOD3dc89d0dHRWlcBIYRYtWqVPGhtbS0qKup3m+7u7l27dsvjJUsWe6cwBB673a5M6dXpdJdfvn6gLRcvXjRp0rkPo23bvqqtrfVGfaN27733ZGZmDvTokiWLlVnMX321faB5HirxUuCoqKioqTn3CT13bv6UKVO887pjy3O6cklJSa9HlWyRnp6h/HsXFhb22qyzs/PkyZN9n9AXlJeXK8H/iiu+OdCZOMJjrmt9fX1ra6s3ihtTOTkzZszoZ3oNNDFt2lRl1+5A+8yOHz8uT3MzmUx5eXneKw6B5eTJk8pJCWvWrI6JiRloS0mSvvGNb8hjt9t94MBBb9Q3aoOf1xkeHq7Mf+rs7Dx79qxXijrHS4Hj5MlSZXzBBRd450XHXGxsrHKA+dix470ePXbsmBBCp9Olpk6ePHmSfMBo//4DvTYrLT33qwgJCfHy8bPzUqaySpKUnj5YKAwJCQkPD5fHZ8549U92TFx6aT87UaEVSZLWrVsnj3fs2NnZ2dl3m3379suDpUuX+tqBSPgR5V1OCNHvVDxPixYtVN4ojh7t/e3RT3nm9erqM958aS8FjvLycmWcmOhncww9zZ2bLw8OHjzYaxrHgQMHhBDTpk0LDg42Go3yF+j6+vpeO+KUCRz5+fkDnaCvFWX2xrRp0877np6UlCQP/PFaHpqcg45BLF68SM7oDodj//79vR51OBzKXPIlSxZ5uzgEEM/D3OedwhUUFKR8YPXdXe2nIiO/nv9UX1/vzZf20gee5153vz57Picn55133hVCtLe3V1efUY7w1dfX19TUCiGmTz93lGTGjOnyQmEnThR7Tm9WJnAoM0J8R1NTszywWi2vvPLq4Bsr82G5lgdGLzw8fNWqlZ999rkQ4ssvt61cudLz0eLiEnm3R3h4OMfCMBryMjxCCJ1ON5RZXElJSfJ7e3d3t81m85GFKEcjIiJSGXd1efVa014KHG1t5xZDjIyM9OvdoVOnZur1enmxjZKSEiVweO4b6DU4erRw1apz757yWm/yOCsry2tlD1FLy7n/ilVV1cpkjvPi0ATGhBI4ioqKamtrPWO6ss9jxYrlfc9uA4auufncu1xCQsJQVi73PO3fYrEEQOAIDw9Txl4OHF46pKIsh+X7KxENLjg4eNascwfA5EkbssLCc+OpU89NF83MzJD/mg8cOKC0r6w9GhsbqxyS8B0jWzk0LCx8zCvBOJSZmZmWliaPd+8uUO53uVw7duyUxwsXLvR+YQgkyqHwIV4nxfOESmUdKb9mtX4dMrycn7z08a9MMGxqanY4HL42d2FYZs+eLU9XPnjwkMvl0ul0brdbnsCRmZkZGXlub1VQUFBeXt7BgwctFktFRWVGRroQ4sSJE/Kj8+bN9cFJi2azWV7ZbO7cuT/5yY+0LgfjiyRJF1207tln/1cIsWXLlm9+8xvy/5GysnJ531tsbMy0aVM1rhJ+zmyOlg/x19TUyG/gg2/vOctB+SDzay0tzcrYyx15aQ+HZ1fKtab8lLLGeWdnpzwh9MyZs/KEBmXnh0y5qZxDq5zb4pvXOlKOaBYXF/v1FTrgpxYuXGAymYQQNTW1p06dku+U50IJIVauXOnXV++EL4iONssDp9PZ78KMvShLLhkMhgA4niI85uoJIaKiorz50l4KHBMnJitjf1y2wdPkyZOUD+bKytPCY6nyXhdGUZb/knNGd3e3sgKHb35RU06F7ezs9MHr5yHgyVNH5bGyrqhyeGWgleh8jeeXZk0ukYVBZGZ+fTWJxsbzvMvZ7XZlBamZM3N8cLf0CHjus0lLG/BKAmrwUuDwvD6C52nQ/kiSpHnzzq1xLn8Jk2eMSpLU68IoqampYWFhQogjR444nc7Tp6vkQ4CpqamDrDajIc/AdPz4CQ0rwdApb4KBcYBZCRxbt25zu921tbWnT58WQiQnJyszPHyc5/fgftcUgYY8l1vcuXPn4Bvv27dP+W/V9zoP/sjtdisJ3mQyeXldby8FDs8v9PL7yCAb+/5Fz3Nzz53RKu+xkM90nTFjRq/VHfR6fX5+vhBCvs6qsovYZ687NW3aNOXg1+uvv+HlCcwYGWWnqNVqHeRCJP4iIyNDvlJPY2PjyZMnjx49dxr56tWr/OX7pfw1QzbIDt3t27d7pRz8m2nTpiq7qD/99LNBjqq43e733ntfuTlnjo++bw9LYWGRss9m5cqVXp5P6aXAERsbq/xrlZeXK9dE6OvEiRPvvvt/3qlqxJSMXFxccvZsjbyHKi+vn/w7c+a5uRonT55Ujqf47EICISEhypUFmpqa3n//A23rwVCYzV+vJaCc2Oy/JEm66KK18njPnr3KgZV58+ZpV9TweJ6AtmfP3n63OXbs2P/8zzPeqghfCwoKUi4FZbfb5cvQ92v//gNlZeeWrFy8eHFKykRv1DdqLS0DZtzu7u7XXntduXnBBau9UtHXvHe12EsvvVgZP/PMs8pyFJ527dr16KO/9v09HGazWT7rxOFwfPHFF/Kd/V4YRZnGUVhYVFhYJISQJEk5ddYHrV17YXx8vDx+6623P/vss4F2Rx07dky+Oi60NWHCBGXseTap/1qw4NzU0Y8++vjw4SNCiIyMDM95YD5uypQ0ZRrHF19s7nuhx927Cx599NfK2fLwsjVrViclnVvl5Z133t28eUvfbUpKSp566o/y2Gg0Xn31t71X3+j88Y9/+uijj/r+dXV3dz/zzLPKqt/Lly+TdyV6k/d2p8yaNWvp0qU7duwQQthsto0bN11xxTcXLVoUFzfBbrefPl316aefFhTs8Vo9o5Sfny+HX3k3gMFg6PfiI4mJiXFxcQ0NDcpOnZkzc3x5Xe3w8PDvfe+BjRs3yX+vzz33/L59+y+99NLs7KygoCCn09nQ0FBTU/PJJ58eOHAwLi7u97//XVBQkNZVj2szZ86MioqS9wy/8cZfw8PD582bGx4e3tzcXFFRqSzG70fCwsLWrFn98cefKJeyVK5f7xfCw8MXLlwg/5e3Wq0///nG66+/Li0tNTg4uK6u/osvNsvrmC1evCgkJKTfTzuoKjQ09IEHHvj5zzfK73LPPPPskSNH1q1bO2nSJJ1OV1/fsHPnzvfee1/5rnXnnXf47DXM+3K5XC+++PJnn32xfv1lM2ZMj46OtlqtJ04Uv/vuu/JZDkIIs9l8yy03e782rx6/ufPO2xsbG+RJo06n8+2333n77Xd6bZOenr5o0cLXX3/Dm4WNQK/DIrm5uf1+7kqSNHdu/scff6Lc42uXpO8rMzPz5z//2W9/+zur1SqEOHjwkLwnIzIystcsgYaGhn379i1dulSzWiFEUFDQ+vWXyXtKHQ7H008/I4SQ18PV6XQvvPBnXw64A1m5cqXn/xplmra/uPrqq/bs2St/nnV2dj733J97bbBw4cLvfve+Dz74pxbVQWRkpP/85z/9r//6nTxTbefOXcrFenq5447bV69e5dXiRmf69Ozjx09UV1c/88yz/W5gNps3bvyZl0+IlXnvkIoQIiws7Cc/+fEFF6zp91FJkq644pubNm00m83erGpkMjMzPJdY7ncCh6zXkhvKQRZflpMz4ze/eWzRon9b1bG9vd0zbeTkzNi48WdLlizxenXo7dJLL7nssks975E/6lwul+eFmv1IRka6ct2A3Nxcz8NGfiElJeWHP/yBfGCoF51Od8stN//gB98zGo3R0Rq86UOWk5Pz6KOPDDKFPzU1ddOmjRddtM6bVY3eLbfc/IMffH+ga5bNnTv3kUd+qdUOG2+v+BkeHn7PPXdfeOGFBQUFhYVF9fX1brd74sSJc+bMXrJksbxqfU+PH5y5HhQU9Nprrwxly4ULF7z55l/VrmfMJSYm/uAH3z916tTBg4eOHj1aX9/Q2toaFRUVHx83ffr0vLy87OwsfzlrQJaXl+eP/xBDYTQaN2y4JScnZ+vWrWVl5e3t7fHx8RMnTpw5M0f52PYvdrtdWSNh+fJl2hYzMvPmzf3DH/77iy82Hzx4sK6uPigoaOLE5Nzc3JUrVyhnxa9evXr1am9P3BsTgfG/KSVl4n/+50+Ki0v2799fVHSsvr6+p6cnISFh6tTMuXPnzpqV548LzTkczkWLFs6ZM7ugYM+ePXvKysotFktCQkJ2dtaiRYtmzJiu4fu2NkuMZ2Sky5Mu+9XTY/dmMRjElClTpkyZcuWV39K6EJzfvHlz/e7Qw0COHz8u7+s2GAw+exr5ecXFxV133bXXXXet1oVgMFlZ07KypmldxZhxuZxCiKCgoBUrlq9YsVzrcv6NVw+pDFFgrF8EYMQ+//zcyV9r1qxWrk8E4Lx8+QPUFwMHgPHs5MlS5fzetWsv1LYYAGOFwAHAh7S1tf3xj+fWP5g/f77nVREA+DU/vkw8gMBQWXk6Pj7OZrOVlJS88MJL8nqpkZGRd9xxm9alARgzBA4AWurp6fnpT3+mrPGluPfee3zzGocARobAAUBLFRUVvdJGXFzcd7973/Tp/VwrAID/InAA0JLd7sjMzDx79qwkScnJyfPmzV279kLlqsUAAoYvBo7LL1+vXLMUQGDLyZnx2GOPaF0F4Mf8ZR02zlIBAACqI3AAAADVETgAAIDqCBwAAEB1BA4AAKA6AgcAAFAdgQMAAKiOwAEAAFRH4AAAAKojcAAAANUROAAAgOoIHAAAQHUEDgAAoDoCBwAAUB2BAwAAqI7AAQAAVEfgAAAAqiNwAAAA1RE4AACA6ggcAABAdQQOAACgOgIHAABQHYEDAACojsABAABUN4zA4Xa71atDJYPU7I/tCDryB3Tk+wKsowBrR9CRPxhB2cMIHD099uE+u+YGqdkf2xF05A/oyPcFWEcB1o6gI38wgrKHETg6OizDfXbNDVKzP7Yj6Mgf0JHvC7COAqwdQUf+YARlDyNwNLe0+teeH7fb3dzSOtCjfteOoCN/QEe+L8A6CrB2BB35g8E7GsgwAofd7qipaRjuC2iopqbBbncM9KjftSPoyB/Qke8LsI4CrB1BR/5g8I4Gov/OffcPfWubrdthd4aHh0qSNNxX8ia3211T09DS2jb4Zv7SjqAjOtICHfl4RwHWjqCjAOqoX1JhUclwf8ZoNMSYoyMiwkwmo0/9dtxud0+PvaPD0tzSOvTw5bPtCDr6FzryJjqS+WxHAdaOoKN/CbyOehlJ4AAAABgWFv4CAACqI3AAAADVETgAAIDqCBwAAEB1BA4AAKA6AgcAAFAdgQMAAKiOwAEAAFRH4AAAAKojcAAAANUROAAAgOoIHAAAQHUEDgAAoDoCBwAAUB2BAwAAqM6gdQGDMRoNMeboiIgwk8koSZLW5XzN7Xb39Ng7OizNLa12u2OIP+Wz7Qg6+hc68iY6kvlsRwHWjqAjrUmFRSVa19A/c3RUUlKcr/3r9uJ2u2tqGlpa2867pV+0I+iIjrRARz7eUYC1I8Z3RxrSf+e++7WuoR/m6Kjk5Hjf/zeWJCkiIsxhd9ps3YNs5i/tCDqiIy3QkdcKG5kAa0eM44605YtzOIxGQ1JSnNZVDENSUpzROODBKb9rR9CRP6Aj3xdgHQVYO2L8daQ5XwwcMeZov0iUCkmSYszRAz3qd+0IOvIHdOT7AqyjAGtHjL+ONOeLgSMiIkzrEoZtkJr9sR1BR/6AjnxfgHUUYO2IcdaR5nwxcJhMRq1LGLZBavbHdgQd+QM68n0B1lGAtSPGWUea88XA4Xd7scSgNftjO4KO/AEd+b4A6yjA2hHjrCPN+WLgAAAAAYbAAQAAVEfgAAAAqiNwAAAA1RE4AACA6ggcAABAdQQOAACgOgIHAABQne9e5QUQQhw/fqK4uFger19/mcHgl3+xVVXV27ZtKy0tbWtrj4qKjI9PyMvLnTdvblBQkNaljSO1tbW7dxfI48WLFyUkJGhbD/qy2+1Wq1Ueh4WF+en/dwyEf074tNLS0tdff0MeX3zxRX73BuR2uzdv3vz88y86HA75nupqUVR0bPv27S+88Gdtaxtv6uvrlb+lqVMzCRw+6Pjx44888pg8fvTRR6ZOzdS2HjW0tbWdOnVKHk+ZMiUqKkrberzJz96+Af+yffv2Z599ru/9+flz2L2BMdfU1PTCCy8dO3ZsxowZd9xxW0xMjNYVobfKysrHHvuNPN60aSOBA8AYcDgcf//72/JYr9ffffddc+fmG43G6upql8utbW0ISK+++vrevXuFEHv37g0NDb3vvnu1rgj4GoEDUMuRI0dra2vl8Y033rB69Sp5PHXqVM1qQkA7fbqy3zHgCzhLBVBLXV2dMl68eJGGlWCcyMvL63cM+AL2cABqaWxslAd6vZ6j6fCCa6+9JjQ0tLy8PCMj4/LL12tdDvBvCByAWpqbm+WB2WyWJEnbYjAeBAcHX331VVpXAfSPQyqAWpSZoXq9XttKAEBzBA74NIOBj2qogR1OgLcF+CEVt9tdVVVVVFRUVHSsvr6hrq4uODg4Pj5+9uxZS5cuSUxM1LrAkXC73YcPHz56tLC6+kxFRYXL5YqPj58+PXvOnDkzZkz3u133drv90KFDu3cXlJefamxsjIkxp6WlLViwYMGC+Uaj0WRisQqfcPJkaUFBQWFhUV1dnclkSk+fcvnl62fMmKF1XSNkNJ5763M4HAcPHtq5c2fwFffKAAAgAElEQVRVVXVdXZ3ZbM7Kylq2bMmsWbO0rRAIPAEbOBwOx969+9577/2ysjLP+7u6ulpaWoqLi99++52bb77xkksu0arCkamurn7llVcPHjzkeWdbW9vJkyffe+/9WbPybrrpptTUyVqVN1zFxcXPPff86dOnlXtqampramp37dqdkpJy1113+uPqWG+//c7OnTvb2trb29vle+rq6q655jplgw0bbrnssks1qm7YOjo6nnvuz8qi4EIIi8Wyf3/L/v0H+t3+yiu/dd1113qruhGSl6w9ceLE008/U1NTq9xfW1tbW1u7devW1atX3333nX53LKy4uGTjxofk8U9/+p+zZ8/Wth41uFyu//7vP8jLjUiS9NBDG3Ny/DX4jjeBGTiKi4v//OcXKisHOw3d4XC8+OLLRqPpwgsv8Fpho9TS0vLww79qa2tT7gkNDdXr9R0dHfLNw4ePHD784x/+8PsLFy7UqMZh2L274PHHn3C5XP0+Wl1d/YtfPOyPbyUNDQ1VVdVaVzE22traHnroFzU1NfJNk8k0fXq2y+U6caLYbrdrW9to6PWG99//4JVXXh1ogy1btsTGxlxzzdXerApD8c4778ppQwhx5523++NbxLgVmIGjqalZSRupqZNXrFgxY8aMmBizEOL06dO7dxd88cVm+dG//vVvy5YtDQ4O1qzWIXO73c8886ycNvR6/VVXfXvNmtXR0dGSJLW1tR04cPCNN/7a2to6efJkv/haU1R07A9/eNztPjetMiMjff369enpU4KCgpqamg8dOvTPf35otVoLC4u0rXME9HqD/BfV09OjxCnPvzGdzj/mTrnd7ief/KOSNq666tvf+tYVRqNRCNHT0/P3v7/1j3+8Jz+Unp4eEnKuQb84AfjNN9/cu3efEMJsNq9ff5n8h3fmzNkvvth84sQJeZt33/2/Cy5YExsbq2ml+Df79+9/882/y+N169auXbtW23owLIEZOBYvXvTPf37Y2Nh44403LF26xHO/qNlszsvLi42Nlf9q29vbd+zYccEFfrCTo6ysTDmScsstN3keDIqKilq9etW8eXP/+tc31669wPcPQ1gslv/5n6eVtHHxxRfdfPNN8ieZECImJmbq1Mx169a++OJLO3fu0q7MEbrrrjvuuusOIcQf/vDErl27hBAJCQlPPfWE1nUN24EDB48ePSqPb775Js91HUwm04033mAymf7+97eEEPn5c/xrZ4CcNtauXXvLLTcp/18yMzMXLVr41FN/3LNnrxDC6XTu27f/oovWaVkoPJw9e/bJJ/8oj3NyZmzYcIu29WC4/OOb1nBJknT//fc9/vjvV6xY3vcorCRJV1zxTbPZLN/8+ONPvV7gSCgXGBRCLF++vO8GERERd911R1pamvdqGqnNm7c0NDTI47lz59566wYlbSiioqIefPABZTlweN/27dvlQUJCwrp1/XyVXL/+Mvn/0TvvvFtd7WdHkW67bcNdd93RK50HBQV961vfUm4qezugua6urt///vGuri4hxIQJEx588IG+bxrwcYEZOIQQiYmJISEhAz1qMBhWrVopj6urqweaRuBTrNYueaDT6fz6f5rdbv/gg38qN6+55qqBDjFIkpSSkuKtuvBvXC6XvBtACLFgwfx+d5uFhIQsWDBf3rjXRGYfd9NNA04Yz8hInzhxojw+darCezVhYG63+9ln/1eeXW40Gn/0ox9GR0drXRSGLWADx3kp58Q6nU7lbAJfFh197irGLpfLr794lZeXt7S0yOO5c/OnTJmibT3oV2dnZ09PjzxOTk4eaLPk5CR5MPgcbV+TkZE+yKNKU8pasdDW++9/oBxdve++7/Cm4afGaeDo7Oy02WzKzZaWVg2LGSLPNQ+efPKPJ0+WaljMaJSUnFTGfjF7ZnzyPAklPDxsoM0iIiLlQWXl6YG28TtRUefCvc1m84vdn4HtyJEjr776mjz+9revXLJksbb1YMQCc9JoX21tbaWlZWVlZSdPnjx1qqLXLg2r1aJVYUMXFxd3/fXXvfHGX4UQHR0dP/vZzy+4YM2ll14yadIkrUsbnoqKCmWcmJigXSEYjPKhK4Sor28YaLPa2nOLWISGDngE0++EhX0dsFwul7+cVRSQ6urqHn/8SXk8d27+VVd9W9t6MBoBHji6u7t37969Y8fOQ4cOa13LGLjiim+ePn16x46d8s0vvtj8xRebc3NnXnLJJXPmzPaXRYpaW79eR4RzDn2WwWBIS0uT0+Egh0uUh5KSkrxTGMYPm832+ONPdHZ2yjc7Ojq1rQejFMiBY9u2r954442mpn87CqvX6zMyMiZPnuR0urZs2aJVbSMjSdIDD9yfm5v78st/kWdrCyGOHi08erQwPj7+hhuuX7x4ke8vba7sXoqMjBxkYi80t3LlCjlwbN++48orr1RmNigqKysLCvbI47y8PC+Xh8DmdrteeOHFsrJy5Z6SkpLNmzez9ob/CszA4XQ6//zn55XVvYQQ8fHxK1euyMvLS0tLlefbHzlyxO8ChxBCkqQ1a1bPmTN7y5YvP/zwI+XDu76+/vHHn9i6deu99/5/Pj5/W7kem3I9C/imZcuWvvPOux0dHS6X6+WXX/7e9x70DIgWi+Wll16WxxkZGfPnz9OoTASmf/zjfXlFUYPBkJ8/R14c5ZVXXsvPz2fPqJ8KzGOT77zzrpI2zGbzgw8+8MQTf7j66quysqb5/qJYQ2E2m6+88lt/+tNT999/X3r61/PtDx489MQTT/n4mtOhoecOkDc1NTscDm2LwSCioqLuuON2eXzw4KGHHtp06NChtra2tra2/fsP/OxnG4uKjgkh9Hr9vffe49enasMHKeuXf/e7991333diY2OEEDab7S9/GXBBevi4APyK2dzc/NZbb8vjxMTETZs2BmocDgoKWr58+bJly3bu3PnSS3+RVz0vKip66623r7/+uvP+uFYiIyOUcXt7u1+shD1uLVmyuKam5m9/e1MIUVl5+rHHftNrg7CwsLvvvmvyZL+5XiD8y3XXXSuflrJhw4bf//4PQohdu3atXLkiP3+O1qVh2AJwD8f+/fuVNbPvuuvOQE0bCkmSli5d+tBDGyMjz52g+Mknn/ryTg7PtbxaW/3ghOTxrKWlZffu3UKIuLg4z3M3ZKtXr3788d8vXrxIi9IQ+FauXPGtb10hjxcuXDBr1ix5/PzzLyiT2OBHAnAPR11dvTwIDg6eOTNH22K8ZtKklMsvX//aa68LIaxWa1NTk7Kyma9JTU1VxsXFJZ6HhOBTbDbbI488WlVVbTabf/GLh6KiosrKyhobG51OV1RUVHr6FM9TZ4GxlZ2dfeeddyiz4CVJ2rDh5v/4j6Mul6uhoeHdd//vhhuu17ZCDFcA7uFwOp3yIDw83PdP2RhDmZkZyriryzbIltqaOjVTWdhg69Ztyu6ofimLXcL7tm37qqqqWgixZs3quLg4k8k0ffr05cuXr1q1cs6c2aQNqOqGG67rNeUuJSXlm9/8hjz+xz/eY+F5vxOAgUNZhrmxsXGg3W4dHR3/93//8GJRY6Cjo2Pw1aM9TwD2nCfha6KioubPny+Py8vLd+3aPdCWJ06cePfd//NWXeitpKREHjBFA96n1/ezA/6KK74pzx51u93PP/+C8vUSfiEAA0dS0teHEpQ1sjyVl5dv2vRwYWGRF4saAy+99PJPf/rzLVu+7HetZbvd/uGHH8njlJQUH5+5csklFynjZ555trS0n2Xad+3a9eijv2YPh4aU75dlZWXaVgLIQkJCbrnl3FXp5WU5tK1nBIxGkzK22bo1rMT7AnAOR0ZGRmxsjPx1/8UXX3I6HcuXLw8NDXU6ndXVZ7788ssPP/zI7XabTCY/+jDbsWPHV19tF0I8/fQzn332+fr1l82alSdP4nO73adPV7322mvl5edWyLn55hu1rHUIZsyYsWrVyi+/3CqEsNlsGzduuuKKby5atCguboLdbj99uurTTz+VV5TS6/V8idHKggULPvvscyHEe++9bzQalyxZHB0d7bkUh06nY9lveNmiRQtnzZp1+PBh4Z/LckRFRSrjvXv3ZmdnhYaGjpOj/wEYOEJCQm677bbf/e6/hRB2u/355198/vkXIyIirFar8tGVnp7+wAPf/dWvHm1qatK02KGaPDk1IyNdXnSvtLT08cefEEKYzeaoqKiampru7q9j8mWXXTpnjh+cMHbbbbfW19cfO3ZcCOF0Ot9++523336n1zZz58699tqrf/zj/9SiQIhZs/LuuefuZ5/9XyFEv/9AQgiz2RwXFxcbG7tgwbz8/HyWjoXaPGePystyfP/7D2pd1DDExcVFRUXJqxhs3rxl8+Ytv/3tf6WmjoujloH57WTBgvk33niD57VFOjo65LQRHBx8yy03P/zwpuTk5LS0NM1KHKZJk1J++cuH7777rgkTJih3trS0VFRUKGkjLCzsjjtuv/HGGzSqcXhCQkJ+9KP/WLv2wn4f1el0Gzbc8uMf/0dqampoaKiXa4Ni+vRs+ZD5QFpaWkpKSnbt2vXEE0/dc8+9+/bt91ptGLc8Z4/u2rVr//4D2tYzLEajUTnXV3bmzBmtivEyqbCoROsaesuZMXVMnufMmbOfffZZZeXpioqKyMiIlJSUefPmzZs3NyJClQmVRcdO9nv/WLUjs9vtJ06cOHLkaElJSX19Q1tbW1RUVEpKysyZOatXr1KW4hgT3umovLy8oGDP0aOF9fX1brc7JWXi7NmzlyxZnJAw9heS9U5H3qRqRydOnHjssd/YbLbZs2fdfvttX3yxeefOXQ0NA145VghhMBg2bXooK2vaiF+Uf6PRKC4u2bjxIXn805/+5+zZs8f8JfgHGj232/3ll19u3bqtrKw8NDT0hhuuW7ly5Rg+/0AdaS4AD6koJk5MvvXWDVpXMcaMRmNubm5ubq7WhYyZ9PT09PT06zmj3sc0Nzf/9rf/bbPZkpISv/e9B0NDQ2+88YZe+8/sdntXV1dVVdUnn3y6e3eBEMLhcGzb9tVoAgcQ8CRJWr169erVq7UuxNsC85AKgFH6+ONPOjo6hBDf+MY3BjqqZTQaIyMjc3Jyvve9B6dOPfd1sKjIz87/Cixfr2ozTuYhwo8QOAD04+DBQ/LAcyn6geh0uvT0KfK439O24R0229cr/oWHh2tYCdAXgQNAPzo7O+TB2bNnz7ux0+nct2+fPM7JmaFiWRhUe3u7Mh7bGV3A6BE4APRDueTNZ599brFYBtnS4XA8++z/yivfSJJ00UXrvFEf+nP48BF5oNPpWHsevobAAaAfF1xwgTwoLS39zW/+/+Likr5XvXG5XAcPHnrkkUflNdyEELfddqsfnW0eAOx2e1lZuc1m6+rq2rJly7ZtX8n3r169ymQyDf6zgJcF8lkqAEZs/vx5l1xy8UcffSz+dbJlSkrK9OnZZrM5LCystbW1vr7+5MnS+vpzF2c2GAz33HPX2J7dh/MqKSl5+OFfyfNDPRMh+5nggwgcAPp3660b0tPT33vvPfmasdXV1dXV1X03MxgMK1euuPLKb8XFxXm9xvFOntvrGTUMBsM999zNfib4IAIHgP5JkrRy5YoVK5aXlJTs3buvvr6+oaGxrq7O4XBERkbGxsZkZGRkZmbm5eVyQoRW1q690GKxnDhR3NDQEB0dPWPG9EsuuXjKlCla1wX0g8ABYDCSJGVlZWVlZWldCPqRkJBwzz13a10FMCRMGgUAAKojcAAAANUROAAAgOoIHAAAQHUEDgAAoDoCBwAAUB2BAwAAqI7AAQAAVEfgAAAAqiNwAAAA1RE4AACA6ggcAABAdQQOAACgOgIHAABQHYEDAACojsABAABUR+AAAACqI3AAAADVETgAAIDqCBwAAEB1BA4AAKA6AgcAAFAdgQMAAKjOFwOH2+3WuoRhG6Rmf2xH0JE/oCPfF2AdBVg7Ypx1pDlfDBw9PXatSxi2QWr2x3YEHfkDOvJ9AdZRgLUjxllHmvPFwNHRYdG6hGEbpGZ/bEfQkT+gI98XYB0FWDtinHWkOV8MHM0trb68U6gvt9vd3NI60KN+146gI39AR74vwDoKsHbE+OtIc74YOOx2R01Ng9ZVDENNTYPd7hjoUb9rR9CRP6Aj3xdgHQVYO2L8daQ5/Xfuu1/rGvphs3U77M7w8FBJkrSuZTBut7umpqGltW3wzfylHUFHdKQFOvLxjgKsHTGOO9KWVFhUonUNAzIaDTHm6IiIMJPJ6FP/3m63u6fH3tFhaW5pHXqc9Nl2BB39Cx15Ex3JfLajAGtH0JHWfDpwAACAwOCLczgAAECAIXAAAADVETgAAIDqCBwAAEB1BA4AAKA6AgcAAFAdgQMAAKiOwAEAAFRH4AAAAKojcAAAANUROAAAgOoIHAAAQHUEDgAAoDoCBwAAUB2BAwAAqM4wgp/R6XTBISEmo1Gn10uSNOY1+QW32+1yOnvsdltXl8vlGuJPGY2GGHN0RESYyWT0qV+d2+3u6bF3dFiaW1rtdscQf8pn2xF09C905E10JPPZjkbWDsaKVFhUMqwfCA4ODg0L86m/IW253W6rxWKz2c67pTk6Kikpzsd/dW63u6amoaW17bxb+kU7go7oSAt05OMdDb0dGV+zxUi/ZnvSf+e++4e+dXBwcFh4+Lj9dfdLkiSTyeR2uRyOwfKyOToqOTne9391kiRFRIQ57E6brXuQzfylHUFHdKQFOvJaYSMzxHZkwcHBEZGRRqNRp9P5fmvqkSRJp9MZjcbg4GC32z34R16/hjGHQ6fThYaFDfcFxonQsDCdbsBfptFoSEqK82Y9o5SUFGc0Dni4ze/aEXTkD+jI9wVYR4O3I+Nrdl+SJIWFhwcHBw/3B4cROIJDQvilD0SSpOCQkIEejTFH+9evTpKkGHP0QI/6XTuCjvwBHfm+AOto8HYEX7MHNfjX7H4NY2uT0TjMesaXQX4/ERH+9yc7SM3+2I6gI39AR74vwDoavGa+Zg9i8K/Z/RrGWSo6vb7f+60WS3d3t8vl0ul0QUFB4zYPDvT7EUKYTP6X1Qap2R/bEXTkD+jI9wVYR4PXzNfswZmMRutwth9G4Og36LW3tdntdnnscrm6urocDkdkVNRwaggQgwRhf8zIAdaOoCN/QEe+L8A6GrzmQb5GQgz/9zOqhb+sFouSNhR2u91qsYzmaQEA0Jw/RihvGu7vZ1SBo7u7/xOKBrofAACMT6MKHAMt/TGyJUEAAECgGlXgGOiUmOGeKgMAAALbqJJBUFDQsO4HAADj06gCR2hYmLHPWUNGo3HcnhkLAAD6NdpjH5FRUSEh/6+9O4+L4szzB/5Un1wNNKccKqiAigIqKuABSjxDjEe84hmTuDlmZ2c2v33t7Oxkkt2ZzMxOZrNzx8zESbyNt4JnVLxAVJTDi0OQ+6abq++urt8f5XQYjqYbuvqAz/vFH0X1U8W3qrrobz/PU8/jyrah8Hg8V1fXkflMLAAAAJgwmOnpe3Bzd0eVBgAAAJiA3p0AAADAOSvUcAAAOL6GhoacnDvscmJiQmBgoH3jARhpkHAAwIjQ1NR08OAhdjkiYgISDgAbQ5MKAAAAcA4JBwAAAHAOCQcAAABwDgkHAAAAcA4JBwAAAHAOCQcAAABwDgkHAAAAcA4JBwCMQJS9AwAYcTDwFwBXGhsbHzzIy88vaGiol8nkPj4+oaGh8fEzZs2a6Y7ph+xKJHoxzbVcLs/JuZObe7+6utpgMAQGBkZHT05ImD1u3Dj7Rjhoer0+Ly8/Ozu7urqmsbFRKpVGRUXNnZsUGxtr79AGplAobt26df/+g+fPK0QiUWhoSFxcXEpKsqura/diNE3fu5eblZX1/HmFQqEYNSpw2rRpqakLfX197RU5mAMJh9O4dy/3009/Y2bh73//n+fOncNpPENx5kz6/v0H2OV/+7cPZs6c2WexwsLCn//8F+zye++9m5KSbKP4hqy9vf3kyVPnz19gGMa4sr6+vr6+/t69e0eOHN258+1p0+LsGKFpjx8/+a//+m92eefOt196KdV0+StXrn7xxV/Y5c8//5Pj/98XCIQajebcufPHjh3X6XTG9R0dHaWlpadOnV60aNHmza/3+JxzNMYbZM6cpH/5l+8TQp4+Ldq1a1d9fYOxTENDQ0NDw/Xr1xcsWLBz51t8Pt9u4f6j3sHfuXN3164vFAqFsUxzc3NeXv6pU6c/+ujD4OBgdmVlZeXvfveHmpoaY7GysvKysvKMjLMffPBDp8irRiynbFLR6/VVlZXV1VV6vd7escBgLFu2dOzYMezyV1/tUalUvcvQNH3gwEF2OSoqav78ebaLb2hqamo//PCjc+fOd882umttbf3lL391/PgJGwdmvokTo6RSKbt8+/btAcsb5yiJi4t1/GyDENLU1Pjhhx8dOnS4e7bR3bfffvub33ym0WhsHNjgNDY2MQxz6tTpjz76uHu20V1mZqZjvuXY4A8cOPi///tZ92zDSC6X//znv+jq6iKEZGff/vGPf9I92zBSq9W//vVv6uvrOY8YBsv5ajgMBkNhYcGhAweEIuFra9fFxU3j8ZwybbIUj0e5uLj096rBYNBqteyyRCKZMiXaVnENhlAofOutNz/88CNCSEtLS3p6xrp1a3uUuXXr1vPnFezyjh3bneUqNzc3f/TRx52dneyv/v7+K1akTZky1dvbS6lUPnny5MiRY83NzSKRaPbs2fYN1QQ+n5+Sknzy5ClCyMOHj+RyuTH/6K2tra2goIBdnjt3ro1CHJrPPvstmw5GREQsW7Z03LhwsVjc2tp6587ds2fPGQwGQsjDhw8PHjz0xhvb7RyrGerq6r766usLFy4SQqRSaVray+wR1dbWXblytaioiC128uQpB2x3qK+v37t339mz5wghISEhaWnLx4wZq1B0FRUVnzx5ir1MLS0tmZnXvL29/vCHPxFCpFLpihWvTJgwQa/XlZc/P3LkKJsa6nS648dPfO9779v3iKA/TpZwMAzzrLR0/969KrWKKMjRI9/4+viODQuzd1y2MGPGjL17v+7v1fT0jH379rPLb7/9lre3t43CGqyoqKglSxZfvHiJEHLixMk5c+aEhAQbX1WpVAcPHmaXX355eXh4uH2itJBOp/v97/9ozDaSkhJ37nzbzc2N/dXd3T05OXn69Ol//euX8fHxoaEh9ot0YAkJs9mEgxCSn1+wYEFKfyXz819kG3w+35HbibpjGEYkEr3xxraFCxdS1IsOpL6+vpGRkTNnxv/sZ5+wNR/nz19YuHChsTbOYSmVSjbbWLRo0datm8ViMbt+woQJCQmz//CHP969e48QQtN0bu79JUsW2zPWXhQKBZttrFmzes2a1QLBi0+luLi4CRMm/PrXn7K/GrOK5OT5O3a8YWztio6OnjJlyocf/pT9xpWVlb19+zYPDw87HMmQGQwGmqatu08ej+c47WjOlHDQNF1SUvS3L3erVCpXN1dCSJu8/W9/2/3mW2+NGTPW3tHZU3V1tXEazDlzkhISHPerc3fr1q29c+duW1ubwWDYu3fvj37078Z//RcuXJTL5YQQLy+vNWtW2zVMC2RlZRcXF7PL0dHR77//nlAo7FFGIpH88Ic/MB6pwwoLCxs9OrS6uoYQcufOHRMJR05ODrswe/YsiURim/CGyMvL60c/+vfx4/voGTpx4sRt27Z++eVu9terV686RSUHIeSNN7YtW7asx0qxWLxq1So24SCEFBUVOVrCwXr//feSk+f3WBkfP2PSpIlPnxYRQthsY/XqVevXr+tx+4SHhy1YkMJ+e6FpuqKiYsqUKTaK23rUatWjhw+LiosM1ss5KIoXEhI6c+YsiadD3JhOk3AYDIanT58ePXK4q6tLIvGYn5yi0+luZ2c1NTUe2L9v3fqN48ePt3eM9qHX63ft+gubF3t6em7fvs3eEZlLIpFs377tt7/9HSEkLy8/NzeX7T3a1tZ24sRJtszWrVuc5csKTdMnT540/rphw/re2QbL8bMNQghFUSkpKWy1WV5efkdHh6enZ+9i7e3teXn57HJSUpJNQxyCd97Z2We2wUpKSvz66z1sF7EbN25u3rypv0vpODZv3tQ722CNHz8uJCSktraWEGJspnQoW7du6Z1tsJKTk9mEgxDy0kupvbMNVkJCAptwEELq6uqdLuHQ6/UP7j84m3FGJpdbd88+Up+AAP8pU2Osu9vBcY6Eg2GYkuLiC+fOtjQ3C4WC+ckpCxam6nRaPa2/eeNGTXV1RvrpVatfGzPG0Ws+uXD27LnS0lJ2+e233/Ly8rJvPBZJTEy4fv1GXl4eIWTPnn0xMTFisTg9PYP9NhMdHe3Iz9r0UFZWZuyvN21aXFRUpH3jGbqZM+PZhINhmIKCwnnz+uifUVhYyLayi8XimJiptg5xsEx0hyKEeHh4zJ0759q164QQhUJRW1sb5vDttibyJ0JIcHAQm3DIZDJbRWSB8PCw/l7q3uNk/Phx/SXrvr4+xmVjm6YTqa2pzcq6IZfLPdw9xoZZp8K+s7OzqqpKT+u0Oq1Vdjh0zpFwVFZWZGSkV1Q8ZxiyZNnyhQtTXV1dCXFfumS5Sqm8ffv2s9LS8+cyVq5aExgYaO9gbaqqqurw4W/Y5Xnz5s6ePcu+8ViKoqg33tj26NEjnU7X1NR09uy5uXPnnDt3nn1p+/ZtTlEZwDJ+DyOELF++3I6RWMuoUaOMFdp3797tM+G4c+cuuzB37hzTn+LOJSYmhk04CCFOkXCYZvweolarDQaDs3TBJoR4mtcW0L0tT61WcxYOJ7q6um7evFZVWcXj8Za/nBZjpSd7i4uK9u3bY5VdWYsTJBwymezkiRPlZc8YQhYtWrxkyVJjryKJp2TDhtc7OjofP35UWFDg7u6e9sqrjt9f0lq6N6Z4eXlt3brF3hENxqhRo3x4gMcAACAASURBVDZsWM9+kz527PjTp0/ZI1qx4hXH76zXXUlJiXHZ9NdNJzJ//nw24cjNva9QKHqMV9bV1ZWbe59dTkxMsEN8nOn+OdfU1GzHSKyi+4VzroTDzKFQuhdjHzJyFjRN5+fn3cnJ0dN0QkLi7IQEYzfzIZL01QZqX47+tmtvb/vm8MGSkmKBgD9n7txly182ZhsskVi84823Jk2aTAjJzsr69tLFPp/kHpbS0zOePXvGLu/c6WSNKd0tXbqEzS30en1BQSEhRCqVrlz5qr3jsoxM9qLxVSqVOku/kwHFx89gK5lomi4sfNjj1cLCh+w/d09Pz8mTJ9shPs5IJN/9s+5znBiwDTPrOJ2oKrSH6uqqk8eP6/V0WFj4ggULrZVtOCaHTjg6OtqPHztWWFgoFAimTY9fsmRZn9mum5vb+g0bxo2fQFHU9WuZWbduGEekGMYqK6u++eYIu5ycPL+/wTqdglAoXLVqVfc127ZtdbrBv42t486b+fXm5eU1c2Y8u3z37t0er96582K8r+Tk+T2+CTg7D4/v3n5IOIAj7e1tBw8cUCpVnl6eCxYsCAkNtXdE3HLchEMul505ffLevbsCPn9ydPTSZcv9/f37K+zvH7Di1ZVjw8IZhsnIyLh+/ZrWSYYIHBydTrdr1y72y6W3t/eWLZvtHdGQ0DR9/vyF7muam52vEts4rugwy3eNY3ndvXuv+0evQqEwPmw5a5aTdR4akFL53ZEOp74p4DjUanV6+pnq6iqRWDhz5qwpU2N6DJjR3Nz8sLCgpaWlz81pmq6urnry5Ak7BqtTcNCEo61N/u2lS3fv3KUIGTd+QtorK4KCgkyU5/F44eHhy19OCw4J1Wl1F86dy8y8qtMN24HP09MzysrK2eWdO9/u83lFJ5KZeY0dvsJ4vx0+/E1NTa1dg7KYsWKjoaFhOA26Hxsbww4kpdPpHj16bFz/6NEjtreNv79/ZGSE3eLjRvenOZxlcBFwIjRN59y+/eB+LkVIWFhYcsqCHo0pWo3mdnbW4UMHvzl8sLmpqcfm7BiY3xw6eOjggeLiImfptuKICUdXV9e3ly7dvp2t0+lDQkdvfP310NDRA24lEAgmTpy4avUaTy9PpVJ55crl7KybznIZLFJRUXHkyFF2OSUlOT5+hn3jGSKZTGYcI/WnP/0J292Spundu3c71+Uz9lY2GAxyaz9Mb0eurq7Gh5ONXUQJIbm5D9iFlJRk521B749M1mpcdvaEHhzQ06dPb928rlKq3T08Vq1e07v+nsfn6/X6jo6Ox48effXV7vr6uu6vPntWeuDA/vLy8q6uTuI8XVgcLuHQ6XQ5Obezsm6pVWqpVPpP77w7apSpuo3u2Jxj3foNFEV1dnRevnz58aNH/U2g5aR0Ot3nn79oTJFKpc7emEII2bfvAFtRv2BByqRJk4wDlz1+/OTq1Uy7hmaZceO+G399GDzX0J3xCZScnBx2zG+dTmfswDH82lMIIQ0Njcbl8PAwe4UBw5JMJrt183pdXR2hyOrVr40dG9a7jEAgWJiaOmVqDEVRFc+f79u7x1jPUVVZ+Zddnzc3NQmEwtSXFk2eHI2EYzB0Ot2D+/cz0s9oNRo/f7933n3Pz8/Poj3weLwZM+Jf37zZxdWlpaX5zOmTxUVFwynnOHMm3ThW4M6dbzt7ZW9eXn5WVhYhRCgUrl37GiEkKirKOIr23r37nKgzR1RUlHHZOITD8DB58mS2wUilUhUVFRNCioqK2dEOxo4d41xPL5uDYRjj/LdisTgkxKFnvQHnotVo7uTcfvzoEUVRSUlJiUlJ/aUL3t7STZs2s/lExfPnhw4dqK2tKSku3vX5n7u6FGIXcXJySmrqS2Y+OewIHCjh0Ov1uffuHfnmsFajCQoKXrdu/aC77CYkJKa98orEw6Omtvb06VOVlRVWjdRunj9/bmxMWbBgwYwZ0+0bzxCpVKrdu//GLr/22hpjcrl+/Tq2m55arf76673Oki9OnBhlvPOvX79eW1tnurwTEQgExpGnHzx4QAjJz38xnHlycrLdwuJMYWFhY+OLGo6UlORh9gAO2JHBYCguLr52LVOvp8PHjX85bYXp8h4Sybbtb8TExvH5/OKiooMH9u/bt0cul7u4usydO2/5y2lOlG0Qx0k4aJq+e/fOiePHlEplQGDgy6+kTZw0edBz3AkEgqSkefOTF7i7uVdUPD929GhdnZP1QOxNq9V+/vkX7KevVCrdsmWTvSMaqlOnTjc1NRFCfH19ly1balzv4+Pz+usb2eV79+7dvp1jn/gs5Obmtnz5d5NZHDt23ESq1NbWZpOgrMY4I2B29m29Xp+dfZv91Um7EJlo81Kr1fv3HzD+unDhAptEBCNCR0dHRkZ6R0dH4KjApUuXmjNMpYdEsmHjxoTEJD6fX15e3tLSInYRL1q0OO2VFc6VbRDHGWm0oCD//LlzXYouQojBwDx5/KTsWZnxVR6PFzVxYmRklEgk6nNzpVJ5JyentbW5+3/49vZ2tqqqvKzsxPFjGza87tf/g7WO7/TpMxUVFezyO+/sdPahpSorK0+dOs0ub968qceTh4sWvXTjxk12WLO//e2r6OjJTjG4xdKlSy5fvtLe3k4IycrK8vGRbty4ocf3Y4PBcPHixQMHDv3qV7908Bnquxs/fnxQUFB9fb1cLv/2229bW1sJIZMmTRw1apS9QxuMzz/f1dnZuXz5sh5XR61W//nPn1dWVrG/zp8/Lzw8vK8dAAxGV1dXTXUVIcTfPyAwcJSZQ75KJJ5RURPv3n3RzEdR1NSYGGd8WtshEo6OjvbsrKzWlhffOVqam2St//DkMUVRtbU1UqlPn42pDMNUV1WdOXNK12v8A7ZzJUOYkuLi7OysFa+u5OYIOFdWVn7s2HHjr7///R9N9xIaP37cf/7nj7mPa5Bomv7yy7+xFQCRkZG9R8Xm8/lvvrnjP/7jx4SQjo6OAwcOvvfeu3YI1EJeXl7f+957n3zyS/bX9PSMJ0+evvJKWmRkhIeHh0KhKCsrv3DhAvtw6Vdfff2Tn/zYWXp7URSVkpJ86NBhQsiePfvYlfPnz7NrUEOyf/+Bq1czX3klLTp6sre3t1KpfPq06MSJE9XVNWyB4dEpGxyKj49vbFxcXl5eeVlZcUmx1MfHnAa7srJnZ86cNn7AadTqQwcPbNm6LSgomON4rcwhEg43N/eAgMDioqd6miYUYQihez0P2dnRqdfp+tycYRiVWml6wh4enx8e7sTz1+fk5HSvnx9w+Ha12qHHPTMOvEEI2bJlU59p/vjx4155JS09PYMQcu3a9aSkxLi4OJtGOSixsbE//OEPfv/7P7BjVJSVlf32t7/rpyyjVqudqFJ01qxZbMLB5vEURU2f7pS9iEaPDp01a9bx4yfq6uq++OIvfZaRSqUffvgTp6hXAyfi5ua64tVVtbV1TU2N6WdOR0REBAYOUEf4/Hn5H//we61WKxKJ5s2b39jY+OTxo+flz3f/9a9v/9M/Dbi5Q3GIhEMgEKxdt+7ltDSmV55BG+hbt25mpKebsx+JRLLx9U0RE/oYg0goEorFzlcBNSx1H3hjzpw53R/u6GHNmtXZ2bfZ2vu//nX3p5/+j1NMNJCYmBAQELB3797u88d25+HhsWbN6iVLFjtXb8SQkODIyEjjHHXTp0+TSqX2DWlwIiMj169fFxkZ+fXXe+rr63sXmDFjxo4d200MbQwwaH5+fouXLD5x7FhHR8c3hw+/8867IrG4z5I0TZeXl321e7dWoxW7iOfNm7/85TRar9/z9VdPnjyuq6v95vChtevWjxoV5DQVpY8elwxcihBCiK+FT6hahV6vz8y8euL4sdCQ0M1bto7ta5Jog8FQWJj/xa5dnp6SHTveipo4yeZhvtDazxi00ZOdchzGx09K+1zvpIdDbHtEDMM8efI0Pz//yZOnLS0tSqXS399/7Nix06bFzZgx3VozxeAaDYVOp7t3L/fOnTvPnpV1dnYGBgZOnBiVkJAwefIkK/4HxzVycP0dDuHsU6+rs/PMmdM5Obd1Ot2yZcuXLlveu3siwzBFRU9OHD9RU13t4uoyZ87cl9NeYStEuzo7DxzY/+hhocFgiImNXfHqyj7bVh4+fPjnP/3B01OyfsPG6dPjuTgQ0v+nXp+c6QsWgBOhKCo6enJ09LCaQ3WYEQqFSUmJSUmJ9g4ERhYPiWR+cnJzc1NxUVFm5lV/f/+ExJ6jcWi1mgf3H9TWVLPPpCxMfcnYS5R9buWsRJJzO/thYeHUmFjz+5/aFxIOAAAAmwoJCV20eGldXV1He8fly5f8AwInTJjQvYBAIIyKmqhQKCZOnJiQkNij2cXLy3v5yy97enk3NzUFBwc7S5MKEg4AAACboigqIiJiwYKFp0+famxovHH9ekCAv6fnd52U+Xx+TExMRGSEm5u7UCjsvQdvb2lq6kt6ndbVzc1ZEg4nqIQBAAAYZoRC4dJlyydOnEQbDPn5D+7evav7xycxRWKxl5d3n9kGy9XVReLp6UR9z5FwAAAA2MeWrdtCgkP0Ov31a9ecaKL5wUHCAQAAYB/e3t6vrlzlLfVuaWn+9tKl1pZWe0fEIaepitFoNZWVFRpNH+NZMQxTN4wmygIAgBGCx+NFREYkJCReuXL5WWnJ1auXp02zznh6dbU1VtmPFTlNwiGXyS5dvCgQ9h1wn4kIAACAg3NxcU1MmlNbW/Po4cPs7KynT59YZbdarcN9LDp6wsHj8by9vChC6Wm6VTZAXZObm7tQ1PeQbQAAAI7Jz89v4cKXWltaauvqGhsbrbhnsdjFxcVR5k9wgoRjakzM9jd2NLc0k/4n+2ZLToiIGD16tM1iAwAAGDqKoqImTtyy9Y2ioid6vd6Kux0zdmxkZL/TR9iYoycchBAXF9dZs2fbOwoAAAAOjQ0bOzZsrL2j4BCeUgEAAADOIeEAAAAAziHhAAAAAM4h4QAAAADOIeEAAAAAziHhAAAAAM4h4QAAAADOIeEAAAAAziHhAAAAAM4h4QAAAADOIeEAAAAAziHhAAAAAM4h4QAAAADOIeEAAAAAziHhAAAAAM4h4QAAAADOIeEAAAAAziHhAAAAAM4h4QAAAADOIeEAAAAAziHhAAAAAM4h4QAAAADOWZBwMAzDXRzDgInz44ynbpgdDsEROQMckeMbZkdkOmZnPCJbsvT8WJBwGGjawmBGFhPnR6vV2TISqzARszMeDsEROQMckeMbZkdkOmZ86plm6fmxIOHQ6pzvzWRLJs5PZ6fClpFYhYmYnfFwCI7IGeCIHN8wOyLTMeNTzzRLz48FCYdapUL9Un8YhlGrVP29KpO3OdepYxhGJm/r71WnOxyCI3IGOCLHN8yOyPThEHzqmWT6U69PljSpGAxKhfMlsLahVCgMBkN/r+p0+vr6ZlvGM0T19c06nb6/V53ucAiOyBngiBzfMDsi04dD8KlnkulPvT7x33v/n80vrdfrGYNBKBRSFGVhbMMWwzBKhUKtVpsuplZr9Draw8PNwU8dwzD19c3ytnbTxZzlcAiOCEdkDzgiBz8iMw+H4FOvL2Z+6vVGPXpcYuk2PB7PxdVVJBTy+PwRew0YhjHQtFanU6tU5md5QqHAR+otkbiLRI719mUYRqvVdXYqZPI20yl/dw57OARH9Hc4IlvCEbEc9ogGdzgEn3qEkMF+6nU3mIQDAAAAwCIY+AsAAAA4h4QDAAAAOIeEAwAAADiHhAMAAAA4h4QDAAAAOIeEAwAAADiHhAMAAAA4h4QDAAAAOIeEAwAAADiHhAMAAAA4h4QDAAAAOIeEAwAAADiHhAMAAAA4h4QDAAAAOIeEAwAAADgnGMQ2PB7PxdVVJBTy+HyKoqweE/SHYRgDTWt1OrVKZTAYLN18RF24wZ0roVDgI/WWSNxFIuGwP0VgdQzDaLW6zk6FTN6m0+nN3GpE3Zhk0PdmZ51P4QFJxTWR/DllMPfcghUxPIFWGt4ZliKL2aSTBA9iD9SjxyUWbeDi4uLm7j4S7gpHxjCMUqFQq9XmbzJiL5z550rq7RUU5D8CTxFYHcMw9fXN8rb2AUuO2BuTWHRvPj4SlPkx8gwHwfAE9Qs+lkevs3RDy2o4XFxc3D08LP0bYHUURbEXwsycYyRfODPPldTbKzg4wFZBwTBHURT7djKdc4zkG5OYf28+PhJ85Se2CgoGRhn07BWxNOewoA8Hj8dzc3e3LC7gkpu7O4838BXEhSMDnSuhUBAU5G/LeGAkCAryFwr7/VKHG5M1wL3ZWReU+bENwwFzBWV+LOyss2gTCxIOF1fXkVnv57AoinJxdR2wGC4cGehc+Ui9cYrA6iiK8pF69/cqbkzWAPdm4QG0pDgmyqD3KTxg0SYWJBwiodDCeIBz5lwUXDiWifMgkeCLJnDCxFsLN6aRqXuz4poNAwHLWHp1LOjDwePzLYsFuGfORemvjFKh0Gg0BoOBx+OJxeJhX7tr4lyJRPjXD5ww8dbCf1QjU/em/LktIwGLWHp1LEg4UPvngMy5KH2W6Whv1+l07LLBYFCpVHq93tPLy8rxORIT5wrvbeAI3nXmMHWW0J7iwCy9Ohj4ayRSKhTGbMNIp9MpFQq7xAMAAMMeEo6RSKPRWLQeAABgiJBwjET9je43iNFLAQAAzIGEYyTq76l3c0b1AAAAGAR8wIxEYrHYovUAAABDhIRjJHJzdxf2evBdKBQO+ydjAQDAXpBwjFCeXl6urq5sGwqPx3N1dR3ez8QCAIB9DWZ6ehge3NzdUaUBAAC2gRoOAAAA4BwSDgAAAOAcEg4AAADgHBIOAAAA4BwSDgAAAOAcEg4AAADgHBIOAAAA4BwSDgAAAOAcEg4AAADgHBIOAAAA4BwSDgAAAOAcEg4AAADgHCZvgz7U1tRkZ2cVFxW1tLYEBQWNHRuWmvqSf0CAveMCAABnhYQDerqdnXXgwH6aptlfKyoqKioqsm7d3L7jzRkz4nuXV6tU9x/cv3D+XEtLy7Jly1e8urK/PWs06rwHD3Jz79XV1RloOiw8PCwsfH5yipubW5/l9Xr9/dzc/LwHNTU1CqUiJDgkJDR03rz5IaGh1jhQABiJatSify0aY7rMcv+27SEtPcrP9FL8W3h9n+XVBt7WwnGEkB+MbUiSdhFCWnWCdx+HmRlSsFj720lVQwyvOxeeYZRY5y/ST3ZXzffplAhoMyPhFBIO+AfXr2UePnyIz+cvXbosIjLSR+pTXVN94tjRtvb2/fv2hoeP8/HxMRYuLCjIzLxSUlxsYJgB91xeXrbn66+ampqMawoKCgoKCm7evPHGjjcnTIjoUb6+rm7v3q8rKiqMa56VPXtW9uz69WsvvbRo9ZrXKIoa6tECAJjtXrv7w063qRKlvQMZmNrAq1CJK1Tie+3uB+t9t4a0LPFrt3dQSDjgHyUkJlZUPJ83L3nc+PHsmlFBQcHBIZ/8/L/VanVBft6ChanGwqWlJUVFRebs9tHDwi92fa6n6XHjxi9avDgkJFSjUZeXl588cVwmk335ly8+/Oi/3N3djeWbm5p+8cnP9DQ9OnT0osWLx4wdy+cLGhsazp07W15edvnyt4GBgXPnzbfusQPAiLIluCW2n+zBXWDoc/2+Ot9fRqr41MBfsbwE9G+iqnqs/FlZSLueP9NLsX5Ua/f1/L6+PVka3tuhzdO9FIQQwhCVgdep5z9VuFxs9pLrBbtr/ANEummedk6VkHDAPxCLXbZt39FjZUhISHh4eHl5eW1tbff1L7+ctnjJEnb5P37078ZWmN5UKpWepufMmbNh4yaB4MW7LjR09PjxEz75+X+3d3RcunRx1arVxvL+AQGvrlzV1t62YsVKkUjErvTz84uIjPz017+qqanJyEhHwgEAQxEg0o9x1ZpZWEgxIS7aCpX4plyS4tMxYHkBxfTeuYBiCCESPm3O37UoPEKIp4D2Feq7r5nkoVro0/HjktEtOsEfKwO/mFIhMCNV4g6eUgGzuLq6EUL0+n94N7u4ukoknuyP6eaNmbNm//uP/mPT5q3GbIMVEhIyZ85cQkjR0yc9Nnlp0eLXXltnzDZYIpFo7tx5hJD29na5XDbowwEAsIieodaOkhFCDtb5Kmmn+ej0FtLrgmSEkE6aX6kSDVieU05z1sCOtFrt8+flhJDQIfTWDAsL77PXxZgxYwghNdXVPbKZ/rh7eLALGo0FuT8AwFAwhEyVqMa7qdv0/HPN3vYOxwKjXTTsglxn5zaNEdykwhhEz7NMvK4PiDJ4BBBCKE2XoKWU0nS92E4opn3CDe7+3Qvz26r57TWE1jNCF13IdMLjcxe47WXduqlUKgV8fvzMmVbfOVt3YmAYrVbTo/6jT9VVVYQQoUDg6+tr9WAAAPqjN1DrRsl+WR58slGa7NPhLzLrO5Ld6ZkX3/RceH13TLGZEZxw0Drv4/9k4vWOZb9QT1lJCOHLKz2u/kLY8JhdbxC7K5PeV07fTHjfnT1x0Tm3u7t5mi7aM0i2I53h9f2cpzOqrq4+cfwYIWTd+g3e3lKr759tGRGLRGzmYVpFRcXVK5cJIUuWLRMKhVYPBgCgP1qGivNURrmrixUuxxp83h3TNPA2DqBSJWYX7J4hjdyEgyIMr7PBVAHdiw69lEHHU8iMhXmdlLjovGZ8Ci0NMxbmabv4XU2UuoPhCYg9O+VYmVql2v3lX/Q0PX36dI46aT558pgQEj1lionHXLVabWNjY05O9s3r19lgFi1awkUwADBytOgENeo+ujUEinXCvjpXagwURcim4JafloZmyjwX+7WPd9M4Tnh9atUKjjT4EELGuWr8RTprxme5kZtwfIcn0I2aQnuP7rGa9u5v6BVGVJEtrH1Ae48h1DDvBHP+/LnGxkYvT88NG1/nYtyLhoYG9sHaGfF9N9bo9fp//cH3dX/v3iH1lr6y4tVZs2fz+cOq0QoAbG9PrV+f6387qTJY3Mdns9ZAEUImuqvneHdltXnsr/P76YRa7oYDsjS87lQ0T6YTFHa6nmqUduj5hJBNwS08ew9dhISDMHyRcuYO1YzN5hTWhUwT1uZRWoVr3hHNuAWMm/WbGBxHTU31t99eIoRs3LRZIvHk4k98e+kiIWR06Oi4uGn9ldF160yqVCoqKyvCw8NHBQVxEQ8AQH+MnSHWB7XmtLs/7nLNbXefyQ594QD+t2JUn+tFFPP9sIapEpWN4+nNaRIOhmEG/Q2bYRiNRiMQ8AWCobb6q2Zs4anb+a3lovJrwvoC7fiUIe7QkX176RLDMHGxcbGxcVzsv6S4ODs7ixCStmIFj9d3XZFAIPjjnz7XaNRymfzp0yeZmVevX792Oztrx5tvxfafowAADOiDsIbZ3l2D2HCUWLcioO1ko3R/nV+cRCnkMVyMbzHo8Izc+YaVgfI53p1+9u69wXLoFgGDwdDeJq+uqix7VlJaWlxWVtrc1EgI6ezsqK6u7P0UZWVFeWtLc+/9KJWKh4V5HR0DD9UycEhuvqppGxm+iKK17rd+T2g7N4lxh2GYwsICQsjMWbO42H9XV9e+fXsIIdHR0VOnxpgoyefz3dzcQ0JDX1q0+L/+++czZsRrdbrdX/61pa9rDQBgA6/4t0n4dL1GeKXVkxAioDjJOSzyzuimv055zv6wQ5NpDVSSw2QbxMETjmelxbn37uTn5RYXPSl7VvL0yaOyslJCSEN93Z3bWWp1zwqi7KybbIEemhobGxrqxWKXvv8MY+B31AoaH3f/4beWE0Mf42YyAlfNuBTabzwhRPQ8W1SZPcRjdFg0TavVakKIt9T6zUY0Te/d83VLS4uPj8/WbW+YX3clEAg2b9nq7uau0+vZx1UAAGzPQ0BvDG4lhHzT4Nul5xNCJHw7T5Dmzjd4CWj2Z+0omZBidAz1Tb0DDR/guE0q9XW1hQV5vn7+06bPdHN35/F4tF5P8XiEEIPBoNPrmF4Thul0WrpXtQdN65ubGn19fF3E4j7/EGXQueYdEhdf7L5SHzipY+knjGsfo7voAyZqJqTyW8ooWutx/TPZ2ETCt/PwbVzg8/nvvfc9QkhgYN/tgoPGMMyxo0cePizk8/lvvb3T09Oy3iEuLi4RERH5BfnPnz+3bmAAAOZL8ek83+xdrRZ92+q5KlDuLjDIHaUqgfiL9KsC5UcafG7IJYv82qPc1faOiBCHreGgaTon55ZIJJo5KyEkdLSPj6+3t9TXz9/Hx+JkrbOzUy6XhYSO5vX3XIOB5rdVCevyu/8ImksoQ9/NJYzIXRO5mJaOJYQIax+In12xNCSnQFHU1JiYqTEx3edUs4pz5zKuXcskhGx8fVN4+LhB7IEdH0wul1s3MAAA8wkoZnNwCyHkVKO0U89359t5WK0eXvZvkwr0hJC9tX4GxxiswUETjs7Ojo729jFjwz08JP3Vtxt66bNYm1xGCPHykvZbb0/xDB7+er/x3X9orxCG6rf6Rzs2QTdmFuEJKJ3KLXcfpXOI5NEpnD93NiM9nRDy2mtr2VlU+qTT6Zqb++6iQdN0WVkZISQID6oAgF1N81ROkyhVBt6lFk83e4/j2YMr37AhWEYIKVW63JJL7B0OIQ7bpNLZ2UEIkUhMnaOK52UuLq6m96PVapubm3x8fF3d+h3FkhG4dKZ+aOZjsS/wBKq4jeLSy7zORkHDI1HZNQu2dRIKheLokcPNzc0rXl0ZFTVx6DtkGOZsRvrZsxmEkJUrV6W+tMhE4ZMnjuXk5GzfviMmNrbHSxcvnJe3yQkh8f0M3QEA5qisrDh29Kinp2T9htctbdkEo9eDW/KKx5xukoYMNDaG7c2Xdp5v9qpQiQ/U+cZ7KdzsXQfjoAmHUqkkhIhEffe6YDU1NQ74mKtGo5a1tk6IjBL304Fj0LSjZ2nGpbgWfMPvahQXX2BcHCJ/tKKbN67fuXOHEPLV7i9/+T+fWtRTDAAADtFJREFU9q4fUqtUGu1306exNXZqtbq9vZ1dIxAIjM0xNE0fPfLN9evXCCFLliydO2++TCbTanoO0ucfEMDn87VabV1dnUql+vzzP8XHz5w5c1ZAQACfz29uab5180ZeXh4hJCYmJjFpjvUPG2DEOHTwQGVlJSHEz89/1eo19g7HDvobypMQwqNIsNis6SHHumqX+LVfbPEqU1n5U2bo4fEpZnNw68/LguV6QUaTNzttrB05aMLBTkpO06Y6/cbETDNOHMqqrqroUYadp2MQPT8GxhcoE3a6PDlD6VSiymyDZwjp1YnVqWl1uh4LPVy/fu3UqZM9VmZmXs3MvMouz5o1+40db7LLx48dZbMNQsjFixcuXrzQ5z5/9T+fenl5iUSi997/53NnMy5dupibey83916PYrGxsZu3bOtv6A4AMIfm7xm/VjtCJ17ubyhPQoi3gP7LFHO7pa8OlF+TSTQGK/9Hskp4MRLlDE/F/Q73k03SZJ/OQLtWwzhowuHu7kEIUalMjeDm5u7u4TFAvUJNVaWnl5enp5c1g/s7XXCseupq1wcHBLIKpqOe0nM4qL7tzZs3v7SkpLm5ad269UMf1LypybJZjkQi0cpVq+fMmZufn/fkyeOW5pYuRVdwcEhwcPDMmbMio6KGGM8IZzAY7t+/X1palpKSHBxsi64w7e3t165dF4lECxcusHp1IwzO2nXrD+zf5ynxXJj6kr1jcW5SoX7tKNn+un7zA/t6Pbj1QYc7zVCH6n1/EGZqBjGuOWjCIZFIKIqqqamOmhg96C+yer2uoaF+2oyZA8y7QetFz29QdM+On4yLlypmrakNKV5X8r+6PDpFaRWU1mEeh7ISqVT6wf/7NxMFlixdtmTpMjP39r1//v4gYvAPCFi0eMmixZinzcrUavXHH/+spqaapvWvv77RBhPTPHiQ9+mn/6tUKk+cOBoWFsb1nwNzTJ4c/ckvfmXvKOwg1EV7JO6ZdcuvCGhbEdA24K4+j66wyp+zqPxoF+03luyQOw6acLi6uk2ZGltSXPT4UeGEiEg+X0AIMRgMhDD9jt/VS3l5mUAgGDVqgC9wlEHrWnjMtfBYj/V6v/EDJByE0B7Bqmkb3e7sJsNpilgY7gwGg0wm0+tppVJpMBhskHCo1WqVSqXRaBQKJdd/CwAck4MmHISQqTHT2tranpUWV1VWSCQSisfTabViF/Gs2WZ1FTQYDKXFRYGjglxd+30+xQqEYvWU1eKic/z2Og7/CgAAgJNz3IRDKBQmzZlXW1Mtk7XqtFqGMB4eEv+AQB6P5y31iYqaJBL27L47afIUP78AdlmtUhkM9Niw8P72z/AEioR3TQRgcH/R1dTg5q+OWa0dk0D6mrNe5x+lmP8Bv/lFhRXj5sXwHPesAgAA2IVDfzS6uLiOnxA5jmHYedoEAgHbezEwcFSf423PnJVoXOYLBLMT5/qaeD6FJ+hc/ok5YdDeIYqk9/t7lXGTKme+Yc5+AAAARiyHTjhYFEUJhRZPKy8WiwMCArmIBwAAACyFkQwAAACAc05QwwEAHKmpqc3NzR1wxN6hKysr62+2IwAYIZBwAIxcmZnXHjzIG/K4bgNTKJS6foasBYARAgkHwIjD4/ECAwM7OjrkcrlcLrfZ33Vzc/X0HG6zDgGAmZBwAIw4rq6un376P1evZtK07UbI5fF4sbGxAw7EBwDDFRIOgBGHoqiIiAkRERPsHQgAjCB4SgUAAAA4h4QDAAAAOIeEAwAAADiHhAMAAAA4h4QDAAAAOIeEAwAAADiHhAMAAAA4h4QDAAAAOIeEAwAAADiHhAMAAAA4h4QDAAAAOIeEAwAAADiHhAMAAAA4h4QDAAAAOIeEAwAAADiHhAMAAAA4h4QDAAAAOIeEAwAAADiHhAMAAAA4h4QDAAAAOIeEAwAAADiHhAMAAAA4Z0HCwTAMd3HA4JhzUXDhWCbOA04RcATvOnOYOks8gS0jAYtYenUsSDgMNG1hMMA5cy4KLhzLxHnQanW2jARGDhNvLdyYRqbuTWm4LSMBi1h6dSxIOLQ6/FN2OOZcFFw4lonz0NmpsGUkMHKYeGvhxjQydW+GpdgwELCMpVfHgoRDrVKhDtChMAyjVqkGLIYLRwY6VzJ5G04RWB3DMDJ5W3+v4sZkDXBvxmxCq4pjYngCWcwmizaxpEnFYFAq8EXQgSgVCoPBMGAxXDgy0LnS6fT19c22jAdGgvr6Zp1O39+ruDFZA9ybkuD6BR/bMBwwV/2Cj3WSYIs2sSxzVKvVhBA3d3eKoizaEKyLYRilQsFeDnOM5Atn5rmSt7UTQoKC/EfgKQKrYximvr6ZfVOZMJJvTGL+vRm9jhASlPkxZeg3ewNbYniC+gUfs9fFItSjxyWWbsPj8VxcXUVCIY/PH5n3ib0wDGOgaa1Op1apzKnb6GFEXbjBnSuhUOAj9ZZI3EUi4bA/RWB1DMNotbrOToVM3maibqOHEXVjkkHfm511PoUHJBXXRPLnyDzsguEJtNLwzrAUWcwmS+s2WINJOAAAAAAsgoG/AAAAgHNIOAAAAIBzSDgAAACAc0g4AAAAgHNIOAAAAIBzSDgAAACAc0g4AAAAgHNIOAAAAIBzSDgAAACAc0g4AAAAgHNIOAAAAIBzSDgAAACAc0g4AAAAAAAAAAAAAAAAAAAAAAAAAAAAAAAAAAAAAAAAAAAAAAAAAAAAAAAAAAAAAAAAAAAAAAAAAAAAAAAAAAAAAAAAAAAAAAAAAAAAAAAAAAAAAAAAAAAAAAAAAAAAAAAAAAAAAAAAAAAAAAAAAAAAAMBMlL0DgAGIxWKxWGyVXWk0Go1GY5VdAQAAWAQJh0Pz8fGJj4/38PCwyt66urru37/f2tpqlb0BAACYT2DvAMCU2bNnr1y50rr7vHTpknV3CAAwOKmpqbGxsUPcSUFBwZUrV6wSD3AKCYdDGzVqlHV36OPjQ1EUwzDW3S0Me76+vrGxsZGRkX5+fqGhoYSQmpqalpaW0tLS/Px8VJvBIKSmpq5du5aihlrRHhkZSQhBzuH4+PYOAEzRarVxcXECgXXyQo1Gc/LkSZlMZpW9wQjh6+u7bt26bdu2RUdHBwUFeXl5URRFUZSXl1dQUNDkyZNTU1N9fX1rampUKpW9gwVnsnr1aj8/v6Hvh6IooVCYk5Mz9F0Bp1DD4dCePHmSn5+fkJBglb3l5+eXlZVZZVcwQsTGxm7fvt3Nza2/AuzX06SkpLi4uD179uTn59swOgBwJjx7BwADOH/+vFXqq2Uy2blz59CYAuZLTEx89913TWQb3bm5ub3zzjtJSUlcRwUATgoJh6NraGi4cePGEHei1+tv3LjR0NBglZBgJIiNjd22bZtF7esURW3dujUuLo67qADAeaFJxQncunUrPj5+9OjRg95DVVXVrVu3rBgSDG++vr7bt28fRG8+iqK2bdvG9iflIjAA+OCDDyIiIggh7777LltpvWvXLkJIaWnpZ599xjBMWlpaWloaIeTs2bPp6enmbGKbyFHD4QS6urrOnz+vVqsHt7lGo7ly5UpnZ6d1o4JhLC0tzcyWlN7c3NzS0tKG/ugBAPSH7bjdY02PV3sXMLGJbaCGwzk8fPjw0aNH8fHxg9j20aNHDx8+tHpIMFz5+vomJiYOZQ+JiYkZGRmo5ADgQnV1dY81paWl3de3traWlJSwC2ZuYhtIOJyDVqu9cOFCRESEl5eXRRu2t7dfuHABI5qD+azSCSM2NhbjIgBw4ejRo+yCsSnks88+674mOzv79u3b3QsMuIltoEnFaVRXVw/iQfOsrKyqqiou4oHhKjIycuh1rVFRUWhVAeAC83cDrrFoExtADYczuXbt2tSpU4ODg80sX19ff/XqVU5DguHH19d36Dvx8fEZ+k4AoLfExET2Js3IyGDXsF1EZTJZdnY2ISQyMpIdfbWkpIRtWxlwE9tAwuFMZDLZxYsXt2zZYs7Yo3q9/tKlS+grCpZiRy4foqE8VAUAJiQlJUVERFAUdfbsWbaKgu2mXVJScvv2bYZhIiMj2TUZGRlswjHgJraJHE0qTubBgwfFxcXmlCwtLb1//z7X8QAAgI2Zbq/s/UDKgJvYBmo4nIxWqz179uzYsWNNz1nf3t6ekZGBvqIwCDU1NUOvn6ipqbFKMADQw+3bt9l6C2PNxNmzZwkhra2t7Brjl1LjwoCb2AYSDudTVlb24MGD+fPnmyiTm5uLaVNgcFpbW4eecGD+WACO9O51wY7uZWTsumH+JraBJhWndOXKlaampv5ebWpqunHjBqZNgcEpKSkZ+pvHKjsBgOEENRxOqaGhITMzc82aNb17j+r1+itXrmDaFBi0/Pz8tWvXDn0nVgkGAAb0wQcfmJnf/9///Z8dvwkg4XBWd+/ejY+PHz9+fI/1VVVV7JAvAIPT2tqak5MzlMFGc3Jy0KQCYDPsEyj2jmJgaFJxVl1dXRcvXuwxwYpGo7l48SL6isIQpaenK5XKwW2rUqnS09PRngIAPaCGw4kVFBTk5+cnJCQY1+Tn5xcUFNgxJBgeWltb9+zZ88477wzia9OePXswiwqALb377rtmlrTvNwHUcDi38+fPt7e3s8symezcuXP4ZglWkZ+fv3fvXkvfTnv27EHvDQAbY8xm3zhRw+HcGhoarl27xja337x5E31FwYqys7OVSuW2bdvMmapepVKx2Ybd/6kBgGNCwuH0Ll++zFZy3Lt3z96xwHCTn59fU1OTlpZmug9pTk5Oeno6WlIAwAQn6NcKAPZFUZSvr29sbGxUVJSvry872UpNTU1ra2tJSUl+fr6NxyuE4SE1NXXt2rVWebzi6NGjly9fHvp+gFNIOADAXL0/G5BnwFCkpqbGxcUNcScFBQVXrlzBW9HxIeEAAAC7GXoNB1INAAAAAAAAAAAAAAAAAAAAAAAAAAAAAAAAAAAAAAAAAAAAAAAAAAAAAAAAAAAAAAAAAAAAAAAAAAAAAAAAAAAAAAAAAAAAAAAAAAAAAAAAAAAAAAAAAAAAAAAAAAAAAAAAAAAAAAAAAAAAAAAAAAAAAIBh5v8D79rOiiu1MKoAAAAASUVORK5CYII=)
- Enable the permission for the browser
![Screenshot_20230720-211344[1].png](data:image/png;base64,iVBORw0KGgoAAAANSUhEUgAAAtAAAAWgCAIAAAD4sOOEAAABDWVYSWZNTQAqAAAACAAFAQAAAwAAAAEC0AAAAQEAAwAAAAEFoAAAATEAAgAAACQAAABKh2kABAAAAAEAAABuARIAAwAAAAEAAAAAAAAAAEFuZHJvaWQgU1AzMTE1LVN1bm1pLTIwMjIwODMwMTIyNDU0AAAEkAMAAgAAABQAAACkkpEAAgAAAAQyNzgAkBEAAgAAAAcAAAC4kggABAAAAAEAAAAAAAAAADIwMjM6MDc6MjAgMjE6MTM6NDQAKzAyOjAwAAADAQAAAwAAAAEC0AAAATEAAgAAACQAAADpAQEAAwAAAAEFoAAAAAAAAEFuZHJvaWQgU1AzMTE1LVN1bm1pLTIwMjIwODMwMTIyNDU0ANcsrwAAAAABc1JHQgCuzhzpAAAAA3NCSVQICAjb4U/gAAAgAElEQVR4nOzdeXRbZ5038EertVte5FXe5S31FjtOms1xkjZNtyHtAAVOh6YD0zMznAEGOpwB3lPaQ+HQGYZ0gJlSOIV2KDQdAm3ToR3SJM7iNJuT2E7seF/kTfKi1ZK13/eP5+We+0q2LNm+tuN8P39J13d57pWs53ef5/c8lxAAAAAAAAAAAAAAAAAAAAAAAAAAAAAAAAAAAAAAAAAAAAAAAAAA4J1grQtwx1MoFI2Njd/85jeLioqCwWDsG4rFYqvV+vbbb7/22mujo6P8lRAAANZKY2NjU1MTd8nevXvPnDmzRsVZS+K1LsAdLycn56tf/apKpfrRj37kcrli31CtVt93331PPPGE2Wz+2c9+xl8JAQAA4I63e/dus9n89a9/fQnbfvazn719+/Yrr7wikUhWvGAAALBWDh8+3NTU1NTUdOPGDeb/d+PGDfqnw4cPr3UxVxWPLRy0ryErK8vj8bS2tt66dSuWrQwGQ19f39KOGH3blJSUhoaG1NRUh8Nx8eJFo9G4tKOEKSwsdLvdra2tS9h2bGxseHhYrVbn5ub29/evSHkAACBeNTU1VVVV+fn57BK73d7a2nr27Nml7fDll19OTEzkLjl8+PAbb7zR2Nj4zjvvaLVaetDXX389+n7iqkkbGhoMBoPH47ly5cpCtWF9fX1tbe3s7OyJEyempqbiO6t1SKFQvPrqq06nkxvTtbW1PfTQQwttkp6e/o1vfOPixYuBQCDewy26bXp6+m9+85u5uTm2MIFA4NSpU1u2bIn3WJH+4R/+obe3t7a2dgnb1tfX/+EPf3jvvffuu+++5ZcEAADiQqt/q9XKLOydd9556qmn4t0z3fb1119//vnnn3/++UOHDrF/OnTo0Ouvv05XiLKHuGrSv/mbvxkaGmJXCwaDTU1N1dXVYasdO3YsFArRdaxW65NPPhnvea0vEonk3Llz835sbrf7wQcfDFv5ySeffP/9910uF7ta7AeKZVudTnfr1q15yzM1NVVXV7fM83355ZeX1rxBCMnLy/uP//iP5ubmf/zHf1xmMQAAIHZPPfXUwMAAW/ueOXPmhRdeeP755x977LHHHnuMRgnvvvuuzWZjGCYUCg0MDHznO9+Jff90t42NjdyFbAtKY2Nj9Pourpr0a1/7GnsiXCaTqbS0lF3t29/+NsMwMzMzP/3pTz/44ANaCer1enaFz3/+87Gf4Lrwwgsv0FMdGRn5q7/6q/T09N27d1++fJkuvHLlCrtmYmKiyWSKvEaxHCX2bX/yk5/QP/X29n7qU59KSkratWsX+0G+9957yzzfV199tbm5eWnbarXaF1988cqVK88///wyiwEAALHIz88/ffo0raFbW1uffvppgUAgEMwzZpMuP3To0LvvvkurjOvXr9fU1MRylMiAIyUlhX27aMARe02anp5ut9sZhvH7/c8991xKSkp1dfVHH31E13znnXfYNS9evMgwzFe/+lX6tq2tjWGYZ555hr791re+xTDMT3/601jObr3o7u6m8eAjjzzCLiwqKnK73QzDBAIBtltLp9OxF/S1116bmpqKPeCIfdvbt29HfvC5ubk+n4/Gd8s6W0Kampp++ctfLm1bgUDw9a9/fXR09PTp08ssBgAAxOLIkSOhUGhoaGjv3r1hcUZ+fv6ePXv27NkTFlUIBIKCgoIzZ87QGGXe6CRMZL3zn//5n7EHHLHXpM8++yzd1VtvvcWumZSUND09zTCM2+1OSkqiCwcHBxmG2b9/P31Lo6gXX3yREGIwGKxWq9PprKysXPTU1guZTBYMBhmGmZycDPtTV1cXvShsm1JiYuKbb775iU98gr41Go0LfQDl5eW9vb0ej+df/uVf4t32a1/72nPPPfftb387bPnExATDMD6fb4mn+mdtbW3f+973CCFCoTA5OXnHjh0VFRVCoZD+NTMzs76+PiMjQyz+f/m5er2+vr4+MzOTvn3mmWeGhoaQMQoAsDoEAsHhw4fZalir1X75y1+mbR5hmpqavvKVr7B1VtiG0YUFHKmpqdy30QOOuGrSt956iy4JSzShnSYMw7AhC23SeOKJJ+jbU6dOMQzzT//0T4SQ48ePMwzz3e9+N5ZTWy8kEsn27du3b98e2ehEGyHsdvtC20YJGmjPE8MwY2Nj8W47r/z8fL/fzzDM8mv64eHhL33pS4QQrVb7yiuvTE5Omkwmg8FAY44TJ05MTEy0trbSBNWSkpKjR4+azebf/va3W7duJYR85jOf6e3tXUKqLAAALNPzzz9vsVi4mRwsNnsjFAr96le/ouNKYkd3uGvXLvr2tddeC4s/aHvDvNvGVZOeP3+eHmv79u3cNV999VW6nO1D+eUvf8kwTEtLy/333//3f//3Ho/H7/dv27btc5/7XCgUunnzJt8TNKzwsFi/33/x4sXI5V/60pdSU1MJIWETrsXo9OnTdrs9MTFxaZuHKSkpee2112iTw5J7Q1gzMzNPPPFEf39/fn6+Vqv94he/qNFojhw58sMf/rCxsbGjo+P111/Pzs5uaGhITk5+8MEHBwcH33vvvbKyMjpGd/fu3S6X6/jx48s/LwAAiN3169c3b95MCPmv//qv119/PXL2z5qamqeeeurw4cOHDx/+xCc+UVRUZLVa4zoEnUW6oKDgr//6r7nLp6enX3755ZdffnnereKqSZVKJX0Rdj/vdrvpC41GQ18899xz9913X11d3YkTJ+iSn/3sZ11dXW+//XYwGPz617/u9/vjOrv1qKSkxGw2Mwzj8XjYcC9S9FaKlJSUioqKpW1L/fM///Pg4OD4+DhtqgoEAq+++mrsZ7GQJ554YnBwcHBwsK+v71//9V8VCkVJScnIyEh/f//U1NSXv/zljIyM+++//9y5c4ODg2NjY1/96lfT0tI+85nPnDx5cmhoqK+v78iRI5s2bVp+SQAAIHY1NTVnzpwpKCiIkpMhEAiSkpJefvnlp59+Oq6dMwxjtVrpnS1N/mDt2bOHEPKVr3wl9lZ5snBNevPmTbrb8vJy7vr/9m//Rpd///vfZxfq9fqXXnrpvffeO3r06Be/+EVCyCuvvMIwzKLTgdwZEhMTr1+/Tk/7Bz/4QZQ14+0WiXfbl156ifuRd3d3cwdGL1lRUdHRo0dHRkYaGxtzcnIIIQkJCXV1dZ/73Od27dqVnp4uEok0Gk1VVdXjjz++b9++jIwMkUiUnJy8ffv2f//3f//ggw+eeOIJkUi0/JIAAEBc2FAjPz//ueeeO3369MDAgMViOX369JEjR9gekFiyRMMwDEOH0RYVFXGrHjYtI0qXSqQoNWlcAUeY3bt3e73esbExnU4X3+mtQxKJ5E9/+hM95w8++CD6ynwHHA8++OBLL730k5/85IMPPvB6vQzD+P3+v/3bv13C4bj0ev0rr7zS09PDpoVSSqUy7Dsql8u564jF4i984Qtvvvnmww8/vMwyAADA0mi12j/84Q/zzmNB80ZjHAcbhmGYr3zlK4QQlUql1WoPHTpE93nPPfcQQjIyMmKv76LXpIsGHHRYw7yuXr3KMMwXvvCFlJSUl1566dSpU6dOnXrppZdSUlLiPuE1d/ToUXrCV69eDZvkNRLfAQfXQw89RIfFmkwmhUKxhCOyaMDR3d29hG0///nP//rXv0bAAQCwhn71q1/ZbLYXXnhh8+bNdO6NgoKCw4cPDw0Ntba2xjgsJQzDME1NTTKZjL6lw1La2tro23vvvTf2Oit6TXrt2jX617CsgyNHjtDl/+f//J95d0sn3jhx4oREImlpaeFGWi0tLXfYE75ozxDDMB0dHdnZ2Yuuv5oBByGEnUHlgQceWMIRWQg4AADuaFqtNikpKbLfhCZwLG2ftH4JGwfLNkIsOg8Ha9GalE0QaWho4C7/xS9+QZd/+ctfjtyKTrzhcDgqKiq+8Y1vMAwzODi4c+fO3bt3Dw8PMwzzta99Ld5TXpRwxfdIffe736W9FUNDQ5/4xCcWGs7Kt8TExGPHjh07duyVV14J+xOb0JucnLzq5QIAgPXCZrPRx6kQQp566im2hmYYJt5hKWGOHDlCp8fIyMi4evXq7du3lUrl+++/f+TIkVg2j6UmHR4epi9oZw0rLy+Pvrh9+3bkVj/60Y+0Wu2RI0du3bpFH/Fx9OjRCxcunD9//u233yaErMizxlYDO6/7+Ph47L1fPLVw0CffeL1e7mNskpKS6MRfDMPQYVFLhhYOAICNoaamhlZey3++Fds9QVNHDx8+TH/qv/Od73A7L6LsIcaa9O/+7u/orv74xz+yCzMzM+l85zabLTJt4LOf/WwoFGpra6P9Jn/84x8ZhmGnx6Szqi//uR+RVv7x9IcPH/7BD34gEAiCweAbb7yxbdu2bdu2cVewWCy/+93v4tpneXn58ePHc3JyfvzjH3/jG9+Ia9umpqZHH31UKpX+7ne/e/HFF1taWoqLi5999tmMjAxCSGtr640bN+LaIQAAbEhDQ0N2u10gECz5kZwL6erqunTpUmJiIjsNV3Sx16RvvPHGd77znfT09AcffPDHP/7xL37xC51O973vfY9Ov3H8+HF2Qg5KIpF8//vfDwaDzz77LJ14g04WwjaQFBcXswvXOzY3YiE3b96cd0OeZhotLy+no48iWSyWsEf5LcFyWjieeeaZY8eOoYUDAGCdWOhBbvFiKxpu70lY80aUFo64atLPf/7zdOhlmP7+/nnTPj75yU++8MIL7Nu9e/f6fL5gMPjuu+8eO3bM7/f7fL6wjJB16sqVKysecGzfvp3OMvvmm2/Guy0hRK/Xv/HGG3QPlNvtPn78+Io8pSY9Pf3FF1/s7++PdxyzSqV64YUX3n///d27dy+/GAAAsH6w1c3g4CDt0K+urqaZIrEEHPHWpI899lhbWxs7uNfj8bzzzjsFBQUxlvab3/zm7Ows3dblcn3rW99azrkvZAXiuNWRkpKSmZl569atJe9BIpHs3LlTp9PZ7faLFy86nc4VKZhCobj//vt/+MMf/vrXvz537pzX641lK7FYXFZW9vjjjw8MDHzve98bHx9fkcIAAMB68Pzzz9PsDerMmTORDeovvPDC888/v4IH3bRpU2lpqcfjaWlpifdZ6Dqdjt79XrhwwWw2r2CpWHdMwLGeZWRkPPvss3v27BkfH49xztBQKKTRaEwm069+9as//elPfJcQAAAA7ngikai4uPitt95ie3YWZbFYmpqaPve5z8nl8rUuPgAAAAAAAAAAAAAAAAAAAAAAAAAAAAAAAAAAAAAAAAAAAAAAAKwCwdNPP73WZQAAAIANTrjWBQAAAICNDwEHAAAA8A4BBwAAAPAOAQcAAADwDgEHAAAA8A4BBwAAAPAOAQcAAADwDgEHAAAA8A4BBwAAAPAOAQcAAADwDgEHAAAA8E4cy0oMw/j9fp/PFwqF+C4QAADcbQQCgVgslslkAoFgrcsCfIkp4AgEAn6/X6lUSiQSvgsEAAB3G4ZhnE6nx+ORy+VrXRbgS0wBRzAYlEqlUqmU79IAAMBdSCAQqNVqi8WCgGMDiymHAz0pAADAK6FQGAgEGIZZ64IAXxYPOPDxAwAAwDLF1MKBmAMAAACWA8NiAQAAgHcIOAAAAIB3CDgAAACAdwg4AABgXUC+4MaGgAMAAAB4h4ADAAAAeIeAAwAAAHiHgAMAAAB4h4ADAAAAeIeAAwAAAHiHgAMAAAB4h4ADAAAAeIeAAwAAAHiHgAMAAAB4J17rAgAAAKwej8czODjocDiCweDy9yYSidRqdV5enlKpXP7eNjYEHAAAcLfweDzXr18PBAIrtcNAIOD1em022+bNm+Vy+Urtlj+hUIg+s0bwZ6t2aAQcAABwtxgcHFzBaIMVCAT6+/srKipWfM8riGEYl8s1MTExMzPDMIxWq9Xr9SqVatViDgQcAABwt3A4HPSFSqVKTExckR06nU76gmGY1WwwiJfX6x0eHrZYLLSFY3p6OhAIGAyGVWuYQcABAAB3CzZvIzExsbCwcPnxwfDwMA04+Gg4WVlut9vpdNJogxDCMMzs7KzT6UTAES4YDNLIVKVSSSSS6CuHQiG73R7jyiyv1zs9Pe3xeCQSiU6nuyN64+4eNpuNYRiZTLa2n0tc38O7GcMwXq+XECKVSoVCjIaD9Wg9t0bwIRgMhuXJRi7h1R0TcHi93qamJkJIQ0NDampqjCvv3r1bp9PFsn+j0Xjjxg320m/fvv3uDDgcDofD4cjIyBCL19d34+OPP/Z4PFVVVQaDYQ2LEeP30O/3h0IhiURy19a1gUBgcHCQEJKXl6dQKNa6OABApFKpVCqdm5vjLklISFi1AqyvSmWtzMzMtLS0EEKUSmVmZqZQKLw7BzgFg8GzZ8/6/f6ioqLq6uq1Ls6dKhQKDQ4OhkKh4uLitS4LACyLz+eTSqVrXYqVoVKp0tLSxsfHae+PSCRKTU1dkUSWGCHgIIQQeiumVCr37du3gu3kTqfz9u3bhJCqqiqZTLZSu+WPQCAQiUR+v3+9NW/cWWZnZ4PBoFarFYlEa10WAFgKhmHsdvvk5KTZbN61a9fG6HwRiUR6vV4mk1ksFkJIYmJienr6av5MoV4hhBCr1UoIycnJWdleeb/fPzo6SgjZtGnTCu6WP0KhcN++fW63W6vVrnVZ7mA0f2g17xsAYKX4/f7p6emJiYnZ2dm1LsvKE4lE6enp6enpa3J0BByEEOL3+wkhq9mVtW7JZLI7ojFm3fL7/bOzsxKJBIkLAHciq9Xa29u71qXYmFY14PD5fDMzM263mxAil8uTk5PD6rZQKGSz2QghGo1GKBROTU3Nzs6qVKrIcMxut9tstkAgIJPJUlNTY4wVGIahjRlCoVCr1QaDQXozGgqFCCEul4s2NMnlcm7GKMMwDofDbrf7fD6JRJKYmLhoA4DdbmeHM9C3Pp9PJBLRu95FTzMUClmtVqfTGQgEpFKpVqvVaDTc/QcCAbpzmUwWVrH5/X46Rov+iT1HrVYrFAoXvW5Wq5VhGO4ViPFDmZubs1gsdIxPZIGjW8IVDuNyuaxWq9frFYvFarWanix3BfY6aDSasA4jr9frcrkIIUlJSWENp8FgcGZmZnZ2ViAQqNXq5OTkRUtCP5ekpKR5T3Nubs7n84VCIZFIJJPJIq8/wzAej4cQIpPJBAKBx+PxeDyhUEgsFiuVyrDGz7hWjm7FyxblQHQnAoEAoS2sTykpKWlpaZOTkzMzM2tdlg1l9QKO/v7+jo4O7khloVBYUlJSVlbG1g1er/fMmTOEkO3bt3d3d9PqPzs7m1u3+Xy+S5cujY+Pc/dTWVlZVFQUvQAMw7S1tQ0MDAiFwh07dhBCXC4XPRzV19fX19dHCKmoqCgpKaELnU7n9evXw752qamptbW1KpVqoWNdvXqVjTYIIZcvXyaEpKSk7NmzZ9HTNJvNra2ttApkpaenb968mY0tRCJRV1eXyWRSqVT79u3j1qC3bt0aHBwUiUT79+/nHquxsZFuwq4pEokqKysLCwu5B7p48WLYYJBFP5RAIEAPyg7vJoRkZGTU1tbGUqMs7QqzvF7vzZs3jUYjd6Fard68eTN3FMnc3Bw9i71794ZFA1NTU1euXCGEHDp0iBtwWCyWlpYWbrNqYmLior1jNKKNjLdmZ2dNJhNtS2PRJGVuR14gEBgaGiKE5OfnT09Pc48uEAjS09O5hY9r5Sj4KNtCzGaz1WoVCAQ5OTmxlA1glaWmpqalpRFC6G/dBhMMBicmJiYnJxmGSUlJ0ev1q5mxt0pH6uvra29vJ4RkZGTQasBsNk9NTXV1dQUCgaqqqrD1r1+/7vV6pVKpSqUKu9O6du2a3+/PyspKTEwMBoNjY2Mul6utrU0sFufl5UUpQ0dHx8DAACFk69at9PsklUppYNHf3x8MBnU6Hf3FZG+vXS7X+fPn6V07Hd3ndruHh4enp6fPnz/f2Ni40NDZ3Nxcn8/n8XhoRVhQUCCRSCJXjjzNiYmJS5cusZPOisVih8MxODhoNpsvXLiwb98+eh8pEAhqampOnjw5Ozvb19dXVlZGdzgzM0MTYCsrK8Nq648//jgQCOTm5qpUKq/XOzo66vV6W1tbxWJxbm5ulOsW/UMJBALNzc0Wi0UsFhcUFCgUirm5uaGhIZPJ9PHHH+/Zsyf6je+SrzDl8/mam5vtdrtIJMrLy1Or1T6fb2xszOFwnD9/fvv27RkZGbGcWiSHw9Hc3BwIBMRisV6vpwUbGRmhseNC3G633++PnKJjdnZ2dHSUziNCG4rowxdcLpfRaCwoKIgcPTsyMhIKhRITE6VSKW3QCgaDJpNJKBRGZofEtXIYvsvGNTk5SQOy7Ozsu3MgGKx/G3goOx2sbjKZ6M2h2+2em5szGAyrNqXQagQcfr+/o6ODEFJaWnrPPffQhcXFxR0dHT09PX19fYWFhWG1o9/vr6+v1+v1kbnBDMNwp0AoLy+/cuXKxMREe3t7ZmbmQuOXbt++3dPTQwipq6vLysqiC2UyGZ363mg0BoPBrKyssGaS9vZ2j8ejVqt3797N3qwbDIZz58653e6Ojo4tW7bMezgax1gsFhpwFBcXz3uzHnaawWDw+vXrDMPk5+dv3ryZPfesrKzm5man0zk2NsYGBwqForKy8saNG11dXXQ+/FAo1NbWRghJS0srKCgIO5ZYLG5oaGDvvMvKyi5cuGCz2drb2zMyMmIZ9zXvh9LR0WGxWGQy2Z49e9gqJD8/v6mpyWazDQ0NRW95WvIVpm7dumW32xMSEhoaGtRqNV1YUlJy48YNo9HY0tJy3333La3dvrW1NRAIyOXy3bt3s59dWVnZxYsXadfMvGjfU1h/UCgUGh8fp0FkZmYmu1ytVhuNRp/P53Q6I+tpoVCYl5fHBnapqakjIyMej8dsNqtUqrAwLq6VV7lsrOnpadqOlZmZyX5YALBqnE4n7TSnb+lIHLvdvujUVitlNUI5l8tFJ9TKzs5mFwoEgpKSEoVCIZfLac4BV0VFRU5OzrwjkSorK7lXh/YLEEL8fj+3n4Wrr6+PHZ4avRWEy263T0xMEEJqamq4lZZCoaBNMiMjI2Gt0PEKO02v15uZmZmfn19SUsI997S0NFqH0fqMlZ+fn5aWFgqFbt26RQgZGBiw2Wwikaimpiby0lVVVXHb+RMSEuhZ+Hw+bj9L7KUlhMzNzfX399Odc29YVSoVjTNoc8tClnmFZ2dnaQt/RUUFtwITiUTV1dVSqdTn89E2rXjZbLbp6WlCyD333MONFBUKxebNmxfaimbtiESisHv3YDBI00pSUlK4y5VKJT1rmtMQJj09ndu2JxaLaR9WMBiMTJ6Pa+VVLhtlsVimpqbothgDBbAmAoFA2C9q5BJerUbAwf42mc1m7nKpVHrw4MEHH3yQe2tFRflJirw3UqlU9OeSVhJhhoeHaW9OeXl5XJNUTk5OEkJocmXYn1JTUw0GQ1FR0TInzw87TYVCUVtbO2/uAq3Dwr4ZtGNFJBKNj4/39fV1dnYSQioqKuZtTYlsw0hJSaEhyLzXbdHSEkJouCASiSI/QdqX4XA4uLPahVnmFaZfJ4lEwg1kKYlEQtt4RkZGop7T/OgFEYlEbGMYK0p7CX1IQWS+qkQiyczMnLf5jbZkzju1cGQ7gUKhoP9KNO16ySuvctkIIXa7nX5YOp0ulsRbAOCDWCwOy9iIXMJvAVbhGHK5PC8vb3h4uKOjY3JyMicnJzk5Wa1Wr+BUKlqtdmZmhpunSZnNZjrAKScnp7y8PK590r0lJydHllMqlUbmnawgr9dLB4PQUQPkz20b3KxMSqVSVVZWtra20qAqNTU1LAk0CoFAkJSUxD7qcAnohnK5fGxsLOxPPp+Pvpibm1soD2OZV5gdfTPvPwyt2Fwul9frjXfAMz2vyPEs0bFjeRZaIRAIuN1un88XDAbpRzlv+0EUMpnM6/XSZ5Ss7Mr8lW12dpadZWjVWm4BIJJKpdJqtTRjlBAiEAg0Gs0GnGl08+bNarW6p6dnamqKtqzKZLLc3NyCgoIVyR2jVRpbybFo3gYhZGpqKkrNNy/20VPLL17sgsFgZ2dnX19fZGyxkIKCAqPRSH/TuZkfsaDDXiKvW4xonTQ7O0snhp9XlCaKZV5huvlC3x82yPD7/fEGHLQlKa5vpsfjoV+weZtAQqHQ1NQUt/d0aaK0Oix5Zb7Lxo4/crlcNAl3OUcBgCWTSCRFRUVyuZzmjep0uhWf7jK6VfrnpyNgCwsLacBhMplmZ2dpxmh1dXVkhmO8aDPAvHWtXq+nz4C9du3ajh07Ys9Apmsu81c4LgzD0ATYhISEsrIynU4nk8loMVpaWhbKUJmbm2ObdmZmZuJKx4ty3WLfXKvVRnZqsKLMf7XMK0w3p2WIxNZ8yzy7GNGPYKGuwPHxcafTKRKJdDqdQqEQi8W0VHR57Edh70tWcOVVKJtGo3G73YFAYHx8fKHcLABYBXRYIh2Uvvr/iat6tyEWi2mHcVVVldPp7OzsHBsbu3HjhlarjXHCgIXQnuPIm8vs7OwtW7ZYLJZz585NTk729PSwI0gXRW+L421YXo6ZmRmaFbFz586wqmuhOIlhGDqego7bbG9vT0tLi32Oy4WuW4xo40RCQkJpaekSNl/mFaabL5SlyCYTLKEFhV6QsKlQoqBzo9HJweYtCa25c3Nzwy51vP/wtLkoxkaCWFZehbKp1eqsrKy5ubnh4WGXyzUzM4OOFYC1tVZB/2okjU5PT4+OjoZlJqrV6rq6OtqYQ5MHl4xhGNpNE3l/WVhYKBQKU1NT6XxNnZ2ddM1Y0BhoZmYm8k7X7/fTWcJi7CCPEU0CkMvlsafxG41GOv/Brl27MjIyAoFAa2trjG0GwWBwoesWI7rh1NTU0jpllnmFaZaG1WqdNy+VZikmJSXR7xgbscVycWinZvSMVy76tDaNRsF/plwAACAASURBVDPviFAaUUkkkmVOrMkwDI2BYtlPjCuvQtlojo5CodDpdISQqamp6HmsALBRrUbAYTKZrly5cvXq1bDferFYvIS7z8j8xMnJSfpjF+WBNCUlJfSvV69ejfGWOj09XSAQBAIB+gA2LrPZ3N7e3tHREX1Wq6VFkR6PJ2w0ytzc3LwxmdvtphNvbNq0SaVSVVVVCYVCk8k0PDwcuXJkS8DExAS9FEt+kE9mZqZAIAiFQnSG1jDj4+PRA5FlXuGMjAyRSMQwTOTgW6fTSffJjoKWSqX044jsJogcpJOWliYQCBiGiRzkMu9Ux2z66kJFJYQEAoGwuMrv90dpRIm8dHSqe0JI5CikuFZe5bKxUlJSaFrM2NjYMod3AayC0tLShoaGhoaGjdQJSO8ze3t7e3p6zGZzjAlhK2U1Ag69Xk8ImZuba2trY3+qGIbp7++nP2phcwBE19/f39nZyf5gWa3WGzduEEISExPp/KHzEgqFdKZtj8dDJ9da9EByuby4uJgQ0tbWxq3vJycnW1tbCSFFRUVsA7LRaLx69WpY8wmbjBPjFLn0lp1OwU4vFMMwZrP53Llz9C03EGE7UzQaDZ30QqVS0ZE47e3tkTeRbW1tdIon+tZqtdKBLUlJSUtu4lYoFPQSdXV19fX1sZVWIBDo7u6+dOlSc3Mze8TISxTXFY4klUrp+XZ3dxuNRvZAs7OzV69eJYRoNBp2njSxWEzvsLu7u9mUF5/P19nZGTlXh1wup5eU9vrRPTMMMzo6ev369bCVF31aG01VZhjGZDKx/96zs7PDw8P07bzJImazmRsb0Wm1SMSDfuJa2W63j4+Pc78bq1A2lkAgyMrKEovFgUBgYmJiNbOjAID8eaK/gYEBs9lsNpsHBwdHRkZWM+ZYjRwOrVZbVVXV3t4+MDAwPDycnJwsEonsdjttry4oKIirwktPT+/q6urt7dVoNPS3nhAiEolqa2ujJ4TK5fItW7Y0NzebTKaenp5Y0g7KysosFsv09HRzc7NarVYqlS6Xi/7UZmZmsuNsg8HgtWvX6Kxt9913H7u5UqlUqVR0EEdvb69EImloaIhyuOTk5NzcXKPRaDQaR0ZGFAqFx+MJBoMikUir1dpsNm4LP+1MIYRUV1ezzQAGg8FoNDqdztbW1u3bt3MD84SEhEuXLimVSo1G4/F46AzTYrG4trZ2OfF7eXm5y+UaGxtrb2/v7u5OSkqiT57z+/0SiaSqqoqdRHXeSxTjFV6IwWBwOp3Dw8MtLS2dnZ2JiYn0AYGEELlcvnXrVm68UlZWNjk5OTs7e/LkSTp4dXZ2NhQK0YNGntfMzIzVar18+TJ9DB4dpZyUlEQvHSvK09oouVyemJhIZ/RzOBy0xmUYRigU0gh43ol3RCLR6Ogo7ewIBAL0oxcKhRkZGZGfVywrh0IhWs17PB527PQqlI1LLBZnZWUZjUY6VjauOw0AWCan02k2m9l+ap/PNzk5qdFoVm12nFWaNN5gMOzYsSM5OZm255hMprm5OZVKVVtbW1NTE9euNm/eXFNTI5FIrFYrjTboQ9FiSTtNS0ujdVhnZ2css12JxeIdO3aUl5cnJCQ4nU6TyeR0OmUyWXV19bZt29hqXiQS0ZiJ3kOzBAJBfX09rdvsdnssXTm1tbWbNm0Si8W0UzwYDGZmZu7duzc/P58QYrPZ6E7YzpS8vDzuQekkm4SQyI6V2traiooKv98/MTFBq8zU1NQ9e/YscxC2SCTaunUrnazM6/WaTKbJyUn60Ja9e/eyoeRClyjGK7wQ2nBVV1enUqncbvfExMTMzIxIJCosLGxsbAybEiM1NXXnzp00r9PhcDgcDolEUllZOe83UCKR7Ny5k+YAeTwei8USDAYNBsOuXbvCSkUvZvTBQZmZmTqdTigUMgzj9/sZhlGpVPn5+bQXxuPxRHYxZGZm0mlknU4nrdEVCkVeXt68yRaxrCwUCmkbTFhLDN9lC6NUKpHMAbAmfD5fWFZc5BJeCZ5++unoazAM43a7pVJp7GMfovB6vR6Ph2GYhISEuGbFiCwVHda/zP3Eezj6JO55n/Di9Xrn/cFlt1UoFDHmrIRCIXrzLZfL451DIozb7f7f//1fQgh9AE0oFKJxDB/XbW5ujj4gXiaTRXaFRLlEJIYrvCg6b5VIJFIoFFEiFfp99vl8EokklgP5/X63203THiNPij5qTqVSxfLsU4ZhfD4fwzBRZvej2bKEEPooOxoE0EfAR24S18rUQjNhrHjZAJZgYmIiJSWF15wJ+hhLQkh2dvaizxiPxfDwMHt3t3v37vWc8DEzM9PT08NttqQzc0TJRlhZq/0zkZCQsMwalBIIBLFkw62URQ8nEAgWqkqXUFShUBhlwsrlEAqF/D03a9Eu/Ch3wMv/QBUKRSwxsUAgUCqVsU/qJZFIojQCBQIBOm1uLLsSCATxfvkFAkHsidWxrLxQZMB32QDWCZFIRAMOh8Mxb359vNhHXC3aIrvmFAqFWq1mZ/mj91Gr+dxm3JcALJ1Go+EpNAQAPqjVatqJ4HQ6l/xUh3lpNJr13LxB/jzBt0QioeMYNBqNXq9fkb6LGCHgAACAu0VeXp7NZlvxgdk0dWxl97ni6OSECoWCJgUKhUJ2ZuHVgYADAADuFkqlcvPmzf39/Q6HY0XCDpFIpNFoCgsLV7NvYskEAsEaJl0h4NjgJBIJHYVxR/wzgEgkysjIIJxJXFZq5eVb5cMB8EQul1dUVKzgTDDrvCdl/UDAscFJJJL139AHLKFQGPtzheJaeflW+XAAvEKUsPpWaR4OAAAAuJsh4AAAAADeIeAAAAAA3iHgAAAAAN4h4AAAAADeIeAAAAAA3iHgAAAAAN4h4AAAAADeIeAAAIB1AZNxbWwIOAAAYF1YwenGYR1CwAEAAAC8Q8ABAAAAvEPAAQAAALxDwAEAAAC8Q8ABAAAAvIs14AiFQryWAwAA7maoZTa8mAIOoVDo8Xh8Ph/fpQEAgLtQKBSy2+0ikWitCwI8Ei+6hkAgkEqlHo/HZDKtQoEAAOAuJBAIUlJS1roUwKPFAw5CiFAoVKvVcrkcTV4AALDiBAKBWCwWiUSYbHQDiyngEAgEIpFIKBRiGjgAAFhxAoEAocaGF1PAQf48xT2+EAAAwAfULxterAEHwbcBAAAAlgrzcAAAAADvEHAAAAAA7xBwAAAAAO8QcAAAAADvEHAAAAAA7xBwAAAAAO8QcAAAAADvEHAAAAAA78QWi2WtywAAAAAbnDgxMXGtywAAAAAbnFgqla51GQAAAGCDEwuFSOMAAAAAfiHaAAAAAN4h4AAAAADeIeAAAAAA3iHgAAAAAN4h4AAAAADeIeAAAAAA3iHgAAAAAN4h4AAAAADeIeAAAAAA3iHgAAAAAN4h4AAAAADeIeAAAAAA3iHgAAAAAN4h4AAAAADeIeAAAAAA3iHgAAAAAN4h4AAAAADeIeAAAAAA3iHgAAAAAN4h4AAAAADeIeAAAAAA3iHgAAAAAN4h4AAAAADeiQOBwFqXAQAAADY4McMwa10GAAAA2ODEEolkrcsAAAAAGxxyOAAAAIB3CDgAAACAdwg4AAAAgHcIOAAAAIB3CDgAAACAdwg4AAAAgHcIOAAAAIB3CDgAAACAdwg4AAAAgHcIOAAAAIB3CDgAAACAdwg4AAAAgHcIOAAAAIB3CDgAAACAdwg4AAAAgHcIOAAAAIB3CDgAAACAdwg4AAAAgHcIOAAAAIB3CDgAAACAdwg4AAAAgHcIOAAAAIB3CDgAAACAdwg4AAAAgHcIOAAAAIB3CDgAAACAdwg4AAAAgHcIOAAAAIB3CDgAAACAdwg4AAAAgHcIOAAAAIB3CDgAAACAdwg4AAAAgHcIOAAAAIB3CDgAAACAdwg4AAAAgHcIOAAAAIB3CDgAAACAdwg4AAAAgHcIOAAAAIB3CDgAAACAdwg4AAAAgHcIOAAAAIB3CDgAAACAd+K1LgDA2ggEAoODg2NjY06nUygU5ubmVlZWrnWhAAA2LAQccDeanZ09efLk5OQku0ShUKxheQAANrz4Ao73339/YmIi9vUbGhrKysriLNKaGR0dvXjxokgk2rFjR0ZGxuoXYGpqanh42GQyORwOn8+nUqlSU1P1en1eXp5EIln98qxzV69evXHjBiFEq9V++tOfjlyhr6+vqamJYRhCiF6vP3DggFj8/77wzc3N3GiDEML+CQAA+MDvjyz9rb9TXLp0yWq1EkJaWloeeeSR1Ty01+u9ePFiT08Pd6HFYrFYLD09PYmJiY2Njenp6atQkuvXr7e0tBBC9Hr9Qw89tApH5Mnk5OS5c+foN1Cr1TY2NrIhhcViMRqN9HVZWVltba1CoQiFQnTJhrkCAADrSnwBh0QiUSqV3CWBQMDr9dLXYX8ihIhEouUUbpXJ5XL6QiaTreZx/X7/iRMnuE1HIpFILpfPzs7St3a7/Y9//OPDDz+8OjHHBjA7O3vq1KlAIEAIkUql+/fv5/aY0LCS2rp1K/24hUIkUAMA8Ci+gOPgwYNhS7q7u8+ePUtff/KTn0xISFiZcq2F3bt3d3Z2CoXCTZs2reZxu7q62GijrKysurparVYLhUK/3z86Otrc3Dw3NxcIBM6fP3/o0CG0/C/K7/efOXPG6XTSt42NjSkpKdwV2BBZo9GscnAJAHDXWsnaSyAQrODeVp9Go7n33ntX/7i9vb30RVZW1q5du9hbbYlEUlBQIBAITpw4QQixWCzj4+O5ubmrX8I7CMMwFy9eHB8fp2+3bt2an58fuQ59gVYNANgAvF6v3W5fwR0KhcLU1NQV3CHF++2yxWL5/e9/T3/iDx8+PDEx0dHRMTk5mZmZ+cADD9B1QqHQyMjI8PCw2Wx2uVwJCQlpaWl5eXkFBQXcTpnW1tYrV64QQoRC4ac+9anExET2T21tbVeuXGEYRiwWP/7441qtlj2uQqF48sknx8fHe3p6TCaT3+9PSkrKz88vLS0Ny8Q8ffp0X18fIaSqqoqNPHp6es6ePcswjF6vf+CBB27fvt3b2zszM7Nt2zbuKEqr1drf3z86Omq32+VyeWpqKi3/olVaKBSanp6mr/V6feT6ubm5YrGY9g5MT0/n5ub+4Q9/oJvk5+cfOHCAu7LL5frtb39LrzY3Y9fn8/X39xuNxpmZGZ/Pp1ar09PTCwoKsrOz6Qput/s3v/kNN+dmdHT05z//OSFk586d99xzD/co4+PjAwMDExMTbreb7qqwsDAzM5O7DnvdioqK9u3bNzIyMjAwYDabfT6fVqstKCgoKyujrTUjIyN9fX1TU1Mejyc5OXnejyZ2N2/e7Orqoq9LS0urqqq4fw3LerbZbPQcCSGf/exnjx49GuMVAABYP6anp8+fP7+CO5TJZIcOHVrBHVKr0T7P/oi3t7dfv36dvmabQ9xu95kzZ0ZHR9n1fT6f0+ns7+/PyMjYv38/mxqyadOmnp4em80WCoVaW1v37NlDl7tcrhs3btCj1NTUaLVa7nHdbvfly5fb2trY/c/NzdH444EHHojMO4ksPN2P1+s9f/58WF4ndevWrUuXLrFZh16v12az9fX16fX6/fv3R+9mEgqFSqXS5XIRQtikjbAVHn30Ubpz2v5vMBhowGE0Gj0eD7dTwGw2s1dbr9fTF1ar9eTJk9zEhZmZmZmZmc7OzrKysp07d9KobqEMX+5yv9//8ccfd3d3s0u8Xu/09HRHR0dVVdXWrVvZgIm9bi6X69y5c9xN5ubmJiYmRkZG7rvvvsuXL3d2drJ/Gh8fp9HMwYMHpVJplOs2L6PReOnSJfo6Kytrx44dcbVhxHIFAABgaVY1IYCNNsifA45AIHDy5EmTyUQX5uTkqNVqh8NB4w+TyXT27NmDBw/SakMqlW7dupX2L3R3d5eXl6elpRFC2trafD4fIUSj0VRUVEQel0YbCoVCJpPReIUQMj09fe7cuYMHD8bYEzQ1NTU1NRVWfkJIe3s7W8mJRCKdTud2ux0OByFkdHT0/Pnz+/fvj36IgoKCW7duEUI6Ozt1Ol1JSUnY+jqdjvs2JyeHHjEUCplMJm6XARu36fV6lUpFCPH5fB999JHNZiOESKXS/Px8qVRqNpvpuXR1dSUkJGzbtk0sFtfX1xNCxsfHx8bGCCEajaa0tJQQwjashUKhM2fODA4O0rcymSwpKclms83NzdHroFKpIq+/yWSin69Wq/X5fG63my4fGRl57733LBYLIUSpVIpEInrR6CY3b96sq6uLctEiWa3WpqYm+lqtVjc2NkY2kxgMBr1ePzk5OTw8TE+BbaaSSCSLXgEAgHUoJSVl9+7dK7hDnrqbVzsDMSsrq7CwUCaT0eZ0o9FIayOhUPjQQw9lZWXR1fr7+0+dOkUIGR0dnZycZGfFyM/Pz8/PHxoaIoRcv379gQcesFqttLYmhGzdunXe22KNRrNnz56MjAyBQOB2uy9dukS7TkZGRsbGxtiWgFiUlJRkZWWJRCLaoTM9Pc1GG5WVlXV1dVKplGEYo9H40UcfhUKhgYGBsrKy6IeorKwcGBigNfHZs2e7u7s3bdqk1+sXymdMSkpKT083m830+rABB506k74uKiqiL4aHh2m0oVAoHn30UVrsUCh09epVGoe1tbVVVFQolcrNmzcTQhiGYatbuoTV09PD7n/Pnj3FxcVCoTAYDLa1tdFxpFevXi0qKmIH+7Dy8/N37NihUqkYhjGbzSdOnPB4PIQQi8WiUqn27dtHP1+bzXbu3Dn6fejq6qqtrY09K8jj8TQ1NdFsULFYvH//fhpvhSkvLyeEdHR0sAEH9xwXvQIAAOuQTCZj+8fXs1VNmtu0adNDDz20adOmwsJCmvwolUrr6+vr6+t37NjBRhuEkKKiIrZnhN4Es+rr62nwZTQaR0dHr127Rpfn5uYWFBTMe9zdu3dnZmbS2kuhUOzatYsdJDkwMBB7+RsbGxsbG0tKSoqKiuhdL5sukJWVtW3bNhruCASCvLw8dqjLoodQq9UPPfQQexttMplOnz795ptvnjx5sr+/3+/3R25iMBjYndP0DkLI9PQ0O/6CDXHYTCK9Xs9mvQiFwsrKSo1Go1araZPSoudOAwv6evPmzaWlpfRTEIlENTU1dBiI3+8fGRkJ21AikTQ0NNDqXyAQZGRkcPMquHOsabXa6upq+trlcrFtIYsKhUIXLlxgU2EyMjLC2oQAAGDNrWoLxz333BPWUKPX6xe6+1er1fTWnK1EqaSkpJqaGto7c/bsWVotCYXCrVu3LnRDHJaoIZVKS0tL6SSVIyMjDMPEcictl8uLi4u5S4LBYH9/P33NVsCsnJwc2vQSyyGSk5MfffTR7u7utrY2ms9BW0cGBgYUCsXmzZvLysq4+bM5OTn0hcfjmZqaogmb7NCM3Nxc9pTZZpKJiQmn06lWq+lbhULxmc98ZtGzZlmtVjZ2CbsOQqEwLy9vZmaGEGI2m0tKSrh/lUqlYU01bChJCAlLNWWLRwjx+XyLZthQDoeDGzONjo729fWFFRIAANbWqgYcC1W6Pp/PaDSOjY1NT0+7XC7a3s5ikzFZVVVVfX19DoeDvQmurq5OTk6OvSQ0+YMQ4nK5vF5vLJMxCIXCsPI7nU42GJqamgq7I6dxQ+yHkEgkFRUVpaWlo6Ojg4ODAwMD9MTdbveFCxeGhob27t3LNsxoNBq9Xk8zNsbGxmi1TXuaCCGFhYXsbnNzc1taWmge7u9+97vi4uLMzEydTscd4xMLGvxRQ0NDYZeCzUiNZWgWdyqRsP1w3y4hVVMoFNKL9vHHH6enp2s0mnj3AAAAPFn7WaRMJtOZM2diadVn0Y4YmuRBCFEqlWGjHxfFzTNguyTixe3sYPNI5hX7IejcGwUFBTt27BgdHb116xZ95MfY2NjZs2cfeOABth2lsLCQBhwDAwN1dXVOp5M7vJbdoUajOXDgQHNzs81mCwQCt2/fvn37NiEkNTW1tLTUYDDEOFcbTcul6ODkeYUFi6uJdtX9z//8DyHE6/V+/PHHBw4cwEwbAADrxBoHHDab7cMPP6Q1d1ZWVllZmUqlonfAFy5coHmR8+IGKHNzc3Nzc0ue5HTJgx4jm15W8BAymcxgMBQWFl65cqW9vZ0QMjIyMj4+zgYTbK+KzWazWq3sCJr8/PywB59mZWU9/vjjtIOGfYbI9PT09PR0e3v7vn37YpkxPRgMxlLs2K/JyjIYDNu3bxeJRJs3b6adZUaj8fbt25g/AwBgnVjjgKOrq4uNNg4ePMhtbI8yDYPNZqOVChUKha5cuXL//ffHPqiBjuSkljzHFHfDxx57bGmJimNjYw6Hg2EYiUQSmXYgFArr6uo6OztpG8nk5CQbcCiVyry8PDraYnx8nA3OuP0pLLFYXFJSUlJSQnM+xsbG6D6dTufJkydjmZOe/TikUumTTz65rmZYVyqVu3fvpjkuNTU1o6OjNPy6fPlyZmZmXH1tAADAkzVucGbzHPPz82Ovw1paWmgFrNPpaJv50NAQe+8eC7Y9QK1WL7lpRKVSsS32bHdGvMxm8/nz55ubmy9evDhvKwL3gXlh+bNsbNHb20sTOIRCIXdwVCgUcvwZ3blMJsvJybn33nsffvhhuo7L5YrSksRi0zl9Ph83n2M9kEgkbPAnkUh27dpFXwcCgebm5iV3mQEAwApa44CDzQwIqxWizAxvNBrZgaa7du1iszcuX7487whSwsnfpPx+PzucNScnZ8mPgKHzaNHXra2tkekLFouFzugQBdsu4vF42FkuuGw2G3spwqa4YKdCn5qaovFEfn4+dx2/3//2228fPXr06NGjYVFFeno6O1MFNz+DFdY5otPp2D23trZGdhINDw+zz0tbWzqdjk7hRQgxmUy0Q2oJ1qp7CABgQ1rjhvHU1FSajXHr1q2cnBw6nYPVav3444/nTSP1+/2XL1+mr8vLy3U6nUql6urq8ng8Nputo6OjpqYmcqvm5mY68RchxOv1Xr58mR1RMm8HROwqKipo9ON0Os+cOXPvvffSMZ+BQIBOs+3xeO6//3423yJSVlZWWloazQylybMGg4G2nQSDQbPZzM3Q5E5VQgiRy+UFBQXs0FxCSNhMJAkJCXl5ebTxo7W1NTk5mR0sMz4+zs6kzp0ji+06mZ6ettvtiYmJoVBIKBRKJJLq6mo6y9nAwIBKpaqpqaF783g83d3dV69eTUxMPHDgQLzjX/hQWVk5MjJC5xBraWnJzs6OJU+FWugKEEKcTufVq1fn5uYqKiry8vJ4KjwAQFwcDkdcbfyLEovF7KO4VnK3K77HuJSUlNAK2+12//73v09OTg6FQmEt9tz7787OTjoCUywW09hCLpfX1dVduHCBEHLt2rWCgoLICs9utx8/flyj0cjl8pmZGbY1JfKRY/HKyMiora2lk4IYjUaj0ZiUlCSVSq1WK1vs6Pf9IpFo3759J06csFgsoVCopaWlpaVFLBYrFIqwkKuiooIdzcviBhxh/SlUXV3d6OhoIBAYHR09evRoXl6eXC53OBzsGNrs7GzubpOSkugLn8/39ttvy+Xy8vLyLVu2EELuueee0dFROjSmvb391q1bqampoVCIlpz8/+OE15ZYLN61a9e7775LP+vz58//xV/8RYwPZ4lyBdra2ugctWaz+cknn1zC014AAFac0+mMPlIyXjKZjI+AY427VHJzc+lPOWWxWGi0kZSUxGZHsh0iDoeDnVe0pqaGzSooLS2llUQwGGxpaYls7acXzuFwmM1mNtpIS0vbtWvXkvtTWHV1ddxTsFqt9JmohBCRSLRnzx46nXYUGo3mwQcf5H66gUAgLNqora1lH2DLlZ2dzea+0Dnjw1ZISUk5cOAA7Q3x+Xy9vb3t7e1stJGVldXY2MgdO5qZmcmNWrjZtSKRaP/+/WybUCgUmpycnJ6eptGGRqN5+OGHI0OitZKcnMx2rFgsFvabs6goV4D98gQCAXS4AADEZe3HGtTW1mZkZPT09ExMTPh8vuTk5Ly8vNLS0uHhYXozPTIy4vf7JRLJtWvX6C++UqnkDncUi8Vbtmz56KOPCCH9/f0lJSVhXRhVVVUlJSXd3d3sIZb5DHQugUBQW1tbUFAwMDBAh5wIhUKtVpuZmWkwGLhTZ0ahVCobGhoqKipGR0cnJibsdrvL5ZLL5UlJSRkZGXl5edzZObkSEhL0ej0NILhPcePS6/WPP/54f3//2NiY1Wr1er1KpTItLS03NzcvL487gSkhRCgUHjhw4Pbt20NDQ1arVaVScVuMEhIS9u/fv2nTpqGhIZPJ5HQ65XK5Vqul88ovOf2WJ/fcc8/IyAj9Ft28eVOv10fp22JFuQJVVVUOh8PlcrHdSQAAay4zM/Mv//Iv17oUixM888wza10GXlgslmPHjtHXn/70pxeqsO90gUDgrbfempubE4lETz755Hqr8gEAACjMw3hnGx4epm3+hYWFiDYAAGDdWvsuFViaUChkNpvZMTthj0wDAABYVxBw3JE++uij4eFhNm8xKysrbMQsAADAuoIulTsSd5SEUqlckeE2AAAA/EELxx0pKSnJarWKxWK9Xl9ZWRnjWBgAAIC1smFHqQAAAMD6gS4VAAAA4B0CDgAAAOAdAg4AAADgHQIOAAAA4B0CDgAAAOAdAg4AAADgHQIOAAAA4B0CDgAAAOAdAg4AAADgHQIOAAAA4B0CDgAAAOAdAg4AAADgHQIOAAAA4B0CDgAAAOAdAg4AAADgHQIOAAAA4B0CDgAAAOAdAg4AAADgHQIOAAAA4B0CDgAAAOAdAg4AAADgHQIOAAAA4B0CDgAAAOAdAg4AAADgHQIOAAAA4B0CDgAAAOAdAg4AAADgHQIOAAAA4B0CDgAAAOAdAg4AAADgHQIOAAAA4B0CDgAAAOAdAg4AAADgHQIOAAAA4B0CDgAAAOAdAg4AHuS8/QAAIABJREFUAADgHQIOAAAA4B0CDgAAAOAdAg4AAADgHQIOAAAA4B0CDgAAAOAdAg4AAADgHQIOAAAA4B0CDgAAAOCd2O/3r3UZAAAAYIMTC4Vo5AAAAAB+iUUi0VqXAQAAADY4NG8AAAAA7xBwAAAAAO8QcAAAAADvEHAAAAAA7xBwAAAAAO8QcAAAAADvEHAAAAAA7xBwAAAAAO8QcAAAAADvEHAAAAAA7xBwAAAAAO8QcAAAAADvEHAAAAAA7xBwAAAAAO8QcAAAAADvEHAAAAAA7xBwAAAAAO8QcAAAAADvEHAAAAAA7xBwAAAAAO8QcAAAAADvEHAAAAAA7xBwAAAAAO8QcAAAAADvEHAAAAAA7xBwAAAAAO8QcAAAAADvEHAAAAAA7xBwAAAAAO8QcAAAAADvEHAAAAAA7xBwAAAAAO8QcAAAAADvEHAAAAAA7xBwAAAAAO8QcAAAAADvEHAAAAAA7xBwAAAAAO8QcAAAAADvEHAAAAAA7xBwAAAAAO8QcAAAAADvEHAAAAAA7xBwAAAAAO8QcAAAAADvEHAAAAAA7xBwAAAAAO8QcAAAAADvEHAAAAAA7xBwAAAAAO8QcAAAAADvEHAAAAAA7xBwAAAAAO8QcAAAAADvEHAAAAAA78RrXQAA2FBGR0c//PBDhmEIIaWlpXv27FnrEgHAurAyAcfg4ODJkyfpTwwh5Itf/KJQGN52EgwGBwcHjUbj9PT03NycRqPJzMwsKirS6XQrdYgwv//972dmZhbds06ne+yxx2IpwwYzNDT00UcfsZeUJRQKVSpVYmJienp6QUFBUlLSmhRvOWZnZ9966y321A4cOJCfnx+5WktLy/Xr1+nr2traLVu2rFoJF7r4kb7whS+IRKJVKNIKiuW8AOBuswIBh8fjuXTpUvSfGIfDcerUqampKXbJ1NTU1NRUe3t7dXX1li1bov+kxnKISDGufzf/OM577qFQyOFwOByOkZGRlpaWysrK+vp6sfgOawzjntrly5ezsrKkUil/h3v//fcnJibo609+8pPJycmLbnI3f/EA4C60Ajkcra2tTqczygoej+fDDz/kRhtcbW1tLS0tyzwE8OfmzZtnzpwJhUJrXZCls9vtHR0da10KAIC72nJvWycnJ9vb26Ov09bWZrfb6Wu1Wl1dXa1QKEwmE7thW1tbQUFBWlrakg+xqE2bNmm12nn/xOuN751Co9FUVFSwbz0ez9DQkMVioW8HBgays7PLy8vXqHQr4Pr16wUFBQt9B9ZW2MUPs2jXIQDAHWFZAUcwGLx48WL0dXw+3+3bt+lrkUh08OBBmhOQn5+vUCguXbpE/9TX1zdvwBHLIWKRn5+v1+uXv5+NSqFQhNV5NTU1Z86cGRgYoG9v3LhRWlp651Z+wWCwpaVl//79AoFgrcsSLvLiAwBsPMsKOG7fvm02mwkhSqXS5XLNu47FYvH5fPR1WAZiSUkJG3AMDw9v3749sjKI5RAr5b//+79tNhshRC6XP/nkk4ODg52dnZOTkwaDoaGhwel0Hj16lPa7l5eXb9++vaOjo6+vb2ZmprGxsaSkhO6EzY2dmZlxuVwqlUqn0+Xm5ubl5YXV1tEPx+uZxkIsFtfV1bEBx+zsrNVqTUlJYVeYmpoaHBw0mUwOhyMUCmm12qysLIPBMG8rQjAY7O/vHxwcnJ6eFggEOp3OYDDk5ua+/vrrwWCQEFJcXLx3717uJqFQyGg0Dg8PT01Nzc7OqlSqtLS0vLy83NzcpQUNAwMDxcXFeXl5sW8yNjY2PDxsMpmcTqdMJktKSsrJySkqKmJbxTwez69//euwbIxjx44RQrKysh555JEllDOK2L9dp0+f7uvro68feeSRrKws9k/cVNk9e/aUlpYSQrq6us6fP09P5ODBg1lZWb29vUNDQzMzM0KhMDMzs7y8PCMjI6w8oVBoYGCgv79/enpaKBRmZ2dv2rRpZU8ZADaMpQccDoeDzb3Ytm3b6dOn512N1qlUamoq90/0F9xqtRJCnE7n3NycQqFYwiFW3NzcXHt7++XLl8OWs/XK3NzcuXPn2B90lt1uP3Xq1PT0NLvEYrFYLJbu7u6srKy9e/cqlcrYD7fmkpKSZDKZx+Ohb+fm5uiLYDB45cqVmzdvclc2mUwmk6m1tXXHjh1htY7X6z158uTY2Bi7ZHZ2dnBw0GAw0Ggj0tzcXFNT0+joKLuEXsmurq78/PzGxsaldYTR7FGJRLLomj6fr7m5mfsRe71eu90+NDTU2tq6b9++9PR0unzVcj+X9u2KHXsiMzMz169fn5ycZP/U29vb29vLDawJIYFA4PTp00NDQ+ySrq6unp4eg8GwnGIAwEa19BbyK1eu0KYLg8EQ5a7R6/Wyr2UyWdhfuREG2xAS7yH4wK3+I++nh4aGIqMNt9v9wQcfcOsDrvHx8T/96U+R5xjL4dZKKBTi5oqy99CR0QZ3k+bm5uHhYe7C8+fPc6MNVuQ1pPx+/4kTJ7jRBtfQ0BB7Lx4jdkyszWaLJXs0FAqdOXNmoeI5nc4PP/wwlhHXK2g53654Xb16lRttsJqbm91uN/u2paWFG21QoVCop6dnRYoBABvMEls4BgcHaWO7VCqtr6+Psqbf72dfR2YAcAdbcteM6xCxMJvNgUAgcrlWq100kXDRCICucOXKFXYojVqtrqysVCgUTqezra2NNhJMT0+3tbUtei7RDzc9PR37gJ3Ilva4mEwmbh1Gb6DtdjsbbUgkksbGRp1OFwgEOjs7b926RZe3trayAeLIyAjbL0OLVFBQIBAIRkZGFqrR29raaD8aPWhlZaVKpeJeyf7+/uLi4tzc3BhPpK6uzmw20xaaa9euFRQUJCYmRlm/p6eHrUpFIlF1dXVycrLH47l9+zaNM3w+34ULFx555BGZTPb0008TQj788EOTyUQ3OXToUFJS0soGjiv17YpRWlpaaWmpRCKZnJxkP9ZAIDA+Pk4bMKxWKzeVW6/X0+XDw8ODg4MrUgYA2GCWEnB4vV4296K+vl6tVofFClyx34ly14zrELG4du3avMsbGhrmDTiUSuW2bdvS09PFYvG8p5CRkbFly5bExESBQCAWi202G3tjJxaLH3roIbZKy8zMfPfdd+nrmzdvVlRUyOXyeA/HMhqNi44iZh0+fHhpXQ9+v39ycvLChQvsEp1Op9FoCCEej4dtM09NTS0oKKCvt23b1tvbSxu0aO1OT7O3t5fdicFgaGxspDFQcXFxYmJi5Ofi8XjYgEYqlT7yyCPslczKynrnnXfo697e3tgDDqVSWV9ff+7cOfLn7NF9+/YtFBAEg0FuVbp3797CwkL6urCw8L333qNDrkwm08TERHZ2Nu2g4e5NLBbH0mvDMplMP//5z+f9E53gbpnfrnhlZWU98MAD9BToZ83GHLQDlBDCbcSi69OpdIqLiy9evMiuDwDAWkrAcePGDXqzlZ6eXlZWttJFWqVDUAvV7nv37uXm2YWRyWT3338/95e9v7+ffW0wGLg30GlpaTk5OSMjI4SQQCAwOTkZ2T0U/XCrIEqdR9XX19M6NT09nU1f4BKJRFqtlm2Z8Hq9crk8GAwajUZ2nYqKCm6Ly7z7MZvNbHBZXl7OvZI6nS41NZV2K4yMjASDwdin4CwpKenp6aGNEP39/SUlJTk5OfOuabVa2cQjtVrN/bBkMllZWRnb/zU2NpadnR1jAZaDnVKMLOnbFS82iqIyMjLYAILtIeUWqaysjP0gBAJBbm4uAg4AiBR3wMGdFWP79u18TLq8CodYlFqtjvJXmUwWdh/J7dGPDB3YKoEQYrFYIquE6Idbczt37gwbVBwMBkdHR0dHR2kXD7drn6KRnNvtZjtlZDJZLNPYs5N/EELoKBjuXx0OB33h8/m8Xm9YlnEUQqFw69atx48fp28vX74cOebi/7J3p21tHOnC+Ev7CshCCIGEECDALGbzEuyxcWwnXrKckzmZa851/T/AfKrz/j8vkudJ5jqJZ+x4A8crtjEGzL4IbWhD+9pqPS/upKbTErIkJAP2/XsFQqhb3dXVd1XdVQ24ac5tbW284tfS0kJ/LpjoUAv7LF37xA0+aJIvjSwJISU+nQAh9JErL+DgrooxNDS011JdXKWPZEPbt4JNlOKLL76o6TocdCoHeVduLDeLtgJjY2NjY2P7+YSytLe3Dw8P8+7N4XD43r173FvOXrgDYSWmNXCPJKywvtc7CyblFGEwGPr7+xcWFgghgUAAfsjHPUH5AQ335OaHWZWpr68fGhoq+Ce4KN5b6SpRNpvlJvfIZLL3sFGE0FFXXsCxvLxMbzOzs7N7LQD6P//zP+T3ezy3eZS/PDb3ngEJpBVsoqyvUCPcoZn8PM3Dvy44754nkUhg0rJarea9M51O/+tf/6Jj+U1NTV1dXUqlUiAQPH/+nBcfcA9LiaHnXhNl81UwH3VsbGx9fR3u3y9evChYeN7/qVQqlcWXrzjkpevoLgeHEHqfygs4KnigCbf1w22oAe5aXpDeeESfmcIdYaHrVVDcL344m4PvvOdRm5ubNNpob2//7LPP6KDD3NwcL+DghpvcoYoiuMfnk08+GR4eLuW/SqRUKk+fPj01NUUIYRgmf1Ynbwfy+zCK93/UyGErXSKRSCqV0k6OVCqFzwdACL1TeU2TCqoz7hwQ3ioCiUSCm50HterhvB+/E3cFVV7aASGEu6TEUXzaOxf3IXy9vb3FM2xUKhW9FcXj8VLWruAWmM3NzeK9YhXo6ekpPk7H3YHt7W3eDhxI7kIFpYvb67DPI1YQN+F3r+cyIoQQV3k9HBaLpeD9MpvN3r59m/56/fp1Qgg8oVur1cpkMmgXrq+vj4yM0Cd3cxcIam9vhy73CjZxGHBT+ZaXl0+cOAGTSAkhXq+XztQQi8XVyko5KNy7F3f4IxaL5fdOiUQis9lM19uYn5+/cOECHVvJv3cSQlpaWoRCIdzmd3Z2Zmdnh4eH6b+kUqnJyUmz2QwLcldAJBKNj4/T7NF8Wq22vr4eumpCoZDNZqPrhqVSqcXFRfpO7hQV7g2+6okUFZQubqqH1+ulU4jT6XTBRdgq2CWaqbq0tGSxWOAI5HK5gv1GCCFUXsDR0NBQcMUk3iIZJpOJ1r9SqbSvr29mZoYQwrLsP//5T3haLNxL6L/QpR0q2EQpbDbbXumHYrGYu2BzZY4dO2a1WuHOmslkfv7558HBQZVKFYlEuF9zcHDwvfXD1wj37ExPT4vFYpVKFQwGX716VTCJsqenhwYci4uLyWQS7t82m427IBilVqtPnDjx+vVr+PXZs2cej8dsNkul0lAotLS0FA6Ht7a21Gp1xVNSDQZDX18ffaYgD6z0BcMuhJC7d+8ODQ01NjamUqm3b9/SPjm9Xs+NA7ijHs+fP+/u7mZZdmBgoLI95KmgdHFj8VevXjEM09jYmEgklpaWuPOAKtbe3k6nB29vb9+6dauzsxOiDd46swghBPb7ePpSDA0NbW5uQk0djUa5y0nRN9S63V9kYQCNRrP/gIMQ8sknn7jd7mg0SggJh8OPHj3ivaGxsXFkZGT/GzpYnZ2dL1++hH6OUCj0r3/9q+DbaIAIa1DSmGNzc/OdLeDR0VGXy0Unneb/C8uycJwrBtmje3VF9Pb2bm1tQc8BwzD0UWeURCI5f/48b00R+h3hsTKEkGoFHKT80mUymcRiMZwmlmVpAFctGo1mZGQEGhKEEJvNxl1wBSGE8r2P9HK5XH79+vW9QoqhoaFqrcd8sFQq1RdffMF9niqXwWC4du3aB5BbV19ff+XKFe6a9EChUHBnz3J7O/KX8QBdXV0FNyGVSq9fv04HMvL/evny5YqHVACsPbrXX4VC4eXLl/faPbVafePGDd6TCK1W616nvirKLV1KpfLixYv571QqlX19fVXZpbGxMbrOLNfJkyer8vkIoQ/M++jhIITU19d//fXXGxsb8LTxZDJZX1/f0tLS2dlZcLnJI0qj0fznf/7n5uamzWbz+XzxeFylUul0uvb2djrI/QFob2//r//6r8XFxe3t7Wg02tDQ0NbW1tfX53K5aFqG2+2mEYNMJrt27dra2tr6+jo8nh6eYx6Px+kKrbzkU1jL1el02mw2eDq8VCptaGgwmUydnZ37fCwq6O3tXV5e3mvxLhrWbG1t7ezsRCIRmUxGH0+fn9osk8m++OKL+fn5ra2tcDisUqmqXrDLLV1dXV319fVLS0t2uz2ZTDY0NJjN5uPHj3u93r2Gk8oiFouvXLmyvr6+urrq9/sFAkFra2tfX19TU9Pr169rkamKEDrSBH/7298Oeh/QR+r169c0D2B0dPTD6OhCCCFU0AfS5kaHGcMwd+7c4c1hicfj3Gfc80YoEEIIfWDe05AK+pi9fv16bW3NbrefOHHCYDDA409nZmZonkddXd37eQoaQgihg4IBB6qteDwOUyRSqdT09HTB9/zpT3/6ANJpEUIIFYFDKqi2lErltWvX6EJVPCqV6vr163RZKoQQQh8qTBpF70Mmk7HZbHa73ePxxGIxpVKp0+mMRqPFYjmii9kjhBAqCw6poPdBIpF0dXXttbIFQgihDx4OqSCEEEKo5jDgQAghhFDNYcCBEEIIoZrDgAMhhBBCNYcBB0IIIYRqDgMOhBBCCNUcBhwIIYQQqjkMOBBCCCFUcxhwIIQQQqjmMOBACCGEUM1hwIEQQgihmsOAAyGEEEI1hwEHQgghhGoOAw6EEEII1RwGHAghhBCqOQw4EEIIIVRzGHAghBBCqOYw4EAIIYRQzWHAgRBCCKGaw4ADIYQQQjWHAQdCCCGEag4DDoQQQgjVHAYcCCGEEKo5DDgQQgghVHMYcCCEEEKo5jDgQAghhFDNYcCBEEIIoZrDgAMhhBBCNYcBB0IIIYRqDgMOhBBCCNUcBhwIIYQQqjkMOBBCCCFUcxhwIIQQQqjmMOBACCGEUM1hwIEQQgihmsOAAyGEEEI1hwEHQgghhGoOAw6EEEII1RwGHAghhBCqOQw4EEIIIVRzGHAghBBCqObEB70DCCFUcyzLRqNRhmFkMplCoRAKsa2F0PuGAUeFlpeXX758SQj55ptv5HL5Qe8O+igsLCzMzs4SQv785z/LZLL3tt2HDx/a7faGhoYbN268t41WSy6XW11dnZ+fTyaT8MrFixdbWloOdq/Q+3Tv3r2dnR2tVnv16tXKPsHn8/3yyy+EkAsXLhiNxvez0Q9P5QFHKBTa2tryeDyRSCSTySgUimPHjrW2tprNZrEY4xiEPjS5XK6Uty0uLi4sLFgslrGxsVrvUinm5ubm5+e5r0gkkvezaZZlHz9+vLOzc+rUKbPZ/H42+pE7bMUPcVUSGbAsOzc3t7CwwH0xFovFYjG73T43N3f+/HmtVlulPTxImUzm+++/J4QMDQ319/cf9O4gdAS8ffs2nU4vLy+fOHHivd3a9xKPx6GmqqurO3PmzLFjxwgh7208JRqNbm9vE0JWVlaOXMBx9+5dj8fT3Nx86dKlg96XMhyq4od4KrnwZmZm4BpWq9XDw8MTExOffvrpuXPnrFarQCCIx+N3794NBoPV3lWE0BHQ2dlJCGlvbz8M1X0gEICOmZGRkaamJrFYLBaL31vAoVarm5qaCCHt7e3vZ4tVVGKH1mFzqIof4im7hyMQCCwvLxNC9Hr9hQsXuCfVbDZ3dHTcu3ePYZjnz59fuXIFM7MQ+tgMDw+fOHHikFz7qVQKfqivr3//WxcKhVeuXGFZ9pAcjY/BoSp+iKfss+J0OuGHkZGR/BCysbFxcHCQEOL3+/1+//73DyF05Bye6p420wUCwUHtw+E5Gh8JPOCHVtk9HIlEAn7Yq8VgMBjgh93dXehOpILB4MbGhtvtjsViYrFYo9G0tbVZLBaRSMT7kL///e+EkBMnTlit1oWFBbvdHovFzp07ZzabA4HArVu3CCGXLl2SyWQLCws7OzupVOrrr792OBwwc6RgFvrs7CyMBN24caOhoaH417x582YoFOL+L8wOgH3gvTmZTK6srDgcjkgkIpPJ9Hp9b28vjBbn83q96+vrPp8vkUgolUqDwWC1WktpftE06S+//FIkEq2urjqdzmg0KpVKm5qarFYr72hTcNh3dnai0ahAIGhoaGhtbe3s7Nxrco3L5VpbW/P5fAzD1NfXt7W1Wa1Wj8czNTVFCPnLX/7CSwpmWdbhcGxsbOzu7maz2bq6OqPRaLVapVJpka/DMMyPP/6YyWR0Ot1nn33G+2sqlfrhhx9yuZzFYhkfH+dua3Nzc3t7e3d3l2EYlUrV3Nzc0dGRf7Tn5+ffvHlDCPn22295kXEikfjxxx8JIWNjYz09PUV2ku7q9vb29vZ2IBBIp9NyubypqcliseSXMZjNodfrP/3009XV1fX19XA43NnZeerUKfqedDoNXyEUCgmFQo1GYzabLRbL/mtJl8u1tbXl9XoTiYRCodDpdO3t7a2trXu9P5lMrq+vO53OcDhMCKmrq2ttbe3q6ip91pXNZnv06BEhxGg0njt3Di7kgsn5cEWfPHmyu7vb6XTCJcAwTENDQ3t7e1dXV34lQMovilw//fRTJBKhv/7v//4v/JB/CZd43IrUPCqVquA+MAzz3XffEUL6+/uHhoa4f8pms1tbW1CoMpmMUqnU6/UWi0Wv1+/1jfL35OrVqxqNZn19fWtrKxgMCgSCxsbGrq4uk8lU8B9LOeOvXr1aWlqiv+7s7MC5s1qt3GK8l1Jqm3/9619wd7hy5Ur+J0DuCK/8wJ67XK5QKJTNZlUqlcFg6Ozs1Gg0vH8vd25IudUj7Mzq6qrdbofqV6fTWa3WUk4cVVmd+QEoO+Cgk/Gi0Wj+ySaE1NfXX79+nftOsLi4ODMzQ39lGMbtdrvd7sXFxYmJibq6uvyPisfjd+7cgWsjn8fjefv2Lcuy9JXW1lYIOBwOR/7NALK3NBrNO6ONIvLHNX0+37Nnz9LpNN3nzc1Nm812/vx5Xp3FsuzMzAwMSIFwOBwOh1dXV8+ePdvW1lbiPjidzrm5uUwmA78yDLO1tbW1tTUyMnL8+HHem3mHHXbY5/PBYdfpdLz3z8zMLC4u0l8DgUAgEFhfX99rEDqZTD569Mjj8dBXoHNrZWXl0qVLRQIpsVjc3t6+urrq8/mi0ahareb+1ePxwKHmHpZYLDY1NcVNDwqFQqFQCBLEBgYGuJ9QrRHoaDT68OFD7kbj8Tgc8I6OjtOnT+cHCgzDPHv2bHNzE37ltq0DgcDDhw/j8Th9Ba6Czc1N3gBlWWCLNpuNvgJJ3FtbWyaTaXx8PP/G7Ha7Hz16RMst+f3ELS4unj17tkiYwv2Ex48fE0J0Ot34+HjBiIEnk8k8e/ZsfX2dt1GHwzExMcH7hHKLYom4BaOC40YK1TzlSiaTk5OTgUCAvhKNRqPR6Pr6el9f3/DwcImfE4/Hp6enuZ/jcrlcLld+fEOqccbfqcTaxmKx7O7uer3eeDyuVCq5708kElCZcM9y/p5Dzbm8vHzq1Cmr1VrrHeba3d19/vw5nWLNMIzNZrPZbMPDw319faVstOI68wNQdsDR0tIC/QTT09Pnz5/PDwOh0cZ7cWVlBc7rsWPHent76+vrM5mM2+1++/ZtJBK5d+/e1atX8z9qbW2NEKJWq5ubm0UiEa9owlQ3nU6n1WpzuZxIJJLL5Xq93uPx2Gy20dFRbv0VDoehuWOxWEr5mp9//nkul4NWOCFkYGAA7uX5teqjR4/EYvHQ0JBWq2UYBlpvLMs+e/bs66+/5r7/5cuXq6urhJD29vaOjg6pVBqJRObn58Ph8OPHj+vr60uMhF69eiWTyYaHh6FZ7/V6ofqbmZnRaDS0h4kQsrGxAYddr9f39PSo1WqGYTwez/z8fDqdnpqa+vLLL7kx9fr6OlTxSqXy+PHjDQ0NDMPs7OwsLy/Pzc3l7wnDMPfv34emVV9fX0tLi0Ag8Pv9c3NziURiamrq2rVrRdqgZrMZDojL5eru7ub+CUbuxGJxc3MzvJJOp+/duxeNRgkhx48fb2lpkUgkkUhkaWkpEAi8efNGJBLlx1v7lMlkHjx4EIlExGJxX1+fXq+XSCTxeHxxcdHj8WxsbDQ0NORvFG6NEonEaDTK5XJ6WsPh8J07d7LZrFwuHxwc1Gq1mUzG6XQuLS15PJ5Xr16dOXOmsv2kd02TyQSNs2QyubGxsb29bbfbHz16dOHCBV7cMzk5ybKsTCbr7+9vbGyEF+fn51Op1NTU1OXLl/fqMKOf8PDhw1wuV19ff/78+RJDpfn5+Ww2C21TmUwWjUbn5+fj8fjOzs7Gxgb3zlFuUcx37dq1XC63sbEBjZDr169DPwT3kiz3uNFvQf5Y85SyP1xPnjyBKKG3t7elpUUsFkej0bm5uWg0+vbt27q6Osh8fKfHjx9ns1mr1drS0iISifx+//z8PMuyCwsLZrOZWw+XfsaHhoZgWPzBgwc+nw9y9UgJ4xSl1zZGo/HVq1eEELfbzfumOzs78ANd6yIYDMKeq9Xq/v5++FKhUGhubi4Wi01PT2s0moKRwTuVWz2Cubk5kUjU39+v0+lEIlEwGFxYWEilUq9fv9ZoNO9c32WfdeZRV/YXa2pq6urqgn7On3/+ua+vr729nRcK8ESjUSheer1+YmKCHs3m5ma9Xv/gwYN4PP769etPPvkk/38HBgYGBgYKlnWhUHju3Dle56HFYvF4POl02ufz0XsVIcTtdsMPJa7ZwjvlIpForypVoVBcunSJNtBNJpNcLl9YWEgmk36/n/azOZ1OuLkODAycOHECXtRqtc3Nzf/85z+TyeT8/Py5c+dK2TeVSnX58mXai2swGAwGw927d3O53OvXr2nAAb8SQvR6/cWLF2m1qNPp1Gr1o0ePUqmU0+mkEVgmk4HLT6FQfPbZZ/ScGo1Go9F47969/D1ZWFg5BOq1AAAgAElEQVSApv/ExAS90nQ63bFjx+7evRuJRDY3N4u0P3Q6nUKhSCQSW1tb3ICDZVm73U4I4a7p8ubNG4g2JiYmaGtMq9WaTKapqSm32z0zM9PS0rKf7qt8drsd4tQ//elP9AtqNJrm5ubbt28Hg8Hl5eXe3t78e1JLS8vZs2e5tVUul3v69ClEG59//jk9fc3NzTKZbHZ2dn19vaenp2CvYXHQwCJ5/fatra1zc3Nzc3NOp3Nzc7OjowNeZ1n26dOnLMvK5fLPPvuMFl2dTmc0Gm/fvp1MJp8+fXrjxo29bqWRSGRycpJhGLlcPjExUfoQTDabHRwchPsZfPfW1taffvoJmom0qBQvivfv3y+l+wpKDq06xGIx7xIu97hRBWue0gWDQaiOuIdCp9O1tLTcunUrFostLCx0dHSUknTCsix3+NhgMGi12gcPHhBCnE4nLUtlnXFAfu+ZEwgEpUSTZdU2arVap9P5fD673c4LOBwOByGkqamJ7uTS0hLLshKJ5PLly7QkaLVanU538+ZNlmU3NjYqCDjKrR4psVh8+fJluu4DlOFbt25BoTUYDMVP3D7rzKOukmHjkydPwvWZTqdfv379j3/845dffllaWtpr7GNtbQ26H0+dOsW7kbe0tMDB3djYgNsJl16vHxwc3Cuy7u/vz7/mW1tb4XzDHYuCcqzVaguO3ezHmTNneMMBdISYe0BgWBSCdO6b5XI53GttNhvtpituaGiIN2YMKQWEkN3dXdr5z7LsyMjI+Pg4r7OHEEJv2Nw8FbfbDZ2W/f39vAiyubk5P9chk8nAl+rs7OTF9Xq9HiItbud5PqFQCLvt8/lisRh93efzwYARHU9JJBLQ3dXR0cHr+xWJRCdPnoSfV1ZWimyuAg0NDePj4+Pj49zgFTYKZzkej9N5EJRYLP7kk094bSOv1wtp1CMjI7zTZ7Va4QRx+/ZL9/btW0KIWq3mDSoRQvr7+6GHdn5+nt6k3W43nPfh4WFe0VWpVKOjo4SQaDQKl0w+GA5IJpNisXhiYoL3CcXp9XreTioUCmgDcHPMixdFXmdYxco9bty/VhxtEELogBqvD0kmkx0/flyr1UqlUjpgWtzg4CDv0jMYDFDwuIOA+zzjpaC1zdjYWCm1DVz4TqeTe/lkMhnYB+54Sltb2/j4+Llz53gloa6uDg7g7u7ufna4xOqRgs5s3p7AXSwUChXfmf3XmUddJQGHUCjs7+//8ssvrVYrRAM+n+/Vq1c///zz/fv3uUNTAKpRg8FQcHSKRrj5/6jVaotEiwWzMuVyOdRfNpstm83Ci8lkEnrqajEbPr9JTRt8tNaATmNCSEdHR36rkZa8EhcvKdjhRtthdEBXJBJZLBaLxZJ/oGA1Au4eEkK8Xi/8UDCbJL9r0e12wxEueFShRoYsyyLfhW7L5XLRF+FniURC+4e8Xi/ErAW7miHlihCyvb1d3cUDtFotHMP8qJceEFrMKLVand/ohwhYIBDkD5ZLpVIoA/mXwDtFo1Go4wrmXQqFQqgKo9EoDX9huEokEhU80SaTCVq0dD4aF8MwU1NT0OtTwfp+Ba9ouJFks1l6JMstihWo4LhRe+WDl4jeOPOLa3d399WrV69evVrid8zvDxMIBBDOcq+7/ZzxEtHaJn+XCtY29CqgYyiEEI/HA5c59xppbW0tmKBNfk8TzI/4y9rhEqtHqmCCMD2wxedm7uzs7L/OPNIqHyuqq6s7derU0NCQ2+222+12u51lWciAs1qtY2NjUEenUilovO6VxKvRaIRCIcuy1VorzGw22+32VCpFRzRoPV7ieMo+0SqV1ia080YqleZHzTT7LL+Pp3Q07uFm5tNX7Ha73++PRqO0KDMMw3sbVKwqlarEHnK6IaFQmP+l6B06FosVqT2hzykSiXB71CG9t729nd4JaNnYq67X6/UOhyOVSsHcn1L2v3TZbNblcrnd7mAwmEqloMqglVGJIQ4corq6ukQiQad6UVB1crP/SkRvhzAqn4/GBOFwGAoJbAVWwcp/v0gkampqcjqdBavO6elpeH10dJSbLbQf+ddLuUWxAhUct2rRaDRGo9HhcKyurgYCgY6OjqampoaGhmpN3IXP4RbL/ZzxcpVY2yiVypaWFpfL5XA4aJcwtDQMBkP+JZxKpRwOh8fjCYfDqVQKvl2JXcJV2eHiaMd5fvXL2xb8sJ8680jbb3KKVCo1m81mszmdTjscjvn5+Wg0CskKMIeKnsK96g6hUKhQKGKxWFVKDyEE8qey2SxMUCS/R+4wOFeVTZSLxuAvXrwo8rb9BLYymQy+NTcqZ1l2dnaWm+r/zq2XPuREz9edO3eKvO2dncMdHR2zs7MejwdS1kOhEARe3F5rOIAymWyvdCpaulKpVHUDjkAg8Pjx4+L1SCmgIz0cDt+8eXOv97Asm81my0pCfOf1xT0y8AOEOwqFYq/PhAPIHeQCMDUAft7e3qYjQVVXblGseBOknONWRWfPnp2bm4N8Z4gGZDIZrBFQWf5jcRWf8bKUVdsQQtrb210u1/b29unTp8ViMcuy0Beev+7A5ubmixcvShxmqt0OFyGRSCQSSSaTKb6TtKWxzzrz6KpaNqxUKu3o6ICUrkAgsLq6arVaK8iA2z+JRGI2mzc2Nmw228jISC6Xg97sA1xdOL/XvaD9TLQr6PXr1zBk2Nvb297eXldXJxaLoQH03XfflRvF85T47+/8UiaTCdY4gZR16GKFxUXoe0ofKKnu+k7RaPTu3buwCMTg4KBOp4PAjhCyuro6PT1d+keVWImwLFuju3i1HDt2bHd31+fzvX37luY8orKIxeKRkZHe3l673e50OmE9j9XV1dXV1ba2ttOnTx/FBm65tQ1M0GBZ1uPxtLa2+v1+iAJ5Y452u/3Jkyfw/uPHj2s0GolEAp0Bjx49qiztqbId3r9q1ZlHV3kBRzqdhtanWq0ueElIpdKhoaH79+8TQnZ2dqBwwJ/2aiiwLAtxXxUftw0BB8wTYVkWTnNVJppXhh6Eq1ev1uixdrSrn24rHo/D5cRNhi8CTmjpwzq0APz1r3/dz6JV9fX1jY2Nfr/fZrN1dnbS6JB736WDtQzDFOzkoKWrug9QWF5eZhhGKpVevnx5n937MOXSaDTCJMNqoWdhr+uLNuXpO2FmUP6wDgV9VwU7iqxW6+joKEwLmpubo5lu1VVuUax4E6Sc41Z1CoWiu7u7u7s7m80GAoG1tTVYEY5l2eoWkv2c8RLR2iZ/RZy9yGQyo9Fot9sdDkdrayuMp8BMcu7b6FySCxcu8OqZ/bQuyq0ei6N9G8Xrn2rVmUdXed85GAzeunXr1q1bvDkgXHTYAgqxXC6HLBuaCMYTCoUgoKtid0hzczOcWofDAeVYr9fvtRrge0A3Xbtn2tE+f9oRTRMCSsyoh4HqaDRaYh8y3dD+bwyQ8ep2u3d3dyHhhpfdRsvGXgcQSpdMJqOVJr2e95NGCtMXW1pa9p9MAIfX7/dXN62VJmLvNQBPiwF9J4S8Xq+3YHsLWpykUHKDUqmEOQhnzpyB6+vJkye1GHEotyhWoILjVi0Mw2QyGW6vJ2RRjI+PQ060w+GobrBV8RkvHT1cZeXJQa/z9vZ2NpstOJ4Sj8ehZjObzdW9Q5dbPRaXX/0WVMU684gq7xTSzKYiAQcdCKR1NNw8nE5nwYHwjY0N+IE383A/6HzLra0tKMeVjadUq3++oaEBboR0hjBPWX1oBQdo6GGkPSi0csnvzI9Go/kfQocwIGeTJz/DhjZt6aZ5Sv9StPMJBinkcjlvJFuv18O5KLitWCwGBbKtrY2eMtqYyN/z0m9jcOgK5taUGztCimUymeTOx+GqrB9VrVZDNLa2tpZ/TlmWhYQqtVpNMx8h4R+SnPI/0OFwFOzZJoTQ56wqlUpYoywej8OyWtVVblGsQAXHrVru3r37/fffF1zYhh7z6kZalZ3xsmo/WtvkxzQFaxtgMBhEIlE6nV5ZWYlGo0KhkDcbhf5j/seyLFtw2mq5O1xi9cj9a/6LdGSneApOFevMI6q8gEMmk3V1dZHfV9fOPyvJZBJ6wAgngOjq6oJ66sWLF7x/8Xg8sNS3xWKpbkYnRMqJRAKS9SobT6ExdZHeyFLAonKEEFgKkPfXVCp1//79mZmZEkvb3Nwcr84NBAJQgnU6He0MoN0q6+vr3FZ1PB5/9OgRvMLdIm3Hw6pl3M+nq5Zx1dXVQSj59u3b/JtoMBj86aeftra2SvlGkLJOfm9u5k9DVSgUUPDW1tZ422JZ9sWLF/B1uAvm0OPAu2ml0+nS75Fws4H5KdzXYbid7kApH9XW1gaHd3p6Or/OstlsN2/erGCWCiEEVnaJRCKwBDDX4uIi7Hl/fz+9f7S0tECrfWZmhpcnGI/HYY0+lUpVvKlqMpngaG9tbdFF3KuFWxR5l17BoliZco9btUDoCUto8/5E54gWSfCsQGVnHMYuS8wkpbXN2tpaKbUNkEgkUIdAFpfJZOINYCkUCqgK1tbWuJFBNpudnp6Gc1RihtxeO1xi9UjNzs7yThw8noIQcuzYseL99BXUmQVX+jm6yk4aHR4ejkajMIILmaH19fUymSyVSgWDwZWVFSgW3DUT6+rqRkZGXr586Xa7f/nll+PHj9fV1cGzVCBDWC6Xj4yMVPeLNTY2qlQquFoMBgP3Ag6Hwz///DMh5Pz588X702CZ9mAwuLa2Br0USqWysqGfrq4uu92+s7MzPz+/u7vb1dWlUqkYhgkEAouLi/F4PB6PHz9+vJSu+3A4fOvWrb6+Ppgj6vP5YD1jQgh3wcTGxkbY+Y2NjVQqZTKZYCHelZUVGt1zi7JIJBodHX38+HE8Hr916xZdT9rlcu1VxY+Ojnq9XlgJqru722g0Qklwu92wPqDdbjebzaVU2ZCyDj8XPClDQ0MulysWi01OTvb29ra2tsKC0EtLSxCmDA0NcU+NVqtVq9XRaPTNmzeJRAIiznA4vLKyUno2fldXl9vtzuVyd+7cgXKbTqdtNht3wYwSs0HFYvH4+Pj9+/fh8Pb19TU1NYlEIngyC7SQfD5fBSk+bW1tJpPJbrfPz8+HQiFYojuVSm1ubkLlZTAYuAsmCoXCTz755M6dO8lk8tatWwMDA7DRYDBIY9kzZ868c33l4eFhmKY4PT3d2NhYxUkl3KJ4+/btUopiBco9btXS09Ozvr6eTCbv3btntVoNBoNMJksmk9vb29BseOfazeWq7IzX19fD4yFfv34NZbVIJ3S5tQ1lNps3Nzeh+sqfnyIWi61W6/LyciQSuX37ttVqlcvl8Xh8dXWVRu3JZDKXy5UbF1a8w9ls9u7duz09PXBMYGlz+JeRkZF37kZZdSY8HFEoFH722Wc1Sv57z8oOOCQSyfnz59+8ebO0tJRMJgs+16C/v5+XhtPT08MwzOzs7O7uLjzwiVKr1WWtjlwigUDQ0dEBu5dfjkvX3d39/PlzlmWht//UqVOVBRxCofD8+fNPnjxxOBxOp5O3xo5Wqz137lyJB8FqtcI8Md7rY2Nj3Aw+oVB49uzZe/fuJZNJ3hYHBwedTmcgENjd3eVeq+3t7eFwGB5vwe0GgKWI8xuySqXy8uXLk5OT0Wh0eXmZ+1w6QkhHR8fJkydLrAhaW1thORaFQlFwLFkqlV66dGlycjIcDi8uLvImsw0MDPCenCQUCuEGzzAMt0OCEGK1Wku8b7W1tfX09CwvL2cyGXj2LKivr+/s7ITltyORSImD3waD4cKFC48fP4Ylenl/HR0dLeXRtfkEAsH4+PjTp0/hCSC8bnNYZJ3XY9TY2DgxMfHrr7+mUilefw8ERqWMb0okkvHx8du3bzMM8/Tp00uXLlVxfk2RotjY2Fhiz1lxFRy3qpDL5RcvXpyamoK8Re6jWQkher2erpxbRRWccYvFsry8zLLs27dv3759azabi5SKCmob0NzcDBNK9wpoTpw4EQgEfD5fOBzm7rnRaFQoFHAhR6PRcuPdinf49OnTMJmWVwWNjo6WctWUVWdCw4Zl2cqaIodQJdNixWLx6Oio1Wp1OBxutzscDieTSYlE0tDQoNfrzWZzwTSr/v7+1tbW9fV1eDy9RCKBBXA6Ojpq9KwaevfljafQDrRS6seuri6xWLy8vLy7uyuXy/cTGEGs5nK5bDYbfRZ2Q0OD2Wxua2srvbJuaWnp6+uDx9NHIhGpVKrX67u7u/OfttXQ0HDt2rWVlRV4krJcLoeVobVarVKphNKcSqW4X+rEiRNNTU3wEFf6TPCuri56YfCqYHg4sM1ms9vt8KBtlUql1Wo7Ojpo4kUp4CnPHo/HYrHs9V9qtfratWvwUO/d3d10Og2Pp+/s7Cx4Nep0umvXri0tLTmdzmQyCY+Vhx0rvaEMYRw8Tp1lWThfXV1dDMNAj25Zw65Go/Grr76ijwjP5XKwQnNnZ+d+cgXEYvG5c+fcbjd9zDrkwZjNZqPRWPB4GgyGL7/8cn193eFwcB9W3tnZWXrzWqvVjoyMvHr1yufzLSws0IcEVcU7i+L+BzsqOG5VcezYsWvXrm1ubjqdzmAwmE6n5XJ5Y2Oj2Ww2mUw1mr9Q7hnXaDRXrlyZn5/3er1CofCdybMV1DaEEJFIBE+NNpvNBad4SCSSTz/9dGNjY2trKxgMCoVCnU7X0dFhMpmgYMDHVtDBVtkO6/X6GzduwOPpI5EILIhcsPrdS+l1psVicTqdEonkAKdYVpfgb3/720HvQ63AE5haW1snJia4r7tcLni+0RdffHGEngXs8/l++eUXQsiFCxfez5KpXNPT06urq2Kx+C9/+UstPj+dTv/f//t/c7nc559/vp9sefTBe/HixcrKSu2KIkKoRj7YqcDZbBYe95U/ngJzHRsaGo5QtPHe0CdLccGi9STvcVNVBM+VgEi/RptAR8tBFUWEUI18sAHH6upqIpHI74xKJpMQiPCe2ooIIaurq/DUdd7ry8vLkKJV8OFP+5dMJmGmQHd3d+36sdERUqQowuz6GhVFhFDt1CR54gDt7OwkEgmPxwMP+e3r6+PNs4LBS3j+y8Hs4mGVy+VsNlsikbh161Z3d3dLS4tUKk0mk5ubmzCHorGxsbrLwycSCb/fH4vFVldX4XlF9Jm36GP2/osiQug9+NACjvn5eTplUa/X9/b28t4AKT9yuRxb0jwCgeBPf/rTkydPXC5XfvJ8U1PTuXPnqvuYj3A4/PDhQ/rr2bNnq7i8PTq63n9RRAi9Bx9awFFfXx8IBORyucViOX78eMFa6QDXOD/kZDLZxYsXd3Z2YMmQaDQKk0fa2tra2tqqnjwvlUrVanU8Hm9ubh4YGKjFczLREfWeiyJC6D34kGepIIQQQuiQwIYCQgghhGoOAw6EEEII1RwGHAghhBCqOQw4EEIIIVRzGHAghBBCqOYw4EAIIYRQzWHAgRBCCKGaw4ADIYQQQjWHAQdCCCGEag4DDoQQQgjVHAYcCCGEEKo5DDgQQgghVHMYcCCEEEKo5jDgQAghhFDNYcCBEEIIoZrDgAMhhBBCNYcBB0IIIYRqDgMOhBBCCNUcBhwIIYQQqjkMOBBCCCFUcxhwIIQQQqjmxAe9Awihd2AYJhqNsiyrUCgUCsVB7w5CCFXiAww4fD7fL7/8Qgi5cOGC0Wg86N1BqHKZTObNmzerq6ssy8Irf/7zn2Uy2cHuFaqWhw8f2u12jUZz/fr1g94XhGqu7IAjmUz+8MMP8HNfX9/w8PA7/8Xr9d65cwd+PnfunNlsLnejCH2EWJadmpryeDzcFyUSyUHtDzoMMpnM5uam3W7f3d1lWVatVjc3N1ut1rq6uoPeNYTeYV89HGtrawMDA2LxOz5kY2OD/pzL5fazRfShymQy33//PSFkaGiov7+/lH+Zn59/8+YNIeQvf/nLOwvhUeR0OiHaMBqNIyMjSqUym80KhZh39fEKh8NTU1ORSIS+EgwGg8HgysrK+fPnW1tbD3DfEHqnfVVe6XTa7Xa/8z2bm5v72QpCBX3wwavX64UfTp8+XVdXJxKJpFLpwe4SOkAMw0xOTkK0YTKZzpw5c/bs2Z6eHkIIy7K//vprPB4/6H1EqJj9tgvX1tZMJlORN2xvb9PhZ4RQ6VKpFCFEoVDI5fKD3hd08JxOZzQaJYSMjIwcP34cXmxvb9doNM+ePctms1tbW319fQe6jwgVU3kPh06nI4S4XC5u/16+tbU1+maEUOmgCwfHUBDw+/3wQ1dXF/f1jo4OGFKkb0DocKq8h8NisQQCAZZlbTbbwMBAwfcEAoFAIEAI6ejo8Pl8e32Uy+Xa2try+XzxeFwikWi12ra2tvb2dpFIBG/w+/23b98mhAwMDJw4cSL/3x88eEAIOXPmTGdnJ/dPyWRydXXVbrdHo1GpVNrU1NTV1aXX6wvuBsuyDodjY2Njd3c3m83W1dUZjUar1Vq8H5thmB9//DGTyTQ2Nn7++ee8v6ZSqR9++CGXy1kslvHxce62Njc3t7e3d3d3GYZRqVTNzc0dHR3Hjh3jfcLc3Nzc3Bwh5Ntvv+UlDCYSiR9//JEQMjY2Bj2rBRXJhL99+7bf7x8cHBwcHCz4yadOnbJarfT1ZDK5vr7ucrlCoVA2m1WpVAaDobOzU6PR8D7573//OyHk5MmT3d3dTqdzfX3d5/MxDNPQ0NDe3t7V1UVP7s2bN0OhEP3H2dnZ2dlZsnd+sd1uf/jwIfeV7777jhCiUqm+/vpr7uuwt06nMxwOE0Lq6upaW1u7urpK7DBYWlp69eqVUqn8j//4j0AgsLq6urOzk0wmlUplS0tLT0+PWq0u+I8wjLi9vR0KhYRCoUajMZvNFouFFzrAITpx4oTVal1YWLDb7bFY7Ny5czqd7h//+Ad9WywWg3cSQr766ivuRksvRcvLyy9fviSEfPvtt16vd2lpye/3y+Xyr776ihDy4MEDl8tlNpvPnj3rcrk2Njb8fn86na6rq2tra+vu7oaCF4lE1tbWXC5XNBqVyWRNTU3d3d1ltSXeeaW/E7Tjt7e3A4FAJpNRKpVNTU0dHR17XdQlngsQDAY3NjZ2dnai0ahAIGhoaGhtbe3s7OQVmEAgcOvWLULIpUuXZDLZwsLCzs5OKpX6+uuvVSoVvIdlWdjPYDAIZaa5ubmrq0ur1e711XZ3d1dXV91udyKRUKlURqOxt7eXOwt6YGCgt7dXIBDw6gGBQKBWq4PBIMMwJR5GhA5E5QGHWCzu7OxcXV1dXV3t6+sreAFD9oZMJjMYDAU/hGGYZ8+e2Ww2+koqlXK5XC6Xa2VlZWJiAq43rVarVquj0ejW1tbg4KBAIOB+iMvlgh94OVO7u7vPnz9PJpN0W1tbW1tbW8PDw/kdj8lk8tGjR9wZAX6/3+/3r6ysXLp0qb6+vshxaG9vX11d9fv90WiUdxPyeDzQTm1ra6MvxmKxqampYDBIXwmFQqFQaHl5+cSJE3tFbxUzGAx2ux0qPm7VGY/HoUlkt9t5AQeEiYQQbj3udrsfPXqUTqfpK+FwOBwOLy8v8+ISKpPJPHv2bH19nb4CR9XhcFy8eBHKzF6pGPtM0cjfW9j04uLi2bNnS0+vSyaT9G4NIpFIJBJZX1+fmJjIv88FAoGHDx9yR9Pdbrfb7d7c3Lxw4UL+HJN4PH7nzh0IicpSWSlaXl6GTNt86XT62bNn3BTv3d3d3d3dzc3NK1eu+Hy+x48f01taPB6Hqyk/yi+oxCu9uGQyOTk5SQsnISQajUaj0Y2NjYIz5so6F4uLizMzM9xXfD6fz+dbXFycmJgoGFd5PJ63b9/SIWNaLyUSicnJyd3dXd5+rq2t7ZUTvbq6Oj09TX+NRCKLi4tbW1tXrlyhVYpUKi3Y+GFZFoZalEpl/l8ROjwqDzhYlrVYLKurq4lEYmdnp6WlhfeGTCYDdxqr1coLEagXL15AHdTZ2dne3i6Xy5PJpM1mW1tbg3BhYmKCECIQCDo6Ot68eRONRnd3d7mthFwut729TQhpbW3lNUTm5uZEIlF/f79OpxOJRMFgcGFhIZVKvX79WqPRcHeYYZj79+8Hg0GBQNDf328wGAQCgd/vn5ubSyQSU1NT165dKzIPwmw2r66uEkJcLld3dzf3T06nkxAiFoubm5vhlXQ6fe/ePaggjh8/3tLSIpFI4LYdCATevHkjEonoAG1V0Jui3+/nLkxCo6tgMMgLlaA7SqlU0kgrGAxOTk7CNLz+/n7o0giFQnNzc7FYbHp6WqPR5FfK8/Pz2WwWekFkMlk0Gp2fn4/H4zs7O+vr6xCjXL16NZfLQUcRIWRgYAC+/l6t3tbW1m+//ZYQ8vbt24WFBULIN998IxKJuGUsEAjA3spksv7+/sbGRnhxfn4+lUpNTU1dvny5qamplKPHsuzLly81Gg10aaTTabvdvrm5yTDM1NTUl19+yS114XD4zp072WxWLpcPDg5qtdpMJuN0OpeWljwez6tXr86cOcP7fBhzhMmNIpFIqVQqFAr4gs+ePdve3lYqlTdu3IA300JYsBRFIpGlpaXipQiijdbWVshC5f4JEsDb29vb2tokEkksFltcXISY8tdff/X5fEKhcHh4+NixY9ls1uPxLC8v53K558+fGwyGd97qSrzSi3vy5AlEG729vS0tLWKxOBqNzs3NRaPRt2/f1tXVcUOfss7FxsYGRBt6vR5ONMMwHo9nfn4+nU7Dic6/2c/PzxNCdDqdVqvN5XJwPGEyM0QbVqu1tbVVKpVGo9GFhYVwODw7O6tQKDo6OrifEwqFpqen6+vre3t71Wo19Mt6vd5EIjE7O3vu3Lnih8Vms0EgiLNU0CFXecCRzWYbGxs1Gk0wGFxfX88POBwOB1wGFoslm83mf0I4HIbmVH9//9DQELzY0NDQ3NwsFApXVlacTmckEoH55SaTCepKp9PJDTh2d3cTiQQhJL/7Xb1ggekAACAASURBVCwWX758mb65ubm5tbX11q1bmUxmZmYGogr408LCArQUJyYm6BfR6XTHjh27e/duJBLZ3Nws2IKn71QoFIlEYmtrixtwsCxrt9th3+itAsIm2BatIKBveWpqyu12z8zMtLS0NDQ07LW5ctXX16tUqlgs5vV6uQEHBENgZ2eHG3Ds7OwQQrjpwIuLiyzLSiSSy5cv07uLVqvV6XQ3b95kWXZjYyM/4Mhms9zxGjgFP/30E8MwNpsNDikvkhOJRMWXmhAKhdA1QjvVxGIx90NYln369CnLsnK5/LPPPqPfS6fTGY3G27dvJ5PJp0+f3rhxo8SefJPJND4+TjdhMpk0Gs3MzEwmk1laWqIN61wu9/TpU7jDff7557R3vbm5WSaTzc7Orq+v9/T05A8/DQwMDAwMcPsI4QjAK/ld6GTvUmQymYqXIpVKNTExsVfpGh0d7e3tpb+azeZffvklGAx6PB6RSHT16lUagBqNRq1W+/jx41wu53K5eFkFPGVd6XsJBoMQEnFLlE6na2lpuXXrViwWW1hY6OjogIu6rHORy+Vev35NCNHr9RcvXqSlQqfTqdXqR48epVIpp9NpsVh4uyQUCs+dO8fLml9fX4eoiNv3o9PpTCbT3bt3A4HAq1ev2trauCU2l8u1traeO3eOvtjW1nb37l2fz2ez2c6cOVOktePz+Z4/fw47jwEHOuQqz0djWVYgEMA9Y3t7O39GFnRvtLS01NXVFZyoIhaLx8fHx8fHeb0ChDMAQTNSGxoaIHTY2tridrbTebn5Ec/w8DBvxLSurg52OBQK0Q5PuG0QQjo7O3kfotfroXuAOyiQTygUQmXk8/lisRh93efzZTIZwrlzJxIJaNF2dHTwageRSHTy5En4eWVlpcjmKgBxBh17IoQwDAPBECR/cIOPdDoNNSbtlSGEmM3m8fHxc+fO8dqydXV10FXA7UCm9Ho9r29foVDAztQuwc3tdkNSyPDwMG+ES6VSjY6OEkKi0ajD4SjxA0dGRng1fk9PDxyHtbU1Gkx7vV74UiMjI/QOB6xWK9zGuGMKQK/XDw4OlpUZup9SdPr06b2iDaVSybsSxWIxjbP7+vp4A4s0eOWm4BRU1pW+F1rD8LqmZDLZ8ePHtVqtVCqFy42UeS5Ylh0ZGRkfHx8bG+PFoPTwFvyO/f39vGgjl8tBZaLT6XgjTWKxeGRkhBCSTqd5hV8ikfCiCqFQSHtBILIsKBQKTU5OZrNZpVI5Pj6O+cXokKu8gEI9azaboZTDuAYVCoWgxx6aPgV7OJRKpcVisVgs+cO3tPeSmwYFN/VIJMK9+GG7RqMxf73ngt28tIKj1/zOzg7sXnt7e/77oUIJBALcbIAiH8u9qUMwJJFI6KCG1+uF2KvgsDekqcKXqu4iExA6hEIh6A0ihPh8PpZldTod3FGcTif9gvTIcHssWltbLRZLflRHCIEjD3M4ebRabf5oGpyXbDZbsFTsHwRPIpGImzdDmUwm6DDgxljF5bcvhUIhHLd0Ok3vBxDACQSC/IamVCqFQ8dbNpTscYiK208pyu9f4e5k/h2LXpv5I1BisRiGk4pfGqT8K32vD4Ef8r9Xd3f31atXr169Sj+trHMhEolg9/IPDu08o6EMV35ybjQahcgpvzuEEKLVavv7+/v7+3klSqVS5Scy02NVcNOEkHg8/uDBg3Q6LZVKJyYmMIEDHX77yuEghEil0o6OjrW1tZWVlZ6eHlp1bm1tEULkcjlc28WX4vB6vU6nMxAIJBIJqHfo+7k1i8lkgtw9p9MJVUMsFoOGdenLpdNuW9qioj8IhcL8dgytgmOxWJHpKlqttq6uLhKJ0JEC8nsTqr29ndYvNMUvv6oCer3e4XCkUqlEIlHFGoTeLfx+P4RQEBgZjcb6+vr6+vpwOOzz+aB2hoBDr9fnx3CpVMput3u93nA4nEql4OzQtNwS0UJSo5W7oHumqampYEe0SCRqampyOp377GKhN6dYLAZ9BlB46urqEokEDewoOJjchMeKvc9SRE9WweEnuDpKX2inxCu9II1GYzQaHQ7H6upqIBDo6OhoampqaGgoGK5Vdi4ikYjdbofsbxpFlTX1g9sjm/9XsVhMR5RKV/DIsCz75MmTeDwuEok+/fTTInEkQofHvnI44AcIOKLRqNfrhaZ8NpuFJEo6+3GvKglG07m9AkUolUqDwQBJ5pDpDakGAoFgr1kw+SQSiUQiyWQytN1A6yP6wJeC9mpnUB0dHbOzsx6PJx6PK5XKUCgEbV9upyt0A8hksr0GZWlDJ51OVzHgkEqler3e4/F4vV6TyUQzbeG4mc3mubk5l8sFAQcc1fzOjM3NzRcvXrzzOBw4OKFFZj3AgeUOflUgvwEKff7hcPjmzZt7/RfLstlstvRZoAWVXopSqdQhafiWdaXv5ezZs3Nzc5AYC+GCTCZra2uzWCy8/KFyzwXLsrOzs4uLi/vZPcIpDLVeE9btdkMPzcjISJGptggdKpUHHDTu1ul0kDq6sbEBAYfL5YL2Ae1X3CtIh0luEPi3tLQoFAqoQ4PB4D//+c/8f2lvb3e73eFwOBgMajQa6Dg1mUz7eX5miS2YdzbjTCYTLCDhdrs7Ozvhtg2Lf9D3HOBq3K2trR6Px+VyjY6OhkIhiIqgYWQwGObm5ra3t8fGxhiGgSkq3AQOQojdbn/y5Al8Tm9vr0ajkUgk0MB99OhRfmrCBy+/n6bEUIxl2X0GHKWXonIHa2qkgiu9IEiD6O3ttdvtTqcTVr+AmfltbW2nT5+mt/lyz8Xr168h96K3t7e9vb2urk4sFsPR++677w7h+ha0f67guCFCh1N1HnlltVqnp6dhiQu5XM5NFy3yXw6HA5opFy5c4N3e9tLa2ioUClmWdblcKpUKkiTKuuRo3wbN/KeV1F//+tf9ZF3V19c3Njb6/X6bzdbZ2QnBEG9RI5ruwDBMweYpzYSoegsJYsFwOAyzUgkhJpMJqlStVgvTFGH9qFwuJ5VKeZ20NI3//PnzvKN0SO5qFMwYyu9Ip2AMaJ9Nf5rDSM8UHEOj0XjhwoX9fPI7lV6KDsmjZSu40otQKBTd3d3d3d3ZbDYQCKytrcHSXizL0iNf1rmIx+MQbex/FRx6wN+Z17JPqVRKIBDQNBqEjoTqZDW3tbVBHABrekI6XvGZcuT3xR7EYvFeqwTmk8lkkBC3tbXl8XhYlhUKhaWPpxDOICsNhugPRbLBSwSJ5W63e3d3Fzo8ecEQvYtz12vigud1yWQy2mNP7+777B3RaDRwawwEAhAM0UEToVAI++l2u+GkGI1GblQRj8fhuNEc4cMMepi9Xm/BhinLsnBqYHGOitGluugkCBi29/v9te7HKr0UHZLxlAqu9HwMw2QyGW6iMaTjjI+PQ/Ksw+Ggl3BZ54Imc3AnjVeGViYFV3LL5XKwrsn+w5FTp07993//N6zXgtBRUZ2bh0wmg9GT1dVVWF2UpovycFvDcD9gGCZ/tKLIwoswlwRW8SKEmM3mvToDCgYQtPOfDvrSSpC7xiJX6TlxNCUeFg2Uy+W8oWW9Xg9HoOC2YrEYpFa0tbXRA0W/XX5uZsGJIXsRCoVQn25ubnq9XqFQyB3rgT13OBxwM+bFcLSWz7+Fsyz7zlmRpaigm2Svf4GCl81mIa7icTgcUN2XvmhBfgHI5XKQpSSXy+k9Bg5aMpncK1OhWk8xfGcpgi/OLUUHq7Irnefu3bvff//9vXv38v9ETyW9Iso6F7RU5xfvaDRa1lwqtVoNk4cha54nFAr9/PPPP//8M30OMEIflaq1VqFxT+MAOtm9CLpGAu/i9Hq9dJXf/BrKYDBwn1RUZDxldnaW9wCXcDgM94ljx47RZiI8MIIQ8vbt2/zqKRgM/vTTTwWrj3zwlA26b+3t7bz+AIVCAR0/8EwK7p9Yln3x4gX8zF1kjO4nb+JxOp3mrrddCqiF4W5kNBq5vfFNTU0ikcjv98MoFW8OpEKhgC+ytrbGHR3PZrPT09PQzt7nHFd6oIoMhfDQAsYLvFpaWqDSn5mZ4WWGxuPxV69eEULgWRUlbmh2dpZXDiFLmhDS2dlJ97ytrQ36t6enp/ODXZvNdvPmzarMUnlnKYJmfZGl6t6zyq50Hii9sNw4708wREg4mbxlnQvaR7W2tsbtEYnH448ePYJXSgwWBQIBLGzj8Xig6UWxLAsPRRKLxSWuclscPoUbHTnVyeEghOh0uoaGhlAoBJdBwTUteMxm85s3b1iWffbsWSAQaGpqymazXq+X227LT/6CZ5fAwkcikajIkHA2m717925PTw/cTSEYgkbMyMgIt/E3Ojrq9XrhSQ3d3d2wqkcqlXK73UtLSzBUZDabS2kvtre303sAb1EgMDQ05HK5YrHY5ORkb29va2srrNAMz9OCN3DzJ+hzZN68eZNIJKAxFw6HV1ZWyp1nkd+lQYnFYqPRCN0/Go2G1xUPC0AtLy9HIpHbt29brVa5XB6Lxeh9lxCSTCZzuVzFTWqhUAjlZ21traGhQalU0pzWvdCuhZcvX3Z1dTEMA7OjhULhJ598cufOnWQyeevWrYGBARhkCQaDc3Nz0FFUfPVGns3NzWg0CiteZzIZh8OxvLxMCJHJZNxn5sHyVvfv34/H47du3err64OCB48dgWPr8/mqMqeg3FJ0sCq70nl6enrW19eTyeS9e/esVqvBYJDJZMlkcnt7Gz7HbDbTclvWuaArJm9sbKRSKZPJBNXFysoK7fMovTexs7MTFht98uSJ3++nS5vD5BpCyNjY2P4ztDY2Np49e3bs2LHLly+XXpIROlhVK6mw6ii00d+ZLgpUKtX4+PijR48IIZBq/ts+icVjY2PPnj0jeyzwZzabIeDgLhme7/Tp0zDVjTfbbXR0lBemKJXKy5cvT05ORqPR5eVluJ1QHR0dJ0+eLPFWStNaFQpFwSwBqVR66dKlycnJcDicv28DAwO8B8sJhUKoOhmG4R4lQojVauX++k5wC4cOifxAjQYcBccaTpw4EQgEfD5fOBzm9qwYjUaFQgG7EY1GSznve+np6Xn+/DnLstDqPXXqVPFbZnNzMyzZ7nA4HA6HSCSiy7E0NjZOTEz8+uuvqVSK1w8Et6KyUhd7e3uXlpZ4DWuxWHz+/Hleyp7BYLhw4cLjx4/T6TSk2XKNjo4WeahvWcotRQcLrnRYB72sK51LLpdfvHhxamoKcjwhzZPS6/WnTp3ivlL6uRAKhWfPnr13714ymXQ6ndwV4QYHB2HhkN3d3RLjaaFQeP78+cnJSQhZeOu9jo2NlfKsu3eC1c8CgUA4HMZpseioqGZo3NbW9urVK5Zl35kuSpnN5rq6upWVFbfbnUwm1Wq10Wjs7u5WKpXBYDCdThccl6E38uLzU/R6/Y0bN+Dx9JFIBFb87O7uLtifWV9ff/36dZvNZrfb4cnXKpVKq9XCk69Lb7hLpVKdTufxePZ6BDYhRK1WX7t2DZ5evbu7m06n4cHinZ2dBesOnU537dq1paUlp9MJT3ylj+QuK+AghBiNxmAw2NjYmJ9OSO/BBW/GEonk008/3djY2NraCgaDQqFQp9N1dHSYTCZ47jwhJJVK7Sfg6OrqEovFy8vLu7u7crn8nen3YrH4ypUrsIJIJpPhHTqDwfDll1+ur687HA7u4+k7OzvLTaXs6+uDGBdKqVKphLnBvDWzgdFo/Oqrr9bX151OZzgczuVysPp7Z2dnFZ+PQ8ovRQersiud59ixY9euXdvc3HQ6nfBfcrm8sbHRbDabTKb8y630c9HQ0HDt2rWVlRVIe5fL5c3Nzd3d3VqtVqlUQmJTKpUqcUqIUqn8/PPPt7a2oDKBNXVaWlqsVmu1ykBHR4fP52tsbKxuoUKopgR/+9vfDnofyuZ2u+/fvy8Wi7/55pvD1p2YTqd/+OEHlmU///zzfc6DQAdraWkJEj6++eYbnHyIEEL7dNinOBYEQ7bcJcMPD1gPAHpHDnpfEEIIocPi6AUcPp8Pct0LPh7pYCWTSZik093dfUhmJCKEEEKHwaHrIdhLMBgMh8OhUAgyOpubm6sytawqEomE3++Px+MwcwQeaHfQO4UQQggdIkcm4HA4HG/evIGfZTLZmTNnDnZ/uMLh8MOHD+mvZ8+e3c+zXRBCCKEPz5EJOBQKhVwuZ1nWaDSeOHHikKzZDKRSqVqtjsfjzc3NAwMDvNVFEUIIIXQkZ6kghBBC6Gg5ekmjCCGEEDpyMOBACCGEUM1hwIEQQgihmsOAAyGEEEI1hwEHQgghhGoOAw6EEEII1RwGHAghhBCqOQw4EEIIIVRzGHAghBBCqOYw4EAIIYRQzWHAgRBCCKGaw4ADIYQQQjWHAQdCCCGEag4DDoQQQgjVHAYcCCGEEKo5DDgQQgghVHMYcCCEEEKo5jDgQAghhFDNYcCBEEIIoZrDgAMhhBBCNYcBB0IIIYRqDgMOhBBCCNUcBhwIIYQQqjkMOBBCCCFUcxhwIIQQQqjmMOBACCGEUM1hwIEQQgihmsOAAyGEEEI1hwEHQgghhGoOAw6EEEII1RwGHAghhBCqOQw4EEIIIVRzGHAghBBCqOYw4EAIIYRQzWHAgRBCCKGaw4ADIYQQQjWHAQdCCCGEag4DDoQQQgjVHAYcCCGEEKo5cYnvYxiGYZia7gpCCKH9EIvFYnGptfp740+xaZak2FwgxeYI8aeyaZYQQpyJ7EHv2gdFJhQ0yoSEkEaZUCoUyISkUSb6/deD3jlCSOkBByEkl8sJBAKBQFC7vUEIIVSBXC6Xy+UOei/+YCuW3YwyzkQ2whyuHftQpdgcxHD5kZxOKuypF7coRBCRHJTyYmGJRCISiWq0KwghhCqTzWbT6fRB7wVJs2QzymzGmM0Y9l4cIr406/OlCSF1YoFFLbaoxC2KA4g8Dl3nG0IIoSPHmci+DGRwlOSQizC5N8HMm2BGJhQMaiQnNJL3OdqCAQdCCKHKRZjcY28KuzSOlhSbexFIzwUz7zPswIADIYRQJSJM7qU/vRTB+QRHFYQdy+HMSa20p77m8QAGHAghhMqTZslcMDMdOPisEbR/ESZ335N6EUjXOuzAgAMhhFAZ/Cn2fx3JFItzTz4oEHY4E9mzTbIazWXBgAMhhFCplsPMfU/qoPcC1cpyhAmk2M9b5XXi6i+BcThWA0EIIXToPfalMdr44PnS7P+xJXwptuqfjAEHQgihd0iz5JYr+SaYOegdQe9Dis39n+3EcrjK6cA4pIIQQqgYf4p94EnVosmLDrP7npQ/zZ7VSav1gRhwIIQQ2lOEyWGK6EfrTTCTyuY+bZZV5dNwSAUhhFBhaZbcdmG08VFbjjDVGkrDgAMhhFBhj704koLIY1+6KovWY8CBEEKogBcBXEUU/ea2qwqhJwYcCCGE+JbDzIsAzklBv0mxuQc7qX2GHBhwIIQQ+gN/in3sw2XL0R/40+xtV3I/n4ABB0IIoT/ARFFUkDORfbGPB+hgwIEQQujflsNMmMFoAxX2JshUPLCCAQdCCKHfpFmCgymoiDSbmwtWWEIw4EAIIfSbN8E0Dqag4t4EmUhFfWAYcCCEECKEkDRL5oI4Dxa9Q5rNvfBX0smBAQdCCCFCsHsDlWw5UkknBwYcCCGESITJ4cIbqHQVdHJgwIEQQojM7WK0gcpQQScHBhwIIYTIZgyzN1B5NqPllRl8PD1CCH3s/Cm2snkHaD9668UTepmAEEJIhMn9/5vxA96hMi2HmRMaSenvx4ADIYQ+dq5qPAu0pmRCQV+D2KQUaSRCqUggFJAMSyIZ1p3IzoeYUOZIPtJWQIjgoPdhP/xpNsUSWckjJRhwIITQx245fKjHU6xq8Sc6qUr8h7uzTEhkMqFOJuytl7wKpGeCmINyALaiTE99qYEE5nAghNBHLcLkfOnD20PQXSf+tFnGiza4JEJyRicd05bRt4+qpazUH+zhQAihj5orfnjHU0SEfKKTCjnBRiDN7qbYbI7US4QGxb/bzKPHpNuxrHefD1BHZXImyjjgGHAghNBH7TDPT+lQi5Wif4cbM7uZZ5zlH7rU4kuG31IIRAJyvF7i9abe+z5+1NJsbjOatahFpbwZAw6EEPqo+Q9xr0Cd5N/RRoYl039cbGotyvTExW3K3+52jXnpiyalqL9e0iQXykWCHCHJbM6bzM6HGGehJNnj9ZJOtUgrFcpEAgEhyWzOn2YXQ5mN2B/e/JVR0fp7z8ov7pRMKBjUiOslQoGA/M9qjL7NohL11kt0st8+LZHNeZLZhT02DYSEjGqlXWqRWiIkhEQy7FqUeXnoV2Pzp7MWggEHQgihdznME2K5s0+EAlIvEQb/OCFlPpjZSf52C0/+safmT02y/oY/pH6oxQK1WtyuFr8OZJ4H/h27KEWCzwxy7gANIUQpFijFIpNStBJm7nsKd5x0qUUW9W+b4O7WRb2sp77Api0q8cxuZjpQYI1OASFfGOWtin/fuY9Jhae00ma56KYzWXDrh0TppQcDDoQQQoeUPZ5lf5/dIBKQqy2yZ/70JqfLwRbP2grloJzVSQcaCt/ghISMaiUxJrcQ/q3zID/aoASE9NSLo0yuYJTQoeZs4vcb77hO2rvHxA2hgIxpJfFsbiHE77dQiwVqcYF+gjalaLBBMpf3/sPDFWeJtqR34iwVhBD6eBXp4T8Mghl2lTNlVyMVXm2R/1eb4pRWWr/3vJVWhWiAsyBVIM3OBzMLISbImYxzslEiFggIIRaViEYbOUJmdjM/OZK3XUl38t9v7tsjduGCeEMnFQ40/HvT/hT7JphZDDOJ7L87AkaPFZ5Qk2HJWpR5E8zY4llut8Efwpqj7AP5GgghhD5ID71psZB0cm66OplQJxOOaCWeJLscZhbD/Nb/oEZCG9PORPam47dBFzEh/2lWNEqFhBCFSGCtEy+GMyqxMPB7ILKbZmlS6k4y+f91KOFzFCKBXib0FEp22YgyqxEmxuRgLk2/RkKTXH0p9sft3wI6jUT4TZtCKiSEEJVY0KYUbf+xY4bJkX+6knQFtj81yWgPTYP0UC8PFmVKzQHCgAMhhD5e0czhTeAATC73izvVpc6e1Eo00n/3ygsJMciFBrl0QCN+6k3bOV01LZxMiFeBDP0DQ4gtmm3U/vYhzXLhYpjMhzLzhQYs4tlcMpujc2SUYgHJS+TYjDK33X941SD/9x7aYlm66WCGdcQZ2lehkQp5AUcim+Ou9+qIMzTg+MO04MOn9BwgDDgQQujjFSm5eXqw1qLMRpTpqRdb68QGhYibDdAoFV5t/X/s3Xl4FOedL/pf9aZu7fsuIQkQiwQCFHaMMWBsiGPscTDGZLme8di5zthzz8yce2cyN2fuPfPk5JknNydzZp5zczOJnYmX2J6MYxvMYAgGy8gGBMgI7fu+q9WLel+q7h+vKJd6U3erW0vz/Tx+cKv67aq3Sq+qfv2u6i8m7W1GFxFlqmTS0SoP5cZJ98OaUZh4SaNMvJzbmKIsiJcnKbk4GSf3esTLOR9PfYNXuJb0Vd0Kib1ZmasTjhtTs9UntvmuurSlyzszKxQCDgAAWAF4ojajq83oSlXK1iYpShPlYoWHgqM9WXETNn7awcfP7dsR7/9xrbxXc7AqQf5AdlyAlEGKl8+JVCxzv/rbeGHeOGOFmrLzmUEsqRLJgEMQlnvVHABATBIkQv0grbRbt97hvql139RSVapye+ZsBwc5UUWK4uqEXcEF+zBi556qlB3IjlPJZj9lcwsjVrfFJfBEG5KVX1VY3LtQ0ovsefWEOYd28/Nd20C7krzFjr6EfNXuhGFBAQciDAAAiJ6nijXis65+2tljmjPVRoPemRcv/2riL5WMiKxz6xX+fcCqC7hSzMZUpdgzxODkzw7ZxBEla5IUylDWc7W4BbfwVQtIgoKLkRXlvJ/1c0OQYKo3KIyAY94gA1EIAMAiE7y+fAcpQ7WsJ0fQyEh97wGeo+Z6TJ4JrC5eEGZPQckJRKR18E5eENtVVifKb017BhxJCk7s6pih4sSL1jMzZ/wqSS6n8NUEV9KL7Hm1ZxzulHuXNEvNDVu/eqsqTSHO69VmdPWa3MKcA3jsam4Nx3IjzW3Q9R8hFLV5i3IYZR0AAJaQKqg5qZeMdBnbtUnKVfFznllpKllh/FcnwNYRc/DChKS3ZkWKsnDup6rTlY8XqjMl/T9E0s6o+RpZGMNDxiRDZ0viv/pKr5ZxG5KVBRo5+y9WuoESEWUouSAf/UFMZnIvcJ43DQAALJXw7sMqjlvOfTgadc78e2NSVDI6nKfW2nmDk3fyFC/n8jRyyaAQGja72Lnc1TnFkSxKGT2cqx6yuI0OXiHjcjWyNJWMiB7KVf3HkM3sFoxOXlyEZX2S0uUmo5PPjJOtTVbOiQsEuteHw8dGUaveuSZRwT6YqZY9UagetbrlHFeUIL83BzrZ3MKAyU2CIK278Ni1d31HiFcuEjgfr7yxsEwsfpz/Co95Ao4wGlAQfAAALLKwO42mq7jlWWfPDFtcdVP27ZKGnwwVl/FVtcxXp6tz8I262UGnQxZXi94hzvgpIyqOl9G9eg72GRVHajmZ3UKH0bkqYTa0UHC0JU3hvXMiipPR7IWa051T8Lh6U3Z3q+GrQ2eouAyVwmN3d6YdLoG/t03apDInlpnbpLL4vyOOBDHSEALEHHFzK8kEQfAXc/htUglccH2WbDSpAABAZDXpnZ+N240BJygbtbovjs5Zu+36lKNR5/TXWVTv4D8Zs2sdPBENWtwN0z727hbmjGv13QziK1PXpxydRpePN4jcAt3WOr5aGMWjhmN5EeYGVH4zmO7VY9RfMOCjhiO8oEGYUxe0/C4dAEDsCruGg4gS5WRaxgvGElH3jLN/xlmeoszXyNPiZGoZp5CRiyebm9fa+V6zu9fk4wFfp7X3mlwbUhRZalm8XCaXkd0tmJ1CbvWttQAAIABJREFUn8XVZnA5+K9O+fa0XWt3bUhRZsTJlTKyuwWtnW/SO4sTFOIqKjlqzntYLBsI633ozyZs/WZ5eZIyI04WJ+eIyOoWJm3uFoNLOhuYtNPo8hoW+1UVRaC6DTGF7+2CQHNbWLgXXnjBO4U3l8vldDpVKpVcLvfXjII4AwBgSbjdbofDoVQqFYqQxx5+NmHvmvH9jRzua3NaRjivLbOeLNIEHhYrxhxzEoURMYix3kKiDUQqAABLZVU8ppwGXzz7x9JsO4ukUkMl4+adhEN8xCu8Ny3c6dOn9+zZo1arI7VDAAAAiLYZi/WNi1e//4+vzf4sCHNqNbwaWEoSghpXzXqSyqurqymIaIPneZ7nZTKZz96n0laob33rWwcPHgyjWg8AAACWUJxSuX396uzU5P+4/uVXW7967nP3Ao7Z/21LV6YouQBDYaVkFFzdhs80Ho0p7MWePXuCOTAAAAAsQ98+8oCfdzwHAq9KkFPQY1RlC4w2vH9ESwoAAMDKlRSvmdNXw0cMIBAJxfGhdQON/MRfAAAAEKO+6sdRkuAZQngPhZUK1LnUXx1G8B8BAACAlWe2gsPnM312Uva8eN89Rv1FAoFmGg3wls9YBNEGAABADPJ6vlckK5MUfvuK+owHfAccCB0AAADud34qOVQybluGap6PegUSPgKOIKMNj3oOxCgAAACxwuuZLnnKV6TK55vui31izk6C+ESIewQAAICVT1ynds5wFZWMq0hRhbFwj49F3uY5fhBDZAEAACAmbU1TitUbIcUMIQyilS6b4jHZV5B7AAAAgJVDrOSYlSinipQ5o2HnreoQ3w22SQVjYgEAAO4XgkcvjtkfdmbEka/HfVAzjYaU2neuEGcAAADEFMHrBW1MVqxKnJ17I6RHP0scVA2Hv/1ilAoAAECMEqRRR26cbGfmnKGwofapkM2bzt8evSf7CqPPKgAAACxvQrpKdjBPTfMFGYFjidCGxQZT1QEAAAArnDD7r0AqGbc3S6XiFjpYZJ7l6YPfEWIOAACAGDL7WH8oW5URFyhaCLJ/RQiLt3m/hSADAAAgBt0bpbInU5Wr8b1Im9+Phrp427z78jkVB0IQAACAGKCUcXsyVWuS5BSw+6Z0e2CK4GtIUOEBAABwP1DKuCO5cen3WlI47quFYdmPHhs9knm/S0QKWhgEGQAAADHmyUK1am4TiM8YIiTzN6kEWXuByAMAACA2qOauluIzEgi1YcV3wBFS64m0aQdhBwAAQGxYyDPd+7MRWJ4eAAAA7h/+FnANbJ6AI/Bi9KjPAAAAiD0hDRzx90EPC51p1HvBegAAAFjpAvfbCKPqwUfAsfAoBgAAAGJMqM99j/QR7sOBKAQAAGClCzAgJexKjkDzcHjvwul0OhwOmlvTglYVAACAGMOe6T7n+Jr3gz7TBzvxF8dxMtmctewRcwAAAECQgg045HI5Czi8Z92QvohOJgEAAGDZCanyA/NwAAAAgG/zzi4avGADDgxdAQAAuK8Evxp8ME//MGs4wluaFgAAAJa/wBUb4T3xPQOO4PeCmAMAAACChD4cAAAA4MlfJUJIlQvSxAsNOFCrAQAAcD9Y4BM/AjUciDkAAAAgsIUu3gYAAAD3rQUt3hbqLgAAACAmhTeHuM+PoNMoAAAAzBGNSgcEHAAAABB1CDgAAAAg6hBwAAAAQNQh4AAAAICoQ8ABAAAAUYeAAwAAAKLOb8DBcdxi5gMAAABig88QAjUcAAAAEHWeAQcqNgAAACAipEGFYgnzsZwJgsDzPBHJZDIEYQAAAAsUWsDBcdz9sMaKIAgOh8NsNguCkJCQEBcXh5gDAADAW/DPR9Rw+MDz/PT0dFtbm9vtLi8vz8/PVyhwoQAAAMKH56gnQRDsdnt/f39TU5Pb7VYqlWlpaQkJCTIZOtgCAACECQGHJ5fLZTQaW1paenp63G63RqMpLS1VqVRxcXFLnTUAAICVCt/aPdnt9rGxsdbWVq1Wq9fr29vbR0ZGbDbbUucLAABgBUMNxxxut3t0dPT69esGg4GNUpmZmbl582ZaWlpiYqJcLl/qDEbFxMSEy+WSyWS5ublLnReIDKPRaDKZiCgjIwOVcwCwHCDgmGN6erq7u7utrc1ms7HxOHa7vbOzs6ysLDU1NScnZ6kzGAKr1WowGKxWq0KhSEhISEtL89eX+L333uvt7U1PT//rv/7rRc4kRMndu3fPnDlDRK+88kphYeFSZwcAAAGHhNPp7O/vb21tnZycFDe63W6tVtva2pqRkZGenq5UKpcwh0Hq7Oy8du1aa2ur2+0WN2ZkZOzatWv79u3x8fFLmDcAALg/IeCYxfO8Xq9va2vr6uryfrezszM9Pb20tDQrK2s5D1dxOp1nzpy5ceOG91tarfbcuXO3b98+ffr0yqqqgRjQ19fncDjkcvnq1auXOi8QU1C0VhAEHEREgiA4nc6Ghoaenh6z2eydwGq19vb23r59++DBg8t2HjCe53/3u9/duXOHiHJzcx966KGSkhKNRsMqaW7fvn3t2rWxsbHXX3/9e9/7XlJS0lLnF+4j58+fR7MdRAOK1gqCgIOIyG63j46OtrW1se6T3gncbvfU1FRbW9u6devy8/M1Gs3iZ3JeN27cYNHGxo0bn3nmGbVaLb6VkJBQXFycnJx84cKFycnJy5cvHz9+fOlyCgAA953l2zqwaHieNxqNHR0dg4ODJpPJ39ztFotleHi4tbVVr9ezASzLitVqPX/+PBGlpKScOHFCGm2I9u/fn5eXR0Sff/65Xq9f7CwCAMB9DDUc5HA4JiYmGhsbp6ennU6nv2Qul0uv19+5c6egoCA1NXW5VXI0NjayyUIOHDiQkJDgM41SqdyxY8eHH35IRN3d3dXV1d5pBEEYGRnp7e01Go1yuTwnJ6e8vNy7n2lPT4/D4VCpVGVlZWazuaWlRavVKhSKgwcPevRxcblcg4ODLJhTKBQpKSklJSX+OpF0d3c7nc74+Pji4mK3293X1zc0NGQ2m+Pi4nJzc9esWSOO8GTvDg8Pz8zMqFSqnJyctWvXBvilCILQ398/PDxsMBji4uIyMjLKysqSk5P9XlBf58syFuQlCvvQoabX6XQdHR06nY7juLS0tLVr16alpQU4F0EQhoeH+/v7Z2ZmeJ5PTEzMz88vLS0NddR3MPth142IrFYrETkcjra2NiLiOG7dunXSvYVUToIvfnq9vq+vb3Jy0m63x8XFZWdnr169OjExMcB5abXarq4uj+tpsVgGBgaIqKioyPvva4GlayG5Za29ExMTZrNZqVRmZmayIXWRSh/SqYVatBZSFKNUtCCq7veAQxAErVbb29s7PDzMim8ATqdzYmKip6cnPT29qKhoWfUeFfu6bty4MUCy4uJi9mJ0dNT7XbPZfObMmS+//FK6MSEh4dSpU+Xl5dKNFy5c6O3tLSwsfPLJJ998802dTse2HzhwQHpZ+vr6zpw5MzQ05HGgbdu2HTt2zPu2de7cuaGhoYqKiiNHjrz33nvsFi/Kysp65plnioqKRkZG3nvvvcHBQem7iYmJp06dWrt2rfd5jY2Nvf/++729vdKNSqXy2LFje/bsCaZHDjvf9evXnzx58uzZs/X19dJ3fV6i8A4dUnqe52tqai5evCgdjiSXy48cOeLvlq3X6z/44IOWlhaP7bm5uSdOnCgqKvJ9/uHuh1038V2TyfTaa6+xM/rRj34kbg+1nART/BwOx+XLl2tqaqQXhx360Ucf3bt3r/ffL8/zly9fvnjxonSjXC5/5JFHioqKWM5ffvllj4Bj4aUrvNwS0e3bt8+dO8cmXBGxwOvAgQPeK0CFmj6kUwu1aC2wKEapaEFUybdt2xbZPT711FOR3WFUWa3Wrq6uxsbG/v5+n703PLhcLqVSmZycnJGRoVKpFiGHweB5/ve//73T6UxPT3/44YcDpExOTj506NDhw4fLy8vF+8WtW7f0er1MJuvs7Gxra8vIyNiwYUNOTo7NZrPZbE6ns7m5efPmzdIv8ewjgiA0NzeLt3siOnz4sHhnbG1tfe211wwGAxGVl5dXVlYWFBTYbDaLxTI6OtrZ2blhwwaPpp8bN24YjUaXy1VXVzc1NbV69ery8vKUlBSTyeRyuSwWS0dHR1ZW1r/+679qtdq8vLz169dnZmbabDa73e5wOJqbmysrKz2eB93d3a+++iob6lxZWVlRUZGdna3T6ex2e3t7u1qtXrVq1bxXmJ2vQqFobW1taWkJ5hKFcehQ01+4cOEPf/gDawRcs2YNu1Zarbajo2N4eJhV1+3cuVO8q5pMpl/96lfsNl1cXFxRUcECUDZL2N27d8vLy4O5BQe/n8nJydTU1Nzc3JmZGafTqVQqN2/enJubm5ubW1lZyfYWRjmZt/i5XK7f/va3dXV1giBkZWVt3bp1/fr1qampk5OTLpero6NDJpOVlZV5nNf58+c/+eQT9lq8ntPT0+3t7WNjYzMzM+x6pqSkhP0r8ym83NbW1v7+979nAzQ2bty4cePG3Nxco9Fos9m6u7tnZmbWr18vjQlCTR/SqYVatBZeFKNUtED03nvvcRzHigR3D91bG1b8kSSrxUrLj8+N93UNBxu+0dfXNzAwYLfb503Plq0fHh7u6+srKCjQaDQymWw5jFix2+0Wi4WI8vPzA6fkOM7fd1+z2Ww2m5966qnq6mr2Xcdut1+4cKG2ttZut9fX1x85csTjI+wWfOzYsc2bNyclJbHpStlbWq32nXfecbvdqampp0+fFu9NPM/X1tZ+9NFHo6Oj77///ne/+13vr246nS4/P/+FF15gPU6IyGQynT179ssvv9Tr9a+99ppCoTh9+vTmzZvZxbfb7VeuXLl8+bLdbq+rq3vsscfEXRmNxnfeecdqtWZlZT377LMFBQVs+9GjR996662urq7z589v2LAhKysr8HVjxsbGiCjISxTqoUNN393dffnyZSLKzs4+deqUmH5mZubs2bOs+7CH2tpadgqPP/74nj172JXnef7GjRvvv/++zWY7e/bsiy++OG+RDn4/x44dYx/5+c9/3tvbm5SU9Oyzz0p3tZByEqD4Xb9+vbm5mYgOHDjw8MMPi9PnHDp06NVXX52enr548WJ1dbW07am7u/vTTz8lIo/rbzQaz50751HtJ74VkdIVRm6Hh4fZxG6FhYXPPPNMdnY2237s2LH333//zp07dXV1a9as2bJlS3jpQz21UIvWwotiVIsWRMn9e6F5nmczffX29mq12uA/OD093dfX19fXJ85GuuTEaGmB0frTTz+9c+dOsWY1Li7uyJEj7Pbnc3oS9pEDBw6wKdE0Go14g/j0009Z2+rJkyel34RkMtn+/fsfeOABImptbWXNrh7kcvmpU6fEaIOIEhMTv/GNb4ih0tGjR6uqqsRjxcXFHT58mH3v9NjhpUuX2Pcb6SOZiBISElhc4na7PdpHInWJQj10qOmvXr0qZkmaPikp6cSJE6Wlpd6Zb2hoIKKsrCxpFb1MJtu9e/fWrVuJqKenR1ph4E+k9kMLKyfkv/jdvHmTiFJTUx955BHpZH1ZWVliUNjX1yfdVW1tLXtx4sQJ6fVMTk4+ceKEzzkeIlW6wsgti43YX4oYPRCRRqN54oknMjIypGcURvpQTy3UIhHBIuTPAosWRMP9G3CwTqB3794dGhoKpjFFxNZbaWxs1Gq1ATqZLiYx/wtZ7SUlJcW7G6larWZVndLZV0VJSUk+m+RMJtOtW7eIqKKiwuedev/+/exFXV2d97vp6eneXboSExPFKbo3b97s8a5CoWD5nJiYEFvBzWbz9evXiWjr1q3e03vn5+ezXhf19fVBBo7BX6JQDx1qer1ezxq/N27cKPbLESmVyk2bNnnnn/VS8llIDhw4cPr06dOnTwfTUBip/SywnPgrfkT03HPP/eAHP3jllVe8MykuGMQqSBij0cjqGNavX19SUuLxEYVCUVVV5bExgqUr1NwaDAb2wN6+fbt39Ul8fDyrqBgYGGDdNUJNH8aphVokIlWE/Flg0YIouX+bVEwmU2NjI/sbk94RWDfmffv2sa4AFovl+vXr09PTYpdSQRBMJtPg4GBTU1NCQkLMrIwll8t9VmCyWhOz2SwIgkcCpVLpszZyaGiIPfV9PvaIKCUlpaKiorm5ub29nXXIDyaHrIeEUqmUNqJ75JOInE4nu5GJvUo9eq2LVq1axcZ3GI1Gn/v0EPwlCvXQoaZn1dFEtGHDhnmzLSovL799+/bY2NiVK1f27t0rvex5eXnSKqXF2c8Cy4m/4kdEAYZdiFUI0q8ZExMT7EXgPtdSESxdoeZ2eHiYvVizZo3PT+3du5ddUnbFQk0fxqmFWiQiVYT8idItCBboPg042FDYW7dueddSyOXy5OTkffv2sWpGnU7X2dlpNBqlY1hcLpdOp6uvry8pKUlKSlry3qPiFwWPLu6R5R1w+DM9Pc1eSCtvPRQWFjY3N7vdbqPRGGQXilCJVbJNTU0eQ1qY8fFx9sJisQQTcMxLvEShHjrU9Eajkf0Y0qU7ePBgd3e3Xq//+OOPr169unnz5tLS0sLCwoyMjJC6IkVqP9EuJzabrbOzs7e3d2xszGQyOZ1OQRB8/o2I1zMzMzPInUe8dAWfW3ESHX/jnxMTE6WDaUNNH8aphVokIlWE/FkmtyDwcD8GHIIg6HS6rq6ulpYWn1N4yWQylUrFYl6VSuWzZ6jVam1vb+/q6kpLS8vNzV3arqPil3vWZrnk2IwgFLBPiThnRvTyLHZtaWpqCpwy4k1joR461PRi+BvSN7OsrKyXXnrpypUrdXV1ZrP52rVr165dI6Li4uIdO3ZUVVUFubdI7Seq5aSxsfHs2bNBTnAXxvWMbOkKKbfioYPMbdjpgz+1UItEpIqQP8vkFgQeQg44vvzyy56eHp9vLZMelPNyOBzt7e319fULnDCU5/m6urrExMS0tLSlHVsVFxen0WisVuvw8PC89RDsrKWDmiJOrOgOcIXFtxbS7yRIe/fuDbx2TOC5lRbz0EGmF393oZbh1NTUJ5988tChQ+zLdHt7u8FgGBgYGBgYqK2tDX5hv4jsJ3rlpLGx8Y033iCigoKC/fv3FxUVJSYmsuaJqampn/70px7pxesZxk1s4aUr1NyK1y3I3IaaXhTSqYVaJCJVFH1abrcgYO67Gg5BEAYHB7u6ukZGRha+t7GxsY6OjoKCAum0FotPJpOtW7fuzp07er1eq9UGqBYeGRn5x3/8RyLav3+/dPhoZInTUZhMJn9VmqwPPEm+Z0ScGAVWVVV59wSMqlAPHWp68Qr7XGtwXsnJydXV1dXV1TzPj42N3bx58/PPPx8bG3vzzTdffvnl4JsIF7ifKJUTt9v90UcfEVFBQcELL7zg8UGf3T7E6x/89YxU6Qojt6F+NQ81/UJOLdQiEami6GGZ3ILAw/01SoXneYvF0tXVNTAwEN6d2oPVah0cHGxvbzebzVHtPzEvsTtYe3t7gGTi3J3zztixEGLXeu8J/hhBELq7u4koKSkpQI+5BWK9cAJkI3pCPXTY6X3OGOuT2+222+12u136nU8mk+Xn5x8/fnzPnj1END4+7jG7a/T2Q1ErJ+Pj46wXQnV1dZDPEjFGD/57SKRKVxi5FZ+gYl8KDzabTafT6XQ61tU01PShnlqoRSKCRcifZXILAg8LCjjS09MrKio2zhWpnEWD3W4fHx/v6uqanJyM1AJsWq22s7NzZGQkmKnDoqeyspJ9L6mpqfH3Pcbtdt+4cYO99tdfPSLy8vLY3/DNmzd9Djnu7+9nN4ItW7ZEb9adwsJC1hJ848YNf+3oIY2Ijt6hQ02fm5vLRlHV19f7PAXvMnDr1q0f/vCHP/zhDz1mqmbE8QjzBuLh7cdn/V+UyonYfu+TdHypKDs7m7UdfPnllz5z4n1ZIlW6wshtfn4+a8toaGjw2UpSW1v74x//+Mc//jG7KYWaPtRTC7VIRKooMotZtGCBFnShMzIy1t6z5p5I5SzieJ6fmZlpbm5m64FFardWq3V0dLShocFoNC5hJUd8fPwjjzxCRHq9/sMPP/S+TQiC8Nlnn7EBcgcOHIjqIgJKpZINcx8fHxfnpxLZ7Xa2sC0Rbd++PXrZ0Gg0+/btY9n45JNPvG+1AwMDP/vZz9gXnaU9dKjpVSrV7t27WXoxiBQNDw+ziZ6kxAkV7ty5471/cZxt4Db7sPfDeiQYjUZpoB+lciIeurGx0eNho9Vq2eKFNHdIl1Kp3LVrFxFNTEx4X8+RkRHv6xmp0hVGblUq1d69e4moq6vr7t27HjvU6XTsFDZu3Mii0lDTh3pqoRaJSBVFZjGLFixQyGupjI6OioOmMjIyvJvHlu1aKjMzM729vXV1daOjowG+VSgUiuTk5J07d7JWQKvVevv2bZ1O5y/SFwSB53mXy5Wenp6cnLyEvUcLCwsnJyfHx8dHR0d7eno0Gg37U7RYLMPDw3/4wx8+++wzluypp56STmjIVqYQ7zIeGhoa2JRWhw8f9lh+xd9HiCg/P7+3t5eNBnI4HGlpaXFxcU6nc2ho6L333mP9jo8ePeoxSp6tpZKQkMDujx7u3LkzNTUll8sPHTrk/W5LSwurD3/ooYfEmUALCgo6OjrYr95oNLJlfgVB0Ov1dXV17777rslk4nm+srIycBecMC5RqIcONX1ubm5DQ4PNZmtvbxcEITExkeM4o9HY0NDw7rvvivVt4loqycnJWq12dHR0eHhYp9MlJSWxsmowGG7dunXu3DkiysvLO3LkSOAvfOHtZ2BgYHBwkOd5jUaTmpo6MzMTHx/PcVx45STwryM+Pp7tU6/Xj4+PJyYm8jyv1Wrv3Lnzu9/9ThwwydbiET+Vm5t7584dtlAIu54ymcxgMNy9e/fdd98V7xjStVQiUrrCy21eXl5zc7PFYmlra2OrOymVSovF0tLS8m//9m86nU6hUJw6dUp8ZoeaPqRTC7VIRKooRqNogQhrqYSPLZvS09MzMDBgtVoD9NZ2u90Gg6G2tpZVQprN5sAzigqCYLPZRkZGuru7MzIyEhMTvRddXBwymezpp5+Oi4urq6tjk697pykpKTl16tQidJJiy5288cYbfX19NTU1NTU1Hgn279//4IMPRjsbGo3mO9/5zptvvjk0NFRXV+c9q+CWLVuefPLJaHT4DfXQoaZPSEj41re+9atf/cpms126dOnSpUtiSrVavXv3bjbOUOr48eNGo7Grq+v27du3b9/2eDclJeXkyZPBlN4w9lNRUfHFF18Q0dmzZ8+ePUtEP/rRj5RKZTTKCcdxTzzxxC9+8QuTydTU1OQxtvPBBx9kR5mampJuF6+n3W73vp6VlZXeY0QjUrrCy61Go/n2t7/96quvGgyGjz76iHU7lb57+vRpaT+tMNKHdGqhFolIFUVa3KIFC3S/1HCYzeaurq6GhoaBgYHAvTdYx9KWlpY7d+7cuXOnubl5ZmYmcFuJIAh2u10ul6elpWVkZCxhJYdcLt+wYUNJSYnD4dBqtdK4atWqVQ8//PCxY8e8B+lFo4aDiOLi4rZs2ZKUlKTT6aRtWGvXrn3iiSd2797t/fUl4jUcRKTRaKqqqryzUVxcfPTo0cOHD0sre/wJ4xKFcehQ06ekpFRWVprNZmlnwKqqqmeeeSYtLY3dx6WrxbIVNZOSkqanp9lqf0x8fPzevXtPnDgR5LRXYewnIyMjLS2tv79fnPHi4MGDbDhiGOVk3uKXmJhYWVlps9mknWrLy8u/+c1v7ty5s6mpyWQyabXaffv2SS9pampqZWXlzMyMOPEoEVVVVZ08eVIul7e2tpLXarERKV3h5TYxMXHr1q0cx2m1WvGqKpXKnTt3njx50ntK8lDTh3RqoRaJSBVFinTRAlE0aji4559/3uMw4lNK+rgSX9fX14vzcKxdu7aiooK9JQgCe/HWW29F4FwjShCEvr6+2traL774QpxSMOISExN37ty5d+/etWvXLodybLVaZ2Zm7Ha7SqVKTEz0WLR9MbGaWIvFIpPJkpKSojfpRZDZkMvl7IIs2kjmUA8danqTyWQwGGQyWUpKijggMPD+DQaD2WxmFdFpaWnhTUUQ6n4cDgcbCpGSkuJdDKJRTqxWq06nEwQhKSkp+H5L7HpyHJeSksL+cGpqalhV/1/91V/5HGYZkdIVXm7ZslA2m02hULCGg8imD+nUQi0SkSqKi1+0Yt6pU6eWV8Dh84M+u1UvIbam/Keffnr9+vWenp4ojUogIrlcXlJSsmPHjoMHD6rV6uUQcwBARLz55pt3796Vy+V/93d/t7Sz/AEsjmgEHLHfh8PhcIyMjHR2do6PjwcTbchkMo1GU1ZWxgJ/h8PR19cXzDQbbrd7YmKiu7t77dq1q1atwl0JYAXhef7s2bM+p7oaHBxkgzvEwecAEIYYDzgEQTCbzY2Njf39/UFWvcjl8pSUlAMHDrBh3Eaj8ezZsw6HI5ghr2azeWBgoLGxMSMjIy4ubmkXWAGA4NXX13/++ec3btx45JFHtm3bxsZruFyu9vb2Dz74gKUR1zQHgDAsKODIzMwUJ3RbngupOJ3OycnJ2traqampIGf6kslkarW6rKyM9Vqanp5OSEgIsn2E5/np6enr169XVFQkJSVhyWOAlWLTpk2NjY2tra3nzp07d+5cbm6uWq0eHx8Xp1A7ceJEUVHR0mYSYEVbUMCRlpa2Zs0aj06jy8rQ0NCNGzemp6dDWg6U4ziZTMaCDPZv8HUVTqdTp9N98cUXCoVi7dq1YeQZABZfXFzct7/97bt379bU1IyOjorTTxHRmjVrjhw5ssjL8QDEnlhuUjEYDD09PS0tLXa7PfhgSBAEl8tlNBrFCexcLldIH7fb7c3Nzfn5+VlZWZilH2ClUCgU27Zt27p1q1arnZqastlsarU6KytbtPYAAAAgAElEQVQrPT0dzaMACxebAQeb/XNoaKirq2t0dDSkZVPEeTjEib9YzBHS0dmKLQUFBYmJiXK5HHcrgJWC47jMzMzg54EAgCDFbMBhNptbW1t7e3tDXd/E5XJNTk6+/fbbC8xDb29vZmbmqlWrWMyxwL0BAACsaDE4VwRr1Ojt7R0cHDQYDEvVs2RmZmZwcLCjoyOkBh0AAICYFIMBh9PpnJ6ebm9vHxsb87dQ+yKw2+0TExNtbW1TU1PinLsAAAD3p1gLOARBsFgsbKYvNtPtUuWELQLX3d09NDRkMplQyQEAAPezWAs43G63TqcTV4Vd2sxYrdbh4eHOzk6tVruEoQ8AAMCSC7nT6NatW7du3SrOurHcvribTKb+/n42FDakwSnRwJZx6ejoyMvLS09PX8J+70aj0WQyERGbAnWpsrEQbO0lIsrOzg5y3erFFPYVNhqNg4ODRqNRJpMlJyfn5OSkp6d7J1vmpw8AMK9Yu3Op1erS0lK5XG6xWJZDMMRxnFqtLioqCmYNz+i5e/fumTNniOiVV17xXod6Rbh+/frly5eJ6G/+5m/S0tKWOjuewrjCdrv90qVLtbW1HgOpioqKTp065RGeLvPTBwCYVwwGHKtWrVq1atVSZwQgEJ7nf/e737ElwZj4+HhWhzE4OKjRaJYuawAAURFrAQfAitDW1saijZKSksceeyw/P1+hUNhstomJib6+voSEhKXOIABAhCHgAFgCra2t7MWTTz6Zl5fHXqvV6uLi4uLi4qXLFwBAtMTaKBWAFYGtDZaQkCCutwwAENsQcAAsATZmOyMjA+vsAMB9Ak0qsUan03V0dOh0Oo7j0tLS1q5dO++gBpfLNTg4ODg4aDKZFApFSkpKSUlJTk6ORzKz2Tw4OEhEPpe2mpiYmJ6e1mg03j12LRbLwMCA9IM9PT0OhyM+Pr64uFgQhJGRkd7eXqPRKJfLc3JyysvLwxjUE+RZeNDr9X19fZOTk3a7PS4uLjs7e/Xq1WzdPn/CuMKiqampqakpIrLb7URktVrb2trYWyUlJWq12u12d3Z2ElFCQkJRUVGQuyUiQRD6+/uHh4cNBkNcXFxGRkZZWVlycrK/xMPDw/39/TMzMzzPJyYm5ufns+FdwR8RACAkCDhiB8/zNTU1Fy9elA6zlMvlR44cCfAg6evrO3PmzNDQkMf2bdu2HTt2TPrEkslkv/nNb9xu9wMPPPCNb3zDI/3HH3/c1NQUHx//t3/7t0qlUvpWR0fHb3/7WyJ66aWXWMBx4cKF3t7e9evXnzx58uzZs/X19dL0CQkJp06dKi8vD/7cgz8LkcPhuHz5ck1NjceoVKVS+eijj+7du1cm86z/C+8KS3V1df3+978Xf5ycnHzttdfY67/8y79Uq9VOp5Nt2b59e/ABx9jY2Pvvv9/b2+txIseOHduzZ49HJYper//ggw9aWlo8dpKbm3vixImQohwAgOAh4IgdFy9eZFM1ENGaNWsyMzNnZmba29vPnz/vb9RDa2vr66+/zh6f5eXleXl5Tqezs7NzcnKyvr5+dHT0ueeeS01NZYk1Gs369eubm5tbWloee+wx6WOMrc1L9yozVq9eLT1Kf38/EcXHx3tMUKHX6994442enp6MjIxVq1bxPN/X16fX681m8xtvvPHnf/7nQU6VFtJZMC6X6+23325ubiairKwsVqei1Wrv3r3rdDrPnj1rt9sPHz688CvsITk5ecuWLSzPdrs9Pj5ejKtUKlUwe/DW3d39+uuvszaaysrKrKwss9nc1NRksVg+/PBDt9u9f/9+MbHJZHrttddYD5Li4uLCwkKO4wYGBgYHB8fGxn75y1+++OKLBQUF4eUEACAABBwxoru7mz0Ls7OzT506JT4zZmZmzp49e+fOHe+PaLXad955x+12p6amnj59WmwK4Xm+trb2o48+Gh0dff/997/73e+K3/XXrVvX3Nys1WqnpqaysrLEXfX29opf+js7O6UBhyAIrNWgsrLSY4pM9th76qmnqqur2Vt2u/3ChQu1tbV2u72+vv7IkSPznngYZ0FE169fZ9HGgQMHHn74YbFK5tChQ6+++ur09PTFixerq6ulbSVhXGFvGzdu3LhxIxH95Cc/mZyczMzMfPbZZ4P5oD9Go/Gdd96xWq1ZWVnPPvusmKujR4++9dZbXV1d58+f37Bhg/jLqq2tZZf98ccf37NnD7smPM/fuHHj/ffft9lsZ8+effHFF9GzBAAiDp1GY8TVq1fZi6efflr6DTUpKenEiROlpaXeH/n000/Z1+KTJ09KO17IZLL9+/c/8MADRNTa2ip2MiAicT+sT4aIpUlJSSGihoYG6aTyU1NTWq2WiNauXeudh6effnrnzp1iIBIXF3fkyBH2+O/q6grmxMM4CyK6efMmEaWmpj7yyCPSBqCsrCwxyunr65N+JIwrvAguXbpkMBiISBoDEVFCQsJjjz1GRG63W9pi1dDQQERZWVnSNiOZTLZ79+6tW7cSUU9Pj06nW8xTAID7BAKOWKDX61mT/MaNG71ncVAqlZs2bfLYaDKZbt26RUQVFRUeLSCMWA9fV1cnbszOzs7Oziainp4ecaPD4WBzWLEnnFarHR0dFd8V+1WUlJR4HCIlJaW6utpjI5uLgogmJyf9n/GCzoKInnvuuR/84AevvPKKd98LcZzqzMyMuDGMK7wIzGbz9evXiWjr1q3e86nn5+ez9pr6+npxmn+Hw0FEPnucHDhw4PTp06dPnw67cQcAIAAEHLGAVZIT0YYNG4L8yNDQEGsE8fekTElJqaioIKL29nY2pIKIOI6rrKwkopaWFrENpb+/32azpaWlbdq0iT3hpJUTrJ6grKyM1X9IyeVyn1X3arWaiMxm87yr4YR3FkSUmpqamprqczSKWOEhXeA3jCu8CNigISJat26dzwSsyken0xmNRraF/YLGxsauXLkivSBElJeXV1VVVVVVFXiQDgBAeNCHIxaIjxNpv4rApqen2QtWY+FTYWFhc3Oz2+02Go3inlevXn358mWz2Tw2Nsbq8Ds6OoioqqpKJpNt2rSpo6OjsbHxwQcfJEkHjvCe04IgBO5MEPZZMDabrbOzs7e3d2xszGQyOZ1OQRA8Bq0wYVzhRSC2fTQ1NYnBh9T4+Dh7YbFYWMB38ODB7u5uvV7/8ccfX716dfPmzaWlpYWFhZgRBACiDQFHLGD15EQU/MLoNpuNvWDVCT6JS4ixThJMUVGRQqFwuVwDAwMFBQU8z7NuAeyrM2vXGBgYmJqayszMnJycZA/FsrKyUE8qqmdBRI2NjWfPntXr9cEcKIwrvAjEKoqmpqbAKZ1OJ3uRlZX10ksvXblypa6uzmw2X7t27dq1a0RUXFy8Y8eOqqqqZXWCABBLEHDEAvG7qbS3ZmBih8EAHxHfkjb5q9XqysrKO3fudHV17d69e3h4WK/Xi/N9ZWZmlpSU9PX1dXd3Z2Zmsg4cKSkp+fn5oZ9WFM+isbHxjTfeIKKCgoL9+/cXFRUlJiayxpSpqamf/vSnHjsJ4wovpr179yYlJQVIIG0lSU1NffLJJw8dOsRqd9rb2w0Gw8DAwMDAQG1t7enTp+edLQ0AIAwIOGKBOC+n2WwO9SMmk8lfewQb/kCSSgKmvLz8zp07bW1tDoeDTYu5efNmsevD5s2b+/r6Wlpadu7cyTpwVFRURGkKy/DOwu12f/TRR0RUUFDwwgsveJyd93xfFNYVXgRivU5VVZV3n9zAkpOTq6urq6ureZ4fGxu7efPm559/PjY29uabb7788svoNwoAEYdOo7EgIyODvZAODwlMHIvhPTsnIwhCd3c3ESUlJXnMmsWebU6nc3h4mI1PWb9+vfguG/7a2tpqNBrZbGA+B8RGRHhnMT4+zhp6qqurPaINf8K4wotAzJW/0/fgdrvtdrvdbpfW08hksvz8/OPHj+/Zs4eIxsfHPcY8AwBEBAKOWJCbm8tmuqyvr5eOrRB5dF8gory8PPYAvnnzps+P9Pf3s8fYli1bPL70Z2ZmsiaS2trakZERuVwunYUiOzubdSatra1ltQveq6tESnhnIfb88Ek6GlYUxhVeBIWFhazLxY0bN8ReGh6kub1169YPf/jDH/7whx6ToDPiUJdlVYsDADEDAUcsUKlUu3fvJqLx8fEbN254vDs8PPzpp596bFQqlWyOivHxcXFKK5Hdbj9//jx7vX37du8jssGxjY2NRFRRUSFda43juKqqKiJiB123bl30hlmGdxZid4fGxkaP6EGr1X744YfstXS4ShhXeBFoNJp9+/axXH3yySfeo4gHBgZ+9rOfsToeIhLn6rhz5453YnHor0d3EKvV6jGAFgAgDOjDESP27t1769YtvV7/4Ycfms1mNpuC1Wrt7Oz8+OOPfX793bVrV1NTU09Pz/nz5y0Wy44dO9LS0txu9+joKFtcjYiOHj0qNltISUedeA95lbahSFtboiGMs8jMzFy9enV3d3dvb+9vf/vbvXv3pqSkWK3Wnp6empoak8nEklksFumBwrjCi2D//v2tra0jIyOXL182mUx79uzJzs7mOM5gMDQ2Nl64cMHlctXV1ZWVlXEcV1BQsG3btvr6+hs3brhcrl27duXk5CgUipmZmaamJhac5eXlSWc2u3v37ttvv61Sqf7kT/7Ee8YzAIDgIeCIEQkJCd/61rd+9atf2Wy2S5cuXbp0SXxLrVbv3r2bjX6UUigUp0+ffuONN/r6+mpqampqajwS7N+/n02n4a2oqEitVrO2Ce8pPvPz87OysthUodGe8zuMs+A47oknnvjFL35hMpmampo8xpQ++OCDbCdsHXlRGFd4EWg0mu985ztvvvnm0NBQXV2dx4SqRLRly5Ynn3xSHGVz/Phxo9HY1dV1+/bt27dveyROSUk5efKkdMmbpqYmt9tttVo7OjoQcADAQqBJJXYUFxe//PLLrDlDVFVV9f3vf3/z5s0+P5KUlPSnf/qnx48f9xjisXbt2j/+4z/++te/7nPIBhEplUrWqrJmzRqPLqVExHEcWxM1PT3dZwVJZIVxFjk5Od///vc9JlYvLy9/8cUXv/71r+fl5RFRe3u7R8+MMK7wIkhPT3/hhRcef/xxj9MvLi5+5plnnnnmGekkJRqN5rnnnjt+/LjHDGbx8fEHDhx4+eWXPQYws+qruLi4NWvWRPMkACD2cc8//7zHJrFxV9rK67FREAR/L956663oZxsCMZlMBoNBJpOlpKRIe1cEIAiCXq+3WCwymSwpKWmFTm4dxllYrVadTicIQlJSUnJycpAHCuMKLwLx9OVyeWJiYkJCQoDJQwVBMBgMZrOZ53mNRpOWluZv6LLZbJbL5QGmVgOA2HPq1CmO49g9hLuH7k1KJP5IkmmKpDccnxvRpBKDEhMTQ40YOI5LS0uTrsa+EoVxFhqNJsiRsVJhXOFFENLpcxzHFpSZNyUbngMAsEBoUgEAAICoQ8ABAAAAUYeAAwAAAKIOAQcAAABEHQIOAAAAiDoEHAAAABB1CDgAAAAg6hBwAAAAQNQh4AAAAICoC3Om0enp6f7+/qmpKYvFwnFcfHx8ZmZmQUFBMBMXAgAAwP0m5IBDEITm5ub29nbpRqPRaDQau7u7scITAAAAeAu5SaW7u9sj2pDq6upaWH4AAAAgBoVWw+F2u1tbW9lrjuO2b9+ek5Pjdrv7+vpaWlqikD0AAACIBaHVcFgsFofDwV5nZWUVFBTI5XKlUrl27dpluHgmAAAALBOh1XDI5XLxtV6vNxgMycnJ7MeHHnpIEARBECKZOwAAAIgJoQUc8fHxWVlZk5OTRORwOC5fvpydnZ2RkZGZmZmSksJxHMdx0cknAAAArGAhj1Kprq7+/PPPZ2Zm2I8TExMTExNEpFAoSktLS0tLI5xBAAAAWPlCDjgSEhIOHTrU39/f0dFhNpvF7S6Xq6Ojo7e3N6LZAwAAgFgQzsRfcrm8tLR01apVMzMzU1NTExMTo6Oj7C2n0xnR7AEAAEAsCC3gMJlMLKQQBCExMTE5OTkpKamkpMRkMn3++edWqzU6mQQAAICVLbSAo7e3V5z1a+fOnfn5+ex1YmJidnZ2f39/hHMHAAAAMSG0eThyc3PF13fu3BkfH3e73W63e3JyUmxVAQAAAPAQWg1HVlZWcXHxwMAAEdnt9i+++CI6uQIAAICYEvJaKtu2bSssLPT3blFR0cLyAwAAADEo5FEqcrl8x44dJSUlg4ODU1NTVquVLU+fkZGRn5+fkZERjVwCAADAihbOsFiO47Kzs7OysohInM4c85oDAACAPyE3qQAAAACECgEHAAAARB0CDgAAAIg6BBwAAAAQdQg4AAAAIOoQcAAAAEDUIeAAAACAqEPAAQAAAFGHgAMAAACiDgEHAAAARB0CDgAAAIg6BBwAAAAQdQg4AAAAIOoQcAAAAEDUIeAAAACAqEPAAQAAAFGHgAMAAACiDgEHAAAARB0CDgAAAIg6BBwAAAAQdQg4AAAAIOoQcAAAAEDUIeAAAACAqEPAAQAAAFGHgAMAAACiTrHUGQAAmJ/DRXaXQERqJaeUe75rdQgunogoQcXJZEREbp4sDsEjmUJGGhXnvXOPxBxRfBwn85HQN5ebrE6BiDRKTiHJm9NNNqdnHnxKjOM4zneepeQcxcf5ztZCzjfAgbxTckQaFSf39V1VmlgpJ7XS7xW0OQWne/Z1/L29CQKZ7AIRyThK8HWaRqvQN8lbnZQYR6XZsnhfpxZ84nkPR0QGizCg5W1OSk/gSrNksoBn7e9qiycb7+u6hXRSKx0CDgBYAX5z1fHONScRvXRY9dQOpce7f/s7e0O/m4j++7fUVcVyImoYcP/n39q896NS0Joc2aEKxTe2KcW7v3dijqPMJG5bifyPtivX5MxTE/zzTxwf3HIS0cldyhcOqsTt7153/rrGEczZffAX8Ulqzl+eRcWZsl+/oPH51gLP19+B/KVMS+AqC2VPfE25ZdVXEZY0cXmu7Od/7DurRPTyb2w9Ezx7/ZNn1dtK5ERksApP/aOFiLKTubf/LF6a/k6/+7UaR/MQL26RcbRjtfyFg6pVmZ6/nSATBzgcEbWP8r+87GgYcPP3wq0kDffoZsV39ik9Yj7xrDUqeu2F+Oxkz4jhH846PmtzEdGPnlbvWvPV5QrppGJDbJ4VAIBPDhe1DPP/fNHx569bzXa/3/IFgSaNwoW7ru+9Zv3/PnHw/qsDXG660uJiry81uQKkXBJBnm+odGbharv7L9+y/ctl3xFVxxjfO8n7fKtrnBejjWB8eNv5V2/ZpA9mIuIFut7lfunX1sZBd9iJ/blw1/Xyb6xf9rulv80Zq/C7G87v/8Y2NeP7Mlod9E8X7NE4qZiBGg4AiGVrc2XP7pmtEbE7qXeSP1vvtDiodYT/h7P2//pNtc/EZjs1D7kvN7vsLvrdDafFLvzFsTif+/+i02WwzD6BtCahrtstfot9cL28OOOrT43ohF9ecRBRcabsuf1zKmk0c1sfpHmW8lfzv/DznfdA0pRTM0Jdt/tmj5uI3r3u3FQk373Wq5WL6OMG1/96WOW9/XyDa96zEA1N8//vJYdAxBF9c6fy4UpFajw3ZuDfu+mqaXXZnPT379v/9Xsa1hIRUmJ/GvrdPzlnFwTiiI5sVhyuUCRruJ5J/u1rzoEpfmCK/y//bvvn72p8Nipd63R/1ubav36eB2tE8rkSIeAAgFiWGs95PACObFK8+JrV5abPO9x9k3xJlsxn4qNVipO7lP/5t7bJGeHcHdfXyuQ+HyQX7rqIKE5BRGR30YW7LjHgKMqQFWV8tfO2kdmvs8kazyzNm+fghX2+Ie32j7Yr/8fH9jP1LiL66Eunz4Djk2bXiwdVHv0e3Dx92hJCwHGlxe1yExE9vEnxvUOz4UtGkryiUP6XFuFOv1trEmpa3UerFKEm9ucfP3YIAhHR9w6rvnmv8W5NruyBdfI/f93WPcG3j/Iffek8Xu0jUCOi//kHx9dK5f662oRxUrEETSoAcH8pyZLtWzd7K28YCFR3XZQhEys23qh1eifQm4VbPW4i2rlGsWO1nIiudbpmrMurWSX48w2J+MTtn/JsH1mXJyMinVm43u15uC86XXqLIKaZ17R59mKWZXumP7BBnqThkjTc0DQfRmKf6nvdA1qeiNbkyL45t6uQRsV9/8hscHC23m/MNDUj/PJTH0Ul7JOKJbEWQAEAzEvs2Weer819x2p5QRo3rBN6JvhRvZCXOueb64VGFxsdc7BCLgh0td3tdNMfmlx/tN3319+lEvz5Bi9BPbtP7+E8XyuTD00LZrtw4a5zz9zKD1YhlKTmtpXI20fnf6bm3Mv5lRbXN7YppCNfvrFN+Y1tyrAT+3S7bzZCemijj4djVbE8K4mbnBF6J3m9RUiNn3Pmm4vl4wZ+3CCcrXc+XKnYWOA3olp4Plco1HAAwH2ne3z2UZeZNH8z+YaC2Udm67Dn9/WLjS4iSojjdq1R7F6rYF0f2DN1WQnpfIN0o2v2akibjRhBoIc2yonoepfbKKnv0VuEm91uInpoozzI3rWHKxVqJRFR+yj/p7+yfnzXZfU/oDekxD713evoujbX98Ox9F6dRK9Xv9c4Bb3ySBwRCQL99/N2t/9oauH5XKFQwwEA9xFBoA9vO2/3uolIIafqUh+dDzykJcw+pMWacKZ9lGfPp33r5GxqkL3l8ouNrq5xvnucXz3fYNoAbvW6H/0Hs8fG7WXyvz+h9pk+gMDnG96BTDahtsP9i3vjU7y/kducdLRK+dGXLpeb/tDoEocx/+FehdDRKuWFxqDCsswk7u/+SP3fPrTP2IQRnfCTj+z/9DHtXKM4VCHfU67wqFwJKbFPM7bZX3FKvO/UKZrZ7UZfDWe71sj3r1d81ubqneDfve702SE3IvlcoRBwAEAs6xjjxckhHG4a1fFa0+yj4umdyozE+e/uqnu3SfvcpvmPG2Z/PlihEF+wOo/zDa4/O+JjgEaQBIGcXn0tvLf4FNL5Bn+g273uYz8xExEJZJeECid2KqVzS8we1yWsz5eVZsl6J/mLkoCDXZyybFl5nuxMfbDf6Xeslv/ri5p/ueL4pNnlcpPdRZ+1uT5rcxWkOV56OM7j6CEl9ua4d2rek8vNbhcLg5946c+OqG73us124c1ax4EN8vw033HnAvO5QiHgAIBYZrAI9X2ej1CFnE7tVn73gaBiAvEhpJZ8X3W66UqLm4jSEzg2bxURVZfI0xI4nVm43OL63iGVItynRmm27CmvXiBZXjNK+RTS+QZ/IF7wjLfi47i//oZqb7mPh4jNSUR0ZJPiF5cdYn2POP3GI5sVJLmqwUhN4P73x+JeOKj6uMF1pcXVNc4T0bBO+D//zfbiIdWJncqwE3sQg0unn+z5LAxSGYncnxxQ/tMFh91FPzvv+MmzfuuKFpLPFQoBBwDEsoxErqJw9skvl1GShivL4h5Yp0hNCLbmetI4+108XVI9UNvuYtXveWncpaavnk75aZzOLBgswhed88/H4E9mIhf2kMiQzjf4AxVnyh7bMpvy7WtOnVmw2oXsZN9f39mE7kc2K16tcbjcdP6u688eVrHpN5RyOrJJIaYJSWo898xu5TO7lb0T/BufO2taXQLRv1x27Fgt956aM6TEoiS17+YzkTjnipjS2+PblJeaXC3DfH2fW1o2Fn5SKx0CDgBYART37r0+K/ydLsEjmagsW/Z3f+R7zq5g8AKJ0z5uLPiqykLsGdo8xDcP+Rj7ceFu+AHHQizwfP3JSebElhGB6OeXHOy56PMbPKsGSI3ndq6Wf97hvtLsev6Akk2/sXutIlnDUXAtRG6e2OhQpZykbROl2bL/8mTc/8ULV9vdvEBXWlz/y35VSIn9HbEsW3a9y01E7aM8G+csJQiz3W85ogB9dDiO/uJo3Pdes7p4+vklh8fY14jkc4WKtQAKAGKS+AV9ROej9/+oXqyEiPA97ZMmF+sDUZ4ry0mZzYN2RmDdMAO42eOeNsXm0IPj1Uo2zra+z33L13UQ7p330SolEektwv/42MGm32DtKdI0ATjdwp/8i/WP/8X6yus+1nMRO8CyucZDSuzP18pmk11u9jFLfX2fm9V8lGXLkjWBashKs2Xf3Dl77h4tXBHJ5wqFgAMAVoDNRbM34s/a3Lq51d1XWlxsS1Yy5zFPxgI1Drr/+eLsWIzvSDpAfNw4+zQ6uUt58a8TPP5jE0a5+dk+krFHKadv7Zu9Gr+87AgQOuxcLWfdVNmlyEzivKsNAlArueLM2TnErnV6RjbiNB5sGFFIif2pKpazCokBLf/61TnLxJjtwv/8gzgwZ/66q+8+oPJZGiOSzxUKTSoAsAKszpFtXSX/st89YxP+7F+tp/eq1uTIrE7hVo/7vbrZ3oxPL7if3ZRJON/gEgQyWoXGQfeNbjd7mv7RdqV09u4/3IskDlcqvNfUOFyp+Pc6JxFdaHQ9szucLLFseG9XKehQRSRv2mEf6OhmxbvXHMM6oWucv9zsOlTpO7FMRocrFe9en/0FHa4Meczndx9Q/tf37UT09+/bjm5R7l8nz0ji9BbhSov74wYXEXEcPbhBEUZif/7T0bj/9IbVxdMbtc7eSf7hSkWyhuud5P+9zjmiE4hoY4Hs61vm/7WqFPS/HY37P972UY0RkXyuRDF4SgAQk35wPO4v37INaPkxg/DT//DsNvHYVsWTX1towNE7wf8/5+bsWSGj03uV0uqN5iH3oJYnouJMmffU1ES0NldWlCEb1PIDU3zLMB9gxsngs8GkxnORDTjCPpBMRt99QPXfztiJ6LXPHA9uUPgbknO0ajbg4IjC6An74AbFCwbhl1ccdhd9cMv5wS3PWcOfe1C15l53ipAS+7OxQPa3T8T9+Izd4aLadndt+5xKiLJs2f/9lFoW3K/0a7nsYDsAACAASURBVKXyQ5WKT7z6jUYknysRAg4AWBnSE7mf/7H67S+cH991iS3cHEcb8mXP7Fb6HJ8ZHo4oQc3lJHPbSuWPb1N4TKXw8b3uogc2+G0dOLBB/kYtT0QfNzg3FkS+C+dycLBC8fY1Z+8kP6YXztQ7/c3mXpQhqyyUNQ3xFUXywvRwHqIndym/Vip/83PnrR6X5V4rB8dRRaH89B6lRxtNSIn92b9eUZIl+3WN80aXS5xvIyuJO7pFcXKXUq0MoZbmpcOqum639/I6EcnnisM9//zzHpuEey1ygqRpzmOjIAj+Xrz11lvRzzYA3NfGDMK0SVDIKD+NS/Q/QBFiiZunUT1vsAhqJZefxmkCrt4eUmJ/bE5hVC9YHZSWEOHuQaKI5DMaTp06xXEcx3FExN3DXotbWErvF/42ooYDAFae3BQuN2W53JphcchlVJguK0yPfGJ/1EquNCu6xSwi+VwpYrCVCAAAAJYbBBwAAAAQdQg4AAAAIOoQcAAAAEDUIeAAAACAqEPAAQAAAFGHgAMAAACiDgEHAAAARB0CDgAAAIg6BBwAAAAQdQg4AAAAIOoQcAAAAEDUIeAAAACAqEPAAQAAAFGHgAMAAACiDgEHAAAARB0CDgAAAIg6BBwAAAAQdQg4AAAAIOoQcAAAAEDUKRby4ampqYaGBqPRSEQZGRkVFRUpKSkRyhgAAADEjvBrOEZGRq5evcqiDSLSarU1NTUGgyFCGQMAAIDYEX7AUV9f773xyy+/XEBmAAAAIDaFGXDo9Xqn0+m9XazwAAAAABCFGXC4XK7I5gMAAABiWJgBR2Zmps/tSqVyAZkBAACA2BR+H44NGzZ4b1y3bt0CMgMAAACxKfyAY/369evXr5duKS8vLysrW3CWAAAAINYsaB6ODRs2FBUVGQwGhUKRkpKiUCxobwAAABCrFhoiJCQkxMfHE5EgCIIgRCJLAAAAEGswtTkAAABEXWgBB+owAAAAIAyo4QAAAIAwBV8T4RlwoA4DAAAAIg41HAAAABAV0loMBBwAAAAQdX4DDrStAAAAQBh8hhCo4QAAAICoQ8ABAAAAURf5gMNqtUZ8nwAAALA4ovQcj3zAUVtbG/F9AgAAwOK4evVqNHYr37ZtW2T3+OWXXyYnJ+fn5yuVysjuGQAAAKLHarVeuXLl17/+NRFx94iv2Qvpj4z0LY+Nc148//zz0hRiz1KPLqbsR493xQXbfL4I/FnvQwTYCAAAAGHwiAM8Nnq88P7RO+agcAOOha4Wy3EcCxGkL9hb/kIH74/4zCIAAABEnHco4DNBxB/HfvtwhHEknyEP+cq6R8SEIAMAACCq/FVXkJ/HdID9BHMs742h1XD4rJPwmUb6r8exxT1I60IQcwAAAESV96M2QI0AecUlQe7TnzCbVKSRh0fcIN0uRhLSNhTvNhdEGwAAAIsmQHOEdHtIkce8FtqHwyePig2fVR0etRroKwoAABA9/jp1Sn8M3MN0gTwDjmAaTbwTB1+x4bNWA00qAAAA0RYgnohgBw5/6cOv4fDopUG+6jM8EkvT+MsQAAAALIJgAovAQ15DEmzAMW/Nh0cC7+YSNKYAAAAsrTAaVsIeluIhKn04vPPhHYugxygAAMBS8TdiJfCWhQg54Ji3uYTx3iLd7vMtAAAAWGQBRql4bFxgRLKgxduC71cS2aE1AAAAsEAeA1893grwqfAOF5nVYoMc0St9jcgDAABg8Xk/ggPUEfhLE4ZATSrefS/8DYL190F/PUnRsAIAALC0As+6Me+cHKHWjvgIOEKaisPfp/zFHN65wSgVAACAxRH4e34YLSzBi8AolQD1GQHm3pAmW3geAAAAIGyhtrCEuk+atw9HqEdFvw0AAICVIrz+HMFs9xaZeTgC9Orwrt4IMFY2wP4jkk8AAIBYtcCHafCjXsN7KPsOOAJ045i3AcXnx727i/p8FwAAAMIT3sM0mKgijMjD+635aziCCT68f/TXb8Nn5uadNH3eTAIAAEBEnqeBW0nCnqIjnCaV4BtQAncXDTKLABA2q9Vqs9kUCoVGo1EoFmMpAwBYQgt8nvqMLXieN5vNLpcrLi5Oo9GE3YdU4a8CY94mknkbULwn28AI2Chxu91nzpwhonXr1m3cuHHRjtvd3X337l0ievTRRzUazaIdd4X69NNPdTpddnb23r17F+Fw4+Pjzc3NBoOB/bjIZQNqa2snJyfT0tIOHDiw1HkJwfT0dE1NDRHt2rUrLy9v3vRLdfMBInI4HOfOnSOiioqK8vLyhezKX+8NQRB6enra2tpsNhvbvm/fvtzc3AAf8bdDWvjy9N6vvbMbOAfkFYiwP9Tgc/Loo4/Gx8cHnz6qLBbLtWvXXC7Xrl27UlJSIr5/nudv3rw5OTm5ZcuWwsJC7wRLVV2EaqrgLcK1Gh8f/+KLL6RbVCoVfkdLYoVe9jAGFS7amc57G7zfeP+yFtJdUpqstbW1tbVV+q5SqQx+Vx6CnWnUX0gROAEFV72xQv8gfZqcnGTfKUdGRqIRcJjN5uHhYSLq6elZ8r+0sCvWINqampqISCaTfe1rX8vJyZHJIrOIAQRvkf8o2traWlpaiOjxxx9fSNvZUv0tX716dXJyMjs7e9++ffMmXpLb4OTk5NWrV4lo//79mZmZi3PQwMLuSxHkR6xWa1tbGxElJSVVV1enpqYSkUwm87nzYHqYKijoqUWDiTkoxAm+fCbetGmTy+WSbrFarTdv3iSisrIy7+KlVquXzwMvIyNDo9G4XK7c3Nxo5CoxMTEzM3NqaqqoqMjn8x41HMvcIsxGY7FYWNS7Zs2aoqKiqB4L5rU4fxrS+3CkjhjMfiJ+8wlmJz5vg4tpGd7uQuq6EGT+dTod29umTZvEGGveaCOAeQLhYGKReSfeCPxZ741paWkeW0wmE3uRkJCQlZUVzJ6XSlJS0tGjRylqJVImkz344IM8z/v8zopoA4jI6XSyF9GoY4PlKeJ/g8u2PYXmuw3e5yL4i3A4HOxFcnJy8DsPkCa0YbGB200Cr9MWESuieC3CH57HdcDzHnxCwbgPLfIvfQnL2CI/DpZhC3KUsuT9+A5cbRZ8LZdCTBR8nUTgRhN/U34xURqo0tXV1dDQQETHjx+fmprq7Oycnp5Wq9WPPPLIF198MTo6ynHcY489plKpPD54+fJlnU6nVquPHj0auPja7fa+vr6RkZGZmRlBEBISEnJyckpLSxMTE6XJpqamWB/vvXv3sq68RNTZ2Xn37l25XP7EE08YDIaenp7JyUmLxRIfH5+Tk7N69Wq2E6fT2d/fPzg4ODMzw3FcWlraqlWrCgsLpdfQ7XZ/8MEHRLR+/fqKiopgLs74+PjAwMD09LTFYlEqlWlpaQUFBcXFxR7nG+AaBnMUKaPRWFNT43A4EhMT9+/fLx3AwvP86Ohof3+/Xq93u92JiYn5+fllZWWsI5I0G/v27cvJyfHYc3NzM2tTfPjhhycmJljKxx57LC4uTpqspaWltbU1IyPDe4DApUuXDAZDUVHRjh07pNsNBkN/f//4+LjFYlEoFCkpKQUFBatWrfIuFe+99x4RVVRUlJWVtbW1jYyMmM3mnTt3io19PM8PDg729/cbDAaO41JTU9nv0d/l4nl+YGBgeHhYp9M5nc74+PiMjIySkpIw2okbGhq6urrEH+vq6urq6oiorKxs69atUTrfAOcV+HdNRLdv3+77/9m70642sjt/4FcLkkACgUBCu8SOAdvYeMFu291tO3Znks500p05Z+YF5H3Ns8k5neQkM5l/4n3HK2bfQSxa0Y72/f/gntyplIQQmDLY/f08kkqlqlu3tl/drdbXCSFffvklb3vpWUMIOXXqVE9PD/enGg/p58+fe71ei8Vy/vx5n8+3sbERCoXoYWk2m7u6umhbh3g87nA4vF5vIpGQy+VtbW2dnZ2tra3cRQWDwUePHhFCbt++LZFI1tbWPB5PIpGQyWQV5//wnCGEuN3u8fHxpqamS5cu8X7izjM2NsadQq8PSqXym2++4U6ne3x7ezuRSIhEoqamJoPBYLfbeecOVyaTWVtbc7lcdEtbW1s7Ozv3dVjuuaVTU1PLy8ts/u3tbXq8lR+xXBUvg+Fw+MGDB4SQ69evq9Xq9fX1ra0teg5qNJqOjg6j0VgxhdXPvnQ6TXuCMPQKTwj55ptvlEol96dgMOhwOEKhUCqVqq+vb29v7+zsbGxsrLgJTqeTrjebzSoUira2NqvVWn7Ro3K53OrqqtPp5B51FZdcHb2ReTyeWCxGCFGpVAaDoaOjQ6FQcGf7+9//Tmeg/t//+3/0w+joKK+WtvZYRyQS1dS2aF+VJtXLNj48EKtegbSysjI7O8udbrFYPB5PqVTy+XxWq5X7r2QyGQ6HCSFWq1UikVRZaSgUevHiBesXRAiJRqPRaHRlZeXixYsmk6l6UmlWFAqFtbW19+/fsxlisVgsFltfX7927ZpUKh0bG+PuY5/P5/P5tre3R0ZGaq82407M5/Pv3r3b2tpiUzKZjNfr9Xq9q6urX3zxBTcUqJKHFbeO7BLYJpPJ58+fZ7NZmUx2+fJlbgeidDr96tUrbhekUCgUCoVWV1evXr1KS+0MBgMNI9xuN4vYGNpSTK1WcysLQqEQ71JCZwsGg+l0mruN6XSaNm7Q6XTcxC8tLdF7G8u3dDrt8/mWl5cvX75c8axOJpOPHz/e2dnh5UA+nx8bG/P5fGw63Y9ut7tQKJTnWzqdfv78OT0OqXg8Ho/HNzY2+vr6Tp48Wb7qgxFoe3dTy74mhAwNDXk8nkwmMzk5ef36dRYxJJNJ2gRSrVZ3dXWxde3rkKay2ez4+DgNa6hIJBKJRDY3N7/88stgMPj69WvWaCyZTG5ubm5ubo6MjHR0dJRvrNfrnZubY5VW+Xyezn/q1Knd+iXyMqrGnCGErKysZDIZv98fCAQq3iyrq7LHCSHBYDAYDC4tLX3xxRfcaIn9KxKJjI+Ps4tePp9PJpNbW1snT57s6+s73C2tZWl7zsY+pFKp9+/fc88peoT09/cPDQ3xUviBZx9babFYnJqa4ob79PK+trZ24cIFXnQej8fHxsZYl3XCOfDsdvvZs2d5oXMsFnv69GkymaRf2VHHPeRqyS6fz/fq1StWUUL+sUeWlpYuXLhQSy/o6t1O90zD/wUc1Qs5yn8ViUTb29sTExM017Ra7enTp2krVt66P7xUo/Ywhd4pDQaDSqWiMYTBYBCLxcVi0eVy8QIOdibsFjFQmUzm+fPnmUxGJpOdOHGCbmM4HJ6bm8vn869evbp58+aeJw/1/v371tbWrq6u+vr6TCazsbHh8Xjy+fzbt2+LxWI8Hu/p6Wlra5NKpdFodGlpKZ1Or6+vG43GA1xuCCETExP00tzR0WGxWBQKRTqddjqda2tr9GpScUCI8jzcE9tBmUzmxYsXyWRSLBZ/8cUX3GzJ5/PPnj2LRCIikaivr482qg2FQnNzc6lUamxs7MaNG1KpVKVSabVav9/vdDpPnz7NTQA9gQkhNpuNENLU1ES3iHc5jsfj7L5Im5Wxn9iVRafTsYlsNJGWlpaenp7GxsZcLufz+RYXF+l5fuPGjfKnQIfDQQhRqVQ6nU4ikbC4amJigkYbbEdns9mNjQ2n01kx6968eUNT1dPTo9frpVJpIpGYm5uLx+OLi4uNjY12u72WXUCdPHlycHBwZ2fn4cOHhJBz587RY5t7/Trc7a2oxn1NCFEoFMPDw69evaIRANvY+fl5GgSMjIxwj4EDHNJ0d1itVpPJVFdXl0wml5aWdnZ2dnZ2Xr58GQwGxWLxyZMnm5ubC4WC3+9fWVkplUrj4+N6vb48fJmcnJTL5XR+QkggEFhcXKQ3G7Vavdvj6QFyhhDS3t7u9/tlMhn3uspjMBj+9V//lRCyuLhIC/++/fZbXj+CjY0Nuse1Wm13d7dKpcrn836/f35+PpvNvnjx4vbt2+Wlv3NzcxKJpL+/v7W1VSKRRKPRhYWFTCYzPT2tVqvLHwYOtqVDQ0N09I5nz54Fg0GtVnv58mXyYdUlr1+/LhQKXV1d7e3tEokkFArNz88Xi8WFhQWLxcJ9Vqnl7FMoFDSHA4HA8+fPCSFffPEFLf/g9gaanJxcXV0lhFitVpvNJpPJ4vH4/Pz8zs7O69evm5qa2MUwl8s9f/48FotJpdK+vj6tVssOS7/fv76+3tTUxI0k8vk8vaiSfxzGMpkskUisrKwsLS3Vni3hcPj58+fFYlEul/f392s0Gjpxfn6eXrdpKSM9cm7evFkqldbX1ycmJgght27damhoEIlEbL/sN9qgv0p5k2qPOVwuF7ejv9/vv3fv3s2bN8vPDYGqlypSKpVffPEF95CSyWQWi2VjY8PtdudyOe555Xa7CSG0DK3KYt1udyaTIYSMjo6yC4pOp2ttbX348GGxWFxbW2Olf9xwu3yZZrP5woUL7AJqsVjGx8dXV1fpDfLixYssJNLr9Uaj8c6dO8Vi0el0spCo4vIrTtzZ2aFPdSdOnGBxPb0misXilZUVj8cTj8fLH2fL87AWIpEon8+/fPkyEokQQi5dusQrel1cXKQ/sXFjCCFtbW0tLS2PHj2KxWKbm5tdXV2EEJvN5vf7s9lsKBTiRgas2MBoNNItNRqNa2tr29vb3Kze3t5mnz0eDzfKDIVChJDGxkZWERaPx2mBilarvXLlCvdar9Pp6FPF9PT0+fPnyzd5YGDgxIkT3CtjIBCgea7X6y9fvsx2tMlkmpubo4/s5J8fIulGDQwMsJLhtrY2vV5///79RCKxsLBgt9trP4No+tlWSCQS3o3kcLd3N7Xva0IIPT29Xu/09LTRaJTL5YFAgMY3vb293IfvAx/Sp0+f5l7BLRbLw4cPI5GI3++XSCQ3btxgNwOTyaTRaF69elUqlbxeb2dnJ29RSqXyyy+/ZAXper2+vb398ePHpVJpZmam/DbMuw7sK2dOnDhhsVhkMll5NMBIJBJ6mLH9IpVKuTfCUqk0PT1NCNFqtVevXmXHZFtbm0qlevnyJS0iokE8l1Qq/fLLL+ltiRDS3t5uMBju37+fy+Wmp6dZL7zdrng1bilLKk2/SCSqsrHcXK24UqpYLF69epWtVK/XazQa2qPV4/GwO1SNZ59YLKZJYkmtq6vjJdLj8dBog7sojUaj0+nu3r2bTqfn5+dHR0fpdFovTwi5dOkSS2Rzc3N7e/uDBw8ikcjKykpvby/brrW1NTr/0NDQiRMn2EotFsvLly89Hg8vTyoqFov0sVahUHz99dfsAtjW1mY0Gh88eJBOp9++fXvr1i16hNCN5R5UrBas9uL28l/3F0VyF0rrhnlo51Xh7HnlHRkZKb9T0mdcWqvCJuZyObqrbDZb9cWygixeNW1bW5vNZtNoNKx8dc9kDw0N8coM2MVFq9XyCmAaGxvp7ZZb4lc7qVR64cKFCxcusFUwrHyPdf/hqpiHe2JD8RBCzp07xyuSyeVyNBjv6OjgXZS1Wi3dTFbobTAYaI7RmhGG7i+NRsPuKDT+i0QiqVSKzUbjSFrrz63IIP8IWbhpczgcxWKRbjVv9AK9Xk+zbn19vTyjdDrdwMAA7+67ublJP5w6dYq7o0Ui0cDAAE0292Bjyeb1vZLL5b29vRqNRiaT7Xl0latyPB/u9la0r31NUzs8PCwWizOZzNLSErtBNjQ0cC+v5KCHdENDQ3d3N285LJLo7+/nFU+yw6Ni/dHJkyd51fZarZbercPhMLeQvHwv7DdnCCEqlaqWG3DF1VHFYvHUqVMXLlwYHh7mXXxYEXrFLR0aGmLRBtXY2EhzPhqN0mBiNwfYUl74cgDsv4ODg7yVtre302zk7qBDPPtoMxSVStXf38+drlAo6LG3tbXFKqfUajU9jLlPU4QQiURCb1XJZJI+4pJ/DPRJF8Wrs5NKpcPDw7xt343P56PbfvLkSV67Q6VSefr0aUJIPB6nF09G9A/cr7wlV5y4G/7lY89/0qVHIhHeUBlUNBo9wPXxEFW8U+p0Onq0cW9ggUCAXnmr16cQQlixKm9nEEIuXLhw48YNXvPDKspbfrGy64qFsXTV3LYjtWtoaLDZbDabrbxYmF3CKu7Eg/WlnJqaorUGg4OD3Mpvant7m974eUEVRS/xtEEfIUShUNApW1tbLFygjQx4S2CFKCwmy2azdLb+/n46IAot1aA/0c/c85yWz+v1+ooNF9iGlA9929LSUn6yeL1eQkhra2t5HopEovK9zyomnE4nr3Cxu7v7xo0bN27cqPF+U6PD3d6K9rWvqcbGxlOnThFCFhYWpqenA4EAIeTs2bO8bT/YIS2TycrjJLaE8iaQUqmUNqDjppCpWMnIaoLYwVbRAXLmw0kkEppp5WXPrCyk4kWbF1dRLLALBoNVVnokW8pUPPvo5nC39LDOvmQySa85dru9/PBgoQ+LdWhvgIoNtNklgl33EokEjaE7OjrKF75bU+Jy9GlNIpFUbOtNaxvZbBUdoGCjfJ4KjUarV6xQVaIK2lqQHGqHlD1jKDZDxdkkEonVal1dXXW5XLlcjuUsPQqr1I9SVqt1YWEhlUq9fv3a6XSazea2trYqddhVdkz5T6y2teKFjG4XDYx4W1o+227pCQQCHo8nHA6nUil6OS4Wi6JKPZn3+5DB/uJwOFZWVmgdB++plIrH43ROsVjMfZyiJBIJ/TWZTNKDx2KxuN1uGiLQ5w+/30/n4ZZPKBSK1tbWUCjk9/vpdHqn1Ov1CoXCbDavrKx4vV66hHA4TJfASqqy2WwymRSJRLsN7qJWq8VicalUqv7kStFWdSKRiPdcyMsx3vJNJpPb7V5bWwuHw7RtfFNT04c851VJ5OFu7272u6+prq4u2pdhaWlJJBJZLJYqTdj2e0iXYz/VeN6RqvmgVqvpr7zyFd5fDpYztat+/sbjcZfLFQwGE4kEu9MXCoWK15PdVtHY2Mjb0oqZfLAtPcCVp/aU079wD48DnH0Vf6K9fgghMpmsfGPZkZlIJLjTC4WC1+ulBQ+ZTIZGGLlcjrcKtvCK96naSxfo1U+r1VYchVYikWi1Wo/Hw42Y97zn1rJe3myVe6nsGXPwyoL+b3FSKSuuKU/QwUIQ3nJqKYMpn2ixWFZXV0ulkt/vN5lMtA0pIaRimMkjk8m+/vrryclJl8vldrtpOYdKpaKNg3jFU9xk7OuUqH7o1L4o7sR0Ov3mzRv62H0oidwNG2x/e3s7lUqVPxux0kvat3A37HzjNvWlBxsrPOBluMFgCIVCXq+Xli7S2WgjD6PRuLKy4nQ66dMzfSZjhauE8wi722C1Eomkvr6elnDueV1mUThtXVVlM7m/Xrx4cXZ2dnl5ORwO03IamUxmNpttNtuHD5/M27+Hu7272e++ZqseGRm5f/8+/Xz69OmKqzvYIV19yr5OyYoT5XI5PVzLbxjc5R8sZw6A9/disTg9PV29gWGNW1pXVyeVSvP5fD6fF2hL97vtNaa84vwHPvsqnlbcHojlstks+1coFHr16lXFGm3eKlhRx54DarNfK95n6R7h9X3l/peW+bH4ZreFk/3soPI5d+0Wu2fMMTg4yO08ySbua/UfTVtbW319fSqVcrlcJpMpHA7TSrIae38olcrLly9HIhGXy+X1ekOhUDwep4M9nDhxYmBg4Ag3bTfFYvHZs2fhcFgikZw8eZI2uafhbSQSuXv37uGuTq1WR6NR2uPm6tWrvDCuYt1NOXbI1dXVWa1W2pP+9OnTpVKJ1teUl9DqdLrZ2dlYLJZMJhUKBZ2N1k/R1vWJRCIajarValb48cHbepikUilt0uhyuTwej8/ny2aza2tr9CURIyMjh1ul8hHsd18zrLFUoVDIZDLl9SYf+ZA+dAfOmQ/Exrro6emxWq2NjY1SqZResv74xz9yGzkdlqPa0v06lLOvxgxkBWbxePzRo0eFQqGxsXFwcLC1tVUul9OSttXV1fHxce6/yl+6vqc9i3lqXM6+llzjzLW+vK0cjS24McfAwADtn33oh9GH385FIpHdbp+fn9/a2jpz5gytcmtsbNyzPoWrubm5ubl5cHAwm80GAoGFhYVgMDg3N1dXV8ea8xxu5CHaZx0Hl9vtpjH7lStXeCVShx4etbS0XLt2jQ7gsb29vbS0xGs8xZqqfP/99zV2eLNYLOvr65lMJhQKFYtFelaXF7NrNBr6yEUHcMvlco2NjbSBglQqNZvNdLAjpVJJWwZw28qwGlDWRIunWCzSBjTl3UQrPvzRD9wWrDWqr6/v7u7u7u4uFArhcHhtbY32pC0Wiwd4l/1u+/dwt3c3B9jX5B+jZbCv4+PjX331Fe/vQhzSBysZ5slkMvR2Ur1O/WA584GSySSNNrgdKJjyK0z1Lc3lcjSYOIZbeuBjoMazjy2ftyKWFTdv3ix/L0e5lZWVQqFQV1f31VdfVSlyoB9YxLPbOVuj+vr6dDpd5dJEl7/fpgL7nfmD3qUyODhos9mi0ahUKm1paWFZc1iVKbslqfqvu81gNptpb2w6xgMhxG6373kylEoleoJJJBI2s1wuN5lM7e3td+/ejcViy8vLFUfCKT9Ay5NX46lefVEVJ9IaBKlUyhvkarclc6fs99S9ePGiXC4/ceKE1+sNBoPT09O02zCbgdWDJBKJGscsoXUf2WyWtdXVarXlFVgSicRgMGxtbdERCwgh3LFZDQYDHeykubm5VCrJ5XJW3U4Iqa+vb2hoSCaTgUCg4ibv7OzQGwn3XwxvikwmUyqViUQiFArVWPiZz+dLpZJYLGYtCaRSqVar1Wq1YrHY4XDQYT13q7arBTclh7u9uznAviaEzMzMZDIZsVg8MjLy5s2bYDC4trbGG2D0Qw7pKqve16IqTmRl46yJQ8X5D5YzNdrtIsPaU/PGLN7t79Unsi1VqVS8YIW73g/Z0loOsypX1D0X2qhz2gAAIABJREFUcihnH3f5rAY5EolUab/F0ArBiqO8lK+CrT0ajZa39+TlQ5X7rEajCYfDgUAgn8+XN+MoFot0NIHqI0TUqMoSKr9nlvfnKvOoVCp6661e9CT6MHtuYS1aWlpo6+X5+XnaJq6WgdWy2eyf/vSnP/3pT6yZAiOVSmn5fDKZPPKywXI0Tsrn87y2b+Sfe8EdCtZp++LFizTef/nyJbcJOnse5fWFY8oTKRaLaW/DjY0N2t20Yot38o9CC6/XS+NIbqUJ/YkO9EkIMZlMvMOJ9kNjA/3ysNTuOaATRWvogsFgeafBYrFY3ib/4cOHf/rTnyrWc7OD8wOfbHgOd3srOsC+3t7epsMY0C5OdrudEDI1NcVrZ/cxD+ndlK+acLa0+v3mADlTu92uk6x2o7ylfzwer1IdULGFARvjtXoTB0G39LAc1tmnVqtp6LC2tlZxu3gT6Y6o2PGC21ibUiqVtLyWlovwfuVdUqrcQ+lVsVAouFyu8l/pIFWktntiFXver2st7Dqsu/7Rohcy2hC3qamplvoUuVxOLyJra2u87ql0XEK6qGOYPyw03tjY4E73+/2s7PrQT3uVSnX27FlCSCKRoANMUY2NjTQ8X1hYKO95FYlE/vd//5eXTvKPuyMrCdytwQ29usVisWg0WldXx73oy+Vyeu+kLebKGzt3dnbSgqvx8XHe+by9vU3Loqs0DeahBxghZHZ2lpu3pVJpdnaWd/sk/4iNgsEgre7hrZ1+qP4YtF+Hu70V7Xdf09HKCSFKpZIWaQwNDUml0kKh8P79e24ofySHNM/MzAzvOhAKhehttbW1tfol5QBnQTwer3GgAfaYzrtHsudvh8PBzcxkMjk2NkanVMy0mZkZ3mG5s7ND40JauVwlMQfYUvrQUn6OCGe/Zx/LYd4BIBKJaA0yHUeVt6hMJvP48ePJyUmWyfS51+fz8R5LVlZWaPaSf94j9KTIZDLccdMJIblcjtfgowqDwUADl8nJSV4mJ5NJOpxoQ0MDb5CIfd3XaplZSmpoH8pd3NE+yu+2STXmi9FoZHdBdm/Y06lTpx49epRKpe7du9fd3a3RaCQSCa0ZpUcMr+D3YA49ZLFYLDMzM3SAuXA4rNVqaYTEfebgtu06QAIq/sVms/l8vvX1dYfDodfr2cjiw8PDgUAgnU4/e/asu7ubjimZyWR8Pt/S0hIbe567zNbWVloFQAhpb2/f7darUqkaGxvpI7vJZOJ1dDSbzWzAt/KAo7Gx8fTp0+/fv/f5fPfv3+/v76cDP9OhvgkhCoWCjopTi5aWlu7u7pWVFZfL9fDhw+7ublp1ur6+XrFjRU9Pj8PhSKfTjx8/piMxy+VyOlY33U0Wi4XVqq6vr9PR9n75y19WH1mcKd9Bh7u9u9nXvqZDqhNCzpw5Q+86DQ0NQ0NDExMTbrfb6XSyQ2i/h/SBVTkXYrHYvXv3+vv76R2XtuKit4daXr2xr5yZm5ubmZmRyWR0YOnqS2YDq7x//76zs7NQKNB8o6PCRKNR2iLKbDZLJBI6nCXLq4rP8YVC4dGjRz09PbSKIRqNsvHmd+tDdOAtJYQ0NTXR9+FNTU21tbVJJJIDF7PVeCnb19lHOPHu7OysSCQSi8Wtra20EUZXV5fL5dre3p6bmwuHw11dXQ0NDbRh2eLiYjKZTCaTfX19bGafz1cqlR4+fNjX19fY2JjNZjc3N7mD33CjzM7OztXV1Wg0Ojk5GYlEzGazVCqNx+NLS0sVyykrEovFFy5cePjwYSaTuXfv3sDAAG1uEo1GZ2dnaQh1/vz5ip1m91T7veMgb4slRx12HFhjY2NrayutCa797SQ6ne7ixYtv3rxJJpO8FyARQnp7e8vHPz4OlErlxYsXX758WSqVVldXWewslUrPnDlDx4QtL8E7FMPDw36/P5FIvH37VqPR0GeshoaGr7766unTp4lEYnl5mfuKSEKI3W4/e/Ys78AViUQdHR20YfJu9SmUyWSiL5Io363ssqXRaCo20erp6cnn89PT05FI5OXLl9yflErl1atXd2vYVdHp06eTyaTb7aYvx2LTjUZjqVTiPe0pFIqrV68+f/6cvkmB13FRq9WOjIzUvuoaHe72VlT7vo5EIvShkI7lz+bp6upaXV2NxWLj4+NarZYm6QgPaW7CNjY2yp8sz5w5s9tgAVz7OgtokJrNZiORyJ4Bh06no9E57brPhq0Ui8Wjo6OPHz9Op9Mej4d7BA4ODtJ2uJFIpFQq8c6+c+fOTU9PLy4u0kiUGR4eriUU2O/5brPZlpeX6RtPCCEWi+VD6vVqsd+zT6FQWK3Wzc3NWCxG39B769YtemTSV0e9evXK7XbzMpkQ0tLScunSJXZamc3mnp6e5eXlXC43MzPDZmtsbOzs7KSPxPF4nLWBE4vFV65cefToUSKR2NjY4JYMDQ0Nzc/P19hNprW19cqVK2NjY5lMhteDVyqVXrx4sUqGf+CjPpu51pe37baajxN5HOLTv8FgCAaDLS0t+2rKZLPZWltb19bWfD4frfhUKpVardZe9g5xltTjUMlisVgaGxuXl5d9Pl86nabvhu7p6amvr49EItlstsZ3s+2Jt7EymWx0dJS+duH169dffvklLcZvamq6ffv21taW0+mkL4NWKpUtLS0dHR1arbZijtFer2SvysX29nZ6nSof0kqlUjU3N0cikSpLOHHiBH0ti8/nSyQSdXV1dFAgu92+35BfIpFcvnx5c3PT4XDQN1e1tLTY7XaLxVKxm35LS8vPfvYz+q6faDRKX1St0WjoW5q4jZrZubZnkvY89g5xe3dTy76m70ij28V7F7lEIjl79uzjx4/p28LYu10OcEhXzI39nqdsNoPBcOLECfrellgsJpPJtFotfefiIeYM1dPTs7Ozo1ara1m4VCq9cePGzMyM1+vN5XLc7hJqtfrWrVvLy8sulysejysUCp1O19PT09LS0tDQQKsPMpkMvSOyBOh0utu3b9PxEmOxWF1dnXBbSghpbm6+fv367OxsIBAQi8UHaFR7gEtu7Wcfde7cuaamps3NTfrKHu7JUldX98UXX3i93s3NzUAgQF9P39TUZLVaaakSdzlnzpxpb29fXV0NBoPFYpHO1tnZmc/naak5r5JLqVT+7Gc/W11d3dra2tnZoe+y7+rq0mq1Doej9noovV7/85//3OFw0H1KCKFnUGdn576qbveb1f93uv3ud7/j/XbgGOKTKPa4f/9+MBgcHh7e7V3ScKzMzs7Ozs4aDIarV68edVqO2MzMzNzcnEKh+NWvfnXUafnJCQaDdFCyK1euHOzVzQCftAM/QnP/eMChzfeVoA8JRA63nCASibD6lONQAgHVFQoF+uIiXtuOnyba0QZZceSQ/3DMHZ97Lm9puw5tTg6vxOKYnJ/FYpFWmLH2unDMrayspFKpuro6PFN6PJ5IJCIWi3kvPgUA4DkO99yKadhjpFHyiVSUVFEsFt1udyaT2draYu8RPepEQTU+ny+VSm1vbzscDkJIf3//Jze896Gj40wMDw8jVgaA46xKuLN3A7FPPewoFovPnz9nXwcGBmppTA5HaG5ujvWD1+l0FUdx/anp6+vT6/Xl790GADgm9ixZqbVF+qcbdtBuAtFotLm5uaenhw5eCcdZU1NTKBRSKBQ2m62/v/+wutJ86hBtAMDxVGtvr/JeKrX4FCMPAAAAOCz7bSxywD73vNUg/gAAAPi8fWBz1MMZ5GfPROw3IjkOjWwBAAA+Xcftzns4AceeEEAAAAB8TMftzlvr22IBAAAADgwBBwAAAAgOAQcAAAAIDgEHAAAACA4BBwAAAAgOAQcAAAAIDgEHAAAACA4BBwAAAAgOAQcAAAAIDgEHAAAACA4BBwAAAAgOAQcAAAAIDgEHAAAACA4BBwAAAAgOAQcAAAAIDgEHAAAACA4BBwAAAAgOAQcAAAAITnrUCahse3v7wYMHhJBr164ZjcajTg4AAAB8EJRwAAAAgOCOaQnHUZmdnZ2eniaE/PDDD1IpMgcAAOBwoITjn5RKpaNOAgAAwGcIAQcAAAAIDgEHAAAACO7Ta6aQz+e3tra2trZCoVA2m1UoFFqt1m63GwwG3pxPnjxxu91dXV3nz593Op3r6+uBQCCfzzc1NVkslu7u7rq6Ojqn0+l89uwZ978//vgjIUSpVH777bfc6ZFIxOFweL3eRCIhlUqbm5stFovdbpdIJNzZSqXS73//e0LI6Oio2WxeW1vb2tqKRqMikailpcVut9tsNpFIdOiZAwAAcDx9YgFHPB5/9uxZJBJhU5LJ5MbGxsbGRkdHx/nz58VifplNKpV6+fLl+vo6mxIKhUKh0Nra2tdff93Q0FD72hcWFiYmJtjXfD7v9Xq9Xu/CwsK1a9caGxvL/xKNRhcWFrgJpn9xOp2XLl3ihSkAAACfq08p4Mjlco8fP47FYlKp9MSJEzqdrq6uLplMLiwsbG9vOxwOtVrd39/P+5fb7SaEmEwmm82mUChSqdTy8nIgEIjFYmNjY9evXxeJREaj8fvvvyeEzM/Pz83NEUK+++47iUTCLYRYXl6m0UZLS0tfX19TU1Mul/N6vfPz87FY7OHDh7du3VIoFLy1z8/PE0J6e3v1er1EItnZ2Zmfn08mk06nc35+fmhoSMgMAwAAOC4+pYDD6XTGYjFCyBdffMEqUJqbm9vb2+/evRuJRJaWlvr6+sqrKk6dOjUwMMC+WiyWFy9eOJ1Ov9/v8XiMRqNYLKZFI6yARCqVcrvFxuPx9+/fE0J0Ot21a9fYT+3t7Tqd7vHjx8lkcnJy8uLFi+XJ/vrrr9vb29n8Fovl7t27iURidna2q6urvr7+MPIGAADgWPuUGo2q1erR0dHR0VF2/6YkEonVaiWEJJPJTCbD+5dKpTpx4gR3ilgsPnXqFP3MrWqpYnV1tVgsEkLOnTvHG5/DYDB0d3cTQhwORzwe5/2xu7ubl1qFQjE4OEgIKZVKLperlrUDAAB86j6lgEOj0djtdrvdXt5QQyaT0Q+FQoH3k1QqLS/zaGpqonGA1+utZeyNzc1NQoher29qair/tbOzk37Y3t4uX3v5/BaLhbbeCAQCe64aAADgM/ApValQhULB4/F4vd5IJJLJZGiEkcvl6K+1j9yl0Wh8Pl82m81kMuVtL7gymUwikSCE6HS6ijM0NzeLxeJischtHFpFXV2dWq0OhULRaLTG1AIAAHzSPrGAIxQKjY2N0ZYcH0ipVNIP+Xy++pzZbJZ+2C0uEYvF9fX1iUQinU7XvvZQKFReAQQAAPBZ+pQCjng8/uDBAzqQxtDQUFtbm1wup3UTKysrb9++PeoE7gMG4QAAgJ+UTyngWFpayufzMpns+vXr1StBapFMJumHPV/SxsYH261AolgsplIpQohcLq9x7bR5ae3zAwAAfNI+pUajXq+XEKLX6z882iCEhMNhQohcLt/zrq9QKGj9i9/vrzhDNBqlfViam5trWXU+n9/Z2SGEqNXqfaUZAADgE/UpBRy0ZShrH8pVpbVmoVAob0kai8U8Hg8hRK/Xc2s3dqvpsFgshBC3212x+YjD4aAfeD1gCSE0EOFxuVy04YhWq90t2QAAAJ+TTyngoOUBtH8Kd/rKysrKygr9XH6Dj8Vi7FeqVCrNzs7Sz3a7nfsTG2ucV3vS1dVF++K+e/eO1/N2e3t7aWmJLkqlUvHWvrKyEgwGuVOy2ezMzAwhRCwWm0wm7k8VxxEBAAD4DEhGRkaOOg0VJBIJWmxgs9nYO0okEsnW1hYhZGNjo1QqpdNpv98/MTGxvLzM/mi329nrUTY2NmiBhMfjicfjYrE4l8uFQqH37987nU5CiF6vHxoa4pZqZDIZOuRGIpGoq6sLh8M0ypHL5XV1dXQ5Ho+nrq6uWCzGYrHV1dW3b9+WSiWFQnHlyhVucxAa05RKpfX19WKxKBKJMpmMz+d79eoVTdXJkye5L5zb3Ny8d+/e0tKSwWDA8KMAAPCZ+ZQajVoslt7e3qWlpVwuNz09zaY3NTV1dnbSF53EYrHW1lbuv1QqVUtLy/r6Om9Q0aamptHRUV4dSnt7u1KpTCQSLpfL5XKxMUwJIb29vfl8fmpqKhwOj42N8VZx7dq1ii1LzGbzzs7O7OwsK1OhrFYr77UvdNCwYrEYCAQ0Gk2tmQIAAPAp+JQCDkLI2bNn29vbV1dXA4FAsVhUq9VWq7Wrqyufz9N6lvIqFalUevnyZe7r6dVqNe/19NyZb9y4MTMz4/F4crkc78Y/MDBgNBrX1tbo6+nr6uqam5tNJlNHR8duXV1UKtXFixcdDsfm5iZ9Pb1Go+no6LBarbxYx263u93uuro6o9H4odkEAABwzIh+97vfHXUahPLkyRO3293c3PzNN9985FWXSqXf//73hJD+/v7h4eGPvHYAAIDj5lNqNAoAAACfKAQcAAAAIDgEHAAAACA4BBwAAAAgOAQcAAAAILjPuZcKAAAAHBMo4QAAAADBIeAAAAAAwSHgAAAAAMEh4AAAAADBIeAAAAAAwSHgAAAAAMEh4AAAAADBIeAAAAAAwSHgAAAAAMEh4AAAAADBIeAAAAAAwSHgAAAAAMEh4AAAAADBIeAAAAAAwSHgAAAAAMEh4AAAAADBIeAAAAAAwSHgAAAAAMEh4AAAAADBIeAAAAAAwSHgAAAAAMEh4AAAAADBSY86AQBH77/+678IIf39/cPDw0edlk9YKBS6c+cOIeTKlStms/mok3PcTU1Nzc3NEUJ++9vfSiSSo04OgOCOY8Dx8OFDn89X+/zffvutUqkULj2C8vl8Y2NjTU1NV65ckclkR50cAAAAQRzHgOMnZWNjI51Op9PpcDjc3t5+1Mn5nM3Ozk5PTxNCfvjhB6kURz4AwEd1HC+7w8PDuVyOOyWVSo2NjRFCuru7rVYrb36FQvHxEnfYTCbT+vp6Y2Njc3PzUaflM1cqlY46CQAAP13HMeBoaWnhTYnFYvSDSqXS6XQfPUUCMplMP/zwg1iM1rsAAPA5+8TucyKR6KiTcPgQbQAAwGfvOJZwHMDS0tL4+Dgh5Pvvv/f7/YuLi8FgUKFQ/PKXv3zy5Inb7RaJRN99951cLuf98c6dO6FQSKFQ/OpXv9rtxs/q/r///vu6ujruT6lU6s9//jMh5OzZs729vdyf0un02tqay+Xa2dkplUoqlUqv13d1dTU2NnJnm5ubm5qaIoT8+te/Zsl79uyZ0+k0m81XrlyJRCIrKyterzeZTCqVSpPJ1NfXV19fX57OTCazvLzsdDrj8bhMJtNqtV1dXTqd7m9/+1skEjl16tTAwECVPPT7/ffv3yeEfPPNNwqFYmVlxeVyxWIxmUzW2tra09NDy5ZKpdLW1pbD4QiHw/l8vqmpyWKxdHd383KGKhaL6+vrW1tbdGalUtne3t7R0VFeiFVlD3KX5nK56KoLhUJjY6PJZOru7q7e2NbpdD579ow75ccffySEKJXKb7/9tnx+uopAIJDP59Vqtc1m6+rqqtiJIBKJOBwOn88Xj8dFIpFarTYajZ2dnbw6PtZ349atW83NzWtraxsbG5FIRCQStba2dnV17atDBz2u3G73zs4OIaSxsdFoNHZ1dZVXLB7sKCKE+P3+tbW1QCCQSqUaGhr0en13d3dTU1PtieTJ5XKPHz8OBAJisfirr77iFlLuuU+DweDdu3cJIYODgydPnuQt2ePxPH78mBBy4cKF5uZmms9Xr141mUzls4lEol//+te8o2ViYmJhYUEmk3333XfcK0Dt+Uy7OJ08ebK7u3tubs7pdCYSicuXL3Mrf30+38rKSiAQyOVyTU1NVqu1q6vrYJkJ8On6TAIOZmlpiQYHjM1mc7vdpVLJ6/XabDbuT8lkMhQKEULsdnuVYoYD1P0Hg8GnT5+m02k2JRKJRCKRpaWly5cv13iDKRQKq6urb968YVNisdjCwsLGxsaNGzdUKhV35p2dnYcPH6ZSKfo1n89vbGxsbGycOnUqk8nsK/Fer3dubi6bzbJFJZPJra2tc+fO2Wy2sbExt9vNZg6FQqFQaGNj4/r167xLeSKRePr0aSQSYVOi0Wg0Gl1aWjp58uTg4GDFtZfvQSqdTr948WJ7e5tNCQaDwWBweXn566+//pDbIVMsFl+9euVwOHircLlc165d48UcCwsLExMT3CmBQCAQCCwsLFy7dq2tra18+clk8u3bt/SQozwej8fjGRgYOHXqVC0p9Hq9L168YLuGpXBhYeHSpUtGo7H8L/s6iorF4sTExNLSEpuys7Ozs7OzsrJy6dIli8VSSyJ5isXi2NhYIBAghIyOjnKjjVr2qUajUalU8Xh8Y2NjaGiIV8bp8XjoB6PRKJPJZDJZNpv1+/3lAQchpFQqlf/k9XoJISaTiXsFOEA+J5PJ+/fv0+iEh3V/pegps7a2hmZb8FPzuQUc9F5lNBobGxvpHcJoNIrF4mKxuLW1xQs4WOfbwx0zIJPJPHnyJJPJyGSywcFB+jQfCoVmZmby+fyLFy9u376tVqv3XM729rbH42lqaurr61OpVLQAw+/3p1Kpqampy5cvsznz+fyTJ09otGGz2SwWS11dXSKRWFpaosUn+zIxMdHQ0DA4OKhWqwuFgs/no3eg8fHxzc3N7e1to9Fos9kUCgVdBY2l5ubmuINYZLPZhw8fxuNxQkh/f7/BYKirq4vFYouLi6FQaHp6WiKR9Pf3l6+9fA/SDXz06BEtFThx4oTBYBCJRMFgcGZmJpVKPX369Pbt27t1PDEajd9//z0hZH5+nl73v/vuO4lEUl49t7y8XCqV9Hp9Z2enXC6Px+Ozs7PJZNLn8zkcju7ubjanw+Gg0YZOp+vt7VWpVPl8fnt7e3Z2NpvNPn369Be/+EV5ucvY2FihUOju7jYYDBKJJBgMzs7OFovFubk5q9W65+0nFAo9efKkWCzK5fKBgYHW1lY6cXZ2NpPJPH369Pr161qtlvev2o8iQsj4+PjKygohxGazdXR0yGSyWCw2Ozu7s7NDO2/XctxylUqlN2/e0Aj17Nmz3If+GvepSCTq6OiYnp6Ox+PhcFij0XAXvrW1RQgxGAy04MFkMjkcDhpDcGdzOp30s8fj4QYc6XSaBsTcDmIHy+fV1VVCiEqlam9vl0gkDQ0NdLrD4aBHXUNDQ39/Pz2nvF7v0tJSxegE4DP2QQHH9vb2+Pg4PWN1Ot2ZM2fKi8o/MqVSee3aNe5lsa6uzmq1rq+vu1yubDbLvQ24XC5CSENDA72mHBan00kLFS5fvqzX6+lEnU7X1tZ27969YrG4srIyMjKy53IKhYLRaLx8+TK7lZrN5gcPHgQCgc3NzQsXLrDpq6ur9NbOqzexWq1jY2N0M2unUqlu3rzJio5NJlNbW9uLFy+KxeL29nZ3d/fIyAi7W1ut1nv37kUikbW1tdOnT7Pp9A5BCLl27Rp7ItRoNGaz+enTp16vd2JiwmAwlN/AyvcgIWRubo4eZteuXTMYDHRiW1tbS0vLgwcPYrHY+vo6NyDgEovF9OGVPcJKpdKK0UmpVBoaGhoaGqJf29vbjUbjX//613w+v7m5yZZfKpUmJycJITqd7ssvv2RRUVtbm0qlevHiRSaTcbvddrudt/xisfjll1+y9Ov1eo1GQ2sE3G539YCDlr4Ui0WFQnHz5k1WMtHW1mYyme7evZtOp1+9evXzn/+cVxJT+1HkdrtptMGtvNBoNO3t7X/729/S6fTs7CwvQNnT1NQULTE6ceIEr86x9n1qNptpGOp2u7kBRzgcpkE2i2P0er3D4YhEIul0mh3AkUgkmUzSz1tbW2fPnmVHAittYuUuB85nmm+Dg4PckpJcLvf+/XtCSH19/c2bN1kUYjQajUbjo0eP9pWZAJ+6gzdXdDqdDx48YAXm29vbf//738Ph8CEl7IDOnz9ffg+j1yNaq8Im5nI5+uBlt9sPty1qIpGgH3jl6m1tbXa7XaPR8Dr97qauro57PyCEiMXijo4O+pnezil6n5DL5X19fdwlSKXSWiIbnqGhIV5FNS0yIYSIRKJTp05xs0sqldLszWazrEInlUrRB76Ojg5e+bNEImFJWl5eLl97+R7M5XKLi4uEkM7OTnZnonQ6Hb1VrK2t7Xczy+l0Ol5FT319PX0gDgaDbGKxWBweHh4dHT1z5gzvrsM2NhqNli9/aGiIl369Xk8jYG7FU0Ver5cu8/Tp07x6EKVSeebMGUJIPB4vDy5rP4poJqtUKl5bH4VC0dPTQwjZ3Nzk1hLuaXFxcX5+nhDS0dHBqzPa1z5Vq9U0ztjY2ODWb7LTmS2BFTxw9xctyOzq6pJKpZlMhnuNohU9zc3NLBQ4cD7rdLqhoSFezazH46H1MoODg2wVFG0ZU5ZnAJ+zgwccr169qnHix1TxMbG9vZ1e1lnJKiHE7/cXi0Vy2PUphBB2ZSm/Ko2Ojt66dWt0dLSW5SiVyvIWaqyhH4takskk7Tbc2dlZ/tRVsS1ndeV/EYlEdCxXrVZbXlNQniSWt52dneXLpw0DCSFbW1vl7WPK96DP5ysUCoQQXo0YRXdfKBTi1rgfjEajKQ896d4sFAo0DYQQiURit9vtdnt5eR4rO6kYU5ZvGsvYPRNPg2OJRFKxIYXZbKZ7jdu8hqr9KKI35o6OjvKjiN3R9wyMmM3NTfpwbzAYzp07x8vY/e5TWlwUi8W4kRw9nU0mE9vAhoYGmsl+v583m9lsplnHfeqgzUe4MfGB87niwcOap1RcGkYWhp+aA1aphMPhipfUSCTCq7Y4DiQSic1moz04WPLoJUOlUh16NZDVap2bm0smk2NjY1tbWxaLpa2t7dAHX2e3alagImgbNProVrEmgl1nWZLYbWm3vNXpdC6XK5PJ0H4Q1VfNRmERi8XlJQfsmTKRSAhx4JVvHTdhTqczGAzG43FuG9tleVZAAAAgAElEQVQDLH/Phsm08F+r1VbcBRKJRKvVut1u7pN9Ldh6WVGHTCYrz2QaPpJ/LhGpIhgM0nY/CoXi0qVL5RHMfvep2WymnZhY3VMikaB5whsJ0GQyRSIRj8dDWxSlUinaO0ar1RYKBYfD4XQ6aTlWNpulJRy8Bhzk8PKZblpjY2N5/ziAn6ADBhxVKgWOYcBBCLFarcvLy7QVgtlsLhaL9Lnn0OtTCCEymezGjRvv3793/gMhpLGx0Waz2e12Xjnth2P7Yrdejh8fbcIil8t3a8jJHkkzmcyeAQerqaG9dndTY0XVoSgWi1NTUwsLCx9tjTQTquximo0s+twv1pXp3bt3VWarsRiJ1qQQQtLpdCAQKO/Wsd99Snvner3e9fV1WuNDy2NEIhFrJkW1t7fPzs5Go9FkMtnQ0EBnM5lMUqlUp9OJRKJwOJxIJJRKJa1bEYvF3CZch5vPNFcP/ZQH+EQdMODYbbjPurq643l2tbW1NTQ0JJNJOjJBOBymtdG8PnKHRalU0sEPnE6nx+MJBoOxWGxmZmZ2dpa2LBNiBLPjMypa7R2Ja0lzjWUG7Cn8I5icnKRNEPr6+mw2W2NjI+1PQQj58ccf91vIcRywCqPqas9khUIhEolSqdSrV69u377NCysPsE9tNpvX693Z2YlEIs3NzayihFd4oNFoaK+0UCjU0NBACzJpxCOTyQwGg9vt9vl8nZ2dtHjDYDAI92IdeiIcnxMT4Ggd/EwbGhqamZkpn/hh6REK7Vw3Ozu7ubk5MjJC63GbmpoErYZobm5ubm4eGhqiYwPMz88HAoGZmZm6ujpe684PwZpcsKfGI0fvAZlMJp/PV7yas+fpWpqYsAKzf/u3fzsOo7Imk0kabXC7tAitvr4+lUpV2cU0gN6zuGg3bEfcunWL2xPkwEv76quv0un0o0ePMpnM27dvr169yr3vHmCfsv7tHo9HqVTSU7i8bYRUKjUajU6nc3t7W6/X04CDVZqYzWa32+12uzs7O2kDC16T1cPN5/r6+lgsVmM9FMBn7+CX7/Kr7eDg4CHeRw8dbYlGa1Vo9/0a61PYBbGWB/dSqZTL5XK5HPfhTCaTmUymr776io5lxB1Y6cOxIqWKPSOOBAvjdmtjSNv0yeXyWi7cbGzWY3LhZn0pD725cRU0CPD7/RXLBuhRTQg5cAdv1sao9mahVZw9e7a5uVmv19PqD7fbzeuRdIB9KpfLaXnkxsbG9vZ2sVgUi8W8+hSKTvR6vcFgMJ/Pt7a2ssOMRh5utzudTtODkDeixuHmM+1vFYvFPrxFM8Bn4IOeF4eGhn75y19euXLl66+//s1vflM+8PCx0tLSQm+EbACAiiMGlmNPY+V9AssH8cxms3/4wx/+8Ic/cMcWpKRSKb0UJhKJQ3xzaX19Pd2u1dXV8oLx/Q4zeihoZTkhhDtqJ5NIJGh5uMViqSXgY/V3FZdGai7nP6ySbXYrKm81Eo/Ha6yb2C/6IF4oFLg9rRg6xgyp+ZAup1ar6V15dXW1Yn7uq8aKlZcMDg7Se/P79++5oczB9int0kJHmSOEWCyWis3F6MJ3dnZolMONC5VKpUajKRaL8/PzxWKxoaGBN0bt4eYzextAxaXtq48xwGfgQwuoVSqV2Wxm/U6POdq5jrYwV6vVNdansNlouQiTzWZpy3kuuVxOr7Bra2u8C0qhUKAPVWq1+nCrdWmH/nQ6zSs7yeVy1dsACqS+vp6+KmJ1dZUNPk0Vi8V3797ReKvGcQgaGxtpyfn8/DxvaYSQSCTy17/+dWNjY8/lsL4SHxiEscKAtbU1buCYTCZfvHhBpxx6gxKDwUBvjRMTE7wWi8lkknZApS9JOdjy6XCfhBA6/inv10wm8+jRo4mJif1ul0QiuXjxokQiKZVKY2NjLFY72D7V6/W0ho6ewrsNtd7U1ET3Eb3N80pB6L9opZjJZOKdiYebz2wI1JmZGd7VwO12Vxw8plQqxePxT7EZEMCePrehzaszmUzs/RflA0Huhr3NYXp6OpVK0Ycb+vxUsbH66dOnHzx4kEwm79y509PT09raKpFIEonE8vIybRhPh1E6RB0dHSsrK5FIZHJyMhqN0tECYrHYEQ6ffOrUKY/Hk0gknjx50tfXZzQapVJpPB6nb2WjM9TegObMmTN+vz+dTj958qSnp8dkMsnl8kwm4/V6FxcXaZ8jq9VaPYxjxfjj4+NdXV35fJ7Xo7JGra2tzc3N9M1tmUzGbDZLJJJIJLK8vMzuE4desCQWiy9cuPDgwYN0On3nzp3BwUFa+B+JRNjNjDfA1351dXU5nU6fzzc7OxsOh7u6upRKZT6fD4VCCwsLyWQymUz29/eXj+pRXVNT08jIyOvXr6PR6OTkJBv27QD7VCqV2mw2OqacRCLhdmflMZlMNPhm5X+MwWCgA8WSf+4QS4nF4osXL96/f/9Q8lkqlZ49e/bFixf0akCHNs/n8x6Phw7WV258fHx5eVmpVN6+ffuTeIoDqN1PK+BobGxsa2ujrdNrfxYUi8Wjo6OPHj3K5/MrKyvcK0V3d3f5hUOn042Ojr5+/TqZTLJLG9PX13foL4qUSCRXrlyhUc76+vr6+jr76cSJE6yP4sckk8m+/vrrJ0+e7OzsLCws8HqQDg4O0ufpGjU0NFy/fv3JkyfxeHxpaYlXkNPR0cEdbX037e3tSqUykUi4XC6XyyWRSA4WcIjF4kuXLj18+DCdTtMWiOynoaEht9sdCoXC4XCpVDrccqy2trZr1649f/48k8nwitakUuno6GiVG3AtxGLxlStXXr586XK5eNtFCNFoNJcvX95vtEF1dnZ6vd7Nzc3l5WW9Xk9PvYPtU6vVSgMOq9VapcWxXq+nCyyvtlOr1fQwIGUNOKjW1tZDzGer1RqPx6emppLJJHdpKpXKaDSWN+ei2Z5IJOLx+Ie33gU4Vn5aAQchxGAwBAIBjUazr/eLtrW13b59e3FxkTY3UygUWq22o6NDp9NVfFKx2+2tra1ra2s+ny8WixUKBaVSqdPp7HZ7xWvch1OpVN98883S0tLW1lYsFpPL5Tqdrru7W61W04Dj4/fNU6lUt2/f3tjYoK+nz2az9PX0nZ2dB7iSNjU1ffPNN5ubm06nMxQK5XI5Wh9P90ItWyeVSm/cuDEzM+PxeHK53IdczdVq9e3bt+lQcvF4XKFQtLe39/T0aDSahoYG2q4wk8kc7PZchV6v/8UvfrG2tuZyubivTe/s7Dxw/xSuurq6K1eueDyezc1N+oK3+vp6tVpttVotFkv5+F21GxkZCQQCyWTy9evXrJfsAfYpa61Z/dW17K0CvE4ohBCRSGS1Wufn53U63W7jcR1uPg8MDLS1tdF35uXz+aamJovF0tXVRV/hxpu5v79/ampKp9Pt9z15AMef6He/+91Rp+GjunfvXiAQOHPmzHHuUHOIEonEf//3fxNCzp8/f+glKwAfmdfrffTokVQq/e6774QbPwMAhHD0oxp8TJFIhNanHLgx/7GVSqUq9nyh20sI2VeJDsDxRHu12Gw2RBsAn5yfUMBRLBbpSGUGg4G1H/w8ZDKZhw8fTk5O8joRpFIp+l5vWlJ9RKkDOByBQIB2Xam9xTcAHB+f/1NCsVh0u92ZTGZzc5O+WGFfzRU/CeFweGdnZ2dnZ3t7m7bbKJVKoVBofn6ejplY/iJ1gE9FJBLZ2dmJRqO0xUN7e7tADaEAQFA/iYDj2bNn7OvAwMBuL4L5dOn1+kuXLr19+zYUCr1+/Zr7k0gkOn/+/MccExPgcLlcLlpQRwiRy+UXLlw42vQAwMF8/gGHSCRqaWmJRqPNzc29vb10sMLPj81ma29v39zc9Hg8oVCoUCioVCqDwdDZ2fmZ1R/BT019fb1CoSgWiyaT6eTJk4fSHwcAPr6fXC8VAAAA+Ph+Qo1GAQAA4Kgg4AAAAADBIeAAAAAAwSHgAAAAAMEh4AAAAADBIeAAAAAAwSHgAAAAAMEh4AAAAADBIeAAAAAAwSHgAAAAAMEh4AAAAADBIeAAAAAAwSHgAAAAAMEh4AAAAADBIeAAAAAAwSHgAAAAAMEh4AAAAADBIeAAAAAAwSHgAAAAAMEh4AAAAADBIeAAAAAAwSHgAAAAAMEh4AAAAADBIeAAAAAAwSHgAAAAAMEh4AAAAADBIeAAAAAAwSHgAAAAAMEh4AAAAADBIeAAAAAAwSHgAAAAAMEh4AAAAADBIeAAAAAAwSHgAAAAAMEh4AAAAADBIeAAAAAAwSHgAAAAAMEh4AAAAADBIeAAAAAAwSHgAAAAAMEh4AAAAADBIeAAAAAAwSHgAAAAAMEh4AAAAADBIeAAAAAAwSHgAAAAAMEh4AAAAADBIeAAAAAAwSHgAAAAAMEh4AAAAADBIeAAAAAAwSHgAAAAAMEh4AAAAADBIeAAAAAAwSHgAAAAAMEh4AAAAADBIeAAAAAAwSHgAAAAAMEh4AAAAADBIeAAAAAAwSHgAAAAAMEh4AAAAADBIeAAAAAAwSHgAAAAAMEh4AAAAADBSfP5/FGnAQAAAD5zKOEAAAAAwSHgAAAAAMEh4AAAAADBIeAAAAAAwSHgAAAAAMEh4AAAAADBIeAAAAAAwSHgAAAAAMEh4AAAAADBIeAAAAAAwSHgAAAAAMEh4AAAAADBIeAAAAAAwSHgAAAAAMEh4AAAAADBIeAAAAAAwSHgAAAAAMEh4AAAAADBIeAAAAAAwSHgAAAAAMEh4AAAAADBIeAAAAAAwSHgAAAAAMEh4AAAAADBIeAAAAAAwSHgAAAAAMEh4AAAAADBIeAAAAAAwSHgAAAAAMEh4AAAAADBIeAAAAAAwSHgAAAAAMEh4AAAAADBIeAAAAAAwSHgAAAAAMEh4AAAAADBIeAAAAAAwSHgAAAAAMEh4AAAAADBIeAAAAAAwSHgAAAAAMEh4AAAAADBIeAAAAAAwSHgAAAAAMEh4AAAAADBIeAAAAAAwSHgAAAAAMEh4AAAAADBIeAAAAAAwSHgAAAAAMEh4AAAAADBIeAAAAAAwSHgAAAAAMEh4AAAAADBIeAAAAAAwSHgAAAAAMEh4AAAAADBIeAAAAAAwSHgAAAAAMEh4AAAAADBIeAAAAAAwSHgAAAAAMEh4AAAAADBIeAAAAAAwSHgAAAAAMEh4AAAAADBIeAAAAAAwSHgAAAAAMEh4AAAAADBIeAAAAAAwSHgAAAAAMEh4AAAAADBIeAAAAAAwSHgAAAAAMEh4AAAAADBSY86AcdIKBR68+ZNJBKxWCznzp2TyWRHnSIAAIDPBAKO//PkyZNQKEQIWVhYaGhoGB4ePuoUAQAAfCY+XsBRLBb/8z//s1Qq0a9ms/lnP/uZSCQqn/Pdu3eTk5P0s0aj+e677z5C8gqFAo02qJ2dnY+wUgAAgJ+Ij1rCwaINQojT6XQ4HJ2dnR8zAVVIJJLe3t6lpSX61Wq1fuQE7Ozs/OEPf2BZ9MMPPzQ1NX3kNAAAAAjkKKtU3r59azQaFQrFEaaB69KlS0ajMZlMtrW16fX6j58AbkAGAADwOTnKgCMej09PT58/f/4I08AlkUiOT4kLAADA5+SIu8VOT08HAoGjTQMAAAAI7eh7qbx58+b27dtica2hTz6fd7lcLpfL7/fH43GpVKpWq41GY2dnp0qlYrP9z//8z/b2Nv08NDR04cIF7kIWFhZevHhBP9fX1//2t7+VSqV37txxOp104oULF4aGhrh/KZVKW1tbDofD7/dns9nm5maLxdLT07O1tfX06VM6z+jo6MDAAPdf0Wh0Y2PD6/VGo9FMJqNUKrVardVqNZvNbJOnpqbevn3L28wff/yREKJQKP7jP/6DOz2dTq+vrzudzkgkks1mVSqVTqezWq1Go7HGDAQAAPj4jj7g8Hg8Kysrvb29tcwcCoWeP3/u9/vZlEwmk0gk3G73xMTExYsX+/r66HS73c4Cjq2trfPnz3N7xLjdbva5s7NTKuXnA685RS6Xe/bsmcPhYFO8Xq/X611aWmpra6uY1GKxOD09/e7dO+7EbDYbDoeXlpaMRuPVq1eVSmX5uqrY2tp6/vx5MplkU9LpdCAQmJub6+rqunz5cl1dXY2LAgAA+JiOrEpFrVazz+/evePeRHezs7Nz584dbrTBlc/nnz9/vra2Rr9yn/ij0Si3m2sul2MlGYQQs9m856rHxsa40QZ3yaurqxX/Mj4+zos2uNxu9/3793O53J6rZra2tu7evbtbRq2urj5//hzNTgEA4Hg6shKOvr4+p9NJSxpSqdTk5OSlS5eq/2ViYoLdbhsbG0+dOtXY2JhKpWZmZoLBIJ3+5s0bm80mkUg0Gk1rayub7vf7WYgTDAbz+Tz9LJfLdTpd9fU6nc6VlRX2ta6urqOjQ6FQRCKRzc3Nin8JhUJTU1Psa29vr81mE4lEXq+XTQ8EAg6Ho7e3t7u722w2JxKJe/fusb/cvHlTqVSyUplkMvns2TP2q0wms9vtCoXC7/d7PB46cW1tzW632+326psDAADw8R1ZwCEWi8+dO/eXv/yFfp2fn+/s7Gxvb99t/mKxyEovCCHnz59nd9bW1tY//vGP9HMikQiFQlqtlhDS0dHBAg6v19vd3U0/s6oWOs+e1RALCwvsc0NDw+3bt1taWuhXp9N5586d8r9wV6HRaC5fvkxbbJjN5mw2yxbocrl6e3uVSqVSqeQlo7m5mTsOx9LSUiqVop/r6+u/+eYbmoZSqTQ5OTk+Pk5/mpubo5FN9S0CAAD4yI6yDUdbW9upU6fYE//r16//5V/+RSKRVJxZLBb/+7//O/vKvT03NzcrFIp0Ok2/shuzyWRijTG3traKxSK967tcLvZfi8VSPZHpdJpbjHHy5EkWbRBCzGazXq/3er28f3V3d3d0dNDPIpGI2yRWp9OxgKPG8UxLpdLi4iL7Ojw8zNIgEokGBwenpqZomY3X600kEtzGswAAAMfBETcaPXnypMPhiMVihBC/37+4uMjr5cEll8vph3Q67fP54vF4LpcrFAqEkGKxyGZj1SUajaa5uTkSiRBCUqlUKBRqa2tLpVKsDqKurq5KmQoVjUa5X2scgVQqldKGqKVSKRwO7+zspNNp2mKDFboQQrLZbC1L29nZSSQS7KtOp+M1/tBoNKxMZWdnBwEHAAAcN0cccMjl8nPnzj18+JB+HR8fr35Hj8fjU1NTS0tL3AhjNyKRqLOzk1U3bG9vt7W1cYf9sNvte74SNpPJsM9isZj2K6lFqVRyOBxTU1PcV7QcDCuzof785z9XmZmbYAAAgGPiiAf+IoTY7XYWZGSzWRYflAuHw3/9618XFhZqiTYok8nEPtOCDZ/Px6bsWZ9COOUlhBCVSlX7eCFv3rx59OjRh0cbhJB9dWahRT4AAADHytGPwyESic6dO+d0OmkYsbKywu0xy5RKpbGxMVaz0NbWNjIy0traKpfLRSLR73//e26lA9Pa2trU1ESbSjidzmw2yzrESiQSg8GwZ/K4bUoSiQRrCFKd0+mcmZlhX0+fPt3b29vQ0CCRSFZXVx8/frznErhqj3IAAACOp6MPOAghzc3Nw8PDrGyD12yCCoVC3LaZV65c0Wg0ey5ZLBZ3dHTQl90XCgWHw8GKHGw2G2sUUgX33XKFQiGZTNbSQoLboaanp2dkZGTPv9SYBkLIb37zm+bm5g9ZIAAAwEd2XB6dBwYGqt9E4/E4+6xQKLhdRarjjus1MTHBPtfY/JNX3MIdMawKbk1KLeUo5bhDeKnVam5stLGxUT5/NptFZQoAABxbxyXgkMlktb82Np1OcytQ1tfXK9anUFqtlrX05M5WYxygUCi4ocnU1BS3L+vm5mZ5n1iecDjMPmez2d1GJuX1B6Y9dyipVMod+v3du3fcEhRCSDQaffjw4atXr2pv3QIAAPAxHYsqFcpisXR2dvJupQyv/OPBgwf9/f1isdjn83HHqCgnFos7Ozunp6e5E202W319fY0J6+/vZ0NxxOPxv/zlL3SUz1AotFuBR3t7OyvkmJ6eLpVKtEfu4uIi7aZLcYsx5HK5WCxmEcPTp0+tVmupVDp37pxCoRgYGFhZWWHdVR49ejQ/P6/VaiUSSTgcZsmTy+UfWH0DAAAghGMUcBBCzp49u7m5ye0YwqjV6p6enuXlZfo1EAhwh/rmKv+72WwuDzhqT5XZbO7u7v7/7d3ZU1tnnv/x50gCISHJArEIkNjN5pjFdnuJne5Ou5J0jX01VcnlJJWr+Rs68y9033bfui+mpqov7ZqantgeZ1Lt3cbYaWMW2QIECCEQktC+nN/F8+tTGhnjBR/JkPfrCh89OucRRXI+ep7v8xxtd/NsNjs7O7v7WwYHB2dmZrT0UFpAWiqTyaiqKjcGNZlMXV1d2hNbZDoRQhw7dkwIUV9f/8knn1y9elU759raWumKG6lQKGgnBADgw/GhTKlIDodD3l93dOrUqR0LLxobG0vnR0qrPaSWlpay8Yy3fZj7mTNntJ1DS3V3d+9Yu9rY2Pjpp5/uuMlHX1+f9nMulyvdY2NsbKysPrSUx+P57W9/u+MSHiGE0Wg8ffr0iRMnSBsAgA+QcWJiojJXUlW1tGbT4/HIJ56UaWxsDAQCpc8NGRoakj8bjcbu7m6n06mqai6XMxqNLS0tR44cOXnypMFg0KYV8vn8wMBA6X3XYDAkk0ntMbMej0c7Zymfz6fVZ3R0dJRuQmo0Gru6uhobGxVFKRQKiqK43e7x8fGJiYmnT59qe2319PS4XC75s9Pp7O7urqmpyefz+Xzebrf39PScOnVqaGhobm5O21rD7XZrGcJisXR1dRkMBrmDqt1u93q9nZ2dWnmHzWY7fPhwQ0ODjDLFYtFutzc3Nw8PD585c6ajo4O0AQD4MCnffvtttfuwP+w4VZFMJv/jP/5D++fnn3/+Jg+7BwDg5+bDmlL5YGUymf/6r//SHsIi5fP5Bw8elB7RhjcAAECpD6to9MOkquqdO3dWV1dXV1c7Ojo6Ojpqa2uTyaTf7y/db+PIkSNvvvIFAICfFQLH60WjUa1AZHl5ufTp9prm5uaxsbHK9gsAgH2jckWj+1ddXZ3b7d7c3Ewmkzs26O/vP3fuHMMbAAC8CiMcb6SlpeXChQvLy8urq6tra2vxeLympsbhcLS0tHR2djY1NVW7gwAAfNAIHG/KaDR2dna+4RNYAABAKVapAAAA3RE4AACA7ggcAABAdwQOAACgOwIHAADQHYEDAADojsABAAB0R+AAAAC6I3AAAADdETgAAIDuCBwAAEB3BA4AAKA7AgcAANAdgQMAAOiOwAEAAHRH4AAAALojcAAAAN0ROAAAgO4IHAAAQHcEDgAAoDsCBwAA0B2BAwAA6I7AAQAAdEfgAAAAuiNwAAAA3RE4AACA7ggcAABAdwQOAACgOwIHAADQHYEDAADojsABAAB0R+AAAAC6I3AAAADdETgAAIDuCBwAAEB3BA4AAKA7AgcAANAdgQMAAOiOwAEAAHRH4AAAALojcAAAAN0ROAAAgO4IHAAAQHcEDgAAoDsCBwAA0B2BAwAA6I7AAQAAdEfgAAAAuiNwAAAA3RE4AACA7ggcAABAdwQOAACgO1O1O/BKP/zwQywWO336dHNzc7X7AgAA9qRqgSMUCt25c8dkMn322Wcm087dUFVVVdUKd+wNZTKZ//7v/xZCfPbZZ3V1dS83uHz5shDik08+cTqdle4cAAAfmKpNqSwtLamqmsvl1tbWqtWHHeVyucuXL1++fDmTyby28e556INNSwAAVFh1Akc6nV5dXVUURQixtLRUlT7sjqwAAMB7VJ3Asbq6WiwWe3p6rFZrKBRKJBJV6QYAAKiM6tRwLC4uCiE6OjpqampmZmaWl5cHBgZe1TgYDPr9/q2tLUVRXC5XX19fQ0NDWZtcLre4uLiyshKPx00mk9Pp9Hq9brdbDqJI169fTyQSZ8+ebWxs1A5ms9m//vWvQojPP/98Y2PjwYMH4h/DG7JEY3R0tKur67186mKxuLi4uLy8HI1GhRAOh6Ojo6Orq8tgYK0QAOCAq0LgiEQisVjMZrM5nU6j0Tg7O7u4uNjf37/jfXd+fn5jY6OmpsZisSQSiZWVldXV1ZMnT7a2tmptUqnUnTt34vG4wWBwOp25XC4YDAaDwc7OztHR0dLTvqoKVR60WCydnZ3FYlHO8ng8HoPBUF9f/14+dbFYvHv37vr6uqIoDodDVdVIJLK5uSk/zqvKZgEAOBiqcJ9bXl5WVdXr9cpbr8PhiEaj4XC4paXl5cabm5sTExPt7e0GgyGfz8/Ozs7Pz09OTv7mN7+pra0VQhSLxYcPH8ZisY6OjqNHj8qDsVjs7t27i4uLNputv7//DTvW0NDQ0NCQy+UCgYCqqiMjI2az+X196kAgsL6+Xl9ff/r0aavVKoTY3t6+fft2OBxeXFzs7e19XxcCAOADVOnB/Hw+L8cP3G63POL1eoUQgUBgx/bDw8NypEEIYTKZhoaG6uvrs9lsMBiUDUKh0ObmptlsHhsbk2lDCOFwOEZHRxVFmZ2dfZPFJhWwtbUlY5ZMG0IIm802ODhoNpsjkUh1+wYAgN4qHThCoVA+n29oaLDb7fKIrLRYWVnZMRlozSSDwSADysbGhjwSDAZVVe3p6SmblWhubrbb7fl8XmtZXXKvjvX19Xw+rx30er1ffPHF8ePHq9cvAAAqodKBY3FxUX7R145YrdampqZisbi6uvomZ7DZbEKI7e1t+U+tALOsmaIosrZUa1ldXV1ddrs9HA5fvXr18ePHgUAgmUxWu1MAAFRIRWs4EonE+vq6EKK05FMI4fF41tfXFxcXu7u7X3uS2tpaRVG0cYJcLicPvtxSVmCUjihUkdls/uSTTwKBgP8fFEVpbm4eGBgoXTUDAMCBVNHAsbKyIteDXL16tfS4PLi1tbW1tfXajV0NkEQAACAASURBVMCz2ayqqtoESk1NjfhH7Cgj52h0WgCiLbgtFosvv6qthSldl2symbq7u7u7u5PJZCQSCQaDy8vL6+vrZYtuAAA4eCoXOIrF4sLCghCivr7eaDSWvZpOp7PZ7PLy8msDh5wikRMrQohDhw5Fo9FYLPbyPVvOtmgt5UXf1xaiJpNJURRVVTOZjFYHqkmn0/IHOfQimwkhzGazoihWq9VqtXZ0dDgcjunp6bm5OQIHAOBgq1zg2NjYSKVSNTU1v/rVr14edVhbW5MLWQcHB0tfjcVipctl5d5ZQoimpiZ5xO12Ly4uvnjxoqxuNBwOR6NRo9HocrnkETnDokUB6Z0LKQwGQ0tLSzAYDAQCL29EJsdyHA6HxWIRQhQKhe+//14I8atf/aq03MTlcimKkkql3q0PAADsF5UrGpWbW3i93h3nOJqbm+vq6nK5XCgUKj0+PT29uLgopy3y+fzTp0+TyWRdXZ22qralpaWxsTGdTj9+/DibzcqDsVjs8ePHqqoODAxoe2nI5DE/P6+FjM3NzYcPH5aNeRiNRjkPIgdIdtHf368oyosXL/7+979rOSaXy83Pzz99+lQIMTg4KA+aTKaOjg5VVZ8+farFi1wu5/f7VVXVIhEAAAdVhUY45HSJEMLj8ezYwGAwdHV1PXv2bHFxsb29XTvudrunpqb+/ve/WyyWZDKZz+cVRRkfH5elG/KNx44du3PnTiAQWF1dPXToUKFQiMViMtz09fVpp/J6vX6/PxaLXb9+vb6+PpfLZTKZsmW38oRtbW3Ly8t37tyxWq09PT2v2pWrsbFxYmJiamrK5/M9f/68rq7OYDAkk0lVVQ0Gw+joaFtbm9Z4ZGQkFouFQqGrV6/a7Xaj0RiPx/P5vMVi0XIJAAAHlXFiYqICl1leXl5dXXU6nbvcXOvq6vx+fyKR8Hg8tbW1CwsLmUzm5MmTzc3NmUxG7lze2to6MTFRNiRQU1Mj35LL5eLxeLFYdLlcw8PDhw8fLt3X3GQytbe3F4vFVCqVyWQsFktPT8/Ro0d9Pp8Qor+/Xxt6cblchUIhlUopiuJ2u19ec6txOBwej6empqZQKKTT6Xw+73A4Ojs7x8bGmpubS1vKQY7a2tpCobC9vZ3JZGw2W3d399jYmJx2AQDgAFO+/fbbavcBAAAccDynFAAA6I7AAQAAdEfgAAAAuiNwAAAA3RE4AACA7ggcAABAdwQOAACgOwIHAADQHYEDAADojsABAAB0R+AAAAC6I3AAAADdETgAAIDuCBwAAEB3BA4AAKA7AgcAANAdgQMAAOiOwAEAAHRH4AAAALojcAAAAN0ROAAAgO4IHAAAQHcEDgAAoDsCBwAA0B2BAwAA6I7AAQAAdEfgAAAAuiNwAAAA3RE4AACA7ggcAABAdwQOAACgOwIHAADQHYEDAADozlTh6+VyuUAgEAwGY7FYPp+vq6tzuVwej6epqamS3Xj+/Pns7OzRo0c7OjoqeV0AAH6eKho4YrHY3bt3k8mkEMJkMpnN5kQikUgklpaW+vr6hoeHFUWpTE/C4XA2m93Y2CBwAABQAZULHPl8/t69e8lksrW1dWRkxGazKYpSKBSCweCTJ0/m5+ctFktPT09lOnPkyBG3293S0lKZywEA8DNXuRqOcDicTCZra2uPHTtmt9vlYIbRaOzo6BgbGxNCPHv2LJ/P7+USxWLxDVvW19d3dnbW1dXt5XIAAOANVW6EI5VKqarqcDhqamrKXmpublYUJZfLbW9vO51O7XgwGFxYWNja2hJCHDp0qLOzs62tTZt2efbs2dzc3PDwsMVief78eTQaHR4erq2tffToUUtLy6lTp0ovkUgkrl+/bjKZPvvsM5PJ9Pjx44WFhZGRkb6+Pq1NoVBYXFxcWVmJx+Pyil6vt6Ojo2yiJ5VK+f3+tbW1ZDJpsVhaWlr6+vrKsksmk3nx4sXa2tr29rbJZGpoaOjs7HS73e/h9wgAwD5UucBhsViEENFoNJ1Ol92eTSbThQsXhBDarb1YLD5+/HhpaUkI4XA4FEUJhUKhUKi/v39kZES2UVVVVdWFhYVkMmk0Guvr641GY0tLi2ycyWTMZrN2iVAopKpqR0eHyWTS3lvah1wud+fOnUgkoiiKw+EoFovhcHh9fX19fX18fFzr2Obm5r179+TJnU5nPB73+XzLy8tnz56tr6+XbZLJ5M2bN+VwjtPpzGQywWAwGAwePnx4eHhYh18tAAAfusoFjubmZpvNtr29fffu3Y8++qixsbH0VYPh/0zu+Hy+paUlp9N57NgxeSOPx+M3b96cn593u92l700kEiMjIz09PUajUR5pa2tbXl5eX1/3eDxas2AwKIRob29/Vfemp6c3NzebmpomJiZkNpIlrktLS42NjV1dXUKIdDp9//79TCZz9OjR7u5uRVGKxeL09LTP53vy5Mnp06flqWZmZpLJZHt7+9jYmBzOCQaD9+7dm5uba2trKx3CAQDgZ6JyNRxGo/HUqVNOp3Nra+tvf/vbjRs35ubmotFo2UiDECKbzc7MzCiKMjExoQ0b2O32w4cPCyEWFhZKG7e3t/f392tpQwghF57IhCGl0+lwOFxXV1eWcjTJZHJhYcFgMGhpQwjhcDhGR0cVRdGuuLCwkE6nu7u7e3p65JiHwWAYHBysq6sLhUJyIkYIEQ6HhRA9PT3a5JHb7e7q6jKbzZFI5O1/cwAA7HsVXRZbX19/7ty5lZWV58+fb21txWKxZ8+e2e32vr6+jo4ObZAjFAoVi8WWlhabzVb6dm26RFVVbY6jrI0QoqmpyWQyBYPBbDZbW1srhFhfX1dV1ePxlI2jaMLhsKqqbW1tWtqQXC7X0NCQdi05xVO2ktZkMrW2ti4sLEQiEbvdLj9mKpVaW1trbGzU3js6Ojo6OvrWvzIAAA6ESm/8ZTAYPB6Px+OJx+Pr6+srKyubm5uTk5OLi4snTpyQVRdyo47t7e3bt2+XvlcWXmQymUKhIEsxdmQymTwej9/vD4fDcg5Fjna0tbW96i2JREII4XA4yo4bjUY5rCKEyOfzqVRKCDEzM1MWXOTb0+m0/OfQ0NDt27fn5+eDwaCcAGpsbJTRBwCAn6dKBw6N3W632+29vb2RSGRqampjY2NyclKWQWSzWSFEMpmUyeNlr13+2t7evrCwEAwG29vbc7nc2tpafX39LsUTcjlu6bzMy3K5nPxBzpjs0qvGxsZPP/3U7/cvLS3Nz88LIQwGg9frHRgYKBtBAQDgZ6JygaNQKAghDAZD2SrThoaG48eP37hxIxQKbW9v22w2OX5QuiDlbTU2NprN5tXV1VwuFw6Hi8Wi1+vdZRtTOV4ie/gq2tu/+OKL0vUvO7JYLMPDw0NDQ/F4PBKJLC0tLSwsrK2tnTt3zmq1vv0HAgBgf6tc0ej333//n//5n3JTjTJ2u12OLsg5C3lL3rHlG5ITN4VCYWNjQ86n7L4HhixNjcViZcdVVY3H47IatLa2VhaBasWhOyoUCul0OpPJCCHkCtuurq6PP/64paUlnU4vLi6+84cCAGD/qlzgcLlcqqqurKy8/NL29rYcXZCFDk1NTYqihMPhzc3NspaRSOQNtxNtb29XFCUQCKyurh46dOjl+oxS8orBYFCrw5Ci0eiNGzfu3r0rhDAYDLIKxOfzlb09n89rYSUSiXz//fc3btwoXX1jMBjk0+nkbBEAAD83lQscg4ODBoPB5/P99NNP29vb2vFIJPLw4UNVVRsaGmQssNlsct+LycnJaDQqmxWLxcXFxb/97W8//fTTm1zu0KFD9fX1Kysr+Xy+dEOOHVmt1q6urmKxODk5qWWOeDz+6NEjVVV7e3vlkb6+PpPJtLa2Nj09rc2/JBKJe/fu/fjjj/JDNTQ0WCyWTCYzPT2tlX3IB9TJXr3RLwsAgIOlcjUcDofjzJkzDx48eP78+YsXL2pqaiwWSzKZzOfzqqra7fZjx45pdRIjIyNyZen//u//2u322traeDyeyWRsNpt2+9+doiher3d6elq8bj5FGh4ejkaj6+vrV69etdvtcjJFVdWuri6ZfoQQNpvt+PHj9+/fn5ub8/v9hw4dyuVysVhMVdWhoSG5QNdoNB47duzOnTvz8/N+v99utxcKBXmq5ubm10YfAAAOJOPExETFLiYHEmSJRjabTSaTNTU1TU1N/f39H330Uel+5waDob293WazFQqF7e3tdDpttVp7enpGR0e1hR5yzsXlcsnZipeZzWa/39/U1FT6wBRpbW0tGo22tLRoW4HJx8iZzeZcLpdIJPL5vMvlGhkZ6e/vL602tdlscsuQTCYTj8cVRWlubj569KjX69XaWCyW9vZ2g8GQzWblbFFDQ8Phw4dHRkZ2XwgDAMBBpXz77bfV7gMAADjgKlfDAQAAfrYIHAAAQHcEDgAAoDsCBwAA0B2BAwAA6I7AAQAAdEfgAAAAuiNwAAAA3RE4AACA7ggcAABAdwQOAACgOwIHAADQHYEDAADojsABAAB0R+AAAAC6I3AAAADdETgAAIDuCBwAAEB3BA4AAKA7AgcAANAdgQMAAOiOwAEAAHRH4AAAALojcAAAAN0ROAAAgO4IHAAAQHcEDgAAoDsCBwAA0B2BAwAA6I7AAQAAdEfgAAAAuiNwAAAA3RE4AACA7kwVu5KqqleuXCk7qCiKxWJpaGjo6OhobW197UnS6fStW7dqampOnz5tMr1F5+/fvx+JRE6dOuVwON6u3wAAYM8qFzgkVVWtVquWFYrFYiqVCgQCy8vLHR0d4+PjBsNugy6pVGp7e1tV1Uwm8+aBo1gsrq2tFQqFeDxO4AAAoPIqHTiEECdOnHA6ndo/i8ViMBh89OhRIBCor68fHBzc5b1Op/P48eMmk6m+vv7Nr2gwGM6cOZNMJtva2t693wAA4F1Vv4bDYDC0t7d/9NFHQoj5+fl8Pr9js2KxKIRQFKW9vb2lpeVtr9LY2OjxeHYfPgEAADqpwgjHjlpbWxVFKRQKyWTS4XCEQqE7d+40NzcPDQ3Nzs5ubGw0NjaeOnUqkUhcv35dCHHhwoXS9LC1tbWwsLC+vp7JZCwWS0tLS29vr9Vq1Rp8//336XT63LlzDQ0NQgh5fhl0Xrx4EQwGE4mExWJpa2vr7++vqakp7Vs2m/X5fKurq+l02mq1ejyenp6e//mf/0mlUp9//rnZbK7ULwkAgP3qQwkciqLIH1RV1Q7GYrGbN28WCoX6+vra2lrteGkbIcTy8vLDhw9VVa2rq3M6nfF4/Pnz54FA4NSpUzJeaO8qe2MsFvvxxx9VVW1tbXU6ncFgcG5ubmNj4+OPP9bSjCxTjcfjQgiHw1EoFKanp0OhUCaTKTsbAAB4lQ8lcGxsbKiqajAYSocl0um0x+M5cuTILqMI29vbk5OTQoiJiQmPx6MoSrFYnJmZmZube/Dgwa9//etdakvj8bjH4xkdHZVtUqnUDz/8sLm5GQ6HtVmbp0+fxuNxWTsiC0disdjDhw8LhcL7+uwAABx41a9pUFU1HA4/efJECOH1ekunM+rq6kZHR3efs/D7/cVisbe31+v1ymESg8EwNDTU2NiYTCY3NjZ2ea/FYtHShvxne3u7ECIWi8kjyWRyeXlZCDE6OqqVqTocjmPHjmlDMgAA4LWqMMIxOTmp3eNVVU0mk7lcTlXVpqamkZGR0palC2h3pKrqysqKEKKjo6P0uKIoAwMD0Wi0rBqjjMViKTt/XV2dECKbzcp/bm5uqqrqdDpLl9XIN+7+GQEAQKkqBA5ZDyEZDAaz2dzU1OR2u9vb2992FUk2m81kMkKIl1fJtrS0vMNiFjluoRVnpFIpIURZ2gAAAG+rCoHjl7/85fu6hWuFFEaj8b2csIxco8s6FAAA9qj6NRx7oeUMnUo45fnlIAoAAHhn+ztw1NbWyuWyiUSi7KV0Oh2Px/eYFeSSGa2GFAAAvJv9HTgURZHlorJ0tNSTJ09u3Lix+yqV13K5XIqibG5ulmWOZDK5l9MCAPBzs78DhxCiu7vbYDD4fL5AICCLPYvFos/nCwaDdXV1zc3Nezm5xWLxer1CiKmpKS1kbG1tPXjwgF2/AAB4cx/Kxl/vzGazjY+PP3z48OHDh0+fPrVardvb29ls1mw2/+IXv9h9WeybGB4ejkQikUjk2rVrNputUCikUikeOQsAwFvZ94FDCOHxeGw2m9/vD4fDW1tbVqu1s7Ozt7dXbqqxR2az+ezZsz6fb2VlJZlM1tfXDw8Pt7e3X7t2TVVVtv8CAOBNKN9++221+7D/xGKxH374QVXVixcv8gRaAABei5vla+RyuUgkUnYwHA6rqtrY2EjaAADgTXC/fI0nT57cvn17eXm5WCzKI8Fg8NmzZ0KI7u7uavYMAID94yDUcOiqs7MzGAw+fPiwtra2vr4+kUhks1lVVXt7e8se4AIAAF7FODExUe0+fNCsVqt8hm0ul4vFYgaDobm5+ciRI729vVSMAgDwhhjheL26urqBgYGBgYFqdwQAgP2KGg4AAKA7AgcAANAdgQMAAOiOwAEAAHRH4AAAALojcAAAAN0ROAAAgO4IHAAAQHcEDgAAoDsCBwAA0B2BAwAA6I7AAQAAdEfgAAAAuiNwAAAA3RE4AACA7ggcAABAdwQOAACgOwIHAADQHYEDAADojsABAAB0R+AAAAC6I3AAAADdETgAAIDuCBwAAEB3BA4AAKA7AgcAANAdgQMAAOiOwAEAAHRnqtiVVFW9cuWKEEJRlM8++8xsNr+qZSqVunr1qhDCaDT+0z/9U8V6uItsNru0tBQMBuPxuBDCZrO1trZ2dnbu8in2LplMXrt27U1aXrhwwWAgOwIAPlyVCxySqqqqqq6srPT09LyqzfLysqqqunbj2bNnc3Nz/f39w8PDr228sbFx//79TCYjhDAajUKIzc3Nzc1Nn893/Pjx5uZmnTqpKIrdbi89kkqlcrmc2WwuCzqKoujUBwAA3otKBw5pYWGhu7t7x9tksVj0+/0V6MMbZppYLHbr1q1isejxeA4fPmyz2YQQiUTC5/MtLCzcuXPn3LlzTqdTjx5aLJZf//rXpUcePXq0uLjY19fX39+vxxUBANBJFcbhbTZbLBaLRCI7vhoOh1OplLyvV52qqo8ePSoWi93d3RMTE3a7XVEURVFsNtvY2FhfX1+xWJyamtr7eEyxWHwvHQYA4MNUhRGOzs7Op0+fLi4uNjY2vvzq0tKSqqqyzcuvplIpv9+/traWTCYtFktLS0tfX19dXV1Zs62tLb/fHw6Hs9ms3W5vb2/v7u6WsyHXr19PJBIyIszNzc3Pz+9SKbKxsRGNRk0m09DQ0MvjMYODg0tLS9FodGNjo6mpSQixsrLy4MGD5ubm06dPl7Ysm8HJZrN//etfhRDnz5+fn58PBoOZTOa91GEEg8GFhYWtrS0hxKFDhzo7O9va2sp6HgwGl5aWIpFINpu1Wq1ut7u3t7f0d/j06VOfzzc2NlZXV7ewsBCJRPL5vMPh8Hg8nZ2dQojl5eWlpaVYLCaEaGho6Ovrkx8fAIBXqULgaGtrm5mZCQQCw8PDZbUI6XR6ZWWlpqamtbV1enq67I2bm5v37t3LZDJms9npdMbjcZ/Pt7y8fPbs2fr6eq3ZwsLC48ePVVWtr68/dOjQ1tZWJBJZW1s7efKkyWRqa2vLZrNbW1vRaNThcDQ0NOxym9/Y2FBVtb29vba29uVXTSZTe3u7TDbaHXfH0Q5ZufLywVu3biUSCavVarFYdv2dvV6xWHz8+PHS0pIQwuFwKIoSCoVCoVB/f//IyIh2xZ9++unFixdCCKfTabfbo9Ho/Pz80tLS2bNntVEl2dvZ2dlUKuV2uzs6OuLxeCgU2tzcjMVimUxmbW3N7XZ7PJ5oNLq2thYKhX7xi1+43e49fgQAwAFWhcBhNBq9Xq/f719dXe3u7i59SZaLdnV1vRwC0um0rNw8evSorP8oFovT09M+n+/JkyfaiEI4HJ6amqqtrT1x4oQMAdls9v79++Fw2O/3a2MMz549i0ajra2tuxeNyi/xDofjVQ3kS7LZOzCZTJ9++mlZZei78fl8S0tLTqfz2LFjMn7F4/GbN2/Oz8+73W45mLS6uur3+61W68mTJ2XPc7nc1NTUysrKs2fPTpw4UXrCbDb7ySefaOUpS0tLk5OTfr/faDSWlq3Mz88/ffp0ZmaGwAEA2EUVajiKxWJnZ6eiKH6/v/R7v1Yu6vV6X65pWFhYSKfT3d3dPT09co7AYDAMDg6azeZQKCRXqwohZmZmhBAfffSRNuRQW1s7MjKiKMrz58/ftlRCrkzZcXhDO7kQIp1Ov9VpNbIu5N3eWyqbzc7MzCiKMjExoQ322O32w4cPCyEWFhbkEVVVe3t7R0dHtQhVU1MzMDAghFhbWysbg+nq6iothvV6vXI4qq+vr+y4oijRaDSbze79gwAADqrqBA6n03no0KGy0tFwOJxMJpubm+12+8sTEHKywOPxlB40mUzyi7U8TyKR2NzcNBgMZd+2nU6n2WxOp9OJROKtulooFIQQu8y5yJfeueRz7zMpUigUKhaLTU1NZcW2LS0t8lX5++zo6Dhy5Ig8qJGZqVAoyA+rqampKbuKjDJlS3K0Zvl8/r18FgDAgVSFKRV5e+7p6ZmcnCwtHZXlol1dXeIfd3pNPp9PpVJCiGfPnpXd/mWGkGMMso3BYLh//37ZReUJM5nMW40oyDrTXfKEPK1sVkXJZFIIsb29ffv27dLjMmdkMplCoWAymYQQxWIxGAyurq5GIpF0Ov1W62t2DF5aRSoLbQAAu6hC4JA3ObfbbTKZAoHAyMhIbW2tLBc1m82tra3ipdLLXC4nfwiHwzueU97tstmsqqr5fD4UCu3S7M3Jb/+7TBbIju0y51IZsofJZFImj5fJD57L5e7fv7++vl5bW9va2lpXV2c0GnO5nM/nq2h3AQA/P1ULHDU1NV1dXT6fb2Vlpbu7W5aLaotXy2hfo7/44otddhOXX8GdTucvf/nL99JVh8MRDAZ3qQl9bVVpZcgPXrogZUc+ny8cDre1tU1MTMgBDyFEOp0mcAAA9FbNB3DIekO/318sFmVhY1mJhqa2tlbWCmjFoTuyWq2ygFEbEdmjpqYmRVFWVlZ2HOTI5/MrKytCCJfLJY/IG7/e+7K/zGq1CiHk9hu7WFlZkXWjWtoAAAAAAAAAAAAAAAAAAAAAAAAAAAAAAAAAAAAAAAAAAAAAAAAAAAAAAAAAAAAAAAAAAAAAAAAAAAAAAAAAAAAAAAAAAAAAAAAAAAAAAAAAAAAAAAAAAAD4oBir3QHo6Pz58//8z/+cSqWCwWC1+wIA+FlTqt0B6GJgYODrr792uVyKoqiq+m//9m/hcLjanQKA/+P8+fNjY2N7PMnU1NS1a9feS3+gK1O1O4D3zOVyffnll+Pj44ry/9Okoigul4vAgb1wuVxjY2MDAwNNTU0ej0cIEQgEwuHw3Nzco0ePNjY2qt1B7D/nz5//8ssvtf9TvbOBgQEhBJnjw0fgODisVutvfvObixcv7v0/YEDjcrkuXrx45swZIUTpn5bX6/V6vePj419++eWtW7euXLlC7MBbKf1etBeKooyPj1+/fl1V1b2fDfohcBwQY2NjX331lZxDqXZfcHCMjY198803Vqv1VQ3k39vHH388Pj5+6dKlR48eVbB3APYTAse+5/V6v/zyy4GBAaIG3q8zZ858/fXXb/h3ZbVa//Vf//XPf/7zzZs39e4YgP2IwLGPWa3WCxcunD9/nqiB925sbOzN04akKMq//Mu/JJNJxjkAvIzAsV+dOXPmq6++2mWsG3hnLpfrm2++eYcgqyjK119/LetJ9egYgP2LwLH/DAwMfPXVVx6Ph4EN6OTixYvvnGWtVuvFixcvXbpEBR+AUgSO/URbL0DUgH5cLpdck/LOzpw5c+XKFQY5AJQicOwbFy9ePH/+PHMo0Nv4+PjeTzI2Nsa+CABKETj2gdJtQ6vdFxx872XF0+DgIPsiAChF4PigyaWGLHlFJblcrr2fpLGxce8nAXCQGKrdAeyGDTZQeXLn8j3yer17PwmAg4TA8aEjbQAADgACxwftL3/5y9TUVLV7gZ+XQCDwgZwEwEFC4PigJZPJP/7xj7///e95LBYq5r38sfEXC6AMgeNDp6rq7Ozsd999d+XKlVQqVe3u4OCbnZ3d++qS93ISAAcJgWN/UFX18uXLv/vd727dulXtvuCAey9PQuFxKgDKEDj2k2QyeenSpd///vezs7PV7gsOrI2Njdu3b+/lDLdv32ZKBUAZAsc+I2dY/vCHP1y6dIkZFujk8uXLyWTy3d6bSqUuX77MfAqAMgSOfUlV1Zs3b/7ud79j92joYWNj452fvnbp0iWeogLgZQSOfSyZTP7lL3/57rvvmGHBe/fo0aM///nPb5s5Ll26RPUGgB0ROPY3VVXD4fAf/vCHP/7xj8ya4/26efPmn/70pzecW0mlUn/6059u3brFZAqAHfEslYNAVdVHjx7Nzs6eP3/+/PnzFoul2j3CAfHo0aNAIHDx4sXdH1h/+/bty5cvM5MCYBfGancA700ul5udnb1//35TU5Pb7S596datW4x/4N0kk8mpqSn5J5TP5/P5vMPhEEIEAoEXL178+OOP//7v/37r1q13LjLFz5bVah0ZGXkvT2+4fv368+fP934e6IrndBxAiqIcPnz4m2++0R77+d133/HtE3v38r2BCRTsxfnz58fHx/d4kqmpqWvXrvGn+OEjcBxYiqKcOXNmfHz81q1bk5OT1e4OAOxg7yMcRA3gg8DDZgEAAAAAAAAAAAAAAAAAAAAAAAAAAAAAAAAAAAAAAAAAAAAAAAAAAAAAAAAAAAAAAAAAAAAAAAAAAAAAAAAAAAAAAAAAAAAAAAAAAAAAAAAAAAAAr9mC/AAAAAlJREFUwPvz/wA4hXpWjx1dFwAAAABJRU5ErkJggg==)
![Screenshot_20230720-211352[1].png](data:image/png;base64,iVBORw0KGgoAAAANSUhEUgAAAtAAAAWgCAIAAAD4sOOEAAABDWVYSWZNTQAqAAAACAAFAQAAAwAAAAEC0AAAAQEAAwAAAAEFoAAAATEAAgAAACQAAABKh2kABAAAAAEAAABuARIAAwAAAAEAAAAAAAAAAEFuZHJvaWQgU1AzMTE1LVN1bm1pLTIwMjIwODMwMTIyNDU0AAAEkAMAAgAAABQAAACkkpEAAgAAAAQ1NjYAkBEAAgAAAAcAAAC4kggABAAAAAEAAAAAAAAAADIwMjM6MDc6MjAgMjE6MTM6NTIAKzAyOjAwAAADAQAAAwAAAAEC0AAAATEAAgAAACQAAADpAQEAAwAAAAEFoAAAAAAAAEFuZHJvaWQgU1AzMTE1LVN1bm1pLTIwMjIwODMwMTIyNDU0ANjstk4AAAABc1JHQgCuzhzpAAAAA3NCSVQICAjb4U/gAAAgAElEQVR4nOzdeXRbZ5038EertVte5FXe5S31FjtOms1xkjZNtyHtAAVOh6YD0zMznAEGOpwB3lPaQ+HQGYZ0gJlSOIV2KDQdAm3ToR3SJM7iNJuT2E7seF/kTfKi1ZK13/eP5+We+0q2LNm+tuN8P39J13d57pWs53ef5/c8lxAAAAAAAAAAAAAAAAAAAAAAAAAAAAAAAAAAAAAAAAAAAAAAAAAA4J1grQtwx1MoFI2Njd/85jeLioqCwWDsG4rFYqvV+vbbb7/22mujo6P8lRAAANZKY2NjU1MTd8nevXvPnDmzRsVZS+K1LsAdLycn56tf/apKpfrRj37kcrli31CtVt93331PPPGE2Wz+2c9+xl8JAQAA4I63e/dus9n89a9/fQnbfvazn719+/Yrr7wikUhWvGAAALBWDh8+3NTU1NTUdOPGDeb/d+PGDfqnw4cPr3UxVxWPLRy0ryErK8vj8bS2tt66dSuWrQwGQ19f39KOGH3blJSUhoaG1NRUh8Nx8eJFo9G4tKOEKSwsdLvdra2tS9h2bGxseHhYrVbn5ub29/evSHkAACBeNTU1VVVV+fn57BK73d7a2nr27Nml7fDll19OTEzkLjl8+PAbb7zR2Nj4zjvvaLVaetDXX389+n7iqkkbGhoMBoPH47ly5cpCtWF9fX1tbe3s7OyJEyempqbiO6t1SKFQvPrqq06nkxvTtbW1PfTQQwttkp6e/o1vfOPixYuBQCDewy26bXp6+m9+85u5uTm2MIFA4NSpU1u2bIn3WJH+4R/+obe3t7a2dgnb1tfX/+EPf3jvvffuu+++5ZcEAADiQqt/q9XKLOydd9556qmn4t0z3fb1119//vnnn3/++UOHDrF/OnTo0Ouvv05XiLKHuGrSv/mbvxkaGmJXCwaDTU1N1dXVYasdO3YsFArRdaxW65NPPhnvea0vEonk3Llz835sbrf7wQcfDFv5ySeffP/9910uF7ta7AeKZVudTnfr1q15yzM1NVVXV7fM83355ZeX1rxBCMnLy/uP//iP5ubmf/zHf1xmMQAAIHZPPfXUwMAAW/ueOXPmhRdeeP755x977LHHHnuMRgnvvvuuzWZjGCYUCg0MDHznO9+Jff90t42NjdyFbAtKY2Nj9Pourpr0a1/7GnsiXCaTqbS0lF3t29/+NsMwMzMzP/3pTz/44ANaCer1enaFz3/+87Gf4Lrwwgsv0FMdGRn5q7/6q/T09N27d1++fJkuvHLlCrtmYmKiyWSKvEaxHCX2bX/yk5/QP/X29n7qU59KSkratWsX+0G+9957yzzfV199tbm5eWnbarXaF1988cqVK88///wyiwEAALHIz88/ffo0raFbW1uffvppgUAgEMwzZpMuP3To0LvvvkurjOvXr9fU1MRylMiAIyUlhX27aMARe02anp5ut9sZhvH7/c8991xKSkp1dfVHH31E13znnXfYNS9evMgwzFe/+lX6tq2tjWGYZ555hr791re+xTDMT3/601jObr3o7u6m8eAjjzzCLiwqKnK73QzDBAIBtltLp9OxF/S1116bmpqKPeCIfdvbt29HfvC5ubk+n4/Gd8s6W0Kampp++ctfLm1bgUDw9a9/fXR09PTp08ssBgAAxOLIkSOhUGhoaGjv3r1hcUZ+fv6ePXv27NkTFlUIBIKCgoIzZ87QGGXe6CRMZL3zn//5n7EHHLHXpM8++yzd1VtvvcWumZSUND09zTCM2+1OSkqiCwcHBxmG2b9/P31Lo6gXX3yREGIwGKxWq9PprKysXPTU1guZTBYMBhmGmZycDPtTV1cXvShsm1JiYuKbb775iU98gr41Go0LfQDl5eW9vb0ej+df/uVf4t32a1/72nPPPfftb387bPnExATDMD6fb4mn+mdtbW3f+973CCFCoTA5OXnHjh0VFRVCoZD+NTMzs76+PiMjQyz+f/m5er2+vr4+MzOTvn3mmWeGhoaQMQoAsDoEAsHhw4fZalir1X75y1+mbR5hmpqavvKVr7B1VtiG0YUFHKmpqdy30QOOuGrSt956iy4JSzShnSYMw7AhC23SeOKJJ+jbU6dOMQzzT//0T4SQ48ePMwzz3e9+N5ZTWy8kEsn27du3b98e2ehEGyHsdvtC20YJGmjPE8MwY2Nj8W47r/z8fL/fzzDM8mv64eHhL33pS4QQrVb7yiuvTE5Omkwmg8FAY44TJ05MTEy0trbSBNWSkpKjR4+azebf/va3W7duJYR85jOf6e3tXUKqLAAALNPzzz9vsVi4mRwsNnsjFAr96le/ouNKYkd3uGvXLvr2tddeC4s/aHvDvNvGVZOeP3+eHmv79u3cNV999VW6nO1D+eUvf8kwTEtLy/333//3f//3Ho/H7/dv27btc5/7XCgUunnzJt8TNKzwsFi/33/x4sXI5V/60pdSU1MJIWETrsXo9OnTdrs9MTFxaZuHKSkpee2112iTw5J7Q1gzMzNPPPFEf39/fn6+Vqv94he/qNFojhw58sMf/rCxsbGjo+P111/Pzs5uaGhITk5+8MEHBwcH33vvvbKyMjpGd/fu3S6X6/jx48s/LwAAiN3169c3b95MCPmv//qv119/PXL2z5qamqeeeurw4cOHDx/+xCc+UVRUZLVa4zoEnUW6oKDgr//6r7nLp6enX3755ZdffnnereKqSZVKJX0Rdj/vdrvpC41GQ18899xz9913X11d3YkTJ+iSn/3sZ11dXW+//XYwGPz617/u9/vjOrv1qKSkxGw2Mwzj8XjYcC9S9FaKlJSUioqKpW1L/fM///Pg4OD4+DhtqgoEAq+++mrsZ7GQJ554YnBwcHBwsK+v71//9V8VCkVJScnIyEh/f//U1NSXv/zljIyM+++//9y5c4ODg2NjY1/96lfT0tI+85nPnDx5cmhoqK+v78iRI5s2bVp+SQAAIHY1NTVnzpwpKCiIkpMhEAiSkpJefvnlp59+Oq6dMwxjtVrpnS1N/mDt2bOHEPKVr3wl9lZ5snBNevPmTbrb8vJy7vr/9m//Rpd///vfZxfq9fqXXnrpvffeO3r06Be/+EVCyCuvvMIwzKLTgdwZEhMTr1+/Tk/7Bz/4QZQ14+0WiXfbl156ifuRd3d3cwdGL1lRUdHRo0dHRkYaGxtzcnIIIQkJCXV1dZ/73Od27dqVnp4uEok0Gk1VVdXjjz++b9++jIwMkUiUnJy8ffv2f//3f//ggw+eeOIJkUi0/JIAAEBc2FAjPz//ueeeO3369MDAgMViOX369JEjR9gekFiyRMMwDEOH0RYVFXGrHjYtI0qXSqQoNWlcAUeY3bt3e73esbExnU4X3+mtQxKJ5E9/+hM95w8++CD6ynwHHA8++OBLL730k5/85IMPPvB6vQzD+P3+v/3bv13C4bj0ev0rr7zS09PDpoVSSqUy7Dsql8u564jF4i984Qtvvvnmww8/vMwyAADA0mi12j/84Q/zzmNB80ZjHAcbhmGYr3zlK4QQlUql1WoPHTpE93nPPfcQQjIyMmKv76LXpIsGHHRYw7yuXr3KMMwXvvCFlJSUl1566dSpU6dOnXrppZdSUlLiPuE1d/ToUXrCV69eDZvkNRLfAQfXQw89RIfFmkwmhUKxhCOyaMDR3d29hG0///nP//rXv0bAAQCwhn71q1/ZbLYXXnhh8+bNdO6NgoKCw4cPDw0Ntba2xjgsJQzDME1NTTKZjL6lw1La2tro23vvvTf2Oit6TXrt2jX617CsgyNHjtDl/+f//J95d0sn3jhx4oREImlpaeFGWi0tLXfYE75ozxDDMB0dHdnZ2Yuuv5oBByGEnUHlgQceWMIRWQg4AADuaFqtNikpKbLfhCZwLG2ftH4JGwfLNkIsOg8Ha9GalE0QaWho4C7/xS9+QZd/+ctfjtyKTrzhcDgqKiq+8Y1vMAwzODi4c+fO3bt3Dw8PMwzzta99Ld5TXpRwxfdIffe736W9FUNDQ5/4xCcWGs7Kt8TExGPHjh07duyVV14J+xOb0JucnLzq5QIAgPXCZrPRx6kQQp566im2hmYYJt5hKWGOHDlCp8fIyMi4evXq7du3lUrl+++/f+TIkVg2j6UmHR4epi9oZw0rLy+Pvrh9+3bkVj/60Y+0Wu2RI0du3bpFH/Fx9OjRCxcunD9//u233yaErMizxlYDO6/7+Ph47L1fPLVw0CffeL1e7mNskpKS6MRfDMPQYVFLhhYOAICNoaamhlZey3++Fds9QVNHDx8+TH/qv/Od73A7L6LsIcaa9O/+7u/orv74xz+yCzMzM+l85zabLTJt4LOf/WwoFGpra6P9Jn/84x8ZhmGnx6Szqi//uR+RVv7x9IcPH/7BD34gEAiCweAbb7yxbdu2bdu2cVewWCy/+93v4tpneXn58ePHc3JyfvzjH3/jG9+Ia9umpqZHH31UKpX+7ne/e/HFF1taWoqLi5999tmMjAxCSGtr640bN+LaIQAAbEhDQ0N2u10gECz5kZwL6erqunTpUmJiIjsNV3Sx16RvvPHGd77znfT09AcffPDHP/7xL37xC51O973vfY9Ov3H8+HF2Qg5KIpF8//vfDwaDzz77LJ14g04WwjaQFBcXswvXOzY3YiE3b96cd0OeZhotLy+no48iWSyWsEf5LcFyWjieeeaZY8eOoYUDAGCdWOhBbvFiKxpu70lY80aUFo64atLPf/7zdOhlmP7+/nnTPj75yU++8MIL7Nu9e/f6fL5gMPjuu+8eO3bM7/f7fL6wjJB16sqVKysecGzfvp3OMvvmm2/Guy0hRK/Xv/HGG3QPlNvtPn78+Io8pSY9Pf3FF1/s7++PdxyzSqV64YUX3n///d27dy+/GAAAsH6w1c3g4CDt0K+urqaZIrEEHPHWpI899lhbWxs7uNfj8bzzzjsFBQUxlvab3/zm7Ows3dblcn3rW99azrkvZAXiuNWRkpKSmZl569atJe9BIpHs3LlTp9PZ7faLFy86nc4VKZhCobj//vt/+MMf/vrXvz537pzX641lK7FYXFZW9vjjjw8MDHzve98bHx9fkcIAAMB68Pzzz9PsDerMmTORDeovvPDC888/v4IH3bRpU2lpqcfjaWlpifdZ6Dqdjt79XrhwwWw2r2CpWHdMwLGeZWRkPPvss3v27BkfH49xztBQKKTRaEwm069+9as//elPfJcQAAAA7ngikai4uPitt95ie3YWZbFYmpqaPve5z8nl8rUuPgAAAAAAAAAAAAAAAAAAAAAAAAAAAAAAAAAAAAAAAAAAAAAAAKwCwdNPP73WZQAAAIANTrjWBQAAAICNDwEHAAAA8A4BBwAAAPAOAQcAAADwDgEHAAAA8A4BBwAAAPAOAQcAAADwDgEHAAAA8A4BBwAAAPAOAQcAAADwDgEHAAAA8E4cy0oMw/j9fp/PFwqF+C4QAADcbQQCgVgslslkAoFgrcsCfIkp4AgEAn6/X6lUSiQSvgsEAAB3G4ZhnE6nx+ORy+VrXRbgS0wBRzAYlEqlUqmU79IAAMBdSCAQqNVqi8WCgGMDiymHAz0pAADAK6FQGAgEGIZZ64IAXxYPOPDxAwAAwDLF1MKBmAMAAACWA8NiAQAAgHcIOAAAAIB3CDgAAACAdwg4AABgXUC+4MaGgAMAAAB4h4ADAAAAeIeAAwAAAHiHgAMAAAB4h4ADAAAAeIeAAwAAAHiHgAMAAAB4h4ADAAAAeIeAAwAAAHiHgAMAAAB4J17rAgAAAKwej8czODjocDiCweDy9yYSidRqdV5enlKpXP7eNjYEHAAAcLfweDzXr18PBAIrtcNAIOD1em022+bNm+Vy+Urtlj+hUIg+s0bwZ6t2aAQcAABwtxgcHFzBaIMVCAT6+/srKipWfM8riGEYl8s1MTExMzPDMIxWq9Xr9SqVatViDgQcAABwt3A4HPSFSqVKTExckR06nU76gmGY1WwwiJfX6x0eHrZYLLSFY3p6OhAIGAyGVWuYQcABAAB3CzZvIzExsbCwcPnxwfDwMA04+Gg4WVlut9vpdNJogxDCMMzs7KzT6UTAES4YDNLIVKVSSSSS6CuHQiG73R7jyiyv1zs9Pe3xeCQSiU6nuyN64+4eNpuNYRiZTLa2n0tc38O7GcMwXq+XECKVSoVCjIaD9Wg9t0bwIRgMhuXJRi7h1R0TcHi93qamJkJIQ0NDampqjCvv3r1bp9PFsn+j0Xjjxg320m/fvv3uDDgcDofD4cjIyBCL19d34+OPP/Z4PFVVVQaDYQ2LEeP30O/3h0IhiURy19a1gUBgcHCQEJKXl6dQKNa6OABApFKpVCqdm5vjLklISFi1AqyvSmWtzMzMtLS0EEKUSmVmZqZQKLw7BzgFg8GzZ8/6/f6ioqLq6uq1Ls6dKhQKDQ4OhkKh4uLitS4LACyLz+eTSqVrXYqVoVKp0tLSxsfHae+PSCRKTU1dkUSWGCHgIIQQeiumVCr37du3gu3kTqfz9u3bhJCqqiqZTLZSu+WPQCAQiUR+v3+9NW/cWWZnZ4PBoFarFYlEa10WAFgKhmHsdvvk5KTZbN61a9fG6HwRiUR6vV4mk1ksFkJIYmJienr6av5MoV4hhBCr1UoIycnJWdleeb/fPzo6SgjZtGnTCu6WP0KhcN++fW63W6vVrnVZ7mA0f2g17xsAYKX4/f7p6emJiYnZ2dm1LsvKE4lE6enp6enpa3J0BByEEOL3+wkhq9mVtW7JZLI7ojFm3fL7/bOzsxKJBIkLAHciq9Xa29u71qXYmFY14PD5fDMzM263mxAil8uTk5PD6rZQKGSz2QghGo1GKBROTU3Nzs6qVKrIcMxut9tstkAgIJPJUlNTY4wVGIahjRlCoVCr1QaDQXozGgqFCCEul4s2NMnlcm7GKMMwDofDbrf7fD6JRJKYmLhoA4DdbmeHM9C3Pp9PJBLRu95FTzMUClmtVqfTGQgEpFKpVqvVaDTc/QcCAbpzmUwWVrH5/X46Rov+iT1HrVYrFAoXvW5Wq5VhGO4ViPFDmZubs1gsdIxPZIGjW8IVDuNyuaxWq9frFYvFarWanix3BfY6aDSasA4jr9frcrkIIUlJSWENp8FgcGZmZnZ2ViAQqNXq5OTkRUtCP5ekpKR5T3Nubs7n84VCIZFIJJPJIq8/wzAej4cQIpPJBAKBx+PxeDyhUEgsFiuVyrDGz7hWjm7FyxblQHQnAoEAoS2sTykpKWlpaZOTkzMzM2tdlg1l9QKO/v7+jo4O7khloVBYUlJSVlbG1g1er/fMmTOEkO3bt3d3d9PqPzs7m1u3+Xy+S5cujY+Pc/dTWVlZVFQUvQAMw7S1tQ0MDAiFwh07dhBCXC4XPRzV19fX19dHCKmoqCgpKaELnU7n9evXw752qamptbW1KpVqoWNdvXqVjTYIIZcvXyaEpKSk7NmzZ9HTNJvNra2ttApkpaenb968mY0tRCJRV1eXyWRSqVT79u3j1qC3bt0aHBwUiUT79+/nHquxsZFuwq4pEokqKysLCwu5B7p48WLYYJBFP5RAIEAPyg7vJoRkZGTU1tbGUqMs7QqzvF7vzZs3jUYjd6Fard68eTN3FMnc3Bw9i71794ZFA1NTU1euXCGEHDp0iBtwWCyWlpYWbrNqYmLior1jNKKNjLdmZ2dNJhNtS2PRJGVuR14gEBgaGiKE5OfnT09Pc48uEAjS09O5hY9r5Sj4KNtCzGaz1WoVCAQ5OTmxlA1glaWmpqalpRFC6G/dBhMMBicmJiYnJxmGSUlJ0ev1q5mxt0pH6uvra29vJ4RkZGTQasBsNk9NTXV1dQUCgaqqqrD1r1+/7vV6pVKpSqUKu9O6du2a3+/PyspKTEwMBoNjY2Mul6utrU0sFufl5UUpQ0dHx8DAACFk69at9PsklUppYNHf3x8MBnU6Hf3FZG+vXS7X+fPn6V07Hd3ndruHh4enp6fPnz/f2Ni40NDZ3Nxcn8/n8XhoRVhQUCCRSCJXjjzNiYmJS5cusZPOisVih8MxODhoNpsvXLiwb98+eh8pEAhqampOnjw5Ozvb19dXVlZGdzgzM0MTYCsrK8Nq648//jgQCOTm5qpUKq/XOzo66vV6W1tbxWJxbm5ulOsW/UMJBALNzc0Wi0UsFhcUFCgUirm5uaGhIZPJ9PHHH+/Zsyf6je+SrzDl8/mam5vtdrtIJMrLy1Or1T6fb2xszOFwnD9/fvv27RkZGbGcWiSHw9Hc3BwIBMRisV6vpwUbGRmhseNC3G633++PnKJjdnZ2dHSUziNCG4rowxdcLpfRaCwoKIgcPTsyMhIKhRITE6VSKW3QCgaDJpNJKBRGZofEtXIYvsvGNTk5SQOy7Ozsu3MgGKx/G3goOx2sbjKZ6M2h2+2em5szGAyrNqXQagQcfr+/o6ODEFJaWnrPPffQhcXFxR0dHT09PX19fYWFhWG1o9/vr6+v1+v1kbnBDMNwp0AoLy+/cuXKxMREe3t7ZmbmQuOXbt++3dPTQwipq6vLysqiC2UyGZ363mg0BoPBrKyssGaS9vZ2j8ejVqt3797N3qwbDIZz58653e6Ojo4tW7bMezgax1gsFhpwFBcXz3uzHnaawWDw+vXrDMPk5+dv3ryZPfesrKzm5man0zk2NsYGBwqForKy8saNG11dXXQ+/FAo1NbWRghJS0srKCgIO5ZYLG5oaGDvvMvKyi5cuGCz2drb2zMyMmIZ9zXvh9LR0WGxWGQy2Z49e9gqJD8/v6mpyWazDQ0NRW95WvIVpm7dumW32xMSEhoaGtRqNV1YUlJy48YNo9HY0tJy3333La3dvrW1NRAIyOXy3bt3s59dWVnZxYsXadfMvGjfU1h/UCgUGh8fp0FkZmYmu1ytVhuNRp/P53Q6I+tpoVCYl5fHBnapqakjIyMej8dsNqtUqrAwLq6VV7lsrOnpadqOlZmZyX5YALBqnE4n7TSnb+lIHLvdvujUVitlNUI5l8tFJ9TKzs5mFwoEgpKSEoVCIZfLac4BV0VFRU5OzrwjkSorK7lXh/YLEEL8fj+3n4Wrr6+PHZ4avRWEy263T0xMEEJqamq4lZZCoaBNMiMjI2Gt0PEKO02v15uZmZmfn19SUsI997S0NFqH0fqMlZ+fn5aWFgqFbt26RQgZGBiw2Wwikaimpiby0lVVVXHb+RMSEuhZ+Hw+bj9L7KUlhMzNzfX399Odc29YVSoVjTNoc8tClnmFZ2dnaQt/RUUFtwITiUTV1dVSqdTn89E2rXjZbLbp6WlCyD333MONFBUKxebNmxfaimbtiESisHv3YDBI00pSUlK4y5VKJT1rmtMQJj09ndu2JxaLaR9WMBiMTJ6Pa+VVLhtlsVimpqbothgDBbAmAoFA2C9q5BJerUbAwf42mc1m7nKpVHrw4MEHH3yQe2tFRflJirw3UqlU9OeSVhJhhoeHaW9OeXl5XJNUTk5OEkJocmXYn1JTUw0GQ1FR0TInzw87TYVCUVtbO2/uAq3Dwr4ZtGNFJBKNj4/39fV1dnYSQioqKuZtTYlsw0hJSaEhyLzXbdHSEkJouCASiSI/QdqX4XA4uLPahVnmFaZfJ4lEwg1kKYlEQtt4RkZGop7T/OgFEYlEbGMYK0p7CX1IQWS+qkQiyczMnLf5jbZkzju1cGQ7gUKhoP9KNO16ySuvctkIIXa7nX5YOp0ulsRbAOCDWCwOy9iIXMJvAVbhGHK5PC8vb3h4uKOjY3JyMicnJzk5Wa1Wr+BUKlqtdmZmhpunSZnNZjrAKScnp7y8PK590r0lJydHllMqlUbmnawgr9dLB4PQUQPkz20b3KxMSqVSVVZWtra20qAqNTU1LAk0CoFAkJSUxD7qcAnohnK5fGxsLOxPPp+Pvpibm1soD2OZV5gdfTPvPwyt2Fwul9frjXfAMz2vyPEs0bFjeRZaIRAIuN1un88XDAbpRzlv+0EUMpnM6/XSZ5Ss7Mr8lW12dpadZWjVWm4BIJJKpdJqtTRjlBAiEAg0Gs0GnGl08+bNarW6p6dnamqKtqzKZLLc3NyCgoIVyR2jVRpbybFo3gYhZGpqKkrNNy/20VPLL17sgsFgZ2dnX19fZGyxkIKCAqPRSH/TuZkfsaDDXiKvW4xonTQ7O0snhp9XlCaKZV5huvlC3x82yPD7/fEGHLQlKa5vpsfjoV+weZtAQqHQ1NQUt/d0aaK0Oix5Zb7Lxo4/crlcNAl3OUcBgCWTSCRFRUVyuZzmjep0uhWf7jK6VfrnpyNgCwsLacBhMplmZ2dpxmh1dXVkhmO8aDPAvHWtXq+nz4C9du3ajh07Ys9Apmsu81c4LgzD0ATYhISEsrIynU4nk8loMVpaWhbKUJmbm2ObdmZmZuJKx4ty3WLfXKvVRnZqsKLMf7XMK0w3p2WIxNZ8yzy7GNGPYKGuwPHxcafTKRKJdDqdQqEQi8W0VHR57Edh70tWcOVVKJtGo3G73YFAYHx8fKHcLABYBXRYIh2Uvvr/iat6tyEWi2mHcVVVldPp7OzsHBsbu3HjhlarjXHCgIXQnuPIm8vs7OwtW7ZYLJZz585NTk729PSwI0gXRW+L421YXo6ZmRmaFbFz586wqmuhOIlhGDqego7bbG9vT0tLi32Oy4WuW4xo40RCQkJpaekSNl/mFaabL5SlyCYTLKEFhV6QsKlQoqBzo9HJweYtCa25c3Nzwy51vP/wtLkoxkaCWFZehbKp1eqsrKy5ubnh4WGXyzUzM4OOFYC1tVZB/2okjU5PT4+OjoZlJqrV6rq6OtqYQ5MHl4xhGNpNE3l/WVhYKBQKU1NT6XxNnZ2ddM1Y0BhoZmYm8k7X7/fTWcJi7CCPEU0CkMvlsafxG41GOv/Brl27MjIyAoFAa2trjG0GwWBwoesWI7rh1NTU0jpllnmFaZaG1WqdNy+VZikmJSXR7xgbscVycWinZvSMVy76tDaNRsF/plwAACAASURBVDPviFAaUUkkkmVOrMkwDI2BYtlPjCuvQtlojo5CodDpdISQqamp6HmsALBRrUbAYTKZrly5cvXq1bDferFYvIS7z8j8xMnJSfpjF+WBNCUlJfSvV69ejfGWOj09XSAQBAIB+gA2LrPZ3N7e3tHREX1Wq6VFkR6PJ2w0ytzc3LwxmdvtphNvbNq0SaVSVVVVCYVCk8k0PDwcuXJkS8DExAS9FEt+kE9mZqZAIAiFQnSG1jDj4+PRA5FlXuGMjAyRSMQwTOTgW6fTSffJjoKWSqX044jsJogcpJOWliYQCBiGiRzkMu9Ux2z66kJFJYQEAoGwuMrv90dpRIm8dHSqe0JI5CikuFZe5bKxUlJSaFrM2NjYMod3AayC0tLShoaGhoaGjdQJSO8ze3t7e3p6zGZzjAlhK2U1Ag69Xk8ImZuba2trY3+qGIbp7++nP2phcwBE19/f39nZyf5gWa3WGzduEEISExPp/KHzEgqFdKZtj8dDJ9da9EByuby4uJgQ0tbWxq3vJycnW1tbCSFFRUVsA7LRaLx69WpY8wmbjBPjFLn0lp1OwU4vFMMwZrP53Llz9C03EGE7UzQaDZ30QqVS0ZE47e3tkTeRbW1tdIon+tZqtdKBLUlJSUtu4lYoFPQSdXV19fX1sZVWIBDo7u6+dOlSc3Mze8TISxTXFY4klUrp+XZ3dxuNRvZAs7OzV69eJYRoNBp2njSxWEzvsLu7u9mUF5/P19nZGTlXh1wup5eU9vrRPTMMMzo6ev369bCVF31aG01VZhjGZDKx/96zs7PDw8P07bzJImazmRsb0Wm1SMSDfuJa2W63j4+Pc78bq1A2lkAgyMrKEovFgUBgYmJiNbOjAID8eaK/gYEBs9lsNpsHBwdHRkZWM+ZYjRwOrVZbVVXV3t4+MDAwPDycnJwsEonsdjttry4oKIirwktPT+/q6urt7dVoNPS3nhAiEolqa2ujJ4TK5fItW7Y0NzebTKaenp5Y0g7KysosFsv09HRzc7NarVYqlS6Xi/7UZmZmsuNsg8HgtWvX6Kxt9913H7u5UqlUqVR0EEdvb69EImloaIhyuOTk5NzcXKPRaDQaR0ZGFAqFx+MJBoMikUir1dpsNm4LP+1MIYRUV1ezzQAGg8FoNDqdztbW1u3bt3MD84SEhEuXLimVSo1G4/F46AzTYrG4trZ2OfF7eXm5y+UaGxtrb2/v7u5OSkqiT57z+/0SiaSqqoqdRHXeSxTjFV6IwWBwOp3Dw8MtLS2dnZ2JiYn0AYGEELlcvnXrVm68UlZWNjk5OTs7e/LkSTp4dXZ2NhQK0YNGntfMzIzVar18+TJ9DB4dpZyUlEQvHSvK09oouVyemJhIZ/RzOBy0xmUYRigU0gh43ol3RCLR6Ogo7ewIBAL0oxcKhRkZGZGfVywrh0IhWs17PB527PQqlI1LLBZnZWUZjUY6VjauOw0AWCan02k2m9l+ap/PNzk5qdFoVm12nFWaNN5gMOzYsSM5OZm255hMprm5OZVKVVtbW1NTE9euNm/eXFNTI5FIrFYrjTboQ9FiSTtNS0ujdVhnZ2css12JxeIdO3aUl5cnJCQ4nU6TyeR0OmUyWXV19bZt29hqXiQS0ZiJ3kOzBAJBfX09rdvsdnssXTm1tbWbNm0Si8W0UzwYDGZmZu7duzc/P58QYrPZ6E7YzpS8vDzuQekkm4SQyI6V2traiooKv98/MTFBq8zU1NQ9e/YscxC2SCTaunUrnazM6/WaTKbJyUn60Ja9e/eyoeRClyjGK7wQ2nBVV1enUqncbvfExMTMzIxIJCosLGxsbAybEiM1NXXnzp00r9PhcDgcDolEUllZOe83UCKR7Ny5k+YAeTwei8USDAYNBsOuXbvCSkUvZvTBQZmZmTqdTigUMgzj9/sZhlGpVPn5+bQXxuPxRHYxZGZm0mlknU4nrdEVCkVeXt68yRaxrCwUCmkbTFhLDN9lC6NUKpHMAbAmfD5fWFZc5BJeCZ5++unoazAM43a7pVJp7GMfovB6vR6Ph2GYhISEuGbFiCwVHda/zP3Eezj6JO55n/Di9Xrn/cFlt1UoFDHmrIRCIXrzLZfL451DIozb7f7f//1fQgh9AE0oFKJxDB/XbW5ujj4gXiaTRXaFRLlEJIYrvCg6b5VIJFIoFFEiFfp99vl8EokklgP5/X63203THiNPij5qTqVSxfLsU4ZhfD4fwzBRZvej2bKEEPooOxoE0EfAR24S18rUQjNhrHjZAJZgYmIiJSWF15wJ+hhLQkh2dvaizxiPxfDwMHt3t3v37vWc8DEzM9PT08NttqQzc0TJRlhZq/0zkZCQsMwalBIIBLFkw62URQ8nEAgWqkqXUFShUBhlwsrlEAqF/D03a9Eu/Ch3wMv/QBUKRSwxsUAgUCqVsU/qJZFIojQCBQIBOm1uLLsSCATxfvkFAkHsidWxrLxQZMB32QDWCZFIRAMOh8Mxb359vNhHXC3aIrvmFAqFWq1mZ/mj91Gr+dxm3JcALJ1Go+EpNAQAPqjVatqJ4HQ6l/xUh3lpNJr13LxB/jzBt0QioeMYNBqNXq9fkb6LGCHgAACAu0VeXp7NZlvxgdk0dWxl97ni6OSECoWCJgUKhUJ2ZuHVgYADAADuFkqlcvPmzf39/Q6HY0XCDpFIpNFoCgsLV7NvYskEAsEaJl0h4NjgJBIJHYVxR/wzgEgkysjIIJxJXFZq5eVb5cMB8EQul1dUVKzgTDDrvCdl/UDAscFJJJL139AHLKFQGPtzheJaeflW+XAAvEKUsPpWaR4OAAAAuJsh4AAAAADeIeAAAAAA3iHgAAAAAN4h4AAAAADeIeAAAAAA3iHgAAAAAN4h4AAAAADeIeAAAIB1AZNxbWwIOAAAYF1YwenGYR1CwAEAAAC8Q8ABAAAAvEPAAQAAALxDwAEAAAC8Q8ABAAAAvIs14AiFQryWAwAA7maoZTa8mAIOoVDo8Xh8Ph/fpQEAgLtQKBSy2+0ikWitCwI8Ei+6hkAgkEqlHo/HZDKtQoEAAOAuJBAIUlJS1roUwKPFAw5CiFAoVKvVcrkcTV4AALDiBAKBWCwWiUSYbHQDiyngEAgEIpFIKBRiGjgAAFhxAoEAocaGF1PAQf48xT2+EAAAwAfULxterAEHwbcBAAAAlgrzcAAAAADvEHAAAAAA7xBwAAAAAO8QcAAAAADvEHAAAAAA7xBwAAAAAO8QcAAAAADvEHAAAAAA78QWi2WtywAAAAAbnDgxMXGtywAAAAAbnFgqla51GQAAAGCDEwuFSOMAAAAAfiHaAAAAAN4h4AAAAADeIeAAAAAA3iHgAAAAAN4h4AAAAADeIeAAAAAA3iHgAAAAAN4h4AAAAADeIeAAAAAA3iHgAAAAAN4h4AAAAADeIeAAAAAA3iHgAAAAAN4h4AAAAADeIeAAAAAA3iHgAAAAAN4h4AAAAADeIeAAAAAA3iHgAAAAAN4h4AAAAADeIeAAAAAA3iHgAAAAAN4h4AAAAADeiQOBwFqXAQAAADY4McMwa10GAAAA2ODEEolkrcsAAAAAGxxyOAAAAIB3CDgAAACAdwg4AAAAgHcIOAAAAIB3CDgAAACAdwg4AAAAgHcIOAAAAIB3CDgAAACAdwg4AAAAgHcIOAAAAIB3CDgAAACAdwg4AAAAgHcIOAAAAIB3CDgAAACAdwg4AAAAgHcIOAAAAIB3CDgAAACAdwg4AAAAgHcIOAAAAIB3CDgAAACAdwg4AAAAgHcIOAAAAIB3CDgAAACAdwg4AAAAgHcIOAAAAIB3CDgAAACAdwg4AAAAgHcIOAAAAIB3CDgAAACAdwg4AAAAgHcIOAAAAIB3CDgAAACAdwg4AAAAgHcIOAAAAIB3CDgAAACAdwg4AAAAgHcIOAAAAIB3CDgAAACAdwg4AAAAgHcIOAAAAIB3CDgAAACAdwg4AAAAgHcIOAAAAIB3CDgAAACAd+K1LgDA2ggEAoODg2NjY06nUygU5ubmVlZWrnWhAAA2LAQccDeanZ09efLk5OQku0ShUKxheQAANrz4Ao73339/YmIi9vUbGhrKysriLNKaGR0dvXjxokgk2rFjR0ZGxuoXYGpqanh42GQyORwOn8+nUqlSU1P1en1eXp5EIln98qxzV69evXHjBiFEq9V++tOfjlyhr6+vqamJYRhCiF6vP3DggFj8/77wzc3N3GiDEML+CQAA+MDvjyz9rb9TXLp0yWq1EkJaWloeeeSR1Ty01+u9ePFiT08Pd6HFYrFYLD09PYmJiY2Njenp6atQkuvXr7e0tBBC9Hr9Qw89tApH5Mnk5OS5c+foN1Cr1TY2NrIhhcViMRqN9HVZWVltba1CoQiFQnTJhrkCAADrSnwBh0QiUSqV3CWBQMDr9dLXYX8ihIhEouUUbpXJ5XL6QiaTreZx/X7/iRMnuE1HIpFILpfPzs7St3a7/Y9//OPDDz+8OjHHBjA7O3vq1KlAIEAIkUql+/fv5/aY0LCS2rp1K/24hUIkUAMA8Ci+gOPgwYNhS7q7u8+ePUtff/KTn0xISFiZcq2F3bt3d3Z2CoXCTZs2reZxu7q62GijrKysurparVYLhUK/3z86Otrc3Dw3NxcIBM6fP3/o0CG0/C/K7/efOXPG6XTSt42NjSkpKdwV2BBZo9GscnAJAHDXWsnaSyAQrODeVp9Go7n33ntX/7i9vb30RVZW1q5du9hbbYlEUlBQIBAITpw4QQixWCzj4+O5ubmrX8I7CMMwFy9eHB8fp2+3bt2an58fuQ59gVYNANgAvF6v3W5fwR0KhcLU1NQV3CHF++2yxWL5/e9/T3/iDx8+PDEx0dHRMTk5mZmZ+cADD9B1QqHQyMjI8PCw2Wx2uVwJCQlpaWl5eXkFBQXcTpnW1tYrV64QQoRC4ac+9anExET2T21tbVeuXGEYRiwWP/7441qtlj2uQqF48sknx8fHe3p6TCaT3+9PSkrKz88vLS0Ny8Q8ffp0X18fIaSqqoqNPHp6es6ePcswjF6vf+CBB27fvt3b2zszM7Nt2zbuKEqr1drf3z86Omq32+VyeWpqKi3/olVaKBSanp6mr/V6feT6ubm5YrGY9g5MT0/n5ub+4Q9/oJvk5+cfOHCAu7LL5frtb39LrzY3Y9fn8/X39xuNxpmZGZ/Pp1ar09PTCwoKsrOz6Qput/s3v/kNN+dmdHT05z//OSFk586d99xzD/co4+PjAwMDExMTbreb7qqwsDAzM5O7DnvdioqK9u3bNzIyMjAwYDabfT6fVqstKCgoKyujrTUjIyN9fX1TU1Mejyc5OXnejyZ2N2/e7Orqoq9LS0urqqq4fw3LerbZbPQcCSGf/exnjx49GuMVAABYP6anp8+fP7+CO5TJZIcOHVrBHVKr0T7P/oi3t7dfv36dvmabQ9xu95kzZ0ZHR9n1fT6f0+ns7+/PyMjYv38/mxqyadOmnp4em80WCoVaW1v37NlDl7tcrhs3btCj1NTUaLVa7nHdbvfly5fb2trY/c/NzdH444EHHojMO4ksPN2P1+s9f/58WF4ndevWrUuXLrFZh16v12az9fX16fX6/fv3R+9mEgqFSqXS5XIRQtikjbAVHn30Ubpz2v5vMBhowGE0Gj0eD7dTwGw2s1dbr9fTF1ar9eTJk9zEhZmZmZmZmc7OzrKysp07d9KobqEMX+5yv9//8ccfd3d3s0u8Xu/09HRHR0dVVdXWrVvZgIm9bi6X69y5c9xN5ubmJiYmRkZG7rvvvsuXL3d2drJ/Gh8fp9HMwYMHpVJplOs2L6PReOnSJfo6Kytrx44dcbVhxHIFAABgaVY1IYCNNsifA45AIHDy5EmTyUQX5uTkqNVqh8NB4w+TyXT27NmDBw/SakMqlW7dupX2L3R3d5eXl6elpRFC2trafD4fIUSj0VRUVEQel0YbCoVCJpPReIUQMj09fe7cuYMHD8bYEzQ1NTU1NRVWfkJIe3s7W8mJRCKdTud2ux0OByFkdHT0/Pnz+/fvj36IgoKCW7duEUI6Ozt1Ol1JSUnY+jqdjvs2JyeHHjEUCplMJm6XARu36fV6lUpFCPH5fB999JHNZiOESKXS/Px8qVRqNpvpuXR1dSUkJGzbtk0sFtfX1xNCxsfHx8bGCCEajaa0tJQQwjashUKhM2fODA4O0rcymSwpKclms83NzdHroFKpIq+/yWSin69Wq/X5fG63my4fGRl57733LBYLIUSpVIpEInrR6CY3b96sq6uLctEiWa3WpqYm+lqtVjc2NkY2kxgMBr1ePzk5OTw8TE+BbaaSSCSLXgEAgHUoJSVl9+7dK7hDnrqbVzsDMSsrq7CwUCaT0eZ0o9FIayOhUPjQQw9lZWXR1fr7+0+dOkUIGR0dnZycZGfFyM/Pz8/PHxoaIoRcv379gQcesFqttLYmhGzdunXe22KNRrNnz56MjAyBQOB2uy9dukS7TkZGRsbGxtiWgFiUlJRkZWWJRCLaoTM9Pc1GG5WVlXV1dVKplGEYo9H40UcfhUKhgYGBsrKy6IeorKwcGBigNfHZs2e7u7s3bdqk1+sXymdMSkpKT083m830+rABB506k74uKiqiL4aHh2m0oVAoHn30UVrsUCh09epVGoe1tbVVVFQolcrNmzcTQhiGYatbuoTV09PD7n/Pnj3FxcVCoTAYDLa1tdFxpFevXi0qKmIH+7Dy8/N37NihUqkYhjGbzSdOnPB4PIQQi8WiUqn27dtHP1+bzXbu3Dn6fejq6qqtrY09K8jj8TQ1NdFsULFYvH//fhpvhSkvLyeEdHR0sAEH9xwXvQIAAOuQTCZj+8fXs1VNmtu0adNDDz20adOmwsJCmvwolUrr6+vr6+t37NjBRhuEkKKiIrZnhN4Es+rr62nwZTQaR0dHr127Rpfn5uYWFBTMe9zdu3dnZmbS2kuhUOzatYsdJDkwMBB7+RsbGxsbG0tKSoqKiuhdL5sukJWVtW3bNhruCASCvLw8dqjLoodQq9UPPfQQexttMplOnz795ptvnjx5sr+/3+/3R25iMBjYndP0DkLI9PQ0O/6CDXHYTCK9Xs9mvQiFwsrKSo1Go1araZPSoudOAwv6evPmzaWlpfRTEIlENTU1dBiI3+8fGRkJ21AikTQ0NNDqXyAQZGRkcPMquHOsabXa6upq+trlcrFtIYsKhUIXLlxgU2EyMjLC2oQAAGDNrWoLxz333BPWUKPX6xe6+1er1fTWnK1EqaSkpJqaGto7c/bsWVotCYXCrVu3LnRDHJaoIZVKS0tL6SSVIyMjDMPEcictl8uLi4u5S4LBYH9/P33NVsCsnJwc2vQSyyGSk5MfffTR7u7utrY2ms9BW0cGBgYUCsXmzZvLysq4+bM5OTn0hcfjmZqaogmb7NCM3Nxc9pTZZpKJiQmn06lWq+lbhULxmc98ZtGzZlmtVjZ2CbsOQqEwLy9vZmaGEGI2m0tKSrh/lUqlYU01bChJCAlLNWWLRwjx+XyLZthQDoeDGzONjo729fWFFRIAANbWqgYcC1W6Pp/PaDSOjY1NT0+7XC7a3s5ikzFZVVVVfX19DoeDvQmurq5OTk6OvSQ0+YMQ4nK5vF5vLJMxCIXCsPI7nU42GJqamgq7I6dxQ+yHkEgkFRUVpaWlo6Ojg4ODAwMD9MTdbveFCxeGhob27t3LNsxoNBq9Xk8zNsbGxmi1TXuaCCGFhYXsbnNzc1taWmge7u9+97vi4uLMzEydTscd4xMLGvxRQ0NDYZeCzUiNZWgWdyqRsP1w3y4hVVMoFNKL9vHHH6enp2s0mnj3AAAAPFn7WaRMJtOZM2diadVn0Y4YmuRBCFEqlWGjHxfFzTNguyTixe3sYPNI5hX7IejcGwUFBTt27BgdHb116xZ95MfY2NjZs2cfeOABth2lsLCQBhwDAwN1dXVOp5M7vJbdoUajOXDgQHNzs81mCwQCt2/fvn37NiEkNTW1tLTUYDDEOFcbTcul6ODkeYUFi6uJdtX9z//8DyHE6/V+/PHHBw4cwEwbAADrxBoHHDab7cMPP6Q1d1ZWVllZmUqlonfAFy5coHmR8+IGKHNzc3Nzc0ue5HTJgx4jm15W8BAymcxgMBQWFl65cqW9vZ0QMjIyMj4+zgYTbK+KzWazWq3sCJr8/PywB59mZWU9/vjjtIOGfYbI9PT09PR0e3v7vn37YpkxPRgMxlLs2K/JyjIYDNu3bxeJRJs3b6adZUaj8fbt25g/AwBgnVjjgKOrq4uNNg4ePMhtbI8yDYPNZqOVChUKha5cuXL//ffHPqiBjuSkljzHFHfDxx57bGmJimNjYw6Hg2EYiUQSmXYgFArr6uo6OztpG8nk5CQbcCiVyry8PDraYnx8nA3OuP0pLLFYXFJSUlJSQnM+xsbG6D6dTufJkydjmZOe/TikUumTTz65rmZYVyqVu3fvpjkuNTU1o6OjNPy6fPlyZmZmXH1tAADAkzVucGbzHPPz82Ovw1paWmgFrNPpaJv50NAQe+8eC7Y9QK1WL7lpRKVSsS32bHdGvMxm8/nz55ubmy9evDhvKwL3gXlh+bNsbNHb20sTOIRCIXdwVCgUcvwZ3blMJsvJybn33nsffvhhuo7L5YrSksRi0zl9Ph83n2M9kEgkbPAnkUh27dpFXwcCgebm5iV3mQEAwApa44CDzQwIqxWizAxvNBrZgaa7du1iszcuX7487whSwsnfpPx+PzucNScnZ8mPgKHzaNHXra2tkekLFouFzugQBdsu4vF42FkuuGw2G3spwqa4YKdCn5qaovFEfn4+dx2/3//2228fPXr06NGjYVFFeno6O1MFNz+DFdY5otPp2D23trZGdhINDw+zz0tbWzqdjk7hRQgxmUy0Q2oJ1qp7CABgQ1rjhvHU1FSajXHr1q2cnBw6nYPVav3444/nTSP1+/2XL1+mr8vLy3U6nUql6urq8ng8Nputo6OjpqYmcqvm5mY68RchxOv1Xr58mR1RMm8HROwqKipo9ON0Os+cOXPvvffSMZ+BQIBOs+3xeO6//3423yJSVlZWWloazQylybMGg4G2nQSDQbPZzM3Q5E5VQgiRy+UFBQXs0FxCSNhMJAkJCXl5ebTxo7W1NTk5mR0sMz4+zs6kzp0ji+06mZ6ettvtiYmJoVBIKBRKJJLq6mo6y9nAwIBKpaqpqaF783g83d3dV69eTUxMPHDgQLzjX/hQWVk5MjJC5xBraWnJzs6OJU+FWugKEEKcTufVq1fn5uYqKiry8vJ4KjwAQFwcDkdcbfyLEovF7KO4VnK3K77HuJSUlNAK2+12//73v09OTg6FQmEt9tz7787OTjoCUywW09hCLpfX1dVduHCBEHLt2rWCgoLICs9utx8/flyj0cjl8pmZGbY1JfKRY/HKyMiora2lk4IYjUaj0ZiUlCSVSq1WK1vs6Pf9IpFo3759J06csFgsoVCopaWlpaVFLBYrFIqwkKuiooIdzcviBhxh/SlUXV3d6OhoIBAYHR09evRoXl6eXC53OBzsGNrs7GzubpOSkugLn8/39ttvy+Xy8vLyLVu2EELuueee0dFROjSmvb391q1bqampoVCIlpz8/+OE15ZYLN61a9e7775LP+vz58//xV/8RYwPZ4lyBdra2ugctWaz+cknn1zC014AAFac0+mMPlIyXjKZjI+AY427VHJzc+lPOWWxWGi0kZSUxGZHsh0iDoeDnVe0pqaGzSooLS2llUQwGGxpaYls7acXzuFwmM1mNtpIS0vbtWvXkvtTWHV1ddxTsFqt9JmohBCRSLRnzx46nXYUGo3mwQcf5H66gUAgLNqora1lH2DLlZ2dzea+0Dnjw1ZISUk5cOAA7Q3x+Xy9vb3t7e1stJGVldXY2MgdO5qZmcmNWrjZtSKRaP/+/WybUCgUmpycnJ6eptGGRqN5+OGHI0OitZKcnMx2rFgsFvabs6goV4D98gQCAXS4AADEZe3HGtTW1mZkZPT09ExMTPh8vuTk5Ly8vNLS0uHhYXozPTIy4vf7JRLJtWvX6C++UqnkDncUi8Vbtmz56KOPCCH9/f0lJSVhXRhVVVUlJSXd3d3sIZb5DHQugUBQW1tbUFAwMDBAh5wIhUKtVpuZmWkwGLhTZ0ahVCobGhoqKipGR0cnJibsdrvL5ZLL5UlJSRkZGXl5edzZObkSEhL0ej0NILhPcePS6/WPP/54f3//2NiY1Wr1er1KpTItLS03NzcvL487gSkhRCgUHjhw4Pbt20NDQ1arVaVScVuMEhIS9u/fv2nTpqGhIZPJ5HQ65XK5Vqul88ovOf2WJ/fcc8/IyAj9Ft28eVOv10fp22JFuQJVVVUOh8PlcrHdSQAAay4zM/Mv//Iv17oUixM888wza10GXlgslmPHjtHXn/70pxeqsO90gUDgrbfempubE4lETz755Hqr8gEAACjMw3hnGx4epm3+hYWFiDYAAGDdWvsuFViaUChkNpvZMTthj0wDAABYVxBw3JE++uij4eFhNm8xKysrbMQsAADAuoIulTsSd5SEUqlckeE2AAAA/EELxx0pKSnJarWKxWK9Xl9ZWRnjWBgAAIC1smFHqQAAAMD6gS4VAAAA4B0CDgAAAOAdAg4AAADgHQIOAAAA4B0CDgAAAOAdAg4AAADgHQIOAAAA4B0CDgAAAOAdAg4AAADgHQIOAAAA4B0CDgAAAOAdAg4AAADgHQIOAAAA4B0CDgAAAOAdAg4AAADgHQIOAAAA4B0CDgAAAOAdAg4AAADgHQIOAAAA4B0CDgAAAOAdAg4AAADgHQIOAAAA4B0CDgAAAOAdAg4AAADgHQIOAAAA4B0CDgAAAOAdAg4AAADgHQIOAAAA4B0CDgAAAOAdAg4AAADgHQIOAAAA4B0CDgAAAOAdAg4AAADgHQIOAAAA4B0CDgAAAOAdAg4AHuS8/QAAIABJREFUAADgHQIOAAAA4B0CDgAAAOAdAg4AAADgHQIOAAAA4B0CDgAAAOAdAg4AAADgHQIOAAAA4B0CDgAAAOCd2O/3r3UZAAAAYIMTC4Vo5AAAAAB+iUUi0VqXAQAAADY4NG8AAAAA7xBwAAAAAO8QcAAAAADvEHAAAAAA7xBwAAAAAO8QcAAAAADvEHAAAAAA7xBwAAAAAO8QcAAAAADvEHAAAAAA7xBwAAAAAO8QcAAAAADvEHAAAAAA7xBwAAAAAO8QcAAAAADvEHAAAAAA7xBwAAAAAO8QcAAAAADvEHAAAAAA7xBwAAAAAO8QcAAAAADvEHAAAAAA7xBwAAAAAO8QcAAAAADvEHAAAAAA7xBwAAAAAO8QcAAAAADvEHAAAAAA7xBwAAAAAO8QcAAAAADvEHAAAAAA7xBwAAAAAO8QcAAAAADvEHAAAAAA7xBwAAAAAO8QcAAAAADvEHAAAAAA7xBwAAAAAO8QcAAAAADvEHAAAAAA7xBwAAAAAO8QcAAAAADvEHAAAAAA7xBwAAAAAO8QcAAAAADvEHAAAAAA7xBwAAAAAO8QcAAAAADvEHAAAAAA7xBwAAAAAO8QcAAAAADvEHAAAAAA7xBwAAAAAO8QcAAAAADvEHAAAAAA78RrXQAA2FBGR0c//PBDhmEIIaWlpXv27FnrEgHAurAyAcfg4ODJkyfpTwwh5Itf/KJQGN52EgwGBwcHjUbj9PT03NycRqPJzMwsKirS6XQrdYgwv//972dmZhbds06ne+yxx2IpwwYzNDT00UcfsZeUJRQKVSpVYmJienp6QUFBUlLSmhRvOWZnZ9966y321A4cOJCfnx+5WktLy/Xr1+nr2traLVu2rFoJF7r4kb7whS+IRKJVKNIKiuW8AOBuswIBh8fjuXTpUvSfGIfDcerUqampKXbJ1NTU1NRUe3t7dXX1li1bov+kxnKISDGufzf/OM577qFQyOFwOByOkZGRlpaWysrK+vp6sfgOawzjntrly5ezsrKkUil/h3v//fcnJibo609+8pPJycmLbnI3f/EA4C60Ajkcra2tTqczygoej+fDDz/kRhtcbW1tLS0tyzwE8OfmzZtnzpwJhUJrXZCls9vtHR0da10KAIC72nJvWycnJ9vb26Ov09bWZrfb6Wu1Wl1dXa1QKEwmE7thW1tbQUFBWlrakg+xqE2bNmm12nn/xOuN751Co9FUVFSwbz0ez9DQkMVioW8HBgays7PLy8vXqHQr4Pr16wUFBQt9B9ZW2MUPs2jXIQDAHWFZAUcwGLx48WL0dXw+3+3bt+lrkUh08OBBmhOQn5+vUCguXbpE/9TX1zdvwBHLIWKRn5+v1+uXv5+NSqFQhNV5NTU1Z86cGRgYoG9v3LhRWlp651Z+wWCwpaVl//79AoFgrcsSLvLiAwBsPMsKOG7fvm02mwkhSqXS5XLNu47FYvH5fPR1WAZiSUkJG3AMDw9v3749sjKI5RAr5b//+79tNhshRC6XP/nkk4ODg52dnZOTkwaDoaGhwel0Hj16lPa7l5eXb9++vaOjo6+vb2ZmprGxsaSkhO6EzY2dmZlxuVwqlUqn0+Xm5ubl5YXV1tEPx+uZxkIsFtfV1bEBx+zsrNVqTUlJYVeYmpoaHBw0mUwOhyMUCmm12qysLIPBMG8rQjAY7O/vHxwcnJ6eFggEOp3OYDDk5ua+/vrrwWCQEFJcXLx3717uJqFQyGg0Dg8PT01Nzc7OqlSqtLS0vLy83NzcpQUNAwMDxcXFeXl5sW8yNjY2PDxsMpmcTqdMJktKSsrJySkqKmJbxTwez69//euwbIxjx44RQrKysh555JEllDOK2L9dp0+f7uvro68feeSRrKws9k/cVNk9e/aUlpYSQrq6us6fP09P5ODBg1lZWb29vUNDQzMzM0KhMDMzs7y8PCMjI6w8oVBoYGCgv79/enpaKBRmZ2dv2rRpZU8ZADaMpQccDoeDzb3Ytm3b6dOn512N1qlUamoq90/0F9xqtRJCnE7n3NycQqFYwiFW3NzcXHt7++XLl8OWs/XK3NzcuXPn2B90lt1uP3Xq1PT0NLvEYrFYLJbu7u6srKy9e/cqlcrYD7fmkpKSZDKZx+Ohb+fm5uiLYDB45cqVmzdvclc2mUwmk6m1tXXHjh1htY7X6z158uTY2Bi7ZHZ2dnBw0GAw0Ggj0tzcXFNT0+joKLuEXsmurq78/PzGxsaldYTR7FGJRLLomj6fr7m5mfsRe71eu90+NDTU2tq6b9++9PR0unzVcj+X9u2KHXsiMzMz169fn5ycZP/U29vb29vLDawJIYFA4PTp00NDQ+ySrq6unp4eg8GwnGIAwEa19BbyK1eu0KYLg8EQ5a7R6/Wyr2UyWdhfuREG2xAS7yH4wK3+I++nh4aGIqMNt9v9wQcfcOsDrvHx8T/96U+R5xjL4dZKKBTi5oqy99CR0QZ3k+bm5uHhYe7C8+fPc6MNVuQ1pPx+/4kTJ7jRBtfQ0BB7Lx4jdkyszWaLJXs0FAqdOXNmoeI5nc4PP/wwlhHXK2g53654Xb16lRttsJqbm91uN/u2paWFG21QoVCop6dnRYoBABvMEls4BgcHaWO7VCqtr6+Psqbf72dfR2YAcAdbcteM6xCxMJvNgUAgcrlWq100kXDRCICucOXKFXYojVqtrqysVCgUTqezra2NNhJMT0+3tbUtei7RDzc9PR37gJ3Ilva4mEwmbh1Gb6DtdjsbbUgkksbGRp1OFwgEOjs7b926RZe3trayAeLIyAjbL0OLVFBQIBAIRkZGFqrR29raaD8aPWhlZaVKpeJeyf7+/uLi4tzc3BhPpK6uzmw20xaaa9euFRQUJCYmRlm/p6eHrUpFIlF1dXVycrLH47l9+zaNM3w+34ULFx555BGZTPb0008TQj788EOTyUQ3OXToUFJS0soGjiv17YpRWlpaaWmpRCKZnJxkP9ZAIDA+Pk4bMKxWKzeVW6/X0+XDw8ODg4MrUgYA2GCWEnB4vV4296K+vl6tVofFClyx34ly14zrELG4du3avMsbGhrmDTiUSuW2bdvS09PFYvG8p5CRkbFly5bExESBQCAWi202G3tjJxaLH3roIbZKy8zMfPfdd+nrmzdvVlRUyOXyeA/HMhqNi44iZh0+fHhpXQ9+v39ycvLChQvsEp1Op9FoCCEej4dtM09NTS0oKKCvt23b1tvbSxu0aO1OT7O3t5fdicFgaGxspDFQcXFxYmJi5Ofi8XjYgEYqlT7yyCPslczKynrnnXfo697e3tgDDqVSWV9ff+7cOfLn7NF9+/YtFBAEg0FuVbp3797CwkL6urCw8L333qNDrkwm08TERHZ2Nu2g4e5NLBbH0mvDMplMP//5z+f9E53gbpnfrnhlZWU98MAD9BToZ83GHLQDlBDCbcSi69OpdIqLiy9evMiuDwDAWkrAcePGDXqzlZ6eXlZWttJFWqVDUAvV7nv37uXm2YWRyWT3338/95e9v7+ffW0wGLg30GlpaTk5OSMjI4SQQCAwOTkZ2T0U/XCrIEqdR9XX19M6NT09nU1f4BKJRFqtlm2Z8Hq9crk8GAwajUZ2nYqKCm6Ly7z7MZvNbHBZXl7OvZI6nS41NZV2K4yMjASDwdin4CwpKenp6aGNEP39/SUlJTk5OfOuabVa2cQjtVrN/bBkMllZWRnb/zU2NpadnR1jAZaDnVKMLOnbFS82iqIyMjLYAILtIeUWqaysjP0gBAJBbm4uAg4AiBR3wMGdFWP79u18TLq8CodYlFqtjvJXmUwWdh/J7dGPDB3YKoEQYrFYIquE6Idbczt37gwbVBwMBkdHR0dHR2kXD7drn6KRnNvtZjtlZDJZLNPYs5N/EELoKBjuXx0OB33h8/m8Xm9YlnEUQqFw69atx48fp28vX74cOebi/7J3L0FtZWue6Bd6IwQIIYRAQrwEGLAx+JWYtHHazrSdJ0+ezuo8XR0VNake3JzcQUV0D25EjapGFdGDjq47qug+deNWVHVVRVVmV2Z1Z+Y5dvqJD3ba+IUB837qhRBCCKG3tu7g67N6X0nIkpAMdv5/4YEs9Fjae+21v73Wt9Ym4jTnpqamlOrX0NDAH2dMdCiFfdaufRIHHzzJl0eWjLEc704AAD9x+QUc4lUx+vr69lqqSyz3kWy69i3gK3Lxs5/9rKTrcPCpHOx1ubHiLNoCnDhx4sSJE/v5hLw0NzcfP3485dzs9/tv374tPuXsRTwQlmNag3hL0grre70yY1JOFkajsaenZ2pqijHm9XrpQTrxDkoPaMQ7Nz3MKkxVVVVfX1/GP9FB8cZqV44SiYQ4uUepVL6BLwWAt11+Acfs7Cw/zYyPj++1AOivfvUr9rtzvPjyKH15bPE5gxJIC/iKvH5CiYiHZtLzNA//uuAp5zy5XE6TljUaTcoro9Hob37zGz6WX1dX197erlary8rKHj9+nBIfiDdLjqHnXhNl0xUwH/XEiROLi4t0/n7y5EnGyvPmd6Varc6+fMUhr11v73JwAPAm5RdwFHBDE/HVj/hCjYjX8qL0xrf0niniERa+XgUn/uGH83Lwtec8bnl5mUcbzc3NH374IR90mJiYSAk4xOGmeKgiC/H2ee+9944fP57Lu3KkVqtPnz49MjLCGIvH4+mzOlMKkN6Hkb3/o0QOW+2SSqUKhYJ3ckQiEdwfAABeK79LkwKaM/EckJRVBEKhkDg7j1rVw3k+fi3xCqopaQeMMfGSEm/j3d7FxDfh6+rqyp5hU1FRwU9FwWAwl7UrxBVmeXk5e69YATo7O7OP04kLsLa2llKAA8ldKKB2iXsd9rnFMhIn/O51X0YAALH8ejhaWloyni8TicSNGzf4f69du8YYozt063Q6pVJJ14WLi4v9/f38zt3iBYKam5upy72ArzgMxKl8s7Ozx44do0mkjLGNjQ0+U0MmkxUrK+WgiM9e4uGP3d3d9N4pqVRqsVj4ehuTk5Pnz5/nYyvp507GWENDg0QiodP8+vr6+Pj48ePH+Vsikci9e/csFgstyF0AqVQ6ODjIs0fT6XS6qqoq6qrZ3t5eXV3l64ZFIpHp6Wn+SvEUFfEJvuiJFAXULnGqx8bGBp9CHI1GMy7CVkCReKbqzMxMS0sLbYFkMpmx3wgAIL+Ao7q6OuOKSSmLZJjNZt7+KhSK7u7u58+fM8YEQfj1r39Nd4ulcwl/C1/aoYCvyMXq6upe6YcymUy8YHNhampqrFYrnVljsdh333139OjRioqKnZ0d8c88evToG+uHLxHx3hkbG5PJZBUVFT6f79mzZxmTKDs7O3nAMT09HQ6H6fy9uroqXhCM02g0x44de/HiBf330aNHbrfbYrEoFIrt7e2ZmRm/37+ysqLRaAqekmo0Gru7u/k9BVPQSl807MIYu3XrVl9fX21tbSQSefXqFe+TMxgM4jhAPOrx+PHjjo4OQRB6e3sLK2GKAmqXOBZ/9uxZPB6vra0NhUIzMzPieUAFa25u5tOD19bWrl+/3tbWRtFGyjqzAABkv7enz0VfX9/y8jK11IFAQLycFH9Bqa/7sywMoNVq9x9wMMbee+89l8sVCAQYY36/f3R0NOUFtbW1/f39+/+ig9XW1vb06VPq59je3v7Nb36T8WU8QKQ1KHnMsby8/Nor4IGBAafTySedpr9FEATazgWj7NG9uiK6urpWVlao5yAej/NbnXFyufzcuXMpa4rw30i3lWGMFSvgYPnXLrPZLJPJaDcJgsADuGLRarX9/f10IcEYW11dFS+4AgCQ7k2kl6tUqmvXru0VUvT19RVrPeaDVVFR8bOf/Ux8P1Uxo9F49erVdyC3rqqq6vLly+I16Ul5ebl49qy4tyN9GQ/S3t6e8SsUCsW1a9f4QEb6Xy9dulTwkAqhtUf3+qtEIrl06dJexdNoNB9//HHKnQitVuteu74o8q1darX6woUL6a9Uq9Xd3d1FKdKJEyf4OrNiJ0+eLMrnA8A75k30cDDGqqqqPv3006WlJbrbeDgcrqqqamhoaGtry7jc5FtKq9X+q3/1r5aXl1dXVz0eTzAYrKio0Ov1zc3NfJD7HdDc3Pyv//W/np6eXltbCwQC1dXVTU1N3d3dTqeTp2W4XC4eMSiVyqtXry4sLCwuLtLt6ek+5sFgkK/QmpJ8Smu5OhyO1dVVuju8QqGorq42m81tbW37vC0q6erqmp2d3WvxLh7WrKysrK+v7+zsKJVKfnv69NRmpVL5s5/9bHJycmVlxe/3V1RUFL1i51u72tvbq6qqZmZmbDZbOByurq62WCxHjhzZ2NjYazgpLzKZ7PLly4uLi/Pz85ubm2VlZY2Njd3d3XV1dS9evChFpioAvNXKvvjii4MuA/xEvXjxgucBDAwMvBsdXQAAkNE7cs0Nh1k8Hr9582bKHJZgMCi+x33KCAUAALxj3tCQCvyUvXjxYmFhwWazHTt2zGg00u1Pnz9/zvM8Kisr38xd0AAA4KAg4IDSCgaDNEUiEomMjY1lfM3777//DqTTAgBAFhhSgdJSq9VXr17lC1WlqKiouHbtGl+WCgAA3lVIGoU3IRaLra6u2mw2t9u9u7urVqv1er3JZGppaXlLF7MHAIC8YEgF3gS5XN7e3r7XyhYAAPDOw5AKAAAAlBwCDgAAACg5BBwAAABQcgg4AAAAoOQQcAAAAEDJIeAAAACAkkPAAQAAACWHgAMAAABKDgEHAAAAlBwCDgAAACg5BBwAAABQcgg4AAAAoOQQcAAAAEDJIeAAAACAkkPAAQAAACWHgAMAAABKDgEHAAAAlBwCDgAAACg5BBwAAABQcgg4AAAAoOQQcAAAAEDJIeAAAACAkkPAAQAAACWHgAMAAABKDgEHAAAAlBwCDgAAACg5BBwAAABQcgg4AAAAoOQQcAAAAEDJIeAAAACAkkPAAQAAACWHgAMAAABKDgEHAAAAlBwCDgAAACg5BBwAAABQcgg4AAAAoOQQcAAAAEDJIeAAAACAkkPAAQAAACWHgAMAAABKDgEHAAAAlJzsoAsAAFBygiAEAoF4PK5UKsvLyyUSXGsBvGkIOAo0Ozv79OlTxthnn32mUqkOujjwkzA1NTU+Ps4Y+73f+z2lUvnGvvf+/fs2m626uvrjjz9+Y19aLMlkcn5+fnJyMhwO0zMXLlxoaGg42FLBm3T79u319XWdTnflypXCPsHj8fzwww+MsfPnz5tMpjfzpe+ewgOO7e3tlZUVt9u9s7MTi8XKy8tramoaGxstFotMhjgG4F2TTCZzedn09PTU1FRLS8uJEydKXaRcTExMTE5Oip+Ry+Vv5qsFQXjw4MH6+vqpU6csFsub+dKfuMNW/UCskMhAEISJiYmpqSnxk7u7u7u7uzabbWJi4ty5czqdrkglPEixWOyrr75ijPX19fX09Bx0cQDeAq9evYpGo7Ozs8eOHXtjp/a9BINBaqkqKyvPnDlTU1PDGHtj4ymBQGBtbY0xNjc399YFHLdu3XK73fX19RcvXjzosuThUFU/SFHIgff8+XM6hjUazfHjx4eHhz/44IOhoSGr1VpWVhYMBm/duuXz+YpdVAB4C7S1tTHGmpubD0Nz7/V6qWOmv7+/rq5OJpPJZLI3FnBoNJq6ujrGWHNz85v5xiLKsUPrsDlU1Q9S5N3D4fV6Z2dnGWMGg+H8+fPinWqxWFpbW2/fvh2Pxx8/fnz58mVkZgH81Bw/fvzYsWOH5NiPRCL0oKqq6s1/u0QiuXz5siAIh2Rr/BQcquoHKfLeKw6Hgx709/enh5C1tbVHjx5ljG1ubm5ubu6/fADw1jk8zT2/TC8rKzuoMhyerfETgQ1+aOXdwxEKhejBXlcMRqORHmxtbVF3Iufz+ZaWllwu1+7urkwm02q1TU1NLS0tUqk05UP+4R/+gTF27Ngxq9U6NTVls9l2d3eHhoYsFovX671+/Tpj7OLFi0qlcmpqan19PRKJfPrpp3a7nWaOZMxCHx8fp5Ggjz/+uLq6OvvP/P7777e3t8XvpdkBVIaUF4fD4bm5ObvdvrOzo1QqDQZDV1cXjRan29jYWFxc9Hg8oVBIrVYbjUar1ZrL5RdPk/7kk0+kUun8/LzD4QgEAgqFoq6uzmq1pmxtjjb7+vp6IBAoKyurrq5ubGxsa2vba3KN0+lcWFjweDzxeLyqqqqpqclqtbrd7pGREcbYL3/5y5SkYEEQ7Hb70tLS1tZWIpGorKw0mUxWq1WhUGT5OfF4/JtvvonFYnq9/sMPP0z5ayQS+frrr5PJZEtLy+DgoPi7lpeX19bWtra24vF4RUVFfX19a2tr+taenJx8+fIlY+zzzz9PiYxDodA333zDGDtx4kRnZ2eWQvKirq2tra2teb3eaDSqUqnq6upaWlrS6xjN5jAYDB988MH8/Pzi4qLf729razt16hR/TTQapZ+wvb0tkUi0Wq3FYmlpadl/K+l0OldWVjY2NkKhUHl5uV6vb25ubmxs3Ov14XB4cXHR4XD4/X7GWGVlZWNjY3t7e+6zrlZXV0dHRxljJpNpaGiIDuSMyfl0RJ88ebKjo8PhcNAhEI/Hq6urm5ub29vb0xsBln9VFPv22293dnb4f//n//yf9CD9EM5xu2VpeSoqKjKWIR6Pf/nll4yxnp6evr4+8Z8SicTKygpVqlgsplarDQZDS0uLwWDY6xell+TKlStarXZxcXFlZcXn85WVldXW1ra3t5vN5oxvzGWPP3v2bGZmhv93fX2d9p3VahVX473k0tr85je/obPD5cuX0z+BckdS6g+V3Ol0bm9vJxKJiooKo9HY1tam1WpT3p7v3JB8m0cqzPz8vM1mo+ZXr9dbrdZcdhxXWJv5Dsg74OCT8QKBQPrOZoxVVVVdu3ZN/EoyPT39/Plz/t94PO5yuVwu1/T09PDwcGVlZfpHBYPBmzdv0rGRzu12v3r1ShAE/kxjYyMFHHa7Pf1kQNlbWq32tdFGFunjmh6P59GjR9FolJd5eXl5dXX13LlzKW2WIAjPnz+nASni9/v9fv/8/PzZs2ebmppyLIPD4ZiYmIjFYvTfeDy+srKysrLS399/5MiRlBenbHYqsMfjoc2u1+tTXv/8+fPp6Wn+X6/X6/V6FxcX9xqEDofDo6OjbrebP0OdW3NzcxcvXswSSMlksubm5vn5eY/HEwgENBqN+K9ut5s2tXiz7O7ujoyMiNODtre3t7e3KUGst7dX/AnFGoEOBAL3798Xf2kwGKQN3traevr06fRAIR6PP3r0aHl5mf4rvrb2er33798PBoP8GToKlpeXUwYo80LfuLq6yp+hJO6VlRWz2Tw4OJh+Yna5XKOjo7zest/tuOnp6bNnz2YJU8Sf8ODBA8aYXq8fHBzMGDGkiMVijx49WlxcTPlSu90+PDyc8gn5VsUciStGAduNZWp58hUOh+/du+f1evkzgUAgEAgsLi52d3cfP348x88JBoNjY2Piz3E6nU6nMz2+YcXY46+VY2vT0tKytbW1sbERDAbVarX49aFQiBoT8V5OLzm1nLOzs6dOnbJaraUusNjW1tbjx4/5FOt4PL66urq6unr8+PHu7u5cvrTgNvMdkHfA0dDQQP0EY2Nj586dSw8D6aIt5cm5uTnarzU1NV1dXVVVVbFYzOVyvXr1amdn5/bt21euXEn/qIWFBcaYRqOpr6+XSqUpVZOmuun1ep1Ol0wmpVKpSqUyGAxut3t1dXVgYEDcfvn9frrcaWlpyeVnfvTRR8lkkq7CGWO9vb10Lk9vVUdHR2UyWV9fn06ni8fjdPUmCMKjR48+/fRT8eufPn06Pz/PGGtubm5tbVUoFDs7O5OTk36//8GDB1VVVTlGQs+ePVMqlcePH6fL+o2NDWr+nj9/rtVqeQ8TY2xpaYk2u8Fg6Ozs1Gg08Xjc7XZPTk5Go9GRkZFPPvlEHFMvLi5SE69Wq48cOVJdXR2Px9fX12dnZycmJtJLEo/H79y5Q5dW3d3dDQ0NZWVlm5ubExMToVBoZGTk6tWrWa5BLRYLbRCn09nR0SH+E43cyWSy+vp6eiYajd6+fTsQCDDGjhw50tDQIJfLd3Z2ZmZmvF7vy5cvpVJpery1T7FY7O7duzs7OzKZrLu722AwyOXyYDA4PT3tdruXlpaqq6vTv5ROjXK53GQyqVQqvlv9fv/NmzcTiYRKpTp69KhOp4vFYg6HY2Zmxu12P3v27MyZM4WVk581zWYzXZyFw+GlpaW1tTWbzTY6Onr+/PmUuOfevXuCICiVyp6entraWnpycnIyEomMjIxcunRprw4z/gn3799PJpNVVVXnzp3LMVSanJxMJBJ0bapUKgOBwOTkZDAYXF9fX1paEp858q2K6a5evZpMJpeWlugi5Nq1a9QPIT4k891u/Few/3/Lk0t5xB4+fEhRQldXV0NDg0wmCwQCExMTgUDg1atXlZWVlPn4Wg8ePEgkElartaGhQSqVbm5uTk5OCoIwNTVlsVjE7XDue7yvr4+Gxe/evevxeChXj+UwTpF7a2MymZ49e8YYc7lcKb90fX2dHvC1Lnw+H5Vco9H09PTQj9re3p6YmNjd3R0bG9NqtRkjg9fKt3kkExMTUqm0p6dHr9dLpVKfzzc1NRWJRF68eKHVal+7vss+28y3Xd4/rK6urr29nfo5v/vuu+7u7ubm5pRQIEUgEKDqZTAYhoeH+dasr683GAx3794NBoMvXrx477330t/b29vb29ubsa5LJJKhoaGUzsOWlha32x2NRj0eDz9XMcZcLhc9yHHNlpRdLpVK92pSy8vLL168yC/QzWazSqWampoKh8Obm5u8n83hcNDJtbe399ixY/SkTqerr6//9a9/HQ6HJycnh4aGcilbRUXFpUuXeC+u0Wg0Go23bt1KJpMvXrzgAQf9lzFmMBguXLjAm0W9Xq/RaEZHRyOUTNfmAAAgAElEQVSRiMPh4BFYLBajw6+8vPzDDz/k+9RkMplMptu3b6eXZGpqii79h4eH+ZGm1+trampu3bq1s7OzvLyc5fpDr9eXl5eHQqGVlRVxwCEIgs1mY4yJ13R5+fIlRRvDw8P8akyn05nN5pGREZfL9fz584aGhv10X6Wz2WwUp77//vv8B2q12vr6+hs3bvh8vtnZ2a6urvRzUkNDw9mzZ8WtVTKZ/PHHHyna+Oijj/juq6+vVyqV4+Pji4uLnZ2dGXsNs6MLLJbWb9/Y2DgxMTExMeFwOJaXl1tbW+l5QRB+/PFHQRBUKtWHH37Iq65erzeZTDdu3AiHwz/++OPHH3+816l0Z2fn3r178XhcpVINDw/nPgSTSCSOHj1K5zP67Y2Njd9++y1dJvKqkr0q3rlzJ5fuK6o5vOmQyWQph3C+243L2PLkzufzUXMk3hR6vb6hoeH69eu7u7tTU1Otra25JJ0IgiAePjYajTqd7u7du4wxh8PB61Jee5yw3/XMlZWV5RJN5tXaaDQavV7v8XhsNltKwGG32xljdXV1vJAzMzOCIMjl8kuXLvGaoNPp9Hr9999/LwjC0tJSAQFHvs0jJ5PJLl26xNd9oDp8/fp1qrRGozH7jttnm/m2K2TY+OTJk3R8RqPRFy9e/Mu//MsPP/wwMzOz19jHwsICdT+eOnUq5UTe0NBAG3dpaYlOJ2IGg+Ho0aN7RdY9PT3px3xjYyPtbzpjcVSPdTpdxrGb/Thz5kzKcAAfIRZvEBoWpSBd/GKVSkXn2tXVVd5Nl11fX1/KmDGlFDDGtra2eOe/IAj9/f2Dg4MpnT2MMX7CFuepuFwu6rTs6elJiSDr6+vTcx1isRj9qLa2tpS43mAwUKQl7jxPJ5FIqNgej2d3d5c/7/F4aMCIj6eEQiHq7mptbU3p+5VKpSdPnqTHc3NzWb6uANXV1YODg4ODg+Lglb6U9nIwGOTzIDiZTPbee++lXBttbGxQGnV/f3/K7rNarbSDxH37uXv16hVjTKPRpAwqMcZ6enqoh3ZycpKfpF0uF+3348ePp1TdioqKgYEBxlggEKBDJh0NB4TDYZlMNjw8nPIJ2RkMhpRClpeX0zWAOMc8e1VM6QwrWL7bTfzXgqMNxhgfUEvpQ1IqlUeOHNHpdAqFgg+YZnf06NGUQ89oNFLFEw8C7nOP54K3NidOnMiltaED3+FwiA+fWCxGZRCPpzQ1NQ0ODg4NDaXUhMrKStqAW1tb+ylwjs0jR53ZKSWhs9j29nb2wuy/zXzbFRJwSCSSnp6eTz75xGq1UjTg8XiePXv23Xff3blzRzw0RagZNRqNGUeneISb/kadTpclWsyYlalSqaj9Wl1dTSQS9GQ4HKaeulLMhk+/pOYXfLzVoE5jxlhra2v6VSOveTkuXpKxw41fh/EBXalU2tLS0tLSkr6haDUCcQkZYxsbG/QgYzZJeteiy+WiLZxxq1KLTFmWWX4L/y6n08mfpMdyuZz3D21sbFDMmrGrmVKuGGNra2vFXTxAp9PRNkyPevkG4dWM02g06Rf9FAGXlZWlD5YrFAqqA+mHwGsFAgFq4zLmXUokEmoKA4EAD39puEoqlWbc0Wazma5o+Xw0sXg8PjIyQr0+Bazvl/GIphNJIpHgWzLfqliAArYbt1c+eI74iTO9unZ0dFy5cuXKlSs5/sb0/rCysjIKZ8XH3X72eI54a5NepIytDT8K+BgKY8ztdtNhLj5GGhsbMyZos9+lCaZH/HkVOMfmkcuYIMw3bPa5mevr6/tvM99qhY8VVVZWnjp1qq+vz+Vy2Ww2m80mCAJlwFmt1hMnTlAbHYlE6OJ1ryRerVYrkUgEQSjWWmEWi8Vms0UiET6iwdvxHMdT9ok3qbw14Z03CoUiPWrm2WfpfTy543GPODOfP2Oz2TY3NwOBAK/K8Xg85WXUsFZUVOTYQ86/SCKRpP8ofobe3d3N0npSn9POzo64R53Se5ubm/mZgNeNvdp6g8Fgt9sjkQjN/cml/LlLJBJOp9Plcvl8vkgkQk0Gb4xyDHFoE1VWVoZCIT7Vi6OmU5z9lyN+OqRR+XQ8JvD7/VRJ6FtoFaz010ul0rq6OofDkbHpHBsbo+cHBgbE2UL7kX685FsVC1DAdisWrVZrMpnsdvv8/LzX621tba2rq6uuri7WxF36HHG13M8ez1eOrY1arW5oaHA6nXa7nXcJ05WG0WhMP4QjkYjdbne73X6/PxKJ0K/LsUu4KAXOjnecpze/Kd9FD/bTZr7V9pucolAoLBaLxWKJRqN2u31ycjIQCFCyAs2h4rtwr7ZDIpGUl5fv7u4WpfYwxih/KpFI0ARF9rvInQbnivIV+eIx+JMnT7K8bD+BrVKppF8tjsoFQRgfHxen+r/223MfcuL76+bNm1le9trO4dbW1vHxcbfbTSnr29vbFHiJe61pAyqVyr3SqXjtikQixQ04vF7vgwcPsrcjuaCOdL/f//333+/1GkEQEolEXkmIrz2+xFuGHlC4U15evtdn0gYUD3IRmhpAj9fW1vhIUNHlWxUL/gqWz3YrorNnz05MTFC+M0UDSqWS1ggoLP8xu4L3eF7yam0YY83NzU6nc21t7fTp0zKZTBAE6gtPX3dgeXn5yZMnOQ4zla7AWcjlcrlcHovFsheSX2nss818exUtG1ahULS2tlJKl9frnZ+ft1qtBWTA7Z9cLrdYLEtLS6urq/39/clkknqzD3B14fRe94z2M9EuoxcvXtCQYVdXV3Nzc2VlpUwmowugL7/8Mt8oPkWOb3/tjzKbzbTGCaWsUxcrLS7CX5P7QElx13cKBAK3bt2iRSCOHj2q1+spsGOMzc/Pj42N5f5ROTYigiCU6CxeLDU1NVtbWx6P59WrVzznEfIik8n6+/u7urpsNpvD4aD1PObn5+fn55uamk6fPv02XuDm29rQBA1BENxud2Nj4+bmJkWBKWOONpvt4cOH9PojR45otVq5XE6dAaOjo4WlPRVW4P0rVpv59sov4IhGo3T1qdFoMh4SCoWir6/vzp07jLH19XWqHPSnvS4UBEGguK+It9umgIPmiQiCQLu5KBPNC8M3wpUrV0p0Wzve1c+/KxgM0uEkTobPgnZo7sM6vAL8/u///n4Wraqqqqqtrd3c3FxdXW1ra+PRofi8ywdr4/F4xk4OXruKewOF2dnZeDyuUCguXbq0z+59mnJpMplokmGx8L2w1/HFL+X5K2lmUPqwDkd9Vxk7iqxW68DAAE0LmpiY4JluxZVvVSz4K1g+263oysvLOzo6Ojo6EomE1+tdWFigFeEEQShuJdnPHs8Rb23SV8TZi1KpNJlMNpvNbrc3NjbSeArNJBe/jM8lOX/+fEo7s5+ri3ybx+x430b29qdYbebbK7/f7PP5rl+/fv369ZQ5IGJ82IIqsUqloiwbngiWYnt7mwK6InaH1NfX06612+1Ujw0Gw16rAb4B/KtLd0873ufPO6J5QkCOGfU0UB0IBHLsQ+ZftP8TA2W8ulyura0tSrhJyW7jdWOvDUi1S6lU8kaTH8/7SSOl6YsNDQ37Tyagzbu5uVnctFaeiL3XADyvBvyVFPJubGxkvN6iK06WKblBrVbTHIQzZ87Q8fXw4cNSjDjkWxULUMB2K5Z4PB6LxcS9npRFMTg4SDnRdru9uMFWwXs8d3xz5ZUnR73Oa2triUQi43hKMBikls1isRT3DJ1v85hdevObURHbzLdUfruQZzZlCTj4QCBvo+nk4XA4Mg6ELy0t0YOUmYf7wedbrqysUD0ubDylWP3z1dXVdCLkM4RT5NWHlnGAhm9G3oPCG5f0zvxAIJD+IXwIg3I2U6Rn2PBLW/7VKXL/UbzziQYpVCpVyki2wWCgfZHxu3Z3d6lCNjU18V3GLybSS577aYw2XcbcmnxjR0qxDIfD4vk4YoX1o2o0GorGFhYW0vepIAiUUKXRaHjmIyX8U5JT+gfa7faMPduMMX6fVbVaTWuUBYNBWlaruPKtigUoYLsVy61bt7766quMC9vwbV7cSKuwPZ5X68dbm/SYJmNrQ4xGo1QqjUajc3NzgUBAIpGkzEbhb0z/WEEQMk5bzbfAOTaP4r+mP8lHdrKn4BSxzXxL5RdwKJXK9vZ29rvVtdP3Sjgcph4wJgog2tvbqZ168uRJylvcbjct9d3S0lLcjE6KlEOhECXrFTaewmPqLL2RuaBF5RhjtBRgyl8jkcidO3eeP3+eY22bmJhIaXO9Xi/VYL1ezzsDeLfK4uKi+Ko6GAyOjo7SM+Jv5NfxtGqZ+PP5qmVilZWVFEq+evUq/STq8/m+/fbblZWVXH4Rpayz311upk9DLS8vp4q3sLCQ8l2CIDx58oR+jnjBHL4dUk5a0Wg093MknWxofor4eRpu5wXI5aOamppo846NjaW3Waurq99//30Bs1QYY7Syy87ODi0BLDY9PU0l7+np4eePhoYGump//vx5Sp5gMBikNfoqKiqyX6qazWba2isrK3wR92IRV8WUQy9jVSxMvtutWCj0pCW0U/7E54hmSfAsQGF7nMYuc8wk5a3NwsJCLq0Nkcvl1IZQFpfZbE4ZwCovL6emYGFhQRwZJBKJsbEx2kc5ZsjtVeAcm0dufHw8ZcfR7SkYYzU1Ndn76QtoMzOu9PP2yjtp9Pjx44FAgEZwKTO0qqpKqVRGIhGfzzc3N0fVQrxmYmVlZX9//9OnT10u1w8//HDkyJHKykq6lwplCKtUqv7+/uL+sNra2oqKCjpajEaj+AD2+/3fffcdY+zcuXPZ+9NomXafz7ewsEC9FGq1urChn/b2dpvNtr6+Pjk5ubW11d7eXlFREY/HvV7v9PR0MBgMBoNHjhzJpeve7/dfv369u7ub5oh6PB5az5gxJl4wsba2lgq/tLQUiUTMZjMtxDs3N8eje3FVlkqlAwMDDx48CAaD169f5+tJO53OvZr4gYGBjY0NWgmqo6PDZDJRTXC5XLQ+oM1ms1gsuTTZlLJOjzPulL6+PqfTubu7e+/eva6ursbGRloQemZmhsKUvr4+8a7R6XQajSYQCLx8+TIUClHE6ff75+bmcs/Gb29vd7lcyWTy5s2bVG+j0ejq6qp4wYwcs0FlMtng4OCdO3do83Z3d9fV1UmlUrozC10heTyeAlJ8mpqazGazzWabnJzc3t6mJbojkcjy8jI1XkajUbxgokQiee+9927evBkOh69fv97b20tf6vP5eCx75syZ166vfPz4cZqmODY2VltbW8RJJeKqeOPGjVyqYgHy3W7F0tnZubi4GA6Hb9++bbVajUajUqkMh8Nra2t02fDatZvzVdger6qqottDvnjxgupqlk7ofFsbzmKxLC8vU/OVPj9FJpNZrdbZ2dmdnZ0bN25YrVaVShUMBufn53nUHg6Hk8lkvnFhwQVOJBK3bt3q7OykbUJLm9Nb+vv7X1uMvNpMujmiRCL58MMPS5T894blHXDI5fJz5869fPlyZmYmHA5nvK9BT09PShpOZ2dnPB4fHx/f2tqiGz5xGo0mr9WRc1RWVtba2krFS6/Huevo6Hj8+LEgCNTbf+rUqcICDolEcu7cuYcPH9rtdofDkbLGjk6nGxoaynEjWK1WmieW8vyJEyfEGXwSieTs2bO3b98Oh8Mp33j06FGHw+H1ere2tsTHanNzs9/vp9tbiLsBaCni9AtZtVp96dKle/fuBQKB2dlZ8X3pGGOtra0nT57MsSFobGyk5VjKy8szjiUrFIqLFy/eu3fP7/dPT0+nTGbr7e1NuXOSRCKhE3w8Hhd3SDDGrFZrjuetpqamzs7O2dnZWCxG954lVVVVbW1ttPz2zs5OjoPfRqPx/PnzDx48oCV6U/46MDCQy61r05WVlQ0ODv744490B5CUbnNaZD2lx6i2tnZ4ePi3v/1tJBJJ6e+hwCiX8U25XD44OHjjxo14PP7jjz9evHixiPNrslTF2traHHvOsitguxWFSqW6cOHCyMgI5S2Kb83KGDMYDHzl3CIqYI+3tLTMzs4KgvDq1atXr15ZLJYstaKA1obU19fThNK9Appjx455vV6Px+P3+8UlN5lM5eXldCAHAoF8492CC3z69GmaTJvSBA0MDORy1OTVZtKFjSAIhV2KHEKFTIuVyWQDAwNWq9Vut7tcLr/fHw6H5XJ5dXW1wWCwWCwZ06x6enoaGxsXFxfp9vRyuZwWwGltbS3RvWr42TdlPIV3oOXSPra3t8tkstnZ2a2tLZVKtZ/AiGI1p9O5urrK74VdXV1tsViamppyb6wbGhq6u7vp9vQ7OzsKhcJgMHR0dKTfbau6uvrq1atzc3N0J2WVSkUrQ+t0OrVaTbU5EomIf9SxY8fq6uroJq78nuDt7e38wEhpgunmwKurqzabjW60XVFRodPpWltbeeJFLuguz263u6WlZa93aTSaq1ev0k29t7a2otEo3Z6+ra0t49Go1+uvXr06MzPjcDjC4TDdVp4KlvuFMoVxdDt1QRBof7W3t8fjcerRzWvY1WQy/fznP+e3CE8mk7RCc1tb235yBWQy2dDQkMvl4rdZpzwYi8ViMpkybk+j0fjJJ58sLi7a7Xbxzcrb2tpyv7zW6XT9/f3Pnj3zeDxTU1P8JkFF8dqquP/BjgK2W1HU1NRcvXp1eXnZ4XD4fL5oNKpSqWpray0Wi9lsLtH8hXz3uFarvXz58uTk5MbGhkQieW3ybAGtDWNMKpXSXaMtFkvGKR5yufyDDz5YWlpaWVnx+XwSiUSv17e2tprNZqoY9LEFdLAVVmCDwfDxxx/T7el3dnZoQeSMze9ecm8zW1paHA6HXC4/wCmWxVX2xRdfHHQZSoXuwNTY2Dg8PCx+3ul00v2Nfvazn71F9wL2eDw//PADY+z8+fNvZslUsbGxsfn5eZlM9stf/rIUnx+NRv/5n/85mUx+9NFH+8mWh3fekydP5ubmSlcVAaBE3tmpwIlEgm73lT6eQnMdq6ur36Jo443hd5YSo0XrWdrtpoqI7itBkX6JvgLeLgdVFQGgRN7ZgGN+fj4UCqV3RoXDYQpEUu7aCoyx+fl5uut6yvOzs7OUopXx5k/7Fw6HaaZAR0dH6fqx4S2SpSrS7PoSVUUAKJ2SJE8coPX19VAo5Ha76Sa/3d3dKfOsaPCS7v9yMEU8rJLJ5OrqaigUun79ekdHR0NDg0KhCIfDy8vLNIeitra2uMvDh0Khzc3N3d3d+fl5ul8Rv+ct/JS9+aoIAG/AuxZwTE5O8imLBoOhq6sr5QWU8qNSqXAlnaKsrOz9999/+PCh0+lMT56vq6sbGhoq7m0+/H7//fv3+X/Pnj1bxOXt4e315qsiALwB71rAUVVV5fV6VSpVS0vLkSNHMrZKB7jG+SGnVCovXLiwvr5OS4YEAgGaPNLU1NTU1FT05HmFQqHRaILBYH19fW9vbynukwlvqTdcFQHgDXiXZ6kAAADAIYELBQAAACg5BBwAAABQcgg4AAAAoOQQcAAAAEDJIeAAAACAkkPAAQAAACWHgAMAAABKDgEHAAAAlBwCDgAAACg5BBwAAABQcgg4AAAAoOQQcAAAAEDJIeAAAACAkkPAAQAAACWHgAMAAABKDgEHAAAAlBwCDgAAACg5BBwAAABQcgg4AAAAoOQQcAAAAEDJIeAAAACAkpMddAEA4DXi8XggEBAEoby8vLy8/KCLAwBQiHcw4PB4PD/88ANj7Pz58yaT6aCLA1C4WCz28uXL+fl5QRDomd/7vd9TKpUHWyoolvv379tsNq1We+3atYMuC0DJ5R1whMPhr7/+mh53d3cfP378tW/Z2Ni4efMmPR4aGrJYLPl+KcBPkCAIIyMjbrdb/KRcLj+o8sBhEIvFlpeXbTbb1taWIAgajaa+vt5qtVZWVh500QBeY189HAsLC729vTLZaz5kaWmJP04mk/v5RnhXxWKxr776ijHW19fX09OTy1smJydfvnzJGPvlL3/52kr4NnI4HBRtmEym/v5+tVqdSCQkEuRd/XT5/f6RkZGdnR3+jM/n8/l8c3Nz586da2xsPMCyAbzWvhqvaDTqcrle+5rl5eX9fAtARu988LqxsUEPTp8+XVlZKZVKFQrFwRYJDlA8Hr937x5FG2az+cyZM2fPnu3s7GSMCYLw29/+NhgMHnQZAbLZ73XhwsKC2WzO8oK1tTU+/AwAuYtEIoyx8vJylUp10GWBg+dwOAKBAGOsv7//yJEj9GRzc7NWq3306FEikVhZWenu7j7QMgJkU3gPh16vZ4w5nU5x/166hYUF/mIAyB114WAMBcjm5iY9aG9vFz/f2tpKQ4r8BQCHU+E9HC0tLV6vVxCE1dXV3t7ejK/xer1er5cx1tra6vF49voop9O5srLi8XiCwaBcLtfpdE1NTc3NzVKplF6wubl548YNxlhvb++xY8fS33737l3G2JkzZ9ra2sR/CofD8/PzNpstEAgoFIq6urr29naDwZCxGIIg2O32paWlra2tRCJRWVlpMpmsVmv2fux4PP7NN9/EYrHa2tqPPvoo5a+RSOTrr79OJpMtLS2Dg4Pi71peXl5bW9va2orH4xUVFfX19a2trTU1NSmfMDExMTExwRj7/PPPUxIGQ6HQN998wxg7ceIE9axmlCUT/saNG5ubm0ePHj169GjGTz516pTVauXPh8PhxcVFp9O5vb2dSCQqKiqMRmNbW5tWq0355H/4h39gjJ08ebKjo8PhcCwuLno8nng8Xl1d3dzc3N7eznfu999/v729zd84Pj4+Pj7O9s4vttls9+/fFz/z5ZdfMsYqKio+/fRT8fNUWofD4ff7GWOVlZWNjY3t7e05dhjMzMw8e/ZMrVb/4he/8Hq98/Pz6+vr4XBYrVY3NDR0dnZqNJqMb6RhxLW1te3tbYlEotVqLRZLS0tLSuhAm+jYsWNWq3Vqaspms+3u7g4NDen1+n/5l3/hL9vd3aVXMsZ+/vOfi78091o0Ozv79OlTxtjnn3++sbExMzOzubmpUql+/vOfM8bu3r3rdDotFsvZs2edTufS0tLm5mY0Gq2srGxqauro6KCKt7Ozs7Cw4HQ6A4GAUqmsq6vr6OjI61ritUf6a9F1/NramtfrjcViarW6rq6utbV1r4M6x31BfD7f0tLS+vp6IBAoKyurrq5ubGxsa2tLqTBer/f69euMsYsXLyqVyqmpqfX19Ugk8umnn1ZUVNBrBEGgcvp8Pqoz9fX17e3tOp1ur5+2tbU1Pz/vcrlCoVBFRYXJZOrq6hLPgu7t7e3q6iorK0tpB8rKyjQajc/ni8fjOW5GgANReMAhk8na2trm5+fn5+e7u7szHsCUvaFUKo1GY8YPicfjjx49Wl1d5c9EIhGn0+l0Oufm5oaHh+l40+l0Go0mEAisrKwcPXq0rKxM/CFOp5MepORMbW1tPX78OBwO8+9aWVlZWVk5fvx4esdjOBweHR0VzwjY3Nzc3Nycm5u7ePFiVVVVlu3Q3Nw8Pz+/ubkZCARSTkJut5uuU5uamviTu7u7IyMjPp+PP7O9vb29vT07O3vs2LG9oreCGY1Gm81GDZ+46QwGg3RJZLPZUgIOChMZY+J23OVyjY6ORqNR/ozf7/f7/bOzsylxCReLxR49erS4uMifoa1qt9svXLhAdWavVIx9pmikl5a+enp6+uzZs7mn14XDYX62Jjs7Ozs7O4uLi8PDw+nnOa/Xe//+ffFousvlcrlcy8vL58+fT59jEgwGb968SSFRXgqrRbOzs5Rpmy4ajT569Eic4r21tbW1tbW8vHz58mWPx/PgwQN+SgsGg3Q0pUf5GeV4pGcXDofv3bvHKydjLBAIBAKBpaWljDPm8toX09PTz58/Fz/j8Xg8Hs/09PTw8HDGuMrtdr969YoPGfN2KRQK3bt3b2trK6WcCwsLe+VEz8/Pj42N8f/u7OxMT0+vrKxcvnyZNykKhSLjxY8gCDTUolar0/8KcHgUHnAIgtDS0jI/Px8KhdbX1xsaGlJeEIvF6ExjtVpTQgTuyZMn1Aa1tbU1NzerVKpwOLy6urqwsEDhwvDwMGOsrKystbX15cuXgUBga2tLfJWQTCbX1tYYY42NjSkXIhMTE1KptKenR6/XS6VSn883NTUViURevHih1WrFBY7H43fu3PH5fGVlZT09PUajsaysbHNzc2JiIhQKjYyMXL16Ncs8CIvFMj8/zxhzOp0dHR3iPzkcDsaYTCarr6+nZ6LR6O3bt6mBOHLkSENDg1wup9O21+t9+fKlVCrlA7RFwU+Km5ub4oVJeHTl8/lSQiXqjlKr1TzS8vl89+7do2l4PT091KWxvb09MTGxu7s7Njam1WrTG+XJyclEIkG9IEqlMhAITE5OBoPB9fX1xcVFilGuXLmSTCapo4gx1tvbSz9/r6vexsbGzz//nDH26tWrqakpxthnn30mlUrFdczr9VJplUplT09PbW0tPTk5ORmJREZGRi5dulRXV5fL1hME4enTp1qtlro0otGozWZbXl6Ox+MjIyOffPKJuNb5/f6bN28mEgmVSnX06FGdTheLxRwOx8zMjNvtfvbs2ZkzZ1I+n8YcaXKjVCpVq9Xl5eX0Ax89erS2tqZWqz/++GN6Ma+EGWvRzs7OzMxM9lpE0UZjYyNloYr/RAngzc3NTU1Ncrl8d3d3enqaYsrf/va3Ho9HIpEcP368pqYmkUi43e7Z2dlkMvn48WOj0fjaU12OR3p2Dx8+pGijq6uroaFBJpMFAoGJiYlAIPDq1avKykpx6JPXvlhaWqJow2Aw0I6Ox+Nut3tycjIajdKOTj/ZT05OMsb0er1Op0smk7Q9aTIzRRtWq7WxsVGhUAQCgampKb/fPz4+Xl5e3traKv6c7e3tsbGxqqqqrq4ujUZD/bIbGxuhUGh8fHxoaCj7ZlldXaVAELNU4JArPMYTVqwAACAASURBVOBIJBK1tbVardbn8y0uLqYHHHa7nQ6DlpaWRCKR/gl+v58up3p6evr6+ujJ6urq+vp6iUQyNzfncDh2dnZofrnZbKa20uFwiAOOra2tUCjEGEvvfpfJZJcuXeIvrq+vb2xsvH79eiwWe/78OUUV9KepqSm6UhweHuY/RK/X19TU3Lp1a2dnZ3l5OeMVPH9leXl5KBRaWVkRBxyCINhsNiobP1VQ2ETfxRsI6lseGRlxuVzPnz9vaGiorq7e6+vyVVVVVVFRsbu7u7GxIQ44KBgi6+vr4oBjfX2dMSZOB56enhYEQS6XX7p0iZ9ddDqdXq///vvvBUFYWlpKDzgSiYR4vIZ2wbfffhuPx1dXV2mTpkRyUqk0+1ITEomEukZ4p5pMJhN/iCAIP/74oyAIKpXqww8/5L9Lr9ebTKYbN26Ew+Eff/zx448/zrEn32w2Dw4O8q8wm81arfb58+exWGxmZoZfWCeTyR9//JHOcB999BHvXa+vr1cqlePj44uLi52dnenDT729vb29veI+QtoC9Ex6FzrbuxaZzebstaiiomJ4eHiv2jUwMNDV1cX/a7FYfvjhB5/P53a7pVLplStXeABqMpl0Ot2DBw+SyaTT6UzJKkiR15G+F5/PRyGRuEbp9fqGhobr16/v7u5OTU21trbSQZ3Xvkgmky9evGCMGQyGCxcu8Fqh1+s1Gs3o6GgkEnE4HC0tLSlFkkgkQ0NDKVnzi4uLFBWJ+370er3ZbL5165bX63327FlTU5O4xiaTycbGxqGhIf5kU1PTrVu3PB7P6urqmTNnslzteDyex48fU+ERcMAhV3g+miAIZWVldM5YW1tLn5FF3RsNDQ2VlZUZJ6rIZLLBwcHBwcGUXgEmGoDgGanV1dUUOqysrIg72/m83PSI5/jx4ykjppWVlVTg7e1t3uFJpw3GWFtbW8qHGAwG6h4QDwqkk0gk1Bh5PJ7d3V3+vMfjicViTHTmDoVCdEXb2tqa0jpIpdKTJ0/S47m5uSxfVwCKM/jYE2MsHo9TMETJH+LgIxqNUovJe2UYYxaLZXBwcGhoKOVatrKykroKxB3InMFgSOnbLy8vp8KULsHN5XJRUsjx48dTRrgqKioGBgYYY4FAwG635/iB/f39KS1+Z2cnbYeFhQUeTG9sbNCP6u/v52c4YrVa6TQmHlMgBoPh6NGjeWWG7qcWnT59eq9oQ61WpxyJMpmMx9nd3d0pA4s8eBWn4GSU15G+F97CpHRNKZXKI0eO6HQ6hUJBhxvLc18IgtDf3z84OHjixImUGJRv3oy/saenJyXaSCaT1Jjo9fqUkSaZTNbf388Yi0ajKZVfLpenRBUSiYT3glBkmdH29va9e/cSiYRarR4cHER+MRxyhVdQamctFgvVchrX4La3t6nHni59MvZwqNXqlpaWlpaW9OFb3nspToOik/rOzo744KfvNZlM6es9Z+zm5Q0cP+bX19epeM3NzemvpwbF6/WKswGyfKz4pE7BkFwu54MaGxsbFHtlHPamNFX6UcVdZIJCh+3tbeoNYox5PB5BEPR6PZ1RHA4H/4F8y4h7LBobG1taWtKjOsYYbXmaw5lCp9Olj6bRfkkkEhlrxf5R8CSVSsV5M5zZbKYOA3GMlV369aVEIqHtFo1G+fmAAriysrL0C02FQkGbLmXZULbHJspuP7UovX9FXMj0MxY/NtNHoGQyGQ0nZT80WP5H+l4fQg/Sf1dHR8eVK1euXLnCPy2vfSGVSql46RuHd57xUEYsPTk3EAhQ5JTeHcIY0+l0PT09PT09KTWqoqIiPZGZb6uMX80YCwaDd+/ejUajCoVieHgYCRxw+O0rh4MxplAoWltbFxYW5ubmOjs7edO5srLCGFOpVHRsZ1+KY2Njw+FweL3eUChE7Q5/vbhlMZvNlLvncDioadjd3aUL69yXS+fdtvyKij+QSCTp1zG8Cd7d3c0yXUWn01VWVu7s7PCRAva7S6jm5mbevvAUv/SmihgMBrvdHolEQqFQEVsQfrbY3NykEIoCI5PJVFVVVVVV5ff7PR4Ptc4UcBgMhvQYLhKJ2Gy2jY0Nv98fiURo7/C03BzxSlKilbuoe6auri5jR7RUKq2rq3M4HPvsYuEnp93dXeozoMpTWVkZCoV4YMfRxhQnPBbsTdYivrMyDj/R0ZH7Qjs5HukZabVak8lkt9vn5+e9Xm9ra2tdXV11dXXGcK2wfbGzs2Oz2Sj7m0dReU39EPfIpv9VJpPxEaXcZdwygiA8fPgwGAxKpdIPPvggSxwJcHjsK4eDHlDAEQgENjY26FI+kUhQEiWf/bhXk0Sj6eJegSzUarXRaKQkc8r0plSDsrKyvWbBpJPL5XK5PBaL8esG3h7xG75ktNd1Btfa2jo+Pu52u4PBoFqt3t7epmtfcacrdQMolcq9BmX5hU40Gi1iwKFQKAwGg9vt3tjYMJvNPNOWtpvFYpmYmHA6nRRw0FZN78xYXl5+8uTJa7fDgaMdmmXWA21Y8eBXAdIvQKnP3+/3f//993u9SxCERCKR+yzQjHKvRZFI5JBc+OZ1pO/l7NmzExMTlBhL4YJSqWxqamppaUnJH8p3XwiCMD4+Pj09vZ/iMVFlKPWasC6Xi3po+vv7s0y1BThUCg84eNyt1+spdXRpaYkCDqfTSdcHvF9xryCdJrlR4N/Q0FBeXk5tqM/n+/Wvf53+lubmZpfL5ff7fT6fVquljlOz2byf+2fmeAXz2ss4s9lMC0i4XK62tjY6bdPiH/w1B7gad2Njo9vtdjqdAwMD29vbFBXRhZHRaJyYmFhbWztx4kQ8HqcpKuIEDsaYzWZ7+PAhfU5XV5dWq5XL5XSBOzo6mp6a8M5L76fJMRQTBGGfAUfutSjfwZoSKeBIz4jSILq6umw2m8PhoNUvaGZ+U1PT6dOn+Wk+333x4sULyr3o6upqbm6urKyUyWS09b788stDuL4F75/LOG4IcDgV55ZXVqt1bGyMlrhQqVTidNEs77Lb7XSZcv78+ZTT214aGxslEokgCE6ns6KigpIk8jrkeN8Gz/znjdTv//7v7yfrqqqqqra2dnNzc3V1ta2tjYKhlEWNeLpDPB7PeHnKMyGKfoVEsaDf76dZqYwxs9lMTapOp6NpirR+VDKZVCgUKZ20PI3/3LlzKVvpkJzVOJoxlN6RztEY0D4v/XkOI99TtA1NJtP58+f388mvlXstOiS3li3gSM+ivLy8o6Ojo6MjkUh4vd6FhQVa2ksQBL7l89oXwWCQoo39r4LDN/hr81r2KRKJlJWV8TQagLdCcbKam5qaKA6gNT0pHS/7TDn2u8UeZDLZXqsEplMqlZQQt7Ky4na7BUGQSCS5j6cw0SArD4b4gyzZ4DmixHKXy7W1tUUdninBED+Li9drEqP7dSmVSt5jz8/u++wd0Wq1dGr0er0UDPFBE4lEQuV0uVy0U0wmkziqCAaDtN14jvBhRj3MGxsbGS9MBUGgXUOLcxSML9XFJ0HQsP3m5map+7Fyr0WHZDylgCM9XTwej8Vi4kRjSscZHByk5Fm73c4P4bz2BU/mEE8aLwxvTDKu5JZMJmldk/2HI6dOnfq3//bf0notAG+L4pw8lEoljZ7Mz8/T6qI8XTSF+GqYzgfxeDx9tCLLwos0l4RW8WKMWSyWvToDMgYQvPOfD/ryRlC8xqJY7jlxPCWeFg1UqVQpQ8sGg4G2QMbv2t3dpdSKpqYmvqH4r0vPzcw4MWQvEomE2tPl5eWNjQ2JRCIe66GS2+12OhmnxHC8lU8/hQuC8NpZkbkooJtkr7dQxUskEhRXpbDb7dTc575oQXoFSCaTlKWkUqn4OYY2Wjgc3itToVh3MXxtLaIfLq5FB6uwIz3FrVu3vvrqq9u3b6f/ie9KfkTktS94rU6v3oFAIK+5VBqNhiYPU9Z8iu3t7e++++67777j9wEG+Ekp2tUqXdzzOIBPds+Cr5GQcnBubGzwVX7TWyij0Si+U1GW8ZTx8fGUG7j4/X46T9TU1PDLRLphBGPs1atX6c2Tz+f79ttvMzYf6eguG7xszc3NKf0B5eXl1PFD96QQ/0kQhCdPntBj8SJjvJwpE4+j0ah4ve1cUCtMZyOTySTuja+rq5NKpZubmzRKlTIHsry8nH7IwsKCeHQ8kUiMjY3RdfY+57jyDZVlKCQFr2ApgVdDQwM1+s+fP0/JDA0Gg8+ePWOM0b0qcvyi8fHxlHpIWdKMsba2Nl7ypqYm6t8eGxtLD3ZXV1e///77osxSeW0tosv6LEvVvWGFHekpqPbScuMpf6IhQibK5M1rX/A+qoWFBXGPSDAYHB0dpWdyDBbLyspoYRu3202XXpwgCHRTJJlMluMqt9nhLtzw1ilODgdjTK/XV1dXb29v02GQcU2LFBaL5eXLl4IgPHr0yOv11tXVJRKJjY0N8XVbevIX3buEFj6SSqVZhoQTicStW7c6OzvpbErBEF3E9Pf3iy/+BgYGNjY26E4NHR0dtKpHJBJxuVwzMzM0VGSxWHK5XmxububngJRFgUhfX5/T6dzd3b13715XV1djYyOt0Ez306IXiPMn+H1kXr58GQqF6GLO7/fPzc3lO88ivUuDk8lkJpOJun+0Wm1KVzwtADU7O7uzs3Pjxg2r1apSqXZ3d/l5lzEWDoeTyWTBl9QSiYTqz8LCQnV1tVqt5jmte+FdC0+fPm1vb4/H4zQ7WiKRvPfeezdv3gyHw9evX+/t7aVBFp/PNzExQR1F2VdvTLG8vBwIBGjF61gsZrfbZ2dnGWNKpVJ8zzxa3urOnTvBYPD69evd3d1U8ei2I7RtPR5PUeYU5FuLDlZhR3qKzs7OxcXFcDh8+/Ztq9VqNBqVSmU4HF5bW6PPsVgsvN7mtS/4islLS0uRSMRsNlNzMTc3x/s8cu9NbGtro8VGHz58uLm5yZc2p8k1jLETJ07sP0NraWnp0aNHNTU1ly5dyr0mAxysotVUWnWUrtFfmy5KKioqBgcHR0dHGWOUav6/yiSTnThx4tGjR2yPBf4sFgsFHOIlw9OdPn2aprqlzHYbGBhICVPUavWlS5fu3bsXCARmZ2fpdMK1traePHkyx1MpT2stLy/PmCWgUCguXrx47949v9+fXrbe3t6UG8tJJBJqOuPxuHgrMcasVqv4v69Fp3DqkEgP1HjAkXGs4dixY16v1+Px+P1+cc+KyWQqLy+nYgQCgVz2+146OzsfP34sCAJd9Z46dSr7KbO+vp6WbLfb7Xa7XSqV8uVYamtrh4eHf/vb30YikZR+IDoV5ZW62NXVNTMzk3JhLZPJzp07l5KyZzQaz58//+DBg2g0Smm2YgMDA1lu6puXfGvRwaIjndZBz+tIF1OpVBcuXBgZGaEcT0rz5AwGw6lTp8TP5L4vJBLJ2bNnb9++HQ6HHQ6HeEW4o0eP0sIhW1tbOcbTEonk3Llz9+7do5AlZb3XEydO5HKvu9ei1c+8Xq/f78e0WHhbFDM0bmpqevbsmSAIr00X5SwWS2Vl5dzcnMvlCofDGo3GZDJ1dHSo1WqfzxeNRjOOy/ATefb5KQaD4eOPP6bb0+/s7NCKnx0dHRn7M6uqqq5du7a6umqz2ejO1xUVFTqdju58nfuFu0Kh0Ov1brd7r1tgM8Y0Gs3Vq1fp7tVbW1vRaJRuLN7W1pax7dDr9VevXp2ZmXE4HHTHV35L7rwCDsaYyWTy+Xy1tbXp6YT8HJzxZCyXyz/44IOlpaWVlRWfzyeRSPR6fWtrq9lspvvOM8Yikch+Ao729naZTDY7O7u1taVSqV6bfi+TyS5fvkwriMRisZRNZzQaP/nkk8XFRbvdLr49fVtbW76plN3d3RTjUi1Vq9U0NzhlzWxiMpl+/vOfLy4uOhwOv9+fTCZp9fe2trYi3h+H5V+LDlZhR3qKmpqaq1evLi8vOxwOepdKpaqtrbVYLGazOf1wy31fVFdXX716dW5ujtLeVSpVfX19R0eHTqdTq9WU2BSJRHKcEqJWqz/66KOVlRVqTGhNnYaGBqvVWqw60Nra6vF4amtri1upAEqq7IsvvjjoMuTN5XLduXNHJpN99tlnh607MRqNfv3114IgfPTRR/ucBwEHa2ZmhhI+PvvsM0w+BADYp8M+xTEjGrIVLxl+eNB6ANQ7ctBlAQAAOCzevoDD4/FQrnvG2yMdrHA4TJN0Ojo6DsmMRAAAgMPg0PUQ7MXn8/n9/u3tbcrorK+vL8rUsqIIhUKbm5vBYJBmjtAN7Q66UAAAAIfIWxNw2O32ly9f0mOlUnnmzJmDLY+Y3++/f/8+/+/Zs2f3c28XAACAd89bE3CUl5erVCpBEEwm07Fjxw7Jms1EoVBoNJpgMFhfX9/b25uyuigAAAAcooDjD/7gDwYHBzEdAAAAYJ/C4fDDhw///u///qAL8r9JT548edBlYIyxP/iDP/jggw8O4awTAACAt45MJmtpaamsrKQ19Q+DwzJLZXBw8KCLAAAA8E45VOfWwxJwYCQFAACguA7VufWwBBwAAADwDkPAAQAAACWHgAMAAABKDgEHAAAAlBwCDgAAACg5BBwAAABQcgg4AAAAoOQQcAAAAEDJIeAAAACAkkPAAQAAACWHgAMAAABKDgEHAAAAlBwCDgAAACg5BBwAAABQcgg4AAAAoOQQcAAAAEDJIeAAAACAkkPAAQAAACWHgAMAAABKDgEHAAAAlBwCDgAAACg5BBwAAABQcgg4AAAAoOQQcAAAAEDJIeAAAACAkkPAAQAAACWHgAMAAABKDgEHAAAAlBwCDgAAACg5BBwAAABQcgg4AAAAoOQQcAAAAEDJIeAAAACAkpMddAEA4FBY3t5a2fYxltzrBccNDVpV+ZssEgC8SxBwAPzUPV93fP7V3y75vNlf1l/fePMP/48axBwAUBAMqQD8pPnCocv/7b8u+rxJxrL/e7buuPzf/utWOHTQRQaAt1KuPRzxeDwej5e0KADw5v31y6e5xxAUc6CfA+AtEhWY4nD0LeQxpJJMJsvKysrKykpXGgB4w3zh0J5ZG5k8W3ec/H/+75bqGsZe3xRoVaoLlrY/Pv1+wcUDgH36fxd39QpJZ5WsoVxaqzzI0CO/HA65XC6VSktUFAB4Kyz5tpZ8Wzm++OuZya9nJ2/94Re4UgE4KJ6o4PFEGWOVsrIWjaylQtZQfgCRx+HoZwGAd1SSsTsri9/MTB50QQCA7cSTL32x/2EP/fVi8Ik3FhXe6LdjlgoAMMZYtVLVX99Q3M98vu7cjoTpwWddvcX9cAAoWERIPvFGJ3yxo1r5Ma38zSR5IOAAAMYY669vuP2HX7CiJmld+tv/cmd1kTGWZXkPADgoFHbM+mMndYrOqpLHAwg4AOB3kBMO8NOzE0/ecUeeeKOlDjuQwwEAAPBTR2HHnfVIpGSJHQg4AAAAgDHGZnfi39pCO/GSjIEi4AAAAID/xRMV/vtqyFOCjg4EHAAAAPC/RYTkf18LzfqLvLw4Ag4AAABIdccdeeCJFvEDEXAAAABABi99sTvrkWJ9GgIOAAAAyGx2J/7SFyvKRyHgAAAAgD098EQdocT+PwcBBwAAAGRzwxnZ/7wVBBwAAACQTURI3t33mmAIOAAAAOA1NqPCDWd4P5+AgAMAAABezxFKPPEWPlEWAQcAAADk5KUvXvDACgIOAAAAyElUSE74CuzkwO3pAYAxxrYj4Xuri0X/zOJ+IAAcuJe+eGeVvFJWlu8bEXAA/KRVK1VljCUZe77uvPi3/6W4H87vOFmtKi/uJwPAQYkKySeb0Q/qlfm+EUMqAD9pf9R3slqlosfJYv8j1UrVH/WdPKgfCABFN7sTL+AW9gg4AH7StKryW3/4RUt1TYk+v7lae/sPv6hBDwfAu+XJZt6ZHBhSAfipG6hvXPw//y9fOPR83VHcT+6vb9QqVWVleY/1AsAhN7sTP1mryCuTAwEHALAyxmpU5Reb2w+6IADw1lgOxI9p5bm/HkMqAAAAkLdZfzyv1yPgAAAAgLxtRoW8FgFDwAEAAACFWAnk0cmBgAMAAAAKsbyLgAMAAABKzBHKY0wFAQcAAAAUIioklwOJHF+MgAMAAAAKtBlFwAEAAAAllvsK5wg4AAAAoEDOYK5pHAg4AAAAoOQQcAAAAECBAnH0cAAAAECJ5X6fegQcAAAAUHIIOAAAAKBwntxuqYKAAwAAAEoOAQcAAAAUTq/MKZZAwAEAAAAlh4ADAAAAClSryDWQQMABAAAABVJIynJ8JQIOAAAAKJBSmusrEXAAAABAgXS5ZYwyBBwAAADwBiDgAAAAgAK1VMhyfCUCDgAAACiEQlKW4yIcDAEHAAAAFKalIueUUQQcAAAAUJjcx1MYAg4AAAAoTIsGPRwAAABQSs35jKcwBBwAAABQgLzGUxgCDgAAAChAoxo9HAAAAFBKR6vllbJc76JCEHAAAABAHhSSspO1inzfhYADAAAA8nBUK8t5ua//DQEHAAAA5EohKTumzbt7gyHgAAAAgNyd1MkL6N5gjOU3pwUOyoMHD1ZWVujx0NCQxWLJ5U/vsImJiYmJCfEzn3/+uVwuP6jyALyNvvzyy3g8To//zb/5N1JpfpMO4CdIIys7pi2wpUXAcTC2trZ2d3fpscFgUChe0z1169atv/qrv6LHf/3Xfy2OKrL86e3i8XhmZ2e9Xm8wGNRoNFqt1mq1GgyGjC9++vTpn/7pn4qf+cUvfoGAAyAvf/7nf761tUWPP/vsMwQc8FpDemXB70XAcTD+w3/4D3fu3KHH//k//+df/OIXB1qcAzY6OvqrX/2KbxCxU6dO/dEf/dGHH3742pgMAABK6mi1PK+1zFMg4DgAy8vL4pPrV1999ZMNOILB4J/92Z/90z/9014vGBsbGxsbu3Dhwp//+Z8bjcY3WbZ33rNnzyKRCD0+ceIEQjp4M1Dx3lINKulQ3b52FgKOA/Cb3/xG/N+RkZGFhYX29vaDKs9B2d3d/eM//uNbt2699pV37979d//u3/3N3/yNXq9/AwX7ifjTP/3Tly9f0uNHjx5h28KbgYr3NqpVSK40qvb5IZil8qYlEol//Md/THny+vXrB1KYg/UXf/EXuUQbZGZm5k/+5E8EQShpkQAAIIVCUnahXlnYzBQxBBxv2uPHj5eWllKe/Md//MdYLHYg5Tkojx49+tWvfiV+RqfT/cf/+B9HR0cnJiZGR0f/8i//squrS/yCH374IfcABQAAiuKKUanff7iBIZU377vvvuOP//2///f/6T/9J8bYysrKo0eP3n///ZJ+dSgUcrvdfr9fpVLp9fqampqSfl12f/u3f5vyzF/+5V+eOnWKHqvVaqPR2NXVde3aNT7cyxj7u7/7uw8//DD7JzscDq/Xq1QqzWZzeXl5juUJh8Nra/8fe3ceF1X1/w/8DDMw7Mgqq+OCG+AamqKiiYqaiGaZmmVpoKV9tPy5lJqWmpXmR/18zLQy1EpcU5IUyw0TFxAXUFTcUEBAYIBhHQbm98fN8z2fOyzDnbmg+Ho+/OPMXc9cjnPf92z3YUVFhUKhsLGx4a0tKCjIz88vLi62tLR0dHQUcOmKioqys7PVarWTk1PLli15a5VKZU5OjkajcXV1dXR0rPdoKpUqLy9PpVKZm5s7ODjos4uBjF54srOzlUqlWq22trb28PCQy/Xq+l5YWJiXl8f9Idzd3S0tLcXbq7y8PCsrS6VSWVpaOjs729ra1ruLWq1OT08vLi42NTVt0aKFq6urRFL/yyaE7VU3rVb76NEj7j+Ci4uLnZ2d/vsqlcrs7Oyqqqoay2qNRPptEXZYMa7n82ygi7yhL2mrDQKORlVQULBv3z4uPWrUqAkTJnABByHk0KFD4gUc165d27Fjx+HDh1UqFV0YEBDw+uuvjxw5kh0Ll5iYGBYWxqWnTZv2/vvvs8cpLi4eMmQIVxmzfft2X19fdu3Jkyfnzp3LpefNmzdhwoTa8pOZmXno0CF2SWhoKI02KIVC8cYbb2zdupU9RXZ2dm0/gnFxcevWrUtISOA+WlhYTJw4cfr06c7OznSb2NjYDz/8kH5s167d7t27Y2Jivvjii4cPHxJCli9f/sYbb3Br1Wp1dHT0b7/99vfff7Mn6t2795gxY8aMGWNu/j+NmryDe3p6Hjx48N69exs3boyOjqaR06BBg+bPn9+pUydCyNWrVzdt2sR26xkxYsScOXPat2+v+wWrq6uPHTu2b9++48eP0+kTCCG9evUaP358SEiIPv3vpkyZwk1hQsdDEkKGDh1qYmJCCPnxxx+7d+/Obq9/4dFHYWHhvn37IiMjb9++TRdaWFiEhoa++eabnTt3rnEvrVZ7/PjxyMjIY8eO0YVyuTw4OHjKlCk9evQw4l6EkLS0tIiIiKioKHqJZDJZUFDQlClT+vTpU+Muqamp27dvP3DgAB3uTghRKBSvv/7666+/XtudUtheukJDQ9PT0wkhvXv33rhx45EjRzZv3kz7SchkspEjR86cObPGQsVKSUnZuHEj+1DUq1evDz74oH///rXton/xaFDBE1bqjHU9gWNmIunrZNbR1mhxAppUGtWJEyfKysq49IgRI5ycnEaNGsV9PHDgQH5+vtHPqNVqN2/eHBISsnv3bva/LiEkLi5u9uzZ7777Lvv/v3Pnzmq1WqlUKpXKuLg43tESExNzcnK4tWfPnuWtvXz5svKJrl271pEr3pxdhJDBgwfXuCV3V2bRWc54du7cOXnyZBptEELKysq2bt06fvx47reYU11drWSkpqYeO3bsvffe46INQgj9LcvKypo8efLcuXN50QYh5MKFC5988smrr77Kywzv4CkpKXFxcaNHj96/fz9bT3Py5MmJEyfeuXMnOjr61Vdf5XUiPnz48KuvvkrvFpRKpXr//fenT59+9OhRNtoghMTHx8+bN+/tt9/O3vr2ygAAIABJREFUzs6u8eKwysvLueyxCwsLC7mFbC+ZhhaeeqWkpLz22msrVqxgow1CSFlZWWRk5Msvv/zrr7/q7lVRUTF//vywsDA2buCWR0VFjRs3bsuWLVqt1ih7EUKioqKGDx++bds29qtpNJqYmJhJkyatX79ed6/o6OgxY8b88ssv7H2OEJKWlvb111+/8sorKSkpuicStleNSkpKuD/f3bt3v/jii1mzZrHlR6PRREVFjR49Wrcks/7444/Q0FA22iCExMfHv/XWWzWOI2to8dCz4AkudUa8nkAIMTORjPIwN2K0QRBwNDJavWFhYREQEEAIGTlyJLekoqJCjA4KP/zww1dffcUucXBwYD+eOnVqxowZNAyysLAICgri0nFxcUVFRezGZ86coWndjq4XLlzgElxrSB25un79Om9J27Zta9xy5MiRsf+LV61CrVy5ssblaWlpy5cvry0nhYWFixYtYpfIZDJCiFKpfPvtt9nwpcZv8eabbz569Ki2DTQazbRp03g/f/S8c+fO/X//7//xQgeOSqVaunQpe+9Xq9UffPBB3Z2Lz507Fx4eXlxcXMc2DdLQwlO3jIyMadOm0VDDysoqICBgwIABbG3/4sWLdW+KK1eupP9xOLxxDV9++aXuHVHYXvv3758zZw4bHfL2Wr9+/d69e9klFy9e/OCDD+hF6Nix4+jRowMDA62srLglaWlpYWFheXl5hu9Vr9TUVLZGkFVRUTFz5swHDx7Utm9tpZEQsmjRIt1ybtziYeBhRbqezy1HM5OJCkuj9NtgIeBoPKmpqbTOYPTo0dzvbEBAAO1nsGfPnhofuQRLSkpatWoV/bho0SJuWosbN25s3bpVoVBwy+Pj47/77ju6Gduyc+PGDZquqqo6cuQI/ZiQkJCRkUE/qlSqc+fOcekhQ4bUXdOu+yBeWy8ES0tLz/9Ff0H09+eff965c6e2tTk5OexHLudff/31rVu36j1yenr6559/Xsdfjb118Vy9erWOtZcvX2bDsu3bt8fGxtabn6SkJPZPWaOdO3empqampqZ26dKFLjx79iy3kDY0CCs8ddi0aVNWVhaXHjNmzMmTJ3/++edt27adOnVq/PjxdDPe0WJjY2l3H3d39++///769esXLly4fPnyxx9/TDdbtWpVbm6ugXulpqYuWbKE/cqXLl26cOFCcnLy+vXraS+TL7/8kt1r48aNNL18+fJDhw6tW7cuIiIiJiaGtr9kZmbu3LmT/V7C9tLTwoULz5w5k5qaeunSpfXr19OYSaVSbdq0qY4d58yZc/r06dTU1IsXL65fv57e6TUaDa+iSEDx0KfgCS51ol7P500HG9koTwu5CLPOIuBoPOzjaXBwMJewtbUNDQ3l0vHx8Tdv3jTiGbds2ULTS5YsmTZtGvcLYmZmNmjQoM2bN9Pf0C1bttCbAdu2zVbMpqSk0HYHDq3SIISwOa+tnZsqKCjgLeF1hhBg+vTpZ86cSUlJOXHixNixY3lrdetUdHGRn0wmu3nz5q5du9hVw4YNO3bsWEpKyqlTp8aNG8euiomJqaMipGPHjnv37r1+/XpsbKzu9G4ODg7fffddcnIy93zGW0svaWFhIft7Sgjp0qXLgQMHkpOTz5w5M3PmTHbVTz/9xN4OdZmYmEilUl5EKH2Cdq8TVnhqo9FoaH2DTCZbunQpDTFtbW0//vhj2lE3Li6OrTBnhzKtWbMmKCiIKyq2trZhYWHTp0/nVhUWFrKT6QnbKyIigj4iz5kzZ9q0adxTgaWlZUhIyLx587hVSqWStoKVlJTQI/j4+EyaNIleWHd394ULF9KDs/WXwvbS09dffx0eHu7m5iaVSu3s7EJCQmhHMULIvn37Hj9+XOOOn3322b/+9S8PDw+pVGpvb89+ZfK/PwVEUPHQp+AJK3WiXs/nTV8ns0HGGAFbIwQcjUStVtPpN+zt7Xv37k1XDRs2jKbZKgQDpaenR0dHc2lPT0/dLpwdOnR48803uXRFRcVff/3Fpdu1a0efJNhbKa3AoH2vTp06Rddeu3aNpuvojsfhNc0SpueEYB988IGbm5tcLlcoFOwPJSczM7O2HRUKxZYtW65cuXLt2rWbN28OHz788OHD7AYymWz58uVt2rSRy+VeXl7Lli3jVbNHRUXVdvDly5f37NnT3Nzc09PznXfe4a2dO3fusGHDLC0t7e3taV9dit4YTpw4UVhYyK5auXJl165dLS0t3dzc5syZw/a3LSsrYwNBYQQXntpIJJKoqKiYmJiYmJgjR47wBk3Y2dl169aNfqT13nfv3qUtLB07dnzxxRd5h2UzRu+IwvZSKpX08dfe3n7q1Km8vcaMGUPT9Puq1Wq6UKPR8OaJ6dSp07dPvPfee3S5sL30NHToUN6Sfv360f+SGo2mtvj41Vdf5S3p2bMnTbMxpdGLh4GHFfV6Pj862MgmtrYU/GI2fSDgaCQXLlyg1QNjx45lB+a9+OKLtOpy9+7d5eXlRjkjGwGMGjWqxgGi7G/T+fPnuYREIqHLY2NjaX7+/PNPLrFgwQIuERMTQ0OHxMRELtG1a1c3NzejfAXBXF1ded+X1xmFtXLlyiFDhnBP2KampqamprxuBIMHD2bHuVhZWdGeN5wTJ07UNiMZe2fVbTZiu81bW1vz2qppb4yLFy+yy319ff38/OhHqVTK3q1JTX1yG0pw4amNVCpt/0SN/XXYQaf0/sFmY8SIEbqDG728vL755ps1a9asWbOG9js2fK/BgwdbW1vz9nJwcKD9h86dO8dlskWLFnTox61bt1auXMn2dTAzMxv+BHu5hO0lmEQieeWVV+jH2toKdS8U23zJhrxGLx4GHraRr2fz42YuHeVhPqil3EYm7vhhDIttJL///jtN82aSsLCwGDNmDNfVKysr69y5c4MGDTL8jPfv36fp2kYbent70zTbhbt3795cpXRZWRnX5pqZmRkfH08IcXJyGjNmzN69exMSEioqKhITEwcOHKjRaOhNurbxJizdiS5q660mmLm5OdutjH0G4mGDCS4nNHjisE3OHB8fH/ZjZmZmQUEBL1zQVW8tDm9Qa1VVFZdgf4gJIcXFxbyOrlevXmU/1tvAUS9DCk/dKisrL168ePbs2ZSUlIyMDKVSyXVk0a30IoSww4tqfA2yiYmJbvOZ4Xs9ePCgxj7INASsqKgoLCx0dnaWSCSzZs2aPXs2tzwiIiIiIqJv3759+/bt2bNn9+7da5zzQ9hehvD09KTpOro56+aTptmOSiIVD8GHbfzr2Wy4mUtfcDR1t2iktwQj4GgMeXl5tNbdzc2te/fu9F7CGTx4MO1bfvDgQaMEHOwzfYsWLWrchn2sfPDgQVVVFXdTZNtErl271qVLF1pLP3LkSDMzs+DgYK5i9syZMwMHDrx79y5td+/Vq1e9edN91jdWvY7hdEd56F493SUqlaregEMwXh/btLS02sYGc3S7yDSUIYWnDpcuXVq+fPnly5f1zAYbheg/iYKwvdgn+Pj4eC68rkNpaSmXGDVqVFlZ2cqVK+l5z549yw0at7Gxee211yZNmqRbqSNsL8HYRsA6avv0JFLxMOSwjXw9mwE3c2kHW5lxR73WC00qjeH48eN0PMKjR498fHza/6/JkyfTjQ8ePKjPbAoNoudEe3QzR0dHbtQueVKfT/tkBQYGEmYkyx9//FFVVUW7ZMrl8rpn4ODovve1to5sKpUq7X/VOMrUiHSHnHADZVm8eNGI56pRQ0e6GveNMw0tPLWJj4+fPHkyjTY6d+48bdq0jz/+eMmSJUuWLOFVGgnOhuC9GvpuAVoGJBLJ+PHjY2Ji5s6d6+XlxW6jUqm2bt06fPjwH3/8kfe3FrbXU8hYxcPAwzab6ykqMxNJBxvZQBf5lLZWIZ5GnmNDHw07Xx310lAbrVbLG7hfr7/++otOdikY+yhQ2yMv+yzo4eHBTfnHCQwM5Abxnjp1qrCwkOvAIZfLX3jhBUJIhw4dvL29b9++nZmZef369StXrnB7DR48WJ9hq2wXBM7t27drjFR+++23ZcuWsUt2796tOyepEdU4rzlvCa8LJyFEt8nfiNzc3Ni/lLu7O28yUB7a51cwAwuPrsrKysWLF9NGrm+++SY0NJTd5eLFi7ojidi/hf4zjAnbi/0Lzpgxg44jqw2vo5Krq+vMmTOnT59+48aNq1evXrhwISYmhnvM0Gg0K1eudHBw0G3HEbaXAOz8E/rM0V43oxcPYx220a7ns8VaJmltJXO3kLa2bqSmk9roG3BIJBLDxxE8n27cuFFv9SzPnj17Jk2aZOD8/2yrbW3dxNjXyPEeMelNPTc3NzIykrtVDB06lOsFaWJi8vLLL69fv54QEhcXRycE03N2dj8/P5lMxvbbOHbsGNuvjdKtfvfw8NDnFILJZLKuXbuyvSJ0W6B5o5ddXFxqqwE2ivbt27N/QRMTk3//+9+mpiJ2Jjew8OhKSkpKTU3l0uPHj9fzR5/9W7OTvoixl4uLC02Xl5fz+uHqSSaT+fn5+fn5TZo0KT8/f+3atXTu1K1bt9b2rYXt1SBsDxXD+3QbvXgY97CNcD2fLZNaPy1dWPQNOHTHT4Oe2JGub731Fp3HU9eyZcu4/05Xr15NSkrSp22iDmwtQnR09KxZs3RftMGOSuf1vfD19bWzs+Me5b/99ltuIdu5pH///lzAsWPHDjrolB1HVwcnJ6dXX301MjKSLjl8+PDJkyd5nVdOnz594MABdkmfPn0aYQhMYGAgG3D8+eefSqWS9gYoKyvjTUY+aNAgYf879Kzg7devHx0uSAhJT0/fu3fvxIkTeZvt3r27f//+7u7uAnLCY2Dh0cXe+Ot9owfF9hyMiYl57733eFG4SqUaPXo014Q0aNCgzz77TPBe7Ay2hw4dmj17do0vPOP1Rfjtt99oxczUqVPZwung4LB48eKjR49y06Jcu3attLSU670obC/BtFot+/9I93UBDWX04mHgYRv5eoJg6MMhrvLycnb65AkTJgyoHRt6Gz4hh0KhoMHNvXv39u/fz9uAe0MV/cgbOyOXy+l4E1qNyc7o1bVrV64rBo023N3d9b+XTJo0ibckPDz8m2++OXfuXHJy8okTJ1atWjVlypR69xIDrzq9rKzss88+y8jIqK6uzs7OXrVqFW8YSEhIiKj5GTZsGK/z49KlSzdt2pSZmVlVVVVaWnrlypUFCxYsXLjwww8/1L/DB9s3hXaB5BhYeHSxVd+6NUa3bt06ffq07l7e3t70ppKUlMQbPUQIiYmJSUtLe/jw4cOHD2nLvbC9FAoFLfC5ubkbNmzQDQdLSkpmzpzJzrmZl5f34xO681vI5XK2hZFecGF76Ul3Rtr4+Hh6Frlczk4CJIyBxaO2gif4sKJeTzAiBBziOnfuHL05denSpe43jLADSnfv3s27BwhAZ1QkhHz22We//PILFzpUVVXFx8fPnDmTdsAMCwtj6zM5tN8op0+fPuzTs6mpKW86iqFDh+r/oO/n58e+WJUQotFoNm7cOGnSpNGjR0+bNu3777/n7TJ48OARI0boeXxD+Pr68updo6KiBgwY4O3t3bdvXzpnNmfAgAH1zqxqIAcHh48++ohdotFoVq9e3b9///bt2/v5+Y0dO5aLa+Pj4z/99FM9+7Sy44F/++03lUpVXFxMS52BhYenXbt2NL1///7IyEiuZb20tDQqKmry5Mls2zzt6iGRSNj50ObPnx8XF8d9u+Li4sjIyKVLl3Kr5HI5nUBP2F6EEPbdyD/99NOiRYvu3r3LhR2lpaUnTpyYMGHC0aNHw8LC6LuOBw8eTG9ga9asOX/+PA1TNBrNjh076HiiQYMG0ed1YXvpaf78+b/++iv9Y50+fZqdB2/ChAlGeWmqIcWjjoIn7LCCr+fcuXNHjBgxYsQI3jhzEAliPXEdPHiQpseMGVN3t4zOnTt36dKFm/owPz//77//Zn8NBfD39589ezbX8FFRUcENB1AoFPn5+ezvu6+v76xZs3R3500YqjtnTmBgIPumKN0pHesWHh5+//793377TZ+Ne/TosXr16kZr1/v4448vX77MNhjXyMnJ6fPPPxecK/37zE+cODEpKYlOVluH1NTUoqIifW4qPXr0oNPtr1+/nisn3333HVfqDCw8PB07dgwODqZNUZ988smnn37q5ubGmyyfwx4/KChozJgxXIvAvXv3Jk+ebGFh4eTkxNtx0aJF7JQbwvbq2bPnwoULv/zyS+5jZGRkZGSkg4ODlZUVb0d602rbtu2HH364evVqQsjDhw8nTpzo4+Pj6+tbWVmZnJzMvhR3xowZNC1sLz1VVFQsXrx48eLFCoUiNzeXHdVlb28fHh7e0APWyJDiUUfBE3ZYwdczLy+P649leD9r0AdqOESUnZ3NBhwDBw6se3uJRMJOn8zrviDMrFmzeP/h09LS2P+6/v7+P/zwg+7QDEJImzZt2Gl2+vbty9vA39+frause+iELrlc/tVXX33wwQf1VnK+8cYbW7duNcqTmZ6cnJy2bdumO+UXq02bNj///HPj/FSZmJisWLGC99oUXcHBwd9//72eFyokJIQ3RzuPIYWHRyKRLFu2jO3lp9Fo6F3c29ubfdEM7V7K7bhixQq2ZqusrIx3+1+8eDFvVJewvQghYWFh7PvbCCH5+fnsjg4ODlu2bGGfBMLDw9nn8uvXr+/Zs+fAgQP0PieXy9etW8dryBC2lz7ot+aNIbewsNi4caMRu0AJLh51FzxhhzXwehrYQx/0hIBDROwbBHr37q3PtDNsq8qRI0fYvuXCSKXSjz76aO/evaNHj6bvPeJ07dr1iy++2LFjR8uWLWvcVyKR0FbStm3bdujQgbeBpaUlbVXp2bOn7uwa9ZLJZB9++OHhw4fDw8N179yenp5vv/12VFTU8uXLa+zBJypPT89du3atWrVKtyesr6/vkiVLDh48qHtNxCOTyebOnRsdHf3mm2+yQyo4I0eO3LJly8aNG/X/K7i7u0dERPDag9jOFoYUHl0tW7b85ZdfZs2axd4qbGxspk+fvnPnTvaVeLwXk1paWm7YsGHDhg28rMpkstDQ0IMHD06dOlX3hiFsL4lE8s4778TExLzxxhu8uM3Ozm7q1KkHDhzg9UiQSqULFizYvn37sGHDeKGzjY3NlClToqOjdd/bJ2wvfSxfvnz16tW8X5uXX375wIEDxm37E1w86i54wg4r7HrSxjtRR5kBJTFWDZuBNm/e3NRZaP6Ki4sfPXpUVFQkl8sdHR2b/I0nPFVVVVlZWQUFBWVlZRYWFnZ2dh4eHk/Jk8fjx49zc3NLS0vNzc0dHBya/NJVVVWlp6cXFRVVVla2aNHCyclJ8OQKWq32wYMHubm5pqamLi4utcUrRiw8FRUV9+/fV6lUVlZWCoWiQUMGcnNzHz9+XFJSYmVl5enpqU/liuC91Gp1enp6YWFhdXW1nZ2dp6dnve80Li4uzsjIKC4uNjExsbOz8/Ly0mf0srC9WEOGDLl79y6XvnTpkp2dXXV19YMHD/Lz883MzNzc3HTn9jUuAcVDn4InrNTpeT21Wm2/fv24Pnbz588X0Hr1rGDrfpoWAg4AgGebbsDRtPl5JqSmptLxaAcOHDBwGoKn2dMTcKBJBQAAnju0u7q/v7/u3McgBgQcAADwfHn48OFPP/3EpRcsWKDPzOtgOFxlAAB4vshkMq49ZdGiRdz7oaARYB4OAAB4vri5ua1bt+7dd99lp7QHsSHgAAB4tnl4eNCBGGgd0B+6bjQyBBwAAM+2bdu2NXUWAOqHWBgAAABEh4ADAAAARIeAAwAAAESHgAMAAABEh4ADAAAARIeAAwAAAESHYbFQs71792o0Gi49bty4hr6+8jlhyFUqLS2NjY29fPky92ZLGxubNm3adO3atVu3bk5OTrrbnz17Ni0tjUsHBAS0atXK8PxDs4T/vPB0QsABNVu1apVSqeTSo0ePpr9ZBQUFO3bsSE9Pf+GFF8aNGyeVSpsuj02vtqtUr6NHjy5btox7NbaurVu3Dho0iLfw+PHjP/74I5fetm0bAg6ojeBiaSxP26+EUqm8efPm48eP1Wq1jY2NQqHw9vZu8lw9hxBwQMOsXbv2559/JoTs2bPH0tJy1KhRTZ2jZ09UVNScOXPq2MDDw6PRMgNgdE/Pr0RGRsbmzZsjIyNplQ+nQ4cO77//fkhIiEQiaaq8PYcQcEDDXLt2jabv3bvXhDl5RuXm5i5dupRdMmDAAIVCUVxcnJ6enpCQIJPJvLy8mip7AIZ7Sn4lEhISwsLCCgsLdVfdunVrzpw5SUlJn3zyCWKORoOAAxpmxIgRly5dIoTIZLL+/fs3dXaePceOHaO/gJ6ent9//33Hjh3pWqVSmZqaam5u3kS5AzCCp+FX4vHjxzNmzGCjDTc3NwcHh5s3b9Lajh9//LF79+4vv/xyk+TwOYSAAxpm2rRpXbp0ycrK8vX19fb2bursPHuuXLlC03PnzmWjDUKIvb197969Gz1TAMb0NPxK7N+/Pz8/n0srFIqvvvqqV69eEomkoKBg9erVO3fu5FZt2bIFAUejQcABDSORSF588cWmzsUzLCcnh6Z50QZA8/A0/EqcOnWKpj///HMax7do0WL+/Pl//PEHV/mRlJSUnZ3dsmXLpsnlcwYBR1NSKpU5OTkajcbR0bFly5a8pkSNRpOZmVlYWGhubu7h4WFpaanPMcvLy7OyslQqlaWlpbOzs62trT67PHr0qLi42NbW1tPT01idt7Ozs5VKpVqttra29vDwkMvlRjmssU5RWFiYnZ2tVqsdHBzc3Nzqbcc11lUqLy+naQsLC2EHqfcUDS0DarU6PT29uLjY1NS0RYsWrq6uBjZsl5WV5eTkFBUVmZubOzk52dvbN2j3hv51jMvAzAtTXl7+8OFDQoinp6f+BcOQYimgnBhdYWFhXl5ecXGxpaWlu7u7EX/lzM3Ne/XqxaW7du3KrrKzs/P19Y2Li+M+KpVKBByNAwFHIwkNDU1PTyeEeHt779q16/z585s3bz558iTdwN/ff9asWYGBgYSQkpKS7du379y5k9uFECKXy1977bX33nvPzc2ttlOkpaVFRERERUXREXEymSwoKGjKlCl9+vSpcZfCwsIffvhh165dubm53BKFQhEeHv7qq6/WdpbVq1dHRkZy6Q0bNvTr10/3mPv27YuMjLx9+zZdaGFhERoa+uabb3bu3Lm2I+uvoacYOHBgcXExIaRLly4RERE3btzYtGnT4cOHaVNu165dP/jgg6CgoNpO19CrpOvHH3/89ttvCSEqlYouHDNmjImJCSEkJCRk2bJlhJD169dv376dW/v111/XlqXaCCgDqamp27dvP3DgQElJCV2oUChef/31119/XcC99tq1azt27Dh8+DD7TQMCAl5//fWRI0fq3hEN/Ouw/vOf/0RERHDp0NDQTz/9lLdBbm7u8OHDtVotIUQikURHR/PuNA3KvEajYZ/j4+Pjub8m9eDBg7Fjx3Lpbt26bd26la6iPwhOTk5HjhzZs2fPunXruGHSX3755fjx4+v9soYUSz3Lye+//84VS0LIuHHjPvnkE95xtFrtmDFj6M/U7t2727VrR/T4ldBqtcePH4+MjDx27BhdKJfLg4ODp0yZ0qNHDwNzTghhr7YutpsU5ilpNAg4GklJSQn3PyQtLe37779ftWoVb4OEhIS33357w4YNvXr1evfdd9lu3oSQioqKn3/++fjx47/++muNEzBERUUtWLCgoqKCXajRaGJiYmJiYmbPnv2vf/2L95iYkZHxzjvvsPdsLnuLFi26cOECbxQZpVar6X/16upq3tqUlJTZs2fzjkkIKSsri4yMjIyMXLFixaRJk2o8sp4EnKK4uJjL86NHj37//ffZs2fz9r169WpYWNiyZcveeust3iphV0mXRqOh142iPdoqKytpgm5WVVWl58E5AspAdHT0/Pnzy8rKeIdKS0v7+uuvd+3a9e233+ofI2q12i1btnz11Ve6q+Li4uLi4vbv37927VpeEGPIX4cnMDDw3//+N5c+ePDg/Pnzed1vExISaLv+kCFD2GhDQOa1Wi37N+XiGBa7gVqtZlfRHwSVShUREbF8+XK6ihe11MiQYql/OQkICFCpVNzRoqKi5s2bx7s337lzJykpiUv36NGjbdu29MvW8StRUVGxePHiffv26S6PioqKiopauHBhWFiYbrWWgBJeo+Li4osXL3JpCwsLVG80Gkxt3thycnJ0ow1q6dKl7733Hi/aoDIzM7/88kvd5fv3758zZw77/5A3VeX69ev37t3LLikvL585c6bubZtz8OBB9glPTxkZGdOmTaPHtLKyCggIGDBggJ2dHd1m8eLFf//9d0OPbKxTpKam6t7PqGXLlnF12pQYV0kkAsrAxYsXP/jgAxptdOzYcfTo0YGBgVZWVtyStLS0sLCwvLw8PfPwww8/8G7YDg4O7MdTp07NmDFDN77hNPSvo6tLly4dOnTg0kql8vLly7wNYmNjaZrXVdDAzAum0WjYaIMQok/rnuBi2aBy4ujoOHLkSC6dk5OTnJzMO1p8fDxNh4aG6tnytXLlSl60wcvDl19+uWfPHkNyXrctW7bQWH/cuHHW1tb67AWGQ8DRBCwsLFasWHHhwoXU1NQLFy6sWLGCdj7gfiXt7e3XrVuXmJh469atU6dOTZ8+ne575MiRjIwM9mipqalLliyhHxctWnTp0qULFy4kJyevX7+eHvnLL7+kVa+EkD179ly9epXm54svvrh48WJqauq5c+eWLVsmkwmp+tq0aROdOnPMmDEnT578+eeft23bdurUKbaK+LvvvhNwcCOeYtasWbGxsampqYmJif/973/Zn63jx4+zWxrxKoWHh6empqampgYEBNCFx44d4xauWLFC/0NNRuxUAAAgAElEQVTpElYGNm7cSNPLly8/dOjQunXrIiIiYmJiaO10ZmYm7c9ft6SkJDaSXrRoUUJCQkJCwo0bN7Zu3apQKLjl8fHxxvrr6DIxMaFNGISQ06dPs2vLy8tjYmK4NG+4prEyL5hMJhs1atTMmTPfe++9eqd9E1wsBZSTESNG0O3Pnj3LO+CJEydoeuDAgfV/T0JiY2O5OcEIIe7u7t9///3169cvXLhw+fLljz/+mG62atUqtqwKK+E12rlz53//+18ubW9vP23aNH2yDUaBgKMJfPPNN5MmTXJycpJKpU5OTpMmTeI92K1Zs2b06NEtWrTg5oCaP38+17eDk5qaym4cERFBn7rmzJkzbdo07nHf0tIyJCRk3rx53CqlUkl/bauqqrZt20aPsHz58gkTJtjb20ulUhcXl7feemv9+vUN/VIajYY+tchksqVLlzo6OnIfbW1tP/74YxsbG+5jXFycbuNCo51i8eLFH330Ede9rkWLFiNHjpw/fz5dS+uHibGvkkQikUqlvE4AJiYm3EIDO0UKKAMlJSW0C5GPj8+kSZNo3tzd3RcuXEgPXu9tnrNlyxaaXrJkybRp07gaAjMzs0GDBm3evJneFbZs2VLbnO76/3VqM3jwYJr+448/2Gapq1ev0lIxcuRIWniMlXnBevTo8eeff27YsGHu3Lnz5s2rrbcNx5BiKaCcBAQE0BqvmJgYttlIqVTSItS/f38altXthx9+oOk1a9YEBQVxzV62trZhYWH04aqwsJDt4iYg5zXat2/fokWL6Me1a9fqmW0wCgQcTaBv3768Jf7+/jTdpUsX3ns0JBIJuwtbxa1UKukDqL29/dSpU3lHHjNmDE3/9ddfXCIlJeXu3btc2tXVldaaUsOHD2cbKfQhkUiioqK4xtQjR47wdrezs+vWrVuNX6GRT6HbHY/di72XiHGVxCCsDLBdCjQaDa+hvVOnTt8+8d5779Wbh/T09OjoaC7t6ek5YcIE3gYdOnR48803uXRFRQXNBo/+f53atG/fnv5vSktLu379Ol3FPqAPHz7c6JkX7PPPP9f/tie4WAorJzY2NqGhoVw6KSnp/v37dJvExETaWSQkJESfzN+9e5c2d3bs2FF36Cx78Wl8KSznuv766y8amhBC1q9fr2etDBgLAo6nAtuIWOMgQHaD0tJSmmZ7ewwePFi3MdLBwcHX15dLnzt3jrvN3Lp1i24wduxY3XktJRKJPj3XWFKptP0TtO8Yix26xutA15in0P1e9AGO/O8QEjGukhiElYEWLVq0b9+eW3jr1q2VK1c+evSI7mJmZjb8iaFDhzYoD6NGjapxVCd7nPPnz9d4HP3/OnWgN0hCCB36qNVqjxw5wqUtLCzYCN5YmRfM09NT/40FF0th5YQQMmzYMLoN+93PnDlD0wMGDNAn82weRowYoftD5+Xl9c0336xZs2bNmjW0skpwzlnp6elstPHvf/9bzyAJjAijVJ4KDapRZ2s16YA0QsiDBw9Wrlypuz035pAQUlFRUVhY6OzsnJ2dTde2adOmwdmtU2Vl5cWLF8+ePZuSkpKRkaFUKrl+XkbsX2ncU9R28UW9SkYkrAxIJJJZs2bRtryIiIiIiIi+ffv27du3Z8+e3bt313NGBA774FvbqBZ2xsmUlBQ9jyygsemll16i6T/++CM8PFwikdy5c+fmzZvcwpCQELYOQLzMi0FwsRRWTgghvXv3dnJy4vpGHD9+nKuE0Gg0NIAbNmyYq6trQ/NQ42g7Xi8cA3PO+vXXX2lH0UWLFrFRKTQaBBzPNvZNAfHx8Wyn8RpxtSP0PychhG3JNtylS5eWL1+uOzrg2ToFR7yrZFzCygAhZNSoUWVlZStXrqSB2tmzZ7l2Bxsbm9dee23SpEk11iTpKioqoukWLVrUuA1b//TgwYOqqiqR3g/u7u4eFBTETfCQlJR07969tm3bXrhwgW7APrKTpyzz9RJcLAWXE3Nz87Fjx37//feEkL/++is/P9/BweH69eu0hUv/qcHZRwL9p3gRnHNKq9XSvh2enp5vvPGGnqcG40LA8Wyj8zfoietDx9aRGHEOx/j4+Lfffpv27ercuXNAQICLiwvXbX7fvn1sg/pTewpKpKtkdMLKACFEIpGMHz8+MDBw3759u3fvZgedqlSqrVu3bt++fcGCBVOnTm3Q19dzY1Ev6ahRo+iMUmfPnm3bti0dT2FnZ1dHr8ynIfN1E1wsBZcTQsiQIUO4gIMQEh8fHxwcfO7cOe6j4Nez6Z95Q3LOKS4upi+tDQwMxMsRmwoCjmcb25w5Y8aM4ODgurfnJipl9xLWf1NXZWXl4sWLaSjwzTffhIaGsm3JFy9eNDAaaIRTsMS4SmIQVgYoV1fXmTNnTp8+/caNG1evXr1w4UJMTAzXRKXRaFauXOng4KBby83DVgAUFBTUuA37dOvh4SFq95fAwECZTMZ1aTx69OjIkSNp/BEaGsprLXraMl83wcXSkHLSo0cPLy8vLiQ9ffp0cHAw7Zs5atQo/esq6DgyQoj+Q9UMLOGEkLKyMjp7KZ2pBRofAo5nm4uLC02Xl5ezXfrrwDa41juZkp6SkpLoeN3x48fXe4t6Ok/BEuMqiUFYGeCRyWR+fn5+fn6TJk3Kz89fu3btr7/+yq3aunVrvZea7fbI9mpk0UdMQoiPj4+ATOrP3t4+JCTkt99+I4ScPn36wIEDdNWQIUN4GwvOfJPUcwguloaUE5lM9sorr3ADbg8fPjx16tSEhARuFTvep17sFCO8+YTqYHgJd3Fx0Z3YFBpf0/exB0PQvtmEkEOHDrGNnSxeHSP7ktKDBw/q1lhqtVrdCYnrxv580OEPxtUIp2CJcZXEIKwM/PbbbyufYMenEEIcHBwWL15MZ9y6du2abqM4j5+fH01HR0fXOEyAnc+DvlVLPOyMVWvXruUSTk5O7BB0juDMy2Qy9pHd6JOQ1khwsRRWTij6LhulUkmn+rCystId5F8Htk8ub1YPjkqleumllwYOHDhw4MClS5caJefw9EDA8WxTKBR08Fhubu6GDRt0/w+XlJTMnDmTfUlSp06daL1iWlqa7sj1Ov5X14atZNbtxn/r1i3etI8CNMIpWGJcJTEIKwN5eXk/PkGfVim5XM6OR613TlWFQkFvSPfu3du/fz9vA+6dW/SjbjWD0QUEBNChKPS9dK+88opu+70hmWcDX903EtBxHEYkuFgKKyeUj48PDRd+//13LhEaGsqGXPXy9vam4VpSUlJiYiJvg5iYmLS0tIcPHz58+NDLy8soOadUKpWwAflgLA0OOBISEiL1wE4SB6J6//33afqnn35atGjR3bt3uf+QpaWlJ06cmDBhwtGjR8PCwg4dOsRtJpVK33nnHbrXJ598cuDAAZVKpdVqc3NzIyIi5s6d29BscG+J5Ozfvz8yMpLrB1BaWhoVFTV58mS2FZx9Fpw7d+6IESNGjBjBzgBo3FMII8ZVEomAMjB48GAaRqxZs+b8+fP0R1yj0ezYsSMtLY37OGjQIDMzs3rzwE7A/9lnn/3yyy/cn6Oqqio+Pn7mzJn0rh8WFtagmSeEsbS0ZOeD4tT2ylnBmWenrlq+fHl8fLxara6srLxz585XX31V46vgDGRIsRRQTigTExPd66nPHC0siUQSFhZGP86fPz8uLo6rmSguLo6MjKS1GnK5nB1MZEjOCSGVlZXz5s3r1q1br169xIgCQU/ow/HM69mz58KFC+lL3biAz8HBwcrKitfEy942xo4du3//fm6AWWFh4UcffUQIkcvlvDcx6q9jx47BwcF07Nknn3zy6aefurm51djMzEYGeXl53AQJ9U62KPgUghn9KolEQBlo27bthx9+uHr1akLIw4cPJ06c6OPj4+vrW1lZmZyczL4YbMaMGfrkwd/ff/bs2Vxle0VFxZIlS5YsWaJQKPLz89m/ha+v76xZswz7uvoaOnQoOwu4p6dnbe89F5z5kSNHbtq0iUtfv3799ddfp51VxSO4WAr7raAGDRrEvnHGwcGhd+/eDc18UFDQmDFjuF419+7dmzx5soWFhZOTEy8DixYtYifqMDDnZ8+e5fpwqFSqjz/+eMiQIcJeFwUGQpNKcxAWFsa+2YgQkp+fz/4/dHBw2LJlC/vEYGZmtm7dOl6HbfqDNWLECAHPLsuWLWM7A2o0GpoHb2/v0aNH01W818HQI4h9ioYy+lUSj4AyEB4ezj7ZX79+fc+ePQcOHKDRhlwuX7dunf43lVmzZvHux2lpaewN29/f/4cffmhQJbwh/P392QELY8eOreM2Iyzzvr6+7NteCCFstPHuu+8KznwdDCmWAsoJxU4bTwgZO3ZsjbOy1k0ikaxYsYLtYVNWVsYLGhYvXqw7VYYhOWe7d6jV6qeh69XzyaCAw8nJqVstnuaZGZsfiUTyzjvvxMTEvPHGG7whanZ2dlOnTj1w4IBuq7mbm1tkZOSMGTPYWRfd3d0//fTTtWvX6jnjE6tly5a//PLLrFmz2B9lGxub6dOn79y5c9y4cXQh29RK2z5qm3PJ8FMYwuhXSSQCyoBUKl2wYMH27duHDRvGuxPb2NhMmTIlOjqajeHqJZVKP/roo717944ePZq+7YzTtWvXL774YseOHS1btmz4lxPIzMzslVdeoR/Z97rpEpz5GTNmfPvtt7xxN127dv3222/ZFwoal+BiKey3gmIn6KytfapelpaWGzZs2LBhA29CFJlMFhoaevDgwRqnfjEk53379uUCEZlM9tlnn+nTRAhikISHhzdoh4SEBPoA1KlTp+7duxslH5s3bzbKcUCtVqenpxcWFlZXV9vZ2Xl6etY7y01paemDBw9KSkpsbW3btGljeGVjRUXF/fv3VSqVlZWVQqGoY5JsrVbbr18/bsrC+fPn61l736BTGIvRr5J4BJSB4uLijIyM4uJiExMTOzs7Ly8vU1NTQ/JQXFz86NGjoqIiuVzu6OioOzVC4/j000+5l6F7e3sfPnxYz+lBBWReq9U+ePAgLy9PJpM5OjrW+4p5YzGkWAooJ0aXm5v7+PHjkpISKysrT09PPeMzATnXarXZ2dmWlpbstCvPCbYis2k10o9meXn5vXv3MjMzVSqVRqOxtLR0cXFp1aoVO8AajMLMzKyhj92WlpadOnUyYh7kcjk7eK8Ot2/fphMkBwQEiHEKYzH6VRKPgDJgbW1t3OtpbW3dCEOX66ZUKunsC2PHjtV/MnIBmZdIJAqFovHfdW5IsRRQTozOycmJDsDWn4CcSyQSPV/4AuJpjIAjPT393LlzbNNmUVFRUVHR7du3W7du3atXr6Z6KwE0OW5qJkKIv78/Ox0CgOF2795NG+zYN7oBQJMQPeB49OjR33//Xdva+/fva7XaOl5tAM3Yw4cPf/rpJy69YMGCp+FV7/Csq6ioKCkpUSqVx48fp6NSBw0a9KzUTgE0Y+IGHJWVlefPn6cf7e3t27Zta2pqmpOTc/fuXW5hWloaneAFnisymSw4ODgqKmrRokUvvPBCU2cHmoOLFy9OnjyZt/Bf//pXk2QGAFgGBRw3bty4ceOG7nJ3d/fAwEBCyMOHD8vLy7mFdnZ2QUFBXJ+m1q1bW1tbX716lVtlxBduwTPEzc1t3bp17777Ljt1MYBxLVq0yFh92wHAEOJWYqenp9N0+/bt2R7U3t7etAo9Pz9f1GzA08zPz+9pfvk7PLs6d+783//+d9q0aU2dEQAgROwmlcePH9O0s7Mzu8rMzMzFxYWOUAAAMFxAQMD58+cLCgpsbGycnZ3RIR3g6WFQwOHi4uLu7q77eMpNP1ddXc2+yZA3lw4hpBHmTgCA542zszPv8QYAngYGBRwODg519P3mvdBPdwwC5pcFAAB4TojYh0MqlbKTFdLeo5Th7/MEAACAZ4K4nUbZKeRyc3PZVWq1mu3hAQAAAM2YuAEH+0KBW7dusZON3rt3jzap8N7EAwAAAM2MuKNUFApFcnIy15hSUFBw7Nixdu3amZqaPn78mL4BjhDSuXNnUbMBAAAATUvcgMPU1LR3796xsbHcR6VSmZCQwNvGy8sLM40CAAA0b6K/vcLd3b1fv361jYZXKBQvvvgi5n0CAABo3hrjbbFeXl5OTk709fSVlZXc6+kVCkXLli0bIQMAAADQtBoccPj7+/v7+zd0LwsLCx8fHx8fn4buCAAAAM0AXggOAAAAokPAAQAAAKJDwAEAAACiQ8ABAAAAokPAAQAAAKJDwAEAAACiQ8ABAAAAokPAAQAAAKJDwAEAAACiQ8ABAAAAokPAAQAAAKJDwAEAAACiQ8ABAAAAokPAAQAAAKJDwAEAAACiQ8ABAAAAokPAAQAAAKJDwAEAAACiQ8ABAAAAokPAAQAAAKJDwAEAAACiQ8ABAAAAokPAAQAAAKJDwAEAAACiQ8ABAAAAokPAAQAAAKJDwAEAAACiQ8ABAAAAokPAAQAAAKJDwAEAAACiQ8ABAAAAokPAAQAAAKJDwAEAAACikzV1Bv6RlpbW1FkAAAAAsQgMOHJzc+/fv5+Tk1NaWiqRSKysrFxcXFq3bu3g4MBu89dff3FpJyenIUOG0FVlZWUHDx7k0iYmJuPHjxeafwAAAHgGNDjg0Gq1SUlJ169fZxcWFBQUFBTcunWrU6dO3bp1k0gkDTogIUShUDQ0JwAAAPCsaHAfjtTUVF60wbpx40ZKSophWQIAAIDmpmE1HFVVVcnJyVxaIpEEBAS4u7tXVVXduXPnypUr3PLk5OT27dubmpoaOacAAADwzGpYDUdpaalarebSLVu29PLykkqlZmZmnTt3trW15ZZXV1cXFRUZOZsAAADwLGtYDYdUKqXp/Pz8goKCFi1acB9HjBjB9cYghJiYYLQtAAAA/J+GBRyWlpYuLi45OTmEELVafeTIEVdXVxcXFxcXFwcHB8QZAAAAUKMGj1Lp3bt3bGwsbTTJysrKysoihJiamnbo0KF9+/bm5uZGziMAAAA84xpcJ2FtbR0cHOzv729tbc0ur6ysvHbtWnR0NFf/AQAAAEAJmfhLKpV6e3u3a9euqKjo8ePHWVlZ6enp3KrKysq4uLiQkBC2twcAAAA85xoWcBQXF1dWVnJpGxsbOzs7Ozs7b29vlUp14sSJ0tJSQkh5eXlhYSGvSwfdCwAAAJ5DDQs47ty5Q+f16t+/v6enJ5e2sbFxdXW9e/cu95ELL9ipOIqKikpLSy0tLbmPjx49MjDfAAAA8AxpWMDh5uZGA46EhASpVOrs7EwIycvLo60qhBAbGxtCiJWVlampKRd8aLXakydPent7m5iYPH78GK9qAwAAeK40LODg3tB2//59Qkh5efmpU6d0t2nXrh1Xk2FiYtK2bdubN29yy4uKihITEw3NLwAAADyDGjxKxd/fv1WrVrWtbd26dY8ePehHX19fOjMYbzP0KgUAAHh+NHiUikwm69u3b9u2bR88eMC9nt7ExMTKysrZ2blVq1YuLi7sxmZmZkFBQXfu3Hnw4EFBQYFMJnNycmrdurWXl9fjx49LSkqM90UAAADg6SVkWKxEInF1dXV1ddVnY1NT006dOnXq1Im3PCQkRMCpAQAA4FmEycgBAABAdAg4AAAAQHQIOAAAAEB0CDgAAABAdAg4AAAAQHQIOAAAAEB0CDgAAABAdAg4AAAAQHQIOAAAAEB0CDgAAABAdAg4AAAAQHQIOAAAAEB0CDgAAABAdAg4AAAAQHQIOAAAAEB0CDgAAABAdAg4AAAAQHQIOAAAAEB0CDgAAABAdAg4AAAAQHQIOAAAAEB0CDgAAABAdAg4AAAAQHSyps4AABhTZVVVqaaSEGIpMzWVSnU30FRXl1SqCSGmJlJLU9PajqPnZqz8stJUZV5ppdrF0rqTo7PUhP88o66qKtNUEkLkUpm57H9+fMo0leqqKhOJxMZMXmM2zKRSC5le2QCApxMCDoBm5ZNTMWvOxRJClvQP+jxwqO4GZzPSAndsJoSMbt/54GtTajuOnptxLmVlfnLyyJ/3bldpq7klTpZW03u8uLDvQGsmgDh+//aIXT8RQt7p6r911KvsEcbt+/nwnZtSiUn+R5/ays3p8l3Xr0yO2kUImdcn8OvBI+v58gDwFEOTCkDzUVlVtSMpkUv/dCWhWqtthJP+eu1y74j/Hrl7i0YbhJDc0pKVZ44HbN/0qFhFF/bxaCUhhBBy4dFDXrZPP7xHCKnSVp9JT2NXXczK4BIBngqxvgAANAoEHADNx5G7t7JLirl0uqrw2P3bYp8xLj3tzahdmupqCSHTe7x4avL0q+/O+TV0QhcXV0JIUk7Wq/t/1lT/E4i0MLfwdW5JCEnJzSlWV9CDJGSlF6vVXPrUg7vs8S9k/hOa9HFvJfZ3AQBRIeAAaD4irl4khFiamnK9Ln66miD2Gacf3s/Vo/w3OPS7EWMDW7Xp4uI60bf7uSkzX3D1IITEpadxueIM8GpDCKnWahOzMunCU2n3aPr4/Ts0ramuvpSdSQjxtnd0tbYR+7sAgKgQcAA0E7mlJb+nphBCQjv4jG7vQwjZf+NaQXmZeGeMfXAv+XE2IaSXm+f7L/RlV1mamm4YNppLb7x4li6nLSMJj9LpwuNpdwghdnJzQsjFrIyiinJueUpuTmllJSGkn2dr0b4EADQSBBwAzcTO61cqq6sIIZN8u0/y7U4IqajSRF6/It4ZuUCBEPKGXw/dtQGeCoVdC0LI5ezMvLJSbmG/JwEH7cZRUaU5k36fEDKvT6CEkGqt9u/0+9yqhKx/gpJ+XujAAfDMQ8AB0ExsvZJACLE3txjWpsOwtu3tzS3oQpFczXnEJbq3dKtxg+4t3blESm4Ol2jTwsHVyoYwnTPiM9O5aozXfbp1dXEjTAvLxUdPeox6IOAAeOYh4ABoDi5lZV7OziSEjO/c1UwqlUtlr3bqQgiJf5R+7XG2SCfNL/unvcbRwrLGDZwsrLgEreEghAxo1ZoQcq9A+bi0hBBy8sFdQkhrO3tve8chbbwJU3HCBSUtzC06O7mI8w0AoPEg4ABoDrYn/zMadoJPNy4x0fefxLakizXvYzBuFi9CiJm05hl96OxedEtCSP8nHTIuPkonT3qJDm3TnhAyuHU7QkhiVkZhRbm6qupKziNCSD9PhYlEIs43AIDGg4AD4JmnfjL9hpu1TWCrNtzCga3aulnbEEK2XU2srKoS47x0BtIKjabGDWicwc5V2pf2G83KKNNUch04uIBjgFcbqcSkWqv9++H9pJwsdVUVYQIUAHimYaZRgGde9O0bXJtFR0fnXUwv0Q4Ozo+KVTmlxUfu3gpp39no53Uw/6clJae0uMYNuEYTdktCSHcXN0tT09LKyguZD89lPFBXVUkIeUnRlhBiYyZ/0cMrLj3t1IO77ewdue37emIGDoDmAAEHwDOPzrdxMu3uybS7NW4gRsDRvaXb/pvJhJDErIyg1t68tVqtNvHJPKHcfF8cU6n0RfdWJ9LunM94yOW2e0t3J8t/ensEtfaOS087fv+OsryMECIzMenl5mX0nANA40OTCsCzLatY9cftm3Vv83tqSk5JzZUQhqBBxvakRN1p1GMf3stQFRFCXnD14IbMUP29WhNCckqLtyclEkKC23agqwYr2hFCLmVnctOk9mjpruer4wDgKYcaDoBn26/XLnMvMVnSP+jT/kG8tZ/G/rkq7oSmunrn9Suze/Uz7qkDPBU9XT0SszKSH2d/efbkJwEv0VUqdcW/jkZx6Zn+ffk7evzTSnK/UEmYwIUQ0sejlVwqq6jS3CtQEkIGPOmSAgDPOgQcAM+2rU/aUyb4dJXpvBF+gk/XVXEnCCE/XonnBRwPiwrpm95Y/m6e7DDUujfbMuKVvtu+rayuWnQy5kr2o7e69HSwsLiem7P6XOzNvMeEkMBWbd7y68nbl3uLG1clIpfK2Hm9zGWyAV6t/3ryFhjMwAHQbCDgAHiG0Wk2uri4+ji11N2gq4ubr3PLa4+zk3KyLj7KeMHNg666lJ351u+7dXf595BRbMBR92YvuHnsGzd5/G+/lGs0u1Ou7k65ym7T09Vjz9g3pDphEPcWN25a9AFerS1k/9NoEtTamwYcfT3QYxSgmUAfDoBn2LYn70Wb5NO9tm3e8P1nVYQ4E3KEtO+cFPbhRN9ubGcLhV2LLwYF//3WDBcr6xr34t7iRp4MiGW91Lodl2htZ+9uYytClgGgCUjCw8ObOg+EELJ58+amzgIAGKRMU5lWqCxRVzpbWbWybdHU2QEAQgiZPn16U2fhH2hSAQDjsJCZdnLEHOQAUDM0qQAAAIDoEHAAAACA6BBwAAAAgOgQcAAAAIDoEHAAAACA6BBwAAAAgOgQcAAAAIDoEHAAAACA6BBwAAAAgOgQcAAAAIDoEHAAAACA6BBwAAAAgOgQcAAAAIDoEHAAAACA6BBwAAAAgOgQcAAAAIDoEHAAAACA6BBwAAAAgOgQcAAAAIDoEHAAAACA6BBwAAAAgOgQcAAAAIDoZIbsnJOTk5iYWFBQQAhxcXHp0aOHvb29kTIGAAAAzYfwGo709PTjx49z0QYhJCcnJyYmRqlUGiljAAAA0HwIDzjOnz+v50IAAAB4zgkMOJRKZWVlpe7ygoICtVptWJYAAACguREYcNQYbXAQcAAAAACPwIDDxcWlxuWmpqbW1tYG5AcAAACaIeF9OPz8/PRcCAAAAM85gwIOXnjh6+vbsWNHg7MEAAAAzY1B83D4+fm1bt26oKDA1NTU3t7ezMzMWNkCAACA5sSggIMQYm1tjU4bAAAAUDdMbQ4AAACiQ8ABAAAAokPAAQAAAKJDwAEAAACiM7TTqLGkpaU1dRYAAABALKjhAAAAANE9LTUcCoWiqbMAAAAAYkENBwAAAIgOAQcAAACIDgEHAAAAiA4BBwAAAIgOAQcAAACIDgEHAAAAiA4BB3RitqEAACAASURBVAAAAIgOAQcAAACIDgEHAAAAiA4BBwAAAIgOAQcAAACIDgEHAAAAiA4BBwAAAIgOAQcAAACIDgEHAAAAiA4BBwAAAIgOAQcAAACIDgEHAAAAiA4BBwAAAIgOAQcAAACIDgEHAAAAiA4BBwAAAIgOAQcAAACIDgEHAAAAiA4BBwAAAIhO1tQZAAAAgKdXdXV1cXGxRqORy+UWFhYmJgKrKhBwAAAAQA20Wu3t27evXbtWXl7OLRk4cKCbm5uwoyHgAAAAgBokJydfu3aNXWJqair4aAg4AAAAgK+0tPT69euEEBsbm969e9vb2xNCBLenEAQcAAAAoCs/P1+r1RJCunfv7uzsbPgBMUoFAAAA+CoqKriEra2tUQ6IgAMAAAD4uOoNQohEIjHKAdGkAgAA8FwoLy+/e/duZmZmUVERIcTGxsbd3b1du3bm5ubsZtHR0SqVin48dOgQlwgICGjVqpXgsyPgAAAAaP6ysrLi4uLUajVdkpeXl5eXd+PGjb59+7q7u9d7BFrnIYxBAUdOTk5iYmJBQQEhxMXFpUePHlwvVgAAAHh65Ofnx8bGVldXy+VyHx8fR0dHbuG1a9cqKipOnz49ePBg2jM0ODhYq9Xeu3cvMTGREDJ8+HArKytCiFQqNSQPwvtwpKenHz9+nIs2CCE5OTkxMTFKpdKQ3AAAAIBxVVdXnz9/vrq62tzcfOjQoR07dnRycnJycurQocOwYcPMzc21Wu358+erqqq47WUymampKR0By31klwgjfOfz58/ruRAAAACaSlZWVmFhISGkW7du1tbW7CorK6sePXoQQoqLizMyMkTNhsCAQ6lUVlZW6i4vKChg24cAAACgaWVmZhJCpFKpl5eX7lpPT09u/lBuM/EI7MNRY7TBUavVZmZmQvMDAEajqa4uqfy/BwAJIdZmcpPaR7jxttcllUiszeTslqYmUsuapjou01Sqq6oIIVamZjITE5W6olqrJYRYyEzNamoGLqlUa6qrCSHmMplcis7sAMaUn59PCHF2dpbJavjPJZVKnZ2dMzMz8/LyRM2GwP/YLi4uNS43NTXlVdcAQFM5m5EWuGMzu8REImll2yK4bYdZ/n39nF3r3Z6ni4vr1XfnsFvayuXXw+d62PDnBXo3et+v1y4TQo5OnDa0Tft5x/7YfOk8IWSib7dfQyfyNs4tLWm98Ssugrnwzqxebp4CviwA1KasrIwQYmFhUdsGlpaWhJCSkhJRsyG8D4efn5+eCwHgKVGt1d4vVG6+dL7r9+s+ORlTbdggN0JIUUXF7D+j6t1sSf8gc5mMELLr+tXU/Fze2vXxZ7hoY1wnP0QbAM2V8KpLLrZITk6mS3x9fTt27GiETAGAUfV291rcbzAhpKC87Fzmg4irF0srK1fFnVCpK/4zbHQd2/PYyuW6C/fdSP49NSWkfec6MuBhYzu7V7+vzp6q1mpXxZ3cOupVuqqgvGxDwhlCiIlEsmLgsIZ+NQCol4WFRVlZGVfPUSPu7fNcPYd4DGor9fPza926dUFBgampqb29PbpuADydXK2saUDwZpeeH/UeEPTr92mFBf9NiBvWpr1urMBur49ZMQdfUrTlunfUZn6fgd8lni+sKN+RnLh0QJDC7p85e/6TEFdUUUEIebvrC50ca26rBQBDODg45OfnP378WKPR6HbjqK6uzsnJIYRwk3OIx9B3qVhbW3t6erZs2RLRBsCzop2949aXX+PSy07/ZfgBHxQVfBr7Z93bOFhYLug7kBCiqa5efS6WW6hSV6yL/5sQYiaVLh0wxPCcAIAuNzc3QkhVVVV6erru2oyMDG54qT6TjRoCL28DeB4Nbt2uk6MzISQxKyOtUPh8fUNae7dt4UAIWR9/JuFRDb9lrNm9+re0siaE/HA5PlNVRAjZdPFcflkZIeQD/4BWti0EZwMA6uDm5sa98fXy5cu8nqGlpaWXLl0ihFhZWXl4eIiaDQQcAM+pAE8Fl0h4JHy2H0tT000jxhJCqrXa8D/2c0Nb69j40/5BhJCKKs3aC6dLKyvXnI8lhNjK5Qv7DhKcBwCom4mJyYsvvmhiYlJeXn706NFbt27l5ubm5ubevn376NGjpaWlhJDevXvXOGjWiDDeHeA55Wb9z1jW7BIVb9Wh2zfMv1rMWxjSvvOeV97QPc6wNu0n+Xb/9drlS9mZ/0mI+7B3/zpO+m733t+cP323IP+7xPNmUtnj0hJCyLw+A50srYR/EwCoj6OjY2Bg4JkzZyoqKrg3pFAymaxPnz4tW7YUOw+o4QB4Tpk/eZop0/Dn8avWaiuqNLx/6ipNbYdaO2SUvbkFIWTJqaN1N9CYSaWfBw4lhJRUqlfFnSCEOFtazenVz8DvAgD1cnV1ffnll7t27ero6Mi9G8XBwcHPz2/kyJGeno0xHB01HADPqdIn8wVbmvJ7fPdo6a5bUeFVex+LllbWXw8eGfbHvpJK9ftHDkS//k4d553o2/3rc6eu5mRxH5f0D6p7eAsAGIu5ubmPj4+Pj48+G3t7e3t7exvx7Ag4AJ5TD4v+edUz15GT5WVr92aXng062rRu/juSE2Mf3Pvjzs3dKVfr2NJEIvkscOjYvTsIIW7WNuE9ejfoRADwjEKTCsDzqFqrPZl2l0v3dq/hfU4NJZFIvhs+1tRESgiZffR3ZXmtUwwRQriBLYQQTxs7vDkF4DmBgAPgebQn5Wq6qpAQ0sejlaeNnVGO2dnJ5ZN+LxFCskpUh+/cNMoxAaDZQMAB8Nw5l/HgvSMHuPQyo063tbDvoI6OzkY8IAA0G6jMBGj+HhYV7khK1BKiLC+LfXDvwK1r3GvbFvQdGNy2Q23b6y63MDV9tVOXOk5kLpN9N3zsS79sMVbOAaDZQMAB0Pxdys586/fd7BJTE+nygUMX1DLdlu72HFcrm7oDDkLIIEXbd7r6/3Q1QWhmAaB5QsAB8LyQEGJvYdHGziG4bYfwHr3p69OMbnXQyN9vp+SWltS/KQA8NyTh4eFNnQdCCNm8eXNTZwEAAKC5mT59elNn4R/oNAoAAACiQ8ABAAAAokPAAQAAAKJDwAEAAACiQ8ABAAAAokPAAQAAAKJDwAEAAACiQ8ABAAAAokPAAQAAAKJDwAEAAACiQ8ABAAAAokPAAQAAAKJDwAEAAACiQ8ABAAAAokPAAQAAAKJDwAEAAACiQ8ABAAAAokPAAQAAAKJDwAEAAACiQ8ABAAAAokPAAQAAAKJDwAEAAACiQ8ABAAAAokPAAQAAAKJDwAEAAACiQ8ABAAAAokPAAQAAAKJDwAEAAACiQ8ABAAAAokPAAQAAAKJDwAEAAACiQ8ABAAAAokPAAQAAAKJDwAEAAACie1oCjvLy8qbOAgAAQLPyVN1bn5aA49y5c02dBQAAgGblqbq3Sl944YWmzgMhhCQnJ9vY2Li6uspksqbOCwAAwLOtvLz877//3rlzZ1Nn5P9IwsPDmzoPNcjJyTl+/DghJDAw0N3dnVt48uTJrKwsiUQSHBzcokULuvHt27cTEhK49MiRI21tbbl0bGxsZmYmIeSFF15o37493V6r1Z4/f/7+/fuEkIEDB7q5udFVN27cuHz5MiEkJCTEysqKLlepVIcPH66urnZ1dR0wYIBUKtXNauvWrfv06UNPsWvXLkKIiYlJUFCQo6Mj3V6tVv/5558qlcrExGT06NHm5uZ0VWlpqVQqlcvlwi8cAADAU+lpqeHgKSkpuXfvHiFEoVDY2NhwC6VS6cOHD/8/e/f21caZ4Hv/0QEkIQmEAAGSEEdjjG1sbMendtJJpxNnJj2zMtM9s9bsy76Y/2vuZq/Vvdea6e69uhPHcezEjk/YxjZgzghJCBCS0Plc78Wzpl5tgTG2KcDO93MlFaWqRyWh+tVzKiHE0tKSoii5XG59ff3x48czMzPqC3t6ehoaGuTjpaWlZDIphFhZWUmlUnq9vlgsRqPRR48eBQIBIURHR8eJEyd0Op368nw+7/f7ZQHq6upisVhTU5MQwmQy1dXVye2srKzU1dVVKpVkMjk3N/fgwQNFUcxm85UrV6qrZ54/fy6EUBRlcXGxUqnodLp8Pr+6unr37l1ZqpMnT1ZnHb/ff+3atenp6c7OTovFos1xBQDgYLxL7RddXV2Dg4PT09PFYvHp06fq8sbGxr6+PlkzkUwmq6sThBA2m625uXlxcVFWaVS/6uLFi9VpQwjR3t5utVrT6XQwGAwGgwaDwefzyT8NDg6WSqXx8fFYLHbnzp2aXXz00UfVdRUqr9ebSCSeP38u84fK5/MNDQ1VL1lbWxNCVCqVSCTidDp3e1AAAHgXvEuBQwhx5syZ9vb2ubm5SCRSqVSampp8Pl9/f3+pVIrH40KISqVS8xKj0Xj58uVAILC4uBiJREqlUlNTU1dX18DAQF1d3daVP/3002fPnq2srBSLxZoT//DwsNvtnp+fD4fDsgrE4XB4PJ7e3t6XdT2x2WwXLlxYWFjw+/2bm5s6nc7pdPb29vp8vpqs09PTEwqF6urq1CYkAADeG4e0D8eekH04HA7HF198sc+7VvtwDA0NnT59ep/3DgDAYXNYhsUCAID3GIEDAABojsABAAA0R+AAAACaI3AAAADNvc+jVAAAwCFBDQcAANAcgQMAAGiOwAEAADRH4AAAAJojcAAAAM0ROAAAgOYIHAAAQHMEDgAAoDkCBwAA0ByBAwAAaI7AAQAANEfgAAAAmiNwAAAAzRE4AACA5ggcAABAcwQOAACgOQIHAADQHIEDAABojsABAAA0R+AAAACaI3AAAADNETgAAIDmjAddAODg/ed//qcQYmho6PTp0wddlndYNBr9+uuvhRBXrlzxer0HXZzDbnx8fGJiQgjxL//yLwaD4aCLA2juMAaO7777bnV1dffr/8M//IPVatWuPJpaXV29c+dOY2PjlStX6uvrD7o4AABo4jAGjp+VpaWlXC6Xy+VisVh7e/tBF+d99vz586dPnwohfve73xmNfPMBYF8dxp/d06dPF4vF6iXZbPbOnTtCiIGBAZ/PV7O+2Wzev8LtNY/Hs7i4aLfbHQ7HQZflPacoykEXAQB+vg5j4Ghubq5Zkkwm5QObzeZyufa9RBryeDy/+93v9Hp67wIA3mfv2HlOp9MddBH2HmkDAPDeO4w1HG9genp6bGxMCPHb3/52fX39xYsXGxsbZrP5N7/5zc2bN0OhkE6n++qrr0wmU80Lv/7662g0ajab//Ef//FlJ3617f+3v/1tXV1d9Z+y2ex//dd/CSHOnDkzODhY/adcLjc/Px8MBhOJhKIoNputo6Ojv7/fbrdXrzYxMTE+Pi6E+Kd/+ie1eD/88EMgEPB6vVeuXInH47Ozs+FwOJPJWK1Wj8dz9OhRi8WytZz5fH5mZiYQCKRSqfr6+ra2tv7+fpfL9de//jUej4+MjAwPD+9wDNfX17/99lshxBdffGE2m2dnZ4PBYDKZrK+vb2lpOXLkiKxbUhRleXl5YWEhFouVSqXGxsaurq6BgYGaIyNVKpXFxcXl5WW5stVqbW9v7+3t3VqJtcMnWL21YDAod10ul+12u8fjGRgY2LmzbSAQ+OGHH6qX/OEPfxBCWK3Wf/iHf9i6vtxFJBIplUpNTU3d3d39/f3bDiKIx+MLCwurq6upVEqn0zU1Nbnd7r6+vpo2PnXsxueff+5wOObn55eWluLxuE6na2lp6e/vf60BHfJ7FQqFEomEEMJut7vd7v7+/q0Ni2/2LRJCrK+vz8/PRyKRbDbb0NDQ0dExMDDQ2Ni4+0LWKBaL33//fSQS0ev1H3/8cXUl5Ss/042NjW+++UYIcfz48ZMnT9ZseWVl5fvvvxdCnD9/3uFwyOP84YcfejyeravpdLp/+qd/qvm2PH78eGpqqr6+/quvvqr+Bdj9cZZDnE6ePDkwMDAxMREIBNLp9OXLl6sbf1dXV2dnZyORSLFYbGxs9Pl8/f39b3YwgXfXexI4VNPT0zIcqLq7u0OhkKIo4XC4u7u7+k+ZTCYajQohenp6dqhmeIO2/42NjVu3buVyOXVJPB6Px+PT09OXL1/e5QmmXC7Pzc3dv39fXZJMJqemppaWlj799FObzVa9ciKR+O6777LZrHxaKpWWlpaWlpZGRkby+fxrFT4cDk9MTBQKBXVTmUxmeXn53Llz3d3dd+7cCYVC6srRaDQajS4tLf3qV7+q+SlPp9O3bt2Kx+Pqks3Nzc3Nzenp6ZMnTx4/fnzbvW/9BKVcLnf79u21tTV1ycbGxsbGxszMzCeffPI2p0NVpVK5e/fuwsJCzS6CweBHH31UkzmmpqYeP35cvSQSiUQikampqY8++qi1tXXr9jOZzIMHD+RXTlpZWVlZWRkeHh4ZGdlNCcPh8O3bt9WPRi3h1NTUpUuX3G731pe81reoUqk8fvx4enpaXZJIJBKJxOzs7KVLl7q6unZTyBqVSuXOnTuRSEQIcfHixeq0sZvP1Ol02my2VCq1tLR04sSJmjrOlZUV+cDtdtfX19fX1xcKhfX19a2BQwihKMrWP4XDYSGEx+Op/gV4g+OcyWS+/fZbmU5qqMNfJfkvMz8/T7ct/Ny8b4FDnqvcbrfdbpdnCLfbrdfrK5XK8vJyTeBQB9/u7ZwB+Xz+5s2b+Xy+vr7++PHj8mo+Go0+e/asVCrdvn376tWrTU1Nr9zO2trayspKY2Pj0aNHbTabrMBYX1/PZrPj4+OXL19W1yyVSjdv3pRpo7u7u6urq66uLp1OT09Py+qT1/L48eOGhobjx483NTWVy+XV1VV5BhobG/P7/Wtra263u7u722w2y13ILDUxMVE9iUWhUPjuu+9SqZQQYmhoqLOzs66uLplMvnjxIhqNPn361GAwDA0Nbd371k9QvsEbN27IWoFjx451dnbqdLqNjY1nz55ls9lbt25dvXr1ZQNP3G73b3/7WyHE5OSk/N3/6quvDAbD1ua5mZkZRVE6Ojr6+vpMJlMqlXr+/Hkmk1ldXV1YWBgYGFDXXFhYkGnD5XINDg7abLZSqbS2tvb8+fNCoXDr1q0vv/xya73LnTt3yuXywMBAZ2enwWDY2Nh4/vx5pVKZmJjw+XyvPP1Eo9GbN29WKhWTyTQ8PNzS0iIXPn/+PJ/P37p161e/+lVbW1vNq3b/LRJCjI2Nzc7OCiG6u7t7e3vr6+uTyeTz588TiYQcvL2b7201RVHu378vE+qZM2eqL/p3+ZnqdLre3t6nT5+mUqlYLOZ0Oqs3vry8LITo7OyUFQ8ej2dhYUFmiOrVAoGAfLyyslIdOHK5nAzE1QPE3uw4z83NCSFsNlt7e7vBYGhoaJDLFxYW5LeuoaFhaGhI/k+Fw+Hp6elt0wnwHnurwLG2tjY2Nib/Y10u1+jo6Naq8n1mtVo/+uij6p/Furo6n8+3uLgYDAYLhUL1aSAYDAohGhoa5G/KXgkEArJS4fLlyx0dHXKhy+VqbW29du1apVKZnZ09e/bsK7dTLpfdbvfly5fVU6nX671+/XokEvH7/efPn1eXz83NyVN7TbuJz+e7c+eOfJu7Z7PZfv3rX6tVxx6Pp7W19fbt25VKZW1tbWBg4OzZs+rZ2ufzXbt2LR6Pz8/Pnzp1Sl0uzxBCiI8++ki9InQ6nV6v99atW+Fw+PHjx52dnVtPYFs/QSHExMSE/Jp99NFHnZ2dcmFra2tzc/P169eTyeTi4mJ1IKim1+vlxat6CWs0GrdNJ4qinDhx4sSJE/Jpe3u72+3+y1/+UiqV/H6/un1FUZ48eSKEcLlcv/zlL9VU1NraarPZbt++nc/nQ6FQT09PzfYrlcovf/lLtfwdHR1Op1O2CIRCoZ0Dh6x9qVQqZrP517/+tVoz0dra6vF4vvnmm1wud/fu3b/7u7+rqYnZ/bcoFArJtFHdeOF0Otvb2//617/mcrnnz5/XBJRXGh8flzVGx44dq2lz3P1n6vV6ZQwNhULVgSMWi8mQreaYjo6OhYWFeDyey+XUL3A8Hs9kMvLx8vLymTNn1G+CWtuk1ru88XGWx+348ePVNSXFYvHRo0dCCIvF8utf/1pNIW632+1237hx47UOJvCue/PuioFA4Pr162qF+dra2t/+9rdYLLZHBXtDH3zwwdZzmPw9kq0q6sJisSgvvHp6eva2L2o6nZYPaurVW1tbe3p6nE5nzaDfl6mrq6s+Hwgh9Hp9b2+vfCxP55I8T5hMpqNHj1ZvwWg07ibZ1Dhx4kRNQ7WsMhFC6HS6kZGR6sNlNBrl4S0UCmqDTjablRd8vb29NfXPBoNBLdLMzMzWvW/9BIvF4osXL4QQfX196plJcrlc8lQxPz//um9zK5fLVdPQY7FY5AXxxsaGurBSqZw+ffrixYujo6M1Zx31zW5ubm7d/okTJ2rK39HRIRNwdcPTtsLhsNzmqVOnatpBrFbr6OioECKVSm0Nl7v/FsmDbLPZavr6mM3mI0eOCCH8fn91K+ErvXjxYnJyUgjR29tb02b0Wp9pU1OTzBlLS0vV7Zvqv7O6BbXiofrzkhWZ/f39RqMxn89X/0bJhh6Hw6FGgTc+zi6X68SJEzUtsysrK7Jd5vjx4+ouJNkzZssxA95nbx447t69u8uF+2nby8T29nb5s67WrAoh1tfXK5WK2Ov2FCGE+suy9Vfp4sWLn3/++cWLF3ezHavVurWHmtrRT00tmUxGDhvu6+vbetW1bV/OnW19iU6nk3O5trW1bW0p2Fok9dj29fVt3b7sGCiEWF5e3to/ZusnuLq6Wi6XhRA1LWKS/Pii0Wh1i/ubcTqdW6On/DTL5bIsgxDCYDD09PT09PRsrc9T6062zZRb35p6YF9ZeBmODQbDth0pvF6v/NSqu9dIu/8WyRNzb2/v1m+RekZ/ZTBS+f1+eXHf2dl57ty5mgP7up+prC5KJpPVSU7+O3s8HvUNNjQ0yIO8vr5es5rX65WHrvqqQ3Yfqc7Eb3yct/3yqN1Ttt0aMwvj5+YNm1Risdi2P6nxeLym2eIwMBgM3d3dcgSHWjz5k2Gz2fa8Gcjn801MTGQymTt37iwvL3d1dbW2tu755OvqqVqtUNG0D5q8dNu2JUL9nVWLpJ6WXnZsXS5XMBjM5/NyHMTOu1ZnYdHr9VtrDtRrynQ6rcUXb+u7qy5YIBDY2NhIpVLVfWzfYPuv7JgsK//b2tq2/QgMBkNbW1soFKq+st8Ndb9qVUd9ff3Wgyzjo/h/a0R2sLGxIfv9mM3mS5cubU0wr/uZer1eOYhJbXtKp9PymNTMBOjxeOLx+MrKiuxRlM1m5eiYtra2crm8sLAQCARkPVahUJA1HDUdOMTeHWf51ux2+9bxccDP0BsGjh0aBQ5h4BBC+Hy+mZkZ2QvB6/VWKhV53bPn7SlCiPr6+k8//fTRo0eB/yGEsNvt3d3dPT09NfW0b0/9LF42ynH/yS4sJpPpZR051UvSfD7/ysChttTIUbsvs8uGqj1RqVTGx8enpqb2bY/yIOzwEcvDqKbP16UOZXr48OEOq+2yGkm2pAghcrlcJBLZOqzjdT9TOTo3HA4vLi7KFh9ZH6PT6dRuUlJ7e/vz5883NzczmUxDQ4NczePxGI1Gl8ul0+lisVg6nbZarbJtRa/XV3fh2tvjLI/qnv/LA++oNwwcL5vus66u7nD+d7W2tjY0NGQyGTkzQSwWk63RNWPk9orVapWTHwQCgZWVlY2NjWQy+ezZs+fPn8ueZVrMYHZ4ZkXb/UDi3ZR5l3UG6lX4Pnjy5InsgnD06NHu7m673S7HUwgh/vCHP7xuJcdhoDYY7Wz3B9lsNut0umw2e/fu3atXr9bEyjf4TLu7u8PhcCKRiMfjDodDbSipqTxwOp1yVFo0Gm1oaJAVmTLx1NfXd3Z2hkKh1dXVvr4+Wb3R2dmp3Y115D/C4fnHBA7Wm/+nnThx4tmzZ1sXvl15tCIH1z1//tzv9589e1a24zY2NmraDOFwOBwOx4kTJ+TcAJOTk5FI5NmzZ3V1dTW9O9+G2uVCvWo8cPIckM/nS6XStr/m6vX0brqYqBVm//qv/3oYZmXNZDIybVQPadGaxWLJZrM7fMQyQL+yuuhl1A/i888/rx4J8sZb+/jjj3O53I0bN/L5/IMHDz788MPq8+4bfKbq+PaVlRWr1Sr/hbf2jTAajW63OxAIrK2tdXR0yMChNpp4vd5QKBQKhfr6+mQHi5ouq3t7nC0WSzKZ3GU7FPDee/Of762/tsePH9/D8+iekz3RZKuKHL6/y/YU9QdxNxfuiqIUi8VisVh9cVZfX+/xeD7++GM5l1H1xEpvT61S2nZkxIFQY9zL+hjKPn0mk2k3P9zq3KyH5IdbHUu5592NdyBDwPr6+rZ1A/JbLYR44wHeah+j3XcL3cGZM2ccDkdHR4ds/giFQjUjkt7gMzWZTLI+cmlpaW1trVKp6PX6mvYUSS4Mh8MbGxulUqmlpUX9msnkEQqFcrmc/BLWzKixt8dZjrdKJpNv36MZeA+81fXiiRMnfvOb31y5cuWTTz7553/+560TDx8qzc3N8kSoTgCw7YyBW6lXY1vHBG6dxLNQKPzxj3/84x//WD23oGQ0GuVPYTqd3sM7l1osFvm+5ubmtlaMv+40o3tCNpYLIapn7VSl02lZH97V1bWbwKe23227NbHrev69qtlWT0Vbe42kUqldtk28LnkhXi6Xq0daqeQcM2LXX+mtmpqa5Fl5bm5u2+P5Wi1Wan3J8ePH5bn50aNH1VHmzT5TOaRFzjInhOjq6tq2u5jceCKRkCmnOhdarVan01mpVCYnJyuVSkNDQ80ctXt7nNW7AWy7tdcaYwy8B962gtpms3m9XnXc6SEnB9fJHuZNTU27bE9RV5P1IqpCoSB7zlczmUzyF3Z+fr7mB6VcLsuLqqampr1t1pUD+nO5XE3dSbFY3LkPoEYsFou8vzyOyQAAIABJREFUVcTc3Jw6+bRUqVQePnwo89Yu5yGw2+2y5nxycrJma0KIeDz+l7/8ZWlp6ZXbUcdKvGUIUysD5ufnq4NjJpO5ffu2XLLnHUo6OzvlqfHx48c1PRYzmYwcgCpvkvJm25fTfQoh5PynNX/N5/M3btx4/Pjx674vg8Fw4cIFg8GgKMqdO3fUrPZmn2lHR4dsoZP/wi+bar2xsVF+RvI0X1MLIl8lG8U8Hk/Nf+LeHmd1CtRnz57V/BqEQqFtJ49RFCWVSr2L3YCAV3rfpjbfmcfjUe9/sXUiyJdR7+bw9OnTbDYrL27k9dO2ndVPnTp1/fr1TCbz9ddfHzlypKWlxWAwpNPpmZkZ2TFeTqO0h3p7e2dnZ+Px+JMnTzY3N+VsAclk8gCnTx4ZGVlZWUmn0zdv3jx69Kjb7TYajalUSt6VTa6w+w40o6Oj6+vruVzu5s2bR44c8Xg8JpMpn8+Hw+EXL17IMUc+n2/nGKdW44+NjfX395dKpZoRlbvU0tLicDjkndvy+bzX6zUYDPF4fGZmRj1P7HnFkl6vP3/+/PXr13O53Ndff338+HFZ+R+Px9WTWc0EX6+rv78/EAisrq4+f/48Fov19/dbrdZSqRSNRqempjKZTCaTGRoa2jqrx84aGxvPnj177969zc3NJ0+eqNO+vcFnajQau7u75ZxyBoOhejhrDY/HI8O3Wv+n6uzslBPFiv93QKyk1+svXLjw7bff7slxNhqNZ86cuX37tvw1kFObl0qllZUVOVnfVmNjYzMzM1ar9erVq+/EVRywez+vwGG321tbW2Xv9N1fC+r1+osXL964caNUKs3Ozlb/UgwMDGz94XC5XBcvXrx3714mk1F/2lRHjx7d8xtFGgyGK1euyJSzuLi4uLio/unYsWPqGMX9VF9f/8knn9y8eTORSExNTdWMID1+/Li8nt6lhoaGX/3qVzdv3kylUtPT0zUVOb29vdWzrb9Me3u71WpNp9PBYDAYDBoMhjcLHHq9/tKlS999910ul5M9ENU/nThxIhQKRaPRWCymKMre1mO1trZ+9NFHP/74Yz6fr6laMxqNFy9e3OEEvBt6vf7KlSs//fRTMBiseV9CCKfTefny5ddNG1JfX184HPb7/TMzMx0dHfJf780+U5/PJwOHz+fbocdxR0eH3ODWZrumpib5NRBbOnBILS0te3icfT5fKpUaHx/PZDLVW7PZbG63e2t3LnnY0+l0KpV6+967wKHy8wocQojOzs5IJOJ0Ol/r/qKtra1Xr1598eKF7G5mNpvb2tp6e3tdLte2Vyo9PT0tLS3z8/Orq6vJZLJcLlutVpfL1dPTs+1v3Nuz2WxffPHF9PT08vJyMpk0mUwul2tgYKCpqUkGjv0fm2ez2a5evbq0tCRvT18oFOTt6fv6+t7gl7SxsfGLL77w+/2BQCAajRaLRdkeLz+F3bw7o9H46aefPnv2bGVlpVgsvs2veVNT09WrV+VUcqlUymw2t7e3HzlyxOl0NjQ0yH6F+Xz+zU7PO+jo6Pjyyy/n5+eDwWD1bdP7+vreeHxKtbq6uitXrqysrPj9fnmDN4vF0tTU5PP5urq6ts7ftXtnz56NRCKZTObevXvqKNk3+EzV3po737pWvatAzSAUIYROp/P5fJOTky6X62Xzce3tcR4eHm5tbZX3zCuVSo2NjV1dXf39/fIWbjUrDw0NjY+Pu1yu171PHnD46f793//9oMuwr65duxaJREZHRw/zgJo9lE6n//SnPwkhPvjggz2vWQH2WTgcvnHjhtFo/Oqrr7SbPwOAFg5+VoP9FI/HZXvKG3fmP7Sy2ey2I1/k+xVCvFaNDnA4yVEt3d3dpA3gnfMzChyVSkXOVNbZ2an2H3w/5PP577777smTJzWDCLLZrLyvt6ypPqDSAXsjEonIoSu77/EN4PB4/68SKpVKKBTK5/N+v1/eWOG1uiu+E2KxWCKRSCQSa2trst+GoijRaHRyclLOmbj1RurAuyIejycSic3NTdnjob29XaOOUAA09bMIHD/88IP6dHh4+GU3gnl3dXR0XLp06cGDB9Fo9N69e9V/0ul0H3zwwX7OiQnsrWAwKCvqhBAmk+n8+fMHWx4Ab+b9Dxw6na65uXlzc9PhcAwODsrJCt8/3d3d7e3tfr9/ZWUlGo2Wy2WbzdbZ2dnX1/eetR/h58ZisZjN5kql4vF4Tp48uSfjcQDsv5/dKBUAALD/fkadRgEAwEEhcAAAAM0ROAAAgOYIHAAAQHMEDgAAoDkCBwAA0ByBAwAAaI7AAQAANEfgAAAAmiNwAAAAzRE4AACA5ggcAABAcwQOAACgOQIHAADQHIEDAABojsABAAA0R+AAAACaI3AAAADNETgAAIDmCBwAAEBzBA4AAKA5AgcAANAcgQMAAGiOwAEAADRH4AAAAJojcAAAAM0ROAAAgOYIHAAAQHMEDgAAoDkCBwAA0ByBAwAAaI7AAQAANEfgAAAAmiNwAAAAzRE4AACA5ggcAABAcwQOAACgOQIHAADQHIEDAABojsABAAA0R+AAAACaI3AAAADNETgAAIDmCBwAAEBzBA4AAKA5AgcAANAcgQMAAGiOwAEAADRH4AAAAJojcAAAAM0ROAAAgOYIHAAAQHMEDgAAoDkCBwAA0ByBAwAAaI7AAQAANEfgAAAAmiNwAAAAzRE4AACA5ggcAABAcwQOAACgOQIHAADQHIEDAABojsABAAA0R+AAAACaM5ZKpYMuAwAAeM9RwwEAADRH4AAAAJojcAAAAM0ROAAAgOYIHAAAQHMEDgAAoDkCBwAA0ByBAwAAaI7AAQAANEfgAAAAmiNwAAAAzRE4AACA5ggcAABAcwQOAACgOQIHAADQHIEDAABojsABAAA0R+AAAACaI3AAAADNETgAAIDmCBwAAEBzBA4AAKA5AgcAANAcgQMAAGiOwAEAADRH4AAAAJojcAAAAM0ROAAAgOYIHAAAQHMEDgAAoDkCBwAA0ByBAwAAaI7AAQAANEfgAAAAmiNwAAAAzRE4AACA5ggcAABAcwQOAACgOQIHAADQHIEDAABojsABAAA0R+AAAACaI3AAAADNETgAAIDmCBwAAEBzBA4AAKA5AgcAANAcgQMAAGiOwAEAADRH4AAAAJojcAAAAM0ROAAAgOYIHAAAQHMEDgAAoDkCBwAA0ByBAwAAaI7AAQAANEfgAAAAmiNwAAAAzRE4AACA5ggcAABAcwQOAACgOQIHAADQHIEDAABojsABAAA0R+AAAACaI3AAAADNETgAAIDmCBwAAEBzBA4AAKA5AgcAANAcgQMAAGiOwAEAADRH4AAAAJojcAAAAM0ZD7oAh0g0Gr1//348Hu/q6jp37lx9ff1BlwgAgPcEgeP/d/PmzWg0KoSYmppqaGg4ffr0QZcIAID3xP4Fjkql8h//8R+KosinXq/3s88+0+l0W9d8+PDhkydP5GOn0/nVV1/tQ/HK5bJMG1IikdiHnQIA8DOxrzUcatoQQgQCgYWFhb6+vv0swA4MBsPg4OD09LR86vP59rkAiUTij3/8o3qIfve73zU2Nu5zGQAA0MhBNqk8ePDA7XabzeYDLEO1S5cuud3uTCbT2tra0dGx/wWoDmQAALxPDjJwpFKpp0+ffvDBBwdYhmoGg+Hw1LgAAPA+OeBhsU+fPo1EIgdbBgAAoLWDH6Vy//79q1ev6vW7jT6lUikYDAaDwfX19VQqZTQam5qa3G53X1+fzWZTV/vzn/+8trYmH584ceL8+fPVG5mamrp9+7Z8bLFY/uVf/sVoNH799deBQEAuPH/+/IkTJ6pfoijK8vLywsLC+vp6oVBwOBxdXV1HjhxZXl6+deuWXOfixYvDw8PVr9rc3FxaWgqHw5ubm/l83mq1trW1+Xw+r9ervuXx8fEHDx7UvM0//OEPQgiz2fy//tf/ql6ey+UWFxcDgUA8Hi8UCjabzeVy+Xw+t9u9ywMIAMD+O/jAsbKyMjs7Ozg4uJuVo9Hojz/+uL6+ri7J5/PpdDoUCj1+/PjChQtHjx6Vy3t6etTAsby8/MEHH1SPiAmFQurjvr4+o7H2ONR0pygWiz/88MPCwoK6JBwOh8Ph6enp1tbWbYtaqVSePn368OHD6oWFQiEWi01PT7vd7g8//NBqtW7d1w6Wl5d//PHHTCajLsnlcpFIZGJior+///Lly3V1dbvcFAAA++nAmlSamprUxw8fPqw+ib5MIpH4+uuvq9NGtVKp9OOPP87Pz8un1Vf8m5ub1cNci8WiWpMhhPB6va/c9Z07d6rTRvWW5+bmtn3J2NhYTdqoFgqFvv3222Kx+Mpdq5aXl7/55puXHai5ubkff/yRbqcAgMPpwGo4jh49GggEZE1DNpt98uTJpUuXdn7J48eP1dOt3W4fGRmx2+3ZbPbZs2cbGxty+f3797u7uw0Gg9PpbGlpUZevr6+rEWdjY6NUKsnHJpPJ5XLtvN9AIDA7O6s+raur6+3tNZvN8Xjc7/dv+5JoNDo+Pq4+HRwc7O7u1ul04XBYXR6JRBYWFgYHBwcGBrxebzqdvnbtmvqSX//611arVa2VyWQyP/zwg/rX+vr6np4es9m8vr6+srIiF87Pz/f09PT09Oz8dgAA2H8HFjj0ev25c+f++7//Wz6dnJzs6+trb29/2fqVSkWtvRBCfPDBB+qZtaWl5f/8n/8jH6fT6Wg02tbWJoTo7e1VA0c4HB4YGJCP1aYWuc4rmyGmpqbUxw0NDVevXm1ubpZPA4HA119/vfUl1btwOp2XL1+WPTa8Xm+hUFA3GAwGBwcHrVar1WqtKYbD4aieh2N6ejqbzcrHFovliy++kGVQFOXJkydjY2PyTxMTEzLZ7PyOAADYZwfZh6O1tXVkZES94r93797f//3fGwyGbVfW6/X/9m//pj6tPj07HA6z2ZzL5eRT9cTs8XjUzpjLy8uVSkWe9YPBoPrarq6unQuZy+WqqzFOnjyppg0hhNfr7ejoCIfDNa8aGBjo7e2Vj3U6XXWXWJfLpQaOXc5nqijKixcv1KenT59Wy6DT6Y4fPz4+Pi7rbMLhcDqdru48CwDAYXDAnUZPnjy5sLCQTCaFEOvr6y9evKgZ5VHNZDLJB7lcbnV1NZVKFYvFcrkshKhUKupqanOJ0+l0OBzxeFwIkc1mo9Foa2trNptV2yDq6up2qFORNjc3q5/ucgZSo9EoO6IqihKLxRKJRC6Xkz021EoXIUShUNjN1hKJRDqdVp+6XK6azh9Op1OtU0kkEgQOAMBhc8CBw2QynTt37rvvvpNPx8bGdj6jp1Kp8fHx6enp6oTxMjqdrq+vT21uWFtba21trZ72o6en55W3hM3n8+pjvV4vx5XshqIoCwsL4+Pj1bdoeTNqnY30X//1XzusXF1gAAAOiQOe+EsI0dPTo4aMQqGg5oOtYrHYX/7yl6mpqd2kDcnj8aiPZcXG6uqquuSV7Smiqr5ECGGz2XY/X8j9+/dv3Ljx9mlDCPFag1lklQ8AAIfKwc/DodPpzp07FwgEZIyYnZ2tHjGrUhTlzp07astCa2vr2bNnW1paTCaTTqf73//7f1c3OqhaWloaGxtlV4lAIFAoFNQBsQaDobOz85XFq+5Tkk6n1Y4gOwsEAs+ePVOfnjp1anBwsKGhwWAwzM3Nff/996/cQrXdpxwAAA6ngw8cQgiHw3H69Gm1bqOm24QUjUar+2ZeuXLF6XS+cst6vb63t1fe7L5cLi8sLKhVDt3d3WqnkB1U31uuXC5nMpnd9JCoHlBz5MiRs2fPvvIluyyDEOKf//mfHQ7H22wQAIB9dlgunYeHh3c+iaZSKfWx2WyuHiqys+p5vR4/fqw+3mX3z5rqluoZw3ZQ3ZKym3qUraqn8GpqaqrORktLS1vXLxQKNKYAAA6twxI46uvrd3/b2FwuV92Asri4uG17itTW1qb29KxebZc5wGw2V0eT8fHx6rGsfr9/65jYGrFYTH1cKBReNjNpzXhgOXJHMhqN1VO/P3z4sLoGRQixubn53Xff3b17d/e9WwAA2E+HoklF6urq6uvrqzmVqmrqP65fvz40NKTX61dXV6vnqNhKr9f39fU9ffq0emF3d7fFYtllwYaGhtSpOFKp1H//93/LWT6j0ejLKjza29vVSo6nT58qiiJH5L548UIO05WqqzFMJpNer1cTw61bt3w+n6Io586dM5vNw8PDs7Oz6nCVGzduTE5OtrW1GQyGWCymFs9kMr1l8w0AAFo4RIFDCHHmzBm/3189METV1NR05MiRmZkZ+TQSiVRP9V1t68u9Xu/WwLH7Unm93oGBAXV280KhMD09vfNLjh49+uLFCzU9VHcgrZbP5xVFkRODGo3G7u5u9Y4tMp0IIc6cOSOEsFqtH3744bVr19Rtrq6uVo+4kcrlsrpBAAAOj8PSpCI1NjbK8+u2Lly4sG3HC6fTWd0+Ut3bQ3K5XDX1Ga97M/dLly6pM4dW6+np2bbvqtPp/OSTT7ad5KO/v199XCwWq+fYOHXqVE3/0Gper/eLL77YdgiPEMJgMFy8ePHcuXOkDQDAIWQYHR3dnz0pilLdZ9Pr9co7ntRwOp2BQKD6viFDQ0PyscFg6OnpcTgciqIUi0WDweByuY4fP37+/Hm9Xq82K5RKpcHBwerzrl6vz2Qy6m1mvV6vus1qc3Nzav8Mj8dTPQmpwWDo7u52Op06na5cLut0uo6OjtOnT4+Ojk5MTKhzbfX29ra0tMjHDoejp6enrq6uVCqVSiW73d7b23vhwoWhoaGZmRl1ao2Ojg41Q1gslu7ubr1eL2dQtdvtXV1dPp9P7d5hs9mOHDnS3Nwso0ylUrHb7W1tbceOHbt06ZLH4yFtAAAOJ93vf//7gy7Du2HbpopMJvOf//mf6tPPP/98Nze7BwDg5+ZwNakcWvl8/q9//at6ExapVCo9fPiweolavQEAAKodrk6jh5OiKHfv3l1ZWVlZWfF4PB6Pp76+PpPJLC4uVs+3cfz48d2PfAEA4GeFwPFqm5ubageRYDBYfXd7VVtb26lTp/a3XAAAvDP2r9Pou8tsNnd0dESj0Uwms+0KAwMDV65coXoDAICXoYZjV1wu15dffhkMBldWVlZXV5PJZF1dXWNjo8vl8vl8ra2tB11AAAAONQLHbhkMBp/Pt8s7sAAAgGqMUgEAAJojcAAAAM0ROAAAgOYIHAAAQHMEDgAAoDkCBwAA0ByBAwAAaI7AAQAANEfgAAAAmiNwAAAAzRE4AACA5ggcAABAcwQOAACgOQIHAADQHIEDAABojsABAAA0R+AAAACaI3AAAADNETgAAIDmCBwAAEBzBA4AAKA5AgcAANAcgQMAAGiOwAEAADRH4AAAAJojcAAAAM0ROAAAgOYIHAAAQHMEDgAAoDkCBwAA0ByBAwAAaI7AAQAANEfgAAAAmiNwAAAAzRE4AACA5ggcAABAcwQOAACgOQIHAADQHIEDAABojsABAAA0R+AAAACaI3AAAADNETgAAIDmCBwAAEBzBA4AAKA5AgcAANAcgQMAAGiOwAEAADRH4AAAAJojcAAAAM0ROAAAgOYIHAAAQHPGgy7AS33//feJROLixYttbW0HXRYAAPBWDixwrK2t3b1712g0fvbZZ0bj9sVQFEVRlH0u2C7l8/mvv/5aCPHZZ5+ZzeatK/zpT38SQnz44YcOh2O/CwcAwCFzYE0qy8vLiqIUi8XV1dWDKsO2isXin/70pz/96U/5fP6VK++chw5tWgIAYJ8dTODI5XIrKys6nU4Isby8fCBl2BlZAQCAPXQwgWNlZaVSqfT29jY0NKytraXT6QMpBgAA2B8H04fD7/cLITweT11d3YsXL4LB4ODg4MtWDofDi4uL8Xhcp9O1tLT09/c3NzfXrFMsFv1+fygUSiaTRqPR4XB0dXV1dHTIShTp+vXr6XT6F7/4hdPpVBcWCoW//e1vQojPP/98Y2Pj4cOH4n+qN2QXjZGRke7u7j1515VKxe/3B4PBzc1NIURjY6PH4+nu7tbrGSsEAHjPHUDgiMViiUTCZrM5HA6DwTA9Pe33+wcGBrY9787Ozm5sbNTV1VkslnQ6HQqFVlZWzp8/397erq6TzWbv3r2bTCb1er3D4SgWi+FwOBwO+3y+kZGR6s2+rBeqXGixWHw+X6VSka08Xq9Xr9dbrdY9edeVSuXevXvr6+s6na6xsVFRlFgsFo1G5dt5WbdZAADeDwdwngsGg4qidHV1yVNvY2Pj5uZmJBJxuVxbV45Go6Ojo263W6/Xl0ql6enp2dnZR48e/epXv6qvrxdCVCqVsbGxRCLh8XhOnjwpFyYSiXv37vn9fpvNNjAwsMuCNTc3Nzc3F4vFQCCgKMrw8LDJZNqrdx0IBNbX161W68WLFxsaGoQQqVTqp59+ikQifr+/r69vr3YEAMAhtN+V+aVSSdYfdHR0yCVdXV1CiEAgsO36x44dkzUNQgij0Tg0NGS1WguFQjgcliusra1Fo1GTyXTq1CmZNoQQjY2NIyMjOp1uenp6N4NN9kE8HpcxS6YNIYTNZjt69KjJZIrFYgdbNgAAtLbfgWNtba1UKjU3N9vtdrlE9rQIhULbJgN1NUmv18uAsrGxIZeEw2FFUXp7e2taJdra2ux2e6lUUtc8WHKujvX19VKppC7s6uq6evXq2bNnD65cAADsh/0OHH6/X17oq0saGhpaW1srlcrKysputmCz2YQQqVRKPlU7YNasptPpZN9Sdc2D1d3dbbfbI5HItWvXxsfHA4FAJpM56EIBALBP9rUPRzqdXl9fF0JUd/kUQni93vX1db/f39PT88qN1NfX63Q6tZ6gWCzKhVvXlD0wqmsUDpDJZPrwww8DgcDi/9DpdG1tbYODg9WjZgAAeC/ta+AIhUJyPMi1a9eql8uF8Xg8Ho+/ciLwQqGgKIragFJXVyf+J3bUkG00Gg0AUQfcViqVrX9Vx8JUj8s1Go09PT09PT2ZTCYWi4XD4WAwuL6+XjPoBgCA98/+BY5KpbK0tCSEsFqtBoOh5q+5XK5QKASDwVcGDtlEIhtWhBBNTU2bm5uJRGLrOVu2tqhryp3u1RSiRqNRp9MpipLP59V+oKpcLicfyKoXuZoQwmQy6XS6hoaGhoYGj8fT2Ng4OTk5MzND4AAAvN/2L3BsbGxks9m6urpf/vKXW2sdVldX5UDWo0ePVv81kUhUD5eVc2cJIVpbW+WSjo4Ov9+/sLBQ0280Eolsbm4aDIaWlha5RLawqFFAeuOOFHq93uVyhcPhQCCwdSIyWZfT2NhosViEEOVy+ZtvvhFC/PKXv6zubtLS0qLT6bLZ7JuVAQCAd8X+dRqVk1t0dXVt28bR1tZmNpuLxeLa2lr18snJSb/fL5stSqXSxMREJpMxm83qqFqXy+V0OnO53Pj4eKFQkAsTicT4+LiiKIODg+pcGjJ5zM7OqiEjGo2OjY3V1HkYDAbZDiIrSHYwMDCg0+kWFhaeP3+u5phisTg7OzsxMSGEOHr0qFxoNBo9Ho+iKBMTE2q8KBaLi4uLiqKokQgAgPfVPtVwyOYSIYTX6912Bb1e393dPTU15ff73W63uryjo+PJkyfPnz+3WCyZTKZUKul0utOnT8uuG/KFZ86cuXv3biAQWFlZaWpqKpfLiURChpv+/n51U11dXYuLi4lE4vr161artVgs5vP5mmG3coOdnZ3BYPDu3bsNDQ29vb0vm5XL6XSOjo4+efJkbm5ufn7ebDbr9fpMJqMoil6vHxkZ6ezsVFceHh5OJBJra2vXrl2z2+0GgyGZTJZKJYvFouYSAADeV4bR0dF92E0wGFxZWXE4HDucXM1m8+LiYjqd9nq99fX1S0tL+Xz+/PnzbW1t+Xxezlze3t4+OjpaUyVQV1cnX1IsFpPJZKVSaWlpOXbs2JEjR6rnNTcajW63u1KpZLPZfD5vsVh6e3tPnjw5NzcnhBgYGFCrXlpaWsrlcjab1el0HR0dW8fcqhobG71eb11dXblczuVypVKpsbHR5/OdOnWqra2tek1ZyVFfX18ul1OpVD6ft9lsPT09p06dks0uAAC8x3S///3vD7oMAADgPcd9SgEAgOYIHAAAQHMEDgAAoDkCBwAA0ByBAwAAaI7AAQAANEfgAAAAmiNwAAAAzRE4AACA5ggcAABAcwQOAACgOQIHAADQHIEDAABojsABAAA0R+AAAACaI3AAAADNETgAAIDmCBwAAEBzBA4AAKA5AgcAANAcgQMAAGiOwAEAADRH4AAAAJojcAAAAM0ROAAAgOYIHAAAQHMEDgAAoDkCBwAA0ByBAwAAaI7AAQAANEfgAAAAmiNwAAAAzRE4AACA5oz7vL9isRgIBMLhcCKRKJVKZrO5paXF6/W2trbuZzHm5+enp6dPnjzp8Xj2c78AAPw87WvgSCQS9+7dy2QyQgij0WgymdLpdDqdXl5e7u/vP3bsmE6n25+SRCKRQqGwsbFB4AAAYB/sX+AolUr379/PZDLt7e3Dw8M2m02n05XL5XA4/PTp09nZWYvF0tvbuz+FOX78eEdHh8vl2p/dAQDwM7d/fTgikUgmk6mvrz9z5ozdbpeVGQaDwePxnDp1SggxNTVVKpXeZheVSmWXa1qtVp/PZzab32Z3AABgl/avhiObzSqK0tjYWFdXV/OntrY2nU5XLBZTqZTD4VCXh8PhpaWleDwuhGhqavL5fJ2dnWqzy9TU1MzMzLFjxywWy/z8/Obm5rFjx+rr6x8/fuxyuS5cuFC9i3Q6ff36daPR+NlnnxmNxvHx8aWlpeHh4f7+fnWdcrns9/tDoVAymZR77Orq8ng8NQ092Wx2cXFxdXU1k8lYLBaXy9Xf31+TXfL5/MLCwurqaiqVMhqNzc3NPp+vo6NjD44jAADvoP0LHBaLRQixubmk97aPAAAaVklEQVSZy+VqTs9Go/HLL78UQqin9kqlMj4+vry8LIRobGzU6XRra2tra2sDAwPDw8NyHUVRFEVZWlrKZDIGg8FqtRoMBpfLJVfO5/Mmk0ndxdramqIoHo/HaDSqr60uQ7FYvHv3biwW0+l0jY2NlUolEomsr6+vr6+fPn1aLVg0Gr1//77cuMPhSCaTc3NzwWDwF7/4hdVqletkMpnbt2/L6hyHw5HP58PhcDgcPnLkyLFjxzQ4tAAAHHb7Fzja2tpsNlsqlbp3796JEyecTmf1X/X6/6dxZ25ubnl52eFwnDlzRp7Ik8nk7du3Z2dnOzo6ql+bTqeHh4d7e3sNBoNc0tnZGQwG19fXvV6vulo4HBZCuN3ulxVvcnIyGo22traOjo7KbCS7uC4vLzudzu7ubiFELpd78OBBPp8/efJkT0+PTqerVCqTk5Nzc3NPnz69ePGi3NSLFy8ymYzb7T516pSszgmHw/fv35+Zmens7KyuwgEA4Gdi//pwGAyGCxcuOByOeDz+448/3rhxY2ZmZnNzs6amQQhRKBRevHih0+lGR0fVagO73X7kyBEhxNLSUvXKbrd7YGBATRtCCDnwRCYMKZfLRSIRs9lck3JUmUxmaWlJr9eraUMI0djYODIyotPp1D0uLS3lcrmenp7e3l5Z56HX648ePWo2m9fW1mRDjBAiEokIIXp7e9XGo46Oju7ubpPJFIvFXv/IAQDwztvXYbFWq/XKlSuhUGh+fj4ejycSiampKbvd3t/f7/F41EqOtbW1SqXicrlsNlv1y9XmEkVR1DaOmnWEEK2trUajMRwOFwqF+vp6IcT6+rqiKF6vt6YeRRWJRBRF6ezsVNOG1NLSMjQ0pO5LNvHUjKQ1Go3t7e1LS0uxWMxut8u3mc1mV1dXnU6n+tqRkZGRkZHXPmQAALwX9nviL71e7/V6vV5vMplcX18PhULRaPTRo0d+v//cuXOy14WcqCOVSv3000/Vr5UdL/L5fLlcll0xtmU0Gr1e7+LiYiQSkW0osrajs7PzZS9Jp9NCiMbGxprlBoNBVqsIIUqlUjabFUK8ePGiJrjIl+dyOfl0aGjop59+mp2dDYfDsgHI6XTK6AMAwM/TfgcOld1ut9vtfX19sVjsyZMnGxsbjx49kt0gCoWCECKTycjksdUrh7+63e6lpaVwOOx2u4vF4urqqtVq3aHzhByOW90us1WxWJQPZIvJDqVyOp2ffPLJ4uLi8vLy7OysEEKv13d1dQ0ODtbUoAAA8DOxf4GjXC4LIfR6fc0o0+bm5rNnz964cWNtbS2VStlsNll/UD0g5XU5nU6TybSyslIsFiORSKVS6erq2mEaU1lfIkv4MurLr169Wj3+ZVsWi+XYsWNDQ0PJZDIWiy0vLy8tLa2url65cqWhoeH13xAAAO+2/es0+s033/zf//t/5aQaNex2u6xdkG0W8pS87Zq7JBtuyuXyxsaGbE/ZeQ4M2TU1kUjULFcUJZlMyt6g9fX1shOo2jl0W+VyOZfL5fN5IYQcYdvd3X358mWXy5XL5fx+/xu/KQAA3l37FzhaWloURQmFQlv/lEqlZO2C7OjQ2tqq0+kikUg0Gq1ZMxaL7XI6UbfbrdPpAoHAyspKU1PT1v4Z1eQew+Gw2g9D2tzcvHHjxr1794QQer1e9gKZm5ureXmpVFLDSiwW++abb27cuFE9+kav18u708nWIgAAfm72L3AcPXpUr9fPzc09e/YslUqpy2Ox2NjYmKIozc3NMhbYbDY578WjR482NzflapVKxe/3//jjj8+ePdvN7pqamqxWaygUKpVK1RNybKuhoaG7u7tSqTx69EjNHMlk8vHjx4qi9PX1ySX9/f1Go3F1dXVyclJtf0mn0/fv379165Z8U83NzRaLJZ/PT05Oqt0+5A3qZKl2dbAAAHi/7F8fjsbGxkuXLj18+HB+fn5hYaGurs5isWQymVKppCiK3W4/c+aM2k9ieHhYjiy9efOm3W6vr69PJpP5fN5ms6mn/53pdLqurq7JyUnxqvYU6dixY5ubm+vr69euXbPb7bIxRVGU7u5umX6EEDab7ezZsw8ePJiZmVlcXGxqaioWi4lEQlGUoaEhOUDXYDCcOXPm7t27s7Ozi4uLdru9XC7LTbW1tb0y+gAA8F4yjI6O7tvOZEWC7KJRKBQymUxdXV1ra+vAwMCJEyeq5zvX6/Vut9tms5XL5VQqlcvlGhoaent7R0ZG1IEess2lpaVFtlZsZTKZFhcXW1tbq2+YIq2urm5ubrpcLnUqMHkbOZPJVCwW0+l0qVRqaWkZHh4eGBio7m1qs9nklCH5fD6ZTOp0ura2tpMnT3Z1danrWCwWt9ut1+sLhYJsLWpubj5y5Mjw8PDOA2EAAHhf6X7/+98fdBkAAMB7bv/6cAAAgJ8tAgcAANAcgQMAAGiOwAEAADRH4AAAAJojcAAAAM0ROAAAgOYIHAAAQHMEDgAAoDkCBwAA0ByBAwAAaI7AAQAANEfgAAAAmiNwAAAAzRE4AACA5ggcAABAcwQOAACgOQIHAADQHIEDAABojsABAAA0R+AAAACaI3AAAADNETgAAIDmCBwAAEBzBA4AAKA5AgcAANAcgQMAAGiOwAEAADRH4AAAAJojcAAAAM0ROAAAgOYIHAAAQHMEDgAAoDnjvu1JUZQ///nPNQt1Op3FYmlubvZ4PO3t7a/cSC6Xu3PnTl1d3cWLF43G1yj8gwcPYrHYhQsXGhsbX6/cAADgre1f4JAURWloaFCzQqVSyWazgUAgGAx6PJ7Tp0/r9TtVumSz2VQqpShKPp/ffeCoVCqrq6vlcjmZTBI4AADYf/sdOIQQ586dczgc6tNKpRIOhx8/fhwIBKxW69GjR3d4rcPhOHv2rNFotFqtu9+jXq+/dOlSJpPp7Ox883IDAIA3dfB9OPR6vdvtPnHihBBidna2VCptu1qlUhFC6HQ6t9vtcrledy9Op9Pr9e5cfQIAADRyADUc22pvb9fpdOVyOZPJNDY2rq2t3b17t62tbWhoaHp6emNjw+l0XrhwIZ1OX79+XQjx5ZdfVqeHeDy+tLS0vr6ez+ctFovL5err62toaFBX+Oabb3K53JUrV5qbm4UQcvsy6CwsLITD4XQ6bbFYOjs7BwYG6urqqstWKBTm5uZWVlZyuVxDQ4PX6+3t7f3uu++y2eznn39uMpn26yABAPCuOiyBQ6fTyQeKoqgLE4nE7du3y+Wy1Wqtr69Xl1evI4QIBoNjY2OKopjNZofDkUwm5+fnA4HAhQsXZLxQX1XzwkQicevWLUVR2tvbHQ5HOByemZnZ2Ni4fPmymmZkN9VkMimEaGxsLJfLk5OTa2tr+Xy+ZmsAAOBlDkvg2NjYUBRFr9dXV0vkcjmv13v8+PEdahFSqdSjR4+EEKOjo16vV6fTVSqVFy9ezMzMPHz48OOPP96hb2kymfR6vSMjI3KdbDb7/fffR6PRSCSittpMTEwkk0nZd0R2HEkkEmNjY+Vyea/eOwAA772D79OgKEokEnn69KkQoqurq7o5w2w2j4yM7Nxmsbi4WKlU+vr6urq6ZDWJXq8fGhpyOp2ZTGZjY2OH11osFjVtyKdut1sIkUgk5JJMJhMMBoUQIyMjajfVxsbGM2fOqFUyAADglQ6ghuPRo0fqOV5RlEwmUywWFUVpbW0dHh6uXrN6AO22FEUJhUJCCI/HU71cp9MNDg5ubm7W9MaoYbFYarZvNpuFEIVCQT6NRqOKojgcjuphNfKFO79HAABQ7QACh+wPIen1epPJ1Nra2tHR4Xa7X3cUSaFQyOfzQoito2RdLtcbDGaR9RZq54xsNiuEqEkbAADgdR1A4Pjoo4/26hSudqQwGAx7ssEacowu41AAAHhLB9+H422oOUOjLpxy+7ISBQAAvLF3O3DU19fL4bLpdLrmT7lcLplMvmVWkENm1D6kAADgzbzbgUOn08nuorLraLWnT5/euHFj51Eqr9TS0qLT6aLRaE3myGQyb7NZAAB+bt7twCGE6Onp0ev1c3NzgUBAdvasVCpzc3PhcNhsNre1tb3Nxi0WS1dXlxDiyZMnasiIx+MPHz5k1i8AAHbvsEz89cZsNtvp06fHxsbGxsYmJiYaGhpSqVShUDCZTB988MHOw2J349ixY7FYLBaLffvttzabrVwuZ7NZbjkLAMBreecDhxDC6/XabLbFxcVIJBKPxxsaGnw+X19fn5xU4y2ZTKZf/OIXc3NzoVAok8lYrdZjx4653e5vv/1WURSm/wIAYDd0v//97w+6DO+eRCLx/fffK4rym9/8hjvQAgDwSpwsX6FYLMZisZqFkUhEURSn00naAABgNzhfvsLTp09/+umnYDBYqVTkknA4PDU1JYTo6ek5yJIBAPDueB/6cGjK5/OFw+GxsbH6+nqr1ZpOpwuFgqIofX19NTdwAQAAL2MYHR096DIcag0NDfIetsViMZFI6PX6tra248eP9/X10WMUAIBdoobj1cxm8+Dg4ODg4EEXBACAdxV9OAAAgOYIHAAAQHMEDgAAoDkCBwAA0ByBAwAAaI7AAQAANEfgAAAAmiNwAAAAzRE4AACA5ggcAABAcwQOAACgOQIHAADQHIEDAABojsABAAA0R+AAAACaI3AAAADNETgAAIDmCBwAAEBzBA4AAKA5AgcAANAcgQMAAGiOwAEAADRH4AAAAJojcAAAAM0ROAAAgOYIHAAAQHMEDgAAoDkCBwAA0Jxx3/akKMqf//xnIYROp/vss89MJtPL1sxms9euXRNCGAyGv//7v9+3Eu6gUCgsLy+Hw+FkMimEsNls7e3tPp9vh3fx9jKZzLfffrubNb/88ku9nuwIADi89i9wSIqiKIoSCoV6e3tftk4wGFQURdNiTE1NzczMDAwMHDt27JUrb2xsPHjwIJ/PCyEMBoMQIhqNRqPRubm5s2fPtrW1aVRInU5nt9url2Sz2WKxaDKZaoKOTqfTqAwAAOyJ/Q4c0tLSUk9Pz7anyUqlsri4uA9l2GWmSSQSd+7cqVQqXq/3yJEjNptNCJFOp+fm5paWlu7evXvlyhWHw6FFCS0Wy8cff1y95PHjx36/v7+/f2BgQIs9AgCgkQOoh7fZbIlEIhaLbfvXSCSSzWblef3AKYry+PHjSqXS09MzOjpqt9t1Op1Op7PZbKdOnerv769UKk+ePHn7+phKpbInBQYA4HA6gBoOn883MTHh9/udTufWvy4vLyuKItfZ+tdsNru4uLi6uprJZCwWi8vl6u/vN5vNNavF4/HFxcVIJFIoFOx2u9vt7unpka0h169fT6fTMiLMzMzMzs7u0FNkY2Njc3PTaDQODQ1trY85evTo8vLy5ubmxsZGa2urECIUCj18+LCtre3ixYvVa9a04BQKhb/97W9CiE8//XR2djYcDufz+T3phxEOh5eWluLxuBCiqanJ5/N1dnbWlDwcDi8vL8disUKh0NDQ0NHR0dfXV30MJyYm5ubmTp06Zf7/2rufpybuP47jn4UQdB1i7GIJmgjWGqfUNrFjnUmddqbNoYfm5AwchWP/Bum/oFe9xkMvHuGql84QZsoMie1USImGSQyQBjBSNiEJ2e/h8/3u5BtoKvlBSHw+Tk6yfHivs7qv/Xzeu3vq1Orq6vb2dqlUstlsTqfz0qVLQojXr18nEom3b98KIc6dO3flyhW5+wAA/JM2BI7h4eHl5eVkMvnJJ59U9SLk8/lUKtXX1zc0NPTixYuqH9za2vr111/39vb6+/vtdvvOzk4sFnv9+vXt27fPnDljbra6uvr8+XPDMM6cOXP27Nk3b95sb29vbGzcunXLYrEMDw8XCoU3b95ks1mbzXbu3Lkap/nNzU3DMC5cuGC1Wg9+a7FYLly4IJONecY9dLZDdq4c/DAUCu3u7qqqevr06Zp/Z/+uXC4/f/48kUgIIWw2m6Io6XQ6nU5//PHHY2Nj5m/8/fffX716JYSw2+0DAwPZbHZlZSWRSNy+fducVZLVRqPRXC7ncDguXry4s7OTTqe3trbevn27t7e3sbHhcDicTmc2m93Y2Ein019++aXD4WhwFwAAXawNgaO3t9flcsXj8bW1tdHR0cqvZLvoyMjIwRCQz+dl5+Znn30m+z/K5fKLFy9isdhvv/1mzihkMplIJGK1Wm/evClDQKFQWFhYyGQy8XjcnGNYWlrKZrNDQ0O1m0blRbzNZvunDeRXcrM6WCyWb7/9tqoztD6xWCyRSNjt9i+++ELGr52dnbm5uZWVFYfDISeT1tbW4vG4qqq3bt2SlReLxUgkkkqllpaWbt68WTlgoVD4+uuvzfaURCKxuLgYj8d7e3sr21ZWVlb++OOP5eVlAgcAoIY29HCUy+VLly4pihKPxyuv+812UZfLdbCnYXV1NZ/Pj46OXr58Wa4R9PT0XLt2rb+/P51Oy7tVhRDLy8tCiOvXr5tTDlardWxsTFGUly9fHrVVQt6Zcuj0hjm4ECKfzx9pWJPsC6nvZysVCoXl5WVFUW7cuGFO9gwMDFy9elUIsbq6Kj8xDOOjjz76/PPPzQjV19fndruFEBsbG1VzMCMjI5XNsC6XS05HXblypepzRVGy2WyhUGh8RwAA3ao9gcNut589e7aqdTSTyei6fv78+YGBgYMLEHKxwOl0Vn5osVjkhbUcZ3d3d2trq6enp+pq22639/f35/P53d3dI5W6v78vhKix5iK/qrvls/GVFCmdTpfL5cHBwapm2w8//FB+K/8+L168+Omnn8oPTTIz7e/vy5019fX1Vf0WGWWqbskxNyuVSk3ZFwBAV2rDkoo8PV++fHlxcbGydVS2i46MjIj/nelNpVIpl8sJIZaWlqpO/zJDyDkGuU1PT8/CwkLVL5UD7u3tHWlGQfaZ1sgTcli5WRvpui6E+Pvvv+fn5ys/lzljb29vf3/fYrEIIcrl8vr6+tra2vb2dj6fP9L9NYcGL7MjlRttAAA1tCFwyJOcw+GwWCzJZHJsbMxqtcp20f7+/qGhIXGg9bJYLMo/ZDKZQ8eUZ7tCoWAYRqlUSqfTNTZ7d/Lqv8ZigSysxprL8ZAV6rouk8dBcseLxeLCwsJff/1ltVqHhoZOnTrV29tbLBZjsdixlgsAeP+0LXD09fWNjIzEYrFUKjU6OirbRc2bV6uYl9Hff/99jaeJy0twu93+zTffNKVUm822vr5eoyf0X7tKj4fc8cobUg4Vi8Uymczw8PCNGzfkhIcQIp/PEzgAAK3WzhdwyH7DeDxeLpdlY2NVi4bJarXKXgGzOfRQqqrKBkZzRqRBg4ODiqKkUqlDJzlKpVIqlRJCaJomP5En/lY/l/0gVVWFEPLxGzWkUinZN2qmDQAAAAAAAAAAAAAAAAAAAAAAAAAAAAAAAAAAAAAAAAAAAAAAAAAAAAAAAAAAAAAAAAAAAAAAAAAAAAAAAAAAAAAAAAAAAAAAAAAAAAAAAAAAAAAAAAAAgBOlt90FoIX8fv+dO3dyudz6+nq7awEAvNeUdheAlnC73ZOTk5qmKYpiGMZPP/2UyWTaXRQA/B+/3+/xeBocJBKJPH36tCn1oKUs7S4ATaZp2vj4uNfrVZT/pklFUTRNI3CgEZqmeTwet9s9ODjodDqFEMlkMpPJ/Pnnn+FweHNzs90FovP4/f7x8XHzf6q6ud1uIQSZ4+QjcHQPVVW/++67QCDQ+D9gwKRpWiAQ8Pl8QojKQ8vlcrlcLq/XOz4+HgqFZmdniR04ksrrokYoiuL1ep89e2YYRuOjoXUIHF3C4/FMTEzINZR214Lu4fF4pqamVFX9pw3k8fbVV195vd5gMBgOh4+xOgCdhMDR8Vwu1/j4uNvtJmqguXw+3+Tk5DseV6qq/vjjj48fP56bm2t1YQA6EYGjg6mq+sMPP/j9fqIGms7j8bx72pAURbl7966u68xzADiIwNGpfD7fxMREjbluoG6apk1NTdURZBVFmZyclP2krSgMQOcicHQet9s9MTHhdDqZ2ECLBAKBurOsqqqBQCAYDNLBB6ASgaOTmPcLEDXQOpqmyXtS6ubz+WZnZ5nkAFCJwNExAoGA3+9nDQWt5vV6Gx/E4/HwXAQAlQgcHaDysaHtrgXdryl3PF27do3nIgCoROA40eSthtzyiuOkaVrjg3zwwQeNDwKgm/S0uwDUwgM2cPzkk8sb5HK5Gh8EQDchcJx0pA0AQBcgcJxoT548iUQi7a4C75dkMnlCBgHQTQgcJ5qu6w8fPrx//z6vxcKxacrBxhELoAqB46QzDCMajU5PT8/OzuZyuXaXg+4XjUYbv7ukKYMA6CYEjs5gGMbMzMy9e/dCoVC7a0GXa8qbUHidCoAqBI5Oout6MBi8f/9+NBptdy3oWpubm/Pz842MMD8/z5IKgCoEjg4jV1gePHgQDAZZYUGLzMzM6Lpe38/mcrmZmRnWUwBUIXB0JMMw5ubm7t27x9Oj0Qqbm5t1v30tGAzyFhUABxE4Opiu60+ePJmenmaFBU0XDocfP3581MwRDAbp3gBwKAJHZzMMI5PJPHjw4OHDh6yao7nm5uYePXr0jmsruVzu0aNHoVCIxRQAh+JdKt3AMIxwOByNRv1+v9/vP336dLsrQpcIh8PJZDIQCNR+Yf38/PzMzAwrKQBq6G13AWiaYrEYjUYXFhYGBwcdDkflV6FQiPkP1EfX9UgkIg+hUqlUKpVsNpsQIplMvnr16pdffvn5559DoVDdTaZ4b6mqOjY21pS3Nzx79uzly5eNj4OW4j0dXUhRlKtXr05NTZmv/ZyenubqE407eG5gAQWN8Pv9Xq+3wUEikcjTp085FE8+AkfXUhTF5/N5vd5QKLS4uNjucgDgEI3PcBA1gBOBl80CAAAAAAAAAAAAAAAAAAAAAAAAAAAAAAAAAAAAAAAAAAAAAAAAAAAAAAAAAAAAAAAAAAAAAAAAAAAAAAAAAAAAAAAAAAAAAAAAAAAAAAAAAAAAAIDm+Q8qePQFHetw1QAAAABJRU5ErkJggg==)
- Open the downloaded apk file
- Enable application installation permission for the browser
![Screenshot_20230720-211407[1].png](data:image/png;base64,iVBORw0KGgoAAAANSUhEUgAAAtAAAAWgCAIAAAD4sOOEAAABDWVYSWZNTQAqAAAACAAFAQAAAwAAAAEC0AAAAQEAAwAAAAEFoAAAATEAAgAAACQAAABKh2kABAAAAAEAAABuARIAAwAAAAEAAAAAAAAAAEFuZHJvaWQgU1AzMTE1LVN1bm1pLTIwMjIwODMwMTIyNDU0AAAEkAMAAgAAABQAAACkkpEAAgAAAAQzMjgAkBEAAgAAAAcAAAC4kggABAAAAAEAAAAAAAAAADIwMjM6MDc6MjAgMjE6MTQ6MDcAKzAyOjAwAAADAQAAAwAAAAEC0AAAATEAAgAAACQAAADpAQEAAwAAAAEFoAAAAAAAAEFuZHJvaWQgU1AzMTE1LVN1bm1pLTIwMjIwODMwMTIyNDU0AMgSFd4AAAABc1JHQgCuzhzpAAAAA3NCSVQICAjb4U/gAAAgAElEQVR4nOx9eZxeRbFo9ZmZkEyWmewLkAQSSEAIkEQUJQmLqPf6xA1xY/G6K8i9KoIsoqxugIje93uuCETvdRd3FBQSF3ZJwg5ZSUJIJpOZSTJZZubr98c53V3dXdXd5/smyPWeEjPfOV1dVV1dXVXdp08f0dQyFECAlAAAAkD9KX6CBAAJAiSAkIBAgAABIEFKCQBCCIUtizJREJBSIpISpMJGNxQvISweOQNVBxAeqBtS5gQEWFUNRylVLWnh2AjSNFnTB60ZJSMSr8BQwiHOBaMCV1qqZejr+2B1AliqQfSRBrV+WA1IKUFKYasWtUYWPaiqO+p1BDBCevIDVrJmpzrI61xLfld4JIDfOkvDUuLqxlRs+XUrLOFB9w9pe0CKZ3WfZwA5NVu8HM/qwQLBFs9Tjiu/qS6ELb9vvW51x0q5/tXiCSGMbbkakEJkpHhFZwkhcn+hmo/FUMyFHlieeQNWoK8B1WBDgULAAzDkQCzBfAq0ikAACCE0dbcuYPdFasD2bjaCY2CYu29gjngFQtEFqA9Z7+par3Ivlv/JmVqDBUmHilxG2v5xaX4zyzLVCtPvXH9GwTOhgpsAqNVqNVnTzREC8tGXW2fhooXpyCKc1WhZhBAgCs9EmY1Sn4SalNhNar0U9KWU0ngarc9MFM5BV9cIOZ0sE4AkQAZToGkBcPgp4jCAUNVrRexGFoyqF+KhdulWFJaPLVMJLwx36Y/djFQoA4L+LdgSjozlvFO4DQ6QFAkJOM7JEiHEyOhJHVxOKiH0PUmV+ywi5ZxmjHhMD/vyO6RoV1wSHAvzUitbDjP20jo3V6Z3H3lIl7uFRamASJ9chCQwwcwWK0w8ARLEk849D4Enrasz/rqcOHEIqUipsJSLQkihJrhWlwx+dRZ0jLSqC7fYpa+6oO7oHWbgogh2tAAASDsu55cyD02NykeBMH8LPeC0y9c+NlkkNUPaE5lrA5cLC8t1uxwFvvCEESjXk77CpUXfEUBYfyREbJwWDyzzQyVpfioDEAn8pMMiJmg8gOmkN8o5DfhOZ4MeH0Vo+qmpd9SfxgdZJB7Qtz3xCrMz2QlBRTrXSeKBFdVDQGcsiDvnoxLSVodBck2emAu8x9YpfYSUGdUpYiUbmBtvAvInMnQpIKfMS07rx7G3UMMDDiTepMZilWc/qRZHXdeRbQDiX8o/WGGDUiBVvZyuyEmD+lEuUBUmQrhh2oPIhrNPQx0xkGYh04voTtqYmA5TbbcSW7tn6UZJSpNKBmlLqFVojQ1c0WuhKael9eaaEs2WmLFPLJQjY2QkM6BXOKycC9MM+xxsi25t6dgYoXwkFGu8uQBUSm8YBOSLTLI4trYhlB4D0RGZGLBt8LyjK14UwaWnejcQb+oBL7vgxpuP7if2bHWUr9AJS0j+YAvt3qGMxRqTUWtiWATQ02zDUxbqb9f0hVUa1Q841kTNlQjwoymDEJhw4N6sxwSpscUEjdDwD6oomhQkj6Cgj3BTOnrai7Et8fDwF0A9ACsJyKGz6vHSFdTlOAYIYD13nTkH5yaItX0BANLVri4T4C0PoGgmbGSquiuB/cPJJ6LVVSXLG8qI9t0WGGebMvYJ8N0BI4LCp8oyqoadisa9klAiEOGNTylSRiQdLzlz9Bwsuq2UbMe42AB0IwwdcuoF8wwsvYolf0gaQjzbH7laLNmU4KBhSHrqDGC78kuME08I2DtWIaX/cBVvUkBBIR6hnaQENsndmpBio0uycykgeodUL1shLlq8Sjglj8f7klYrtdemGuglQbyK4uyDXRCdkFBgrNWWn6XC+nbHuyc54UAp0VUpY0TvYSraZJRSp1v1Eq7ittR2TaUHuLa9lM+KESKDXCOV8bPpiJenWfc8b826Xm+yR4ZPcvuJGf6+9Ka2ms1IcwsEIBWH5lJ4D4fa7Ye9PMfUb4ZVFgJLBfVNIKIIodKE0RV12Ukhge80XhpB/izBvfQcppSzoZBLOYc0ZNodc9Gbq84jlZtAhcRgZAoES43gPsokXH+kgSXzK0e8KAIXbb3RUTo81Du2yjCyJgi+U+UJRlWkSRI9WEeXhE2USQhYA3MTCpeen8OXhrDj9wM2taVJAAih9IcerHopX0mQ7n6R/C43TfB4CSVFAMLZhkNdkKV0BRvfCx4iL7S73qGPH4hgNQgmjfMEiW8vsyyTB6Y4s0oxEs1X4L8yjEtWLAUhlx1AsIsDk8qE+BmNciGPEKpJW2IaxCY3LGESnbxZZ0xwAlGwf7hEOMXj1DVDpCA0TcDyWw2rc82/cWmVIOFpmNn2Xlf8C0Faf9HiDbow9RKQQD+iTaybkqJb6Q4F6QYcQgkP/6isdQE3+BlWTDalzVjai7aNAmVkxIuCCJFVUVB38bmkE6b81qE9FGWHhv9qk+2pbG/FLnFwwE17E3NxQigNmfD3jPqDxV7oKAKFBC11pGuC96Pm5mmrxOwK9XTq0MMO3e5TX0SdkvrLWDRlO/lxU6GU5Y1gqHMoSa9zbAQvFQvkZnHJ0rGs5iflavx9Y5p5YwP64RIrajh6lQjVkMt/jU399XyEYclXScO1O5sTL0DFUm/hxpnn8GaDEEOmoXAs2IuIDKjDZZgFryJ2kkcEgdDEItQBwpr5B0QMXtKOKadPTdwsbxZWPz18iSkzXcTuu6s/73C9PQqsnhSma11+fi0uHcCux6yreLaNfhvNerNPbnJj3YjNUvVZFJiB/ZIwaOX40wKBEaSfsaI+Y7SnD8ugGwKQAUgQULw8qx6qAIga5K8om+MUVHv9aCnRSLMGGbZjRMNWg5Q44TV/qW07CEH4bXYDduFQhLCCg9UCxjCsci6ucAcEOI2nAhhlNW4z8CZlrWzCnVFliJXNQYJ671u6RoGaZMacZ5QYQTpslXs3lsB4TUs/2Ehk4SK1AO6rX5Ti/LHLOWvbHm2HizbQCnCKUTX7hcOou3UzdfeEGg/BkLBpe+5IkgoMi+cL6DHB4UZ68dp0AvGKvSMewQ+d2EMkiDg9MD3oSJimItyDfhf4VTGC8Q/S87i5o1QMJNaC7bIJFrx4flZg7N+LzEQPev5SvzZvvLNd07pPCCCKXZPqhB7jn0VBXhQcjb4EUAEJcMATxkXoY4GEyE98CexKKAEC1AEwipjuIrTMwUd0R2gUdosgaccvafeiUDowTbYHkA6xFoIoopnQg8N3fODZEyGyqoD7G0kpANTxOagOciO6U9hMW5/PgfpbyiKJ0Ew55yAENOMIhg4nabzrSYZUwKBiyGAAHTAaBrf/W1tbFy1acOEFnzz44IMHBgYMSkCFAgCguam5q2vbD3/445tuunn9hg2Nqpz08BzvugptjFTzL6n1BGQXRSSW2bfiwTgNEpxXqO4gDLR0hjFMdq2Cql2HuqxUI5HIvnIPDYF0zwmgcPYF48joFdLWsJfN4OBnxxqOYN2iErBvogoDZQzHyasbkpOovGjRwjvvuB3fOfmU19x11xLjikwmD27qxXWOB2lYbNuizWcS6XICNOuxI+nt7Xi/TUrTHakY4Uxp3T6XrxWeEQSBftzFXOe/DzjggPM+eu6IESNu+MqNO3fuBABnCYESTwDAyBEjTj7pxNNPP+35zZu/8Y1vuWh1aQWnj1AoV0jbyzhMEkK0D/z8MFVA6d1RF/swwoSWcRvVtwsheqhMeL/S0lVOgmChJwI5os1pkv7ywD6O/479BhHAOsOUz2+9TrczzlgC7mkAS0hvsaNJCqeQXl4Ap7hMxmxLhhx3VDaOe5nSSHTANu96ocFORIyhSupmGYakZ2A3d6liKJEn8HQcmvYJGYaHzpb8fAVLb40tSgENDG2Z7ByaBUgh88RY+uNHlvTE6TJL4lIGjmi0e7gQK+zUg4LTT3dJCDdqwoTxc+bMufa667/85a9Y4nlmh3qlyEiefXb9py+96Kg5c1paWvr6+qzqnAieuwmLV6oDE04wVP+nxiw2elI8ziipwRmdARMIaXMUEUMAZD2eAMJUTrB2ZuIYlSAqXlopG65UCyj7l8gKuSa6Ari2HQVv9KWAlZMlLDLwLOh816+bxkTTjCZMJJNUoEKG9XiGHL9U0CkV4bXFszGUS0Bs/mjU4Gcv7tn3gwLaDUm9/g/201+yEnkCh1XO1dXVEf2zzzrzrLPOAIC29jYH97prv9jV1S0Abrll8c233Mq2QaiFqkRIUaTVG2WsPOy3IqGjgOYMoGatELqJeLIxSMeeh7W2Llq0YMrkybt373l42bJHH320QBCOMVoMZsyYsXLlKmszgU+fgRkzZqxcudJIYDddooTm4IMPBgkDAwNr1651qaOQSbPPB6CifdBBB/Xu6n142XKFWGIOsXHjxrVrnx0xcsSBBx64ctXK4r0nD4TVeNroOfHc0kSg4kHAm9q9RVicmwIH5EfpGhMvaQSreoNgO0tbe8JXryeiEc/VvPGEfDagRAghsAKkac/llqx/QlIK6ppBJfWgl9EyAjAIvP1wCGwP2iGsJMRSRk9AawRJ/Y8nF0LAPt31b6ZyQBLXB9oC2uQ0A6O8QkUuA5wWDerihi9q/hkp9yZT46ij5sw5cs70aVP1ne7u7oeXLb97yVKDKyyZXV0Wvrm4cf31X2prs1KN97zvA7feunjhwgU/+dEP2o9qz5nefMutufa4hKa1tXXRooVTpkzes2fPw8uWPfrIY0BNZfPqC44/fsbBB+/es/v++x94ZuVKjKkVP3/+vLlHH7Nj544//OGOLR0dlj4kkXEZ+sohklYRSdcEAEBzVpBQD1SowU4G/0DW29raet21X3z7208fMWKEvrlixYpLLr3st7+9XdG3vN7EiRPOOvNdb3zDG+bPnze0dRR4CrXaZcPEiRPOPPOMN77h1Pnz5w1tHUnn9Kj6pZdc9JnLLgWAbdu2TZi4P2KCGHJB03bZADBq1MiB/v5t2zr9CgwYkXbt2tXb2zty5MiDDpq+ctVKi5XHXeI9PQTQ4lnVgdIHIV6SF/AmdIi7Z6+W2dsj1Cqt24FHxPMynuQkrFz+kqTehjOiWLRyruxsibjPe1CfJCF/ef3o+YCnL76DvEvqg38MuJzSVMQAZ+Fptcnsxadvy4XGSNFD+R10yJL+CphlsFS2lGDRye2pa7zuq0+oKND74ot/UL5F9N2iRQvP++g5ixYtbG9v5yjedtsvbvvFL29d/D3NIWUI5tnGLbcsXrN2LQAsX7b8tl/+EiTcffeS97zvA2889dSzzjrDZarifa6gPJK+4+1vcyLpxZdc9pvf/s6qKOC97/u3iz514bSpRcJUq9WWLv3zxz7+yWXLl2sckPCDH3zvTW98Yx5Lurq6/v0/Pv697/0XkNkzoS37hp/zyohxiZH7Dd09UBuALE9ghKojtSWjhEO4A8CZGQkAaGlp+f3tvzn++Ff6zHbt2nX6297xu9/9Xss9pGXI6W897a1vPe3EExe1trbmaC37Dfc+AVpwEgB6h0RLS8tb33ra6W7dVjtPc7bEi5cc8ZKld/9p5MgRYCccaP2DUjOPcP11X1q0aOHc+ceiUkBzFDsP1QhSAsDUqVM/ef7H58w58qc/+/kNN9xYfMRPlTrcAQB/I5QRjyjFsw37I6iWeOpCa8/NoBUOiSABhEDEfQEc7p54Wjeu/i050SdYwehal9LyGxz1f4n3JlkI+TtNvgJVuiSEDKwCew30PD7dfXZ1kLIGpFfO5Q/MC4VwFqm9vgPdPifhwIPLoSo9/TulVnXOulwByE8E5/+PSQhSSvcTvkQThDEvQxsSVBT5yi5p/xB2IBx9l5H9EVnHfSH7VxytUsPdDrS0+8K6QSNIF1AC2ASscyctByAVPYFtQeRYmTr/iVjJrh+05szHWmsD+QdXZX4CBOYJcNaZZ3z6skumT5uW4y9ZsnTJkqU1KZcvXw4Ac+bMAYCjj56zaOHCtrY2KeXatWtvuXXxFVdeTRunACGyYlFFAgAM9O0CgJNf9Zq7714CkH+jFaZNnbZm7RopYdGihX+843YAaG4ZBqBeYEELDC1DWv5w+2+5SHra6e+4/Xe36774+MfO++IXPu9/Evz55zefeNIpTz31VE7/ok9deMXln+ns7PzvH/zw4IMOeu1rX9PRsXX+S1+2fv2GHOGMd73r1sWLzYZOiVsnACD/wqz5wKzX/Bp1zJr+4FyWqTeUhGWI1niLgI1x8UUX5jpav37Du//tvfsfOO3Ek065//4HAGDYsGGfuezTWpa2trbVq57+7ne//brX/YvOGBKhrW3U6lVP38zVzRvg5WYAcP11X8qzDQaipu8iDBs2bMeOHb4AUZAAPT3d27ZtGzJkyKhRoxzqQQJUYQLHkkBRHBzPEALlwKJQX4Ot17xdvlHSboBjoLz0+jKm4GB5whEKUQSm2HaxUfR6qDvXMZqNGnx6fYQZt3+VMtbLjKHn/Y4boKTwaPEYCmF52KzbJUGLwKfdjYO0GZivwhd/p02bescffvftb3/joOnTV6xY8d73fbBlv9ZXnfLay6+46oorr/r5z3/x85//4oorrrr8iqvectrbxo6f/ObTTv/lr341ffr0yz596f33/e3oo+a4bSG4EzB27Jjp06clWsPFF30KR9IDDpx+4smv1pH0s5/5tMacOHHCpy+9RAjR399/+eVXTpi0/9x5L7vzzj/mRZ+75kqN+bp//RcAuPrqz330vI/9n9e/ccWKFePGjf2X174WBICAT114wU3f+eaNX/lyknx8Q3mzEFkLgACZFUefEtm3ABD2F0eRNRPk3/a2twKAlPKcj563+Hvff/75zUv//Oczzjx7165dAHDMMUe3jRpVLG8MGTJx4gQAWL9+w03fvbmjY6vTECfuqAkKAEi+LgrZwq37wQ+9/6QTTwBvCus2Q71jzQKS7JBDZj719NOkMxCsuygQurt7tnV1TZ48eeGC41HzkvpROr/tXqCahxaMVPggJ5hIfExQYoSg+sgiv/VOaUFf581EDLZO+BCuxrUCveUNcDC9ctxiiaTxUMwD6bDToBMINIAc4ZHsAN4CSoCXbaiEeI5JcaEcDS53gNvP59361uwV3SKsyw12pPUJsn9dbFtDUrNzWBBeisgZmahh5uhUKTh6sDa8R0YwXWzp0ObkjiCETQwmxMKsQLg08yVkIPaN2fszpOli4SFY+mU9gOUERUQLDYPZCyGV7FJivwYA55137qJFC9ete/ZVp7x23vyXf/fmW6RaNJo+ddrChQsWLlxw1FFzBOSbTuVtt/3ytNPefsisw5csWXrM0Ud/5zvf1Isouon5jJ3dbS4AAC7/zGf0phK/q+xrE0k/cu55i7/3/ec3b/4ziqRzjzm6ra0tRz7zXe/Mp6w/+enPrrzqmq1bO5cvX/72d75r69atAPDqV58yekx7Tn/ipIkAsOKRR/Nhtnr1GgA4cOqBADBjxsxPfPw/duzY8Y1vfNs3xcJObEvSTkE3P9SrAgAgawZoMspDw1ad7aETZQEghXBHmkAKBxg6dOiMGTMAoKNj669//VttzStXrnr22WcBoKmpqb19dF6nb+/e7//Xf7/lLadPP3jm+z/woVyPVA/A7Nmzn3j8kR3bt33+c1fn9r7H1D3EqsvDgfsfcNmllwLAnX/8Y29vbww9GLIRwpgxY557bhMAZE3ZmDFjjjvu5S85/PBMrRlOnjRp3vx5EydNbG5uzlV7wP5T5s+bN3nSJAFQk3L79u39/f3Tpk3FRzZRCY9+QEvHeyViQH5TPdpU8AcMfSvEGbeB8eluKZLPjdQmxNCNl+CFKKsMUH3iE004nZLovr5rpQRQOBcbKPOw2mDrn8RgmmfCDjuk3VIvWSfRiVLUbyQSYZ2WOp1UONW6qNuupVsZG5+v+OG1QCCyL+sXTrn4rICqixKyQgHumWBYIFpFrvzCkt0j5CcgJD8zVcAWgoybcgo4J8b2YBuBVSA0rue/rWwQLfsLXTQ4kHdb0cn6qRORIJ1//oXve98H57/0ZXfddbeUsr297aPnnvOH23+7d8/Op59+/M47br/zjtsfuP+evr29d/7h9vM+es70adMkyDVr1px8ymve+94PnPyq15jjJHTbUDv8ZFmAGDdu7Ac/+H5jLtTg0unI0GFDZ6pI+ptf/0ard+XKVetUJB09utj/MXfe3PzH7bf/QRPftq1LL4e88hWvyBG29/QAwLhxY/PLkSNHAkBPT7cAcd2XPt/e3v6VG7+24pFHHFeEXBfjvBS+f0CNg9gMxfHmsjg1xp29mISCqC5daxkYGFh0wskSpJ8BjBkzFgB6enr0iyHd3T1nn/0eSIA3v+nUXPvvePvbP3XRJbG6tKv40rVfmDBh/PbtOz5x/gV/WXq3Uxq1ei4atLW1PffccwJg1KiRV17+2Te96Y21Wm3RCSevXr26Vqt95zvfPOKIIzZv3vyBD374wYceOuSQQz77mUtPWLToj3/60403fu3++x/Y3rO9v79v+vTpYXESBqUA/5T6eiCVBh+xEioEisPxVKGQ0cafdyZDkoKjpBN4EyhJvMuBO5KTa9nVicSjXhNzXWwDsA+mxl7K1biwgew3AKQjd67Ktl+Ae8Y5iZNSXLfq9SaP2DhuFJCOyEwpL5VSv4x62WWXfvTcj7S3t+ey5e+k5OhHHTVn0aKFCxcuuP66L91y6+LzP3nBtm1dN99yqy934I3Z/v7+/Mfnrr4K33/00UfXrF07fdo0shkDAwMLF50EALt27XKYjVWRdI2KpAfsX+xEfPrppzHms+vX5z/yVQAAePChvx955JGf+MTHOju3zZw58xWvOK6/v3/J0j+/4+1v+9d//ZdHH33sqquu8Zqmge39QC+aIgmgEw59TEy+48Y7sZcCKt3u6+v72z33+pPUj3zkQ3lWddfdS3jZWPjjn+76xMd72tpG3XW3myjwYPnct7z5TW9585sA4Iav3Ji/VkTXYC4C0NnZefpbT1u1atW06dPb2ts++KEPjxo56rprv3j9l29YtHDBY489fvMti/fff8qCBcePGTPmta999Zo1az7xi1/NmnXoggXHjxs39vjjX7lzZ+8vf/lrAEgbgZGZFwOhcuGhMBE9MAWnyVKo9qQN/0YRnawbyCdK+C0viNrN96ZnJeiHc7A0GlSwEx5CjDvFLh6uGgwAtM8lYrl3vwxXa2kBLSxEJXMIhHKySL4mXRQym6IamJAI1pPwpyvQs35iaSOdf/Rtk0Ixct8kFyGgN4i4N++//2/HHH00ANy6+Hu33LL4rrvvtjaECjjqqDlnnXnG2WedefZZZ576+v9z6OzDt3V24ZHkdr3HdsP6DQAwffr0d7/7bHy/o2PrjTd+9frrriXF7+vru+eee6VH/yMf1pH0bs2rdXixi7GruxtLohfyR40cmf/47GevOPmkk+bNnfu73/4qv/P1b3zzySef+q/vLR4YGPjkBRcWx0E5MGg9J5slQFMmsn6oqQc0aCUqz0qDxhKyo6Ls0EMOufSSiwFgz549119/AzZ5aQ1FC/TQlAD33HPvrNmHT5o86dFHH/MTHXIFUZjFNWhrG/X5z18thFi2bPkVV1ppJiUzI5CLU5R/6UvXXX3NlV/72o21gYGf3/aLO//4p/2n7H/VVVd865v/b+TIUVdf87k/3XXXkUccccnFnzrnnA8PaRly3fVf/uOf/iSlfM973v2RD39oYKD/V7/6zbe+/R0cD2jWdrjn/bWb7YFlte6ASHQE8QCcOP0qM0eqRzZqA8dgejrbQCgJ+R60oXzEoMOVH015F88+Yg4iuJMcR46AdZEcyiD4yfAggnUIrwmOnIoE+O32oJha8wOEkiNJWEWfc4CWeCWmqZZFl1/EU9MAPupqX4w3cOyDZaqCF4DavqEVY2Rz+L7vfR/88vXXvvd9H1i7bl2+XQPsJ1oP/33ZsoeXX3XVNZ/+9CXLlq3Ytq2LZU0dQdHV1bV+4wYB4tvf+np+Jz/j/KSTX71k6VLNBy+QBIzhkENmXnppEUmvu/4GUAF6SMsQ1TpLgFqtlv8YOmxoTn/9+g0LFp5wzjkfmT3r0F27dt9x5x+/c9NN//m1G6dNm3rLrYt//4c7pD+UudwUMEJwLoqa1AxCZsULO0phErEUKudgpi8eQRfa2kZ973u3TJgwHgBu/OrX/vKXv9rlKIcT9i2b8NatnVs7t+VWEJlEobs55jVXXzV9+vS+vr7zP3lhTGuS7XUG4YEHH7rvvvtfcdxx737fB1etWt27s3fdunVvOe30WYceuu7ZZ5955pktHVvvu+/+8/7jYzNnzOzq6nr88ce3bu38wx13rF237m2nv3XmzJn33nvfU089bTs7T0dmquCKZ6uLlD8hcJNzNFyIiGFyRXbjOmssEO5g3s14EcuNmoMQc4QTD0xqxshPIGBCpPwNe1LfeQc7J41UTsL7Yp8BpJGUYLVvMoAgoC5Q7WJzqqh4ugddZCqhBw+hruaHXKgtFM9CWqgEDhJPFsEMFTFJLp8skOghQNWFxROdaRDm0zhI/Q+ADJ7XsmzZ8pNf9RoAAAHTpk4784x3Llq0cNr0ae1tbcuWLV+2fPltv/jVkiVLtnV1feL8C3T8JoDxbV+58Wv9/f0zDp6xcOECfXPLlo4lS5YCwHnnfbSoW5gG5VRE8b+2USaSfuXGr/3lz04kVS3XfpMolACwfv2Giy6+RA+T4xe88t/effbGjc996lMXk8QKEfRooZoObKFGEHk61Jz/bBIik3KAqVC3e2lpafnv7y/O16x+97vfX3yJfpPHvMdLjl97qPgN4V2Kh7vohEXvfvdZAHDTTTf7T2QS59AB+nv37Ona1rV7966//PVv+eO63Xv2PPTQ35988qne3t78zIaenp4VKx555plVfX17+/v6AaCzc9sDDzx42GGzx4wds2PnjoGBgbTDcIp8y+5jaSfxvrzKbCj5U8FLCBCHsOQhBBPRC/EkXR4Nuax4DoUTXL4AACAASURBVAI5QxM8cS2gi0B7mMD5JTEBY8Umo0k58EpnTzK6lxbXKDkinOgCoXBfwvxCw5vL6CwLSWqEcKWlw7eVsXEJq/7riUcNGEu8ZG0XPHkDI3qQS6eIjCVFDhzJ/exFIiTj4aXeQLJvj/sqWCs3Im1B8/NpyDAs5egx7d/8xtffcOrr8RaTE05YdMIJi8776LlLliz9xCcvWJafJU1HXONcpM6zAACgu7sLADZv3jx+4pSFC47/yY9/CAB5ijNp0kRrA4cf0ZGLaWlp+S8TSW+/+OJLQ2rwfJPbchQVrv3SF4cMGfLZK64YqA187pqr58+bCwAPPPjQtdde17FVnWYp3JFHmQ4zMtXAzAubBYCQskl9d5Y5PMrMspzdyRSYAfXd7377lFNeBQAPPvjQGWedlRztSpwhGIaWlpbrr/3CkCFDNm16/qabb5kz58hC10IAQJY1zZlzpAB4/PEn+vKtPaHpUWjKIaXUm4NyKD7khmDXrl1Ycf39/X19/RJNOiXLXQJkItil9eUTOGAYd0WDMwtyLjOygKnuS1G6u7k6MlTYMBAdJC39c9wFUcH+XafATrWo/hNUw8lPp1hu1cFqCX0vQYYy9AHAz9cl210vEogYWDLoMBBtI59B8hLhQgDrnOPAQlsjYI8szSPOpauru7u7u6en58av/udtt/3i4WXLBcD06dMWLlhw2WWXjh7dvm7ds2zlIPk3nHrqN7757R07dwCIfIPFihUrHnvsMQCYprIN9S4nkRNoFt+9qYikDzz40LvOOFvaFfbu3Zv/aGpqwjT0y5K7du22MjAFF33qgvnz5t5x552LF39/6ZI/zZtbvO1y4oknnHTSCa88/oT+vr6kWMyPS1NZAgA0gwBRg0wIIfGnjTkoMdr/82s3nv7W0wDgsccff8tbTu/u7kFE0HxTDPKQxuQ+8P735gfGTZo08W9/cfertrWNeuiBewHgoIMOWb9xoyYgvTMeApcaGvCFnPh0cXTN4B/iIHXzI8Il3EoAnwmdb1HCOBG/cdb1g08o0r+ycf4qvjpzqcSqLxCQjQymdDwk52QuCt/c0CJCkhB1IChmoarEI0GaLuWstPt3pprBSjaOs/hhFjkAAPArKvvWknxHFHPO4vxPXnD++Rd0dXXrdZDVa9asXr3m5ltvHT26vburx9Atw3fRooUvf9nL7l6yRBe/451n5UVDhw6l63vwn1/FkfSt3XhnKAAAbN++Pf8xZsxofF8fiN7T06M5aNlmzpjxiU98bPv27ed/8sJ/P++j8+bOXbNm7Vln/1vWlN3y3ZvmzZ177jkfvuGGGyNtLgmZrNWEkE0gm9SnYYscAHlw9Aa3MC5P/4dAo1/+2c988APvB4A1a9e++c2nb3juOYWgO8XMmgQAt9xmnxnsrw0pDTLDtewBpiQtnJo7xe7QjH4oSJJFAEIf2SSoJ3nK/XlLEMxyiP4lIV/QRCcQOC5Jtw7LT6nA0Lbf6A+J5xOjzwzT3Rv86JY+Vsc9FcoSB4gushrJymZZp5IMH5iWx2qHDbIJycshdONs4XLxhHVlzwoc8wP0Lo9pjVqVxMTNgyjhdIHRijUOKe6AEdRNrCXHuhxGRVUhQn1ryaDGuyFiqwhdgO4LoyMjlCUtou+rCFWRTtPMYd6UigwpWwOOVaFLR35DUdOno72i7zTSNjCrxVpOI1MxApwDKvSR59LxrhJLKwrdaDelSIEA4Z+onReptgnPv3uRYzBA6LV5WZy1ozOd0FfiBADIrm3d27Z1SSlBwNlnnXHuuedI9Uiyq6tbAuAjuwkvIkFKSYVEuO7aL5555hlS1iZOmvjAAw8+8eQTw0cMv+3nP7nuui9iAfKfVmcJAIDLP/uZD3zgfZBH0je9dcOGjZpBrlYhxFq1APOSww/XAVoC6O+qPPHEk/pjDprFtdd+ob29/Stf+eqjjz42d+4xAPCDH/7or3/925+X/uWHP/oxAMyfN0/zkupgE7eNMceNB6YEtYdDAGQg0M4QzxqEq2bleXF4K+p+7D/+/eKLLgSA557bdNppb1u5cqVlb0odaijH8kZaAola4pt7cevHP/7p448/YXyiGjP/9f1bhw0b1tPTc/bZ75EAHVu3QgRShgfZEIkjVloVF4PqDPsiLJ3r3lIBsbb23Hi+I8bcBGyCv/boFls8Mgh5ikuSPSUQDifWwUPMhw8prdP3rQPZaHBtn4VI76hoJ61bhHUxXGSknK7iulAVqDwKTLLqk6PAKDBdOMJ36PCNbvlrwiwLSoVGxfT4dseXZ6LCCEuIp5vi/QqJR/MPgkjTr3Su0Jslpsw0xh6tdo9I7DdwCEAfRBr8tMPNLbTwzOjKd0Sq7AKOPmrOt7/1DSFEU1N2w1e+qnNBfnALjaDzRgxHHTVn+rRpUsLQ/YZecdXVAPDxj/3H6173r7aItG/82MfO05H0Laed/szKlb67BIB777vvzDPeCQCve92//L+vfyO/OWXypGOPfSkAdHf3/PWvf7PEE/D2t53+utf964oVK6753BcAYMTwEQCwc8eOHCE/Rmv4iFaCmbqTn/HlOe4INGsSmfJkZraJLpwMDGjjBwA4+6wzr7n6SiHEwMDALbcuPvbYlx577Ev1d3UAoLOz88c/+Skxwnh3O3v27J//7EcHHHDA1772fy+86BK7WqiNa9asWb1mjUo49P4Tme83HhgY+NWvf6PIiDg5lGEF2JeJx26pHwIHf0SyAoQcgG66G29Ls5PeHYs+5gd2vkKSaxDsZKAMunWdMNai5FPSjZg8IQSKgOO+SkYAnO68IOAFbOEXuxDt4YSM2eYxqOMz3QDrkj4dTL5YalaSRBovSe67L6gYfupHKeXktdauXdvd3S2EeHjZchZJA++a/GpPPvnkvffd19bW9u/nncuRxQKffeaZ11x9VR5Jb128+GXHHvuylx5bIOWRdFvnj3/yUwC49dbFn77k4okTJ7z2ta+54YbrvvWtm8aPH3fVlZfn553/8le/NidrSxAALS0tV111xcDAwCcvvKivrw8ErN+wHgAOP/zwHOuQmTMBYP36DbF2Ucrgb4l802j+KxMiAymklPn+0SAdBYSiP/TB97e0tABAU1PThRec7yM8+uijP/7Jz8CPMSxH8aY3vSE/K+0d73j7hRddEp4QOCMmPJ9wb4QsJ2ZVJQeSABg6dL9hw4b59Rmnxk3pHQm4lKBIF9i4kzBBp0ssewltRU9IpxJ6j4OoQy7RQEqHqf1bystxGUwSrTLpBr7HzJTDBKh8zw/GgKxXeGW0wMFmOB8UYLHiBZK66SKIoKScgA59SoAG0oWIjRD0sQMxAuhHKRZC0IOG5EtKTYp1g0zoL5F7AjYCBJ08rNBGSILdjq5t3eMnTgEJNfN0jzlh32IaUkX+Dfp77r1PAJz30XPdT9L71SUAwIc+9AEdSS/4JB1Jf/KTnwFAb2/vpz518de//n+HDBly7jkfOfecj2ic1atXX3rpp52KfXv7LrzwoiOOOOKOO+7Mn0P94Ic/evfZZ51++mmtrcP6+/tPPfX1fX19P/zRj9m1PXcwpSbL+S5WmX+/LSs+f85/gca66+eREgD853kxsB41akKY+p/uuivfc5q/1yocnFjUStZJ6dxbAPT1923t3Nrc3Dx+/DgSwfy1yY8YMWLKlCn7DdmvJ9/yQ5gcJmPWYxn90s8rSHdC/o5BUr7FEEwL2PY3Ahkq3qUoUQUcY8W8kfxcthd0YcYYywSr9EmSQaLF4+yHoC9KG3ry+kxSfp9GkawRnhHUGdWpiJ4oXlKCmHdzKN91nY+MxeSYf/O+wMlQwKMnock+ip9VJsJgLXQow8NK8EIT+zyFcgeyJqXZsOFQ8knYfylGp576+qPmzAGAOXPmEMsbQAefEpFUwq2Lv/fOd525YsUK/URpz549t932i1e/9nUbNm6U4H625Cc/+dnlV1ypq991192fvfzKXbt2nXrq69/85jft3bv3iiuuWrr0zwGe2HfFpnJmZIpJQ4dIAUJm/ULsGZB7arIGQoJ+8qkfUUvQSbLt8FCXSX3HeitJ4GKdNhaXHoJOF6TQb7AIGDt2zKSJkx559DGMAPhlK8rhWsFIuqWm0BKZVJuwGoCotra2vupVJ3/xC9csXvz9JX/+y949ezAXAUgI1C/Nzc2zZh36pje+cfXq1Z/7/Bc2PrcJl7pxJUW86I48akMrEk9aZ/r6CKHdnAnckfwSZYSCQtBogHuQbb5rXlT4EI7x2rYX5m5bJ0JAGQ8voV2aKB6BoLYfYWUEtadHh2t7lPGDQ58UD1MQxjyMftR9tG0CGb9DXDoCKApAyEB3gS+h9ORVEhJ1kXnbeqEHYExFkSEQcFBB86PoEz1o7egE7WaxQsBlYzknb3wI46s9BM8DYwEsFjlmlmU6fNqSJsdURNH/uqIOQlJKWSvyBQEq0giQzJFdQgDkW0pJ28vXZaT+n2UsImesTQ+3SQIAXHbZpZd9+hJN7O67lyxatNAR4MqrrrniyqtqNepjN+rIL0zf6oBi2Uh/qA4A4LDDDps165Ddu/c8+OCDHR1b0chQX1ZDzhfTlxImjB93/PGvBIC//PVvm5/frBGK2OA10GwnZvO5wnQ0gpg0bIgEEFIMiGxvTe6pQb+EWiGN+ievg3liic0NP+EgzREno9I3aGzNYI9J7Mtsl0o6XDARxVaJl68IxyESAx51OSBMEDBp4qSPf/zfFy5YsPG555oy601oCxWJUJO1USNHbnr++ZtvvuX3f7jT6TRSPEd+3xvS4UoLEArnOX/TNRaXsADEqS20eA5rI1o4HjAIZLhyWSMepP0wp84YIcmAbVc3xBnxMHd1wxWPT0fA6F9a6Gw+ARiBFQ/1dXLCIS1hXQPQN5MTDntSQ6kIj4G0hENaPprXACT0IBLfbWNYP5SE4CDY4vkDxA72WiALwXFfJsnw7BcHDd2HePRbNE26YenTkBWuDH5QAo0JABk6H2LfJhy1PN3QZ43pF6Q40y4CKv7MKR68RcKBWGL1CVWdtMwiHbETAq1MUaQLAqSsSak7Asunv+NO7ITFCUdNWkUqt7DyIWViwhUAdL7lagAjgNe3Su9WsmULqV9/0ghq02jxVEUIYTiz4ycE4RqSvVQ/A/WpRqkjM8gG2yTrak4SbOno+MY3vz1lypRXHHfcgQcekFJl27Zty5ev+NUvf7106V+ocqn+NXYo4+ehcU0UQQUJ4pd1KQKkEe/Sx7WZUJJnPC6LfEgZBFwA3nEpwDZSDdqgMJ78dHqQDsn2VjQNi2fXJTxhcRlfdA2PJ/fAq0SpTWfUqx7T2HQKXEpHlzsQGAKcA6nDYZgqRMZJ42fqRx3AJqhedNL4uFRXD/uHhsF5hz3/NnkDHAOV87hq0gV9kyPkX3rDQIKaivmEhPVbEu+8oR0KmoL1ppmU6GwCXM+eWttpq9TtQ1NlX8Ikz2eAtfhw9OAPfPerN+OMUQgcvS3/S2c4DNXwyOcGMZlPhLaMJcRAKoLRIhFmBpDocQYGBp555pl3nXG2U0HZgU6yJd38SNgYtDQpoo/QFXWDFC3Jk5QMFgw0qpdU82BLg/jYm/8joGTrBoHBvgdu/Jpy1/XiGalXPWLwPMP6ARFUP+kRU0Ial6Akyl4cIKWsY4+fD4H8LYTN6E8OQrqVk6YmRwHGtowJ9AN36rVUQpX+tRlVuDjGjyzPpCwSCyGhCWpNIIszMmSmpKnJ4hQXAdLZb+bOjxiZ8QROKmqgTlVSn6kt0Kg00hyDj/gLleIhlhKsYkdWgX5rXQvEVFqVcyyhpLboyOKIIoWGm6hI6U5Sa0pWAqezPABryQ6JrpczdS1VyaquZLHoq6QYPY8Qlnqlk0NjT2CEV80nzoPSijTaw4xQuSs84XOkVonJygXSoJSOfnUfOs11HIi1l8xtsG8h+Ao/cJHg8ccSSGShOFdV3CQSz2VipLPsk+xfRl6c6zuTB1OODUlYrIz9CatNyrylNcWy+avRgVrnPU/R8hP1DQWqB70nDtKpbOtAT2l1bULlGB0TcPAsFUnptNFthW/uhY0ZBFeFar3bco46dOnl+Jyn3YOYjcC/iodKtvuSekVe00TGJZQMIAEZWG7wtgPSUdU8vkEGLgt1Sq3cYvKdiUxLAyDVAVmF6+T+Y6HoCilU/6p2CilrWJ2iaD6SxwUBOvgAaBcjlOXmz1MKUqj/ck2Z6bltm1o7eTW35z1HIh0KegwIrE8wQxSrT7PCGzLy5ykZkoDyMEJ1h9S+1tGNEKDe1qGstGAXyyCt1mbYFYv8NA6iX/wkIGAUnlOICeGXKeukXFwQQhGEwFQIOPjzUgUK1XhOly0RLAeBfznUguI1KE552gniCRrRIKMOigtAYwSbiAqJ2nV1VkScUqBDFUNxECaKcQEQ93CTIuOZo1+mDVGd2vmDG/ydOwWyJ0C5nkt3N5GqdYDTP+49z3tKG9UpGQSLJUTDUwZKmMHg4RAtT5m1z1gXRdzL4AxQaTINmj6zf8TUp8GPrq4x04mfP5tiGHgUAUB/c0sXZgKahBCSNQ9ckNohJQcxzsJMbkmIE1IqOdgInPDbaiEo4/E5kwhmRF5h/EZimQ3GYhtzA/Vma/HqsVppcjcQHUhqJeilMKMCSBrBurqN3o5YL8FBz34YguTtaDoUohWsmdisaMQOO2V+hsbzp+ZL+xC8hC2iGjOd2Ad5sZs4moUE51W7UA/bS58gIj3BCuCuXcdrFxhqQ2mYB1VMVmG3bvIg3d/l0m9n6cUG9N6QdT8r7qnVoUyIzDISneaoRy2AVnuwXJ6Cgg4UR1Mm5w7dUwypdMQSoMyQFGVGbnj+ZF8afySIUlo6KxokjoOYmEkFaWyY5rMHPEQISoTFHDZOqJcfky4F3/5wmfTuETfofB9TZ9vIZe8lwlkA12mb8H4mMeSbxyXr0TlUmCFGSBp2hISeCAxCCUfsBrMGwJ8j1kswcb6UTl6k4ZMuvMRSl86KqHXZhrIkQnQ77RQlLCtEXQYiOZPoWrHRw2HXev0CfmQ7bHjEIlCaPnB6HvsWtECEym3nhjsyz/NY1ZgfGCUz11KK/F0VAGF9cAggjyQSQJhoEAuZZUea47VRR6kSNnmwPTLRxWXMzh8xgz6BCIgXyLJTHDxdlWhSGag7by6GhDFal1IxDsiArVVv7Z4pD/z0l1EvRYEp5XypFWmi8TggnvBHLKcvS9xEyOWvM0mMYSAXFREpVBwegeUS4/L0aQKlYzyXMsbDr3DKqEkRNgd/Bsbqn3Sn0jfoBHuSnhyGi5cD+hnxoIDE++wQ8VCyxpdrol6t4keppRsf1X55m6yiuj4838BBEnUe+cAFayQif9QzOaQJFN8UAQAyOzJJAZAJ86CF99aoUuBaxARz69Na8FmoIBCcdDIIdA/Q7FJdKo/g6t2Lx4SAXE48mAMULKtykjuHYb0Zl+Uuw2OGSN+T6UfCBVvMlkoKwfX1wkJgph+D1WOkSRDyC+uXILUTzlfs6mEETK4cOOT5qADxCUM0G4kgRFWUlLCGC2kPYN0xPKPcLQTXWwl+yBHxGN+xUxCdwAD11ECV0kIqXCHQxtIA67rAJuOedWEKQlWt9N3aJ2xIRAKUJDo3kk9QCYhPAgSleYnTneIADeHgJE92SPEEn1BpXaXmW55vzBDjfPOwzPKT75HZCb9JdJcai01yKBC2vZjVqJLIHDYSUfxFSSKrtIIyJ0eJEjSkQ0DK701CEqZ/5EgMCeiiJkUVS3tJlaOzEALI/kz0YZZ/oXjEvKI3XyyZjxtDEgEsQoIyTjpw5iXm5o1pVhJXgLQco3yNIEj6skjovVKZMC2khw8a7K5/sEsZyTRY1k0icZGB8A+MhbjzGQY5pH+bWd095WVKxQVpZrTtleNGMHPv+a8fuhAMydF9Ec7qdCiVp1IyTD9J7xFhXPeFz/MKaYBBoLOZBKD7HACKPRzCQhMAWWaNFUe80pDm/8AVknmYbyB1klVq+JUBPkskOEr0O0GW1PlflFAY6hn2TLAOQFqan1w1CZLFi43iCINoOtUIe6ocB1M63pRwsFQ0TcuozPzameExmYF/p8S26waNe7AGPAVxC6mfwAsANPdIBk/5HnpS5sf+RgEHMyunNfSpXx6Vci2MIYQvaWHU4PXmHoGphpXT6MEm4g3StdLnjhZy8lhFRwM7N0Gi12ILHKFeVAHsUSxBys98reo2SKKUmX+ks0pJk6LZDGAFCHNZChrL4hX3KM2EkOnpsehhp3TwPuvFzDyYvolNRPwayflKWjrYEFCzl4YoGwpuQE/k0tAMsnSuWy+kz+r89ohUPUfXe+roJIH+rRcaNGCBy6lQlv+1ApQZ3XZQYJxMiqchX9JQJCwZbckGF6S9ebFuJiEzAhPg2Qcug8FNqV64HetZgkRHeKSDlZxYCzTpFBLTNUK0TEIGMhMSirOVpMwAmqRswrOd4sh0fEq/BmXwZIfrRRlz8g8y9Tyj0MeAFSfUSCgOdXGT5uKIWRDCOa1Ouj/xkVbOiMAOXCUU/sFGBt2cOOZojjlRCt0yzVNn1GhKhPjeuVim03CcRjUNfTCfpcCFQj3jcwxEour4AszR+4h+/tvpBZOv4D6yLNHSj31kmcQnSuEBYCjaq3JS3UeSGfGcE8+EqU7OH0jxzF1zhJFpr9XLVNYsXWR03pqHbB1o5kjDWJsBUZzpJSQA8xUH68gv7imya/yqgrDE0+j4Cmncoy6sEe72L5gO0tduQhCITtKYB4AQyENZ0mkBJfq/IyQ1BHET9LlOvors6ryK7Nb4zkWPXwnIP1C95Zz6b6O4FbRAApT/Esar4BEhsK6xCzcNRPbjrs6bMw+lpmZ5ACFEEVjyYsuiGoX8vCp9XqIbeQVYhmRvVTX9ah0Kjg6/U+2yw4IzPPF5aui2aalE2jfxD78QK5WZouOz1JFv3lmTwv6rqmsKRgDncx8qAuVEzRdenPGhXkPV30+xhhY2K2y5Lpg6El3r15Uzv0ZONEPfFTL3SWxVFi59ASHGTDWMM34yqgwWeyuQhsZfoEiwF3WCCF46MvMr4dFoydBnwfLmTioDjIoixPlAQ6H4GcsLBJEesYs8ewjlKwVI90Y5iAWORLJ8B7Dx9wXrjsGKjeXANnUaJc2BGHIMWBE6xWlaYc0vVvcR3X1+PJ2CQXtigygy4DcJBeb0cUsXp/rOF8g4Q66eLovYpv/pIJHfbcoEMi97bsNIgcJNQjIrGleadAYAk2+5Hhk4rUTDD00/UIlvYXwgsjrkxnuYYRK4/iRGLioelYI48tcrsmQvQncFVVw+gWMNSs1AkqpGm66mHoMK3hEaHP1oyluPedgUyhWRBQnaCaCERLQnmA6toAa8pC/ggPzS8v2dRMBbpSFul6Hvul9E7oXI0wUAWqzw15ZsCHQUD76DiE4mG8q0G1cZMlXy5Su/28OWie+5OUbEcOjiDKz9QYXGihUOdcS+tNb8bJKU2+dmUcoWo/442YdI4l5gfmrWzFwUjNWYBysBzpKd0w9RhtJXeKRGUVDqkMwA3cgYdxLZ5MTCMx+/mDeSutIFj5mbL4ZDMhNakpZP4qIx+bJMcOuFeNHM3xOnnH0zPstzDzw6a8BRp2ZGgG/T4QESEgndDEpQ5o1/qpRP+HL5zUdhXLEMDc+g0OBoLPBLWj7hIdB5/D7KOPInKfh9W3txPzIAjXaIqWY8DQvlWraYVLy3O0u6pYFLXF3Y1QMJlt9/iXMhdwkCu8KEfuVdSYZsWchi2EpR7CYtdqXol2ZjYvu3jZysWjj5o+2ybSw6HQvwZ0KcBEmOJP6GxZN4fh5OEEj69cRVN15ywC8SFP7OxU703071SAbhV+XpBwZs3cBG3IhPQdsJyNIknoHCQAMtHxCO1kRpoWLXvF0I+9wAQhDceBlGCMNgaIBHKFgwCV85CcuJl0LAFHL5gL+fMzH/iPpLLBkzgVRfPhykMWqL4NyRJJtIvs/F90BAFQiB2JsjVSnVbGF+hHqAeIDgTqr9xNrCMidalAVJsnflyzHZrcwmCaQJqD0cQg/CokoG+TYOY1ZowhLutcD49RInSm4vxkf0RxCnUlhiChvyd7Tek7J3xqeitghgzMKizyU4bH5ESBDSXYJdMhw48cIedNCdT9ipSBahDDHwc0E+J0oynsRwVbe2qHQzzSGXYhlOnrU1WPbv10nPyMMlhJMvl2+TCI1ZbLh2ZIYkfAWCo5/QaHNvEwbMCGCbj6TN3XMAtmcXiTPhwQBp9ZMSltcuFYuIwpLzmQCysnvcd1TfWlVY9nzkwgj8u03oRDI7PibybxDMplGJlC1ACiGbirdBpLNLKdxkP9qGJhDMNRPRcCk1B4+D3iHPLQKUDpmN9AvFPdFLhfOhaH2u+RpMUuPiiJAAqojrYFe96UGBTuwHGWyfwIpnrFMj2C7Pu0kU0ggBySxVhGpGzfcFCgVp7Qu5asnGfH7FlLl0J4oR3mEVCS1eqWoOUlS8/Dab0iUYGMuhDiCGot8CM3NNiI31Ah5i6l0R69W+MNuUvvUICP8Xn7JEAjZWjKCKqMtoPi2dLC9R8U57SeUI5jeNSmBo4pl9A1cSWYath21ApF1eMTn/F15JMj2yPOpQCHp1T0hKQOlZGAmcotKopeumbhYKcZ9kyeVyLV4EVGKRtEZgqAUNrkGkVmecaPCltCSgA1751YW6GPqXFqsUXoEJSXAamygDUezH3MQFhvq4O+WUMJK4RMzr7DJ+vmc5asUNayO4tDII4LUozzfi47SEIPwymnmeUle72N1zJfPEhHQmXifagn0xL1EnjQoAUFs4BEiADGQzCPSFWOUk8Ra04HJArHnSu8jT+YivIOeIVL4SmEwG5geRDBHlX8R4C9O36rJgvZAfHkbk/CIsXiCxI1J4AM/1W9RLpmjO8Ap0sCDHVHCCzjsJ4iJtjkNGYX6lJUEbRS9xhAN0fAAAIABJREFUqQwtniNF4goKlU75ztqrzk7fXHr1OFxbkNCUKkg+zh8fG+PyjgMagE7/6vHFhAGWk4wpLFE824cYhsqihCHmngiGilRd7MqlmmcCOLL6w44rLj7xqU9KGtxkQ1g9o2jTPHjfYnRDFqrme+ST2pKeZwadG05o7GQuxMByDMHgpY/H8hCo4Ct9BHrDq+6g/PgnSdlJ8bXYwlSLLaIgAYSEFgAhZQYAsrAkackTTiHUtXD6zpCwB7SdOVjPuMwYMONNupYgCIGwTO6SmzPizPDUZ1K5bXLGs6tN190o+na8xyeS+YCElK7HCLauHvFyDbshE8V7CY5ROuJpypq2G91xp7jRxtkDb3eybrwdAKUnv6FZSBLKV3T/gt+/9uFjrEMTSL1E/La5ezZpHZglsNgGRaiRiOkCoKeByBdZeI6ojn4cEahkRTjyE14FuXxcgM/jchyqu70OfczLMTAc0ZWKLAdhOWEpc0Hdhrgxk/AUMbdt2Y+nKOxzsXi2h2KfBVG1QuIEgxgeQtZwUm8YWsq3DpBWDRB2fdKszYmLFlU0VIRTD51jJVWNUv95FO1GS6VldFAktyyGzltVvsVyX8hxIqICewREyxuxpgibnqV6rX3D33IymgAxvPR4wh2FBVCOGp0Yhvji4WiNLtQ0zzVL6xIAb532/SrqKc+3SPPleQHAHvylfmToa7LUi7F+tQSUfQbCGp+RkUzV1lC2boBmiRZTqML+tU/1Vzf1cvUCyg0QSuPhYolgKV99sAwgkX1K4+L2mdgN9batTC9bPMiKgzbEsLfkcilHjiBvtpmx9tdxyFV4xCeYL9dgqoX71HfgeYVlqQ1uvKVAQJHH4LBJfkrFqhGghkFSNwcbOPpFowaRPe4YfYeamkRHab2HuFmv5dMJh6Ium7MMpDmdWCRkHb6gVFKk/8SpEWlmiFeKX6fnfknZEpfmhdhRIFMSiHD4LMfSLvHNEOhygoJvsEkCgDddsy78KT1N3XKxwisOcifo+90v3Rs+RCNaDILmQ/vLREhFDX6di53rNsq4BEFPBlF+ADIMB8OdNxqW9Ly6rI3x5UHXPOhhn01y0AkZ+wyUEUgpXUt2kg+/ErU8Qb4f7q6MpQE3dvL1D8kisCpTixMB52nlUyHfLDjD5TIy6h4XzQGoh8VOrLUTDuH8hSYhMjrApM2xqAgfql8a+OFqhyRnoQCvMUVpJZbbyqMjYtxdIgSaX5L8qfkQJZ4I5dmeYUYTFloD9YS0yBDl0xe+DodgRiU5/6HrlUsekysSZGztUiLFw5XjeKLGg8w79hzAEi9kIKXyxaBUYRkCGCUS7iC/eP0yuQ9xygNFn1MvN6EicmpCoFKu2bbHnLz+1NW+WN7I2eRs/acSHBh12p4nOrztfJc/4kIAeqJid17iYBFoNEcmJLEvj0anLBx9J9QTg1QClc8JUDsRwNWwhQOQsbJJCSCbivdYpMomGUGLiljDCNUZ/ALs6/pBkXPew7baTIvM56GOPyVzwZiV13Nkk2QQ6HBim0LCpFwXJrhorkinI4q7HrQkAkOBZ1WYbQKE9G8SJgo9GC8Z8cjgFRIhYj+8n+T14+uFTwfD51kJnc5Sug72UF3DtXwlV0UyZmB2BwnX3IgejB0ZkwCOipJJBR1ILr89/KWLQDgQMjnWw8l2yFySKpy/vITMreL11AadejJIP/QJ8O+ZMi2n/gfdwG+g+HwAtTIy9COTydAJGUUxk0+QyaKTW+rqhN9BJ3BQ45zbEFqU8rHDyUhwIi/NPuLiJvtIJcfIJDR5US8hY/MTcL+RfBoS4RNO6gllpxAqmzKWSt1LTAgZdNvhxjg0mA9RVGI5Tbo+iOqplZF+Sk6dQuEF+XTXeOoKlg1DcttoZqh76Qkb7/O4Us/LEUGQpEcl9JRcHi0+JyVBSgYhZcIQ1rcgrkpaX9AsZHxw0bUcVIHLWFp8DmZX94KyhapKhauQFyrdkIUR2hJyqZQphdDakXfLjubWMw3BUmGpsaXCu8OKwSA5wvE6YOeCghwZFIWk2EEXm4SDUrUUAoSEpgx97DbqLyIc68YobcaRF4MQgm+z3k2GA00/GbkenDSjqBOk/ktZpVQTJjreB0K6nYMmuPuQxwzVsyv4CGG3HxKIVHmgH0IRHZWyHj0IjM8AMAtEZp7BCNnoECamljZCGOh4xlEPI/sIgVeqAygAnNMuoyzjQOLNC8UYjr+bMUhWwnpbUMb7UWEbbePdJ+kHvdTgs+KYB5Jl/O4c2ULrBA42++UQqNzVrhI9YMN7u4/nTtQOh4/gbCTAERul9T6v294i4WDpCBAgm6x9osSkRbFipXFFq98ICX/nTEgTHbY3Y0uo4zKL4Dr4zugv4wDq8b4NQ4hDJFoMNjsEgYSmHnIcxCfgg8AkkeM/hFysfrA8WJieMfPxMuRSgzB44a8xBdcrR2T5x0EY5GAfbrIAPsLvC4gd94VksbcCMFVKz4b5eB+xjXpXCBJg0PS/r9ycgIyRMX/pSGYCmoRospYGVMB00m6HkASDpOdZZs0Wdws+V8CdlKkrCVoGZT82FiYlcdZvRFP11ZWnVX/FzKbj36BmqK5x56QtBdriqxU1IynWrgCvKgCec0uNhlZnGG8dcvfBbE1QKnExdGE4IlD5FlpVtF4Cp8Cj7/Zv+A0g9Ao+qm7lsrimS0qZH7EXHz8xtxhi8SxbM4YLuPN9kTE28RlFNTyIaRmaLGDxvNzdGh1W06Q//EnVFuSj2RqRj1MyEDUdwIbtvA8vSDZhuUDVIw5ZMYPYXLGEiC0mqIHo6BCJUVz7Qe7LPmzR62OuQ2w6wtM/gDo8nj4BAjVMaH9nIbBPsgYBJIDajWB5H23n/gYOrCa70BmajuXhbEk69x18RlL8zTYLWe2jFHYGZGkS959EHY+4m22yjt/HSMg3OT1lHb7jKtQyDp+2cP4Ggfbd+dqGhEwG9nDk1QVkAE3Ox1Qc8CXRHl25ZgJLQJ4f6EHsBjQ/ZlrjHQDvT6EDrDug7V8+uEqn8wmLghtNyHghMAb1MRp7FPPMWXCPbHIE4KpLXMEOSOS6FuoXZ1gFLBZLiNgiZMo+PEKWeKSPxSHXKXaQ9bFIqJhXr05oOP0iJPLAtALDko+oTpeT+aLjThE2n68o8cAVzxpdfL5gyu2+ND4b9U4cojLY7p40L8cWA00Q5l/iTD+EQqjXBufVC9/oCAt0P+EEdGRxxPI7WZDEuQHu5zXaPgkQ5E+SsMtEqAE5qGsc4Te3vV4Q7l08c8m/Q+oc1iY9A2JNRynf2RJpp39CSvpAQFDOw32O77ol3vAKyyLOK1TEkXgM0C8NOckXVVTkmzLwXhAb/HSxAClAhhMOyI/zywb1WVzEG2mN2imYk8C6ENBaWUiKWBEh+PsNi5fGuIzL2Odg5Sv7RgMYqGSHBPJ2yBs3KHrd1UPpvjddCVaPiREVkeYfvRO+T7JwMtqQBNGifWj/Lk8ylDTKP1afVE+4L/eRStDsr7F3YsOPx0t5koaayqb2MfrSw0CRxZnhEIeaykBOmsIelTrxh8grrBdY6CbU1ZkozS8gmHAUebNsEnaKEyJOiOZN38PV/boqaxQB2pFOF+iGQ8PrakY4GqFuY/b8qXuDoxy0wejkJWkGS1GnJ5+cBKmDIDSfJ7ib69J6txk24IMGwVOXIpFin3EOoerppJPSjfI00sjEUawFhsbJBZCZhD6hbfQkMx6zSgLt5BIphoOs5yH0UoL6hgqo2XS9OUdS3+jXVOJb96LOvSDIIZjnJWRtx5npoC6LibP1wq0fhMHK0zR4ropbPQlLbxExCySE53U3pHpYjG/3jYtaK8n/I87hMDhKC/k2jiDYz8gicx4rcYoFKFTuyirA1QHu02iCTMqXFI/9avUBRaywKpaytwCTLAOhQ2H/E2u+6d76G84lNIkkeacQLFaloXyjVLjyq7LVHdsPr3oGRZB+7/vV+VIa/NkxE02jN4Mvh6T5/Bi680jImiQmMJRBG2ZFJIIKjQQxpKg+AjMowZhHPPnm50sEpyQX4N0mfYKEQX1RRfOQ/sy3Hi6aHncChwPW93UQbiRf9FXDpqvu43YV3ZRvCXo/c+iqRpNEdelVdJgCcUXdcMVnS9V/AoT6eBuHKkGCkBlAk7B3TFHgNweN0oA3d5/V+XkgHjAeF/SozjKC4lZKBImqzBLNA5R5puYrTIIT3m9pWsgEbDpchd0NKR5LIiqe6jwqORRUkp6qgBjgDvBSbVsF2rakq1BXPC8+kLbKXBHSBUD5DOuKlp8XLyBNyYDPI2BvFlAvA1EVWQjSSjFcwsSI9wRIzHhSx28UPIOwDMzrEls8J6F03FfdsjkZb4NkcEpk6xR9IbZhPYJiRhw3Kf3gK6D45BoFSRlZeCJHeDRUhDpX2CVgshkmY9AhLpxqOq7RyrSDnpmsToFUcdptqxp64RM48P4YP6HS/2WaGSVkAZnZxiEpfTC3BIGAdZbgmPgtkM5ViJZnCAHVE0mThoBPksCXBcEzcxYSUwaOgblMl5EY6IHSCBCjIr3xTg22ApFxufbBZO5Bkhqhfg1QAccpDFFNyfaIDnP1FZY42h53P6ztI5lsvHwvk7Q4FsR3dQlSjIpIkUkDKn4mdDmhooI7aYRsOuXhWnlUQBDJ/Mb3gsxY2pSbU5SE9Q2VOr0Vy9fpNvMmkcARnYJotkF+v1tSCIlC0k7K7zEzMFTAtnM5l6tDwPco2PKo4WJ5urQe8pLKIPiRVulf08lsZKuyzmwg38aRqPioUFx0NjrSmvHzxQAoWesULJhIccwT53UJCPYMB4Bsi326nj09SmFPkAxXdbwdr9tYlu0R5ITws2Pqdl3A79AP1YHAGCWCQQNzO9/bR805IUcoczMYq8guCAnAlYXSrlgPhdL9uiC5MjHfkBRCOBsIEY9Ua6iZdUPA87lGbyug8Bj74HMqZlSkxkP1igpvXdzTSn2XrMzORvRMXzB27SETKzl2cGF9gUc/MHJdTyb9ZtjV8v8L36aJtCowIXJXOIKQWw9aLwtisiACV0EiKHGzU0CS3j9mWAYgOZXMIR5CAgSplNZxBiksQtwbRq0nRAWKmYFQF9D+aPAsqkS+Q3eyXz2NYDQfSk+X0/KQQYTB6eBS6wfJtZMQSjQA702wSIaWQMKg3cW+7SeXy777ZqyvvthkqGzTQxaWOrVzVyisgK3njTJ1+YQERLKMgYYnDvYc3z7vYBA8YYaSMHv2LKAGIpNCShAgm0Cq/aXuC6vYxGyRBOgTY7wmof2was3FfkhlkkZrsEnrj6MQnRgZPggvemQTtQKtNvIYoa3QnRMUmQA6mVcULfqIi1D5HF638NJ3VJ047wKJ57Qat0YabM+Cii/9BWbDQjpVbJkRNjX38PJFVCLUmWi5s3UGplWdBGMdUitIOOWYolOGD0TyVxgKepqBO42wz3NT+qety5lNeI2wfqqmeAeckDXdEYYoospmFdrJ1b3Qpn5I1MqY5Oz0BqlIJqrIekswsrKaq6gYIM4s0A/1/kQwKp7RsDcRFNY9zr24KrJouXmF55pMJeuwRLtQvdZovWeAjUqoxktTGYSFZilL6r/GZ1AjW0stRAaAOEgdTesKqLlDymkV774oPylrUtYKurHPpmpaeHnDi1E2urT+ZsJ+4oGmbzJXvCh8v9M5zrdOLZ8rXKPOW1SUov8U/SIKIV+n2o5Ml/Bc5oVXKaU5TkMFNuV/BUgpixIcRJDTN14aNagYngUDo07DRADkWzKgOGOU+fg80oymkqHRwM0LqO4Pegu3beQckKXAFZRJ/ahK6RK4tdiUgydLuGxJoAW4oxhFskAqtqw8IBnLy2IkrD8FVpAsqS46P/DCv+sRkf9mMwwvsJFSBaImDtjh1rmpUkq2RIrI1IhlKhyO6v1Id0etgTgzjBZVEj+FUwCkiij1uhkTW+pSpUodFqE2cz1IeDzbRpzycP9zCjR5jAiheeGSTQoo2VyHEBWMA3cI1ksnCoVmCC/LhDFmZPuZKMY1Mms9Urk8uo4FHOXn/JyAv0I2wDkeYVI66dZySJEtZi8JAvFy6bamMN088Sg6KAtYRO4kik0fAjJ0/hdrzUH7Sohw3mwmcQ8ug1PW3Dk2XvBLrRgVIUVCzd13Zwm1LSpE/YgBOD0S4xiK6NLLJ0pH43pgEH1eoHUJAZunEcllksShzH9w3X2I+wtCOI1jcBJEL5fQPRhlF+0xvoOSmuK7tvI2EkvK7Ps6Nmp/njRE94Gh2VNtiVhwOgjIUI/a7PqB4EIRdxJGt4p/QYgvSPUT3NypQEpnxFyHxyOefZu8x5mR4oQ8A7vMkUCtwkoA2SREZqGR7Ro0yyPzcZ4fq7PwHmZMgq8e8IDp+UQoJ0HZRAkFWpIljynGLsPqjcwbMQYTUGMQ7aGEGTqvO87HRgiErSvcuftiykdUrt+hRcQpnFhwEmZwGQ2hjDZJRfxg489QCSbESQMwCZImgRF1ksDrB3AHhPMh1l2GTJjNvfzxQvWwE1cGEUx4E/ajXmdrpb/8EAR+eBOPJJj1BgvD7Z3wkCubNtoplrXkJhzLpr1zeLZOJzSYjlJvyuqolw9KLKkudTeNmmgk0bMjAACZFad2cKtLxKqWINCCUnv9Jiyj0NSKHMJyQfayVmA6kRB8WPl4jx9zKGkshc+kzGjmDT7MvvT02kYXCfGAQBDgikjInxiuuPUDexwQAwzRJ5TvChCOdgHgB73tFCj5RUIHhfOtqDSlM6pAdllv+AmoKIU4rwFrxpGUhpXA0R3kNaD8DILhF6fAeTtnlRvbMNOhNoGkLY37bH+o/wSf+o4NEN5I/fAjrtf9oS9mONVxDLYgdsm93+Ke6GUnC+pfFBh58Vw36di79BAAq8+i7tltnZm6QP9q4N9SwdFA5geAySZToXDO7K4daX3iEIJqs1D8VMmkD05Icp2ItG9Jt5CSwONGi8aiKCzvCTfi7uY/FinPEMpl7dF0h0KSrngueAi887TFZaxBaO2w5uLIWgKiNYJf4fFo0bis/In5Zt2Q0Lo480C+kiYeO5Zdh86yCKVM4YyKZSEpBGqy4fllVRbOaP0KMQxp/2JVJPzxFULwxSMmTcEhGNS97T6JdIfyndhZB5ZhGgDCJ0jGUMLptmQfCOTxnEgWXeRAu9ytuEae6I5vhp4lHjBNtoTkypmRZ2k2nI1FujTSPAEgzCiTYL4W64xGYz9C3ci/4gYZ7d/sZRcHIUHperRYPh2ZCbdqxGncViP5lcU0+Rh/RLkDM59w3Q0FSKJwRGwsYin9MBriiNvJHGGURLbnVyYRpJU5Bvy1U92LI7zo/CBixPN8aTQh866DA5MyPzI6oXsomefMm0FIcPvpkSEppU1jUIJGGDWQr9MUopzTRGOx+DlsgJhPjerGqPuy1CGouwjCn6GnafrowvltcSVOlKgL8OGb+SC1aackOX50EPYPG8GlHUyV68knHGcTTgg84YVzU1Un0ymXoOfnyDQxvUFm/cmzWpVvWf/l1LlvqeBwUDg+IWWTgEy4xpYMwTSMw/E42OkIEaJINnappLSksgZ0ywuiVqrvh9hgHuwQ5LNOdcOLQMRNXeaIJ4PCuEZOm7y1euWrN5Tj+RERALz3OLjKdPQInYpGHOPH0efkD3t/GWo4DXqQk0QU2BlrkFoJvoa28IeQ4UUlyLx0HhXlRXzZvITAu+8g2J7eN3VG/1yeQUQYaSvZ97ERDZMvVTI4pKD0EPOmV2EuxDChNCwdbOloDytJ5RNk+xkHr+lLgEH9XIrFRObBVAQ6SHAFFiGiTrnx7HSr2wvByGYhSK/Yx3FZo8XzgKL9eVMa6HzF05Jwx6auUQYcsZvTqwmADIQQSfwczbDKDEzifFyfruVPwxS4gKJXbDhnKFCn+GhCGWB+RoftY/Rl6IgLANeGKZmNSVIChEaPg0DSD/SPYSoJ5yZAN14h24NTqJsSJLDGw7bOETUckdk79rQormopbHzWHyDjQd2NGAusQIg5cOK2YBsui1lEseONWodR3Dnz88TzIDQ6YuZhy8CEQoUgi+oSdxARXumGIARVX1I4AZDMRVADRA3ODoOGTT7mR7Xc/lXK0hKmeU9w9EuJTcrPlgoAlBNgLynpaFUOctLYi2JJnK4REp3gQsnvzGwF0iMW03FyFguKu8/PR0a0zViRAALRd/BDCzj0WOMQAoPbv5NgSRRrCSBMbVH0Glq3KEqaAfKeguKDf4UdFwYjRHHwlxRSADRLaJayCWAAIJ//ZkIUh54YdYl8a4dUQiB/jbyB2dFjFVkH1zjZkbseZRZ1skyMGz9+7Jgxo9vbRo4cOXx4635Dhw5paWlqin3mtoIKKqigggpeHDAwMLC3r2/P7t07d/Zu3759W1f31s7OLVs6agM1Hfx0dMzvCPxDBX98IpnOB/VLP+bbaMVlUVMiBvkNJ8NAKZ1A532Z/FeJkNOw3zUR/goHlcDge1n+URUnmRQOWkKmFAOU4JFJKwDAmDFjDjxw/ylTpkyeNLFBdhVUUEEFFVTwj4WmpqZhTU3Dhg5tb2/H95/btGnDho3PPruhs3ObvskvXohAFG78EVjCJ/FAmGU5LYYQE4ftV6xZSZXVCLXGYBbu9B2xF2B3DfbWoKaOnAVZK5YmiktQKxzgZU7UCoeRyFrXElpwQGdeCwCA/fbb79CZM2bMOHjs2DFp+qmgggoqqKCC//HQsbVz1cpVTz+zcs/evc4B6hqEOe1eLVHoJ0iSQnDiNF4god5Ezd88yVc4iO0TojjOvBlkk1BPOwBAgJg0bD+gEw6wnyrlwop+KXZL2DNQGxAiE1l+ZHzxFFHtJc6bh896rz/h0KVSgoC2trYjDp89e/YsQscVVFBBBRVU8L8DnnjiyUcee6K7q9t9CqDfyOUSDhV89YlnOOHIkfNtGOTmInw+SiDhaAJoErIJAL+EiRIO/dyG2EFjUpABEHtqsHtgoB8ykWX54kORxKgnRSrREOjpkUSNRm0WOhlxmiVsdNna2nr0UUceVqUaFVRQQQUVVAAAAI8//uTDy5b39u4yt8iEA9AzFjvhKIrAJBzCvBkUTDh0gqJA5ysq4YAm84QEACUcwmJr6ropSA2yvRJ2DQz0SwFZvsKR7woROuEAnS+onaB2lmWpJZZwSAlw5EsOnzfvmGoHaAUVVFBBBRVgGBgYePDBv6945LH80jwu0QsYRYH7bMFJONR+UpSOgBOZpcpGVGy2y0DF+SaVcGT5xlOVlTSNaGk2DN1nHO6XoXOKNRADADUQeDXFOQXFJByOIB4Ks+2lKB09ZvSJJyycPevQLOMPRa2gggoqqKCC/5WQZdn++0+ZPHni1q2du3btFm7cBlDhVzr5BHqGYjD5E82kethib7dwnucUeUNTflIooi8DCYdhbZ7w5BhCijzhUNkS5KmHl3A4h9oxCQdGceSeNevQV59y8sgRI8jGV1BBBRVUUEEFADByxIjDZs/q7e3dunUrPvLIhPZ8i6YAJyNJSTjQh+KFl9D4CYcQAJmAJjCvoOSQJxyCqSmAYi1BSBADEmpg0gb84MfctraL2FTIHAplSy8/9qXz5h1D4FRQQQUVVFBBBR5MnXrgkP2GbFi/AcBM5AX6I9SGUKtIl6o4zp1F5yUcRGoiALLieQoI/cl5AEArHARd6iYAQCYBJOyFWk0CQAYSsmKJpmiNk0FJgQ4hEyDQkxq3RarNJ5246NBDZ5KCVVBBBRVUUEEFJEwYP3706PbVq9eaF1DUEw0BILIin0AHTZgNm+rRhD5e2VkLEQUC+qyNlXvkL8RKaBGQCRBQMxtBAUQg4eBAAIAQEkS/hBp+IqSKDJpTS4vMPB/KoSnLXn3KyVOnHlhKqgoqqKCCCiqoAADa29snThi/evVaKWs45Ap/t6X9w96fAf7KA94s4VDQ6wUZQCZACOJ7C6UTDlDbOPoBauYAdGFvIcVi4gWVWMIh4TWvPnn//aeUFamCCiqooIIKKshh1KiRE8aPe2blKuv5h7B2PkBKwmGDh0AkHE357g0q0teTcOR50gBArQY1tcqSn76hHxYlr3BYe1xPOmlRtbZRQQUVVFBBBQ3CqFEj82cr+o6/IRQnHN7zCS9hoL4h6yQcWfGfzKiFhfoSDpAgaiBqNTkAepOr3oVCPFUJrnAUly8/dv6hhx5ShzAVVFBBBRVUUIEDo9vbhwxp2bBhI3gvdoAXo/3VCwc0gn82aP5LvZwiM/C+DS4FiHoSDv2FFTEgZb/aliJNouEeWe69+kLsGJ116CHz580tKUkFFVRQQQUVVMDChAnje3t7t27tBLRjFNCOUf2DO9FLg8pXTHU3uKsjvzJMV/8SUNdpWlIKgEyI4sux6N1XOzvyz0T1SQEAjBk9+vhXHlePJBVUUEEFFVRQAQ/Hv/K4MWNGJ6GGFjgKYLKR/LutEay6Eg70qEagdQ39cAWAkpstgJe//KX1iFFBBRVUUEEFFcTACrL0ERvJEKwsQAY+Xl/HIxX9DqyQAP2ylv8QIvMeqQh7S6gutgQ/8ojDZ886tKQMFVRQQQUVVFBBEowcMaK/v2/zlg58091NSb5YYkr9t0GshxtCFKeLZvppi7O/o54VjpyMlAJkk8gPAZNqH4n+6pu+Yr+Vkt9uHd5aHSdaQQUVVFBBBfsU5s09pnXYMLy6Ib0fQVD7P6ha+dpCJlGq4WzgAIC6HqkUJ57n2z8z6t2XwGMg9EqNBICjjzqy+gZsBRVUUEEFFexTaGpqOvqoI/Ed/IarwBflQT/VEDZZBxr5BKsUApqzTIA+UEzYeU1x0zoPDEFbW9ths2c1IEAFFVRQQQUVVJAEs2fPahs1Kv/NHO/FvqICgB5j+GAFfwfJXNZxCId+biKKd1UKMeyjv0CdzSHIQ9klALzk8NnluVdQwf8M6O7evmXrtr6+vt7eXa2twwCgvW3kuLFjWuqIOxcYAAAgAElEQVQ6+aaCCiqooHF4yUsO++tf76WyDRFY33A+/e5XEOg/CgrE8r7PPPbJt3EIcw6I2t6BEg1XLA377bdftbxRwT8f9PX1r1y9du26jb29uxyzz4fi5MkTZh40ddy4Mf8A4SqooIL/3XDY7FkPPvT3Pbv3WndFEaf55Q0BQJSqVQUA/LoI8bJIAfWcNCrRMxQpxEANaiAlCCmKl2Spf+wzRiUcPntW9c2UCv7JYN2zG/96z4ObNm/t6+vncLbv2Lnu2Y0dW7dNmTS+2sBUQQUVvMCwe9fuzZu3mOs8TAdeZo2WAmQCMqEOywAu4RD1rO7qo8zzrKgpE2Kg+DS9gdDeEwkAB884uA7WFVTwooWHHn5k7bqNueG3NDdPnjxhyqQJra1D29tG7e3r6+7e3t2zfd26jV092yXAlo7O2+9Yevwr5re3jfoHy11BBRX8b4KDZxy84pFH88NC1SkXsQO/RPGCCocXe6RSQF3fUlHrGPlnY2sg+moy/w6d5g0KA5wVDgEAMGbM6Hlzjy7Nt4IKXqxwz/0Pr9+wKc82Djv04JfOn3Pg/pNHjhw+dOh+ANDU1DS8ddiY0e0HTT9w3NjRPd3bd+/ZO1Crbdi4acKEsTlOBRVUUMELAK2tw9auXbdr1259YKf7jRUvaxAiA/5RiRAyA5GvcHgncFg/60s4cpGEzE/aENBfkzUhpBBCvasLUJw3ZlIecw47HHrozClTJpfmW0EFL0p4/MmVa9aslwAtzc0nLDj2wAMmB56VDG8ddsD+k/bs2dvdsz3POQ6afkD1bKWCCip4wWDnzp2bnt+sTvMSIAAk+X6KBBA6dDsJh0bP3x3hEg4M9Rz8hTaDggCZgcz0d+HIJynS/aBbtXujgn8a6OjofOLJlXm2seCVSY9IWlpa5h1zxLQDpwDA3r7+e+5ftu/FrKCCCiooYP/9p8QeoiDIN4xKbnkjTzJkBpI96FNBI+dwqPUYIZoykQGorIOWKv8jQWZZNnnSpIb4VlDBiwYef2pVbvjzjjmi1IaMOUfMbh81EgC2dHRu6ejcN9JVUEEFFbgwedKkLGtKOOdLAKSdBmY2UoQO8qgn4SgOODVkZVOW6TUM72gQNy8aP35cHUwrqOBFCB0dnR0dnQAwbuzoKZMnlKrb0tJ85BGz8sGxctXa+gTYu7evq7uns7Nr+/YdtVqtPiIvDGza3PHTX/z+7j/f948WpIIKKoDx48fF94pCbBeoOXg8h0huUtc5HDqXESClFCAyITKoDRTSqYUOtQSja+QFY8dWJxBU8E8CGzdtLjaKzppRR/Xx48a0jRrZ1bN946Yte/v6hrS0pNfd1tX9+BMrN202X2NqaW6eefDUQ2Ye1Nxc7QipoIIKQjB27Ojnn9+sYzO3LpHy5EXoY0bNiVw0NPRIJT9CVEiZgcSPVPQxHV66I0FCe3tbI0wrqODFA89t2gIALc3N4+s9yGvq1GI/U0fHtvRaG5/bfNfSezdt7mgfNWLGQQfOPvTgqQdMlrL2+FOr/nLPA/397CkgFVRQQQUA0N7Wbu2spEDEFi6E9Z+MZid1nbIs3QsBsqkQTqrjOfL7+cZWS4xRI0fWw7SCCl580Nu7CwDGjxtdN4X2USPz0dLd05P4UGbPnr0P/H2FlHDEYYccMnO6fqVt165D7rn/4a2d3Y898cycI6rvBlRQQQUsjBo1EtTZFcEHIWwWYWcbSdDYplFZvDGTH/9VvKjriSnBEqd1eGtDTCuo4MUBebYBAG1t9efQ+ozzwOGkDmzp6OzvHxjeOhRnGwAwbNjQo448DABWrl63t6+vbpEqqKCCf3pQgVh/uz0IASx3G0cIGvuOFDpvNBMZCPMgKHAk2dChQxtiWkEFLw7QCccLTG3v3r0AMGzYMP+84fa2kaPbR0kpd+/ao3eESCk3Prf52Q3Pbd++o6W5eezY0QdNP3CEl/f37tq9Zu36jo7OXbv3DBnSMn7cmOlTDxgxwqB1dfesWv3siBHDpx4w+YmnVnVs7Rw3dvTRcw7PS/v6+teu27Bp85beXbtbmpvHjmmfPu2AUSNH+PLXarVn1z+3fsOmnb27hu43ZPLkCQdPn9rUFJn8RMXb1tWzes2zY8e0T548YfWaZzc937Fnz97hw4cdMGXS1AOnaF0loink7jVrN2zb1tU/UGttHTppwvjp0/Zvbq4+v1fB/3gYOnQoSICMfJU1EMBDIGKpS31HmwsJIEV+JIcEACGhScgmkP1my6jJiYQ6FTWHUjvjKqjgRQt1LE74UMcyyfDhrQDQua1r+/YdI+2InmXZiQtfju/09fU/8PcV+V6T4a3Dtu/o7ezqWbX62eNfMX/smHaNtqWj8577Hu7r729pbh7eOnT79h3bunpWrlp33MvnTlDN3L1n75p1G9pGjVizbv2OHb0AkH8FFwB6e3cv/ev9O3t3CQGtw4b1bN+xratn1Zpnj507Z8qUiVie/v7+e+57eNPmjpbm5lqttmNnb0dn15Ytnce97JjA9xqSxNu9Z826Ddt37HzymdU7dvQOGdIy0D+wY2fv85u3Pr9l60vnHpnTT0QDgDVr1z+07DEAGNLS3NLSsnlL5+YtnWvWrj/+FfOrw2Er+J8OZkLineilD/fMly/0G6n++MSPVAosobMOIv0onXAQLkEWR5ZnILMiB3E9B2ZbHapYwT8ZdHVvr79uT1G3JTkRHz9uTHvbyK7u7Uv/9sCRh8+aMnliYHlg2YrHn9u0ZdLEccccdfiwoUNrtdrqNeuXPfLEAw+teNWJr8gH4549e++9/+G+/v6jj5w9fdoBWZYNDNQeffzpZ1atfejvj7z65OOzzNDv7tkxYnjrsfPnjBo5Ir8vpXzgoeU7e3dNPXDKkS85dL8hQ6SUa9au//vyx+97aPmr2l6JV1O6e3bImjxhwcvGjG7Ll17ufWDZps0dW7du476gW0q8rZ1dkyaOe+XL5w5vba3Vahuf2/zA31es37Bp4oRx+UlriWg7e3v/vvwxIeBl847Kc6beXbsfeHB5R2fXI489NX/ukYmdVUEFL05oamoKfpFNgXfQhQb1HRaz9ODVdKH0Hg6CqjrTK8sEmqNQTUk5P6SCCv7nwLhxowGgY+u2uvdMdHR05sNi3NjUnadZlh33/9l7s2ZLbiNN0D3OXfLe3JPMZDJJZpJJLdRGaitVtarUbdY909XW8zCPYzbz/9psnuZh2kxTVTJVV2nt0kJq4SaRVJLMjbnvebcTPg8RANwBdwAR51yKpMJF5T0RcDgcgMP9AwKB+OtvPHni2NbWzi9+/bvv/9O/vPbbNz66dmOenMNx69adDy5e2Tiw/u1vfm3jwIEu74vnzz554tjDR4+vftR/MfLuvfuHDx96/uwz51842wXv2az5ypc+3zT46PFWt5jhaTZr/u7ffevZM6ePHD7UIYmPrt28cevOkUMHv/nKl9fX1gAAEV94/rkXXzjbtvThxSs8+8rK7Lt/860Tx492bM+ceerZM08BwO0796z6DlJvc+PAd771ysHNza6yzz5z+qUvvAgAf3znwiC227fvEsHJJ074FZrNjQMvf+0lALh4+eon/MiTiSaqpdwxXWVKw/zyH6m45ZL4ldsZYgOEYn+J/169DZMmmuhTS0+fPnX9xm0AuHLl2rmzzwzNvru798GHlwFgdWVl0CmlGwcOfO9v/+rS5Y/+8M6f7ty9/96Fi+9duHhgfe0Ln3v+heef84uIFy9/BADnzj4TPcd87tkzN27duX7j9jNnTgPAqZNPnDr5RFTEbNYcOrh57/7DCEsdO3rEP0np6OpH1wDg+XPP8JUGADj33Jm2bdfWRNFHjxze3BS7uA4fPgTw0fbOjlXZQeptbByIjiE599yZN9565979B48eb21uHKhkW1lZBYD7Dx7u7Oysra35uv/v/9t/AoCophNN9Cmm0qfdTXJPNgJ3aclk9O6nHlT4opCgQWgQoGXnfWnFz+fz6anKRJ8NOnP61Ftvv7uzu/fWH959+ulTQ/cnvfPe+zu7ewDwufNnhxaNiM8+c/rZZ07fvXf/o49ufHDxyr37D377+h8+uHjlu3/9zW6Twb179wHg8eOtd9/7gOe9/+ABADx4+JDf3NubX79x687de9vb221LAPD48TYAFKcKd+7cgx43CDp27Mg3jn25WJGmcZ9qyNJo9TY2DhxYX9va3nn06LEHHEW2k0+eOH7syO07937wzz89+9yZJ584ceL40bW11cl3TfTZoPl8nu7d8FR82uI/ocK+z1oudBzgiEZ4f1YZAjZu5cNv4+i2lhLLtLO7uzEN2ok+E7S5ufHi+XNvvv3uw0dbv3v97W99/av1ee/eu9+daL66snJ2+OqIp6NHDh89cvjzn3v++o1br/7mjTt37//qtd//7d98CwAeb20BwPsfXn7/w8tpxj221/Wjazd+/drrj7e2EeHg5ub6+hoAVD446DDT6n6+u7GIegBw8ODG1vbO3t68nm02a/7u3337vQsf/PHdC39458If3rmACGdOn/r8i8+fYJttJ5roU0p8aTADFaKJQHTSOIY9HF4SJdtFw0njC/iIZOMqdh+oRZz3p3/pB45ubW1tTG/GTvRZoc+dP/fue+/v7O69/8HlzY2NyjPOHz16/KOf/KIL1V/64osH5UOKEYSIp04+8Z1vv/zP//o/P7p288GDR4cObSI2APDKV186flx5XuMn6/fuP/jZv70KAN/6+leefea0v/+Df/7pvfsPikV3W1b3b1vDguoBwPb2rteznm11deWLnz//+Refv3P33o2bd65evXbpyrVLV6594+UvvfD8c6OrM9FEnwTa3toC4ME5Xe7Q33LlfNi9MxLuUvrKCKdFnkRSr5JTDYFmiA2G9RUKX24Lej96KDZ5TTTRp5pWV1f+7rvfXltdAYA33373V6/9vviW7I0bt374Lz/r0Mba6oo/3byS/r9/+tf//v0f3rmr7LI8fuzoyqwBgEdbWwBwcPMAAGCDJ44fS/87eqR/EffipattS587f+7c2WdGPDI4fOggADx8vJUmEVHxWUmRFlRvPp8/fPQIAA6sr41ga5rmxPFjX/jc8//+777zzVe+DAC//f3b0+HxE33a6eHDR6PO2ghxn59o7hYx0o/FijJGAY7oLFSOORCxcaePyu2jnu7dG/8O4UQTfQLp2NEjX/vKS6urKwDw/geXf/gvP/vgw8sq7Lh77/7Pf/Haj376yx2XurO79+Of/nJ3yEsuhw5t7uzuXbuufNF+e3tnb94CwNrKCgCcOvkkAFx4/2Ia9bl6jx9vAcCBdXG2xHw+39k1N3Jy6nZ0XrlyLbr/wcXL/8//+0+/fu31GiEZGqReutBy9aPrRLC+tnqQvZ1bZPvp//z19//xXy7LSp197gwizNt2a7uqZSaa6BNL9+/HgThemuhXLiLfgdHfmBgWgU4AoxGAo1tEaQib7nOxSARALQIBrba02vZ4p22R+kWWlhd65+7d4YVONNEnms6dPfM9t87x8NHjX776+//+/R/+6Ke/fOvtd7v/fvXa7//hBz/64f/42eUr/QdmP3f+7LEjhwHgzt37PxqCOb7w+fMA8OZb73zw4WUeOHd2d3/zuzcB4NDBze4YseeefXptbfXO3ftv//E9jjkuXf7oH37wr9du9JCle7v1wgeXdnZ6HXZ2dn/12utbWzsA0M4LSxRnzjx1YH3t8tVrFy9d9TcfP9566+33AOAZefDXCBqk3u079y58cMlfbm/vvPn2ewDgX6mtZDtx/Ojjre133nufL2bcuHWHCGazZmM6+GuiTznduXM3bK5EAMDWvQXSYwaSTzHYNgoEQKIZ0Mw9TiGXp7sh30oNV0va54Vhn2qD0ADMO6yBAECI4vDUmzeVmdlEE33a6djRI3//v3zvnffe70IXAVy/cev6DcXaNzcOfOsbXz355Ind3d0f/eSXd+7d7zDH97777Zrjv049eeKbr3z51d++8ctXf//6m3988onj6+trj7e2r1272Z3F+Vff6o/LXFtb/etvv/LTn//6jbfevXL1+lOnngSAm7duX79x++DmxqHNfsZ/9uyZd//0wb37D/7phz8+efKJtm2vXb9JLa2vrW7v7GZeWO1obXX1m1//ys/+7dV/+9VvP7h4+djRI9vbOx9evLw3b88//+zpp04ObcmIBqk3mzW/fu31ixevnDhxbG9v7+Klq1vbO4cPbb4o3wMqsr34wrlLlz+6cfP2P/zgR8+cOb2+vnb/wcNLl68CwFe/9IXpXZWJPu1081bnmtiKhXxukT/KYszTGIDZodWhmAPZP+67bA5uIOAccI+g7faOuE+7cXr8+PE3vv7yKG0nmugTTbPZ7OSTJ849d2Zzc2M+bx/JbQ2bmwfOnD718le/+MrXXup2ic5ms2efOX3t2s2t7Z2t7Z1r12/yTZEZOnbsyDNnnmrb9u7d+7fv3rt1++79+w+bBp8/+8xfffNr/AsmBzc3nj59cntr+8bN291/W1vbL5x79q+++fLGRj9NX11ZOf3Uk/cfPLh3/+G9+w/uP3h44vixv/6rV9q2vX3n3oH19Q40PHj46MOLVzY3DjyfvFNz6NDBk08cf/Dw4fUbt2/cvH3n7r0DB9a/9pUvfPEL5/1hgFb2m7duX79x64kTxzo8lFKteg8eXbx09cTxo9985cuXr1y7dOWjW7fv7s3nZ54+9Z1vveyfyFSyzWbNs2dO783nt+/cvXX77o2bt+/df3Dk0MFXvval58+Nf6Voook+IfTTn/48nFnO0IZ73yMcVg5REHdfa5sBNANxB57eGLo26AFHv0EDw6foAaHZBXzUtjtzoqYBwO6BS/QU6L/+1//89OnTA8udaKJPH+3s7t69ex8AThrndgOAX+cAgGNHD1euc3TUtu3W1s7e3t7Kymxj40DmcyS7u3tbW1vYNBsH1i1Ms7W1vbOzu7a2OvpbIdvbO9s7O7NZs6l9W25Byqt35er1n/3bq0+cOPYf/u47APD48dbu7t76gbX1tbURbJ7atn30aKtt29W1len1uok+G3Tl6tXvf/8fyR3EgQjEnqe4kUstQyEddcdrNQAzgBnQDIdtCR/xSMU4K8SdBIaIM8QG2nl/S1Ho0qUrE+CY6C+B1lZXM1Cjo9XV1e/97bdHPFsBgKZpooM77VJWVleVb7dyOnBgfcHPkq2vr61nXwZZhAapt7FxYKPiXeMiW9M0/Ju0E030GaDLl7oPDriXSNNTMyD3CRUMCyHDaNxrseTxRaqVW2lBJc3Rhx9eHFXuRBN9NqnDHOP2kE400UQTDaIPP7xova7uNmTqz1PCB9tGLV8OBxzppoxA3aMVmgHOMGw6oSTDrVu3p62jE03EScMc02EPE0000ZLp5s1bt27dzm0JzYIJBECkHBCwaTmfIIpOU2/cCkfmiPV3331vKUVPNNFnhiLMcX0C5UNoZWV25PChDftrKYPYJpros0rvvvcef9cjJrSuop2jxS+1abIHbxrlhcgdJdTXAVvCHYIH7ZwIkZAw2cmBcGB9/f/6P/+P4QpPNNFnnLo9pC+ePzvi87MTTTTRRHn6b//t/97a3k4fqXQbQvsdo21/lgYHHASECDOAGdKsX64Ytml0xGuxComVDCIEbAF227YFIITGIyH21Zf5vN3YOPDkk/qLcBNN9BdLs9nsheefG/S1+okmmmiiGnrrrbf/dOH95Db1H2PDpnsf1r+xQuJ7bdCAe0UlOnC8jpbzSCUtFgEaROuRSrer4/U33lpK6RNNNNFEE000UZG6sJssbyD7NxBpN8ft3uhoOYADpGYd2pghIhEge1HXoabuDZY7d++++ebby1JgookmmmiiiSay6K233r5b+LQIuRPNBS3rRJ2lAQ5BSAgw648ZVUFSf+u13/xuPp/viw4TTTTRRBNNNBEAAMzn89d+87sMg3skEfBGtO6B/SaP8TosF3A4aETQQL+phCLAhP0CR3fr0aNHv/rVq0vVYaKJJppoookmEvSrX7366NEj0A/j7AgB0H/QDeRmCeT/ISCNeUtlGYDDa9Fr2p+R2oB7qmIRAQD87vdvXLl61eSZaKKJJppoookWoCtXr/7u929Urk5QssgBcrXjz7eHI35nt/vSCkH3/gw2YeOGLeHnP//FompMNNFEE0000UQa/fznv0iDcAw/EKNvxoYUAH+EZ8g0+CWVpT5SQXmYSAPQNO5oDoU9KHvr1u0f/+RnS9RkookmmmiiiSYCgB//5Ge3bt9mUZhAOZvc7+CgwBRlgXDA6LhFjtmh1ZUACsLqSWZBQrKKc8g6/IPuR0OAu21LTFr4gCSJ65s3b66trZ06dXJULSaaaKKJJppooph+//obr/3md4iIiEAQvkgfPZ1ABAT+vXq5UoDYncCB2AA1MPLt2Nmh1ZV+lQPdAR/9qeSIAYagu8GXVDBoRYiAhBR2hBJ1FdptqUUkIMCuRv3pYKKWAARw8dLl48ePHz92bHAlJppoookmmmgiSX+6cOFHP/4pACAiZnc4dF8jIY84GBO5+D8DnAE1ANm9mTmaHV5dRXKIotfEOGY9PWIdlUuHRno4sgcw709I7XGMlIJ+fQYR/nTh/adOnTxy5PCoukw00UQTTTTRRAAAly5d/scf/LBbOHBnltsvqKA4OlSsXyD45Y1ZL26kSrPDqyth3aFffagGHOwmWxph9xHngHtt6/BI+tgIgwBEAPjTn94/efLJCXNMNNFEE0000Ti6dOnyP/7TD/0xWH6ng0kMcHBGt/fBP0+BZoFzOGaHV1cdNgC/+QIGA45+0SWsWCAAISK2iHvzeeuev8gHKo7doSkEJKJ33/nTsePHpmcrE0000UQTTTSU/nThwj/+4IdE5EN69z/rQYhbKwjPUyJqsDvnApoutpMKEco0O+QAByBBeL5RABwofhEEwNC9DxvwCCHuzluCBuSRX/1DnO5bskFmj1v+9KcLa2ur0x7SiSaaaKKJJqqn37/+Rrdvgz90yKxvRN88U5Y3esABM+xeVLFODy/T7ODqqj+BvIcEOAhwcEwUVkg8jCDEtm33+sWPjptY1ihfuHPp4uVHjx6dPfvcmGpNNNFEE0000V8Y/fgnP3vtN79zL3wAdM8u+qm+vr7hA350rqinDm10/2K3NAELAI6G7SXpv39SCzhI7OHgEAn9EgYSwF5/O+TrV0MswAEAADdv3nr//Q+OHTt6+NChMZWbaKKJJppoor8AunL16g9+8M8XL14CALEmEDZp6pSuMGDCgAAzhAaoO4rDneMxGHTMNlZXGwz7RXrAoSqYAA62XAPiBjotsX9TdqcFDzjIreH4Y81QARy9yMePt/74x3f3dndPn36qafbnU3MTTTTRRBNN9Omk+Xz+y1+9+pOf/Pzx4y0AiNGD31oZL3CwczDkCywJ4EDkKxzu5ghV8YnNzZXuqQy13apE9zSkf1SCfNeq+6oLIQIB+gPJMPwMz4NC/hbw3k47x6b1z4SoR0jdZ1ciCMYfu/iHSAc3N7/+ytdeeumLIyo50UQTTTTRRJ89evOtt3/zm989evSo+4xZtAMDwb2fQtDGn1sjBxsQ/AkcAnj02zMbgBWAFYQGSL45C0OPN8fjmwdXgRBaBOo2VeQBBwAAIbhzP8Kezx6CIAbsEf7c26U9wHmQGnad8ENAuksCitAHYI9pjh49+uUvv/SlCXZMNNFEE030F0xvvvX266+/effePXeEqPbuiHs/JQUcBIQScBC4SMzm+x1cWQNYQZKvuYwCHMc2D65FgKMrVQEcTroDHGHXJwAAOaTi9GCA4+Ee7ADMCVtwx6s6LurepmUFOMDBsVY4EZ0A1tfXv/C5F1988fwTT5wYVNuJJppoookm+vTSjZu33nv3vT/88Z3t7R2OJwYCDv5tEQE4ILwK0ktoAFaXBTiObG6uAcygRaCG3Psu6J6fsG2g4CAG+ddQVMAB/oz0gFm22marbffIw5AM4CB/LCl7hTasf/Aanjh+/Lnnnn3mmaefPn16ULUnmmiiiSaa6NNCV65evXTp8ocfXrp163a4Gw7YoO4tlHTzp2eQD1zkh0zcExVCFvb7zD3gmAnAMQZtAAAe2thcR1iBtgFCDzi8TvWAI4AiuRwCCAQ7OHu8N98hIEDqHqn0CncncYgFjARwiN0p8bs9BIAwm81OPvnkiRPHjx87evjw4YMHN9cPHFhbXZ3NZkNbZKKJJppooon+LDSfz3d2d7e2th49fHTv/v27d+7evHXr+vUb83nbT88Z+Z2b5PdgiAcDfK4eAQ7H7IgDDoAQ+RFghrRKMAO/GQLGA47Njc11gFWkGRC0BOi0oARDpIADwD/9IH78l6uCZ9jD5vHefLuFOSIHFEjY8leGNcBh7iftF5JCqytYpOPDfocqyfteWeSpaRt1Ish+j9n9ozL4TuffxSGNgesgAVe3g0XXUM0e6+aWrEwGAHBtUKmeUNVuH6YAKYtXXn5RPbAZnMXm2j/XfXEHqdlz6tnyRfX10sH3ttm/LDXqHdAqqPSOWbtc6V4O2lUYYGBmBX0PFgxsgHw216uQX+rBwgAsMtjVJ3YCc6cen6WG8YJx7ULZrm+kWF/JMIUFYTropqvdd0Sx8YNoX6gLhERE1HJV+k94RMqxbFrXAu9dZ3o+BnkHU2wdgO5VSuKBxXdACC3E/i98c/cJVugXGES7u7K9/hIukEhV5DsBLsopE231eYoGOCh+NuDSfQaXzgAHQvdRVoQZ0ArATGgxEnCstAQtUtcj/m0TtDMkIEkkysUYl6P7si0iYuuurOwppWjDY68e+viLOBf6NSaUVhIVgCDVZp3jvRkCKB0K/RMh6MJ10nLeYQj8wEtRs3MpbliQswWx3wXA36DoOJagZDhQXjy6CpcuHZkCYfQKqRC1g0uMNRSdFascWoM9T4t6Nsreq+NYfWRFKVA0kaXSb98AACAASURBVFDPpbJNUY5TsBMfopF6shrep8QMif2EfHxLFrM57tX62nbbqJjtyPbWNRSFsSaN+llTj2IG0fHShoUXS1rAd0PSg9FI4OEha2B9KZGBkd9pFjURAnTrpkwm7zrRREEBpP6UZFU9jDvI5VHUi0Z6qp5TxQ9Zdo/3ld9ChywURK3VtX8UkSIVfPY4Y+90/fFLSsxbIqHbKAAAwby98kqhjiFUjUT3eUSQqu0cJ6uma5aoINefcaozXQYFmGnG2npfr5WeVpBxoqp/xBl3LjcTSkKn0ppZbBD4WUv7kenP+yJe6ihqWkDiqDY4nwqi6G+UGLRrABrEBiOXvQwSfiV1XmB0s3qH5H3UeNTsolqGPmk80HjtghZvMSkB2V/LOFP9FWZb9XyVciMC4192n1YZv9p4w4ZNLILHI4N405rd5wZ61Dsi1pqGLe9Ip8T/icsn5YaqVkbjlLQmCiZfaoHKAsOolE1kyzLkJ01UKD0ZPnHhDLOh5MYku0IMM1guKzv0Ql5fqVA7ihn4CEJ+qMJ+YI3ooXiSnMsKydiwxGTICnAYXauKoeWbILSkNZoKwz9Z71WSHaZIFauhvPnU5nTHmS8chJpOCF9S0ptOGQkDS2o6u2ZOOELlKekOrExhPNXpa0Wz1KNzx5+Bo6jxm0r2vGqJg4pTkipIYaxECkWVNDBTkFzDPlA9RWrWzZQLNeqVGyTFgR91pcaTzKoSEVEpaqGYpskGGRC0ZUra9Va2pRiYNsZLTVTngS2HkMkSK5YgmcxQDQymyVYMC1ei1nrpqrIy0x9Q1vJoZGHCvyCMC4VJH/G245OuPCCxrwulj6y7rk2hARaACqRZ1EhqAHAOuIcNADbgjkkn6LaHdHs8+72e/VIImxxhl6GHPxgWZylgou51W2pXiWZ9av//3maw711y8hoPRPQuIfeHwD+SIJ5EBNS/ZBymV155MZY7i2WdEda2WNHEC+WLXygyRijUPy7xdU4BRtBCrWT3fJd6/WNCzqyhN+7CAqREf4PXO1VBnnhr4SHxlIPito0KYBLTwa7r759vmzMjl96rpzpqH0oT9yL1l4uiiv3xpzmsCr39xzMnyaDo1TcIfz1MFpRsPuC6sObkVsmzC/mReqH67A18WVmAhMcIhMRyaYthFF0nTUR+ZEnT6IdovKGdFYRRhYH3hW+fpI5pE1nqkas+sIZ27gst9Xof557ARO8QyEeWJLuYfKp3X1Jl9OphXGRQvt804CeUYvRhJxX9LgRfb5tw1H/Qf0scqG35YgVCt38C3M69pDjkvl1RxrVJvx2SeyfXfAgI1MqHeVwqYuh4GR/ccZTiwZfbiRIqAJC8jyqew/UnZATd+nuhDl1277/ARUOnCVHoflHzUFXyqomB5nrWVUFombyfImV3eRqAGeGsy40VcL5EDQC0IfgggLl2z71IWq700wkDEiI0fLjHmFt6xOTCKq5MhREEkDHqlNK4jsbvJFuSGIX/KEEXMkDV4aSJ7scilTk1Yj6uu45bC2Nu+1JVrKhPnaVo8SKKlrkq61vt4nBrChnSmiwHhpvuOpGkjbKK4plHDjyp8AE9xBz+QIpqnS1DT8GyL8l30BhSNMu6B/9HcmWbOATdRJYLm/yuJssBjljM8gh19cRcsEiCJcRzF1DBCEuAIqBpEwK9CF6QTFZk+H7jIlDvHoVMRIVKKiYMBsntC2p8SaK0rkbIJXUZYy7910nabhGjr6CBN0eIl7mbDnMEaBPjm5K7zN01R1SZKnZme+9rlZBvML2Hh2rLAkyWQyO1hr46CnSuUq6KSTenhMeUbWUe0HyLRLmxpHr3fSjdat689ygXojvw+vxVZHfyMoPfaAsq2uDSKBMzbcoBdFQY0hI/HkJf3ICJQcZXWlKU+xTibRK5o4huFVGaTYyZTKQ9F7WRWGlIp/FsrSLdMVqkSt+urx0sRt1TFKB+nQNJrqMP0K+mMGya8CoMo6EIVzeSymb3DjqdnxVjRN7Sh7UT8r+m7mFaqHuQ3k5LCiiIokJd29/GeZ38/BxusQCWUd6cIwxSx2CPVj9yILg+gqU3lDbO4tM8oFDNdjCgtJWLk5UZKP9JWprhdgcUHxvo2HBdq55BYoFCzTHYQC1+5y3Ili6XOKIUqWrlRH8pROlD57p8pm31ySqhVrmYFwHSR+HkvQNy840WL3LFU8RhvdCieX7+antki/6O1sGkjoH0rm0coNUxH5xGUNMBjJb6RY4liuaEfWEwAwiAo2R+hjbKEWPFTGlBKZ+L6AlgjN1R7oURwxjyVFpPspbAJIOSmrh7dlXf14sYXNZie3Br24HX3zJNDQVU4lmGrI0Or4UP+Wmb7gqq1LMZkP/JtV52eSmfHVgHWYh/cYexAAitKzzbSWimiNzSA6gZch5Gb6xobpdMwEvy7YT8lFdWRnm0vWzI4d9w0FcgspQz3iSIyuQoVVngqFNBKJMe/GD4XvP9l4q+EUaRV0+mllDEsOQe5ETnRuTKKlP3SAVbt5NjtKASERA14LdxkD8qhXH0pmmEV0oSPEKotJl6h5+5Jf1X5zP0CVKuUAt31lDkMCrxTIqYw19TQqUtjJ6/1cgvxctSwBxKFGRi2rwIiYlaACdxeRntcn1ozF8z7CX1vI8c1D4kfzFvoTWRKKLQRMYAzgZkzmQ2kQrbfRPVq6fKG0hFc8jkIXELVRnIM3gqTOn4tnouf5nkN6jG9Qj3zVxCNY2JtOOPWBHATqSU4hxcyOJ9c38Iphy6hJhc4cjVS/nF8gyxHyQYwoZQyRxO9DIoWJY9rjzakJ1UGXV0apzzwJagDZpUzhJriZzqM3kah2uYEWNQ0S/uMsmgD0hDuAYIKL7BOIgZpeqfSjGZ1LtWhkx7qZA3O6jKVIj5BkLMSEiQppZqxIMKfFhvTtGgryTDxSgKKEy1ZbFwWwcp5RXqCkQuvxiRSiWbGjG5ahEM0hlphQJANI9hYFYDFgGeiTg7lhhTljRNiYfTnLkwOUpjyfFRiWAFc1LkPk04SdrEgFKS6tU0vnj45K7THHq8x/BveLtIma6J+XGqr8iuUmkqIjwT31xpTB+VEnibD+xaLMHPEabSfa8NCbBNOnKZlufeWmyAA45aNK31S90bOiqT91XorWqEClYMtWaUA8XnBKRwZ2BIGposW7s2HojfgyBHBfXxOBNQS/er8ZFqfhnVigVUILTKgoZ6sgqRdg4Rz4i53UITlaqZieiSIRsc87VSU2s9XF2DJXMGu/8Hwj61KDHCBs4okpCtYLalEkFSRtUxFNYCgJScW+IozORI7yn+QCSeQPJ/h7aalypnU7w/ZKcYanuGpHnU6a6pip3WKbh09Nn4Xx0CJX69PPJ6hyU8BEhe6s/Rfg6HQdKrhskC8pdG5SGhV2X8esFA4gGsckamYZdFi65gz/CU0IgWTStKhLKhifR0QWF5vsKORnXNqBmUzT66d8fPQMaXUjfNZDS2dmk+NA2gXgILyfvuoQYVgDn3NbQP0byIKYnW4YHFEoNvcc0AeWlaO8SvF0qqXt1abNo0ivqTRgFxDrjXn/uVHquMgLhI0dSfStLOEFbdg5z+//zhXn+AiT8MrLsnXvyhCPaGTcbI1pzYhix3JBX79IMPcN146z7KEA7bceVAp4XmH7tTYbrieS5mKX2LhW/4sSrII5sIEMNGVC/RH7iE7k0ioQj7rhCwNkGBoPsBo4yWvpZE1Hb6xRUVHykApp6UIJsmHIrjDUaZ3PQjitdIsy10FXM7yTGqKPB+ZQqi0J96buRTAuTy42qxR9v6933kkcOCxzW+aBPxu59U9eoRU0+hZAYT9S9vGs/BNsSF7vPtzB9pJq3HqiM+0SJq5Y4M7oxWP5Mt00RemC8geU+AnUhMUX+LAlgVuHppCyOfs4rxqBwD0MvzFhZ1DfJOSAyMVTBUX8JABHBngoWtbGEixnL330R0D+yDer79WCpzRL40rgJ47+rKasKZX4sG1F4Q7wrqq9l3QjIyFLMQevvT0PhBIX0l2YlbIYEPkm5wEAnBbsdHb738Y5XaOA/qsT2H5L85RRRswzkRAnZSvPTanRN0A5Dph+5zMYkO3c3+CE45V/cVJWeDvvaNO4wuat5gasBNRmgKLvI0ADOCxgejkMibczA18jLE4cXPFJPk4zEgYgPIP/Q2XG89hsaUkasFS4MnuI5hRdSI1iVgPtnntwqPlB2pY07kEqUrhrZk01s2LaoeZq6qeEoKKOkLN2n+hec4MTdkmC+oNOCPnSL4V+MsamRmLi2SKF3ClpxGXnzmaStGrEugpCwPQyi5vW8k1gcESWDOVBqiT553uTVj3cj/+JtW35b6fEjRg+QXSQCObt+oOyZ1n6g7clTMf2FcPwlIKATw6YuWLoUohHmNBmhb6JrankPxIx01i/SXlje5pzhgVjxPlFnt9YsBJLtDExY7ZtsjG6roH5sY17y2xxtKiv7JkkdaegVlrXuU7sObqKf8EMhNGka7vQUBPYQp+D5RNTpRVmY0Ji3SatM9In29qoKI/ZLrK0DxIlIRi8bXbEKt+PbMHb0MzUX54qwTMqopXnpLkvOZWcfIpads9XX3laUMKnErKWoTL2T1cg9Hf+QoLB2CuiYj6D8byxqWLyQkTqQ4B6pDFGxpzK3JqSL9UExGY65BVFyfuVZlYTa1ggEVC6y3DTZPjVwTqSXm57CaetpV9HxEYzCUBC1dF5Ujo4FY6dkVCAVOVeCt7GJBrYoizZBY7P7iFNl2B37uWjUZGgTfMfxb7TazkcrSv0Yf+8tVNYaWt6/kDkXDLc5OxfZ03cVDvYhhIfiLT6hklB1G0t92SqRRKofo4kd5cXIWzrPAoDzEyVCGL5ps5WejteUpiz6V0Ds6QaQwOU6phKaTKuqfuhlnLXyFI5zGsW/IHQC60zhQDojuwisCLPwXa5paFaYMsg1jOMEkZrbHo0jN27waLzM6Om7pIJXtCRAxJBKqCaOmWybGlHiwKNmMl/qIitGmNuSK4Qr5L549NUgtVWRX8qolAYA47ik7ha4lzWC70ZObAw3EowoJCZq6gcGujII41dGryraTS9T3gXnKQihjiHy7vbGkb+LumIuy0Il0XwGxIGcYF7YXo6hLo60aI1fPVUPSbur1ch683nIsrC0WMDJCSoPbwkP+m3GZvJAOb5Feg++FAEzsFRdc5zGo4WV3L8e2+wU3+u5uAGbddiX+4VUe89OfbM5TILkkoS5QoMYQi8hPIdjvhVrLgFQF2CrdJYzACkmGRIc6kFBYfo0BkrTw/KDSFcBc4tJgeKH6CRyM/UPSQUumWDuJeewGiuFskQp416akCL2JEgO2VyQq9Mtr0F/maq0g/oEMaeGVA0RcysbRpVdGg8wwWj7iMLCEscBh7cd2mZSpaMiuRfu8faqp3CxdNNLifdobhtdWSseoRDsysTuhfjGMDdkVFbJxgxeQtxz0/y379HG/wkHdh1Qo6QB+UVUdlfrdub3IBmHmMIRiTCrlbUi/BiUqE78IeYpOeHjFCwhYK1AOzSHhyplhOY/B0TtHlPcMj1ghbzipgmzpduNGdTAZhgGCOt7K7lPCRfAhtZOwODpXIwh1olhFGT9ZKW0QSK5RLDbaqvzJ+FcZCj1Ye2Choh4aVxKiUMpjnhsh7zL1w2TVpXk3bsTgcT6evPDo9nDcHUBHJB2kejrCiAK2QSP04uPNv9MXDcLK9Q+RWuG2BZRJZm9gtI8tqBzpYpjEUUhB2RyJTaO0/49UEAiB0L1XN2jWpJHSqTk5AyrWw0A9R2aWbWsRQ1VLQrkCJXfJJBhQuLjAkKXKrlI6J3ah+fnm/tlhlkj8caR4QS2X4N0HikOLokN4CJ7qWmzSAarnOmjMGgX7Hb1WaMitsg99VuKaqA7TFe9VZ44YcnCnICIbdsAbCkr+4LrSKRaORxu8kGTOolthyXb2Z/CXHxTU43fDQVTKL44dkmwcc0RtGnH2N62pVtLD0moIWHDK+ugxpsIAB/ZatoQMRi+327E7dAO7d4WLpz2VhqOSgFkOFP1WaMn8qHCJxekLvy3hcG8nQ/ot728j56JPR7PFKfXF7GWeOcukDhNTTN3w5wfYK+ZVo17pIw55iJ/rIBIDvljxeAGjgsq8vG76ckeBokzZRrZcniKw6q4MjpbAlF0IK6H1PBE3kBQQpcpU3MmPMBX+ohFQGIPhvjqnJc5iWYaTTz5q5mRSonhxppFRydI6Awx5lmJnhJ5VkFwAZBTYY986yD9WjL1aXzNEZh4QoQ9J3dHtpsAxZtO4U0g8cMI5NC00AAREPHBVvIWG1n+E1H+oBYGIZkArQLO+W/05V1YZrhtVC3KKd54gPkKfEfkMYQLYncKUWoGCQsOu537MiLUZWSBHoXZcUcA/X/wMSfq7HP2JXiEtNgznqeL77EQvBkmSFqb4q0isOkGCDM/k5Pd6oa689EjsLgFx9fj4dalOPsvOfqbtl8QXdyqO7FyvPIBYeosP9ZK1JZLNn4mm7NXAID/yak4EKmn+V7xoKxx9eF1TizfiSLBYPS4ldIFKzPrjyJdgrJDKFeWORU6wgFcvMWoL4+s9mE6u80c0olQgepuT7fLz7RMYQns6/6BOQ4N8JpidR9UfaBWaLaqFOAOrb6LYW7EhwFUUnxMJJw12Xzkhbt2WHyf7v1C8+MBIaATufs3HDdjn5+2euK++ZuTbw5UoAlk01Kg/q7H3I+xQLH98Y8guyxIujFsWhjtMY+zLJ0UCcnWTgtyJYX39UzNPfFm4z3UBiI/8YqzolZGOty+wAZgBNED9UWS9uQ8+lgvTjgOAcNKoGyrMgJTvFi+DemzdIDSYPPCryb8cNerkJ4UtWLoalJZDGibZB1LwkE4igo2Qv28Zlix52SZSUaKCVT4WkjXTFai08BhkjKFUgX1v+lIR+9/3+ULqWt/gWIbyLnAhu6ynARpw5LmsoVDt2wrZByfGVL0Xfx9on014pfvj0R4BtEAt9SepIhH4pzoLEccWiECIzaxBmFOd2YxpY22KK20KQ99KZtIrXNMICwSgxftaVVqrjNGeFi6tzF7OnI7pHMAzuiEvPZ4/VmaUM4oq9bLajbBYVYFClrFejnCkiuFM+oUpq0MyXVeuyoSKEQ2QWNNIqoB92n9kuq+EQymeLbGoqwaLaiYXSdxEX3XDo+SDX6DTJHCsFVql2oPoXCy7sv5RSdySCcwnBYnf0nSvd7BVKvFs0ZKNzpelcy+cf+mrXzl6/DgA3L19+63XX3//vfcintlsdd2VGQqaIazw7Ua1KxE5NpQcBNAC7rUt8YMJHAtG2UAuyYUbYqZkFx++T9tLFwFFXCeTBCHWla87XQQhEFWtRAFojn4hH2WDCD+o1BoDgwIhZIF67YwFE1ZBhaLqa/LN7KyCmRiPSf9xNoycaWRyzBXmZ+d59eKb+f6V7Ir+SfsUXaqqi37LYFDV8+2j54slUHTNGbgFa6NSSAgMRQV4MLObKJSOunqKrop6yvhFpqEuIbHApGRldNuaAG8UKjmTRIj26isiNhhv2V/8DVmXn8BZOQAAUUskm8PsO5FRyHS/Ma5Q6KRIvspgZyfOEKE4x8+fyCj6cfn8gUjkXlHIl2NRU0+Vb5APXdbzlMj5JJIQEWbdwwcAzBx5p9HffO97X/vGNzY2NxERETc2N587d+7Q4cMXP/iAszWh+RgonBO07kNuFWWVyUvpUELX4g1iA2kZ3RM39RkW5PWh+HfA9PyBWgJVNN9ph6RMcp5Iu/KlZY54lRFSbwFZB1u9yv7UdEGenFRGbU/zVsKS5lloxdzSZkj1DXbMMfghnW9ALfuQkZaZQAf17FAa1CsuMBgSeGEqe/6I0ozXC6nZIahFbFm+Lp8HmYFNZBqD8ygZaCPVTSUpcSYd8hrc8YwxHFHb10nI2BpljGIgxZtglJpx4q2VthfyRG14q2gDZCDBIF0bjFo4F1NaXfGQmcnn2cNkOSWKL7MneuVGRt6FRDt9VO+K4cewTRvnzp9//sUX0/vPv/jiufPn+Z0mZnHbONrQUyQH3RIgCBI0QA3QzOHBsIWnV8FdgFNBUvWYsHdURRd6Een0xSwew9+KI7ly6EIP2WyUqDbpJSoS1OZKTN0rUNW6Sgm50jmD7YPscJIpG9gcxWYpysjxDvPBOfPI5ii45Jz8kH1gvKhhp7iH0h6s18GycFWc0CFzmac83i2hgRyCVpAC9AM0nUfVkxsyGDcohjQlVWhBUUqX6ibZqt4LEUbFM6MpusMaNZItz8lvFU84Hn1xxWoIMgej+gJLRmAY2tmh0deuooUGO0chofAuewZVZ+ilr3ylMqnpcEVfUt9TSACt3Ga7VOTrbBOhaRofp2vONJNBJY+UbZ8Y4U6e0xUQpix2AQtQqjlF+mp1y861eFIuswW44uusWY6mxZuuXoLid0SaId/I0nv4rm+KjZNlqMFCAyBOOjJ1d+zVK4hWG0AWkonAWgvU4N0orcL8SL2bpql+fiSkA9GBWe8cRBQBTUYDqzNsVMu9R5p7CCQfQt1gQz6PJ1Jw1wJYtIpGYe6YkuxKL+jdWK6AcoIqJrfGzSi6yXredEuJWIQ9GnX7NqwkLrBRRggCAfZfcQvfPFmafWL4D2cBb0RcI3Zd+Tl0NXPyk91J7yL7dxyVqjRC+f1RJGLKYTdBy5osVZFdiTHtM1D1GtAwQlZxt5Q+o07uDWuB4BGqW6GiADIvqmQsMJFTklOwPgjR7StVzlwjdvkzzhzHNc9ZXGlbUm2j+aosQ6dgvDV9u2RfwwpXSxcPRAwOKOhenOxVIILCNFulWjwTy6tYA+hcR9Mkj0ocRUlNXDpBv8IB2LobJFACyCuZMoQaoBli0y0ksAkkRD8jX0HRXU9urTBxdJkZRujl7L4pCdRjmZXxWBwBkmrFnIc6gwnQs+LE8UQ9/oBZnzyh/yc3uSqPKiOPoVwolzko18XGAkzf/jJVZOceKbAhSPm6oqTcC1c+VZEhmleLBQh22YxZ86dp9wmcYqtnTJFDH2sMKto2d7QFozbsn3UBH8NJE0mfy4XF3U1yXhjn0WcMFski05iL4Y70AnzWklY9MnNXuVQ+aY1nuRLXgFkz1WxEKGJlHuPHXUZiDzO6wz1iKF1h/74pkt53R2jwthIGGUZv7MAwZjbqqXoM+VtDZNHkVZTeee0olkXWFOK66vgBIN0ZYKiuJ8dQyag9NWwFomtlPcyNNBIEwIZJ8nWi/itugETItmaPM8VAJHqeEGgG1KRDh9jBJcxxZg/tMU/OcxuXQjzV8vIuiH21gSdI2lkaL+M0GTQoEmzooJcNKgw38YysUZ0nTscaX+5KnXIaYCnqvYTSoOj102IuAHM52oDhNpCgTuuq15N3XwppkdUhxPSkITEGO1GiFBA/RWPmppx2aqClxDgVRKQASNMGOGITHcTblpSIzpy10oBSZaWJOAQhqwntJvI7nDCkiw7CKDvI9g8hgGQCzynxkDfwuAvC3N4vDDO4T1EgTlpDXPogrsYI0cA2jujjPIJ4f8TINxZyiK7pNSfXNb75rADWp1PsVQMbAgCSe07jSwy/M75TFBobj8METpwygEL0EXuJmc2GXQnckCFioKAB05lYv4QGiPsBY+OMeynXa8JzM5IuOpTJ7idBkAotrJDL0vaAw+ABiubFy3mwwnsEAWbdNg4ORbJtV1TAZjCP+x1GuoD8GYZD5SvmlmkVdTwPpmXpX5A/Mrlaem9feXFJarH0AepVt6Ams5B5TO8Y6GdglhI/A7tlgQsZmYa1I6xpR1+d8uPLzmSCgDHWzOTZE4665w2W/P2jCCgQAAmUl7IJysDLYVpoMzGK3YGGmMP98ri0amG82Ln4XD1bKk8fPLD6wIvQvZmyrzYC3VsqqafogEUbdMKF41A0ZerEesBBCOx8hPzrxomcCir7k+rUgAgTFFulRjZHfb0y+FYVMsyQKHPpzHp49WNhqQRr2lWkfLQzyg95i3gumoCOQSxVlM656wVHMz6rNYoBqaYVa5Qa1EQl+80mW4JRZchDguR2sTmUsPoxEO/tVAE3H47uFnHhaAqe2136iWUydoKO4ncZKZW63pUapshh/oGBIYpFlFh+omc+Hgn1OCNVDeOofZRRKDkUQLMs69s/U0YAQAJoLPtr+6cqTgESX64fU5wx7Zg1fOwsZQ0lS8LdkIKDKGbXvFVRviDhTYNVJT7C5c8izXL7pMIzAdX0WalqFaVaeEItT5cQreVVKJF2EGYY5BpbRr8EZWPiiKoIo78mw0iqjZxdhQozcPXQI3nD6qAqrWqZ8z1o3+RvpBcxfcXnoeKCKJUiXATFqbGANL3QUpiadyqcx3mtUm7yurTQZJB3qySspKJYPRBRlKjNhDBcZV7RkBrwjOn8FgWbwC8pUeKvrZhqn7GRN9V8+YJlXPBEAIAGKX3egQ4LxgoOLMgjPf8tlZQD50QtlGZ/o4itPNEMoEFCchs3stFgNPFKyH5U/Ku3RkrZGW8CVpIIFWuQ547nLJ6YBhXnKSkMEeoeRXb8T9XjTMxlVLRPUb0K9bNlxNgyVi/JLAN0IVwPUk4P56UqDlp/sNCfbT92cRIQ5xmUVKPYJDFvITFT0oNF+fFV3CFK+ckURBe5zxTPIKywZmdOTuDYJ4q3qTgFiuFWTUYLO7LFA4VBIgDXWH2E4fYTAGMm9Fg3iYkv4AkUV7y4oJzVOaj0Nqt+cktmdqWrm868Cl0dtKFNyR1ZbJEQOnBPAI1VRQJoAeYO3ODAIvRCkzvdfw3bSkKgLjtEqo2naLdmrJiBsNXRjfwnhnuD9KuNH9qAku1k4hW0GayAZFMccSsicK6KJPS3v9JRG05s08k6NVu4VzBuvUH+PpJolJ9zOUyBqjKTzq6BszoVDSxbBBkWM46GThITOFKBL+okJ0OHGZgMdiOE5yjfAGyOhCLE4IhHwCPJQFfL0QAAIABJREFUnGcXwnEu4KrJrp7ZA785t5uMGT0qN0sHvxnjiViPutasfbevOBDVLPkTOIpFIrpXVLhhW0E7XNQTAbSUnDTq5CEgtgAtUcvG7NLNFAEQYdZ/NzZ6tSzyDUNrp5bGylUSA1wYUlhmSjeAMiPODZPh2owgM38+JFfNT4cWqabl401F9SPEOazBEm5lojG2E8YMryiPrZ7FUMpQzsTPwK0Wad0seOW0GNmbg60X5PDygM6YDOYLcekRQ3Z6XlSP8bhPi3P3leSMHVhgFq+o7BvkcDE7vAFdHpo1c4kSdwQm2MND/wUT0XZp6FSHclYJHqLIMJxUyUQS9tmzebNgrIqiAvhMAJUmcA8clYJHGg/1R5sn4bfTgfoDzocFvGHlEyBA06DH337Zb4HAGQ9mzCTWShoEt0aWMTzvUBo8P62nqhmskrZIWy1OS1uhKCSXTTBtP6I0cRwVSl8Qcg1WomKJQvV1tonVwh2EZdtQvGIiaWC/7YePNZz3x7zEYa+uDJj1F74yUtTKzJLpuTFjw0M+HzS6gDZE1kArLWG6uiaKpSwz9vfwxS2i9CE+Ms9mDtj6/UaLFZi+iURIhITUrkF3/Fd3pDqoxenuyoE0TTcUD778OzDx8WC8rMTXG56a5A/0/+inY+j24PL2ub0+qQhe93TUJI2l6Gl/YNOvKiHvHm35xysQTY/QvaFuAcVIOY2BPWSVpyOQaONoEhOXoOyIZDfQMSBbKoydH/cYnWb8/BcC4MuMyi/NbtwdSl/SdztumKGGbk1e5XNNkTgE37/ig+9JNUneVOqR9iBGDBpxnvhwkVi+n2TmXD5/QplpIj0z54tTKbqOmyjgHJkLBQOK3mHqSV2xf27NfKq+R8h/xZOcxfOeYgtI5PMEBgKSXzHl4wMBsVdJ6It+aA36z6A+3bVBG3Ei2AdIQXhzJpVP3FTIX/ZCI1OIdzu7kzHC+oFsw+43AiAixdIDJ6ILGUQU1SLYRbBT4Qpc0wNCnxvZf8D9AYVTfsiZl/fvmO+A4FuikeBK7I628lYiBzgBAjXQ7xh1UroOpT5ZjpnoMyS2YYQ8bf9f/1qsaOYw6ABaYi+q1EjOEnOF/g4B0ArRDL1Zoque7UdkWCi4Q4kOmHNkbkWpn+YZdKEi2nTyE58dDymxlcSbrEu0h2eBonjJ6xw1niCjBROvXZ9VMoSAraAN0SPZEqJEI6hEEYX9TbFSktcoStyPHGb3r+EzlfyZFuO9lUmOOWT/qmkZ7RAKvch7MBIUiyR2kzd9MIBcIeX2U7ZEW6e9adAkAZRaCUkuVXxBwIA8CCHqJtxJXI072zbhkMzhy/IpBgx+iKTuPiFieCIrnbkOH4BTWRlydhMP4KC9nh8jqOsyxQza4wqusWL6KH5ZR4NIkcwipBwycwe70k7vdvpx5GYcyIF94TK8VAwKCi2AAdYYqrpvDBfd0kjqMCg2iOgAI3fhQ0kZsZhjMKNZqYgEUoyhmnyDZCP7NyYdnyWQvqKQBezAyqouKZUy1aSWaBhSt2J9fsNWJVzP+Nx6hYakVmuQpzJcXUj8mLIH8SuuVcOURRpcvXhioMrRv5DqE90/RfuThr70rhDrMaXpmtRskUIN8QnWyT7P4KFWSc5hUK3wermY4K0IH4M84VSZ7gxrQd2EVHhRRdXZ/OquetJo6C4CaDOnry2DuvaeNdhAWPcSydVYx7C6oZpbWFYpQvT40gZxojBm0jjlUHS5RJmbZGJOoph0DRsC8QBL7mWkFftG8hVm19lbtfPv4VTdQZpwrfUsqtfeBIVDOyglnTk7A7ZBns6tcNUiNlJ5XbhWGrBXr9AEKWDgHl6fdCbdke0+O7EYLJdGYY1P7J70j7KtT6IFUiaLBhHnsSunueZhtlt07n1PUvxAxyJi/4XsEO8YJXM46njO+FJeWJyJF0CQt8h4wKGUqRCvTaNm4gtCbb91tPaQHKNIBO2cO48lZtE7ObJdWS7JkJbTwULGYcwPqLqRB8xvFoIc0rlqU4TcQpQaD4rT9yF2lq9cHpb2oyqeainytUhfpcCCJPTXvJIFwJgEl1rv1Izwli2glKjF57qms3rQRvwo/sSIM2/RAybBBmSU9j4AD+YhjFZVU3g6OUD7kpt4bO6JdjZDf10JJjBVShO3FKIkdFaWpa9AcNuh2BcoVknGbztV+eRblBGldjXNxsKb+sBIceU5saUezqqUz9w5K4x32SyZeoiFABi+Fht3nYv46ADHMgnFXyKgBnGGHRruV4+I91vQXGpqusJesjFczRExNCyPA4bDGtPXsc4oNZV0NYf5awvwdOplckv5ylSROWBMu9cXX1Awr4H3g4GNQQylfVh19bYtApBYgUyilBdfaDGbRPcp7T/Ao9lTaNECSXMkXlSkdjflSM9rUCKlPLJSZYvrwye2f7U+kMNbJfVE+UmZrg8NiKfWTkL2uk5GRL9RmtJuXCaRgjdyBVkbOEgy5LTmg1uVj7nJGi8NlXv+iozCg/5hHCcujOSuCBTZEewHsn311c1vEE70ssiZUSFyxHOkAYQVX7Dvmr+HGfyRiizXTV5agHlQudB1g4iNdEKiGbDPqSRsxgCu8/ajm9OKMfGVKMAqrRhz5IVm8kxU6k+LaKk0ARjQs3k7UOLlcAgvAmqO6nvXREzlqisMEq+YG16rpqAaHgqJ4mYMULLmVqtAzGO1hzEEsm1oll9vb3lQbLaA1lyqAqoEJQzYGhPEsUYPURrFkz3xN+mcenO3ZiH7gjUA3NdhlaJzW5wif5cql/ObJpSLhJvZ04jD7kQfleWSY++k+Vb9cQ/HHVFsQ5UzfjMwjRZ286r1jwU08QlYtVQ5gClszND3cHB5CI67BstUkgSw1Omx0jTogLj5ZG4Q2klMeGlYiZOAkYNKENOVCjiSBwxZGcUjLHNUhe+GvWauCSzmLypqhPwqzkT/Edg6gQulQhelKrhdS5p6JC/UeVa9NC01RVS6/Lx2WOLItEMGLVGJYQDl5gPWdIpdkhVWCjE10sEM64sTQf/yZxeFw7+Cxc6ckHhdvlg2y2amm7bqUJLqjUkYQirH7JqOVcvO3R6pr2QgxA9k5GaLvGnG+qc3JZRdzB7qchNAAXBA9wbvQp9tK5PzFd2r4ghsr8cACQCQ0VLfgLLgqBveJsttxZy0YvBQ7mS1q1W9qk3r5s/ZtDFNWRJRGyO1OyO7Nm6uQSapepVFaJyMIYB16SR9t81XNyCWSkx8uQWyPrbs4DK0z/MtTnEB3YxKHLSgcQydq9QsYMixmXcsSWqyhlAF9ezoXa6eNOJkYJNgU2pd0YBqPcScdx/JrV30H2/r6kj8hA/sK4oQnqoMBQKVqiAAIbQzoBUABGo7oEwM4wEEwxDjuF8ioS6L+YYE+fwYfJR4FdN1c5gSIf/rHqOhkOCX1DpR5O8rJkfgcY/rZQ5SoyObHLPEuOK43p4rrKlF56m41FCQhqHZDEIafd/Z7EQpLzXoLZG5HxqhLkImR+pMC5kKfV8Qk98bHzEGNbdmoMylMXPqq4Ypa7ji7SPOTRH8vn+IaROJFOpJKaH7omrJ6pPvTtayZhxKr9NjApwY5DmkBQLrK3WLYtS7RPyqH8ChBRJ4y9wn6U0U+UOMikR0Y0qdYmKYE0r1gHlAUYMoP6s+rzC5z6G6AeKOHBcS3BN2BHfqEyVjMOpE74d59XntVP/Gx4BiHNg06A/eZiUtRgT9SV+d6+l+EfmzsHoPwsuNRyd7h8JZA3d2rOt8avfQJoxhEgzkpKEbvT45HZm9hNDGybjtFXArENKhMvksMAl3G7JLud5J8tq6akTmzl2zFxt8AVI4UCyumX9ckPZ17wwR0D1PGbdpFCVmsGjOnpC4o82zYruto8swUyfRuNkgyPPOqkmGoNiT6L8DO1mpOeLuspRXdxiDamirUC4+TjWY9WCdlY2SIUECi5IxYiKyNrgow1C9UAoQrHV2YQpMsmtorCQyGdiLtXC5SlQqoqDAYs4ibqIknhcVGJRqK2taYLX8MEYihFjyu/lkQaT+BIFwRj70rCDVT9jOI8K+Yz46xmtVwZQhY6j2eKK8HZ6Mts+cn6KKrHey4WaxgppQAYpBTGL2ibh0+5EK27LR4fksyh6pAfUd0x8g231TBYnCXo5MflsRI94AyMdDmZrUVLKqIRCshisGvGBnpjupo+o8i9ldpj0WcSlFEFOBR/aFYnXqi7FaKrlPVmKEhyoCYnyp6WAXMWLYC7CU5ykBPv1mOoAsxGyRXKkcT4PQfoZ4cyj2n3DySET8JmV9JC5aX6Far4TfvRGrnOo/EElVobOFSZdvTgSU/aqqNG15IcYK9QZSN3HM5kX/Z2lmUKVHX1QT8SerP/3v7uXYJXa7GvhniLP0K4NRhdS5CfKBlhhpvATAUvXVAXuJZBDZrYUaQ6lxB1lIdnavRSy0mQvSGSTINpUdD/rpX9oqpjxk/9dEK/wmXqkKV7GArJL8hbV6PFRSUFfPRqv1vVjQsdhEI2LCoAPiDJfOYmtWmq5eyczy8xF1QlRVJzkBiZwVxxAYZWDc0XpJYkLhIcwi5wIr5B5TseeR3YMtoqQZMbN8kVELQTNtXnPgbROOiwwiRdeSct84IUPcsTRMI0lNx6sc7G19xf3yUCZLLI/sYAgkKs2KQOC9uO/UFVTYNNpxUnf8F0G7H+oFM6LukYqGKNRmLs5fQn52ox/Mg+JrlEVDaPowqaDaHdjD3HmSPc9UUX5ticmKRP5MsHRIOfSzgK1h+Gs3by3as+NZH/D6Cz0a51ovHv8aQ7710bftGP0ZA8jhkSiYXrHsittF5t8yBlzTRCX7yzl9NQYl+TUF85ARo7+qUqa/IuAvJhj65+F5CkdUG/BfZh8/a0qp7zS3zy5cqdzZgiNPytBXfAKHokXOqPuzrEjcqid2bAlF7V0gOXXTT3dBU/m8rw+pY/1jJB8LrmM5RKy6FuAQY4MQ2rCNY/nqOa9DCNB4Qws9pZ0BVp6eqVMQjTczIlxEqRk0zHv4AJtB6qbRJAEbohu1rqO2ozTELkUs4Kzyu5FCvOF2LxSvyD5WPTPakcYQhz6ESH+LRqiXhisxIME0nqS4Ma3DcmQBgdShFC8rS9REZIJORqDEu5DpQUWWAoKNwhW8JZhzASuML1R5gsZeZN30owMaEgP7ZYlFsIeykKFNGvzX6LJlYc46s/ixcmZOSfMJWRxPgPRVRfFpZ4vYFLsOSNjzRRTxViRM1S+fvWHv2Y7ZR1NN/K3fhqEcpPC75/TmTf15o5q5LYEQgLqP5M4QG/4B0aB1JrsbsNGodPVkA96zDa7FIv406VCmkaKIxCuK65M2nm8ZzTtE87MAkjhVh32ZI1HPQjSo3FSLoexlvXqRcrESkSA7mg/3Adq9JFxVS40rofXw+DmQFj5MVfy1DlT1DJUxU89OQ7PnROrDhwHIAYg2Gx/55EkmkuZUOytT3New8o35yaIOPAFtKgxB3o6xYtw4SWsmVlgGbarvPgnF0t/9jWF4JcMwCAxb7iXq4miDCCWWVPskxIDJGOxbw0T7R2Q/UgnmAADd6y8LwSDbi8n5VA84EIJN1pY6aJKpYZrKrP7uMPUGUEWILWYCFU9Y8GYQofgzgHRkY9405viLkhoxa5kZZaPRotpS9DeVqQG2JL2mc0uTTHvoKoBygPSxhPJHSf0yVao4sCY2ThiMmKygalK/vBGe5Ed2uuCE1p8R4Awgep4SLazkJOm3o/l9fUu5OFoaHHZqjXfIxHuuMSXtnjBryXyxa0w/RQ8hLBH9G624RM9qUijBABwaXDYf0g0vVdyNjmXwKxzjRWZpOQ4w06WD4lmZwVx5yI+puGU4SMi5m6XFh+ELJAXW3CS6qEA+dalzvuU0YfADBkZcKJpWZR4wuLQZfI6VON5PYWhdyWHWt3CL12idHo9hQrrq2Uxd4Rah+jPcYdPiJcK+sj2GxdkSXK+SruYVE2J7PaNk/Wq4z30/lYzfNmlds/D6Sk6AsD5LxMeCM1KiBiA9StQfNNQ00GCfTnPAOay0MEMiACIkQiCMjcoATQbaACCAFgih6ZYWZ0ArQLNwLH903lhnD4j8a8jg1vT8GaUce1O3jZkhRr580rMwwE6BrU8VU71wCk1Y1GMrimL/9pD5rzzUC6I6E/stfrpjXxIjFt5QSQsHmgG4zV8onvqiqy4ge/3E3+IMQfVo/kn+TKugJ/WlIzvuSS6aoFcv3BRyEpfGHtZ2Twy7LyD6PeCpXxIzCN68FIdD4l2TNiZfAmCzWt47yFhlTzLz8NbVq88rzaRjfyRvZ6fqLCBSMEXAnSDXBanmriA//njs6JooOnFOOnmKehB4G/WyPS+huPZtLdRjSrKxCT7WxYd6iRYnigwg42qDgfWfkowP3WKCIrcJ3mf1Elh/uou+5eP9tE4WGw/Y1yucOKg5VexNwBsKOnfhx4lTwHv5BWMN+xScK5aoja2MeYXeoLD/4fuPpFGBG/co56DoVXbjSnnBJBoGLNy6AeUuxJHhsvuIlSW6i2Vn8r1x8KOxhXrM61Ha9MRbiHsNoT/2Z1u6NmDnvZPx0KHpA1OvvmQhBJgRNIAuYUG8XmtOnbJ+hUPL4x6jBBPpozcC1H0nbgD5mAfNoEWOTybZ6suUTF9nkpbeOGWBaPwWlIb15ZEf0ZXSZfMZmYpwcMxYTKOJRYuNdLP4hXqgLvuYAmryVHgviW1GF5wvRoCjMvsgYtGkxKIWXGHL++o9GTYdmI3NHyqZgUOXgcNl4XWdBAR3d9MKUPS3RqopxKLhlbHdMS7fqmsI03M4BDFURggEOA/W1sM2pKW86M2AHULTYNMgn1MzDQ1dYx3kiK2IlvptUhLU/ivpl7BX+nRN3CLtXWu1PcY30zLiiupFDJRNrSPex0PLH5isM9VrbX5TGn3qMBoxYc2bMDDMVJ1/iPzRBlyJHLQWrnfzrINCohnk7QFVU0tlWUDkZH4vXiLiDCjYACCsAS88gbUJ+YnmcRIwddOjrqAmvkqn71e3eNcovZe1XR5mk7wu0WdnOEKsbZjyy45dpPJVoMBgHhBSTWY8ZyogLP2IlipK93DEKJTH/ZaoJeArT2PhWlQIu0GAALN+QZxZmCFULcieYUpgF63ohd8jZtFaFuaw9GTR2LlCB83QS5T/hkgxs1J6Rj3s0/NngpnZs1ooEL4Yk1j3iu7XlmT9CM2buUjVokU2d0q+9FC/tMPiwZFRT4F02giJRgMp98o0DP4UmqjeZHTUUT0bVxm0eFAerRgS8+pTqp30TmLBXRSR+C/lMrcRYVGicNgWxO1kKRd8Xb1SDHRQMvsznqKI4tL75n7SqC8MKBmNbr0qaKgni6sxTc2sNemcoaJ5EaKG+DioKy73lgrxeiF0D33CaRykjCgE9TaTkVOp/0QWAjVcM0Mcxc2uyNZWSTzyd/9Y8EOWK/xv4lAyZaMwY4u7b7pUA9umi5OrYQsUpHFFQzKjv6LePkytsm6+xBRRTj3kcNCEUwmD1baa/FrSgpeYAxnWpPhExaLBuqVMs9QqDe1kFrCLBlwiczi6ZKsHEaIuzpfMx+9iRp2BK4r6WRFRjBRd5+P6vp6v0BVgjPOC9ukLGhZiSAQI56JHHGtoEP/JvOuAVoojfgJBlIGj5M8Tb500xNlwtvjlHISwB6d/bvFxkvtWGgL/05PvR2LX2BLMQce31iyjpEP/1zdw051JYmYmAPsTdXGMJudw8r4iEcemHQORoFkKgyxdd2cy61Yb2/iC1lKUHzNJSJZx8JJq8JaRI1vFQvUNL5RMsgY3Z3mapvuxtPqVtRtmgVrhyWzLcou8BxMAHFehNKAqGpSSH2pqqonKLtQrll5iUAco7/yIodRNVvgTrct9cfQuazqJMebJ7CO9S6W0ggTKA5WoZF8rp2vZnNUXYuNhZ1XOt4xsG3v2pmQvcKRFS9fo7ykTw973a94peh7EZLJw1KUUhh6F1lbqbU+i9oW4ro2exGYGDrL1Juw+qgJspYAyAGBoxbrCGsRZv8tdmZyoUzrXtaF2ap/kHVb2uoxX0hiRH/FaxK/MYdcjgY0ZpiEhNvqdaUhjSqnRGI84BK9opVm+2JoWRcngBz2/OaIiUkAlvys+ly/TQNbUQJNgwZHKuyXxlWQZcI0MFSxzDXThXWSz4Hh8b1xQD0aITB9+lQWcBXf7sa2Xdy9KhLfMHCioMc+Rng5t86ypuO9c/f0uFtQMtFszGVKyY4c/FDwRi9HgSIbikSDcG4E0ZeXjKQvPWqsEOKbit1S6vg0vChLAnKiN5Vg5hxG6fxuApilPIhmOkwmYsFbSgAhcDvkVHnsRb5URhDnJA8FGrpxhjANL9O+02vmViLKQpzVnyJXz76ICKFhSV5MnkhdjmnhQH9Qx57gGAu6xKsT85kaCgfJH44mUND9f6H/2DrhGalBkiGNfMEcXCNhrsQQw6n3FynaVnj3zzfdUflUJylSqiteWrkkZOx0Zm55NDLt7eBuNspZh9UKQgKPmeV//2djI89WWVk2IMANAIuhO+4A0CPT3uOH3OQNbErIkuUQM8Tk3UGWw0CB4hIAjh5UiIb0UBgjG+3LHgMqY0pVgnDWQJFYvVVdzhvEaQ8ViSP30jpdY8jfSMKJZpqtLfE5AWnjU2eFe9v0Fb3gWg603yOe0dk5jgjw6Cin1FkMuZS1NRqx0McI0fbXcRdM1ejA/X03NkzkBV31KkjlFqRhzlodxPJcwpxtRQNyXTVRxwXpDK+DfqWh2EEHiflHmiUsJPxGUvhL+VkascJySKtawre53bu+Jsn6R8CTyDXvM0hC4QZGJ9idbmQ8lBhDr6woicICDrxRE/3V3Ecm7SWyh6Q8Dcyto7NgMYtKkYgD+LBVmG8GpMNTczqhdAWqkDw/C0J1N5IoiHWh3foEgfNWQ1dKVHv4lZ/DIsYroLGfE4hEh9lUTHJ4Mf6HOVtmRX+QqpcvhufqrKOBFOsQ+wFUwaTNkya7dQmiJ2y6qHEDcCWnMRgDryS/TX4UjBOxtv9Rl8NbTFFDsQ1dP8+DYYwShniSKylDgiG88iluLnccF/jg1VT3W0aEVKQnQ6cFKcTJXrG9tMYdMmhdDIb2GxDMLHSmW4I6M4/sL0uM73VViAMSGCQQFZC4IPSRrGbGR1oMOobNqopDAP/HKByxragwMTuHEJXo37RRF17ZhaBGvR3BfoXNcfO6u+J636uUdGv6f94q+AALghz+mMd+794AAeBTgRoh9qCFh1sA6XAKCuM2lfM7segt7yBCNb/lNEaGAa2U3ON1hj3Kc973BsHf6i1efeBUCQ1BPtKgbSty0w7jwqnvLFPy98t5eGpCfZOctNoIQijtPEcBjnsJzi5QI2PmQ7GZaRK54KdDiaxofviPPoGYaWhVbgKHTkAJ0EYkEMVA0+ZoFfxLItrE0RqoMeqpdSUp+7APVuuoSVfZ+lKHYwzkDTcDZPpFRCNU0WoineSuoRrMxg4xHtqxhlBZKVkItDXUPeYpBbsmRjaWkYSsgDadxelUyl9jybZlga/5LEy3tF+OEgRp8jM7943IUOjVgFK8h8zipowTiKPIoAHm9rCg/AjSIK9jkvjmoUTxlGeDQ0iQyC64dMAv2bJw9/1yWuRrLX3vKoII+HKTtzqKx5S+LB0ZVNkg6eZUqpBeVbW23j0/M9G0Jj1jOKSE+n3I/UsgZjZeOYZEYMggxq8yJDsPe4apjNrmq3Ho+faERWZ15v0BxZIDCVclV0n0lv8xHRGFDR1i5ilYgOEXOI/4UgswkJxnmp+jArwGgGOHaMgmwVXatVpn5r1GjiNjyhZiRR3XhYsUdIm3oBedQ96gs9Y3+P+EDP3bokb6losAMeRcJYG6uiCuNjCJVj3CUNAB2x38R9VtWO4PCOKN9yTXCWLmSZVF0bVzxBAZ2ebg2IJYsPlnH0IdExKAm6IkGxQ3St1UepGf1SjRIQVNKZmubWfPWN8DfZ9SrAcecOXT3omO5PprqrsmPPEWHxMD0/q5rQlt+idlqomIfVw7HkF7fD8j+LVM0go1sychOckKywC+4mDuyNOOPujCjy5LIW5AWBAjU9Wc2dxO+j/w/Zs+SyC1CRTzcJeLhmMOcnFCsngplIDQqKTzQ9QEGds7gbmR238gaqoougQLmWMoGjlFUfEtFIQIk6raOltVOWl5canE14LAZQgM95hg6Z4himASRcYnCLNnsAZkNR3ZdqY8ez1h5EQqPchjt6wGNFW9qNfLPmJsG11aaCGvFY9DDkWjAx62ROQZPYx9BcXmg9WC4pepfo14cjKtBnY0HlfgubTWvnhLAkg6zzkOpLyKPOMFk8BouoYfjOY8ova4Hx3tVTf4gAGqSPr7NXRDulojYENsM+1n/gs5o6nvYfbqsOgokx0lAfJkxPRbRVRYH95WDyETpmYDk6qVrH3CddNWUyLGMpx95xBkxMBgrLMT0R7AWOMLuQmtoYv9visH3z1JSWoGwZ75MrlNhDtT2KxB90lil4w9C8rL6E8AI2oBDLSDqb0YM/g2UFEMmuCOnJyVcFihVVGOsdd5czgGCvzHigTrR0B1XkE8rTfP5p5949okjJw8f3Fhf6dLuPdq+evfh+9fvfHDjrnSIWK6CHa6qWiDbAVhiGI1m3Hj2UpTmZanLUcDLzEaaSD0lh97WVom2+rY1RzrkiihrIZqI+LVoYTnvS4JrvoMoykBp7TSPkHoHcwRZgIfZP8W9E5ePPYPOZbisIn1838fwc0D28i6COjVEZkA55xcqH/VLGT8mSVbfic3MouFLDVfZsF58VNkIzWBcTRPu+NRRPSswDfbbRZdlI9UGGiq1UuMd06FIAC1R2LTNGld3CSXhsQfqAAfCrGlg3gIAIhIxk+S5E79kQ2D9frDB2F8tixSPV4FcUkpAepJYqc/L506/fO7U2sosSjiyuX5kc/0LT59ZBLxEAAAgAElEQVS4ce/RqxeufnjjHlOz8c2TIDsKlqzPEEwGxbeaHSBCXpKhsR0alQZaRv8wwVDzDKDEfOvUk+E+efuDKRIQpeFA0wBfqUMkQdQggUTF7BVDLDNiNJBFMtbaTVSjXfFeLHBxD651R3/fNmk14/4iDsxeVhGJv1Ejeu/bp0b1pzhOM9Pv8muHr5Y6P3h//qpf3O49djWCSxhwPiqKrF5CinMjiaWxYdYmiPJ/QsH+B3qPm+o5nIb6wPiRCmr/RSzUncYhXl1aipVL1ADUAMz6N5lCSZ9Mijo2DwlIZ7Eyaf41e8OQ39Pm2up/+cbnv/3i0yna4PTkkc3/9eXz337xjBGBc12xz930Z7ACrUh1KuddZgH+Ll+dLKtE6GD5TVs8ZQuNUitcpkrVXiRbgC1FCQWLECU/1NR83ojSSa+WkMoiAAAJuSzQuRg5F+YfqKS2tSApgd7hCfE0VwvqvSGaAbliPmkkBzw9ajznvtXBS8gJr2xfc7pdM6UbRQM6XgCO+nk2AbSA85BxKRVILY1W+s8s831V7CXm/iAOQiIAROWBi+5YU++ozbxQMpiH1igz9lQKQPf1u7RcgdAVAVJIQsn8ktjvSB4eWl/9L1//3Jnjh2x5gl4+d+q7XzybqJA2U6Sgbg8GcJQT9HSPd0T6+Yp8AaAQTfUFBnYOTEZz5vTyHkSdeXqfYiuopCC3DpAXQWfDODHl1JovWU/Q4BSaqemZzcpcxdAwIZe/5JC4YfPi0zmkzGYYWF+ismOMdJUw+SGUUubaiRlhesGnXKBT5EaYAwk9tHD0R1Ce+LupM7Xu+OkKomDB5L8BHlmIrzvvVP9Dm/hKXWXbKRYewnlaHyefksmCV6CXn+7vZcaEwnBI1tA5/34ARmA1mmvLseJaj6LP9MZVdIfLOEF9tahHn4AAjd8uynRbxFRYcK6ipvtkXKlDYyJo5oitBvHTqVA0PChu8Pjz2YyBZkDhqBCE8MkURhHeDd6QePdGAdiM6i6VF8QxfLxrJ0hzp8o4PlW89EhxMoqIEDkgdmCSEs2E64ooNPZ/+Mq5YwfXU44MvfTME19//jR6xTR3XREdonCVjC4je+AT36OKs2ewgijbSJcRV7UvUAcXxe2hBjPupdIzh2J2V8MgSkbTFDOkwd6I9fYd1gXq9z95E4khEHx4yC7U0SIIRENSuD73iqMY97G+wgxUz6k1UYI9UvWsmBMzBInCs0iDEKbT/Z+BlwSRyOEP4PuiYq3C4wN+hzL/ebeZ+c9VAaPK+n0brAuTWWcY74CIQR2hsovLvWNPjqrjt4h1u/uNXJx3wyDqiv1dloGEp1R2UvqewaTaUevKXOSStMYgKx9rKWHTvRauA4hXkAtHwQ8A1N9zCdgd3k3uoE9UNpBYlmIT+pBcpr4dx7yl4vVzL6ogxd21HOqarEHEYDgQRZ6Pl6LhMj5zhin4u8gdMSnpyI1IVe6bLzz91NGDNVpE9K3zTz9xeHNExkgZ25WDYPl4aUHTrche6B9DgiVYARNLGn37MYiXJ1tCOo0+TuMpa5MyVwqLMGix5fo4FmOfmqwFhYzySP5lBQ6StZy2q+AI0CeZ53BtUn1s2OmTKkdpOkuQzAydacx1TRUQFMo7VS4igzqrCq2iwYCDb+ppCfj6xHLdVY+pEWaIbm8t8nHkICvUmX09GVaWgzkcVGcyg3cO0fQgBut6XrP4UjoiwOb66teff6qQ3aZXzj3FDXqwBpmrMSE7//2OwvkTFrnBHqOBZRq2Vf6g+DWOBgRso3VZC2ltYhmwXki2B20Nc+lylqfrYOQv9PF4E6gLHJlpYkXRvfuI4uqSbUnAICdbzrkLa+vxuhiwWSQRW7wjJQtRyXTdmd7W6gEprSLrk8EcXj/9YaNnxaSIFO70LoV7FuQqplm5JrldApqt9M9Q2CJIxdpFLeVxlEIrY0rBvvG6D7nN0Hy1dRHyjn/WNA20896kII4L7NXc6qqbJpOUT91oahCaJnx4hqX22dX8cfzDYHQpiHBrip4l2fPl3l/2kv0h/735uswe/qBXg+ClMyf0xqij508dO/zu2v3HO6CbdUQ2C8UMyP8qr2Co2QemZfFOlpffpbSjUf1ZEmiwFs/PyERrnM2aBptcZvmVFpB2Aowhwh0qw9xv4Io0LEGqEoNIpV5hch+ojlRLm5/iG4KKDkLJLg2S+D3hiVCIRwA/GSvC82jmMZwIoem2sHFfuNQZIMMbeuy3QQ7ydBfAYySGVioBISGhd2+JeAJC7M89VcsndI7Vtj0yGZB6z0v++0FhnFa1cThhQ4X0+XEDPjWDlRESIEKSZckTp7E0CnC42rcELULDHt9ZVRo3jjpEOQNswvoC8RMhIJSqIEvOMbqtD67QKyebU5uwuQprTfftmcTSVOmYJOxfh8c1F8ZNALt7tPrk0QULee6JI29cvK5Xo69sGIqxv/MMav4ltIwoPc+gJwLkGMAxLDV7/yoBaxwukkX6kD2Cqghw8ODBV1756qmTpzY3N9bWVptm5HPSQfQ/fgEAYM01uvtLmIlQ27a7e3uPtx/duHP9d7s7D3r57l9mZimEBUjbsFafREZ+KCeQBKP5hVI6uokmipwl0gM78iFWhO3jibSP5nXlarHa22znt+nAKr309Pzck+2xTcq+JPeJpr0W7j7C9282b16abe+hi/dJA/SGk+xfQfnb39KmE+KEU42K8xm/9Xe/4s8QueMAR1dI93Is/6LocmvUN/EMYIYNdgDWuVwUXwvVJk9GB5kQXNP9xDr8/fPN5krMm2ROJQ6HGnmevDOKG6CDRG4xhICwwdXxmzA6OnnkIMF1Y+ZXJGcjkiIhJU+ZxbUJwE/nv4PUU+wrKTCNdhnxumpG6ZLVZDh+/Pjf//1/2tzYKCiwP2ThCaJc6gDCppmtr83W19aPHTxy9sr7P9h+dDOxmfwKgYcLMaTrS+CcmsePhFXUqWZkUOhTjp4S7eqGGIq3RmFZnliLihR/6Zm/C6ErBwQATx2Zf+uF+akj7ezjwMP7SysNPHGInjg0//rZ+bV7za8vrFy962qV9mPfzyxeUZSOnsGxA//tEZtBJpTmxsUxx+LjcjSN7HwCoP6jKvuofddADeKsCW+8xkfB7BsdWqEy2lBJiybDsqgMgzFqMG+crQ7KqdKhjbVCWXXOWPttDoTaiN7nH7dAUUMmYKorwnmdbBma+FyOgwc3/4xo42OmZrZ2+ux/XFmNdj0XmqiaakZgHIBlj3ZhY0R5C7/Dyl/pIaiGKbY4g9ziirK+wXiiWR8hwvmT879/effpY58FtMGpQTh9tP3PX9353FN74kCtmOImFY0YGY7p5+2ulUuJafxRTzRfHg0QPKL/BbolsJHbYuTXGTvM0S9L7VubpaW/ctJGGxw3RiyocVplWDAC7dS84USp/nLs60icVpsGhvTxkDWmQLkeNtYACrk8A0E0604XTHJwQSt82fY4bFHg66987S8EbXQ0Wzlw4qlvjDrPaokdNRA0egUy8ahjGOtAuzUw7zDDvYVJwdOFU25YPvfo5fzJ+b9/aXf1U/sApUgrM/jeF/e+eHrM7Dt6PwXDfcEEFbYhArPGv/zgOdxemyS4VUylu+NFsCHAOUALSMZBHrTABITAfasGaAYwg2QPsuiGpHQt6GtDnkFGltIgPGU9gij0Wx3ayBO5f63mq5Xc94vbc7cQ7c6FEFUF/fQI6QtjIXJylgcEKSEAP1EtmoSm921iW5KR3clZD0LCoIyE+ASRCBKmEnlO5Mpwj9bMZk+dOpWt0WeQ1jeeaGZ8HtA1Ud/CBW8jdwVGnsRyJfw7oMrxCulhgwSqmfQi+v/44HCD1FWB59D2JQUbd9MwD6fBG0n+Y+tZ6pWMVipS0/S/ODfbrkIA8NTR9ruf322yQ/gzQAjwnRf3zhwLHtL1Y9e5ROpkOXSzPdNBf7ZT58llOjNduc4UGBqABqhxo2PpqwLVAgncQSDjCgIAaAFbQFr8I24a9Ue2EDUAs4rdM+G92UhLKE0w3Nj0yQ3Cxuj9LUVK1yH4fb9Mksd++SR51e7tLKQwAADcf7wNAMosXFp61gIyiSK4a/wUJTg4koMW6uJR8juJGUq+jOYh2mnq2fkivGXIZcNa6NA0uLFxICd9X0ltjzy+W0Zqs3IAMYzMJBAP8qhxd1NiY2o5vG8zUUS/VmK3T8ieE2FTQKX7Gdd70KWGxuReH26Rvv3C/DO8tsFpdQbfOb83a6TVcOek9k6KGCg1kqzzwTwDIY4N81UUnyGm8vhfC2jiInRbnFiMJddfhO6tLwyoXlVosBZmyEZYU9sGkx+WvKGDvw8+HGW434VCa4ho5+HozB1du1chIach5ZL1+eWYRhyiksVagxYGKlewzeGmi7i2ltlVs/9EyX/+JmZT83mzqU2zgoXng8kKxQBaIGJbQdcoocrCEoEU3yEA8Vw/Ej+WkilRFAx9QnYWuLEKJw8vYW3100InDtGhA2lT6JPxmp4P/qgwU8vkFwtOf3YaAzi8TXcAoG2p+5zrPu2woO4YjO7TukmfFYr0La63di63vgz45+q1BZq2Oxl3vn2vzJqlD27kJWRcaFH7fPegunJiCLW6rTRk63rWnL7WWr+66yuzshIVJhg+njdgx9C+DRNMXRaaF/Ja0YmtMNka24sYIU+y6Jfg5/zaiTifhxQGn48SmZmv+ozzGig1Y2WzF1T4F2nSNc+uHi+dmX/GdonmqUH4wul512YDln0tijrAYrBZ2OQVnWUt11RypatFjH2kwqraHf+llspn6yPIH6ELAE3TnTfaLepx745i/I8rzNJ+aJZxxdl+K9wkO71ECDBD3Hlwc5H3FN+5euvh1o6Tl4J1vnkjKV4sF4ueWxqxRUi9kj2Dqh7PxOFpbp2aMldKtlLLx4uoinr7AucXoHyViql5ADjcUu0mEgaLUYI1IZEhn6Jr9SKVgXaayG2brGfgLOmnyPgax5LsRKmw8jwlu2R57sm/oOWNjp470XrnYXkbcki33wOQm25gZijUWNeCIbhESLFtFmgR/NkX0wOOpW/YZwX12zj8u7HKEmIyg0imGPvurxcsIKCrZDXZ6tDK+wgzBIT53oOro7X7zYWPkM0HuXBeornq4JyjNgPVve6INec4r5dfHBGaepgwaFTUL8tgQyTRouyicjFkv8kDYPU/yKYWGaJU0FIh/DabyCXG4dmqkXQmsUfTbDyaK1DCkJmGugIV/EKpKFXzbsNsEniKU+MyKTUx1jFswqMbC+nwaaQjaZWJ/dVHurb9K9ourpPe0bzvtBdi025byJdU9bFjGgM4yH/yEIAQCcJnY1OnsCB5wQ34bRxWx6lURIFRWRRdK7rk8meyVwiL/GteSG0TEBAgwkqDW/eutdv3K7Nx+vkfLt55uAX6Z6KzkzSNQRmROZCMZZaUm++aT0gKyupvJ0ZwpKBcLljFGg60s08iLVe9VJoElHqBZF6wGwvAxdB9Qgc5RhzckXAEXUzhcKRkY8ZNv1YeCVisC7iq7pZ1drhREgL8RT1P6UhUWZ0Nm3OagVSR1y1v7OPcZBDagPEHf7ERT4jmKfaLkcNo2K2fzOS3Iqh/N8a/m1I7Yn04H9MPuSWuxciPbmJOyVJxoA4IMENYaeDRrQvtwN2jv33/ozc+vF4RFkn5pa0SWJBlEBmzT5OyeKKqHGVuXbcGUiN/KNxZnC5e/uiXr71x5+4YAPqJoZqWWXIjDjBWAbEDHEnkoXJRaa/IvwGZDsBxlfaHlyuYTXMDn3D0+2emcDw2iOaLTuAws9t4zs5NAPFWYnuRY1E4MiT2jzgPSlOvWOKIOnXwP4Rg/3kig0YsKJQpF1WtVBLjPb9EwRnU36mE4gpS5CX8RAxhtYGG2kfX350/vpMVEejf3rn8y3cvm/2nry4PouzAWSblMCYHrJoeH8Pji0z1l1/6rdt3L3xwZWtr550/fbi3t7d0+X9uqrGlNJoOt8B8Dr+CUfOIw0pF9Se77g6h2ZcvxMoCSR1BcWybqKMlrCvIBSazc+2O1xakl0+DbG6lytK1NAQg6B+utNDsACLQimsXQuyOOukH3fixjA1BC4TUNoANnyz0/+9WOtxGUvYdOdHl/OCVpGbxN1yj2B/PcjHcTBchehYS0rRC06oG9Yj9ThlqhHS32E0EaBDXZrQ7p0c33l87eG/t8FO4um7J++D63VcvXL15/xF0n2NkVWIKMv1YqzA4j50aFC89U3ReE7AWYv0r6s9anX/zDLoFMFZ6p7CW3flM6hN79VhY6G9x9RiAJBQdH+RzY4s/ySa7Juhp1C4ZLhRaDHi1x9O9+/0q1/b2znzeruzfkTP7Q667lSUmNJuIfBY26UTZv2p8F18HZaVA/50F9ryPexzxU6w5xGNVP46MmRBjCF4MQezfQCkcex7ddxjhi0nDvlpdEf7kwPCoEh1TMsOl0LZ/qcR8Q4/TsN9gCd4vYkiPXEU47y94nLQnhfeQU78GkBoIR35590hx9kggQczgbAqhex5C0IIbBi3iHLAtxidW1HBPowknwDYA4MjsyciUKmOW0/F02zgaTE7N5MhbV88sAuNf1ZTBHOCDGyr8NZLV35VZ/HWSFxFmgDgjBNh9dHv74a3VA0dWNo7M1jZxtoaI1M4/ur99+c6D96/dvfXgsfcphnUOVLKgvN06BQYdGxqcnGFYl/vhKCd6mYfvGYXLrbev3rptQ/wY13vef0lPB8DuD0qNZGZSAxWhV5xoMiNA9F5zVrb7ZHUc7iMnJOthS7NUEizKEIxuJUh1KRTiTjoxAvDxUs/2MdFeC1dvw8VbcOM+3HsMWzuw18LaCmyuwbGDcOoonH0SThwsy9lfcpCCT03y5B3O8ECCAITdfsuhWYfQUIMbP7XpYxoiEBK0LQGx76opU49RZfQS3dBqEBt0n0FV+23AoMsuBEaeUh39VZiDyZJXyyGlsnYMIUCABnCtoRnCvMW9rXu7j+8FQQT/fAEe7QH4GQz45hY0wMVoeRf2i2pZBpjIT+U4gh9cbkU9TDgyoBijxf6sM0jq502EzLC7xsQFUiHmAQifuU8nIRa2LhFyEcWaZuVE8wM/WZUfN1HKqoRKcXbZCBjfWhL1pbKDj6xCsnORfaS9Fi5cgwvX4f4WbKzB8YNw7CCcOQGrDcxm0CDMW5i3sLMH97fg9x/C3YdAAE8ehvOn4KmjH9NjIMsXVz9wSWd7RZTdM6GzcoxN1MqRFRcYPDj3SzYD6P9n702/7DiuO8HfzfdqJQoorAS4AARXUdxAarEsjzfJktryzHzoM6dP/38zH+ZTn+52j+WWrCNbsmWbFk2JpMRFXEGABEgshaUWVL2Xdz5kxn5jyXz5CpDY9xSJlxk3btyIuHG3jIzs7HDY53yytaTUeaN60/QcvKlm3ygz1czkBZHtArH8nTC4cqDU25CBfZmJ+hxB2VBuh+hqyPcdfAKIiAgj4nFFNbcfZGKACFQ1H7GxhteqKBGleGkCMrGnN4Gp1ITEXswf6uNYOOPJoWyFTBY14QXD0UrxA07uNeDgh3gzXSoRnNmeCkvOqC4Ob2ZB/gATQhnwWQ/Xi3/kVzdwV0LA/6wjpxwa9t8S04FWgrE5uEEN3NzGe5fxzqdYW8FTp3DmOMZlexFv7+DtT/HzdzAe4dmH8NBRLM71YWJMNVG01LlsbJqc3PKbcCu13zYjcr2NlHwXqkZBoDvNc8/x5uAnM2pCm/EYXNgIzXP6CqQ/N2cPEEUDoEBdB8on9CFNQbyWCsFsDiM+R/NPaEJtSM81Z1d4MjMuqHgmNPtw9X2jB12NGB2emE4NMeSCfHUZgQurZ1V+HOL0rZKszu0CFDrpYVwjcHlXga3/x0rTdQtLo8iOpomMh7VvOt4aWaWuhma48yIqNxX0MfTTFgs1wI/rAQ+HgzvR6+HNu5b18J30uL0zCPPwN3Yn+Nlb+OQ6vvYo/uPXMa66JSoOLOMrZ/HiI7izh5ffwz+8iT96Ck+eGp7PWPDD/qWst/38hzf4lkuSVr4UtD4bNLagzSygu7eBWR6ptAwQoDZk1uAaUG+usnKO22535YzMv6xXPanv2zZNt4u82TPoGABRDG0uBpkIJT/a2wj8knqKaqRx48mNzmbXKmC3oVgtI+yyVxwgykvZN9gJlaOKU52LBIg2iQi6bPCD/aQGe24RlwSuTSnXiixIfob+Fx1SQ0SiRsgNXtmMRVESMSnnZrh1fsp84kzEmuKxEwg7Q1V3xMGfg3Ay4zcX8dZFPHY/vvkUVhb6k6oIK4v4k6fxzEP41Ud451N8/TGcODQYq1rzpQ4P8mxRGCvrECReP/rGrPXRMQ3c+jGdtGAaubVn3MXp6+dwWPbInDBKU+aa3NWmvu89iK4noAKPCBVhqteTZVFqw5wNQuOuLjL3/Etv1Yp5Dihnx8pD1IxbG5OdbaKVNd7ZXF6arh0eVZVrI51IuQTCvBLqGrc3pts7RMtrvHNraak+uD6qRpHHdqH1l0NJaw6FwVOiK01sXFWHJbL7Ezo0gkZORlgx7pV6972pEmdP6pQQ/kpVO0HGTLjGqgiuXb9x89am3iXawA3rO3znL1wauyc0jRfGRw+v37d69z5FWwLJQTdzzPad0KPNT1BDgPs89CeYZ5VBS5aWtK5ZWgH6X4d3AtQGKw7EegCNaw+aAJHB4+ZlBr3vZgjY3sVP38TuBN99Hmsrw9Ak4Ngavv0sPvwcP3odL53FUw9Evp/Vh3bqhnAChxRcFO7nDlUGBX9DzIQglrbkFcKQj7D0U5W+O99dagBcNdF4baOKqtq0kYgmkB1ochY4ASzOjtdGzO0A9IOJrVvTvfHRY9/91mhldbq9dfUffzi6efPAupuCYLduL9i+Pd3B2tG/+M549cB0Z/v6v/xk8+aVNd2QoZ3JagwY/qcTJC3Eci2dWkgVJlrvuEQsIOFXCeWkG2aRZOvClc2ecOGTyx+e/zSN89nn18Kb5z++9Pwzjx9cOzBD4/sHnFzyUXsJrdSlYfYdgkzTvvtpMxQ8h3e4DWLPshk332wbbu1GgGWzYl5nt3widWsw2NjED1/H0w/i6QcwnsOX7h85jhMH8fdv4sJV/PkzAzWhVm/P9Zutk3UiyBfDgnolcmSMFoOZ9TkDpdDjpFGVtYBJbzQGhpuPqvjeXE8g/6d+H5mq5pU0FcZ3aCI5pHahT7N0Tbd4m5vVwRe/MVpZBTBaWT3yzb/Y3pnLMb9bW3T4D/5svHoAwGh5Zf2lb27tqMNQEt5GFvIJgNiox9rqmMjpSt5qx6ua5D9BbkilOQvdlFjm4NJnVzvWMHB7c7t33X2BDhIVxguzkC4TsEKaHPwWEUn/Q/EEyCC+h0/fayZ+Q1cfEC5ew49ex9cfw3MPz8XbaGB1Cd99Dmsr+NHruL0zr1Y84HQKqONMsvV/BE6vjdZjgpSXwbYb0++N+sqSYe+vAIyLTQyqQTVoylSDGM155NwehNerGTu9AYC5JuYR8Zi40plOPdRsCFoDwZb1VRjWmzSKN2oFoPWmSBGHTclXDr5dbwtqZowWRssm9zdaWsbiSgS/LzSkxkt2Q9XSMi0s1sxR/rx7Eor53E+zOz3hubCzbOzj16DqQ55oNQXmQv+wj8xqGTA0nfPcbMbYYt4pN069VZcMv8Z/NkyR6n4QozBbPXQf0jb5bUVOIzigzpAiwOScLTVBFikd/wbPz0mSTwkeP/vw8vJi14cBVVUdOLB6ZD35WDsUpPD/3PF+WallloWn5GoEtfwgeJbNwYngdjYjdWibZqSZQW4jLlZSZH8pXsmdJQhmb5FSQapKECmSXZEVk1pDtYcua+m1llg7fMVK3Ouc9l/Upri6ZmVp2pEn+8pRCqRLufcJLwY+uY4fv4E/fwaPHJ+RUh7GI/zB4zi6hp/8BpMZv3FLgD66QS10banU+Jjly+bwLzWAje4RZE/JvlXdtnqNcSNwBa4s2rCkuXhW2Lswp8wRMdG02cPQUbn0faQie0rhwxTq0ME8GLtQVVRLRd7PLlT1b9tiSfoqbMIdjYqwsFSRfWx8RcsHlsA7bd3YkNjukmBVBVg6sITKaohoYbGKPokMrF8GoQf4pru4RuTSAAflDv2CWWfxp18xQyiDHspKbxhg4awfWjv37JPTae3ROn/hkn6S8vwzjy8uLtqlRFgYj6uqLCenfDLWO9fhDrW6Q+59jam1IEVKSf2/Zc/DCSAnCt7SyqpMs2KHWDFia7I+LaHCwtuwQwAJizg78gPCxhZ+/g6+/yKOrc29rQaI8LXH8OoH+OFr+M5zWJgpodJ3gIKIuRv9GcxgMRMziVsfh4NgdIQNDNSMWgUHjete+657V/CXYuNtjBjTmlt/br7ir1a0aEpCt4AA4ND6yOaKiO5bX8HtG3LdkCxyfVKlB9aXaWRWBoEPro8wkZFTlI1GDXWfN/4dLLRcFK8Q0bsk/OoLqSN3fJ8+DTJCmv8Cf8azy7OK93g8Dk8ut3eJLi4uLi8t+hg58KQ4cDNSVfohlEhxAVCO4ZhHaxW3KPb7/9IUp1gsYN9FodZn0w3Oxc2ADpShczcBH/OH7V388DV87bH98zYaIODcI/iH3+DVD/C1x/qOcXxuPTfRWUTsD23YOCW1l11x8FlyCNpn/XeEnhkOTwvq1cvNNo5WXlu3RNqi3a0tp01GBarab8Q2TXDRPPgEc6XG+rH6X3yDgOt5jGgCtsw+VdXyCm67oyCMSZo1oUK15GQ4iKcjTFKjLXsbCZ0iXcQR3PSe3zL5N2JAWYyCZc3+jQRuMVCwnHMeRlCQZc8yiSQoIiOO9wLsAx/phdJJu3h6078TyV3q7ExkXtv8DskLxCHlJQmsqWzLswIZInVOj2SgGRc/IeXJYuqB3mwywYyfvYXnHsbZ4icpzJjUuLmNC1fx+S3c2cO4wsoiTq7j7IluuYqK8MdP469fwdoneIUzmRYAACAASURBVPrBHuwDwQCQjuTIv49w7pKjp9xA8X7zg4jM3sohl6eSM1Z/PeSu/1sqYWwPUN3ss+hN1AWrg6ZNAlegEZphJ8vXMAsiOQxCIcdK/KUsZTtEqKfY28HKQXPn4ClceT9XrfvIHXrQ4WbvDuq9DoSD+94OCdt9ED0GbwUpg5oW9TIxDYJHtg22EP/ZkpBtf+YjBLLmytlt4I1e54ke2qj8XoEvnJKE9CIJN2JiRxh9+t6rs7bWYglhBtaKkigZGkVVva0YnrsUkp2VLwD4zUXsTvBE2XlcNeODz/D2J7h2G1u7funnN/Ho/QDwxsc4uV6aLxlX+Paz+OFreOLkDDtVpRwamUjcUQ5QckYp3SToX1H/UPvnb0Dr+DSAXBl22rV8jm4w62ux3qpi9VSlGkQ/RsaHgIpQEcjdWON99iNQCH6GIlAiELj25CKW7fAaq6e8dYMOnjB31h8AVajreAqgCzTNVRUOP+zc3r5B9VRmyacQFHsht1A9rXCzUNZnX7YpuEwum3hyxPFXijlIgDscqejWpU3h6LFd6HbQ7+3/8jtaENd3AcQlxEWIGdU0S+ZzwpawBhIb11IyltN8u2VUtgYDQnCieVmw1dTt2ebuBG9/gu88V3Ra+aUb+Nff4vKNKMK5RzCu8OkG/vm3APDUAzh3BgcLTvI4uIIvPYAfvo7/8EKvwzmS3dej2okwgysQ1KfRI9UJ7Xnc7Xbm7kmOBFPmTBkGdTrvq63e47VY0a9pHStq3lVBDZN66/08Jayk71TgilDZm2ab0j4msKxU6Da3EyDSYPDNzx2jPl7C8ccdUvr/sT+x1Obr6FksWKczMfONy/DfLAm5Dp7Lyr2LXOaNtuCveM5MrJlECUvVPZTEdLpBhfDV7tgA+A1mzZWI7rSe5DHu7c0SNf5eAYkzqITYks9m0jPKvxcHghme8/SI7sUgJx6J0HpN9uBZv3POWn+ufvYWHj2RP92LGS+/i//xSsrbOHIAZ09gMsVPft3qvLcu4r/+W6qKDU89gM9v4vObHZg37HkjQP6PaAhhJziCWvp3QsFH3YCS7H8ZtDakpcYAe+cK2uAVDXY4hA7vmLk2O9OFR4H9gAF7wJpP1esMkotXTDCoHpByZ5bdGxpBf/3Mhs0rvH3LuXPyyxgvO2jFDo/PA4DRIk4+7ZTs3MatK7KnZvyMeHdSYmxDzCJ2hB7eoevXSwS434qy3JEsRPNaIj8cLSphKcXALDMwXmhTm1VVzZLlT7jKidKEpw2pFEHpbCAPoORx9nVHIiS98u7Um/fDnQnrtH2tGJTds1x0l5GAsyFavbmNi9fx1AN5TAZ29uC/fGXB0hjfex4V4f3PsGkdrbGzh79+Bb/6KN/EwgjfP1eEGeMQvYYlWaXI1pGav2R5+NefyevXN2KYXlEPhyOmcPWhfVQz8QyrKtqqMQtcAWOicPOUG3+nAwCOMmi8J9vtCEx1SNDKLtDOzfrGFSe+Wj6Ao2dM9YBqEWhBPvIwVu2TEri+eZV2NhxMh3/4RSHdLsyE+tqPLQtqe2Ie+uBk/8w1YJ8Z3Ffu9CEtAnsGJOrk/OtQmNEmCNVnW1ZHD683P1ZXlxfCl1jKoIe3nC1Nq2lB3QjQTGCrDCgW8qVmWMzKslWaYtIudU55KQCDyeG9Rq1Yrc+a84rzRa3aMA1kXWuLXm+23r+Mrz2KleQrU8z49Doqwh89hQPxw/fPnsCBFWzdwc/f8fmpGf/6Ln5Z4EkcP4jbOz2SHMLkIZjccK6j32xjodzzEZRnyGYzwwCOqKGkflFz5paH9+FH52MkvKIqF6VEWAjutR3mCqhqVFNGs1uBuKcPTmgP1uH2I23qfTbimphQLwBETCDmthG9IjnUR/aX69Vy0i5HJCRRV6wru4MjD1jTOBN49/IFTNyNTKdfxOGH/K7GZiAxLesP4MzXnNmYTPYuX2hnwiQzItx6bVvHa1kFJmkTOSfXPfIL+kQs0Raw4zHE/B/HV2S7RVL12fznUCk4YtS8VhakpOSZ96/IuCMhe+Yfk3CMpM+sg/md3lkqO3DFqBlhwuyWBvetLj//zOOPPvLglx5/pPS8DRdK/YkhvBIJK/1prHiR6y0IiknNsFImCd3VTINyKZr/LDNibwA0cqdQffVkf2PW0mDKBTcL0BwMBTQHxGW1hTgQFCwZJ9RlZn3gnlED/njY3pyzujJTK8Ckxtuf4vGTGbSX38MPfoVb2xhVeOGMjLM4xh88DgJ++RF2JzLOK+/j2qZcZMMTp/Ba1JjKwPbAkhlAqpoDuxwfVE+TCaZykmsd+dXaRqbWr66AMZpTMbk1QlZ9TkmKpcsdDsjcJHW8Z3u2p+nhhYufvPue8ErEu++9f+HiJxYpGvi87fYUH3PC5IwgZ1PawIVQgZrzhigMjRFfcPG14KgjMxFsXdreijs3oYm/fWV65aKDU41x9usYLxr8HkAVzn4dIzsw5frqhfrmFYFozMkwfoZ93/7pDycJ9/zymaETkQA5FbO1kB3yWUzkQIOwH8QPrh144OTx5eXOJ3C0kNVd3o80WiciUZjp8UJQNTxQKy1E9mfDezR3L4JWfjABn4w5e3c+/AxrK5m9opdv4PXzmEzxT++gZjx5CofvE9C+8iiWFnBrG7+Nf0doWuN/vILNOxmunjiJjc0+Z4/2HJAeFqGZpH6mpBeITf36N2+98u+/vHr1Wl3XdV1fvXrtlX//5a9/85aHNuTH27R8svmoCkW/odudsoLWY2w+5DapzYO89NPo1ifhkCAy7pFxQdH6r6w2npNfbFepJtt3Pv9sZe0wHThsihZX8cz38N6/4NZnsZ4BbH57x7ceOIrHvokl56tavHnjzuefY3cLKwmRZfOv3ZBb6EL5qsljOgF+pr40pB1azHaGnb7nCRaVexwEKYoOtUXkpMK/x2BYLkNq7Pi/krgkxzvFnlAWE8dQhmx0Dm81+oey8i8DWWjmHP2BxtpK1qnETC/CvU3fh5/jyVMpHd48CmnU/YVruHILJw7iz76M//4KppZDsLyAp05hWuOHr+FOJL3RwM4e3v4EL51N4Swv4Ogabm7hyGzfMczOr3q7Ijp67WH9rsFwP63g5qiGA9vRrs1Nv50LFz+x8hkyzOhwOE2y9aNm7v7ajNSAdHJvk14m0IgqQl27B38lFqEUs+tKDrvtEwk5w2J5A1pEfCVCAMZV/elvz586uDZaWqWFJVO4cghf+nO893NsfIraWhO2M6R/a8LVCIdO4fFvYmyRAnhyZ3rlk8/f+vDUiangRwlX6iseUV/Qc0ZkBG/EcuGdyQkXaiRBeqxUdIFs5TzIIJ9culJV9Yg4xbtnIZB9I6Af+iu/czAeYXUFo44p1GmNzS3HfgiQl59EGB4bcl3oCz5b5VC2WJPTKz/r/wofJU+BhESh0M1JViJPrBiIvbniusNBnJSHjS2cOZZC+PAzXFJb1Ooaf/c6/tM3cHQNDxzGx+obhRXh+y9icYyPruDa7Xyjr53HMw9jKWkGHz6KX1/AH3+ppBMBcMYF6DJ1JFVpP7pEYMKMp1HI1s6+lU8y5qCHwxFbX6w8gcbhoBpg80nXwcC27GNCBUwBBpPvM4Q1uzcWW8xhDKM+daT0FYMwGmFhNLn23sXjiws48Uj7JKVlfRFP/gluX8UH/4bNq/lBOnAEj3wNB47Be+I+2cOVj69/8MlCNRmP3cDdoWmr0biSYqeiZFDVBMsEol5K0dhrexz38nMRlMOe30vLnAhOrIHeEusRIf+XxL9ZTin2bPK/GzmOLz+OY+u+tGahrvHJZ3jrgzRWm/rT1yolqErDXW1B9ZQz7dpaX5AcB0TPaCx/R5aKLlNAKeFP7ykZDgJ/gyzhFCFzYlUOJlOsLqaOBGXGW27wfHsHb36C5x7GH38J/+Vl7OwBwMNHcWwNe1O8/G4RK7sT/OYCXnwkhXNoFf/8Dv7oqV4HciBuRCzQwxuNAe0kg/ATBFThKchDgNZdytuwNjF0h94ZDjH8ZzTngTAxuFZHjqsnEDM0JUFz5OiYaM8wYy1soZalsMuDJG9WY4yRh9/u5jm0Nv308rXlQ6trC8t05AFn4wVVWDuOZ7+H6xdx/SI2r2LnNqbWOaGjMZbWcOAI1h/EkQdRBZM1nfDGpVsXP7v5yZVTJ6YEHXG44Ubz2+syR35nIRJ6pWt0zx90L83Tj+ZXKIcQchBtTQ4MSyxFNPhWZVl/6x6Co4c6exsAqgr3H8s6HD74Ll1QCitBIdfLVbdrSzMgTnFAP2Wy8yAvooEtjMoi9k6d9Kr46QaOHUwhTGohY/HaR3jmIRxYxvNn8PK7IMJXHwUAZnzrmdKms2eJHljG3hSbd7AWfykmCzN6ijHRa6MTFWKRfndiWFAavE7FQ0Uw7B4ODa3D0Rw5OistK33gFYwYY6rA0wZDDO1tOhAQ1LZTyMU+pBeTE9YCoJUlLC7UV965OF5eXJncwfEzNHa36VUjHD2Now+jrsE19raxuwMAC8tYXAFVqOQ8GU8n+PzDO9c2rrxzYXHMq8tsDVPEDe7aHR/CkD0sTFHtHu45yLq67e5bdKRRiubiJOYi0H19CXpBfQ1LbL18GmYzWfsIm9s42Oux941bGYRUCiBaI1z9PYZRD35CwAH3OQMn0CPOq8gZAe7J4fMQA7OwpFibgfhj2NkE8+K1zCaJG1vCyeWbd/Czt/AnT+PpB/H6eTzzEI6uAcDiuP0B4NYO7kgfe9AwmaLmVPZiaQFLC7i909nh8BWdZZ9k/RMZwFZ7kD/42vaT+5eYpTjk9Q+bv/4exzwcjnZolDcUjFMnUpZ6IK8EINCoAk3BaD5Z0zX+U/TdDGkLTl7Gin3ZuaeQgx/q4sB99bXr1ZV3Lhx7gpeZsX6SVkNnnlCNgBFGC1hOuvoN3e1bvHFp5+r1K+9c5Lo+cLDultGU0xvtAimwfo5jlVaX1mXETxDBcTE5GOt49Vn1cC6FEg1vOzSR+qaG4JE08cvgudKZoOmDeUPP0nPN/dfexrEjWBh3GBkG9vZwWT2Pt4mHqnaQfJkDZSKWdCCy9KnpVr+5tNbP3JxOL7RzrWBJq/04u3ILDx5JIehdGh588BleOI31+/C95+VjOW5t429eTR0RVhH+8zdTR3oQcPgAtgN3pxu02cns1PnSEdgT/dM1WuphwpwCEtm+dYcBzvyh4BcDjIq5Zkbz8m5f9qK9a9wEAo+IKsD/YlyQC0mREfwG7YtaOQNzSHsqtRq2dd9qfeMmT3Z2L//6w2NPTO6b7mH3KK0dc99rLYZ6wjev8a0rW1dvXHnr43pajyrctzpNCUImY6P+tVJJJiLX4GZuPBJ2vjqdABK1NVn/STy35G2hJ1MgtCKUOpMWd5iCsSoxDxbvojeaokBCxBC2aYWeYBLfc9h3iBx73f7evoOP4y8l9m5I35NmUCv19kIBhRMUHkGB1LVTotKp5NxWS0cfvBHXe/rUAHu5uU0IDYsPzj0HoRt4cYcaIf8Mc7OBI9LO7M7wjS0sJNVhbAfo7gT//Fv85TmcOCQjnFzHoVVcjx+5UTNu76QcDgAHl6PneZRAuMElWOEU/LCuM5OsvA2N1mc62GpKzBCYE19mgT5PPGzDInRNffGnBtWg8MjvGVu0GgLAFWGkIs/2q7xJb8PxMdt1TzYS+4LBsH1HRmbYdaFCGY9waG1KYK7rq7/9eOP9i3zzKn/2AW9ccnZsZGE64Y3LfPlD3Lqy8cHFK299VNdTIj64NnHWqs1AilM2S6DRkO7oBaNoSoVJ19rcVGen0EKwh9tqRRB1Yzm0ymtvOHihk5AUORYuHfoehtNnr11tvnT+I/TIwgMEBW9CK3thwtxTZkQev1Dgx9zGKlpzZc2MjR7EmP5cW/VYuQLmQCsJFd7csHczuFJqRC0E8mTMxpcd2ORNl0n5T5c7h3npgWO2qre8xQTO9uasdrvJ5529zAtNO3FN+fFVfPBZtLQifOe5zBfqE8QbWF7AdJrBCYHCf3zjo0pISVuMDrEnfuTqleYQsBkdv9B8KteaGKjVO7GzqJ6BH6nYvjnrcCzisnelbC8+2yEcVdVkWg//QowxHTZdqxWyzYuv2fT/CThwX317q9qbVGC+9elV2rl58MxD1d4dvn0dqwexeohGCxiNQCP3A9cMrlFPebKLrZvYuoF6Wm/fvvXRhVvX9sAgwsKI1+6rfR7DS32L9QtrWkk6/lF2CIsd6CKsmUOjrkQ4FkC2hcINSmH04EguLOsE+2rsiwjRrstCP9eREpqU0hC+v5rMqMhCNnA3WDtV5OuvwLCp9ufn5E7qTP9GyeJffoQzx6P7MNbvw5cexOvxA0Ozr59UVc++d1RNPcGkN+YBSVntCoM5HJYbbKKB5ituvT8YW9Ysj6tqd1KrIY81ltJSfsBNQbFBsiJY/cBFG2vJ2QcwHuHggen1G+2Dn9sbe7z3/vrRMR0+Ba6xdYOrEagCVRiNUY0AoJ5iOgVPG58DzNi8zhuXbl7dvX27zahXhIMH6uSnMPxg0GI7jiCNIXvIFnQQwIwYzCAlfkAYxSi+L6EF5EM3U5a/PHtawnwC5COYGltbW0me5wqrd69pD4oFUMx62PfSAhhdIDIDIrGUboqsMfL+1QGCkx7pBm5TYZbHI1kwwrNp+MVxJi25vJQq/fwm3vgYz5+OIrxwBr/+OLqTYzVJHMC0zpzVUQDO6/oGSgTP1JbBEoSZ3geNkfcSY7O0MMMoxvM/Tb9rYMpcNweQzyiP8YiUgHYbR7PJUxbbyLG8hSNnpwBSlsNOsbDVaQLxgVXe3ZtubY0arK0tgHcP7nwwXvqYVw5i6QDGSxgvovE8ADCjnmCyh8kO7mzS9s3Jnb2bm9XWVsXKpV1ZqQ/cN3WDI7uj5PbQyWQ49/xudBDbLN5AiQ7P3ktRJOJSplNAgckRAzubeizyS0AkJOCwdQuh5T85+D6Ho1Hulb7fWxBnUEZIIM2mlYIjv0TvXScJpPwZyaz5hEHBlyotCv2Bg4FsNnCEB1gWEYs73DlYXcQk+czigXVcvJZCeOsTPHkKywv+/Xcv4cQhHFzBn34Zf/9rgbdxlflcHIDNOzi4ksGRgYTZl9zV+Jhp2xV537h5idF+lXEGqY4qUM/n6A09HA5t0uxI2R40naxDDUwZo8FPq2H7Hx5RNSLUQPoY9XiMbhiO2uNwMslbrh6q+3yHqaqwfqCe7FV7EwIxA1vb1XSKg2uTpclV3L4qySFr2rt7dPN2tXOnYiWB4zEfXptWzYOkWFSc6JEIAa5Jp5aAu6hcaFn0E0YBAQqqyYQE9iz/TqBNOgMhlKT1ZGd/SEJgtlBFMAj+OFhu5D4d/dQRbIbDSfRKEQhop0uEY9gs30D81IqWU0cNCqVK3eQC2/9zu+vPFscl3fYnk+8rCXw09dm/1RuU2FoeL+sP7eYjLIuOrXt7+Bzrq5ljyJ88hSdPdSQKbN7BT9/E/ev4y3M4exyvr+FK8NL18mL+KI6NTTxyvHPrNuj9QNLopAYsNc8qpU7DHPkV5YHN36ztDPNIJfBs27GtgeZNlVk98aA5RY0JXDGPqJqU24uEEXOasQMW37kS8wUgq1agZ8ZjrB+c3Lw13p20Omp3Ut24WS0v1UuL9XiMqvK0D01rTCe4s1dt71R7U21LeWGM9YPT8VhxULK+hQ6K1/aiKJ83o5ciFj3NZsJaydjs30AsAhARSjye0H0qP9PItYvZ2DT0V9it3S9unCOkpSkra7Nc2pCbDD9iiMxvKXhJqlw3lYNrYlQNiQll7cMwAGZUlUlvBGt2xhy6E9Zw63EEKEAmmlO89eXlxLpwzIYNNeOXHwo4dS18WW11Ed94AgBeeR+TGhev4f3LePwkvvkk/vsrPvLaMhaTDkfN2NjEaqevHJIreoKZ0D/V8dzJ4eW4O0zqbx7A1sLp/z63BX0cDjnIcLSmOvCMiWfhMxZ1tI3omJVHVYVpndPKacXFSYPCwU/PNwhakFpbXmQ6OLl+Y6yfJk5rbG5XO3doYcwLCzyquH2iUmNa096E9vZoWlOjV5p0xohw6OBkeckoiqj+i/SgADtFqDAsmx0SgbJ3o9hDssM5v8RMrDg2wc0Ca0ep699rOHEYT57FynKHLjNjawe/fhcbubO/AlDWufukdKKfQmBbfIw8qhSKTnsgx0Aq16LfuYUlsANBEy2ZjfD2E6N8S2wtLUbXb6mcPoo3LmSY29jCu5eKqDXfPbm+ifcut3d+9REevR8n1/H4/Xj3soP8pQcz6mxrF1PGWr9HKgo8f0KbLg9LFVp4vjw4l+T+zQiRtUEM/foczRj8DPx5eqh1RgCImm+5z/DBWKGidg1J/UOMEelXB/dNpQfBjOiFBrA45vWDk4VxDZhUWM20u1dtbY9ubY5u3R7duj26tTXa2h7t7lY1ExEq9RL+wgKvH5osL7DTYqxpFhkrY9Tp5FCjysKvXtUNkFDuL8pSWvPOIqg127e9eyvLkYSnH8NqF28DABHuW8GzjxchR4TYH+ESOhF8E9vZlxlS8oVfV7xOTW6scc7US0OjpQWSUkOc1BszSuaRA5lvrRHh2YeKAp3lRTx+EtMaP3oNe2pfyNXbePVDAHj+jEPk4AqeOJkheHsbh1eF3SEDQspCJjLG0vUcVETM/e3TVO9zOIgtv4rA6uSt5k4FgGquGDWqXRqZvF/zvnAkTeDfkd4rVufpMDOIK66ZiEfEI9u0asdDRbPtXWGIApeNrR8Z08zCH+u/oLBpj7C8yOsHpitL9ahiEDeOGak3rZvarSppisAgHhGvLNXrBybLi5EP8QotShyWAbn/a+hz2wMPVc4JWlNMXjzmOIak+GR42y8UhXbC7dIw+dHc9Xdm6nQGm9DQqUS2ABDBHiG2kiEGwTclbbQpWJjQmGkDQTqecPwPzbxdzY5uLQtzd7MltqfLkcvZm5Aom5UdyKO9QY/1nXYy2NSzSlXlMCBvZ08jmPXkgcWQ7594uzsCd8iTDjY91ArTOifDbdoTnp7AhidmBrPXD4ttIZwjIhCx2vbRjo8z4KVAwM3tFMKJQ3nnoKrwf7yEhRHOX8EN9xWu18/j5jaOruHcGXPzxbN5xq7cwpMP5NEcMFIgzZCdSRcSFrCu1QfJGTAHJdluJlfgCqhau9oftMpinTJhEDODpqCabN6cpdQJZspwsLCC4CgApho05Sr5oNFMTnuEX3FH1GRxBVTyPm6NSASz4dcr8/W8N3Gi4stDYOatq4UxDh2YHliZLo25stSe8eKUrW/SG4tjPrA6PXRgujhOqPjuvgVbP+I1sgGYphGaV1cTp470ttoK2xNbt01Pmr0c83L+1/EFBN6MN5NoxhOpmL3KqWeOXtw1CJeJBb95D1s73RhlxuY23ng3EMWO3ZVmw3HSmtVI4S2F7Wn9JA+2N8BxxJ5TZvS8Mjm21RFcgC5grU+ZTD6jQNoozgrHD+K3uScmL53FYnIXwKMncPg+3JngX4Ovxe5O8OqHIODFszi0CgAnDuLRE3nGzl8pQhMg7sw2pRTTdk254/qp/5OPQ9pyxgiVcWrFSP6s16Qc4Zkneh7fUjHP+Bunq5aU6YyuuY52tdaoKqKp1Y5jwNi55wbX8TasSQiVjm1MA0sbIedARVhZ5sUF3pvQ3oSmU2KgtlRtVYEIVcWLzfaOUZDw6abOXYYLiMwoxLNDOobrKkJFsxStWgSBNkgRmDU6vTe8jhh8fg2fJ99jHBjmOxqeO6yDFAaoq2BZnMqpC69JZxPIHIG5Vwvy15FR4q048OgJ/PwdvPhI6hiugyv47vPRb6NUhK89CgCvfSQnS97+BE+ewql1PH8ar7yP//Or+SO/Njaxs4fFWZ6n5Nd+FwFKeMaRO53BNtfUbuCwejGTFM7pa7Gt+91sHKrbndREYG5TdtJKy+5FDJacdscIGFVU1VzHtyolYmQfJUwdsYAtqICOqoeA8YjHI15eRM00nWJiHasxqng8RkWRByglELItjkKJCCn3zsdNxX9+hiCCIqtSp9MpDv1BL54EHyuc3llAqh43GqnxGYqj3z/I6gsFOfnKgKnu+8Apl8GUq72Y+dmM5WDn6W1YGRShlUTWhsSfPeHEIYxH2NnLvA/ywGF89VG8/J5Q9PXHsbaCyRRvfxKt/uqHOHUOTz2A4wfz3gaANz7G6WOZc05l8M4e1xCYjOzENqrXc2xJmT6iWU80F/lq2uA2mSa+DNUnght+0ygAbeia47/q5suxNPPLsW5o4GaRuCIMc/6sOLD6h/b1GOp7uFaRjRP7EzkgjCpeHPPqUq3/lpqXVkqGLN1WInLpHtSUW8AO3nd6Q5qn71MIYY452qZlOgqSPP1AoO+eEWIhxDPb4dh8oT2P2ACGIGbIpOrR2vYPSjzC4PAiIV9szbhEoJDBmYGsf8P3YY1ARv0NoTQRfKehIjz7MP7tvbxCOvcI/vAJjF3btbyAJ06iZvzkN6k3bC9cxSfXURGOrUVxNNSMTzfw5YfymAnQA+tpzsIDdax5EQIk0rMwm0MaiUOJw4+4pOvkYBCHg4MfaBeVEkj13Rd/wcq+WVlPLH+DiVHp09a8j6q005GKcTqb3aCj3eqmHREqQC5wYgyf3SsGFj7RRjLVK1WXwjfntmFNtBghe+xcCTDTYuxc3XWMBfY8zznJv6GgF09yxPcJCgVzHn8aOpm01IixjBCjb7ER29ApioCDEp1rr9B9Ltdp9XcD9jnUizc3dH6/VGc7O0sPHcH7l3G14KXo507jP/6B8+bInzyNlUVc2kh9yA3AiYM4uV7Kz2vn8dj9HU/gsCGbAcq7ChnVSuL28u6QEPUmrGbB3e6zpWPwDIe7V5bR8Djl5mGHs+9ipqUSrOgKGOndl8Z1z06BnvPZVm5WDWRb4OBH10bD+52oydDqywiZnjrf8idcBMGJF7ug5UisEKMf4apgiDyUHGG9a9+viCPc5AAAIABJREFUKvUnHAWhJJCOu+5y3HPQaY6s4L5bmk5ZUz3DKj2Q8Sc40VxsLl1zMvCMu3yIGziS+R/VldAfiefqMrA4xh89hV99VIS8vor/6xv46qNYHOPBI3jkOJjxi/ej+M3p5v/7S0VPUgBsbOLf38cT3Y839SGpYGKF0ZPebBwh65aT5ygbXrOAf5x50kMuhrns4SBLChvhmzJqgvNe4+zQvNPCTEAF1M02Dsa0BhoHm+A62uwGh1mrYf3uMYliT+dqJmYkbjuDzc5f8orJ+eVpLJmo4K/IAboTEWntXApuPCVEV5Goi8IYjf0FjM4j6wyQ2F32nOEs//cc3MMODzm/9PinRrVLUG5OAvVVS4qVSClb7QvYKoSawyFf2lVS75JLbZD6JPl+wZOn8Pan+PDzoqPEVxfx0lk8exo7uwDw/mf47KaDMK6wvIi1ZXzpQTx+ssOiYuC183jpUawtd+Nfg7/VN8z8WC5FoEpFPzMIpqQ3lWXtWsgyAOcBgTryy3psQx56R5iDw2HcDXUYF6F20sZGxftfru+laal5Gbx5MxapIS8j7+U8gqCUIoTucTORYC8jof6A7n8vQ959i52vEUBh8isg2M/5TPOqUdypoBDhf4EL8pgkB8vSPb1B+ZSOzyB/I5K0jyJARFkF0j4H/87Tc3GdmSQxPGNffww/fgP3H8p/U62BxREWVwDg4aP4z3+IzTvY2QMBq0tYWcR4hMVR56OR372Eja32xNIZwP3GTI/qylaSNV0KtBswjF6w/Ar7ph2HEprjr2Zob9ydWz/wZ+2Et+Ve9NvseqEJaASuqDkDmKk58SrspLitIxoUt2MwBUA8Bo3ABDC1Xg8RULexOoNIp7oVx/4DID8pAqFhDvi0Q9l72SiweBH4fOquGia2pSyIxZwtUU6po38D59hMQzMr5tCtNhHmNOgzSNY1q9yZmgd9rDK57IXBgNdfU8cEDxw2aPNvbIEWZic1ZH0KS2IPXkq64ZPB1Bxx3yweiwHSiPeypO0PkDOAejxa/8wk/W0JhZtm9T4azmhLmUA2fT1hBGIyLbr1W7FR8VbV6DqGVkHw5dmmZK2R5ldVVUpyup0UngVW/Wpkta5rzzKSq9Q9UIcaNapBkESa4ciG+w/hxUfw0zfx7Wfzn1WzYXGMxTEO9M1JaLixhVc/xLefncGyqvGp7YerMHLWHk7faFahcgOO6lFpKADq+A3misg6R5M0Wj+mXYNINaiG5l+bzpmMXM89HGG4GSkxCKw0Z2dm849h2nFozsiq2gbJMmFdv3CkNEPK/Wfzp08XhemqX30OIYrIS/QvuI52FiibpSRO6YDL4xvU7j98JTUFZimHsD8Q0/j7y0UIbP0IefTEKzEFs5R2gZ5SECGSH34OfiTbkrD26YNFLQMRPueqtqLw1AMgwi/e73pa6QCwdQd/80t84wkcPdCfiBArBYHNLMSbv8o6Fs7Q7ztiQZ5A/7A9+Vnno/+m0YIV46A3PrXjxhdUa3E8tNikMUYV+XuCyJLaqDuUY8D+f2rYJRdD78cSLb7omqRxYmhRKhLHEXeq+emPU2KVBIR93BYhf8ZKIX0JPeSXomU5yIqkQ5CjJUkKbjQe1P2dSF+E8hiWinZXFOfy0qCd9JTJEh1iuGjhBHlIKphxJ1A31mv+hEqMgi72BWWrxBdiC4CTyDOwXBG+9QxubuPlgrdkB4Sa8eM38NJZPHRkdmIS47YwFtq+CBBIVnOzaA7Xv+PG2+hgDPIw3B4OSnmjBGJGTcxg0um2UlHqEGyOiCoC1Sw8j5KAE/TIxUNE85F06SMhoiqHuJPFEKuQ1KkysHzhmbWBckfSxQhXVjwRKRNQV271mDtTuKhSEu8hJCj6+XSpmX6rfHd3790PLmxu7XSqRYQjhw+eeejUaNQtIElLw8ClmfxaSk2S+deZIO3lKASvWdmL7bgGilaP97rj3IxuJAmfcrc8jM6FhTAe4ZtP4ie/xqsf4Fzy+NGhYOsOfvwGTq7jqdnfTAEgDmwZxIIzdnFii5NmFhjl8bP3Yuns0CPDYa86LxpJObvcnAA21NKRmiKgIowA0m/nRpdStySLSWOF7XrBnZhcYAlzQIg1mmjREV6pd2Rz3Du9m7cjMZsf0+8hBblUP0+ToadLYTlIsy1C10/tRCsfsyv47fsfd/U2ADDj6rWbV6/f6FrxXgRX64cOYKAm3CkJrlwKoUNsh11Fqz2CRPvxSEX1KvBoM/64KkuVzw4HlvGX5/DJdfz0TUymefxZYGML/+0VnD2Brz02EMXY5KvERLu3MSyPmDaXgqCwZzEvheHb7K31e6Rielpst9sjR9NGUG4qcuFx0kAFtY0jc3ilULcDS+FfjEENbP0Y/K8HwwkXKmA7ugRSPjzZvZbiTcGfYK9GQJ29qxjCADovnXQR2COndSpgL+LNuI1nRjgJVccUhUN9X/cQdIRkCB4GFTZw9KJEathZErL8c/JSwhd7MefxVzLInqbMNiuMva9GBuN8PML3XsDqIv7bK9jYyuP3AAbe/gQ//BX+6KlZDxVtwDsMrlemioDoE4Ny5T0LWGIhBtk9oY8+8lor6bM6IZXFD7lFIU1aKGUCRvr9WL8pseWBcg568uctCOUwCyeRCL5AveYxkl4Ew3X7A4dKL4G0QyAgmFiWwvsuROxZgTeTFW/tr4j7+N3za2ZyNgDgyUdPHziwWoRq0yacOHb42JFDXSvuLySHwHHp8mk2qbqZICmlFIpIpDzRitgs2KnNwQ6LwcCyi3IL8SA9XT4oLIzwtcfw5Qfx49fxxscDpzo2tvCPb+GdT/EXz+H00eEe3BCalwhkelnNmhhgy5tW0hLPNfWFNpLNB+2dofMeDr2C7UHL51+IYNIbbAWDcdBhYhcg5qqiEWPSvJDUvmEYcLwPcC/4HHcLIhG8UxjeZfFK3I0j5z+6ICQY9FEouE7KZVTUynyREkktlebRqHr6iTMlmD2Braki92aiFOp+WGrXIpeaXV26SIDrwZJ/Lw7JgXZSWlxQIWAmfl+9Rjtvm94o5F7aUfKXdYKEknv6OgIRnn4QT5zED1/DK+/jr14q+hJKGpjxxgW8/C6+8ij+t6cGfX5FwWUi1FWlnQbM2eLD6QCsHNj5Zz6yN+DBX5kONx9yUwFsu5QoNhno7yJUbYZDxbJtYNuSM0tClAQ1eTOe2PK7D47L4OvrARZn6xAEY9zNxZyHG0n6f2XJm6EZ+B1xVEO1xMWl+rJfaRHEBKywpvGPEq/U28RlZRK7SspX296gNjsKYgIl4eyIgyEEoMM7S+MR/sM5fH4Tr36I2zt4/H48eQpL3T8cv7GJNy7g0gYePYH/9If9zxLtBxFhKovflWhKLrOUhpsBODWFnRMBGsb5vFn0boe+VVzXwBSjPWDEzKiJuDHqufMinfRiwE3IPI+AUTtWpN9IJbRHtCp/wlDjhgypw3XaM65od/eL6HEEAaSRY0uim/FjuN6HtfnMSTCQVWqG37MqZqpJzWtMFzosBgffkZ2BCE6Ws46kdg+MMr2zYvHWWdUmoGVev+MdLnKyxieiAxR7DXFP/i3xdNgLCPxOvDk7PyA0M2AfReAUwko/kFXSzE87wlom7WxLALE33qSvdpu3FeWjukyw07TeNEx25EUgss9zolZ79QLWCwKaiP19Ueb26GpX6Jq+seJGocIc5WzGDu3LDK0SncHVy0JFuP8QvvMcPruJN87j7U9xbA1njuHgKu5bwtKCPE81Y2sXmzu4egsffo6dPZw+hu+fw+rSHFgEoIbRFkMGqDn3Uo0mrFJTRU2UQ8FE56iYK+IRUGl9S80S0Oq0maLOw299eIRq0LQ94asoH1cOc/mWSgiN5ILRfvsE7fU8dGYzAxXx1GjsXCAa+JdfRF+jCJwlEAe5tHvmz7cCMwrMHORtQJIdSd0DMqrXlXat2BUR7/dQpfOEIG4k8zMBQ83GwH1MkAsyKOZKOTocrL4UvX4c9oITB/GtZzGZ4sYWfnMRH72DvQmWFnDkPqwuYXkR4wp39rCzh1s7uH4b0xoHV/HESfzZl7G0gBn2Us8CJSMUxbHij9ZnsZTjANJHhhYxwPPJr+2Tw6HBfqoyPwGtiCoiqpmJvPgl7rJx8vKLBJGAsaSmcinEcLGcDls+elCrwHVMTl60Pjn/sn+7gJR1HXO5nFzRbEJ2l0VUyC6q/3td44JSFJfaJSlZ6DI8FPwIr5UioRBbaiqR3kgzR1YGgq0E7Iz6XzhCX52PTLpYL2BbW7JTRx5yzx3cH9Ecj3B0DX/8JfwRY/MObu9gexe7E0ymYGB5EUcrLI2xuoS1Fedb9vc4RFaWoxDn6t6ploZvZB8zHG2CQ302FvOTSq5AFUGdxmEnVAO2pIz2nNj6nYBAJ85teKzlI02S58LH6ie4SSOUCp9kgZzUWa5CrCQ9vP1cpv0DDn7MWBrejJXGYgY2A1iSzvT9WSOEOq0ND8VFdwiUuKdRZhxBotbjYGVmZvtaVmaFRPJGEfFTfY28yAv9PGWfoSKsLe/3bowohF6zVxrbIJhOH7P6hIoV0c0ctAiNsJG94WG/UkvtF1+IQTXrD1ol8g2zQPNyrLNKIzPIDkbr1McrfIHAfJRKCv7ST2hLlE4sfeFXlyYx7kEGFHIJSrlqEqLsqWsSR49dpAx7eR6+2Hua4Sc4gtFg6aZTnhxAwYHgaHsG2WiPDp9vCmTEUV2DaEjbn9H3mAXD16E5OS1UkGP8YkL5AScesItDQDXPoGOuDse+PlJpHgrWjJqaISNvFQ8B7eHpI6IRaKp2dbX/tm5P4kyVeyB4vPtQ5Ddnk6ipqXXNbwfh1ho9ZfJFdvzQNyl57gdGZ4ZA36cy6llqlDen8wedoInFauk4bwiYxV0DEDCnsyf6HTUWJoxg3enLQjyDYJK/2RRe7wYdv8nK7OiuJRMccbral/6CuxvN6wmihplBZtXeXhWvmEEezoia9AYPLIAt7O/mGULzcmyt4pPh93EoNVARRpXJO6n2PYsjM/nFBiGK4whCsnY3mEVFCexFyc06u8oaxNgwYUxKvMR4PHV9r0Iqb7zPvej7UMMHZwLJuCchfTfH0hE8cmHWTr8k0vzuN5Yp9tr8RogSkU6Vko49UQlhWheh/T5BXWdlvyjYiLnx5FuxwYHml97Afjoc1P6PuD3jfL6GvQJV+nBgO5klJzG+6F5GCLLMFY+Tq6M7NJjMyHZw5cPotYB+Kc2IxmXhV47U/4JeMMT49aDhpDeCTAG8u9150REs1EOZuSVd+4xgh+XPAG5uf+H06s2dRJdVtiwRbxQ8dpGfZA0Nc1JQiQ/ODQ3qTAzrBLBIy7O4cI1fw9y89Ow/C7XDS8cR/V2NMOcFQb449gTDBjIITAEyuf/GZj+SVmkK+zxg9oANe85Nh72C5JeEkivPspR/4GI8prsuohz/S5d2/QupIXvociDAUnmue52Kg++7srMiYqBTZu4KG2x2w4BVPfYQ8hvZ1W14jS5PNqmfj67enddP7yJcuFaJWsB7ntvetJQOmXXtzItNwftrynscuREH4vb5w7zSKJXUkeFb8oS1ZpKTHL6D0LsproAReEQgoG5fi9H50VYbUPvnVW2nfLAP2/7uQOt6y5lWtheBl2pwshOSMVR7IshqRogJ3V3uTiTgkGTog4kcVr3Ti4rZSxgoNswDpF9Wp4Ajy1IIxsjROMbA2AvD8ohF0WtWjD4dgYC6vms563Q8P8elYz7H5Fk9/UYn2y8BkIfXIgBqMG0KphEHu/UbwmIBzBqxDC+i40ValoHmwC+/P+Ja7ASeaOswWy1zl7r47MZd8Oz9qwq1J9OSpbc+GX2htGjNePvTkeddaOXT6gctW/6sCo+r2PpFDAJXrYfBLMjUTLa7UW01iFm94hHIhiv6GZ9fhH3yQDm4dP15/+dMQO3/iagKzk4vHCEG9r5IS6WBPaYBLVh58OQiyOPeVTo8Kl2qS8FbDjqxJ5muEgIODnO9t7fXpdm5wD6sEruJmieMRkjF/Fl/sCik+9Srx9q1uataJbHGMpuP3GAsRdr6ubVLn9/8AiU5rm/SrZ1oqZPH6gFz/nwwW4eVlkEf/+buSAMDNaPmmTyyFBCo+U49EYUf4AxH1HbRmxuM7Xqu83svwh3GVBI30v8D+q2ZcChJukzHzcHdXtG14OpGG4zVdwdEpJEg2NOeeRmUmrGzE1dvv6fA0x3mvh8M9YRMHute8kFRlORk23kHL98yp9eedZLNZBm7NOTkCtNj0ij5Vz4cDft913sWJjV+8cF4WldAkTrhcCdwMBnk/alEfZZ2MddOU6r9kgxeT9gvh8Nd5OZFlTk5HACa0zgq6VMLNkQyLFPG1b0vnMNxbY/2Ii8OeSY25UDExDUI8XL+AwXEbIvRwd8vzq6Qy6CElTdXwYOeACWUfNH9SkM9nV65cq0A8fcK9u5c43qPXYG0JmI2oVDyRe69bvo7sb2mwG1pKMD5NZvvQd6/CM+dChu2gGE2GMT8MVBk7XyyUf383fEXIVn8i/fHF66NwvuNL9o8L4lByREd9jOOCDr3e8yhG2Gg5tTXCmeHfc5wtEd/Nsd/1bZuHqqPZsy5OY1DnZGiP1zk4FrgKi/Ca7er3S/Sa117Nf1qc5TXcNEUCETl7BoDcXuHJpG29wo95qgWPfewdWZp9eJkheE/wh7pBEk0fs5HFwbj9Td+s7t795+q7BvU9e6ta7+UPmuXCV4i/jE5iQQ3/yEchuwg2BEhwT7yy0LW8aKdvmBLF9k9oYDM0Hba8go4lFwKbxfTdYeYrFEE3r08+qd3xnu/v3mOyRQ//+34zU/HuaxYdm2nPNVKz1/Kpe0PbD48MkfYP4fDHqQ2yaFW4nxa4wrcfKpef7zP4YCcO6HK36zx443xzhfjwcpeTX9/Y3RrGg/nLE2YlUgOr+I+uc5YeFXl/Md8Vpp9VdiCn5uW2BNIZT6AK9Zwo0oLZXNz88c/+YedO3eKOJ43cPAjVhoicL56Pd3duPT308ktDyn0cHvOoAzyjMBMBiMq3WWgyMW+STuIyDtEpBNGU31IBtQGwdrhYQXiVDPeuTT+0RuLV27R79ke0ppx5Rb93a8X3vp0zJIMm/SGHfV6QOHK9svR0gldmsGCdYb5QPD8Zmk0Hs/tG70SEMx7IWPCGBXF9inyzCNJYKIp04QZqEwStl3hbk5bympt1/hop1quMNJvufweuR/M2GNs1XRpt/rZjdH1qe99Bkl/koviCJYujQ0cOwiyere/CYfgi/MCA2E2y6ou8E+Au2vOXFhdaqsH/gHZ1T2x9ao3KBH+U7KlmvB52NrePn/+wvLy0mg0aj5ZOOe9ZS18cGHcshXToRwvLQZGzfVePdnc3fl047OfTXavwxYqp0Hy9j1qBE8oJb1C7vA6E0RadIIX2pzqAtgpDIs9Fsg1cye9ujAT+B1pzR43H+02Qk42ojNCDPXyjMuKCdXa9EzV+hsKTdnappBu79A7l0fvXR7tTbE4xuIY1Yx9u3swrXFji357efSzt8dvXBzd3B5RJazNFpTDET2/VduVeKxXESryzdCMH9nxGmFUU6A2DIVdiba2urqSIL29va1/79vR5q7uIZVYTJmhng2pmeVm+Y4qwrQZP8qECw6P7cVmjZ/fqBYqjCuqvGSkjW8tWDH40l/cYV1k952hPmsbs7m6BWZL43JYKlW3FIYZdQZqxpSxJ1jAtLSZ0hBvRu84LhTBG0dDOKVDgDIgJmEzE1NB/SZFFKV5e/P2P/3zy4sL49FoXFUVpCDftSfGCtq/tViom+RZbhvhzi7ZtKh9X9cWT4cJ89KqTgm5KlhAaMW7Zp4yqydHM4mX5AFJLmRYTa6Tmmq5IKl/tNUZMMLsTMqT5hKguDawkKiucXMbv/hg/IsPmlpAM91EFREj3Fti0Scng+KWotWe0W+iUSNsseSX/qZ4jIGKCEAtlUYzU90gP9xzVXRs5avcPRwDq9hx6RIbAhy3GVQDE2Cx1XpKzmdca81LKQwCMYOIR0QVuFYNaFurB9IoXTshRqzvMLDLtDdt3T5Lx0I79daSgA6RW/fEpNTI1uVem2Q5ubZLY8i1DehjGPQi50SGwPhezRkSLJZCU2+tW0wAjC1w7nlftdbgL6OAPQomnNzfrfS7tM3cedWk5xtk/WcctIBUjEOXLW9LLWl3L8eez5HfehMdcXDfbR56ul0OmHl3bw97E0cEfQKOzrYlkAyHrdIVpt86mUiA+Hc4lHzaDDCFg2CdocLODLrVW+YdnRh6+3oHhu+6tWtSU2jHz50goytYfXYynKC2tuxw2xogGDpDDq2qin9pckZ1yI5byQDZb0eIa9OTZtLpHzai5QOZ2+rxtVkDapBaxeyLFqFqUjvqMJKQOLXJRSZpS7sKyM1Aw4w3q/RMo7uF6u3HtwAwk6RFNX0xLAMMewiEQXchN5EsYmgxqoAKqFj3DHBG0pFe+PcdZiVMAjBttBuDHMyBPYHYHo4Z5TwALQjWKNWgSdtBVpaFZuwhQ7kAilwFjJoStrAIjmoMdLMjAGTMfQRM2lUrNcWOw13jWrnaUec2vV0urDm0TS63QujZ5RS4G9akcou+B6F/Iluj1AcuBYNud5UsFCk0t38kxDI2CM4y8w2+X1twCJQWcdoP6HiKyplIQ5y9WgrTfZXKGF7njtNE4Nf5LadlQuBB+C2BGQER05zJFbQmDKCPIuwGdTGCVl0xCt1li6LkepBVubnr+U0h03ER8JiSJdwD68QvV0oGAvPOgXYymL0mVNOx8B7w1aW6ZV/FuSZv7oy+a3QZQe/sh7VPQVgTbvP6HhFU3BLY/GbpVA7L5PxJz+a8hlr6oj0n/QZKZARsiYr4aqll1+S+q3bTKAuC57KTNQeOZbNamTRHiyX7Mjvs06ZRFcY6zjWr0zypOfFT8Lp6tdXqnqYZJsKoqlyBDf0+JO8UtDcrlS7tpa/l0tkc1YLaqeCnlKLszARLMsVNwbDHqwsOQbbrmceoXmm5VISmLFZ3Vie9Azel7sgsMLeFEyEdd75kjK7ghheekIsOy4CgPAV1VrX6CO4gjYVE/DuW6UolAFpU4Sei+lVuMXHpe3Ke7WatwqKPXrqosk4Ic65vQXJxWSdMz02h7PPH2xzg5pjiRstb/5ex+7ZCwHhUkS1Xxgjn2gs8k2QwKEWXdnQTpgti+QIZZlLFomNs2aroBuosFHdg33ww+7YQ/UeqZr2lFAKbcpJREzzGoZN85EFmyx+DYbWNRC0MQjsQCPBlAolI0Ksur0+RXA4hihX3x+frL6o4TrfjG9Ns56UQnPwfZoMEuTpPIaUXl7RynPmzuKaQuETfKGMVbLoZZONvUMhIOCOp6c8npSSynjWIqV99uL0kJBz5K+NGNeJXm2f4cpfOnW0feunTOEitjEGzOWqRNds4nFQRO86NZTYCjSs47cLdJBdlTrBhTSRh1mQ0CdBZ1Mqxy/obfGPFqu0MrWwzytiPKuiy4DTdk/jsdkp191qyJfyrGCTSQITFJDseuYj4UTACcgomHiCxLcPlLFrs5dyl0vyaQy5ePf4ALt9EgJDoX/tNJ5GHIcDsqkDwOCU9ei1/AkldOdwzKa7PiCNLtkMQa6Ytl/IT4dNibxhNYWJkXT/M/df2V/pA3J+TDYuEViGXR+0AZpFCWV4Wdk7Oy+nYb4fDDgSbSayHXWWBZBBzRagc79b5ZbnUroUl8zME8vAEiWQPnf3f9twnG3HXJDs8x+xBSCaLkCsts+gaLBdD1lmu/WEPL/C4+4qJVD0wncLy53hpM9wh/5BHK2lN4yXiCCSHKA2d/dH0mZnZDqbZm02Bl9zNkhH2jLjeQZrHTA8cf4XNP/MMIH1w1RQzUjs1EvW9yYyuFq/AaEcWkC386Psjhf5eUNuVPeuNXXeuSb/sLpIR+bfLTetpb5gReYzlCqJQ6jrc83BIW9JQzsdcJfSuZDgcb3LCqMnafTxIZ82gMYEJqNwQQhAszVB8Ttn/HTcAcQI9+8fhIi0HIYaQjEHMJBfGePLQSrS9u2UxYspbKh+S1OzGV30afG9PZjfrDkoojp7OjkBK/gqdynipQJxjEuPcirIne2wRkLtPPpJUaq18NrrB3YxvxR6uzyE1kyqJ9sKON7zqFGINBL7TIx74le5dM3XRtaHsudhwi6BmP2ZyQ9UmzisJ9+Ax4EZ53vtcfl3bn2BrJDpo2FSCppiW4L/ZZWrH6AAQehPcxPwc2dM6NOzf12LZzhya+zQF1wrHIM/c9caXp3bCeFxV6p1UM+YR59iDHhMtaavEfBYa9BKT1ROy5gopNz7DgC5NNhCzZ3EdEDHPkkoNmo8MOXtimGTPJ1TmYhTNkqN4Ux5V1rzF1HQf1qTyGReqb0lSMxhMj0iwF0O9lXnOSZK8F6FtEkR0SOhFXs2NvPQ8m61bAav3Z8XWyKoYNibho3mtNxebePrVV/GBZ2fHmGZohPCeAPfpmoATe5asinvP6yBnfCQbaFgTDt+cjyzerW8HG2GOnt8+U4eNoLU+R+XlODzZi1rcmLpuFIkkDYOEK4JQR+hZRln6+mCuOuILJWaz+kNWPQ9FqiPMc1HPL3odimaEw4SD2b+BQWtzHKkH4xFfZxDa8YryQh8UrAxTnPWZZ1pWhfZpcino2rybEyk7i9txMRR7bYIkjtyDQ3J/SyNTppnbglTE0QcKBJpjBbPCfr0W254poi/bfxlUo5oyuDl6XJnx3DdeM6DcmUrZYB4TKv16Cjvnv7Rn1EGQyCD28psI7jDaVtr/OV6O8mq0wIsHhNoBQyNqYaBtOe5qwcRUpZMeMWwA7D9Y9Wm4p3mpqlIAgEajeNFc6J0HK5EsZoQ+WATDjzm70qQmUNjCFiLbt5zxDw44EfSOIWX3t4lwWKhp2IM+osrPYIhHdIR9CLb82TwEb/MZveo2EbRiO+K8F15QAAAgAElEQVSuHPopSb91q6O+DPpzKb1saAuAxZ4tQqZ3Nq/OXXK6b4WyelE7BIM42Jlxtu9rEdFr268tyrhZcqTZc1q0fnAwBMODPUPu+S6kjiuMOlr6VEYDeoiMwWZ1yoQoxi510rJin+jl0lUTa0umqzoVA7pT5lz4oC/M7FT3hVo+Dkx10D8G3nRT3Y3FeTF+zFA0JBQDjfGwVVVFoOaLYM7y6mEa5boMMFEN1KHanM0Ex2AfMxyBymhmjZnqdgqFozC7Atk/1UKj5jGYPlyHPLx4cBMFN7jyrZqAHjgNzsu5/pp21q6jJNNcGsFNonWBwCGy2XC1ebR2EUbIslWZHYtmrILjTuU5IOG34zHY5W7zgrF1yzMQQTF2M9n/shlNmCxZvJzhT0+AWNpVIxWyF8MUmssuPaE89ENaSrZr4yHEVYQ514rDMfHlM3T2omcEDwzNhtFOVZQ2yVRj719V1fRdONk0OiA2ibTBNhOWUXi+K+22zNrp89izXB+PmuVRWNpbYEFWniJ7IWPNryo4HtW1XeKfx2zEIYJ5dXPe0qdhfx+pmJ7ZHWRWz5Bm96iUKeJQukeVPtAuCGxCpgR+Uv5EBIZ1EYVgKoYXFKV0ZWh9EsRjtJK1hpDnlHPTyd54NOXi2WcuOMHQojrQ+g4Fwp/B7t1ICFUKivZ0DgnaH7cu/RYjwx1d+b2mJe4aOb60j1bmYg0Axmp7Q5ZrOjN5rZbpyXY4c7PVDz257I1U8zJy3znrtgwcf0Afc10ac3aDrDc5NOyrw0HeGkTrXiona/gkjna+CRhV+puItnZKe9EDMuGF0Omelro6as1HVl2HNpIYmaMJCz34OA0TUAiN94d0g+UQ1dQlTZnWZu6RtECKiGY9qvQcca4Hca0dZBG6QTKBkZuRrMUU1754QI/ceGF6xQNbKVknms8N1IdC5CM4ejJv38mLN7nC0PwmMYEQaSP8HZsdf/o83ZXWlAW6Kqwg2y01vFGHNLLUbBwrZTEP370xHjzvV2Ft2E+Hg4Mf7UXNNA0lYbYlqGVbfaOFR82R+tqjY0De9SlAF17MZ9/KiMsJv0RtgZlsBG/rhM7mryABEA/zdGl0TSbGKuVOWZfB9w0LmLNKY1/okG0BBT9ZKtPX8dZLbE12iGATCVE66JH4BKURSP+MO9QN/8EMttWF6L9fUOjHMxGbyhEEv7p4pUBMFbCDIDTvXJD1DZW5Aqtv4tmNm0KpSjIYS0uummylbZLaicPRt6uLCIH/kRjD2Cu74YllHvGEu+m6CznxiAwvRYu5cUabFVW1e0WkjSZRKI1CtO3pRH0WuDtvqbibcFAT1JGj7ubSHqDXiG9DmuO/GhNQok9mB+OY5r4j0Ikcmw60rpRBkLui1qRkD2wXJNJmlqk0QvHw9uU/k/9JFgo6jN3LUE27QUjcwYmYL5G9eFBH3oUcEqbVbmoKKHZhSKai0OQIuOx5KPnlEA0DPSTfZbdmMBvJ+rd8M9AlaEgCWeFNxAWZlyJqiId+RapvGXdEG+z01MdbcHLNiY4nUg5atUr+aSKBItPvCIE3FENJayd24l+PuBKaXoaDIn8OMPRbovvkcdyt12IBdSQXQE2368H9LEsQCajAzVMVp2iGAKMkQI1VFMOj3pwEHr/dVJx0cdcznHVhXGAvUL+OO5WAXga2C0QmKv/cM6Emi5hL4ngOjzwKXskcZpA9+oIXX+QxdG3XgjTtTMtss+caPtfbGEaaQiqW6rFOHx8W2tdAQm/D9XWlLiY7b1yn6BmacgLDjb3y9jpa2F15ecrGI0Aerv+N2yh/pWvVu0OZqs0nhIH2/Z8o3z2BPAnYL9ivg78C1U1miRGDpsbVAtMA+QCrJePdjYgq/a35kpoGOmnsYv5TEYD5t2BRzurJF1vQThB1d4YU8bJ0VVylSrh5miUhQZS+KB/BDY6Pn1spk2CI38ua5FRlj4AYLGTZizlkcroh1r5gM10L7oePGTNq3+ith9K5kiZnThZ2NJnUG5zuW+9eBszk6s8Dyp3R9Jiw9cOf5uhUO89rEotdSsCQ8yu3Rlj8Ges9a9uhJY+g3zmW6/QAbVxYKaN98zn2L8PhDHeQP5LPYRi0fQKqxuHw/eu5NSv7Az2yG1bMjyALgEykkM1/zB9mCuCC6FnDMPwXTH9HCemEnkfumSYZioOsJp1PA8DcBTQew85xfJXlMEfw7GeECZNOKQrR4yDOTX/dFiuMJWBgG/zohgyNONsYu9q2DCjyO1uPjCfq0hhkNcxb2DMwLohdBgECzP4MLeoMbnZW1Kj2GGNuXgyuQc0up15c6I8ksN7AyTUxUC+gGjWEmwd/RABqnVt15bK5aXZbsePctgGKs/ebLAKk66v3vJvr5pUcJgvBHhHTTvtfW1v7twRiaqpbzRHAzORETFZ1pwHVup3ibFH1lxG8PVte/s1jz4Z2XNUIaQbZymmFq1c3rbcRGgyjcEiz6/DvzYy+CjpoEzIjpejrG23fVXUxM2CGlNl0WdOzxZZN75zxsR1tabmZj1Aob9wWIWuYfAYtYbWbcATAhE8BAVNGVXNNTpV2Bpszi7htIBwkr0MMZwTKZlCF5jZFiz2bnvuR8Vbo23N92COomrfuODPogSLQPkxvzwgkoyC8WMkaKadUiYGeOo1F5kMW/dWuK+5OB9o4Vgk1WUPOzM2127CWHX9q9CpVvlo7+Mr4s4PA3NB3VAUZ2+keWG70qJIurtXkWr0xJlk9KSJnkg1978Uci34rHly37Bmtbfcz2Gur0fSBad7IQHPrdsmb29bW2Hv51Ylf6lAWAkaoR80VoeMei8x6ZPVUYcpUm9neD9ivDIdjyEksyZxHPwtYFrJqno0pmbYKNWYROQeC+SURTQAt0J067urWCFMiY13oC9ZoBnAIUeR+GVgSlK1dRL6b1KWx+0lQDmKjF8EIBijeYDhAsjxGB9L3sFRtCrAK20+6U2UQnBgrtWDop/SztLYTpSLDlt1xNI16YVWo0gkc7ZpBsBVuf1D+RrSdhIRbYy/JToQgjGCmYn1OXQZ+7dxAYlDHGcExYzIB9TGOHv5AHp/V3z7D/p40KvZPeZGsXlTxQphhmlZUK338V/NsJf/GinCL4kXpir1BFDrX/Y5KWV8+nAkrJuJOm2Tv5uFU+ux1bkMe3by9LqU2Q/2UVu53HHZ6G5NYkJ3BAWe1kFT/FiX/qAhKBjtOzE1AzucEDsEDsgN9k1FIOWSxDSUdWC2zZsJYpZy5HC8m/ZVsIsdTeFoTSb5U5tM0YqYpCzrVlVyi3SFq2PbZ59g/h4Mcq+leAWgdDmYilT7qPxSatDN9AMAV0chd6YKE68kuZMFEKx6EDrrfpnVNYQIzGv/5d5yQLsd1xsvvEMF3mCJxX1L80CBnjhxRCbl3K/tHksuELRkTnDmrdXk0fPaCwjhCaYzl26PUtHiEDAOzqpN4/TZIK4xRg9URW4MeRoZ/+X1gKx5I8x8rtz9yFOXPal9q3FT2X+dRTTTXPV1agRWbvKWTvLAERjwig+OOjKht3KbCYnG1WpfJ3mY2K0RCA2tha9mKzK6obfp5ualTz5Kyy/582VNC1osO8wC2xWVfDoLRsG8fb8uUMFCDm9M45sUCA81HVaC2iIRfBFMc+QzLuRnxhu8zGKLihX/TJppTl9EVVQhZ+gnooBT0VRglJGmFr9RFcWWHJWuuyso7eGBefZfjgmxUlEK5Vih1aLq41JJ19qNACUSdnzlZIFDpBUghZkRiSB4fx1lPDqDvgHSal0Y/KKOrDcwwQaZ8SrVScSKf0W+2tXNbHI5IYuC8AOKIPgXFKZqC55dVBwgGlYIfuQRKxl+J+1uGhogTN/D2ZsK+x28kwI9+52ZqU3AXz+EwoAOBGqj1RqDZIQw2wBVhDKoIZjuooE0HmutgS6UvgexpHMHAuug2d9klK4MVfwslUnvBRalNSxRmF62v0xPWrowZCaIVsnqMPH8oEJ+kYs60nuEh2YRf3Wuk2xD1HmFpBsPfOQnPQYo938XPuiNOPkQh2CiOBSzhMC4T4RdkB/Q8VGMN2TDBoVrMLN0CjmL+dHS+y2TWckik0C23NqPOryqxEGzBUC5N8P6O7N2KAyuHqwGCoPZtUm1UnKCSh4T+Ud8SYfD+pjdwjzgcANDsm2U2blfv1eenqZxLAkaEkbVdKyI0URYENya5xMQ7bkxVDn6DXkjBDoLcuxjFHqWlKMZBSCGLZX3Yy/pDaX8u21Yqp2FhDGY+5gDFaRAX1Azm1VQiRu7QXMfqhj1jbKOgzbzYG3KlJCIxGfL54nnre25fkjItpd6+Uiiqsn/bZjq249M21zaBjDtiVk5uSIwvmJuO+OwG3ClEUbkjw7OAUwJyAqh9AYosERwQtBRwVh3PB/bN4ZC7xmrdU/ulXxtv8NFgAJV9/JfcTEzoBuOhAIqC1yhdv7zcJyhkYDaw9FaEMzk6h6s6y6Cg74HzJ5qXiBqese0sBZa1dhqKhygexhYYzCJ/IpHFStm82Gh3lMv4wdwC/eGVsBiQgLA/X1ABoA4A8JpvyzJVFXp2UIoim65qiRNXGWTEZTNxpLq9+HnWzTXJ1hWGn+ci7+cc/QHL15mHYxOFu/Lxtsh1e8C51hEzjILgnBpqzfFf3cinJiVSxiErLh9zhGgeM926tMYSQi8Udemdf4BBLzfJVxqdPbVka9LNTutTSp+V1I5E1G7VgiA1WhaG7wU1BaxZ3+mMVc+RnWUK0sWu+5lM6FiWOECRIgAf2dld4RugDhB33my76/hWMUcslG7ruUb5gmd18kcMp2QDh8263I4wefPVr1H6RhTUXIsJ1FzApLeLqjpz8TnY+ttn2K+jzaXuEZiUXDIzmJiqKarpQD6XZfHbo6iYa3BN4DG4AjOx/a04o311zlAxbYuB5Ru2IkRt7xiuRNqYbBdRe0sffOMsP0sD2afaWjSd5chGVwn2SBjK9uuD0meP7EOi3AfYRKT7qDrgsmtqkI1gBXnk/GC3lmbZetplM28pL2MsbbPJDoLeKxemL1T3fb7VcWdEVsTmJRjY7S17oxDqE3bq6nP12T5g0mvCZVtaCOp0INuCGZmKn9vsqcRQ31gzaLpuyUT7P3JaDjrizKAz/mpSjXjYksTOALZdMf1y6XsHdCom29PRQkNrL1K3mhYksnsZaCxW0kl6rC0xg8O7K3SefrDtd8pl6QCtxJJKFLcrQj8yVtzqpWm3qKSJ7ZvOEKhpgJpQddyd6qGq2RxwZO6qnqtpMd92aauzUTk2U46/Yq0xWbSVuBlvyZtpPcSKPdZfl7HOn6NANZnG3LHRrVutadlumdFjaw8vt4VsqTe296oQcwUeAZUyjn1BqNpIqdorqTdwsIg8J7i7eziMAbanlpsvr8ycdbTr2yLUzHNl0AZwboabswwzieKIpetCTXBP8jVkiLcflJDwKwuure1BoIi6D0PRn4WHTuCvosQlC+UJiGm0JIYMJY2Gvlw/KJbvwgWU5ynAmIMQaT+2uVDq1Djl2YZ9R8O77CAcw1svv92uLVBZlVj3yC2MkEoPTrzUcnE4QOwvKqmaajL3U5u1cA9tGm3+aXzTod/YUQ6oOuyNKqqIKtdvTai04byJsAHnDPBQrDsKYKEMCR3K9FFrnGKtJRXb0d09BJ5KsW4Gd4o9rkhx0RC5wVs5NEpEHeifBsnvyyrNYu9cbr2HQ9m1XhpMjOoKdHKwOuYg4uaNAOmhxexgB/Pms3AeFyThA0EczU7+wImCyRlBPzZ2F3f5aAUcWffJvRaJBs3Jb2MnCtNrxQxFQZ+sTBzcsc1MfJNiab70MVCwIXJ3dzXvvjkcsdH2kxzMNGWa1xs7arArYETWvIYevVCzdQkoQOlrHsJWnSUbWkFRZZCMEGkmyWLoEGSJd2LPuxbNvA3xXAiLaOkoJKZwkyB7HaF/GECIEB2JtA+TbSOBnL5Mth6fQV+plkr9UM5yEQFBfl0bxgGuKCEEWGfWuWPDrjiy15wtAYIcDPt4vo2T7V6ZJ37yaglI2J+nEeU7cwSFyIZuNBFrmIhbou+ZCO95Rpw9X5CLXWXnjdxIdeF2hL6w+9SXPYfGoNtQfFLt85T+NmtWGO9vczJw69M1XjnXjLr9uNOga5L1P1wRVaCKaAqwkq3ReLy6usI1b25umloxix+DeHzD1hoQ55v0NePw4fUjRw6PRuOdnZ1Lly/fubPrILgEySZOTgM9RzCb7mDv2uY/26ZQXbZqLsRGP9DpvoLNKoV02wF7MY2nh0BA8GyR2OWwCQ3r64cOHz68sLCws7N96fJnu7u7cuORLmh46MEHvvvdbwP4v/+f/3d3b8+2As4ApubXGU52qz/00IPf/c63NP1E/+JA2qUhu2lYv8qsNbVxY/t8X2pdaKFBcI2C6ya7W67EFe8Z+lYcyBu/+YA6gcP/Dm2H9anQrUt9S1t8jdZEY1XoLthTCBBo/dChw4fXFxYWtre3L136bHd3158BkbmSEaOU7jU40vu0rC19hAI5yIJDpVRQigOyTkbR7boIqKD3jQ5l+3yWzNLad28Dd8PhCExtuwSMlmlcsNFQ7QhFDGBEqAioDd7zz375pZfO1XX9X/7rX9+4cdMnJcyQ+6H7wtnTHZWr0BOPP/rcs8+srx/St6bT6ccfX3z5335x+/ZmqPAsLrU+m0VYfc8e8DglV2il1mMRTsCez6vQuATF5ipNIztjEfa6gWutS3CcZh85e+bc888dOXJY35lOp+fPX/jXf/vF5uaWwLGiF+mgPL9WYUx+lFoOasSwI+AzlXPp2Y355EHMCb3yOVQHOVbLkGers6FT4sWtdlhNVpWQUSq0+rOB8NF7R1kFEHsRWXLH2jvRFSQt/0cfeeTcC74Yf3T+45df/sXm5hZbIxdNsCQgdJbdqTX+UAmR2NwomnGfonH0ctxGqtp/g4IZC1YWtuPnZweDeyLDAUCrMwaaJMccFiTZaqIiGhHZO4EfeeQMgKqqnnri8Zd/8e8tnltf8wrpdxELSXjx3HMvnnsBwNbW9sbGxu7e3n2rq0ePHnnkkdPHjh392//5o5u3bjeYX//6Vx984NSnn176l3/9N7+BjL03yyai+wv7VOpkWa3J7AkxaBSSWMWLKGEOJdPlsuf6iq5upBAh0niIIgzRCy8899KLLxDRzs7OlStXJ5Ppyury8WPHzp49c+zYkb/5wY9ub24mGwoKHYPq9SOh6zhxFW0rCWEFW6RLRNCjIDYfd0Q6M1zinmZR1ApLuHQzgetwGoptuFQcjAh+ZfOP+Sa8uWf7y8LXKQjnXnjuKy+e02K8N5msrq4cP3bs0bOPHD929P/7wQ9v394sfJTgvVwnD5mWZbuzZmlaHYK/gDMHeMhFTXGBQ8PxBhqUeW1zU2EYDb9BshPcMw6H641ybElmIbaiqHXqmAhgYlSgiipg2pTff/LEkSOH67ququrMmdOtw5HhOKLiqMBdChEYx44ffeH55wC89/4H//Tzf9nbmzQN3H//iT/90z8+cOC+b/7hH/ztD3/coB+4777Dh9dv3rqVaylkNSXwNpr8laMUlKrLATTrQEQ0FLo7VpCTriEidOP39JmHG2/j3Xff+/m/vDzZmzS67f4Tx7/9rT9dW1v7w298/Uc//sksTfSGssEv9yMBJdK3lEudbj0Obf4g0q7KLhiMdkotl5E1QrGBlliMeUBzAyugMO+dFvTBdUvies1vLNJH7/aZ06cbb+Pdd9//5395eXevfRp4/4kTf/HtP1tbW/vmN77+w7/7iUlxdAR25y7NTHsrCu3se+rSoZDOpCVZTTY776Xbds1KvvWX7t6w32+phKnG1pUmG4emoKk9/uVTIVJX99n6rc6rZxAYePKJJwB89NH5re3tgwfXTj/8EEDxc6RsSqx0k4oKpLSbHzxKxuiRM6erqtrd3f3Hf/znPev5+uXLn7366i8BPPDAqeZRi0dc8l68dgTBouRlpMiOv0tnJY3Xxl4m0DA5Ub+iG75JPpQbxXil7gEhMVZiEuQ25Iywq6fdiCkkGd8BYldg4KVzLxDRpUuX/+FnP9+z9kNc/uyzX732BoCHH37wyOF1sb7XRKTHER7Y+xdtLxM23DXa8g14QxQ2mLsXL3JF0lu32Tm0EdWJCRHWw0ryDWX8AzkhqYrIZ19g9ViCrcZU804g5wl8wFqgspg9ofB/WpOuxKJxmi9duvzTf/ynvb09TeDy5c9+2YrxQ0eOrKv68lskgX5tm9AC5R/e6miE6GQGd+Mz46oWgYBZBhIBV3wo0G/NZSWQ4fhfITApmWZHM+y3t4F9y3DoDqtzV0JvuVESdTOlU4wmzEuYOhXN+JSNlJa1NrfBjGbHOQGowGNQBdTAeDw6/fCDAN57/4O9yeTJJx5/4vHHzp+/4BKjxx979Kmnnrh69dqbb79z7oXnTpw4vjBeuHNn5+MLF1/95Wt7u3tNWxrtrbffecFCu3Dxk1df/dXu7p7NXuOtEIiBpeUlAHfu3JlMJ15XPz5/YXNri4DD64e++pUXlxYX1w6uAThx/Phfff97NfPf/OB/6ipLS0svvPDcgw+cWllZruv65q1b73/w0Vtvvm0rmEcfO/v0U0/eunX7zbfe/spXXjy8vr5xY+MHf/t3DcLC4sJzz3z59OmHV1dXJtN64/r137z59oWLF+3B92YwNG624fWMlZZ3a4rUj5Q3QHbw5jbI7Sf5zD2j99QgA0obe/yoO6FKbpln1QdL3YXhu+MtBfzr9mUEUkqVATCfPHl/88D7tdd/7TmQzPzW2+985aVz4/H49OmHr1/f0IWnTt7/9NNPHTt6ZGFhcW8yuX79+ptvvn3hwkU1Fo6KI4vowUOHXnj+2RPHjy8tLU3r6cbGjbfeevvDj87rcX/yicefePKxW7du//Rn/9QMVzPEX/nKiyfvP3Hp8me/eOVVoU8KTp68/8tf/lLIWFP6nb/4cy3Sx48f+6vvf6/m+gc/+JEadVukV+p6evPW7fc/+PDNN99uZwIM0KOPnX36S0/eummJ9MbGD/72R+SJbOuvwpID/R4KWZsfnIdrWvpgiZMiwFAfZ9DFABGhrkGktJ0+BGp4YP02tXklmp1SCmWbrF8E71v2rLpspWtJH+zhuPy6t9L7IydPnrDEGPaJXgy8/dY7X33p3Hg8PnP69MbGG5rpU6dOfvnpLx09emRxcXFvsvf/s/fm334VyZ1gxP2+/T1JTwtPC5LYtLDvlA1FuVy2+0x7xnZ3n7HPsXtm/r2Zbttjz8yZdne5awEKilVQFGiBAgqQAO08gaS3fm/MD/dmZkRm5HK/i3jiTJwH+t6bmZGRmZERn8ibN+/XX399+syH5859SdTuuTt65L7jx45+/fXy+6dOP/7ow0t7l6amptbX1s598eWJE79ZW18/dPDOhx58YOfOxV6vunlz5bPPPn/n3ffE9EWYmpx65OHWyvX79ddfL586ffrzs19Y8e+7754H7j/eGMmnn3picXFxeXn5X/7rv6Ii5GZjJM+eFV6jrQoBANEc/eb7fOP9egCVi4rsIHVD3oZz8GoVQI3YJ5Svf4a5xku39JGKdSdBIOS3l9pJDEQWaFDnTkmUQACACqFXYb+GI/fdNzMzc/36jc8/P7u+sXHs6JE779w/PTO9trrGZZtfmN+7d2l+fu7ee++emZnZ3OxXFc7MTO/YsWPf3qX/9tOfNdvym2xzWra9S0v/7af/3WEOKdE333wLAAsLC3cdPvzZ55/z1JW1tf/8n//PRnP/8A9+MDMz3SD62dmZmZnpunbP5XbuXPyzP/3jbQsLALC6ujY1NbVv7959e/ceOnjgF7/8Vb/fPkJamJvbu3dp2/ZtBw8emJmZAYC1tZkmafuO7X/6kx/v3LkIAGtr67MzkwsH7zxwYP9rr7155sPfdRuCoM8HTi7m3upTyC6JUkc530K9K+duwBMc2L8PAFZWVo1XFjz6m/23TrwzOzv79fKyvfnggw8889QTvV6v3++vra3Pzc4szN9554H9b7z19qmTpxOV7t+/709+8uPp6SloR3xm/sDcgf37fvPue++8826TZ2Fhfu/S0vTUtFd25+KOvXuXVtfWEm188MH7n3n6yVawdSfYm2+9ffLkaQC4Y8/umZmZlEr/2U+kSi/t27t06OCBX/ziJafS83N7l5a2bVNUuiN1j/w8BG3Y2H2qPNcYAssW/LHKS+voIktuAvGVIyPK/v37oVHjNlwRGTb7m2+deGd2doar8UMPPeC0ZW1tbnZ2YX7+zgMH3nzr7fdPnmqqWpif37t3aX5h4e67D8/MzGxubk5MTMxMTz+4ffue3bs++fTzHzz9ZFVV7f2ZmV27du7YseOFF39la9mxYwe3cjMzkwcPHjhwYN+vX3vjgzMfNnnm5+c9I7lqNOqhh+5/5umnmJAzC/N3Hjiw/403T5yMzDULBaMdWNLPnYmiF1rd46bvfg+H3JFsAzwihLp95MN9CRYea1RCiNCrKqzre++9GwDOnj0HgF99dX752rXFHTuOHzvSoHKPFhYWlpeXX3jx5S++/HJ6evrRhx965JGH9uzZ8/jjj73x5ls227Ym20svf/EFz7b78ccfe+ONt0K2APDRR5889OD9c3NzP/6j50+f+eDUqdM3b66A7R1jrv6P//QPBPSnP/nju+8+/PnnZ3/28xdaFIfQ6/V+/KPnty0sLC9fe+XXr124cLGqquPHjz3z9BOHDh78wTNPvvoa32EKc7Ozq6trv3n3vStXrvT7jYmnP3r+uZ07F5eXl1/59esXLlycmp76wdNPHTt25Kmnnjj3xRfXr9+AgLoorFzBlb8HHtVc8XKwkwgavMCxnPKOIJRvYdsCANy4cV3LgABw6tQZfmvPnt0N2vjgw9+9+dbba2vr83Ozzz//3ME7Dzz5+KMfffTx+pryJi0ATE5OPv/8s9PTUwtQUBMAACAASURBVBcvXn71tdevXL06NTn59FNP3n//sccfe+TixUtffPFlVt5E/+7Zs7vxHx98+Lu33npnbW1tbm72+R8+d/DggScef/R3H328vrb+v/+nf0SAP/nJjxuV/u8/f8Hy7PV6P/6jVqV//err5y9cqJCr9FOvvvYGx5eaSkMAQI0Z4b7Rb4Mer2TGn1xZZalLOcRnZGTWJJoPOIhaU2UilxwbKfGhqFKsJYrwEKGBiVaNObfmx8lTp8Es7wHTljMffPjWW2+vra3Pzc/96IfPHjx45xOPP/a7jz5aXXVqvDA/d+nS5Z/9/IULFy/Ozc49+cRjx48fXVpauuOOOy5duvzqa29cvnJl28LC008/ee89d99zz12/ff/9K5evNmNjrdzLr7x24eLFmemZZ5558tjRI8889eQX54SVazTq3d++1+zaNkI+1ev1Pvjgw3auzc+1c+2Jxz766OM1fa6xo+YB3CIEmVdh0Z4KN5SGWPTpjVUN7aLcWPSvjLbISaPaxCaowaz/WEyCQ/SVv3pEiDCBuGP7tn17lwDgdx993CQ0D1PuufuwymZ9ff1f//svv/jyKwBYW1t/88Tbv//9ZwBw3733VFiJbD/75RdfNNnW3jrxzu8/bbNhpXU7wsrqyi9f+NX169cnJycefeShv/6f/8Of/9t/8+gjD83NzqZbZoOb48eP7tq12O/3f/HCSxcuXASAuq5PnT7929++DwBHjxzZvm2BF6zr+pcvvPT227/57LOz5774EgCOHzu6tHTHxsbGL37ZclhfW3/5lVevX78+PT117NhRSPvkCJ5wlBhArQBbDI/azdAgKgsMRrxo/d1QPvoF4sXDlExVBAAwOTEJABub/aCY34Lmet++vSsrK+cvXHzl16812OLmzZWXX36ViKampg7s3x+T94EHjm9bWFhdXf35L164cvVrAFhf3/j1q69/8eVXiHj82FFVvHwrjHfdt3fJCra2bgR75ddOsGQXHT9+dNeunf1+/5cvvHT+wgVoVfrMb997HwCOHj2ybds2Xtyq9KefnT1rHtkkEJ9cYI1ph7JeFsvK7pPVksadpOsYjqhZGGt+eu9mpnEOAmBafQ0c0M+QCJZWiOWYnGRq7DlArRH79u69ubJy/sKFV379WuO2b964+fIrjRpPHti/nwu6vr7+s1+8cOHCRQRcWV19+devLi8vA8D6+sYvfvni5ctXgKB5CLi2to6I+/ftawoeP36ssXI//8VLTfG19bWXX3712+vXp6enPJ2v6/qFF1868fZvPv3s82a5cd++VsiXX3ltbW0dsJlrRqUP7Nd7kqRyBH0cBmCjIgJkGzi+S7rVgCOw02oWaE43b16OpebGYBWQ+FfMeAIAqBCOHztWVdWVK1cvXb7SeKvf/e7juq737Nlzx57doXVdW1//9vp1LtLpMx8AwOzszNLeO3i2626/PQLAmTMfNtn2LrlsggguXLj4z//3//vb375/8+bNiYne/v37nnn6yb/563//ox89tzA/b6c8/8I075rDhw4CwBdffOWe6wMA4MnTZ9bW1iYmevfcczev8MbNm19+dZ637667DgPAl1+dX16+xnOeO/clACy1kgu7Ix43yoFyKBvFlUKF1rhAEVJZmDTBDUX+mHiDmoPsU522ixAQKwQA0rZ8qLW/f/LU3//j//Uv//VfeSU3b95cXV0DgJmZ6VgD77zzAACcPffFyuoqz/DRR5+cP39hbX1NlzRsUgTQvH/y9N//wz//y7/8lKfeuLnCBIu2igAOHzoEjUovL/PFzpOnjErfexcvcvPmza++Om/5+cci+Gd2QwqDFpCGvrRF7DHDjVZrAG0YrXanayqPo6Oyh1Xw0kULfk6N5YnpnC1/pfT9k6f+/u//6b/8l59KNV5ZXWu0ZYYLvLq2dvPGTWPzCQCuffMtAFy5coUfUdPv91dWVlxxgLvvOgQAX355vn2UYxg2eGJp7xIXsDWSTJ733zdCtr2BwOfatP4gL1w/slcIwXdiw0LdiDk5dosUjqPFNhn67h+pAFdfMGaXgIj6CBU0XzwRHq4kQPQr8BcPqVl8rADvuvswAHz2+VmbuLy8fPny5aWlpWPHjly8fFkVmBjT8xcubGxsTk5OLC4ufvXVhZhc5y9cdNnOn49JubG+8daJd0688+7ddx06fPjQgf37Z2dnjh65784D+3/+i5cuXbqkc0cAwB3btwPA5StXPLC8sb5x7do3S0t3LO7YoRc3/dIsgczOzDz/w2d5wvbt2wBgfm4u6F1KB0hpYu60MYGasS4hH0u6a7O8YceLUOZOi2da5ntrNLOXZciKl20DOyK22aAndgEoiMFrwsLC/H333rNr186Z6emqqgBgamrS8lEx37Zt2wDg6wZfssSPP/7k448/UfBOmfweLWxbuO/ee3bv2jU9PaUJ5rXI9ev2Ha1K2+SmBl+l5RqFYiUEyByxkVVXaPyeGNeO0bY+ptOi5qJqW/zRFnZYjC9waM5KVN7GQgLHNLs8w1HWJHCvUCwsLBy5716nxghTk5NtY2TPEj/Ri6DZ0LPZ99cFzWxqbzTbk2dnZ370/LNWfgKyVq5EQRa2LRy5755du3bNzEw3a9uNSqd7PDQXyP78HknJkbeOrKvaE82j4twq2gqAg7XZ7PtvPs3bJ5hAkcd/RTrJVBkQkh/GBjhw4M5t27cDABE99OD9NuPNm6sAcPjQwaqqqE6/Io0AtLa2Njk5MTU56c92ed1mm4p2u9sAX9ef/P6zT37/Wa/Xe+D+Y48/9ujc3Nwf/ejZf/yn/wf0PkAAmJycAICbN4MDKAFurqwAwNT0ZKIlADA1NQUAS0t3LGnLML2JCa1fyS6VaeND2mzqSsGaRCRDehZqqWnx+KsoWKyAai5+JHSMh6uieQ92cmKCYaZ0XfjIww8+/tgjzSL22tpaw8Gz9WEPTE70AMCelR4dwUyzbf8rkPHRRx7igq1rgsVaONWq9ErYiEalp6emTPG4iG0YIyJ88menT9E08vTR+LEAYtjhFt8pGQtZC6nWkLZfOY1mcEQv7kfshgjWWzWebC7bZBXGGvaPPPzQE48/yrUFrbYEoMfNzWChyk0MXhMCGJ2JWzlxzHUzugRuZwwBPPqIEHJjY4NSuAohMu3RCWl7ZsQaYtkRhec8tCMxegweoe8ecDhjqi3ZUdsXvhUbvHdQmIhD997b3H7qycfDvHNzc/fde89HH32SZToxMQEAm5ub6XwmWz9Mihm/ut8/efL02tr6H/3ouR07dhw+dOfZs19oGQEAml1yU9P+qwQAbYgQVu3PegIA+PDDjy7apZRWJxGANjaiDbTyp0ZHw4CaFDwV5WVXYngiO5mjx81n+WdFDFQ8LQdgc/7VNrnnhtf38MMPzszMXLp06dPPzgLA3YcPPf3UEwBw8tTp998/bU8g/bu//ZvZ2dTLGv26BoCJnjWy3U7rytLddznBTp48ff36jaYX/mNOsFa8fh8ApqenwmFoVbqvzCZHaWMR077RGWAyWwLHTtiiVXcUqLSaI/laXGnHmEzXr38LANu2zcfKPvzwg7Ozs5cvX/70088B4K67Dj/z9JMA8P7JUydPnv72+g1EQKz+7m//etY8EOGo0f7DvrfmCaIc3tn0xYcffnTh4kUAQKyAfXpmc3Mz2k4EILhbCnnj5k0AoJr+49/9zWxuv53C0LwKG0DmUWkNRn5/B3TLAEeynWx0idnmmrBuXvgnRGq+IJvEYmKtRP4y4JHIAcrJycm9+/cDwLmz51bX1qUgsGfPrsXFxSP33vPRR59oWNy6V5ifn28eRV+/cUNma5Yr2tLzc7NtNvtJFCY1VtX/8rd/3ev1Xn7l1Y8//r3XN5/8/tPnf/iHVVVt27Yt0QM3btyYnZ3ZsX0bLwsAgLiwsNBUHSneztrV1dXm9I4PP/xIJmIkyGE70vwVWd4+1yeB+eVLtn5q6MxTgIC8az+4QRKnwJow16sjFACNeP7cFRWaUwoidsO3k2oTbKavvjoPTzw2PT19112HPv/srO3/JuPU9NSTTzw+MdF768Q7CGcB4b4j9yLi2XPnXn/9rUgdnL2jlZsrc7OzzdsEXJaqqnq9Xk11f7NvA8jmtIVODvTIkfsQ8ey5L15/4638CMprBLhx4+bs7Oz27dtC9bMq7RUXyxhaZd4A85gn0CCjQm6wiRUwed3wcQhDzTcox/osRRALwcX2+jCaCRWB4oDbZIinot2m0VZnqvjyy/NPPgHT09OH7zr02aef2+xN6vTU1FNPPjEx0Tvx9m+a4kfvuw8Rz54912gL2v4PwtH2nj+5XCakoIT5d3V1bXZ2trFy2JyPQsG37rwglzX/aDPXzp57/fW3mhFOhBLtN9vI10TbVQiE7VkpXq1N+2IDkh4oWxyo/TyZ+sIFin/GT9/hWyrEF8jIBqJkzl8FqAH7zeRpziNPjWp5n1m0QIeOHJmYmtpYX3/xhRd+9fIrL/zqlRd/9cqLv3r5xZdefvGll5vDHPft27uwMN9+6xkAAKqq8pTx/mNHAWBzc/P8ebeBowpeRTl+3GS7wPd5tOasrvsrK6u9Xu/OAweITyUgANi1a7FhuLa25tXO7V3zXsnhQ4cmJnoOFSHedfhg83jy7DnlXBredZcuXQaAw4cPTk5NsmdPCAA7tu8IEUe215l46mqvfa4Kdla7Zos6/AiNmyA2V7NxnG+Kk23gaaQtkjj8mt1xqlz4t8myuXDh4pUrVwHg4QcfDB3qA/cfn5jo1XX96WetEW/iv5XVNZ5tbn6uWVRLUBPkNeclcHrqycf/t//1b//8f/g3jXjNA5qp9vmFo/bhuq0S/KtGsNXVVZ4kBAvGgF804h0+fGiiNwHMox++61Cg0nr/p/CvhA2KdspstnZXLkQo0gkqAHTUJOeHhUVWSimbB4aVmRdwBkW5A/cpWRjrc+GiVeMH/PIEDzxwf6PGv//0s6bI7Ow0AKysrYF1mIjzc1KNQziokppCAATN8u3hwwenpqfMylCL5Xcsbgc71WU5+2NmdsYKaVVjfm5uonly5IEjNP0TcjMbRatQxYbQmTCiqwFrHXzfatoir8UyYp1CxkcRGLA7Utp/+C4AuPjll1DXIetPPvmsQQD3y7ek5ufmnv2DH9jLPbt3Hz9+DADOnfuSH3XgZdu9Z/fxY0o2Tmc++BAA7r337j945mm3ex9wcXHHD5/9QwBYXV2z5582j2/sMiMAANCp0x+sr6/Pzs489+wfWsSzbWHhqSefAICvvjqf2NPazIJTp89sbvbn5uae/+GzvZ6b5E8+8ei//3f/00MPPdiIFGcyGFFklhVUFMQFWoYAomkyhIko0yKV62V19iVk2Lz9zrt1Xe/bt/T8D5/t9XqWw6GDdz7y8IMA8PtPP7OfNW5ODjh054Gd5rDznTsX/+xP/rjZ1tNrnphoMpw58+Hm5uauXYtPs6eKe/cuHT16BAA+N+68QaKzs7P3Hz9usz366MP79+9Lt7kR7ODBO3cu7owKBgBAmkrDqVMfrK+vz87MPPfsH3CVftqo9PmUSkMhJDbCDkUpMB6Gr6MjO3f4UZ8YIvQms7ZUkLyjd2BiNcDj9s5vGjXe+6MfPce3Rxw6dLBR408//fwbp8Y3wahxU3znzsU//ZMfG22JOKwQIOjtaa9PneJWzohE8OSTj/+Hf/eXDz30gF9UMr9h59qunU2/L+7c+Wd/9pNApYsMJYJcBWP4ezA760VE41G6Aem738PREEK4H691FDVB5ZY1c2Ogw3Tl7vadu3bu3gMAX3726URVbfZrBCSWl+r63Lkvjh697+67D5942x3bXNf1gw/ef/DggatXlycnJ5aWliYnJ1ZXV99+5zecv8v29fLk5MTSHW22EzIbl/zkydPbti08+MD9Dz/84LFjR7/55tra2vrMzMzi4o7mSLs33jxhP3105erVI3Dv0tIdf/WXf96v65/+6883Nze/+fbb19848cPn/uDIkXv37l26cuXqxERvaemOqampGzdu/vq1NyK95qzh1atfv3Xi7R8889Q9d9+1dMcdly5fBoBdO3du375tbW396tWrsdLW6SYHyB+LxKxWxYuWZbejeGIEM6+7BehUwi2CAgCcPXvuxNu/eerJx48dPXL40KGvl5fruj8/N7e4uAgAV69efc0d44anz3xw+PDB2dnZv/yLP19evlZVVfPZneawRc+Lc1pevvabd997+qknHn304cOHDy5f+2Zmenpp6Y6qqr766vz7751qsl24eOnixctLS3t++NwfHD923/r6xvbt2xYWFprvHSbadOrMmcOHD87OzPzlX/zbULAZJpiv0j/92cZm/9tvv33jzRPPPWtU+urViV6r0teFSuvjK+OXdIYkFa1e+dmbp8Dj3zEKrAIVZQzJN77+ke4+BAT8XKjxwa+Xl+t+PT/P1Pj1Nyz/U6fPNGr8V3/xPypq3Gz6IcteUrSZfoKwckt3XLp0GQh27bJW7utoswgA4NSpM4cPH5qdnf2r9FxDVyT0bXaxFLFd4Qgq1T1XAQlfSuzvO6etADjIqS5/+gQAADVBjdA+VbFnEsRQepcePXzfUUBcuXHjwtmzPayQXIRglxk/+viTo0fv27Fjx513HrDnLd64efP06Q8eefjBu83JYFevfv3a628uL1/j9ZtsD919l8v26mtvLC8vm6AB2SpXq1uvvvbmV1+df/ihB/fs2b1nz562E+r6q/MX3n33vS+//MrisDMffLh//77Dhw422exzxA9/99H6+voTjz+6a9fOZsthv98/e/bcG2+9vbx8DcHv4ZBOnTqzsrL62KMP79q1c37+MAAQ0VfnL7z55onLl69EVyrdAnJILWJAgPgLP6kFhqKhTeEV5fgFdo0p+dnERYjkCar3wXOa/DUYV/S9905eu/bN4489snv3rv379jY3V1dXP/308zdPvL2+vmGN/oWLF1946eUfPP3U9u3b9uzZDQDffvvt2++8e+zY0f379u7ZszuU0Nb22/fe39jYfOThBxcXFxs3sL6+/tHHn7zx5tt1XVtv9uKvXn7+uT/cv39fo3L9fv/jjz+piY4euU/tgYYuXrz04ksvP5MSrKUPfJWuAPqA8OHvPlpfW39cqvTnZ8+9+dbb15av5e20NhKBOiQfKKTIPZMIyqF4sjFWQvMODvm3G/H0HaPaiV4KmamhPXISwUBs+rz33slr16499tgje3bvtqdvNWr81om31+WHCV948eUfPBNqy5H9+/ZZk+jx12VO9vvJk6dXVlYee/SRXbt2zt9lrdz5N948cfnSFS+zN7oXLl564cVf/eCZp7mQJ95+9/jxI/v37dtzxx4mmgMdzVMm5N/oMY9UEOyW38LmFRKa7/cFny/7jginZvxt8G3C2OVLLYHZtAmgaexPVVi1H18DX/Ozq97OzVGz/OWlAOAGVjfWN9fN5tT28IPmxLFWawgAHnvs0aeefPzb69f//h/+CQD27d07OzvzzbfXr165ykSgx122f0aAffv2zszOfPPNt1fMWQJsP5P9ehS6c2+BAGBmembXrp3TM9Pr6+uXL1/hT2FsCxBg587Fbdu3XVv+5to314BtayKAxR07dixur/v1lStXV1ZXeKrlY9wVhjaHAHbs2L64uKPu18vLy/ysX8EnUhziGbSVLGX4QvF0GyL5K3kwLV7oMDLy+63Q5JepSfEiHDwBFhbmdy4uVhXeuHnTGkTTRaIJd9xxx/z83M0bNy9cumRkaLxCpAJW+549u+fn5zc2Ny5cuNjf7Ksasn3H9l07Fzc3+5cuXV5bW/M48B5o1dsUv2NPK1jzBJ11kZOfAHbuXNy+bdvytWvfXPuGo38A2LG4Y8eO7XW/vnzlyurKKhOPzRwBATDMwM1HOIKMDbOBYgABnM8gvqVUjrDd7l61K0CjeU1EpyYeq+u6lpsT0Uga1t30jgMcEWfnPt8mJ6BfHPzeb2tHxp1gYdvCzp2LVVXduHHz8uXLdrt4uOF0aemO+fm5mzdXLl66BNS+Q2I1sZXMAh59e5gbwbZbfM0ABNy+Y/vi4o7+Zv/r5eUbzQZki5+s/JGhW1q6Y35+/uaNm81OI79+U6WBgs3Js60ramToAUwATLVfhyTTt0OBVLYFEAmxT7AJ0AesDQIegrdOu3fvSqReueLWxbfCCgcnrzuwBqqB6thmk25d50UertIeQA8R7UZl3yDpdP7CBQ7LYg6l3SKaMzZkoG6zELC6tvrlV+eZuQf7dgCX/uuvl9sTGAN/vHxt+dq1a8wkC/FCcby3DxDg2rVvvrn2jeQAVgCUhcO2sOzp5mOYHCLK+B55x19DGzGp5GUB3AmIjPVQ5Af3cmlOR5kh5HjRK3b92+vs4FpNZGpH8NIl9XA4pYeZO20zXL585fLlK4EAYgS/ufbNtWvX7NdiEz0gigNEBPPp66+Xl8U5uY6Wl69dMwfgtgPOPq7JVyel7DHx2Pgk9LODkSHg8SsAl2eMaKPhr3pdteku0T9HS8nQEIm7/thSgonFZgCNGl+/3l5ianpevHQJLwm8okzesLiZrMKQRZE2Arb6nLAvFJ+Yly5dvnT5svmEbaz1GdtXtWpon+cjq2gQfCA6ym2CdPfGgTkK6RZtGqX4XzSvVfWmyzCl1HHytDSaqWe+g+I+M92WiDs5n3z+iVHFeJYyXfAMQHuT9AzatVYh6Qkt3PH4+ddDW9RUeTsRR1kDJdJGWE1ZFRTPIjHikL0QB1nj84gp7nmHXNTgSGlliCm4X8w96rhihgxRgUCjJ/llefuvtWT5pZXi/tAzxgc3htbzHIIYpmEYpGAK7rT58wIoOcJxi49kxLL4cVrIz5xoPto3SITFIONDkzNpvLPf0nf/lkqqp1tdSkGNkfQTAlR8c5cEQ9EQaLi60f+VXvIevqm58gPyH2Cm8AhwQAkyWQeZvp1XvMc6RyMubJT1B+UHY+isW7r8EOIah6oluekx4u4ZDSmTe2yCBaHrgF7MDWVge2KRlofsomC2XKKiUDFK5SXKIqWMbS4urBdA/4ca4xWTXPhhoxMT99ZNlVv0SEVrqF1q06N8czIHblKvIugBmMPg2fYXbyeMEmowzI/sGZn8F6A/hdUqutfKEAHNg7s2uiba2NhYWVlZsycKiHF1S3J+tmDhw8ZY7iFj29rmHzTPTa0BMSK4pypWM9mao/+9QbbgTyBKWfE5wgoOF0DLkgjV42/ltc2A9rfsIl94xiJ4h5/VzobNB39a8E+mi50Epod4E1JHMuviqUcYOP5eu4T8pPA3HJUBMrfEFzLap7/EmwBKBvbozQjiH2/itEV2oDaCPEgWIxhgRdfp5pcnv8wuigcjaGV32YllCVm1L5m54m31XAGEPqH7zz1JbYqIPcZsc4Yt7hoIvEuBjU/TeZVbfrA0lmCWgO3eMGOW2gzAJ4ftEH+CABLU5G2XNsocHsllLXAw8wwx5GFiexL7M2QeMN1vJwo4FUQzdvIFR2OqkDXPndzHG6L6Ea05wFrqK6c77k+Us22xUJOZL2zcXgXUA6zMHSsB6l1WTBLc1tB80gOJ2u/OBBxHqpFJ+m73cOTbSYhE2OgMAdoHXVHnh/EBig8cAVQAFSrTk1WHp06eOXXydE5wOnnqzMlTZ7xcaa2hdotZnpSGG2eh7fNVJ73KVeu5oCb+YRHnboU307vG9/adSDijogKl+ydkBZwCbwqDNyDS92UShhksoGJeIDa8pnQgOoniyv2Quho+NiGVojEB2lQK8a9ehXSRigCQV6BGO/2m+9MX5aUbwAA9MY+WHJ0REQLU4fKcdLG6wdRG28PqShH7u82vtV+F89Jhe3BHZE9EA2nFSZJXtbubI65hbf80HRQvm51F2O4htXY74bo6k+VFQgu+e/ruH6nEyCF3oLoFseinchqiUxtuFbY70OxdD38U10DQ6ZmciJCiGcZIGv/AvAIkwqVUccNhaBgdYRBavEHHrUvl6dbo9jpGWQXIFB6gaO6Tbgrk0trTrVeCnGaSJ7PpqWKqpuQv7JzS1/IChxtjdyvCRgQARONa/GUU/zQplTSgUip5JJ+nOeO0Xmzm+PBSqV/ipWQr5fs7QzbBAAoVAY9FTTja2FK0dQEHQLta1SyZib5L9OLAHYwwUVUVxNcZFMWQ9jKuOf4U8KeImuy2fCUk4PxlLR3dnSxTHHdzV4mBDC5jhmHrz6R91CBPIMCgEIjzLl1BCTIUVT6ERiZ5xCtXgtaybgp8TSmeUPQ5C7kGS9R6IoaG/DKsLG8pZ+l0uBQypsBSZPVg9ESaV7SP4HTS30BhyfE0tgLhpReuFrBnyaI2CKwdyftu2keET1jW8GbMIUewi0bRA06CBgRZ7AO/8SBTYn9WmO8cgmxpwGFmPxJA83KseAg7wp4jAqIKsTLP+swbsra6YOyyCqUQN3MYn9EJAyqdepHP0fFKsZLHj8xq7+n2mhWIe/Q2e7oL43CgsA1u0FLeNMKfUgIICcN0/86gy5teCWajmp8ppFni1kX5hEeP8EprSLrBmtOKsooAPg3kemMWB6w+JSyLjlviND5f4hPFFhKQIONT+esLPG7x8EQK0wmjaAvLEzgKySlSVDGCEoFo6HNIDEJOdwul8CmLWJrZhGabzKD1ZKSoZQfcGmVM05YGHC0h1gD97CIHDjtkFUAPoAL3VJFbHzsbYxbZ/VRcPEFsc6xuwCRDkdbJZzlRFOOsgTfpYBWRY3An6iGyM9rMie4LCEmrFHhTnX+ZO4zDHX1DqKNBdbLYXelwQVGgkhr9AhhzZaYAiivl9xBzUqqsgYzRj4HoBkCOv4INWYakBvoHbCQED/iNN6ok0sxL09xIzQap+hlEzK3BBQ+AU3wFJUM8lItTdHaVRXtOfr+Z6s51brmz3SfrickXlbA5chSDmj0mA4IEguYYiQEPkxgf3Q6AA5AAa4JaTCpX8QAAIABJREFU1U8cZlw4UQXUq9i7sf73lpSnfsxZR4VQjaDmTrRILcahhPQ5mbTJ4irmj+3SjwqXMvyl/fdBQTO+nj/wOIYVdIqiAgMbSS3ymfqIJ7ECU+EuSptuoYIjYZCzjEsQoiqJBnQgHF9xOTgq8Rno9l7HQ9JBFiAIJYbWQWxomYqC7EGp4dv6Rc/ta+FFIF2aWOdiJKWIV6gZYtyVcCrKNaF5fvAj90sklzj0G9aca5Va7FvAT6+1wRrozbiwkiGIEAmgDpT3u6WtDzgQEKlZHSJVuwwND+QIetCexhHZHtn1wHd/G0bahqsxOYUZlLIj87hduWm5Bwj5x4jCYyalsO4M2shyL6PyUrl1pe7158wmR/kkUk2Qq7ItnimSZ5mAIjW1ApMtXk4JOTv0wDg0XTGLrd3J1pbJoEFFau2aov8hEov4UkVWCG61KyzRzlXtZRkx8Qqnv4aXBlne4XzGCATY4IwL8Q5EWx9wgPW79fgqMJC12cTR/ja7NtkztsFChoxBTEqmF++k5wUBenRxJU6p2C4mQiH8LxIgnmGUc0uzp4WdPwoxkjwiQbdP0RAtW3jcZ2QOzr4jzBNeQ621axzRiUj9OToSJ1Xw+5SuMd+M0YsbaB6Jq84CFBpHLWJD/96A6D2aKWF4sXUxAP6pGyMjKoBTt562OOAgaD4RgFUNVQ1Ym8N9hLIM3a91y4x6QJMAPSACqJvj1PlrK4TY/JlXSBzGtt9hQXRQpbkn7I05fwjZNQECgn1cqbhydMXtdaOt7fMN9B86Nirtziwyt+1KoDjQibsWjrxZ0/0+c87XnSAiljJND7Ay2GY2j5RIazP5xQOBmAq4I4tsBtsghLZvtehELDoTz2DX0XwLzt6X58GVtJgWLTX79UQHohkpt1TXnlqkhTv2i2vBCRGuA0317MQwNB1QgWh6KCS2AuitNIUp7OhmBN1tTIoXCO8a13BAU6kbBQTOH8TRzIY1ih2RXA/8Npt8doueUbG2t+xXSOxkMXse9T0AzQxvMvB0c5IVIID5YBswzmziD0cyyK7dTJb7sz3kLp4Vs/62XeeCLVbY2hcilq21PfKwAnskl3kY3XwyzR24iGKcwhc80JpPI4HTYKtkjj+R5S+HwaqePbqRzVfbQCKz8cXbFoTGtLqe8aRs22+LYljcjT2j1vYjVeA+SR9MUcUYdKV2EwKhNbWBIOGdW0FbGnAgM+4EUDtzPopZKyoyixlM45U6glvqKA0onLBFuuVU7w2lOFpuVX7MZUjXrU2qgcnHQ4Pz0gXGVGKGRrQqgIkrn0ZiOcpLFTawLFthtTFmnduqMUoxocRVuQyjNubcyanfSS2SIixmo5VRjN6oDuCIiMJgXMd6oq0r4RMUlTcyusQQXcTFjI7cYG4l2sqAQ/k8WIM5RvuhG14DAvSqduNoVC+71m7ys2WAZIYybtqMHsEML2gcy6LjlSAe8O+ISyXM6U4yREmJl60gagnIzxVnF8eLbXJhI9X1Cb2ypDzpEmGyWG8YgIMpPtAA5GvMtJjNJ9LSuwqQya7F6d0qGIyQrYHxyr0lCkckcqmvrJL4zd7Wc6tP5dqrMS0Zi8j6RxiWY/xHrJp8sCTnbpg/OB4pw8+72aw5jGipK1Y1moXvsdUxKG1lwNGSHV4iqAHq8fSiZVoh9OwTEbFU2orRkXST5zFjK4JikZJnEFNekzy4pEiemIEO6sysf8T4Kxm6kPgAhy5A3GxlxdMyxDVKfdXDX2EpohKtLYygwyMLo5UNPIL+EKB/ESEU0yVHEf+RIAx8aiGR57CMz9Uq5tfZ9Q/0Im20faDyG57k+oZ24JdidfyRDtfUfRa5eyqgiRgark3ijA2uqAl5TKqHh1Qp9S+8BL8p6BJPzjLyVN2+45h5Wx69GTViQqftQWfEJboVtKUBh+eQa8B2hSPWOwN3WgvmCYEqhMpuqdCMPblCoOUIYYR3w1vQsCqLIJLVNdDQlJfMEcGSOezICkkcPqQzyAoVE1dC6ehVOEvJ0fcl2TpixYMc5XCqgwJmhCzq4hyRV4fubjMMhsii2VwWaua4yygz5pLQcCPvrq+vwWhGFABN8Y7uAGUVY7bgdp9BVA3jeN0kk/ztu/NY+9FksIWRJ/ouTgNErFaMFNfGu4VyNsmDVNI0e+ligDXTTODwivIu9OioAjQbOHhL0O+LQYl1Xgbw3HrauoDDogo0e3cIoKbmxeKxQMMGYlQAzRf8oFmsTAWL2QBN0Wvu66OtQAimbVBJBC2YTAp+97MpKsnmcaqL9Qy+RU8arHJ/U07GSMTEsw1GtX98B5QaHq3q/K1ixJambA/ni+sSSPFiKtQhEhwFpOECpEfQPxOMabP0wR7mV6sy6ax4dCZJn4l212SM76hIsQ9aX8jafTjC43u0Lj/i06MV+4LF4A7GMhR5eDdwcf6oZyCbQbuvUMp8RU40t8nxNHv8RrKtxP46EwHUW+/Ir4a2LuAAaF4Yajqt3WzbDkI4FYYmjjCrZt8otTU29ecLZ3L4Vw3kENBC0RES2TN8lQriRHqFKcYcocQzRLvDTtI4agLhTuItUD1eqsGeK0pliaSTyNS5uMxmwhs/QWLAwQ2GNbpeqJOaOSQy+Gt8rkyAV3wxs3BkwJmryJLjnzgowfpdZL+79niYv+ntEQxhlJzT1tc3UvUGcESBkgyQcPTOHHZxvMGwDAUzxOtuZVA9Q6KhvnjhSB8kiysnkPqWu0x3Y1WjwxwZkYYiJF/1twr22MKAwwezEm3kSnWurAlksAEcWJlLy7Ur48CfhwxiIZKaWSbmJ1ha3kiMTiJlKCXVCw9u0FMdKfLHk4sDcj8GDIo2UYx3M+J8utRfQF68nhByFDQ8y/KoWCmYhpBaaiEE5Uscyov2cdLmHokfeUMxTKe2trANozXA4ftE36kHax2yqFwfiPt4H14MSSh+iKVlgTQVuCMiAY60feKqmHtgpkKhQRsbWg/zNxYcQAOvjYyftjDgAPCtACK0H3KLR/DDdLN5fxq9WRuzmdm6zOyQ0aFOYXzgByGBBdbq90MrPW4opYQP1bxdvvMzcMbrrUwkneYfJvBEFs4HxewBD6o5z0pSkCVTlok4QOHC8R2dQQoq5NMzHlEWHFHaxcJH1SaSSZ7Qz9d+kssTOSAfsRzjoOAMlQIKTBHG0hOFy1/FDYrbztb7tgDvWYot0sTygzg7KUHh7jAtcsisIcXuKWhjKC0JV4G26MOUhioUXeD+GE4K/24FIQESVOz8IwKoETeg2mxlJHv6KDZoYbAPCSFQBQSEBDUREPWQJrC5B6Y/WgHMSSoBmY5Rt6ebxWklNmKzhsB+ZbFNdUDffn3RNtfkELUhGNgUYHhyWVCDM00fcs6Kt+UvICh97ZtrPwuzOJFDdaS4Sn9ZFlqQgiyj/VeGR37+MJV5S2GdGeoleyKZz0w+o9aNDzv1zTto0TRO4GkfvyQegwuSHawopzbAUjzUnw00Uy2yD59pR9ADjYeMfvGZuMzK+KrDFzxfZTMDzUqAY9uIz06cczrgGJnaTWdYRysqZtldxyAiVgDKB+P5CA5O/vMUaQDs5GLw3/U2m7skEnwi+6hXKmFzoqF4M4ZMAdN6YLrBszHzQrU5Maw9s0sAf/P0xfzZT5yZ/7FT2uwY8B9iSjcCA7V8KtdzRkA+ek71bUcIvUdAJFeerGytqzAhcbMZwExwPvLUA6qATLvb/IFj9e0iE81Zcvb6OoKx7TXgBkAfkMTLjsPo3Chpi69w2Enj9xdJSwqRbJ3q4fazeVclKVOOnZ41ZKqyGwzVeTo5JCU7c/AaUPxTXKfuvHNZvqN5pveO5rwH5l7EI4rnIpnFvxkBBiAOVVuzGYC2whrUDL5BSJlwjcmg2jLuM+BHQNmpIsC6gME6+k9xGIyKyjsEFNqR8IiQEkzuA9YBqYVD3tnODinZS35g8choJAb/VtBWBxwAbtCwBY1UkxxQBogHGUZW0h74VWHVMxtHgUXWOJyjjYSDkes20mPXwir4BUR8rHGP3RMcxYTxUbbJEHOoCKN5LMkCNF+8aFxWNPLc5SmJPKgbQJVE8VT9rQwJG55gk5Qr2cBsaVlYj7GGoQSHsDu06ZERofxUKi8CzwinFmYij8hplQuQ+ZClmhQGbUGGJN5XEwVKDSJAtXq5RpxFgcIAJviHvJQxVmyXP2kpSBU/hJMhvgTiLBMfGoE2Ir3YAWqh6Ei/GlJbuJXoNgAcJP5pP1JfA5hPlmjwuyOFQ1gh9CrE9ss6ytwe7OmNqCa44nAiEsFF3W2XCuM3mf2Mr0CUrE2o1jB6opdvUyIUP6PVu+7QP1nIV87Hs7llZSOBYnELok46wyELzhPH+abRTAeHz+cdC1iTJ875GVD5pUboempcOP+iIJxBHPdahzQRYoywRPlJ6TyS46Y8bfU4ZCSLUxKQRx8VNqoSggnuewPT4HkNlFkUYeNY1Q++nCKoPd4+B8dAqOYOBk0pidFK7AFZz7iFaUsDDk0FEZrP0qhR8PAVNjyJ0Hxcx4MD4qFvjENBmmdvJZZRykqL7HokAPExd2WrSPszkRoB48onbVQE4UGQUZriwF0RTwtiFGYySoKwzJFHxQLGOCC3SjHesUWYXAXJ1NH1QEbaBGIopmC+RPPEo7ohDYTnUTxI2aqWjGQLR2hYoRLWz/9eYuQiUli5YRobKd5pXM3WFmVwM8EUU81INMY5+jMrMiyiTjT8lVDJND9AuuRliBMSYeZ5SnylJZWV+CyoE+y3AG1pwNEQm1otAKjbdQ5s/U7E83SsQ/xojhztmUcELGAfzo44FuoaQJjB/mA+lik9K++DlhLLV66YbBbGC1lvOhglpfHiVy0IyrHgmeV14RJLhIFXtKD5mlnnledY+EFXMWWMevEYqGsAxfWHOJmPIKlpyhATBD+j7QtBdJjJj/HZaIRVKXUg2F2TYeIICQnkbkbu9aKFWGbeww4osd3C8bqDD7eEyaSK4/vjqMtVghVneGT4x0cmv5cak6mmcJrSzNPUBrEdJ22H7Ig1Yj3MY//x020AOCw18QUB1vbLsdwLDdHNnidFgIqa0zh43KItQ6QqTeDwVva4MokpG4LyxmJ4Pjivm0MBX9Hfuj+IQDImnJIh8C9Zj65mKgn5E+3Pyl8OaNJUCIl8IbpW3Kl30oWVmDAThuYBTdpsF5+qzSk7xBkqnT2JfGM974vXLhEHFbixvGRhUJ/O4CfmInw7dCRZYfBLhU8auAEefHiqx4tH2kLihp+pfAaiC7Wi31togCgqZr8bXM+itq2MNuA2AhxOIRDIfFRlFA7AkFFfqz0VQA99nS2uzxv3snL5XEUWTXHhYXqce7xkm57jP25zG00Nwp5xULi+4gRo0rP94yXzmLHYcSSSU8M4XBfFak8sKRRmT1OqwOhMQLpG1rXfJcUXwUYhG5UEbsPNLlJ+daSgD8TyRtryeaovOq0ATPP3XANAoxb1IFDZKPk1FJbxX8PderTVAYeyamrO/qpJDF/xWBYRUvPZWESgBro21RPZtRQDeOwIJ3eMJXWyATrp+DsKNYLITtxgOComkrskViBJIj1tid1iTCq45esfucmmp/MOToqvWCSBXb0Z6/eHyTskMkhoQnSJJVO0weIgFVSTJqgj7FHvgBAtt1ezn0HpIl8BOs1XLzPZW36My4TXl/Fda5FJY7Q4a61l56KtbuwbRq0APibARJqfK3I+biRwZmsNWuNI5ICEv0/atih/hYXhrtQS33xJcf5y6oe7kUm5YIrsXmxLqg4CmA+2QbIzPPND7gdC+2V7z9S7zXnUbOAY6Wa5kdOWBhzmlC10TxebP2wfrDQDTVSP5LFVy835SOpV1DMDmFgH43OWlDltLBEzTtCeByc1SoBngZ/Nf7Eje62M4W5EY5rNqTue92Sb0nkT/Qa6maX5e/RvBC7bFlEADQXFNUYoFqxDmxiw5eI5g6PFAMjOdyJ5FJEvv2quWx7sht6aKOokM0CxRnC76A8Nq9L2cHQ+kPmHS+jptv6egmfnQsmMeF7fsUunAEGlOjgxxZH3T8ankef3UPzfPIxAORr+HBNaiiBfAdFfozASJnz+kGSP1SL/jFHRsVrB9of/dTv5w2fCu9DiCVYbaQbBmwDkJG9tqzI1UIx3w1NONjf2XKU89RTDzrKRYeAOUiRbBAjE+46KdPZAM6M5VhafwnumaUjtjkDmqijoLVcCAxa80V4fNrpXE9TjU74R0ZYGHDFqBqp2JzWOC9MhQFVV6OxTozuacXT3RjziI25bgXRhjSOQYRTN8HzIoNyjmeNgYdxBQ7bLRy1AGhAFyMjDr6OrsSSxiHmaQxTpxQFktkZgHiOBmMdDxXKmM7rxLZa+oGaSv7qyTgcPCscM3JLpGiQoIz9KCdNzMqh1YaEIiUxkoI57DWar0m0GOEx8RmTeVXGR7yg6WsTQBAg4UWELghsM7NUyLjzpwG8JQnD2rqM8PDKV5dNrRmnlz+RPTvlYlBHNgIq5TyxuK/wjVkBeRDhinEWcqKDBWViUTk60KVF+SG3WDX9p38TFE3DBi+1TrAaTQymRLEqqCo6L1M+15Uc2SdzquYqcJmWcmP3sgiIZ75jo1Bb8I9jbX7ZD+S9CynSU28aOXdgoYwrwGMiFSIghHHBRbPzP5GOlAj/kvp/y/69wDENiZdNLMC/HwvBT3TPSFgxXSJU7/ktQoDjjMDd6SB9XKdIuyhC0NifJz0DW3ndZJeDuX3EXwnRk3lpLE5VMtwBjBTwyVQxKTL08pfVGl1JdlA2i7C+1jaQNUJcM2nzrsv7hO4507UEf6UXlm/GlpMwuccs6Mc2RBgILEDkGq88maLdJMnA44msAiR+JKK8DxPQhDvFLx83DE9HVCr36hHHmQFHt1nikQ0qmCO5pQBvrMfez2G0QaG5IJA80yreYtjLgaCZXuAemtVk1NS/HjjGwQICe6SOC8GNJLJ+VLEnGftk/hmTTs6iwAm3hz/MHJfoYDZBT8bizH9no3M9QOIapx/dOPIWZFc9k0PAj2ogFg7RC+XKda6vo0AO5PtXRqMY/AnH4LRuQiRTFnQ84gmliwiewdmO+bTwnsImy/WT09tfDcyi2mID8OVJqDFA4wy0cG6Ct4pP0Ih7wFC+2IZQtcDBzzMJtdCswio1T3qf1p4eCIFT5PaURypp5fSVl2cz2NdM6rnCsjxKmEQEQoWq/lVEUF3USlMyO0S2NNQBgawMOAKn9hABI/ON6fafYo+tqps3YHDnKPjqproUIizy24CYkKcw4jJx8YySx/hG9lRGLkpdpSoQcwVW2c1AdOxLdO+TgWrOu8rc3ININgdUuoAG6aNAhyIqXHAIt2CsbwbA6CtriOzQlpg1iBrU+EpOOWwpbfnw2X9Ef4GA7WnN0ZLlLTumVgtBF1ZpcEVsZpwJAEInJ9I6xiSLgCjPJHeWyQv0iIqA2ADagDB1tYqrbsnFZBCgjgLp9qjLG8HsktNUBh0qIAIgEo9s0ah2qN0kAKoDKnv+VqGdcA11mv0R4122JJBdaJyCHwqaT0QrclYL9y/q1zFmWWI0U+4Q8YvIPVMkg/j6Uh/wkawUH5M9KFwxFdjbmnWKHMZTrLS7KZMaYWKK6EtSVNMiGnUZ/ULIR9YBvIhQg1SADeg67Y3HGJk7N0KTXB5JLCKn6NcNNwQ//Wsz34jd2tYv2FgICykaaz9pLA1tIIRa3aGOLL3LcloADzAdNJOodWVd7etGrKrPdJ+d2b9Fod69mZHhokFnfqXzCow9iMktyFnuiYdZjCnnmcw/bwRooKOyB78qYiQA06i+EOVAplRjvkXSr/bWO25C0pqvAPw7H8x1QZJ+DsUUu4OCAJknJBRIuW5H6x+xXgKgZt2EYd2GxBagiY8QK/245af3cxi1VH3ADAAgRwL28OsAfid/oAiVCounm2Zs584t/ktgHISEg8X97MRjxC2j1kaD9qKC57bN1xVkEZxckHKqXTtXquhbIADbMGMrncrmXVpQwgNkDHg4weYO8suagQJgJeNPA6wxGWpTCU1PpIZ5gA9A+wY1HUc6V6zEO2OUGbj8p7AGvD317rkaDjr/2elHYRT7qcOqhjKC098RUrU2MnCAidBGAP6DTe1Ky1ZiKWCDCwMsqOteewmIF418Q4UVsM4N3C7yp4DZwjOkQBNmAgaoIukpOc2ncuW6YYSCS2+V8/MF6TuqqUCc++Yjrh0SStnqj+uIABFYFtvK3xbk1JikI343sjBrLD+pck8XlPLCyyAnJBqgpUwFVAJXdfya4pHTYn2V+IiEQAtaAfcC+y5mZF98tdV7huIWYQygvsv8DYLOho4/Yb6+H7GXP17q7FdCEMfLkFJtDgVjVjA02LBSlN3lRFYDfoHbi6anWYHrOxbslJ6FvYV0Rl5lvyrLlQgGyz+5VaC9Ehai3a+uPdLTnmFQ4lb6nQB5nAnVnWnDDZy/dt5Ij60zCLuLOwQ51+LnQaBeFGhPWqM1ETdLY8812BMMiFoBEujhyy9dPP69VZtm4RITqpONFCPgLzKxZPp+xHTFq+92McHvml3OZ0Z7zSel9N7fQxlAksUdbOXlQmae1pk21ChzOhUMi3HRs2loA4eXw5InAUv97dCjVF8GGVdG5F4G9fv3CuBHPgACVe8EEgx5GYi+1gj4EnkCyBGINUAMRyLO3tyRt7UcqFFyS/EVAze7cMR8r3GtejkUAbA/NKyBpGGU4kDYRXB3TdWQFUTMIydC/J0OUbvIUi9C12C0Eup2pQwNTzcg2UcmgVx1BmLGcAcgrpcDzdiuuEnoXUrihIos08sy0PerSHBoYWLCiOqPrJ8keYRM4bnbIyx7lW9LEZJ4Mf8thfNNdw7AUnAfeoDH25L6UuTehoNWQkfmnEPjxjYxb2Uo2tKUBByqXImJpkLc543xkmEP4VwQAmKiqSg/fNJAtZ5W+INH+YBvmNRoasTLpAvm07o2T3ryh5EP+b/e5ImpmywdZqxpP9wLaSAClCDDwDqLy7iuGG34rPAaRQgVNDFMRFH46p1jxTLFMcs7ZpqfXkIRiBo+QrXIvvZSRACM6RNNNgF5YexldGMM8Ui56hSRgxj/JFkBPUST2wq7I30UH8tGOXHpSi7aLP6N8yOFzIvZ++G2BObY04IiQNFPUnAAml84G4hkHE9RD++md5imwWo0KSTxvag1HGjl7FZSv96V0m6Njn79dn0tK1mnmDOZOIkur5TWGeAhTitFOUrkcZUKcwio90jtQa1joz0tQoF4nJVK96gf49FDR8ovXaSj/TbKIoyFfX52vlAsA3k+JHwU7Z5fltI+vICjzt7lgGzhEmcHNviYOArS7KEDT79TaChp/bPLomplbw9SVyiGOkrHVjKwc3KxZFCz5I5uAW2LykpFEPyO0QAIEs2WQ2RZN8wkBqohzGYrMTCvvsS1CtwvgCLu0vVMTbALUDZIcSccrmJt6AD20gYTi4FtzS6IYZ+bbQwARHLnMQYmsQXRJfrSV1PIyCBA4C9/Qd59KGL0okGe4zBjztab/0eVk/6TMcRhzdKRsDzAZLHMSA6SwCBy0f1UiZ9xSatZVq3wAChRMJClwWQTa5drYWUgPUhgNGb0rid0nb3dOkeZE0R6C+yYZBB3ntCveT/bIr6QAcTjigkRhbKIzKhIRtgxiQCmNthIHkFg8EaHQUofmt/1DALNIM9gfF8iSeQ+22ag3Yj0cE90GgIPAd/Pk4hckaL6SBzBCFIlG0wyOqAB6ze6NqPrFIxx/yltYrfBCrUCsolh7yc8UziqJZhQEkQnYbhGmFnO6qE6G+8UNvbBmkUsDLHkd9Jc8M60zRz0LiitWgRa32jniyRcr0ElG38KneliKlMqg1qVOBznBwvHQPCixmZ2XQJNHcXm6oR+FKeKRBjEhCuuJHWilkcqen7Ap2EhU3uF9VwWmJjtKTUzXx6bFAI8yfLPdNDAJORLgGKDLlr8ioTzurVbXbgRpsKl9y+g2ABwQHzEEJMA+Ya18z6YjJXE6Ek1UVaOCfhysVIvqTz3bkKapg7UM3HCGhTASBe4kCqBSHJjRUrxEnLp3W3YeqhlQmJUBB4v3oeo0fDwVeMSI6U3Ik5fYB+nlhgqVX6Ml8sSLdJ2XIRAHS+diMgaPZ3GAeIRWXmXVfllBa0JmaoavmHhgzj8bLs3Ocgj7Jm1IwIuEwG4QIQsGrUUN0WJS0zK9nwYFUqoQ6abKptkjIECV/rpbFyJ7+AO5yy2NLwK6HQCHTgSA9ulpyZQp5xsSNo/i2nAGlSkh8kb5ptcuRGbngwoapUXYSZFU5BFQKvH20nNBA0EPymW5BR0yVBVlhcurGLa9Hedql4WnwAwXx+DqZWLLi4JwRkUDR8ZOWg9sDbJ7MQjih2/xiCaKs8Jl6zcjrbyUxgXIGdFo4e6YaasDjtZN+y8YN9ftS+k14CZhjQNshVPIwwQEAESI0EOaAEKgGt1qeYMK3P/bEq3UaNa87KE5/sEJZoWEiPxVb7d4wreLoWVilgzt4xJnZd1UbDO0wIUZHH8isBW5lkN4/JQGUsyaI3+K6q//kFvddwyplYhVjrZLPNHa4uLwsZYjOv5MJsPD8OetQyEnsjHh4vviNbWzZ3v8e12hQUb5n+sB3+bLBXnec8QzcPVQlhecAMzZqDuEbEmpCe4UhlA8TH5BwIrnMqA8JYDH2DzsNgXQzBCuYJ54wD0fmipQHKfGxz1oh+lSPq35Z7kYNa1F9ypj+zKc/don2rOejACtlQB9JDqS6RijbwiItWcf2pFhJ2TIxorWWK7k+sj1qJ1xCMZcmYklO8eLYMwJHOSvn9jONYehuVlnEYJaxN6UeNGJ6CyrE6/1AbJUK17bP8RnqVVBBCaeJ47VnxKkSUwydswGIlTQnvo1BCSww9cuajDzggTQB6wJARClj9iytNUBR4KQadB4UJ6vgVXeCLAKAAAgAElEQVT07TTSrlBL06kEoyf1yF/iQPlv+KJ54K66dp80awkOqTQjXMAwV2XYnHgVWkJhjUHtWl95T9g1yTKdqyUbvBLLHNskFpUiUk9QaaSgUnYElo11qvwVF0ThEAAlyV8Uz8xdUSzXQH+ThNCqEdkjNk01cbKaldgTiYlkdyKW2g1FQ9949EwGwQx5GkNACVJTMTIM1l3nZAoWgzpZF8PKPEwZDwSw4IYjxq1OtwPgCDxW2K11c7ibfwjxCMjG+ojYfMXNG1cFIKsiBnwB3GY3FccM4A81ihmUkvJRpqhcjtjSJtvvBUdhcqbzZIAykMjo/Ry2+XGJx+PrFR6jnDwhYBqUe1qBS7B6Jl9+xKS6EYD37QGN21CdKcJx0tYxhuEbsWBqbr8ZFL0ImEcZo52hvAj6ORKBZFnnumUhn0np4JBbPlOTI8Xkgk5BwNidzMJ6SowtSLcD4IiQXSBsOr4mGsG+UfvXXtsUQjSncbgFQYMTEkGSXg3PEJvBqWmb9resAj0VeYYwBNDZqTSwqvsVdcJLavMTET+ms5TW4FK95Oz46/a9E8SIFoiPYLDEhnq+AUJIzkAxyQV422JsPZTASAcOtkhToKaZuNcLCWTukRp8ZCsl5rVV3cRkqo0eE9B6d231Bz3fn4dzisUC9oaI00FuWk3tpafHeP1uRRRLSgVka/fYdqSSV1AtqMKuQpaJQObllNvgPHNGWx1wZJC4Sa4BamoGYEx9TwDQQ6hCe96N0P+hzLmReXHJP8Ua2f8lM9JTZYZIanKBJHCHMSpcotEy+M6sQ8/q4kW9anzWZ+tMLco26bqdHF7Th1iB6Gzl2ZWQP7HI5wPiVJ2yknxOCWi8Di4iu4GjpNKhKEAc+gmvfgZ22bKR1+Dd1Wvm2XxEwW+qfCJDr3zixJMfvL7lcZIrEgv1eHHf4BIXIKM3+XWliL9p308BqIZVC4vbmk+1Cdlo678FG9CWBhxxM+DtD0UiCzjGIUS7WbBC6AFWwKspeQs9gZRMBn8GFGDowEIHMWsMwbCJGIjGNFgXwS8Rbb6roHxQItOfd7cUT5NfLXprvKm9azxCJm4ur0erVekBFD2Aqn7KLkqfwZomfQhCcQoVQKik4oRahmXBfsHTVb17FNaCU1M/25PL19BGQ359robAg8eK6w6VrRT4aI4XFyd6dQqgbWcxQOC7fPaPrhw8FvM8emy0SCpjNnZL4JV8ZS0LrzMlb/7AbUinpMBDb8Eoas23Hm1pwGEprT/U/n+Ir0Ork8rXdHf8lz4Hkdt7TUQ9hYODW6IxblK2cz5lxRSJLF5R+qCkAR5i0NBQiMj8CEXJ5Ivgp8b8WaclCAqa3n3MYn0qSRe/iH9OpJQn0RFsaPbYcHj9kxXPsIu1iIkXwXP5SjK5I61RUtscbpba5QXvMYs3g0cFQZIxrDrSnXSTmB4k9JK0PLEjPsX6hA837G9t5qu9F5gCxz/ZvswHXLJoOUXRwhZuNX/Gv44QcziFq/N9sOXo9gAcCjUvwba2CwmxHvg7KgDRUXOOrbVKFWI1xCGyugnnKH7wNsSlyvAMk4fR4TLUx9HDWChmEYaqMdbFSgwSyU5hYsfRadXeCxNzpYrZB/einESjdfyd4jK0Qx4cope9NTDwnBxaqUXP6t9QKWpBzBv5R5Iz5OnhiaLBT+QIMIecKcT7WC4YyPkb3BDBUqHlExwK1U8LBASg40PjeCPr1FEhT0+k2wtnWLptAQd5ugcE43mkIs8ubl5UGViJYpA7UnVYZCxqlm5NGouNvDovl2eypER+eA3Bdc6fJvozHX/fAsr002CLLFqXKVmKq+5Ot8R9j9rKB8zRczKSRqsjEdSQyphAYxF0nGVeSmzNo0jR4npMfD0jQpE0zObIyFe0/kHy33bhxC1yjFULwaGtjkuM3yUNBjgo8jdaIvUtbINqm9GsgWqgGgnqamIdJjYBAQiJKjIQPS1jk81qJbK/NolqhIoqIECqJ4AmAJDslp1QVntkEAGSWXPE9uh1c5RPW3VbJQsm+KItw7JyidFN6PZMIsfE8DeLlrYwcfa6tWqztGfmAJjzplgzlTIkObATseSBZSRajKzKIOxHxi/orlB6YgGS920Lz/CKE6W889REMV9+mWpF8oemGRDXgV4HCaEcBy6nHQPOkQfl2LaxWeFT319AHiPq9Yu3RLwRBDGCUjzRAhAjKn6174+TdyZck0PGteKlz1AxueYgrwGQiefi3TZuDhSYl229gesclBn8HvNGBxCbJ6v+Q1xuPYYg2wSiurY6ZnW1lYa8k8aYrM6kcLXx2uNeGTUDYGR30812q+0BtOct2+6wXdiaPyGfqNGbztwu8LeMsS2O6HTIilGxkeXfKTFba9hpbKQMp39iWADAEBGx4sXBapMy1+zCesUOGqceUK+dolADunO5BiJCqI0DwdZyYR+qPlYM8iC2/bGlIcdtu8JhJoFQl3b9scuM9zJ6DlAtgcCfqnD7KcyqZDS612dMs7N6FcmA0RwIuY4bVRuGriI0AKMTrYATBT9cwVzxfC8PJlMZfx8qDEUB3IjniZOYraOQKsqtWLWkQ41IlThTa6TUoY5sA0c4fzONV0O7rASF8vHTlUurL2ScuoGxXEEZb5/fiNTEwT81dr4t6LYFHIReeEnmG0ABsB5Kyz2MjAi9qqowrkyd4xsZIMi12luiVd3MVH73f4G3826Xd5iNZ4pLhBwKa1OqCNc70E+WzNUFkiLiepdV3241JJS3A48SFiZNypeSVgYRCm+bgafpMkQliwpQ0o+3AHN3UfNScYq0OccvX9mQxdNlVE03UySIHINYIK8xPDnX9fyLc4GMw5spKYz4QezPVjrKkHacdNsCDgAIxtNgDiREsQYN7HSUAh3QB84AgQqhQvROCc1b/aKlrhSPWMzQkQ0rHawHa8U1XhwTRSsbdAVGpivc2xCexI2oeBEmZdKEN5lHjMlfAmmiHMKiimrZUKdodaHrN4bGa7fMAkzUpmdXgAYOH7L6Gmag8CdGvkg/ctLeuktvHQmhWhgO2Q88hYV4y0ldwUkj1cT6QJA/8wpJQmWZDM4Dg5wn0nT4cpEukp+B3zBrefYhTlMDen3WSsE+xBNh2I2I+MfQCaAuFXzL0e0NOCDAdTWB+VQ9ykSGCzotSMkKkKBCsM/nDI4oDvqlNY34s/Ce809Zc+yxVuAQ+hn0BwRu/kQqkLO6JBiXEoSS8RaSJ49vIU3tGLSiw3AMlJwu6RmgFMURS664MMpRSJhZX7F7l4SCMwXLebWkdPkCTH5tUvon4okMLGLlpSKdj0Y9dIXiqWlZEdi/t8K6d64jccCGnGix1SetaRhkCFP9cFuT3Dvhg5uMZDjFeOvgISUex16R7/W54qZ0lxMWmC4CIPsefUQzu5EXFTabBWu/v3nOWwOHB6TbHnAAgDFZSO680Zivyt5Nz3Fq1kqqZn9OQam4wxbF1DyhSsWz8AqzcpV5jGDCM1kHlReU+ZEUT2QqgXbOWSpBlcyQrVxNzMtfzCFNnWCxXwekCjdCZO1TtvbBxcPQ/zuOEvJINWQYylcNFXA6lYn3eszjqdkAwXwH1Q92Rkxmu7AuycCHYLL0CJkdEiRv6iVL8EoxsTNC2Y7YMnPCr1Pba4LIK81PIbNVXymM4L5sznY1B7C+lJhJdfC6Lvik3Zal7wXgcF4da0CzwtGkkA9o80hEr8Du+UZzGkdw3KkMgBorGCCKrnpXOCsGUOdouOcnhpfDe6N89K9VGeAPmSHBlDk45O42SC0VMEmlZre8EhLWJ11S0QUBGePKgrkMZSRceCwCi5/LnFXvAhcUKLRP0WO1eRbwJcwFECOhFnH5bjMlb0Yd3Lhi0D+SQxmeDj16KnLi2lvSe1rkIop7mqS1qEWauepicE7NjFxzg9wtrm1W1+UxoyMFBwjNCsftiTi+F4CjIWzedGtfVCJpYnNFMznR5GicVWU/qhJ/FMlrL4qhsi4wrCDvtaPFI/xL+isbQQ9D+UAztEKy+LgdghvMrj1g1aEwphYVBiXU4p1ESqluPmXo8WerFWpqekaOUpIob+5KGFq9hdSpbf43SqI8ZRxU3CD2UbZBCIF57C54Jc3UcGS8GHO3xqXUpwsgVnA0kXRExM77Cib48OGLY0Suicju3R60lQFHqfaZrm9AQfsZvS4xUZSpchPbFY6e1UQEbxry/VZ8OngLa34N/gcW0+L4ALfphIQZTngLEQJ1oBBki+L6CkqStE9qFVYtBRhkAnLrO7gBLMFjsbRc9OprUMhHVS8MUzOCKEk+v+xqyTAfaYnIEGGf4OcnyUM2O41R4HrGauTNUw1Waa7bjP66UKuwoz3kFwtDOgxb9PCZchYZ/hpF0RApGaLmMcQrnYgf/JUVLE/e5G+ku9Wod4S0lQEH8FEzyNH/aB5Ag9ipPckFcBOwDwDtTrF2MmHsy3rt7DSmXI09icjg14bLBNEEUNXsT21QDgI/accdwGW/Zg/Ety57CwzicCTdGlKLodGyJ1nCfDDM2FOWqLDyfwGQ64X20p2mBS3vQM+trARNj7e9Hpo7K5MfRBAXQwb/8owTtOc72f84oY+3NHfMYkBvvVq0Tg2/ANihQgp/81AfvR42DoBX4T8FdoPUHt4TLma4D8IxXy/yeR5YBGrsl67jYoDUYw64VkU+mO5n8HGtkNNps/Vo3pl2CcvqhkDJQO2J4HY2mLnpFJn8NrI3C4RSM5THDlcY4rtNGUKA5pwoquvWiNhowPZtMDBerOI0wUxHp3uexlA4HKbhaHtPYA6y582x6tBqFhtOocitcdAPq/NmLplB4g627X5iVbDqmGkxopmyTZbKtIcUoZr2ajPDV2EkcnK4uBIBACqCXnsqn+l0dCUHI8JGMgSiGqAG7DfvrBhbGHrJrUxbHHAMRGSt3Rg6n9DoN1aV6b0W0/LquHUdkW2KuMMBmaTTSuMjtcmjoizDIEO8xIiEG8DPpF6iRPYjJ6G0yckcaSHH5Sp9KUq7XMvnBd0c8w0gyfDE3NqteSl2mCC7C/PSpC3ux5I0fjfsQgBR1yhGDvlPjD0Kv23oNgUc0R4ne5q5xe2dtM2VikBTE2RUFVSI7vQxJRrjASgFjIZSmmzhFMxJh6aRwDhH+Zyq+xiCEjWm/LGZsfq4JooXqJKeSiIVtaQMqXz1ykpHLPyAmTI+gT7nyEZdGYBQ0m4ML8RWvGA4xI2YsMHaWCECNzZh/I43BDThapdazi4wRJOjwpeodeKN08zMILs+wYTjqwnoi6cwM4Y39sJth6kp0ay+SJjmoN21+oFMU5A5gIGoGdPGzdhVmyhtfSRymwIOSPtT83KshYSDskxFzNhrj/8KbFgxk465BvF22dya9c2ub7AF1rD6lLtXbCL6rPwTPmRWsuJ1WRIozJA02UzAJnMCs5RwSFjVeElPwpRfzQow0HIBslX4WEarPyqq4evZIX8unnfD11nU84YFmT7zaoyfDKPGwDFqF9m6B6bUkV8KOX9P7P+WmTq7FCZlCDamumB1M9kpYSLFL9OTPAllYwo+8AkcQTzms0aASoOlWiBXShy02EA6vXK/xTHH7Qo4EMDs5yBkw2zPma/dwOjx2kB1OmYVQs9s62AvjYuprU3/QUi4d1Lu5cjMJmWOYDDFRYcJQI3mHrnCAcMU3MiJWZYjC+6MeH5GJr9iFNj1AEOW9Vde47pWofaN5nHFAGkFXMdoZjE6ggHH+GjFJpzt5WCApH5aQIk8Qw7RFlNRcTe/mrndCiC/aTdycgNKbB+DJ1nGoRdhSR27NcW1uMtutlX4k8miSetG1q8yqCFSPUkBvAawG6mznHnxjoDIVodB3/vzwWIOxmlor8NaaK3xFkcVCbpdAYck39qz47+kFsZGP2HO4yWq9tOFTAvDIqik6DMukyFMdUU0Z5bXyaQF6EbpWdVt6gXxmagjF/wXB/fRG8MtDui3uxqfjiMS+6hrxP7HuMchV3jp6XMCY2gOJCGhPkCBXwShvyRyN6kDW3rbFr82HK0rUQkB2h2vQRW5+tRQ2g2M8s5sLGrpoH4SAajrB97gRJkP2Z8MsXRG817AofOGpgI1uUUbdgKOAZKSPfFB3LvN6PsBOMAuOAEYJDjugwDbRQ77JXoniFsCG1n9hlec4SApgj9we5TA+V4GFWxlAVOnieJFNaQl+RIMksFZCy/PAMNYEEVlOmkgW2L32ZMyQIEE0brj/EsYZItnX5gNhjgIbJU9KDwDibKpsFgwDeuXSy9NYqAyYyB/+M0CS3zBP8BiHtaLAwKeAXihWN5C7fFnUi6AkxzUSRhDE95mTYXzsNFVfqQRwbxRNAa04d7OQamVtxnm+N4ADkPNtGRGndzPQgYFugWARBVgVbVTG0s+kUXyfwVCRUQpn8fFLEVatimDhEAyZBxmnhR488HLJ2j4CZ6FRCOm+GDH3UqJQJkyw7dJ9yoZ7oO6/zJxvRPnxjNu7YLpCCBvjOIhenKht7WrA6weMP5a9V3VL0wfjfKVmNp4ku0kzUbIVfBBREPu1ApE27o0COCgyN/WIQLsA24CVIRISECEcSn9VSrToDhQae5VQBPuZAZD6C+HsvgpCNFzhsSKllvzC4QLqa08AVZQdINa3IgTBCRg51puipKbmJx3qoXkiRcGvGFu8KpBNUs6Rb2hExM/bzJ5FBrIET1dQuXvNZCF9hRk4OoXDKAIislL9ruIPagky5qJ51lG/cySUA+YfB6hl8VD7MqR3awTddVCqfB6oGG6pnGbCK55o8AAvKnUTg7bfQOtq7HpzTs9GfwzEYKBEssk0nChzAaRkSuYP3Z9Ijj5xHZFCuuzL7iKgXGK6NAOmxSCpTGOMbMXkIc2EKhqp0WIQ0bjG4naRyo50bY03XYrHJj7AwAkxE3ETSAErABrIO9ja+TZ1JhOiMnmI2mE5vgvy6kC/zUoBAK0D1lSu5q8ac3tppgmISYQZkVUQChyCiMRSoLyJ5+qxgyouxEJgAD1Q0jcJfOmnjOTeCU9Oa1QwSMDOZpJ0OOPI4CGBf0MEM9gBWi7yPfQsopmfJGX02rjdtODdIEczLESyYxelvh+Us/CJ9OVA2GFCZeKKDCq0oHB1HKBtKkGRW6/NKgbFLjcTgP948Lc+WBO7cUcNsDIBhaidNiaTuTskKvTHFnmmqMDJkZylobZ21Oi2qMRAzuBvHPaK9tKsoDA1zmzTVO+0epGU+A0xz1ompXPlGRjT0KzpPVw0souZNKw0URrSpXuLLE9LEOIyiqAyp7RBAj8y1oSBnUk0ymENWAtP7k4KC79Lum2AxwZYki3+cVnhqShcWdjhqqKW8XQmQWmOcqskCjyO2QfdWpdq861wbZ8NFg+qDolYfcJpxmbbhk61xiw6MYz4W9B+IsiSmXLstDqT4snDHwkfZxWk9K1i5yNg/JhuY+nx0FiEEO0hRIKxSkMjEolj/CO9Z3AbWV1eE9kkP1/9IbDqyZewzBDa5kOO8Oj5ODZGLvoFtL3DXBYIgIibM6CVZVqJAqBCD2skIgdu61nzLFJp6fmZbYhBe4K+bTs6G+7TFgRqtvaM0YhG+ApFUTYeBm0aFmI59c8/KRPcdAb2cmmD0SDgd0OPNUKNF7+ykZQnJRfudqLKFaCsjmGoOYUbPtbe+fWAG4MUpyAyg4JnjMJ6GKT3VkzU1yABedpAWUFflXBG63e+scwc1+kkoK2+AJKlAMoBUWeQEK10yqI4dLhNAedgNoA3Gb0vQMcbFiIoA9AyKf1SAkJASYqtN9LUhasmzlhlEaVM1g/CEOUArzk25wQ//jLzeFqjDenOveZ8jRhpHY6Zf1Fp4dWD+yKqszs5QzlZxlHpkNKFZlVApOi6UykhtKOH2yFB5VURbzIqq/G0h8TbfMkhZkhUP0UKEmv7vjhN1+k517HYtfRKbdhqZ+kGdoPPxmD6e2prBwah77l95l8UmwE+83RYXhEhzZYif5XVj+IdX1u8nny+yPjra4o3Dqu8LB0BKigCWspmXcgInBfJO0yr7cmfd8AB4kphn2CfqnBG4iweXpnwIYxR+LI+7CyjgoZ0XmM5cCwSMBCi0qSFq1zSphRQBoS/YMpPISuOK8xgB+JDQrutjJl422IjqDOIXrssscvUZ/HQnZRRDzwRzDtz+OJaQXwM1Guf4LVCp4dRcTuHKBNlfIoc4DC1ZCGgcchHSX7DJRJlnjHYhRETGqS/ct+JhyezaHm8aTX+aRGXvf3ARRJ9A1C/HwMhb9DMOwyUr1/IJjHxqyvKHUTy5QSHVTr5OWpnCsduY60aIO0Trrt6PsGOAwhEBJAH6hGiL60P4pqKoAeolEJSEHidHyWJeVAgUg+JY/95pzmMIIQKRAwGWQU45VMEOETUSSDXsA//ykoEWSQfBLRSbaFUaG0RDUED/xmmJqq3s8QeGz1ukuqcRkafkKrYAnpSsLKEENoRThoZOiiTSVIcQhAWi4n8uEfC+IIqlRTyqpG1tncEJCGzwBit5gwbPrzHon2Xm4e+HNJmZoKx9gRqAp1HSMESH39NxlsITTepTJSRkzFcA7IbHgd98lSt4C+j4CjGRTEGqBPzUqUmYSjHK92RlcAPbtxVP4zEtKcYsif25koi+RMbN1twWyN5klEUMlKyzJEgxRQVz261FiCJ5pkFSvkK8iYVQVsZOthqdklFF9f1FwUS4hxSVQYpGYhI0JGf1RAXK5sWDorUfw2hzkZnzdK0OFDHyJla2Dq9alGwvZlXXbabNJFhgw8cYKq0gsAbDlCG22ff3oQtNRSY1o29XGAIUxDDnSfUFHFoNbvDOgUrM7xRY7bF3d8HwEHuAGpw2k9wrGidjGtVyEW7WNX9DyAKKVzYWTtMBKUYPK0Ny3IHF+DyCyfpDOpFFsfcRnGHK8OQRHrFQqca0IhflH6SFkiUhlkFJGiF7nMmgMbesQyDBQgxIei8VmjmXotwOOQOiFcDEkWnlOYWR6LvE3Mq9eEY0pR5MU9CyxXYCIlSrFlVIDG2RcEK+UUTg0rZaqXhiDG9vYFGwDfP8CB0J681ZiGZhsH8GPaRuZk2pU4ROgB9DhvgkAtAnuNdqK5QtqkNyvG0m77XIDaRUGxImArxqCgtZ9cViE3CzfRFm0WUzWVV+evjb9Ri+71uJtPLc+ael/zkr9C7sh6SV9RZqbC7v8Qzi2ITDT4IxuoRJhCQlJkNz1MYHxISbjqSro2oJ8k+Hv5tTa5K9YkJco2vZldPEm9AGWyMJdDjDMCaGfJ8BFyAxQc3iEvyXZv07JGIdB/BcGNjttbwA7IFR0xpOVvJRH65k8S07w4FCHuTUOJmo89KZPP1q1OflE5NBwUXTQzRD2rzvRS29vsVq7reHPMzFA7wB4mTkTIRg6kfhLVxEbNKRAKkxIF07GtvG0W6rF9KGJGN79oyFcWsG8+fs6HwNrWgLZuGAXfP8BhqHG+SIjss7EjpXbwCZpFDgsKEhCX+CwMRfIgByozXOZGZhD4PyyLLnicArjQkTTmQkYUd1MTRqapFgfd/01yOkgMcJ8rnmmt8VaFQSiJZpR0uQ5HUMmgVMevQ5elV+jdyI52sCVXOf4rYIRBOjlNiCmLcw3mjtuBlCkTZLBoUEv3IFTc5zJFA1lmQCIOZOwdbfBypssCCqcmvK+ieINXoG6VFWjDRhu2ChV++r+9sQmrcDXI+44JUoyDWtwTSoHKgRgDbN9gilghoP+sfoTupg2VGd4b24bEW0LfV8BhiIAA6nFtt2lwAzWv0HN87QuRvRUP/zpK5F1keVqDEA2BRkq+fIZGBW4iGSKhSzGlxSt12CXUUbAtYnwEUI78LqEwP6ZgXufWF4wjy4nAQwMK8gxBTeDd/kbAxq2qczBDqSalS8tgRWWaeGOWgyE13tEr57jUeyDkI+q4eKkK5AJJGcmvLZcUaMJZQGe4C1dvuhGBO770+0HfN8AhoTYRADXrUWjR8uipQuwhIhnsaeKD+JTjYnqnoYt8/Ge57ORbRxlvO/IfjngLAEVTJxVDFCCKfASedecxbxfjH00bwj0m1rW6SBQl/R3BbGuHgXRtnJyO3TyNicKNmH4E5SPsU5lSCeksCr7xfGe7xqK/rDyMc0FrB3gXFIQmAZ9iNKahOTe5MJ4tR76lYtzRroaQbSD5HWgzhMUDpn4DIHFyCSvtgiexAlTY1sQSCFZi5WfERO6T9Oqi+O1H3zfAAXYSm6lEAP3Sd8oGq48QqIdYtdOLiC176QZVTDuSU9DLxyOCpBTup+YipLsK8ISynDzk8kMgh36H1Z7AHuTfCDmkUnViIVrc23VYRUlT2kdRtA/iQsgVNTd+GibIhokDA8YcFWIi1/i0uPHC7E50LmREA84tsm1hpNTOw8ZtxowAREfHtj4SH3AXlWiH/BKELI6QmJsWr4hq/Kzk5/G4ZEc7JkCmBKCm3GHsldw6jqBu/jJ33Psp49ITqlnnZeD57UAT37UAo6fW5GDzPyDCPlKvhaLSFg0zbsR/UbPI0Sdql9nQj13aOhEmsJrs4XSvt21qcsfU5MLUxNxEb7rCHmLljB1sEmzUsNLfvL7R/2Z949v1jZXN/nq/3qTmG0zk7LMIynidyKuniNWwGbSSfmv9uYeQ6UfNnzXiGHvlF0chgG4xXQZtnkv5hxxmJ3GkwqTHVksoGXzAxPrZxaAQHSP9jeG8DSy3kpS4Ch1VI5DY3clFckOsAUpqrby//Bb2cAS7AZhHqJJ9BLuj2n9tWvhhMBcmDO1jLA8yGzg4y4FfhiF/sijDhRJP5DmqhAF/cqMbrlCgHGlvfUWpJOQvEkVxX1hn/GKMhWxKnpx7R4M5GMqNjVk6NUoEUHvvWuZZjRUjD0vfQ8DRELafpEcAqL03OEY5Iq19a5+qtOovIDUBTlY4Nzmxa3Z619TEtl41W+FshRNAVNdAfdjc9BkCTAMA4CIATCBMTdYafLQAACAASURBVNU4vUq4WtfX+/T1Rv/Kytr1jc31fr9poJ3RZt4auGM8enDmuGf8me0zMguPLgEDuc+Rdw08vPzCm0azKhnIGBzVXXAJOQ/VSxQtf4Xd5yenXVCAGLQC/IZiVnyQEUFseobBQVcaURmPGYoLAo/GERFGYkwrf6HoxPRfSWvqUuCtL4+T3P5vaMSqEbIvikY/5ArR2p1+k8DfTtMYnuCmL+RPET0y/p5ySgBcgJj0BkuG/NuhJpdNFA/uS7SawUNu5qMQJv+8pkkOoDbreHvAaJrJ4OpDDm1gfCrdTvT9AxxolBQNSKUaoNZCtJEAD0RqNQ8rxD7Ko8ZmJib2LczdvW1uzwTC+jrUfaBNqBFqIFRNrTZla6oA5ojmqN6FeHimwu07viX87MbaF9dvfru2YSdtEEs4nA8oTGqAFjR/qaGNWD+kHJL0d6Fl01yvL19HMlFchpQ5HHqewjk+iLhhmYjPpGZNaAQVhA30X1oMSlNVwcw0Tk5UkxMwMYETFQDCZh82N2mzDxsb9coa9esYqM2Ll8waQyROfI0My2iGqG9Eb6rY90d8CBzFN2XkShO0IBmFgzeIQasj5m1T8mhdrJ/AQfqFzIVceRSgUDH+KPPwj9PYdPRKt/xVOGVvEfhqF2tJLLAJbjiwKW4FrNF0AcOkJTrfjajFaUofJEZny9L3DXBIxW69ztjGhM16hKpC7Ld3Znq9PXPTB+am90xOLCBBfw02m4kVOcaitMIKAKCuaXV1AeGh6d59M9uubtZfrKxfXlm7vrGJxY1lM2MArR16XvkMOjO08e/gVOoNWYXRy0GrSBCV7LBq8dwICRGqCqsKdi/27tg1uXux2rW9t33BHqbLHLD9h6gm+PZGffWb+sq1/uWv+xe/7hNRXfvaOHp7rJJSTbc+8uN1tfTwjXGfh6VBmMXhSEcWEfSFMmOEdMlV/6iX1sXK5M33l4MLec5+NaVDYReRFBA/CrLDy/iH4o0wfB47fd8Ah/NDRIhA2B7vs0EwgdjD9iUjJPtVaBP8d6UG1hK059YSTQBUQBXi4Z3b75ufWcS61+9Df8N8TEpTCH2RI1ajyWxZ1f0Z6h9A2Dc/dWPb7Germ59eu76yuSmDe/2LJDyA816DZwufaHK04Zfi4xOvlLEpL9kCZvZcu9Vs+3w7+noiKdG/+Lyns6helcJb8zYTz8/7R0Z0cYkkySG2BsNFUfykhFZaJIyU9+W1jYw/dPa7yD4ycz3Qm4C9uyf37JxY3NFbXOhtX+hNTXqoQjJGUVOFsGOh2jFf3bO/BwAbm/TtjXr5er38LV1e7p+/2t/Y9EeQd4hvRnlUKx+Hut4DtEsMynlZ7TFJwvQzhK2KIocTEbESWQJOXpf4lHEBBATQ4Li6MSfBk6lUBX78LeY5Ms1inFBkQPeGB5ki1CoH2tlHWl+ZuF6cyGU7G421gLa43FPjxG8O7HIemwL+dv89Q7no9n9Ej0g1i9sEsXEwcE2iA3aFbPVFJLddXgH0kNC4jxqx4vPFkygKQoilNp1EAECIm4R9AGp3idQmd+WXvU2gRkODAI4t3r4QBxNgTURmG2lDqnnrWpEzYUSTVe/ObbN3bZ/b1cNqc8OAn7H2Vjvvqrq/re4/PF0d2rv48fXVL2+sGtgRL5hMC/Z8QKSXQtdmuJe2W5mFIagp4dJWGnizAUY3Kr/vchwAQT9fok7p7zsFecWphTC2V8HsTO/YvdPH752dnbbP5Cyq4t8vscAA5SKHUvFkD3Ztr3Ztb4zjxOo6fXSuf/rTjZur1O+HUqhOY+hvtJre9U4gLZnvWKgzI4hjm870GbnTTdUq4sIpKckNPOkWqEjOK5wyEyZzb2puz73PTs4t9iamkhVmpJH/xjPGc2TKFlThJ23+f+y96ZPlyHEn+PMA3pH3VVdX33eTbIqkmsNLGq2GMklmuzNjNvuZ/91qzfbTfllbW5sxW2ls1kSRIkVRvNn33VXVdWVW5fUeEL4fgLgjALyXLyuzsuD9uhJAXB6X+88dEYFJ8eDm5PNfYLrPCi6E/ZAYcyE0MZiFoVDGBaKL5uHwyLZyK9xY421NaQTcTGz9C2BtPH5hY32dZC5LFNYptI/mex2VJVfKDUy+uZy/sLz+9sPjTx/sWxHc6OayxX5qfNLOVsy+XAglMmt1BXTILrC1u2eTys8PTeU1J/Jt5yEStrqavfz8+NmnhtsbeZ5bJrAtMGvATrYh7eRSBYWOOlczjQf05ov5V57L7j2Qn9yS731W7JqxyYEea+A+aKEu38Nro0QOJ8Q77aWS2hCbEBLzFhyMPr99rQWlYdM3tZx2YKRjhQGjjWtXXv2fSCRfELbbMXY83ycRiziL4zhVVNcM8mG++Wy++czky7enn/1LMsNklYx/R1/j5Oehn1e6qIBDz6UaX1TrRrm2K01f8kn8GwDAmciub6w/tzzKp1Pj8tN08rHflepqCSm3Ib+zPrq2svT7u7v7k+kc9fMThO6guD8hlrap9vHzrIIHsZsWfZoqz0vewFxTjFZd1NxETVmG5bMeyQ0pYj0WrQFhaZh9+xurr7wwFgRX3+sZo55Uo9fHjTbCiNUuMIIBgDkTuLQhLm2Ib76af/B5+dPfTY+nejW3x2vHERtt27iJ2RamT7V4BI5J2M76yEeGOnu3mraMNvommpN3Kj1tqugNIAyM169cefUvSUSq1FDLpkL0IG1mMyF3WxJ2mK+JKDS8/DpPD8pbv2tJ35SxReq8r3lzO6d0UQFHRdWENpijw0DtRDqLjfHSixtrG8SYTk+ebWOBFVbqAF8IAERRPE+0vbP2+/3JZw/2Sza5RH2eCYV3Qv9EmtWkxyWSQ2OfVREaXAbdOGjK3o/tQJZ2925bcNQGDWjeJnIg3aWdwVdeXX7hmdEgtzwYdRNWQyRq8cadEEBsQDpbs+OtRMBLT2XPXxUf3Sx//1F5465+Px1WNgpe2imKCDl40lCAWsTQvcw5iIDqq3JcLXvoaJukTgj1Ujs7Wu0yVXA696DucWDJ3r1H2Wglija6C5OGebEYUb5QGl3/5tHhffng81kS2TPEzBlWvwtG2Rwv1dLD5RzBMX0EgaYMEIQY1J6Nbz0Irq6vvb65vlxM5mSxLrtj4TO2LYEYQ1lcHw/FaHT78FivK/Q8BLbUitjMdbBjgFIj2yqvRnmdDmU7f0vf+2gpqe/tI8Xa2GuoAnmN0exgaMohFPqW/8PPzzzq1EQcNpFXRkWDnL79zbU//87GztYgy9S3f8w6YBdYkV39ACzEK+zFDzGDnZJBEIStNfHaM9nqmL64I+2N67HhaNAI+fEiTARef6c761B3UNtpK8IJqTkDgiACQ0ofNOvVxA3fSEXCP0HwV2TrgUB2cuu49hAO6BOFnAjkJI8UbCcHwNh56XuD5Y1UxI4UiU/pIDvWI1NHdteNVsu778VYi2A/KwfHK84gCZQAW2e1nGdaXl5qCD08PNTXF83DoWGvWpZv1qmX9TGxrlDmWSwLlVWeZS9srl8fDmg6qbeqNvF08rcqc445IkHF9LVBtn5161f3Hj44nsA7Y8AqoEIkof/Dje+qk4UicB9MhAab1qoEq6tnL4TCRy45DDRKiiA4ihDCczNTsZsLC5qoIY7BK6+8tPTNr62ur+XJcdg0RKnFM+inTUXl6CXArz2bXb8sfvVe8cePS8lqM0sCUKbRxknJ+D+sveun8lEEC8QzR110ycHiB0RmqB9qsox5kEJy9ne5+SukG/DE8eTD1StB5vNQZEjNN/tPmjRBVnbZ0lb1KDnlTQI33GKL1XlfF8/DcdEAB1wBWM8TApuv4MxPVVohxFeuXt4upyiLlgQLoxad10REQpZPcbG8s/7TO3sV5qgCtEJNmO+UMrHaOevEbJ1/ELdLZePWf2iVJUIbHjWRq+8bBdf86tCHfLGcuo6H0Uj89V9uXbmkvJjOBhONJBSMM3LQbUh/Zah3G1C98sPaVuioJTtV/d2u1RF+8NX8jWez//qzyeFxl5rZOaV7wZUD9RPThUadkhvXdY6cguBX47daMBqfQQ2Feugh7ulom7zdKpXGjy1gjLJRlg28rOam0+iE5pJmKNGOKjKGIH9/iTvmHTCdQNYXFHBcwI+3AXEvIdddqLf3zUC675dGw69f3tmRRS1zH5Hb7oSlEJHYLCd/trN6ZWXJ9pa6pubJComV2xyc0lfdC1iISG3jYcF97OXW4FhojhAjE1cQXnlp6T/+7aUrl0dedVot3PCqsajWsFQ+vsbaXqP/9P3hG89lQoRMdu8EJ6Zbgs80x/4Aqs/jR9gsiMjSNLPkb28XZuvpqTDZnZzOJABcHNssnZy7qBvybCsdI6p2s87PGFXa6vF4mTIrLRZwcPr3CIkrm4wAcHU0DFfnfImCUTLUSgb1DbTOlsBgMHjjyuVNLsHGK7CAd72PhBhYLaZvrS9dWVmyULUjJep9PJa0JdsTUsciL4JVhE5Oddu7oQrTa8cTLKFuLGGdK1sn+6gG9/W1Tl53tGbPrx6MMQunZB2bbe4sCepwaJ9hFPlEDasc6iI856laI0qA8RDY+asWIot7r4nYLEDgSBNV/3/rT9b+4vtbG+sDp8r6r62fCKZ1VfFOs3k2PwFt57bFHlAy1BCvLtEPvpZ/7ysZ6dqZcVg9U3nUda/6m3RoHdN1qKixVy3NUB2um9j4PBwjggGw3cCLIn3clhpNAdRRHAcF1x1HZkGodzCXlm3MVrVUJcIFoeqOnfzB+sA7a7rrXrALtEs242rGFiPqZL49HqIWMGLM7G+1xj8T2K0K6xEKBkquF3A8TjXuRhfUw5GgCniYuTZLb44G+Zs7W+uTIy9ZahP9QmkBRVTSdEVO31pf2hmP5s2z2fBuaVBqj9KS4QypF+PeWAjNnGGzr7o57cpK9pd/vv31r605vgq/6dXmlGjOcf9ucGevs7Rvwx2zAbQNslR6nRnMrz+b/dWf5usrERs2qPy83dyU7rSlfK1aG0VHc71mrvWCddeMrsXmor1jBBZowT0mxqBNHv68aPQEAQ4GJLFU5wh3dMlVfS8EvbK1sS6LR3WoxukRrZTTb6+Pt5fGtmXiXjg0Z4UjySgWgWIxOBUh+qBTkB/etVq+pI4YeDMV0QqhHEgXVqgZtBHR3/zw0ksvLNffPiErjU5pHrqvDLyB0NrOoWdGMeE/DZ0oJlo0e37uMv3ttwdq+65TWqo/5iTH4H8kNqW9XrQ1auomFpCMwP5t5PAPWN2aes8TBX/OpxD0s06O7RS8OKWte+eW7EmtnF9nxsyp0sUEHBGxoc5RqVf/qhHdPGIN2rh06ZLxsNe0WJ4baaETi2hVFn+yvpRnzpLhLvirRdvNwES69chEaMzQt7Ld6G3KPhbeBY60fTEuoqvJu7Yq2BghGm6T7UMHgK2twX/5z1e2tvRKPdWlgcfBzzkSIYpBdMnJHON8sv43EcFcsH6dsLaE//Jnw8sbtoxqVqkWbOjAWhglqvvmn30JHghA/cos/Ph5Y8rI2PFHj9rwaqF19lM05NHpg4ip9aJRgyJNzagiFRqH4I+WumgN96obj9XmhmqLin9y2wWhiwk4NHH9WpdJnzeqtqvUwY1pARBwfX3tGpf+F+7hQPvGjE4+chY99oTYkdO3Lm8Mswzetxw64QlH4JyEOc9UNs9c2zug6BdMEArMhAppY6iFDIdN0d0ICdXSkjxxR3YLVEUMBuKHf7GzuTkE9DEbLoNxHJOKEOkTy5Qm8y9aR7gqqMmj4V3U71bWlvDDbw1WRhGlGZmNM+uewEXjHM+xiEnX4AWLfEKlbT1Y1aHRqdfGrPIxdZNYAV5RLZNEAY47Mjp2njhSUqL99ROjPniPGLT4JUPniS4g4AjMBAfKq82xMVdtLKvV5aVnBjlY1maTK/QW4Oc4C99ZJTuenh6+vLlmr69Li4YIk41vFDgZIZ64cyukfSyOKRpTR83umUiCGaOERSR8ChSGsYOhHAu9i79jY2Pwn/7nqxubAyuOpZlStdb6pLVZwqrC6rSTvirXKycDXMG8Osb/8r3BzrpryLvjK3DNtGNK9u7tOyJ06v9ulFA5DPUN1Rh/TaeixFwMBhW0dgVFkpvEDcmp/nHYTT6dd515+hiocwlkmw+A9nCcDltnThcNcETtnorUm1OSZj63OHmHw8GrqyuDssRcm2mBReGJjqbkbFmKLHtpgO3lcZV1GKXBJXwK1LFqEW09X2Fz5hFxasfu42WiQ+slX6B4Br6+FRl9/7tbm5sDhSR1Tm1lOU6BaOQo0AgcHq0UM3wjkaIuDOa1Jfz51/JhtZ7DKbOlhl08mO4rE+8FyqmJfb0roS6G0cFh5H0/N1L3hD8tjNBeMU5c2098qJaYG93oSXWEONiXlWi6kHticfEAh0tmY5E9E71vaydnkxAvra+vTI/VGdJcb1S7MD4voiVZfHt7bZh3Pv8tPgsWCYM66aamCNSceqHzuCubMzdQ0xBztm3mOX3/O1vXnxp1ZqnKQ8dsVk0Uezg7efrJb5Xwm956z2o9Vy+t05+/mQ/tcbroOehU+HT9jqwdWj5iWsS2inDszOJrbE3QTPNjjoshUwFEpkn4flNRSvtEs7kANA/g4Nl/Z0RBjzFBnVSfjgQADOTry7koAbLenKi96TjxqaWLp3m4IRJrxwdvbK4Jz7ALTCjPtvWy6VRWInLg0a4LnKs+8ceeDREdlQ57rYiFo+XZatNRoScUHdFiKnrza2uvv7oSlhhETGWRegPUoflnrZUFMPyABveKWqD64jXx1qsZRWIgqHuc+dQIjEaq7YoFCn3HZzC/0ZJMGfQk++FtY9t9beW4e9xUrTjadbWdOzplyW1nT4kxxNrB6MxYto78Ol/6ZTF08TwcRpcQoM9XUWfYgEFTogIEFgQi5sq+cn8MQUfPbb99aWlSSuXeULOYmatjcRrtUKCD0jwHm59I0LM5b4wGgDr+P14t64AhBlsn15A9e7wXkiZxBWGq/LX1qnuK7Ky0PPMlZvLAsXjpFh9sGRh6LLjJLfaSveLab1GfttNIscQ2Z7YKtt+gh5quXmrjKA3a2Rl89fVVKyPjEuhADTBGh3I89ITj1m8/z9Fv9xurfxnMrzwtru8I99vuOjaZ/jdtYBo4gH6k/Tx1a1engjHg70FjgOsTnLr/NKYge+Cx3ayshpr+3pm2aDxTrRqw2suq0QChfjlD9ewgw7vVumSxwersOjJsgFVyMKTbuaTOaLY/n2sa09enmkNnfkWpYRC5b5zcIPvqHNp9Nbl8sSPXwiACiET1wTZYS74vHl08wJEC5dYEqERRkzlEo+eu7o/p9vro47VhWWMOsPkcCyu9xMmzCOcUyqxEJus79YtmyM7Ms3/txdS0JMs3ttYsEdSetgu5DdzqGmkxT+dgoHnS2upuQZNb52SpwEWSk99gQH/9Hy6NR8EUdtR2A/6wMA+HIZ7WimbA/sXc5Ihj/UijjfpymOEvv5GPBg0jqkNBLXgylu3ihX8FIWbIV5+mqlL7wbESFkBNRpWlQClAHvOUZXV4WJK7Nc5DhI+UTqM8NaQjm5cuEl20j7dFZjA7erQyzauVwMIYxbAjZCtLu9tDSUzAJ1dWtvcn68w5ASB2P3VmnXPNlX2QYCJGzJCy3nItMmQZRAZBYLAsWBbgAlICFeQVli1XM9pUUNReDR4oOc+XaHJ9a/Xz+w/DnGrL+gSUwhocxOFkuKbZJiM7WsSXiCepVZg8qEIktGPeDeiM1c23vr6+vCQML07BUQTcufxI2xs3VirGDOSnbjNm9afgiEY5/t0b+Y9/My3dRmpsXh/56Wnkj0DLiHdTz1NZz/KvXQReQ3oFed6FMEdlXFATiJyZwyjw182kRFztTwmRIStZmuIiNdcCb0jiQHdVjFu2vfRffdD4MTxbFIBSIbah+ZhWpIUuGuDQ1GADsLX1SAkYp3fFpY3jjAkCjIej7MbGePnLfQwHuWCwhTm8Q/KNwddiuhCzLIoSkMvLYmsn376Ub2yK8ZLI80q6ybLg4qg83i0PbsmDmzzdJS5I5CBRlaf+WlaSvavNfMxDOUKNaLGkh+aeSND06w/Xbv/L8WQyjfOsr9h/kIiQyoL9B969hvpB+CJ0uZ1/C3t2CnIjdaFIVKuICAKyymuRN4yVlez1V5ct/jhWp9AKbFRI5MZqxQTe92NDLptu25jx47JW/C9dE7/9kO490OkjFW+AyGn/hpXEz3J2zEFJ3Mj6JKBK+rArL1LeG/fRDNywEg6JzC1pYLlqtd7zkqd6tRluNzNo24OKpGSZdHi4XCruc6E/UEzc+Hn4s6aIZGNAcvWRWeY5xttjQhcTcISms/OcwYAkkkAWGoZ5vr81hNB6nD+7tHzl/tFqUSIXuQCgvhnF9bF+CniQnU2CM5ZlyUvL4vqzoytX841NMRzXs4TrtSEAMsoxXMtHa1h7luWUJ/flwQ158BlNdkGAyKhWMOYU6QpWqFvFvAYbmjeqo5H6o8SNuLx6dHUr++TmdI6RbuXup2YvtDMc8ZN3FB8xJ4kNsFyWGnlJPY0qX5cHdqOTF+bya1WQbDiSKINFRv/++5vDgefeiKkCe8Q7Upr9OA0Wc3Iwe9HYDaDmrGP5NEerVV8u+N+/Ofi//3lalDpsZt0SJiD/TlVqbsUVzgYigPWqi5lyaotg8ERFiUEen18NFhJb0yc1e5WYcfwfsy+LVaOF8daL2dp4xtTALz+Sd/a5hhvtH+U8X8TW7wLTBVzDAUB3XGwaEQNSnQAWRhk+tX00JLKE5+FQvP/UWsk8kVxIMyusnbKVDHfFul8sSJYFM158eek7P1h+8xvDS1dEPoAsZVlyWbKU6jOCDJYsq4cFQDTazra/PnjqP9DOW5yNwQUgakFhfgL18mbP16DWPBORIEGUCcoECSGo9vHWOQxzvHh9ZGqTbFin1aLRIg8TAs2aYORFml3Mp/wFs1GrYd5WfsKU91BP5yJCFfHis+PrV0dWWMgyJ0M5uEgW1cBXM5Jo7rqOLRpVlzUiv7RBbzy7MNnlIHK9XnQxBrKprDU6OBaeemDNDI4/dgydAMqYGdsAARL+iU5eFX/i6sceCG+mGt6x5O+/Og/aAPDN58VA2Evt5tLdp6jwG7KutBIu6lfpNV1UwFHNAT3mTC/qmVUC0k3BYAwH+5eWJBxxQ5JvbY7urA6FlIXk0mCO2jFhifcU5mBZyuna5vjb31t5481saRlFUS1Zr6BNIXE0xYND7B5i7xD7E0xKMCAIorIcZAExyDZeyZ/6K6y8yNXIFPqjzmpds74FgWqIkWWU5SLLKBNCCEHCOvpa+0CIIOipHdpYGwF+FTrNgKQ9xcngRILWR8mnbUGNmrIZRHXJPuJNs24ajMSWJrIxWT6g119djqEKV8jq5zaAtB9GS4jfus/aJXJjcgRfifDr7Wm/sF4M5lefzsYD1yHUwQ/QGEIq+wRkXATpTSI6V7VFpd5+b49CI7/cRotg8+5KihvQv2uCGc+kWwDpsWwiuOLWKsstuZExZua1MY9O4Hb/izdyKaV2FYfT0Jo27q9e+8/m6vSgh4/E+AT46DGji/dKJeLVV6SmGhEzs7XE0yRYXz4Y+PORGJL4k0vLOw+PM+apBICM1Jng1VSrX69ooWVPV5SSxfMvL7/8KmUZyrLy0wrCgyPc2qN7BzicoChRKj4EIRMY5dhYwtV13lwBAZIlWFK+nO+8JQ+ekvd/KVCoF9vO+ZJEEAQSRGa/XayhAkG/Mipffmb5X/8wkaHMbcITJ4TkTg5hdrrbUkm6UcT/0C0XHctzHTUlaA5vctOnIJdKsbOZX7k0VI+r1ZTRtrERRrQA74KjdymemqjOwYM+HXNrlfPV+yraWqVr2/ThzdhCibZ+DQa++mhpdDvmrO8/YsWZTDkKaBrllklqNU7ok0gnV4ghEaNhYlEwTKJNQVppt3u34p6rCuix/NYLw8YM2umbz+f/9nHBIEBQ9Q5rfudniyUwO6WnvjYNOoyEx5ceGeA4uVrqTkp26GsrQBt71aZn53AJonJzXELmlHn5CYl7q8Mb6+On944hMJWAgKj2qNdeTFZfarQtWQK4JBKvvL704itanDHo4RE+uoObeyhKe7tbTSUwKXAwwb0DfHiHtlfw4mXeXoEAmCUAsfocsqG893PBE20jkYAQJISLMWrBFKhsM64defPy09kfPsz3D8OloxGfLOkGJBOhabLEYIw+XMLmN5Y/rPyDWRuBE1aIb3I5z9QDraF9wOkbJNGh3OQfafLOkzUIVQbhqmNz+60/WRe6shpuevjAmEtsP7bq2AAv3IQmgqt5vD2xvhKN97R1xW5+riqNZqbWLenu+9Yr+Uc3Jykd5naJ+WQQuWG6zBjTJyM1lthqqw46PxFudQiZPxWUIBPmR9dj3QKg/iwO4IjVcjp5OPmJdfIgU01BW0ctirppmPOMTviBqsvr4rkd8fEdCZZqZsX39LSVoyVPm/KagV+90YDU+Ki+2lYtJKbqVChLAlw09PGIAEcoFC1aPBCJaldXqpBkSHKEOw/zyfIgi79mYkl47/ra5uFkpWQAheRcUB1Z7xFgNTxJpxL5618dPfNcfVwVYVLgvVv4YhfTsgLh8flqo5C7+7h/QNurePUKby6jlIAsxPgybX+P7/98II6IhDbSvDoHjRGCEfuZWB5OL20ODjzAYSUKTSDzl5X5aYUG2lS3FLk51Bmk1q+RkXl6l5DdagbuxOQb2XApVoAJjyokW6S7DHuNyGEsP6vAyLHgT9SRa9b+Xt7On7oyMPnbqIJM48Y4VdF8tOGqIKP7yQ9qJrNjRaNYN6GBF16Etvyd6GwKImyt0dOXxKe3pd09Lm4hzz/hF+Y4mywou6CTRYhEbfdX87N22tsKXQ3m4EOQuj8NIGCnyciuqlN1kxyA0MIoQAxsnZ/B7gsdnSDcUsx6H2xTQQAAIABJREFUxCqmCPVpbDXPCWzktE0CJi7gc5jAa0/lL12dX1V/fEe+d1MqrzV5dZibP48hV4yQBKR75IKSWheKLu4ajiaKS/dsZWk6EiB7XrOW5kLy/kh8ur0sldQoJJfmmBbm+pA//QSymIrnXtBoQxD2DvHjd/HhbRSlWfaJtlFVWbS39/DT9+mL+xD17gSm0Xa29acksnoBqPdD9KcaIHhW3QjCtZ1cT7KTUwJORh9HCvSayAcvncufqS5pUDangdohcnsWBLz43LgGHwZVqPGmhqE1AtmKEqANTRy9YTdI6xA2/zrp2Ino71hxqxF5bmHUSBtzhBOAgJevCw8wOJmhU9d4kHxRpFuwYZp3PvuLNQzsTs7kDsuO93unbGeOFMvejFROR5qXcsG5wHy/ly6Lv34zXx+j03HSc5Lf+nbvLn4snhu6aICD3Z7kcBRrgwJgszCYARJbK6VlKYUJB4W8sb30cJBpCV5KlvV2Vp2uzl2WJa49PX75NY02vnyAX3yEoynybJ4hJQQk45ef0Pu3kIv6wA4e7JTj15gLy19A5oLIvrMQhiXfoTFKdSm21/Msp8g8S008V4Wkq9Zl4nZpmEScjqb4fGV2LFA9SjhIGliMakv7ngcDunZlGElR30QGuyPKPbRhbl2s0MJnnMkZYobzynnK/q0zXN1cmK9siuVhXLlZ+j7OrQNhT0fGqymh+zDmwWoezkEoeTddTJYENVWa3Qhet1hZ6APWTZKoS6mRQ+s42fNC330lz0iyqdrJuYu0N6PalxiRHBcSdlw0wBEl2yaybXdZQYVqhXUmHq4Pw61cNsRl4DinD6+sopQV5mDIqYs5qpFJYIyXlr76JyQEAEG48xA//wDHBTLhD93uA7l6//KHL+j9L/VBIeDlV8v8KUAa56t3GL+DRTxEEoxrwvYalob6jAdHhMw558i/jEvRU0AMXneelP9g+eBs/psmSEZW/vFch0NaX8sUGLa9F3Cuza01fn20YT9X8c0Ihv3UBwP2VfowajdmEN/kmVA1uq3YrZtTO6yMaWmU6n4HUaThMvkLq0/jAAcitTIyCEHsqQlCGO56cGJeP3/ut5EHL5zcZ8T3DQgzBonPF8qwiIBXrlTv7xoHxIz8hxKXAclh24QRLwJdPMAR6zgrTD2pvkhE6nA30Hg4GdiRYpkSiPnm1ujm2gjq/QkBZf2WxWysKo+P8xdeFqMRWBJwMMFvPweJao+rn/NMRAQh8LvP6Yv7ai8akVx+o8TIt30qoOBsmnXhSI0k/N94iO2NYcBZO6eBUWTjlciBV65wZLgzzIaJTQzo/FPUPm1Js+sxMWNfNUQwbwrSgMm0h58RAcDTT42GA1t9WvjCQwk2ejBoWf115KcFkxHEjNarXR+zf6kfJPBmuo9stiOZZgLPXfGEmFNGfEQlS4vtUumUMkLasjE+CGuFQo2G2hxAke+nhJiX9X8JPlLBIZ5IdE06b4WXGpvI771o5LZMHj29cHUop8cA9JxaDIP+DCOZhnwXjC4e4KgoJd3ZHtVcnXFe3a+NSpYmID2ymPnDaysTLU6YAS4ky8puY0ZRYH1zeP2Z6ksoDPzhCxwcLwBtVFRtmn37Jk2qFylcYrAuh9fBhbWGA0ZYGWBht0gDgpbXryzPcu6RxhMNrdacvDX/hqbrlrwJr8RydQJnc/B0abkIKOZEuPIwvfrCyFqY6W5FqT0WbDqCA1ACF1hE+4uD0BCdhJH9J5ZHyI/gPWY/OAJ9PPjiO4peeko44SFgaugPc/bdopWd5RdU/Djt5Zu5DWEEg4NmVEkR/0Qar1jcKDxkj8xUA1FwnZCfEdhxioddLISYJZeTyWLysq7NDKFKDXFEV507ALYAunCAgxq1gy2wiKA8HAwqloYItU/sR4wH4/zm+liUrIU8AMksqwJIDF5+lUbVCVr0+X3c2I0sOD7JYCLC/jHeu6W/ag0ePiORB6Pac6129bRe2yYhukZuZRaKxyCIo5f6EZvUER4as2unROTmPBqFbmrEBTbqHDQeiUtbue0psWCHhQw6Lg51kIcawSHicZKE+CNB3ReQ6vjd8ajJrL5aXxGrSwb+R5IYtevLcI02ToXI4VNfB/g38SE2tLvVvV0NkbQJd938Q9HzaHj2i4eEYxSGto2PsyQGE1hOp/GOmIPj2Ly028S4ni8iXTjA4ZDqxJgXWy/mYAYETUcifUaWT5Lw0ZWVg4xISi30uV5DKmlltXJvMPO0xEd3kAmfhRNOLQYE4ZO7uH9QCUyJfKPMrrAxMbt4MlJEGyvleJS1R5yR5lPm6eizpOhiS526wGOg4ZVNE22uZ/WZs35NOPavdct6lKvjEznWdPZDB9O0MdpyIEckQfQyHiWKnHQMZjAT4fKGP8J9o8PZ5uLryiZO5icfJyVK0FC1kYNGQNbJTeBZIvXfNsnQTfXFNxG1sTPjBD5b4nI6PfELlcj7PffPBUUZFj06wMGJ36KLcbfVhcWwjsRMVJCYgjgjmYsZ+puxP87ev7Yqpe3BZjCXZUnbl8RgwFIKQfcPcHC8eLQBAARmfHpPH5ia8ehpxiy1SJMgXl3SgMMouYjHVLtYIjI1oQbMLbmaIZpe24m+UHNeQCv2giJtezKwbvVfrm1P+wxpXwiwfQP2nS/xXrWqoCJ5qMPBHxx5CgKwsZY7FWmdPM7IV8jDS8awPCJeYg86BNE8eKEvIo7hyGUsQvdp4cfcWrN72XImkt/2KlxH0IaH2/aee2DeKcWovm5EfstDPXYeqD/eCPGqy17tYuPUnZ/1WSBhRUjlp2aUw6Ya2P7UNmvALN8dG7bnMHHCWp4bYiUbIIviJFy60gwAg4hBJYPrj3fpKWqvlb5QdNE8HGRPB+swChVqzrmpelMSFSAIwdkMc4QAYv5ia+n26pCkWn2ulHK2s4NSAsgIN+6rNSKKFjiCiHB3H9VR62CJwSWmcSCu5skY4OWxNTYiCkmXQk46N5cGNsj9G1/S5hbIqdBAN8ZkcAMTGo6k2bVf7/g5UMic9dLd86A7sClVXvh8Y03hP6PptcciCuStG4bv1bCfuAoq4qhofSdiqmlXNNCTfh5BbhzexPCQrooqc3WZAvnc0uXVJekPFFRJQlU5n/K0GIgAmkRMj7sQjwNmoDn63i7JzzGmttzWqx/4RcfIh8EAqKlmF4sI4DI8gnk2YqOBamwha1gKu6vmxm3nnC4a4OhAZP1bd3EpSGYCs6ABYhQZPr68wmVJrJZySIl8kK+uybIgwqTguwdOqgXPTMJRgYdH1VFgEtmIxQoQ7N2ci5bG1M2fikcEwxtE4ILKb4Abc2TW2nJuhJYiVpZEQpcnEYcJjGTO8dDQ4eEtyIgwYD/xoEmi3OYI8ShWvXy9yssjZT0mVXCUFjl4IsTWd17Ucq+5TP/Y92I6UEP1Y56OZPHx6/SjmelxACxmVBaF/2iGPNhbsONO10hxF4yeQMCB0DiWZEuGrj+SuLM+/HxzqdoXW+PV4ZBGYwBE2D3EpHDyPDl5mUiJ+wdkzuQQy/F4MxON8lmlXEP8Nm58C6slOzc0knki7QLWB+rCZsvK2C0z5qoeDAZwlDHqPdi+k6PKTD/3xp0OMmWyE+TzYz/QMRMXHMMKzpNA1saKcutun4AfOFEUDZzlRuEajbOQ3rUXoT4WK+QgPhbTmic5PWLCpXl2dCnWmNzRqKEvM5HBY08xjGUwx9w5EaoPhTevC7l4sOPJBBwecYk550dJeOeZ9YNcoDqAQ0oxGlNef6Fm74gWe4ZQNLMHR5bbXizFDdrZKc+ac/FlGnkP7eA6QkqbargRjcBxIZcqLcpAc6izQMXNvmMR3Rq8qqMvd6wcEqUxwLkBlaEL20Ic/r5vN4q5DbV9ACOc6za00UKqB5OQxloLpYP9J4mCGFlsfXPsiAiyr/RbCTUCFqwi2fQ4O2CRvFiRhHDeqMxO1riKv/Egq330PAujIJbcns6N74q6U616HxcFS+ByHsxRk6qmBCRYJrr5cWmMmehJBxyVTJMgnsv6FRIPx/knO8vMsrJjaDis3nAQcDhZ5KCJZ8U4moLVMg6mk37cWZPoNDQoFOfuffqbfc152aRkYhxxNAm8ZJ+GdmP8/XfkkRcevGXvUH4EMDRTpVPtY6la1bztY2DrylhVVlbRbDtii7ABIi9cvOezT4saEMQbNHeOuCEzJhyfSGCVe59pPg2TnNQQjUG7piIN56yRix8YG/66jdQCaNfdw2E7xberd4I7YQSyLih5jtrjR7FasCxPkBexhnkXxBfUiZ50wAGA6y+qzDkz8qL8/NLyw0FGzABTVr+KYEYhW9KelBgASlsi0eL2smoDnx2BGboiQvUSqvNE5PAluuWgSXgYonM/8iwIbHxnE1cILQW0maqJFJ7U9/nyERsAIMtsOKd3RdlowAUZ0Dajum+1Ih20EXsYidlw4JsHL6KZBxdOnPjTgEiB47AxtekeJjRH2JyyLVmtKU9qlqRK9t4gtb6COXktUjlEEI/l4NC8kR3BSt0IO9gaQedx+Wljs8+IOZzZx4A+BWp+9h43eoIAR3IrIVGnE0aTREcD8eGVlVJyi0Cfl+KZRkRo4vk8NINnorXIjnrjJBSZsnPM4nguJxcH7dVtjUG2m8GRWlqiszKlXZDhRLDS6SUgJgJMEQ0wMsQldnTtPmE4F9yUxk1iF6r+kJ0wHgmezR+s4fD7MvKd2VMgRnQNxwzJY3eRI8890tIgWXYI92MPEgxEHjlhfmPbwy1N51X1RnBsTTNgDttWC8yEJ4SeIMCBmK2jvRFurNmGATE+v7T85doIkrkotHjLH0nrZnpnHwNYrFNlUXPBMoPmShwReicVTR2qNrsDI550/vyNdCqd3dWs8HOAog3e0Ksimt0PgYntIJsAZETeuXTBkzO1npdt1Eiwr0m2joizEOpkKX39yOquEyzRcOlUKhe+r+nAbZcKdUMe54a6MModpa6/VIbN/XlFWoum8wA4OP1bJJELMXXZdWAcunf9MfP719cmBD4+rj6hAmA8OCnP8VawnjIwGoCqbiQiWSxq6NYazhhn2tisX3+Daq3mCk6G8yrApNI4gesItgWqp539HoWslGxnZ/Vjwpg19z6WrLNWFbAscLO41bGR/U9gkKMzTBFBdQi6CLg5wE3uKVj1dsy4/AkoyhBe6HTWjhVn7gQ4jS0YwUH7dF/M4TyMJrd5dGVsCCQcZjl44skDyy5Xp+pIS+ATyF+cwf7rCaoHgM42but3ougUtZpBHxtVtX01d1TfRj4gyxZ7VTjpUrwtOwxpZQ6YarovPFxOCagOIHHnlE7uvclk95Z06SpHp1uqgd/NLRgdL+ePwhdF5gVS9T+jE+YwYw9gQgmU7gZJHXqB0cd5AByPjNJdyb5mmiPrB0v5jY0l3t+H2jS1vsTilMcOAWtjrfKI+GgxBVJVCVc1RgpPMRVSc/POxLXlCWfnvkNB3deXJAr10zUkmtVDEouinpWlpYTjOLQxY4NFqicKpsTjx4DFTMV5aQMYaCk7Va/uQ4D861I6hQR4NJKDQXMmw3klQHIeaIvWqV17Ra0B7vxVzFK37FJLIqzzxGIRwgzTDZNs3+ZkjykFc8GFil38HLrl68+VA4h8Z+vi0hMFOJLEkv0DQWcnCXx4ff3o6IgPDwEwY2MJg2z+oRRP6D4VAptLbHiXB0GCOel4YubPLHDAM98bYsSs8AWQzUCYuW1QdAIYPqVFLDt3zfFnAnAAMJ1q94aCDrY7w/vpciOrN2I4I7WYI5XKLNQI3BSRJ3Y+iSeweHTieHs0NOxzjIfj4PhH32xsDD8R+d499ZCIiBSwcyBHAJLbmE2UmFximUYj7RC4BmvB5NWDiMLoDWXMROdV6RqZEf/MnuUsasIcFs6rkChFzKU6woWl/KwZOGOqx8oiAAeA/aX8nSvLG3t7o81NLstRjq0V3NydeRImWWH/bmmA1XHlUibIguT+YoQp4+A4bkc35G5Ug28ykhPaJU8nh0AiN1axNYIhz5tsbvz0Ef0QFBFzB8ULCD3WzQY+A/uH0rSGVsaJRPKYd3871Wpcba3UL4cMJFFvVxTaMLGNEGW/HLsBSHds9XT9+WwUfEpNVSMEOi33iceWC4MA0MFxTNA3l9YZeXYl3ajW+GOYNb6BfzVZaqjvmycOh49i2c8+++pL9kev4yBpwjQXh7SzynkU6cIGzMEmK4kAmfuXF5OedMBREUvmQp5wqhDAEp9eWnpx//4z2YtlWZYS19b5y73056dn4zJ4wNhaxrByopDA9K7gw0VN+YMjGSuzI2tt1OjTDXON6/LWUruxpQVHrOGas0jzEBFQYYQIgkx13t5DtRjeW1KiWbcuKMPhrRLMapGA+QvUL/4joSrz1KYKUqsPKgNePaqvq3/XnsvqqmjXhakc3BZLu0C8CFXF4iCQAD46kqpp/ON0XGGumY/Xby6BT03DoHF5ZDzEcmB0mhy2mcxVO8WwcAR+JXo5NjkjE6TD7GsYz48x2QbNDMYN9OBmkIKhF7B5mql/pQIAKJkXcWiGAE/z7D3ap6NjEkIytlawNJxBjMW9CoibawQ8s2XMTzG9QTjB+XcWFVIeHNYaLj0nuOVWPYgZXYHP1scXJsJck9L3scQCO1CKw8RDq/siFTQPAu6a/UYA9h7KSPHhblgGwCQgggNZau1toQ2Vgwq10EadHTNb+IPV0lTWcMVNAiAfwUEbaW3b9CTq0tDXGmko0LN7oFVbtPk9B43yNXgKfX7hn/QR+NM5Bpy75WcHOid6pSKZ5dBk/Rvmb1+H+DCaQd22jYjF2g2dlGlWBHVx/ix8G5wmTkObdZkTO83yZGGOHnAAABg4LBYy2AXwWTb5/MFtAQIwzPHcDpcxZRHlonsAM57ZxuYK6oXq5YGY3piXa5/uP5DHRfPpAVGNnpxBDfLfShkpj4OLdOmeOq+fdWlV391dIx7fSHcpKinsFkhHqAqMVTeFSO7tFrWI505uITEmhSmUaLOAgx1V+zl0lPpWIxKqN1YIUfk4HAeB8Z0wU4Z8Kdpn3mkcurfD4RM+Cd/nkK0GmPHpl6G1YPCH9QJG6U7nC/VB0nkpHN/MQSF6vWrz4FLNn8ID9X2U+YYa2SeacyK+hydS6KRLcRax+3s8qJFR0zwzbHCuDAJwfdpkh2IuFvWvVIBq0OxPEev55pEUHSlTyF88/PRv1ncyEsx4dhu39nD7gdq82jmfhjAGloZ47arZlCaKm4L3QYvoUMKNO0UpQerYgEYJNhM5mYUCzcs1ZUE9Woo1gO9c9vSCUBd+RnMWBxwc8b3dcnvDfmGRfDcAIF+m6YMqrrPZNQIy9IX1kIiWV0fDYT7Is1wIIUgI0rmxZClZSi6lLEqeTstJIZkxXLOcWSHaiPowOIgfPkkREYj2D3j/yMnYGWFkP2geyyeiOHpU21Zdsl+AoF5a6vDnvALxmW50OdrJmxP6bZPMTSWtsza2w0laMzIUzp/ajRg51ruUChBy51YgazScv7o+IuoBR0XEBwVFXgHPMzIyEreOdj/cv/3q2rWSJYCvPMU/P6bDKWbeJRtFG4xC4rVneJBXQ1hAHonJZ02IZqYymW/cLqIWTpRB8q9ioQ4lFUAEjyyUOjd/Rwkf0Iwy2JPpVo0jubz78eQ7X19y0qTdN4M1OrzZgQHrdQkDQtB4PNzcXl1eHgnS7x2sM9QlA2qFtTRBzDwtJF8uXU8GHLThww73CSFw3rAj4G2Jb86ywGdfxl8jdhg+bm+dDI1QUCLb/g3b+5Eupb38VAytAHWMJ1anLZ48j6X71/cPtfdh6OYhBCuzLyid/SsVTv8eIQ+MoxKH832MJyCiPMt/d/+TiSwEETNWRvjqdS7K+FaYZE0TAYXEV6/j6S1z/IY8/oTk7qJ682jCd/cKzxnsb/13dQMpN7W+M0rEPHXnLTvhVEdQmE8ZA773XgvsYElavWbeRFDN40aoX+HHttS7NY7Y2KS5ri49EQ/LZQ3HctOceM5XciK6TaT0lW6Ej76Y1sfYdpgkw02nEexFG/ZaUe3SyPJs+9LaM89ffvr5y6vry2KQIRf+LyPkBEHICAIQ6ogtAhGGA1L7U0K2wpWhfrjbI258M7JUYYok493PpdoibMEQPf50G6vJYoCUWo5SNTfAYJr5V2VVTQCtiYhAxCzrvnMgFwGoNrLXn2O1wRmBiJglg3W/k+pqM37YzD8Omkd3th6nOgmp1pPM5GatWtA5NI2tgn37w75VQ1EvK64W+OBCUN1QLlSMDk91m4QOREJClEyl+ngbVEe74vXC0tkDjrMm1buSce9wQXkyge5P9n9+533JDJBkXFnHv3uRh5k5FbFJZSQCmCEZr1/DK1f02Rv08OCLvPh4Yeckg+/tlUfTU/zuHOt/HgUtePa2ZRcJn5sDL+HxMT/Ylz4s5/hvuCXE0IGBMIjKzZgwHA2eeeHypWub49UxDTOYn8BQYGD98upfQi6QAxkhU/JyCCyzg0Q5vVfFfpicAzafZKQyqUUloP1DfnDQhOLJyuAUKQKhwketHFA8q+4ZdKREEQYtsrlNJGng8oLgDE2mPmT9D8zRH4/elj5v1AMOoBKYzLxbnUo+93iwhxMLEn/c++z3u59Vr1FKiWsb+NbzPMxRlDMvbAYgGUT4+jP86lUuJZghhNg93BWTD3IcL0oaMeHublGUfn7OrHN9G/DvknMqhoqoLYIVL25geHmljGy/rHRw4HeIRoyV0KkPGiORbRK7NCn4xu2uu5CIsPnGwFuaqHxLTvY7lzeeefHycHmIQYZRhlFeo42B7d6ovBpUIwzv35wggC2JPObHMMPBhZoMf6gEngCLaSgL3zYF6ctdeTDxTG+H2Kk+1U3jm+snUQFu2sYcW93tDeGhM28GcgBEeu6Y8cHBw+pWxXBZsmI3lNDE3hzy8BGTPS2T7g1qED4qrd9YVYKIXXAhqQcclmA7LOiwEug818/NlpBT9uv7H3+4/2XlxS0ltlbwZ6/yM9vIhHJXehRIYFZjdHsF33mJn91G5UEmojsHDz67+/aqeFi7dhdBssSNO0XEQGwjTkRulaHdbaU2L06Ld8EWqY35tGXaKYcZIvhFpGrJ+PDzaVfemZeuZoM1YfIL1B0RXb66vnV5VYy0MyND9TJFUP1TvgQQICqlr96kiMrrwCBgAFwqLd60x9/BFzXI8Ec+Wzo0BLOqdO3W1jwAn90qO2xDMvoxCrlOiDciiKNaWusFzKSPO84Ku4pu/pGRTrGnFFxwGL+Rt0D9XpiXKVFKzaZWUnqCZawPA1l3MakHHBZNJT8MDkk+ARGhkOVPv3zn7b0bFeaQEsMcX3ua33qBr22ACFK6vnALZEj1cHMZ33iW//R53lyuPxuRi+zLg/s//uiXL6wc5Ry4I+bnGPtH8s5eae4BNOlGxCM0CJzKUpgd0DgFOBZbkqGEhG+Uht3c3mFGRoe6FdTPfJtxHhsVN24Xt++Xqrxw0FRRtcHIq89mdVqKLFvZurS6vrNavyXJBIRQGCJaeErTEAi4XDqyJEQPzRWLPnEwrEIcBjbQg3353helHaOBCAamuE8XTBS1PxxK+BianXhqeVC1YVX3EnlROhB7V2p0Ni04bTMmWCef3b1xromsfgnqF3NvpLIBnO8++qmDyBeT+l0qqIUxAcx8/4iuLC+qwxkAYSrLn915ZyqLr2w8LYiq5Vqby9he4b1DfLGLu/t0NEEhzZLSyrYc5dhYxrVNvrQCoMYf1Uv5zx7e+fHHv/r6xmAz31/gF+mZ+b1Pjw/qcxtDL5+WcpWhGgicOk5EhHDgno2EmgiMJkEUlh7JP+JxIcVeu4xrOAjQljpBIbqI1vxj94SWHBj4xe+P//p7y65w4+glgJWnswcfF9MHzMxEJC3Msbq+tHV5tV6NUfsM4LsfDEpKNFrF6UhizTpqRh//0eTwcCNw8MQpRXs4SP8Y+Nkfp6WMI9wUs9bwNU1+QqUX19Jxx8uCVQlbFbCgbALQdAPrkeRs8B4U4mmtSnU8WfcaV7O6KDnPzovCLUq2Ro2FxGd0b9iWDzsncHSRFReKesBRUWUACjyY0MGUV078XXnX6GfGv9794ObR/W9uvXBpvC6ZJcuSsTbG2hJKyZMC0xLVNhYi5AKDHMMMuQBQAxEiykjsT49/ffuDt+98fCnLXl6dQi7OvQHsH/EHn0/Zmg2NtYuq2+bIyuEchKvdKY11afWv+I/JvV6kIItJZbS1WTMPdhMly7p1t7hzv7y0JfwAiiu5K98e3v7XydG9kitQDQAYjfOdq6v1sgwbh7G+VqeX6gvDjfGlgIEB41oB4YGMtnM4IjFd5m0EWnNom/T0YF/evCe92E7+UbLQwSJHg+K29qNI2XTaeSykkwpT/dfOPFu6rNpzSe5saMzfKcNIA8f7EmFAWwtuP1tB7fTP7zz8wRtrXWOfMv387T2i4MjeKKX7j6wrtjvQOJaeINDRAw4Aqs8JPJV8a59f2OzqnQTQZbgQAHyyf+fW4e6bW8+9tn59nA0ll5Jr7+goxyh33vJWeVpQIyu4fH/3xi9uvXP/6CGm/NXrSyM8XKDYZOIbtyf3HpTdcnwUBlwbA6niOHmzyCJTxrjxEXj8LULJ0aTAO59ML22OahVsHxoVIzHA5lfyWz+Tcmp03frmcjbIFNoAwJBap4eOB32r79ULGsG4MsGg/pRJHG1E8rIeRh/DaqwKbRjfRu3w+PBGcXgcr3KcyHaCne7oZcx0roJV1Xm8Y52ytp40+j+sezu2Nu2jB91aXFOFT/26c5AgzgI9OKKjiRwPz/5d/6SQd/eZRMWX1TxKTHeEiJqs7dcOPTloAz3gqKnW+wwivn0orqzKlXzB44CRkZhw+S933n//wa3nVi49vby9OVweiUH9NsfaUUDVfvl6qWm5Ozn4Yv/uR3u3vjy4X8pSQDy7On5mebqU1C8VAAAgAElEQVTAlykAJlP+4POpYpYCYbUAcZwQpxbUV8UnyrOt/6g278BwjAO2RWoiTjrHVDF+dNtCbAYfQajz4J2PJ689n++sZx2F1XBNXPrG4M6vp8URAxgO85X1ocIWBCkhBMhby6mPUWeznghQS0aqHmJsTzFWaMOwCufaD9EPbftOOUgiPWj9q2T93kP5b++VttfFimkTRYbcaZ8QYXkw3JUzqQ73hp5pju5EGjGEfqIgrxbg2+D/iIXVE08j1y4U9JxF4h9+vfdnX1ldXz5L3bR3UPyPX90T+ch3rUXRRsy9EbqT2Aw98mI+OZjjnAOOho5YrDHNIJIMAUIh+e4BltcXUIItBgkABBOIdqf7v7z34Le7n2wNV66ON64sbWwNV8bZMKdMEDG4ZHkkJ3vTwy8Pdm/s371z9OComBAgACHEUOJ7VwZDPjgxfxYRbt8rbt0tlfxnWG9g1X7CqlIpC8nUOibRnBVpEc0A1OohtevAkmgJj67SLu5LZlK2hcVgmJxtDr0AgNWKvUqma8hju0td/iLse2vyfC5IRanan8nL30SfFvz3/3zwv/5wNfPsQK3RAxk23haXvzW4+S+TcoKtK6siEyqOBASkBLnVN/Ai6oRgkMTlYyyVToXiHguOXUcfwuJbDTnyLkgy/v5fJ5NpfY6VU1Gye9/eu6UcI1w7FZ2uaPB6tJLGFErxVgeqVWPRvJ3U5aXHb52J62DSwsNaYuPZzQAgSOMN/0QwfSyZ75+wfBjme3Y6mJ1SrQPHHAZ01dVxanBC3aJaiAgsQFJkwx//8Uge71efomQPtnpZRyhyYHSiRPdSHStXlhD5kshHRESVi2NWcrpbXRNJfZgf6aMR66sZ6vc40zkHHI+IanNe/7lziMvLGM/VOLYwSQgyAuWUSZZfHu3dPtr7w95nOeXDLB+QIBLMXHA5lcVEluV0Wi0yFUIQM4Nlya+tjTayfZQthspMNJ3K339wfDyVbYB7nonQgUsbrsxXK0/Kzb5rbf4SF0m1cCXviR/l4QG/+8n09ecH8XixXhqu0VPfHe29U4yXslrx1EqZlaJWB7lqNYKYn4MZA4mtY4wV2vCxgnsbeRzw6j90wanbmZ/cKncfdnDuWSOJTqm35qQWXrqbvOTNlybnRENwh2KixC3hQcRIfKp8a0RUna7KAiQJQoxXuSiYy4DresBYRkWTw0QXY15y6T+6ocnAViIhBgCqDxUKVGe/krOFqNW9ESW9n8ziM2WeXFjqAQdgJq2yj46K7NaBfGadu7xJbNCQjUOJQFl9zDAmXEzklC1Zow2LzHLLSsYqiVfXgHKywC3NDP7oxvSTW3pLsG83KoYaHoVWTbSgSE6WeOXOtkmclRZ5254BEtnMbDA1ElOjCI4988OZ8fPfHb/0zGCQqcwIBkbY8azxky9h++s5dqfYHYJRr9sAAK6cOI4AZM/PwbUBvjzFzrEaIZY17lTJQiGmtukVGx460V8VI78RSol/+s20kPUQtYzfSBP6Hdldk89NZk9yPLgxbTqCO76bQTmnh070ZVI8q87z0NbEHV9WpSMRETELEBMDeY6SmGUkTRWhDrDwFPmSqJoWIO0p06iBwIBwhU4dSRAAEpXPg00qu65W/FQ1XQ+PQhuhbH1S3BvoAYehesspcWX2ffGQNse8NmyfeKGqnXG8WDPAzY8dM44BIfHm1mgrP4Rc5KKq/UP5m/ePpO1pTpGpmjvvoCBSU92TqKBdegYzvZnDNDriaKhjurQssGA3STy0g+HTWkKUPdPCxxP+f3968FffWR7klq6q29jSwf75U8BmgeUS+wMc5iiEk7M3mG3AQYylKZanGBcmRgRJpJ97CMFE9h7aTWFrAy5K+v9+Ndk/hhoX7HdH1BqGdpOcBuJQhrOjVGajcKxoRrmLCR1Fy+lUZjKpYVJvYQ3JxXKp83Oc5SMnaWAiQFSbOZiYGJRnLEuWshYvcCroeTY8Te6hCPWIvBiW2NWfw6kX0aF2cpCJ7HObIHvgq0Llk/pJept6wGHICDYiljL/bG/yynZ9SkGKTnXYuJlL5qdHg9fWJcpiBgOktRDCO58c39sLN6eYc3qN+0eHuTx6EZr0/Qm8EKa8xqSe3rTwSiMeOgEDKrkpItECTgQf1ugIjp3WxN7nt8s/fjR58+UhKpRc8edYdjbn1u2AsXmMjWMcZdgbYpL70tMGHCSxeoy1iSXRXVQRp7C1A7SRQnastYdyzxABeP+L8oObUqNGy3nSrpNNjMXPWbszOXRydF5Q6axfsuebfeRXMpdoICs8AdP85IcH5ZkMQTqDhpF/UmlUdWb1VqX2XVH1CoSZMsGCWaoT3jRsNRgvUnzzROdgNbH15T31P1H9Mb26/eZyvpquJ8ngGVm9eNQDDgBgy0GrDRbaPc7vHBRXV89mRFiyp7oaML25mQ8X91XYKu/b94rfvHfEUpkW0Uit9rgrz2ORG2drQhvM0PBJmd7IeyxGmAV5fxtyP9FQaYNEYQmMX/7xeH1FPHcttxCGq9cr5R3JlgFgXGBcQBKmAqWArD6CygAgGEIil8hLP2HEgeE+dxiNujG0pRfuoSX3kivY8dkd+bM/lNE1xbbJHliWbH9CdvFTmZ3xod/Tx3FUU/GkdWnkixyNrhkbEDiQ306i4Eh8qJOKkmKtlRqxUAcymMOCBGB1T0RSshbPTnvU+3DZy66B+2poRONo5FGv20ihjS7wwzIhmFlC6HVShveA587d/lhSDzgqqlcsoRZRBBCkHH26x6vDcmV4RlxVIxUApOTnl/JroyPIhfk2QHh4IP/pV/uTadypa7HRiifqsJbpwf6dO+cb0oeTMRohxaMRqKE7JCjCidW5uS1bJs6HpUebMmEvh4ARtkXlZIp/+Pnhf/zz5Z2NzJbU7vp4uNcBE4IxKgH7o4Kc6JHGJaIa9HAYv4vsjHUOE8C7+/zf/42PpxZrYWP5xZDygqi8+VQgh82SmbE+BRqx047ZSDnz8KULj6WPvBBpZieuwet+bwf4Tfna32y3eAOQCUGSpXnLbNbwVNCkjWlrNDsWROyGvMt50IZF1ucHjJLRRaT6dHGC/hzR2Z+vci7I6XmqBzMIhRx9cJcmZTLhaREzcw3vwQAyyW9tDgY8Xeg45N+9f/Tlrv/llOC6C8VUZPR+NkoZ5jMk8EDOCRVOkNxbGRZl4cSFNFJZ4h9/dXxwrH0GXi2957EWMstCrSS+78HeIustuNcCNerGSChgPd18k09lbRXx6W0+LrzMvfoFSkH/S/WfaOUXQy48nzuH7ng9bs434Ilo/A4FOWkS+S/SBqp+BP8HkBAkMsM8QR1yT1xdVVSt1jHX1V2l4clanmH+USVahen850Ab8V7Um+njLpMLCS9C6gEHAH+IVMO7FCRB+UEx+mLvtAyjBnY03iCCxDc3lzYHBwuUlxL8zseTP358zJZnx2ZBS2cjUNSO+ICLpslCbri7xoF9myNIHfofKYzt8teUQyux99cugtH4Wd7Qko9G5qiGTKMVpwEDnVtd375f/l//4+DgWJuXdnYpdRSiChhUkdTrHAARO8huBR3k2JBx8j1KNs8MxiDmivXXyxivvvE2VbdK6c4KVruTUmnRyVGb4G5h9iihul1j+cI+gSMaoc7QG1fa2RD2v9VN8QgR08PqdQsThs1q98YJEF6IOAggEoJErnCD+q5aDS3spC5oqAS6QhjkJK/QhpXeCQpFTbs40TKCaghOElToHY9qw1cDGEdb0ONLjy/g4MRvvszYmjkMZiYqiQoQMQ2/3B/eevho+p8V2rBpI6NXV0uUi/uSLeHGl9Of/nb/eMoG2bMn9CxL2SyxStk+PjXprBQlLNiUMuYwRv3YV192YMitJVcq9Ri8Q0/rezdCCDli4CKhOFSYI9iDUIfs+/0j/vufHR4cy6Sjyqu5M870eRtBCebsL4c3U34qiNxW0zwYxaDsTyX0VZDLKAPA1Q2Mcxc+qSCybeyAf66wANVnXunSEj+e+QctPdSpYm5vmTrp+aUaQQN6m2MfLliVZbf9fDAZIgzr2kxtp+hYBDe1d0aaf0mRBHAXg51MNDvEAIhIWN83Ie0OsQCEHlF1FclEC/hWwk/l5tbGrV072tBZVs1co1CiIiYmW1vp4mGOxxdwnAqZQcFAtUUWIMmjT+7ndxd6smdA4WirZkxRlG+sDVboMKHZ5ynq3m7xs98dHk/gHKDZiYI5GHkSiwckpk9MLflhcXWb4KgxQnPkeeZ3S/Hz9FkqTQS8OHTrbvl//v3+w0OOR/O8M2SpBbVq2i/PA04chDa1mGdyu5rAKABjqhrYQT77G8v4/hsNbWkb7DYt0NvfRt5y1gi8wxz8NOwQ0U02Y5ZBFnNHsMRllxWjKRux+0+VSySENYxcluzxY64pCLMwvsErTjZuzt3b2UflFw83zE094AAQHUzMDDBVJ0wLyaNP72f3D0/p3Qr7c6u2nKTkpwbDl1cKWlC5DL67V/7jr/bv7BWAkmfBnJ1LUfocdskiRDvzY5+U0vGCk9S1hT0A44LUdPk6xokhClkXFiZjAMdT/LefHH5+p2Q/onuhpSArF4VjbVnvTbTng7uFNrNp0AYBwkEbnpfbslArevEq/dkblIugA0yVHPJU/CkKfVt6BEZDIkAFKqUXV9iJqREfIrNOWe0fQjAwQ8iaRPuNgEevDVr4rx4exmFkoEQTVHHGogOn1agm5riw7cqYkzerlUM95qioBxwpqoeu5HpfXXZULL93J79/tCjMERmlJqzmIWd8d2c4xtFiSgTv7cuf/Prg5t2Cm1YjGLJlYoRBEym+MsEt3IrQrpvtzCMMdEiQLr0tdpxm6PboQa3pJtJiMojgATKOMuw+uv9A/refHL798dSE1gZcLEkEaYdP0wo1STaG0AwEPGiQIUR9wlL0h1qpv/6M+Js/zYQ9gmwIFWfiJB6AGYjjMxm6d5NEwWWg/kM44gwMjiMWSuGJKMVel6UCU1i/DfQvlIggMlUz85YrHD/6PC806f5qOHKd89wsef1JSon0mANADziaidXZcATKAFHI8cf38kX4ORozqMNKKV9aHuwM9hcCcRh8d7f88b/t37irtrq4eq1LGSpZYMdZgibu6NCCIZVrhOH0XWv0NHuJ8me2gy0HL+x6RwCSi9iSwqypieKspbiVEv/06+Of/eF4/9gu0H19pq8DIRkUEFiIDl5plc56I4Cof0L99BNbQ0TBB+otBU9ti7/903x1TA6zTlu7Al8v4Dg10t0bejfcoWGRWd2q0HqKwcbW9RwMTmtQ02CCEmsKkERgpsnfdngoAOOaD1H/zaNBHaJVlzdG0HCYCey9WJmVFTtToM5R1gw8Gtx73qkHHAAaxiOV9p4rIDsqlt69M7hzMJ8IS7o0AmYYyEp8ZZ0yOVmAwUD48m7xD//y8PPbU73EzREyjLZp63PpKVjHJe+VnQA0npUWCbX+NoqMxE3kPpVVROa3NbruRsfijtzHqhDgFaeJ2HFmtAIyLfXNMynxq3em/88/Hjw4sA/IJ7u4dswR11j6qUprYQLnXyIDHYTl6tDK0MEZCpGguvZ+0PGfupT95+8Pdta82ocdyFoJnLJxaQZx3AWl+ibelnWMaL4mRUMVWtZPhP4PD6U0YvUWts6cCCS6ajFrODs4g8wYnpsNLy3rTmcmiQWI8ItBWZaf1alW7TRXH83XsUb3WrOpXmmcE2XVirvKO8fIHhwDKJcGLJoG6XyYpP5TyD9ZH7+0fEgsTzJaGVyW/NEXk5/85mD3YWkpGABVjWBkdlVJK7leVRoTl+RGdw6kIjdWGMGKZ/RxTCI3JtcR4iDC+Di9zAOQEuGcYqF+2Y381wwHpk8VnUxfaCsy1oaqguznoFM7NbNvJlP87sNpKWlrPRvkqiy9QhMWArCBCDQsCK7tchyooaL5WMEqtPZeRF+aeKgCdVYmoYlJRIOcnruWFQXfeeA3uK2iicjSRqfl7q8+9cWsPz1uSqm2W+qx6eM6guXsd/jiuoHVcIi+E6mTUwRymK5rUsbqFApVYjz/AC6pC6GTx0IBrF55ozsaOAlV33yzkGz8h+qdS40z1Nw5Cc5QxetLKYvy5m9180siCSovuodjeXmpIfTw8FBf94AjTGlLDBA4Jwz0bTXFJWcPjsVRUS4PMMi8fE58thQzYyfP/nwHuTzZ5hTCtOBfv3f0s98dHhxLLQMt2BF+dzkOOLQutOUTwRKZDC3/YDPtiNQ4aLEihFWIJzcirlFeWLVj2/9MQSRTB59/uJV2UybAimHYieDhCRtwuA9tZhqbqAFw6Isv78n3Pp0uL9HmqgLIGi7YPGhN72ERG0/Y0ttlImAuChes5/pfXbSDP2BdW1kpEDPIxdNXckF84y6r5jKtR2o8Ujg8Fiv5VREKb0QAB+yXEmQnTQKOOhRBcje2ARw+V4Y7kz7kXaiubAI0AX925nXdgzlAADDauJYNV+JlL5yIlNkY+alzytXYJXtAnrhci8rjvfL2O7qFmKis36osdtidL3qSAcec+blywJpTABMGIEH1Hnquv+oDcTjNH07KQcbDrNsSzG7EIOa3NvLLg4c4gXdDSr67V/7sdwdvfzwppHqPYmtduHc6RsWEHVrPZK2PyUQmssWVp2DrULZzrl8ZucpYF1CrZOVtUREYPi4w+SchnosGfJHoOnT0CyLDpFsEPA5dNGA1kJWPap9I/qSdRrEmMpH95G4Fzf++RjMNSMTgaYEPvijv7MrhgFaXhWoZGwHAXDvPLbQROi0csW7tOnF+QmVluTdAkunGXXlrl48mPC1QSL35IFooWXzW1ySIgQ+/KKVxXthDj4QQZI+Q5qnUEOq1rnFZ1NNBqhM41GPNjd25sO5ASt/7rhErEw1lyOtjXThZKxSsrmOTnNw0Jg4p9qvzSXzlq5Pr13vWOR9O/qFzRfFTHO0uX3ppfhE2KxEBgaMDznA2D32mg6sOFIr9yee/xuHdeg6SKEElIBOlXhjqDjj6b6kA6bFAAFfShKpJqfSKIJJMoGx/svz+nWJ7+ejaGo8X0ZjMpeTrefbseIpSRuZzlzyAacHvfnL8uw+PH+xLZX/4Ct7U29sU6WRGrj5npSGtDFLvkNunWHN6FUGdlpTI30/MNjBSEVxRH5ClFKxntr+58aVM6g29n78XTX/3pCFlPP9wAQcsUW8V5UjSj2+Wn98uV5bE998cPLWTK9ihmoWsYtjOjFwLzWKETHgQGGgwi7NPbxX/9NvieMKlRFYtIYV63yJoZw1bq7S5SqtLYnlMoyFlma8QGTg8lP/69rSQ5pHxIDEb5wZbSyuoQ2sH1Ni5KseIl6FS5yFa9EdBc9nNQ4uDwcleeAPj0ebwh1EkB7L+6qnDrhVPwPTg7sGdD5Z3Xkqzv2giIgU/Dd8NLezKkNnQRiCcy8N75d13hZqObF30VFEPOJpIIXtIhiBoXVtNVVGJtYLFrYfi4WRyfa1YH3N+oneWzBgA39jMxziYFRRXw7oo+e794jfvH310w/4mW60ZWnP0NRkapqujW2IK1cl2LoQ/31RdgKt0EfYIeTeBWzXAN3MWFG2leGZlib2H8r/+5HhnY/Lqs4OnL2erS0J4wyREZhxoJk99+qUFT4iY+eEhf3qr/OPHxd0HrNFvIYHSwEQGPzjgD2+CQKCyKiHPeG2ZVkYYDykTKErsHvDtvXSNLYf5gsW9B61Iw9EgmnAfO6inpbO7YnWvxNjDCGLg4DZZXqzxOHYTeWdABN796Kcs5crlV1IFLJoI5J/B5oV3e9ZCYXXL4wcH7/59Vuenv0KnsczpbpV6XOiJAhwt/a2nTmBKkgRLkDC2MoD6U8pVivxgIj64V64NJ1dWy9XR/LCD8dry4KnhAZezvE0hAJAl375fvPfp5JObk/0jY+Vz/OvkHrjX4Mo44+3gMHUrHmkMb6laM2qZB4jNysGM8cPQVhu2Te1EVrzE8ufYwwDLBA/v7PKdvcl4QKvL9OZL+TNX87zaSMI2gLC9QiluGo1/EAAp+dad4pfvFvcfyKNpTOE1EAPAtMTdB3z3AaxREF9E7DaHreE7lJWgRFdaE8jD6W2lhBmGgE0Ft+vO0JSnuguJIZ0YyhdDqF6IWJ43O0+KDz7bwlCvcwKywSoBTLuf/PP+7XfXn/7GeO3qYpZNNBOBiFjGBn0k7jzkebTKo73J7XeL229b73Cp2hArO3g/nyh6ogBHV/L8kwSUgACEmmMW5qhciWAmKlncP8rvH023lqZXVsuVIWczrUtiMJbBX1mTKI7RuLzco6Lg3Yfle58ev/fp5HBSz3hLn9WIOyEhohZQUhsGxq8mY+stBBB0zWUGFRLaYE4WXqf7SjfMJDChY2rDCe3ObDNesRRpOtcOqu9oiqNd+d9/MRkOps9dETubYn1FbKyK5RGJepOIMWGVome3UHL6vMK+ko8m/PCA7z2Qd3bLj2/Kw0nLmGkjv5oJOGa6jqAztqqwCGKTeaWz7S8d2hFiKRU5y0FjRFDHUMVKN8mDytn1T1oaLqBJTuqGFkvnb6MNEIOpOLx7991/sFlU8oXj3W8Lq0QRzUOncXEXAAhCDghCvQORAW8/kVu4LxxUfC0oiSAshMu6c3q8YVEPOGpqmFnMKIGs+vafLWwtZ5ktD4f3DvMHx+XKcLq5JFeHcjxgkdL2zqOikK+tDlarlynNwpHADMl8cCRv3ys/vTm5cW/64MCCGo481v6/IFNr1touPzOVInNaSScjcWwQ5s1Qz4Cyw+wWsSO4OTjyMLQvq2DzgUbLyvP7yU7WwKFvGbktYGlXlTxoIh+vsf+nDnUAQUzoWvkntLXHgJLgEX3sVLAWkFbyyZTf/Uy+8xkyQYMcWYbrO9nVbbG1JlaXxWggyM7brh0AEANFwQdH8u6e/OKO/Oy2LEsUkosSoYPbamGv8ZN42O17q4sjrwzqHex6A8XpkTUEGW6LJNCqFVKP7tTRHdWE9HuNdVorOdyhjGDkpTiPtw47+dvZaQ4s7ctOqe7kYZOB4FoK2cNTnSFOfhb14vb6PLLI1LAgjScTXOyUWD5B1QpnQrWo2Gz699LZKNp6YtqDTGu5xmU99thf2fKkUw84gNi8ZHewSbA6crSaQBTqoWr4VyaPKKTYPcp3j3iYFaujYnupqN6zUBKZS8YGZW+sSuIyOUaVQVUUuLdXfHRj8vmX0719WUp3nqW1k38bchLMPTt+DLCnJWYzmTTRHKzgKC9O+IwFetRycFI0RYcq+zEcmy0JB1qKi+LWWAM6NtoM9ZOSjycA8O6n5buflQCYORdYXxHDHMMBDXIMcyJCKVGUmBb88JD3DmRZeniw5ZVQiuLIPB4xlYpqnVTD0RkybSktHCocUdtUv+6pPB/moD0Xa8JspU2UVufvk9fbrm60L+2j6Ty9bDVPqKYjpUVHfICHzAX5A9YWp/AdvxRc69Vy7Kn7WsFb23E5VvnqhXdquWYFETJCVgGFAH95L4zJ4rFWAGQqG8pLBkv9FRVComWfRDrXgOM0jZPZSmdfNLA/h61BSTVyZwnQpBzcPcjvH/IwK5eHxepQjnI5zHiYsSCzcZOQSf7O1nCIPceSq8+qQ1ny0YT3D+X+YXn7fvnl/eLhgTwuavnnKCRyOGppxUBOh5Ciey+kpPpMOTw6ihdGRkXVZOkJWzw3JPepQZzbEVLs6T6xldacFIWMrakKiXsPJLyaGKnckasOAzJGWqw3M+83PZHzkbkuxcweyvFvqIRrZhFMVZ2v4/4M0YS1K6wROJGrX7XECjgJ0Uxy5raa52nIYUVwNTJZiCQFCGpIxMwgZ9j4W911BLVFSRmEah5bNa6GT71XWBCr7dpOsdpd6kEZZ7u+eZhoFfWWxkiKs1Vm54bONeA4P8Rm9GqRG5mkrq4nwaitHMk4KsRRkd89QEacCZkLOcp5lMtRJgdZmdO1wWBtsrd3PAVISq5sx8Nj+fBQPtgvHxyUh8d8POXplKWZFHVh4bjvqpN0nfwEepI0ThTH4AsapIvZ3hCHG3NJJyc3QlIXRnJIaImW5EEcu8hWQZOK0No+qbTGJO2wML5BfbVE6NYFrQ3Q7F7qCBSCDn6kyDXEn5VWNGdz2Cosmj7GL3uhjaAuFWIpzOg49ZOyd+0U6iKfNp4iWCTwA9jOA489u+kIep+Uhf698utGtl1Kbo7W4nkymfrwzs4raCIKqpwEohX8O6F9cOGoBxyGCODY2GcQQxTgAhgAxJLRhPx1YiJm1KfpApDVRrmSuSzFpMTBVMdm8EPQP7DYl2VRj1TvHb/FozoRKQw2xQcKz45pmwncbALahpc+qcHSNNU1V3vSbQ0n6txDNyWxdf6EfvmtGp4BfT4jbOOxeqvLDLBzfqKTP9c2mfXqSh+wpY0+U30t0/WFZ5q6DDgq1mphI1XItiupriHrClJYX2Wj2fVXD6wK6iTU1ERs/urRwbpuICIKuUcdiyyIok1MHYXtKgEkqK5cFHJqE9M2s6txbbpAaRAOkgPOgV26dPUmk1BvOrVHr2Gk8pJz4JeclxpgFavjAG21Wc/NuuPMSLOPfVPM63cbVSxWHn4FlkFh2jp/yebkEQ8oNKyZtEJtwGyzoa7N4cLVONW9UD2SbGVp8Wm/MbJu60cEgiA1NphB1deqWI1+4VS/chabJfAEJtbrO8yYtF5yV0v5a8FbZSvquaHbkDOqRJSPqFz4k7Ll2L2tJ4XihwCSQAmSuiP6wzgA9B9v84jMyIEziUl/9A/1oEqPHws1V8fx1SfyVStHhTl5sZ69KhKEWsRUT1szV81pi2oOkF1MgguvDtZTQxy5moXcxprlwFUVtXO5HSJ6yjSZyGeTvLuw8fwYJyNLAjv3iSpa+DDMZaZ+c8SrM9jTRPGbQM/NRp26P8lghw54BAKeO7agS6o3FfQMAk8+vmxq5s8ryYEcGk8Y1Gdp1dZyEz1nLUdlgKAAACAASURBVI8wo9H9EGI6Tz8KR8qJTAsvinaBNFCnOqZonmHxZNA58nB89ztvvfzSi4PB4KwZ6amnnnrqqafHm6bT6bvvffCTn/7srBkxdF6+pfLd77z1xuuvZZn/IbSeeuqpp5566mlWyrLs8qWd8Xj86Wefn2pBj9+3VF568YUFvW/tqaeeeuqpp54A4OWXXjg/To7zsoajf5PSU0899dRTT4ulc6Vbzwvg6KmnnnrqqaeeLjCdl1cq/fuUnnrqqaeeerrAdF4Ah0eLwh8U2UfdU0899dRTT+eXLqoGPC+A45Q8HL3jpKeeeuqppyeT2ByNdy6QR7+Go6eeeuqpp54uNp0L2/u8eDhs6t0SPfXUU0899XTB6DwAjurEfP7Rj370gx/8YDwenzU/PfXUU0899fR409HR0Y9//OO/+7u/Uw/O/sXKmQOO2pnxox/96Ic//OHZstJTTz311FNPF4PG43GlVf+3//3/OGteaqLhePVMGagBx+69271vo6eeeuqpp54WSEdHR2sb29aDxTs5dna2G0Lv3Lmrr8920ahZq9GjjZ566qmnnnpaLJ0r3drvUumpp5566qmnJ4TOck9GDzh66qmnnnrqqadTpzMEHGz+9ttge+qpp5566ulUyNOyZ6Zxz4mHo0ccPfXUU0899XSR6TwAjh5t9NRTTz311NOp0tmr2rMCHGdf85566qmnnnp6IulsVPCZezh65NFTTz311FNPj4DOeCXHmQAOjl721FNPPfXUU08XlR494OghRk899dRTTz09cXReThrtqaeeeuqpp54WT5y6edQq+OwAh70xuAcePfXUU0899XRKdD6U7CMGHIlKn/Enc3vqqaeeeurpCaEzc3I8SsCRrNj5wF499dRTTz31dEHpHCjasz7anM9DI/TUU0899dTTk0NP6DkcPfXUU0899dTTI6Yn5RwOVdPeudFTTz311FNPTwb1Ho6eeuqpp556egIobuQ/OtP/kQGO3pvRU0899dRTT+eHLuY5HP3+lJ566qmnnno6b3Rht8UqYji7U7jHHT311FNPPfV0OtSuYR+RDn7kgKPHFj311FNPPfX0KOl8aN5HADjOR0V76qmnnnrq6QmnM13gcJbbYvtPqfTUU0899dTTE0Jnvy22Rxs99dRTTz31dLrU7ts4dW182oCjhxM99fT/s3fncVGU/wPAP7M3y32LgLAooqKogGZ4ROZZaqlZmlkeeGbnT9NS9GtZqdm3uzz6ZoeafjX7hkqp5JWKAoqJCIog9w3LDXvMzO+PR6dhWZbdZRfQPu8XL52deWb2mXlmdj7zzDPPIIRQl9F5p+XOr+FACCGE0AOvYwMOVu8gQgghhKyss7vEwhoOC2NZlmUxmkIIIXTfse7JS2TVpev3ANVzkPCCYRiWBwAoHoFAQAY6O7MIIYRQp+mMgOP+R4IMWq3W1tVqlRV0aQlTVUkrK5naalajAWApkZiytRO6uAkcnYQe3cQubkIHB5FYIhAKMfJACCH0D2TVgON+r7/Qg2VZrVarbmjQFORpEs41Xb/ClJez9fUsrWVphmUZABZYlgIASgAURQmElI1c4OIqDQ6RRkSK/RQSWzuhUCgQ4M0shBBCVscC6F7m6hnVESiJzM5qC28RcLDcvyzbPIVGVW+1bFgGy7JatVpVpVRnpKsu/qlKTqRrqiggxUaRBPd6NLu3WuR/hgGWZYER2tpLBoVJH46U9RsgdXUXSSRY24EQQsiqRGKbZmcaivev7lg9E9rk6upiYGpFReXf39FxAUezzkXus4BDq9WqGxuariY1xf2mupnKNDbwyoS9F2bw1onl9aX6d/zBAMuCVCbp3cdmzCSbIRFSBweRCO9qIYQQspauE3Dg2a4N5B5KY25209m4xgun6bJSAKAoCsx4FIWigKJA1aS6lkzn5WpS/7KZMEXeK0gsFmNVB0IIISvppFsourCGwxCGYdRqdWN2Vv03n6nvZAJDAxdqMMzf6ViySm3VcDSbxIJAIOzu47jsTZt+/SUSCbbqQAghZHEisQ3wAw68pdIFAw6GYVQNDQ2X/qz78Ru6Rvl3MXARAz+SYE0MOEiAwjCUjdz+xcV2j02U2TtgzIEQQsiyuk7AgbdU9GMYpqm+vunypbrd/2HqaqxVHSUQsKqmut3/AY2GHTfJxtEJYw6EEEIPpM44vVHNBqmucW+Jj2VZlUpVn3Cu5ruv6GqltR/vpetqa/d9X3/ymEqlwl5KEUIIWVKXOdF2zvV0Fz+pqtXqxsKCuv98RVdXAYA57UNNQVEUW19Xu+trVWaGWq226nchhBBCnQIr8HVpNJrG/NzqrRu0NdUszbAMw7IMrwGK/gYc7UVRrKpJ+d7bDZm3NBpNuxeHEEIIta4zrvsx4GiGYZjahvqSU79rsu/cfTMKw7KkQSgXZFipwkMgoCvKGo783FhdRdO0Vb4CIYQQ6iTYaLQZlVp9ruzm0aqri2mtHStkWQABBSxLCQQkymjRYQb/TXQkIuEqP+7dNGNbzMHqznpvmGqKPyfqEyIZM0Eol1tutUx28OBBrVZLhmfMmCEUCjsxMwghhB4AGHD8jabpivqqHzJPx7szwXaiMTUaoUhEXokCDEMJSADRopKDBWBoRktrRWLG2YW2sQEAWlWvbSgBTQMlEIFAQFF/hxdcT+hwL4Th+mShgGLZcvWZ/ZLBg8RSPwue5lUqVXp6ellZWU1NjVQqdXR07NWrV7du3VpL/8EHHyiVSjL81FNPYcCBEEKonTDg+JtGo7lcnnWlIosWCb5/1F/x601/rVYMQqBZoZBiWYqiKKCAuhcyAADLMIydoyhksE3oMFlAT7GrOyUSAgUsQ2vqS9VVt+jiP5myC5SmjBIKhBRFCSiBgBIIKKAoioK7o4QCoQAogUAgBEogpIS5Ks1ljaY7ea99O1equLj422+/PXToUGVlpc6k8PDwqKioxx57DOMJhBBC1oYBx100Tdc3NhwtTG7UqgUUlesm+72f26wrxY4yiVgIDEMJBBTLUpSQYlkACiigWFoL/Qc7zJhj2zdYKBQ01GuK69jKeooFcJJTbnbdHfx7MH5jNMpbmtvfsGUnhWIRRVECCihKIBCAQEiJRAKhiBIIyFvrSSzDArBUw9n6hkfEYtd2hgKxsbFvvfVWbW2t3qlJSUlJSUnTp0//17/+ZWtr254vQgghhAzrnICD6npPxtI0nVNX9kdxClAUCyDSMn8GuYxKKxc1auykIBIJGKAoSsDQQAkoigWa1YrHP+k4fZbU2Sm7lDmVzl7PF1TWQZMWWBYkInCSs/2605F9IMgrUBiyRp0TxObtEgpBJBKIxQKRkBKI7gYfJH4BrjKDAknjtUZVplbr2J6A4+eff165ciV/jK2trZ+fX319fU5ODj+ZRqP56KOPsJ4DIYSQ9WANBwAAy7JNatXBvIRqdaP4bl+fVKmDNCa0W9SfuYyadQCxSCgEAUMJBCzDsiwjnjjV46X/09bVn0ljt52iaptAKgSg7gZSKi3UNlK3S6lj12HeCGZCfztp72VgI7Wt2CkQSu6FFtS9IIPi/rkbfLBam9qjart+EnNfYZ+amvrWW29xH8eMGbN8+fLg4GASVVRUVBw9enTjxo2kZWhMTMywYcNmzpxp1sZDCCF0v+mMfsDwsVgAAIZhlI1150rThAKKvfscCcsCez7I5bqXHdB0g0ar0WpZmmG0NKOlBf0HO02fpa1r2JcAX52kmjQgFQFLNX93CgUSETAsfHde8J8/KY2qAbpNVTuOA6CAEoBAAAIBUPxh3oBQJGpIY9SVDP8VcaaszoYNG7jHTKZPn/7111+HhIRwdRiurq4vvPDC+++/z83yySef1NXVtWcbIoQQQgZgDQcAAMMwhfUVZaoaqvkLbuqlwhPB7qE5ShqgCVgKQCQQUI5O9s+8KHF2OpPGHr5KaWgQtB4qUhTQDJxIpbo5wpOhNhrPOSL1LTFTevcbKACWAor36uB7dR4UNICqiGF8zLjTQRpnkGE3N7e3335b70Keeuqpffv2XblyBQBKS0svXLgwbtw4A4tVKpUlJSU0Tbu5uXl6ehqZmaampry8PADw8fGxsbHRmdrY2FhaWlpTUyOTydzc3JydnY1cLJel0tJSrVbr6urq6empUxuk1WoLCwurq6tlMpm3t7fcuCeNm5qaiouLa2tr5XK5u7u7g4ODSVlCCCGkFwYcAAA0TefVlzdq1fxXmVAUJaTZywFOp3u6jsusYChoApBRlO3AUHm/4DulzLbTlFqrG23wXxNLhigAmoHvL1C9PJl+3j009hGi6l8ogRAAgKVAALxog/+fhtIWa7VasVhs6ur89ttv3PCcOXNaO4uLRKKxY8eSgAMALl261FrAkZaW9uWXX8bGxnJjhgwZ8vLLL48YMUIn5ZNPPpmfnw8Abm5uv//++4EDBz755JPi4mIA2LRp0zPPPMOlTE1N/fHHH3/77Td+m9aIiIhnn3328ccfbxkhcUvu1avX/v37L126tH379tOnT3MJwsPDly9fPmrUKACor6//4YcffvrpJzILAEil0hkzZixdutTLy0vvOgJATk7Od999FxMTwz0SLBKJHnvssRdffHHYsGGtzYUQQsgYVg04umDbUD1YlqVpulRVo2VonfEA0CSivhmrGFhQ7a5haBYaGdol/GGhkDqdTtU2gvTe9tN9EX1zFAUqDRy7Dv19GK3dULYmhqLu3cxqpXaEYlmhppCmaZZlTW3G8eeff3LDw4cPN5By6NCho0ePvrsKreQ+NjZ29erV3A0aIjEx8YUXXti8efOMGTP44+vr68nZura29rvvvnv33Xe5SdyLcFmW3bFjx+bNm1t+14ULFy5cuHDo0KF///vfOnESt+ScnJydO3d+8MEHOvMmJSXNnTv3s88+GzJkSFRUVGpqKn+qSqXavXv3yZMn9+7d26NHj5ZfHRMTs2rVKpVKxR+p1WqPHTt27NixV1999ZVXXmn/U8oIIfSPhTUcAAA0TZc2VtO8gIE7sYgYVmkrOjzIc/75PFYsBIlY2jOwvl57PV8gFTbvLFSnbuPeBzJGIoL0IkFVHe0o60ELHAVQc/eWin4sAAjoco3pfZyXlZVlZWVxHxUKhYHEgwcP/uabbwwvcMWKFa1NWrNmzYgRI/TWGWi1Wn60AbxOWr/55hudaMPFxYXfTciZM2eWLFny3XfftbwFAwClpaUtow3O+vXr/fz8dKINTmFh4aZNm7766iud8YcOHdJZTTc3t/Lycu7jp59+2r17d53oCiGEkPGw0SiwLMswTLmqlmEZLuRgeX9SNXO2r3umk4zVaIVOrmJ3j4o6trK+WeWEntqBFmOqG6GgigKhPS1wM6ruh2kiNRwmrU51dTU3bGNjY2qrCL1ee+21P//8MyMj4/Lly59++qmLiwsZr9Vq//jjDwMzikSiSZMmvfTSS0uXLvX29gaAlJQUfriwZs0a0uIkPT3922+/9fPzI+MTExO3bdvW2mJtbGw2btyYkJCQkZGRkJCwceNGqVRKJimVyqtXrzo7O3/yySdXrly5devWmTNnFi9ezM37+++/FxQU8JeWkZERHR3Nz1JycnJCQsL169c//fRTbsmbNm3ihyAIIYRMgjUcAAAMwzRq1Wwr90VYgHI78U8Rvq/9dtPGxkYgEinrqSaN7m2UlnUbOiNpGupUAAIxK/YE1W0jsqU14ymV+vp6btjNzc3U2VvasGHDnDlzyLCzs/PkyZMbGhq4Z25TUlJam3Hw4MH//ve/uRiC2LFjBzccHR09b948MiyRSCIjI7t37/7kk0+S+xo7duyYNWuW3v7XP/roowkTJpBhNze35557rqamZsuWLVyCrVu3Pvroo2TY19f3zTffTEtLO3v2LBmTkZFBoh/iu+++a2xsJMOvvfbaggULyLBcLp88eXJZWdnGjRsBQKlUHjt2bPbs2Qa2FUIIodZgDQcAqeRgGaBYA2+av9Tb5S9vO4qmSWcbhl4c28oyWG4SJTSmgsO8197z325vRoPTlp5++mmdMaGhodwwaRCq1zvvvKMTbeTn5x89epQM+/j4tOz5o3fv3lxwo1Kp4uLi9C754Ycf1hkTHh7ODQ8YMCAyMpI/laIo/iwVFRXcsFKp/Omnn8iws7Pz/PnzdZb81FNPccOt5QchhO4Dnd0IDQOOu8TU3cdN7r2HvtkfAMsAGzvIi6lUslraSc5KRM3qNviPpegbBJYFIQVyKQBLU5oKMOTebR22S5ROy5aS/H7Q+XdwdPj4+OiM4TetmDRpkt4mGmPHjuWGL126ZGQm7ezsuGEvL6+WeeYnaGho0Jul0aNH85MRLi4uwcHBZPjixYtqtdrILCGEUJdz911gLf86At5SAQCgKMpRJKcMPlZDAVwLcD58s/KV4mJXD28nOVvb1KKQWo82AMDeBro7sUA3COlSYwqYAXO6GZVIJNxwU1OTqbMbg58rk5qYZGdnc8N9+/bVm6ZXr17ccFpamhlZahM/z9xzswCQm5v73nvvtUzPdYmmUqmqq6vd3d2N/y6EEEIEBhwAAAKBwE1iR1GU4bMnIxBsi/SdWJYbrPDr60XfLqUk/O1nMNrQaCHQk3GxE7D1xUK2Clo9Qf79oIwW7Mzo9Yt/jV5RUWHGU7XWU1NTww07OTnpTcPvaCs3N5emaau+5IVfQ5OYmJiYmGg4Pb92BCGEkPG6RKV956IoSigUuojtBFQbW4MCqJNLDjZmUgw82hek3F0VtlkrUT3PyrIgFMDYYAAQihqvUaBus4aDBYFa2M2MN9TzH0tRqVSlpaUmzd5hjFwva0dL/CYvxqBNf1AZIYQQYA0HIRKJ/GzdbQSSJm0bd+jFQB1Rps1QFgR7ec0bwXx3XkAzcK/xhy6uvoSiYHo4G+ZHMZpqad15Clq7ZOc1BaGEjNBDJDK5gJydnYODg7mmCZmZmQa6IU9MTNy0aRMZ7t27t4H+LSyCX3tRVVWlNw2/41Fvb2+uuzAr4VcILVmyZPz48YbTG+ioFCGEkAEYcNyt4fCydXYUyZTqtl9gVthY9emNo5vCZo/vLytQsidSKZrRc4eEq9ugKBjRm306nNXQWqbiiJ3mTisLbhax0JQcJN2FQqEZl/gjRozgAo7z589HRES0lvLKlSvJyclkOCwszNQvMhW/GemtW7f0prlz5+/t069fP2tnycPDgxtuamoaOHCgtb8RIYT+mfCWCgCAUCh0s3HsK/diqTaaQLLAUgCH8xN/zDxjL7WZO4J9PoIRUKDWNk92r90Gy8K0MGbpo6yLrSy9IF5Y/YsANK034LiHAhV4UlI385ovTJw4kRvevXt3a91VqdXqX375hftoIC6xlP79+3PDR48e1fvEx8mTJ7nhIUOGWDtL3BMoAHDkyJHWHrrBOykIIdROGHAAAFAUZSuzebJbqIQS6X0slvd8LAAFAkrw7xsx/06N0YB6eij1zlRmdD/W3R4kIhBSIKBAIgRXOxgZxK5/ipk7nKIEmq8uHy3I/8FB2KBvm+s0/AAWqCrhCKnUzrwbCvyOKGpra9955x29j6vs2rWLq2ZQKBQPPfSQGd9lEj8/v8cee4wM37lz59ChQzoJyOvTuI9jxozpgCxxb5MpLy//7LPPWj53U19f/9JLLxnuUxUhhJBheEsFAEAgEEil0gFOPQbb97hUnWUgJXcu0rDsxmsHb9YUvt530kBfzxBfuqKOLqyi6poAAORS8HJk3R0EQkqUU1Px+eVDxQVnv3+oQUALjHnguZH11cgGSqRS8wIOiqLWrVt3+fJl0h7iyJEjJSUlCxcuDA4OtrOza2pqunPnzi+//LJ//35ulpUrV+rtFcPiFi9ezJ25N2zYQNP0lClT7O3taZq+cuXKhg0buJ5SFy5c2LInD2tYtmwZV62ya9euxsbGqKgohUJBUVRDQ8OlS5f+/e9/p6amHj9+/LPPPps0aVIHZAkhhB48GHDcJRaLXRycxrv2T67NVTHatmcAEAqEP+dcTKrInOg9eHS3/n0cu/ftbiMWiCgADaNVqpsuFRedyk85khnfUFt4cKhAzjbpu5miez3NgKhaOERu787vUcNU/v7+H3/88UsvvUS6CTf8wOeSJUu4nsKtLTw8/NVXX/30008BQKVSRUdHR0dH+/n5VVZW8puLBgcHL1++vGOyFBoaunr1aq7x7L59+/bt2+fi4mJra5uXl8dP2Z4SQQihfzgMOO4SCoVyuXyYe2BAifuNhqK22nL8Lbu29Iu037bdPO4uc/CVu/raugIlKGioyFWWFFdXaGg1q6WX+0h7S5XAtHwYVs/XaChnjWygs1zezgc0Ro8e/Z///GfNmjU5OTkGkq1atSoqKqo9X2Sq5cuX0zT9xRdfcGN0chgeHv7555/b29t3WJYWLlwoFov5r7etrKzkv8DWxcVl06ZNHXCLByGEHlQYcNxFUZRUKu3h3O1J98EF+coard4+Ollo8f4UiqJElJAFKG6sKmpUXiq/DcBSFICKBmCEIAi0Eb7oq5Xc7VBWd2k6aEqqpCKkDgqZTNb+J0IjIiJiYmIOHjz466+/Xrt2jT/Jx8dnwoQJM2bMCAwMbOe3mEooFL7xxhuRkZE//PDDsWPHSB0MERISMnPmzKlTp3LvaO0YFEXNmzdvxIgRP/zwQ2xsrFKp5CY5OjpOnz597ty5HXN/ByGEHlSURKb78giLarX3TZ2TrVpVD52NZdmGhoasgtz30/53XHmDZk17U2uzd60xLKvSsgwjoektgaK53auEukvTW4VCVbH9lPZR7l695O2u4dBRUlKiVCrr6upsbGwcHR29vb27Qg+kdXV1RUVFNTU1UqnU1dW1K/RyoVar8/Pzq6urGYZxdHT08fGRyWSdnSmEEDKTSGIDza53KQADfU+afF5wdXUxMLWi4u+qYqzh+Bup5PBycX+2+0NX6/KK1K2+loxP/ztdWZYFVsswYXLhJI8GIUs3L0X9N2w0rKxaOsbOyVtqbnNRAzw9PQ30ANZZ7OzsOr6KxTCJRBIQENDZuUAIoQcNPhbbjFAotLOzG+rd5w3fsUK27UCvtTfIswzDsqymCf5PIfIUNRoTM9Islc9MFjkNsbOzM6ODUYQQQqgrw4CjGYqiJBKJvb39GN9BS3wi5QJJ291y8Nwdy7DAUCwD831txrlXN391vW6XGwQN4lIYw7qMc3BwkEqlXeFmB0IIIWRBeCWtSyAQ2NjYuLq6zlRHNGpU+8oT65k2XrBC/N0shWUZlvEVC/+vZ4OUVbVZvUGDuIwZ1mD/uJurm42NjbXfHoIQQgh1PAw49BCJRHK53Nu921w2UiIU7yo538Tof6eo3tfZsywAA896U37iWmCp1lpsEDQrLGEfabB7wsWth1wux5spCCGEHkh4etNPJBLZ29v3EAiiRKN9JI6f5MeV0w38eyh6Q417k9jeMuELXg0yfT1v8KkZ21ztRMZ5jLu7BzbdQAgh9ADDM1yrRCKRra0tAEwSPeQmddhfdCmhLqeWUbU5ow3AK76MQloHDEArPYhpQVqj9asUjRF6hLs5O9va2opEImy6gRBC6EGFAUerKIoSi8Wk4mGkOKSnvefhwisxFSn56ko12+q7QxmGDZHBFLdaAavvpfUANAhVjFMZ81CDbISDSw9HR0eZTGbea+gRQgih+wUGHG0g7TlEIpFMJptj5/BweeClioyTVTevNxZqqWZ3VsgNFyHNrFOwzlST7s0UCmiGqmN8KpmBKkl/qbPCw9FVLpdbo8sNhBBCqKvBgKNt5F2yIpFIKpU62Nr3dvUZVxWSXJl1tOL6TVVpA6tWszQDDM0CADvPU/qIYxHQwAIFQLFAMSBU07J62rMShqrE/eROHs729ra2tlixgRBC6J8DAw6jUBRFqjqkUqmdnZ2Dg4O3u+eo+gEldcrcurJCdVWBqqpMVUuxmmdc1WVNdiwrZEBMCxzU4KaiXEHiJZC42djYu8jlNjY2EolEJBJhxQZCCKF/DnyXislYlqVpWqvVqtVqlUql0WhUKpVWq6VpmqZpsmYURQkEApFIJBKJJBKJRCKRSqVisVgsFgsEAgw1EEIIdQx8l8p9jNR2CIVCiUQil8vpe1iWZZi/39AmEAgoihLeQz7iDRSEEEL/TB0TcLBmBE1dHIkeSDVGZ+cFIYQQ6hIMdHaJdfsIIYQQsjoMOBBCCCFkdRhwIIQQQsjqMOBACCGEkNVhwIEQQgghq8OAAyGEEEJWhwEHQgghhKyuwwKO1p7LRQghhNCDryM7rcKYAyGEEPqHwlsqCCGEELI6DDgQQgghZHUYcCCEEELI6jDgQAghhJDVYcCBEEIIIavDgAMhhBBCVocBB0IIIYSsrosEHNhFB0IIIfQg6yIBB0IIIYQeZBhwIIQQQsjqMOBACCGEkNVhwIEQQgghq+vIl7chhP4p1Gr17du3AaBHjx52dnadnR1kATdv3qRp2t3d3d3d3fDI+wjuqB2JksisuonZv/9lm41u/lwKq1Y1WDMbbSsqKmpsbDScxs/PTygUdkx+UAfLysrKzMwcPny4XC7v7Lw8CEpKSh5++GEAOHjwYGhoaGdnx3y4Y3AeeeSRvLy8d999d/bs2YZH3keKioqGDx8O9/+OaoBIYgMA1N8jKGj+ublWJ7TG1dVFZ37++b2iovLvnJi66AfV5s2bY2JiDKdJSEhwc3PrmPygjtTU1DRz5szy8vKlS5euXLmys7ODugrcMRCyIAw4mnF0dOzRo0drU7F640ElEAhsbW3Ly8ttbGz443Nycr766isAWLlyJcaa/0Ct7RhdFu6xqCuzXMDBmlET0+U88sgjn3zySWfnAnU0iURy8ODBgoKC4OBg/vja2toDBw4AwMsvv9xJWUOdqbUdo8vCPRZ1ZVjDgRAAgKurq6ura2fnAnU5uGMgZCkYcLRLQUFBampqZWWlXC739/cPvOmMKQAAIABJREFUDg7Wue2iVqtv3boFAAEBAWKxODExMTc319/ff9iwYS2Xlp+fX1VVBQD9+/fXmdTY2JiZmQkA3t7ezs7OJuWhqamJNMMOCAjQafimVCoLCgoAIDg4mKIoUzPMV1NTc/Xq1eLiYpZlPT09BwwYYOBnuqSkJCUlpby83M7Ork+fPj179iTfroNl2du3b9+6daumpsbOzi4wMDAoKIif0oKrlpaWRhrbe3p6AsCtW7fUajXZ5gBw8+bNqqoqqVQaGBhoXjHpuB/Lmkvft29fgUCQkZFx8+bN+vp6d3f30NBQw+tbXFx89epVpVLp6Og4cOBAb2/v1lIaf0wFBgZKpVLjl2zkXqdDZ8fgM2mfb3/+DW8ZA3tsm1nSarXXr1/Pzs5uaGhwcHDo06dPr1692pzLGIbz3HKf5KSnp2u12t69e0skEv74zMzMxsZGFxeX7t2788cbWbhqtTo5OTkvL08gEPj7+4eEhFhkNZGxJDI7y/xJ9Y63lchsJTK5RCaXSHl/Erm42Z8N29leffVVhULx6quvGpm+srJyzZo1iuamTJmSmJjIT1ZcXEwmnT59evbs2WR4xYoVepd59OhRkiAzM1Nn0rFjx8ik7OxsU/OQnZ1NJqWmpra2WLVabUaGCYZhfvrpp9DQUH42+vXrt23bNq1Wq5O4vr5+06ZNffr04Sd++eWXy8rKdFJmZWXNnTtXZ+3mzZuXl5dnjVUbNWqUQqHYvXs3+Tht2jRFCy+++CJrejHpdT+WdWFhIUmTkpKyfPlyfk5CQkIOHDjAT8wtPD4+/uOPP9bJ+ZdffskwjM7yTT2m0tPTP/nkE2OWbPxe15LOjkGYtM/rMCP/xmwZA3usYfHx8RMmTNCZcdmyZUVFRcZsCr0jjcxzRkYGGZ+VlaUzb2BgoEKhiI+P54+naXr48OEKheLo0aPcSOMLNyUl5YknnuAnmzFjxunTp8nw5cuX29xW9ymhWCYUy0R//9mIxDYiSWt/clP/PL18+H/dmn9slrizA577UnV19eLFi5OSkhwdHZ955pmAgIDq6urY2Nhr167NmTNn586dI0aM0JklOjo6Pz+/e/fu/v7+rT2wPmLECFtb2/r6+rNnzwYEBPAnnTlzhiTw8/MzOw8mMSbDxN69e6OjowHgiSeeCA8PB4Dz58/HxcVt3ry5vr7+jTfe4FI2NDQsWbLk3LlzLi4uixYt8vb2Lioq2r9//5EjR0pLS7///nupVEpSFhQUzJ8/Pycnx8PD45lnnvHy8iosLNy/f//p06dffPHFvXv3trzctOyqPfnkk4888khZWdmePXsAYP78+Q4ODh4eHmBiMbXmPi1rYvHixVVVVc8995y/v79SqTx8+HB+fv6bb74pk8kmTZqkk/jdd99NS0sbP378oEGD6urqjhw5kpOTs3Xr1oCAgAkTJnDJzDumkpKS2lyy8Xud8Yzf5w0wMv9GbhkDe6wBZ8+ejYqK0mq1Q4cOnTBhgp2dXUZGxg8//PDbb7/l5+fv379fJpOZunGMz3PPnj0DAwMzMjKuXr2qUCi42RMSErRaLQCcP3+eX9+WlZVVWFgIAGFhYWSM8YVLLmAqKyudnZ2nTp1KflL+97//LVu2zIwVRGbCGg7CpBqODRs2KBSKkSNH8gNzlUpFIvqHH36YC665q5n+/fv/9ttvbV79rF27VqFQTJs2jT+ysbFx0KBBCoXiv//9rxl5MO+q18gM19bWhoSEKBSKzz//nBvJMAx36ZaTk8ON37Jli0KhiIyM5NdS5OXlDRkyRKFQ7N+/nxtJimPKlCn8y5SioqJx48YpFIro6GiLr5reC7WUlBQyCz/DrCnFZMB9V9ZcDcfYsWP5FTOVlZXPPvssyUlNTU3LhZ86dYpLXFVVRa6nFyxYwF+4eceUMUs2fq/Tq+WOYdI+35L1tgzb+h6rV2Nj48iRIxUKxTvvvMMv/YsXL5KFxMbGGt4UrY00Ps9bt25VKBSrV6/mz7569WqSgcjISH7Gfv75Z4VCMWvWLG6M8YW7YMEChUIxevRofsqioqIZM2aQ78Iajg6o4cCuzZvJzMz8Rp9ff/2VS5Obm/vdd98BwIoVKxS8qFwikaxatap79+7FxcU///yzzpJXr149YcKENh+sJVc2ycnJ5E48kZycXF1dDQCjRo1qTx5MYmSGCwoKamtrAWDMmDHcSIqi5s+f36tXr4CAgKysLDKypKTk66+/BoC3337bx8eHS+zj4zN//nwA2Lt3LxmTkZFB+kSJjo7mP9rXrVu3VatWAcCBAwfq6uqsvWoGGFlMFllI1ylrfnp+rYyzs/Obb74JAMXFxX/++WfLxJGRkdxHR0fH5557DgBIbTkZafYx1eaSjd/rjGf8Pm+Y9baMkZRK5ZgxY+bOnTt37lx+6T/00ENDhw4FgBs3bpixWJPyTCow/vjjD1KlAQANDQ2xsbFeXl4RERE5OTnp6encEpKSkgBg9OjR5KPxhZuenn7y5EkAeP311/kpu3Xrtm7dOjPWEZkHA45mUlNT39fn8OHDXJoLFy4AgJubG//nhrC3t585cyYAtOxDrG/fvsZkYMiQIaQxFP+H+9y5cwAwYcIE7j6CeXkwiZEZdnJyIgPnz5/Xycbx48fj4uK4n1SyRvb29i3PxxEREQBw7dq1srIyALh48SIA+Pr6chWnnNDQ0GXLli1YsKDNbmENMHLVDDCymCyykK5T1hyu0DmDBw8m7e+uXLnS5sK9vLwAoLGxkStESx1TLZds/F5nPOP3ecOst2WM5OXltW7dunXr1vn6+upMIt0R1dTUmLFYk/I8ePBgGxub8vLymzdvkjFXrlypra19/PHHn3jiCeBtZJqmT58+DQAPPfQQGWN84ZLd0tHR8dFHH9VJiY8gdSRsw9FMSEjIjBkzWo7n75SkhfnAgQP1dnVMfnbT0tKUSqXhdvt6SSSSadOmffHFF4cPH547dy5FUTRNx8bGAsDEiRM7Jg8m8fT0nDNnzo8//vjee+9dunRp4sSJAwcO9Pf3Fwh0Y9k7d+4AgK+v74kTJ3Qmcb9rJSUl7u7u5Io/LCysZTtzJyenFStWWGVNTGFkMVlkIV2nrA2gKGrQoEHXrl3j19a0RiS6+7ND0zQZsNQ6tlyy8Xtdm9nmGL/Pm8p6W8YwpVJ5+fLl7Ozs6upqUtOQkpICAFxFi0lMyrNcLh87dmxMTMzVq1dJZyck5h41ahQJen7//fdFixYBQGZmZnFxcbdu3bhAzfjCJSmDg4NtbW3NWCNkKRYNOAzsnPdJn2D+/v5tvhGgsrISAFpeExAuLnd7la+pqTHvJ2Ds2LFffPHF1atXb9++HRgYmJaWlpOTI5VK+Y3mrJ0Hk6xdu7Znz57bt2+Pi4uLi4sDAD8/v2nTpk2dOpVfe1lSUgIAN27ceOWVV1pbVENDAwCQ50W5teiajCkmiyykS5W1AeTqXKlUmjGv9dbR+L3OJEbu8+1n7dJvamr6+uuvd+zYoVKpzM6kDlPzPHLkyJiYmPj4+NmzZ9M0feTIEVtb27CwMLlcPmTIkMTExJycHD8/v7/++gsAxo8fz4VlxhcuuQVm2aJBZsAaDpOR3V2tVuud2tTUxE9mhv79+wcHB6empv7555+BgYGkfvKJJ57g/6BYOw8mEYvFL7zwwtNPP52UlJSQkHDmzJnU1NSPP/5427Zt77zzzvTp00kycuU0ZMgQfgt8HeSkRW4nc/d0uyZjiskiC+lSZW2ARqMxOxvWW0fj9zqTGLnPt59VS59l2dWrV8fExPj4+CxfvjwsLMzNzU0sFgNAdHT0L7/80jF5Jo/5nDp1qqGh4datW4WFhTNmzCC1IxMnTkxMTIyPj/fz80tISAAA8qI1wvjCJZVPrWUJdRgMOExGal+zs7P1Ti0qKiIDjo6O5i2foqhp06alpqbGxMTMmzfv2LFjcK+BYYflwQxyuXzUqFGjRo1asWLFnTt3vvzyy0OHDq1cubJPnz6kppScRN3c3ObNm2d4UaShqKl31juYMcVkkYV0wbI2kBPz3lFuvXU0fq8zQ5v7fPtZtfSTk5NJW4qdO3cGBQXxJ7UnfjU1z35+fgMGDEhJSblx48alS5cAgGtpQcKLuLi4p59++tSpU8B7IBZMKVxyTzw/P9/slUIWgY1GTUa6hrx8+XJpaWnLqfHx8QAwbNgwOzs7s7+CNMO+du3a8ePHk5OT7e3tyZu+zcsD11WfNeoMkpOTjx8/fvnyZf5I8qAd6QOAXJcAQJ8+fQDg7NmzpHrTgH79+gFAYmJiyyuSurq6PXv27Nmzh1TdW3XV2tRmMVlkIV2nrA1Qq9Xk1rt5DXKtd0wZv9cZz/h9vv2s+mtDHgAJCAjQiTbayYw8k+ally9fJm2YuGahvXr1GjBgwMmTJ8+dO1dZWRkZGcmv/DO+cHv37g0AV69e7eKXMQ88DDhMNnz4cEdHR5VK1bLKMScnZ9++fQAwbdq09nyFn58faXf97rvvAsBTTz2l09bJpDw4OTmR65WW1xwtnykw1dmzZ5csWfLmm28yDMMfL5fLyU8D1+5s5MiRIpGovr5e74OIp06d4m7/jxgxQiqVlpeX//HHHzrJ4uPjo6Ojt2zZQvrzseqqAQDXapVrxMfXZjEZ4z4qa05ubq7OmDNnzuTl5UHzGm/jWe+YMn6vM57x+3z7mbplDO+xOkg+CwoKdB4yLykpIeFjx+QZAEiQ/f3336elpY0bN46LKiiKevzxxwHgo48+Al7NB2F84Q4bNkwkEmm12qNHj+okI01DUMfAgMNkTk5Or7/+OgB89NFHR48e5X50cnNzSW8EgwYNIgdJe0yZMgUASLd6Y8eObU8ebGxsyIG6Y8cOroeA6urqbdu27dixo535JPX/d+7c+fDDD7nrDJqm9+/fT55zGzhwIBnZvXv3l156CQA2b968Z88e7hK8sbFx165dCxYsWLp0KfmVdHNzW7JkCQCsX7+ef7GYkJCwfv16AIiKiiK3eK26agBgb29PBlJTU/UmaK2Y/vrrr4kTJ06cOLG+vr7Nb7lfypqzYcOGkydPcqfV1NTUjRs3AkBERMTgwYPNWKD1jinj9zrjGb/Pt5+pW6bNPZZvwIABAKBSqbZs2UIe66Bp+sKFC3PnziU3Psx7LNaM0uzfv7+jo2NxcTE0790EAEgDarI6Q4YM4U8yvnDd3d3Joy4ffvhhXFwcyRJN08ePH3/rrbfMWEdkHmzDYY7Zs2dnZmb++OOPL7/8cmBgYN++fauqqs6ePQsACoVi69atep8HM0lkZCQJyT08PEijqvbkYdGiRSdOnLhx48aYMWPIKSE9Pb2xsTEoKIh7/N08QUFB7777bnR09Pbt2/fu3Tt06FCZTJaWlkbOdgsWLODfc126dGlBQcHBgwdJ+sGDB6tUqitXrpSXl7u5ua1cuZLrfWjhwoUpKSknT56cOXPmgAED/P39s7OzyaN6U6ZMWbhwYQesGgB4e3v369fvxo0by5cvDw8Pt7Oz+/bbb/kJWismjUZDvl3nIliv+6WsOR4eHlFRUUFBQUFBQWVlZaSS3MXFZf369WZ3p2a9Y8r4vc5IJu3z7WfSlmlzj+ULCQl5/vnnd+/evXv37n379gUEBBQVFdXW1jo6OoaHhyclJZEg2Np5BgCZTDZu3LgDBw7Ava7AOH379iV9qfn5+ZE7I3zGF+7ixYuvXLly8eLFRYsW+fn5eXt7Z2dnFxYWRkREkMbaqANgwGEOoVC4bt268PDwb775JiUlJSMjAwDIWwOioqLMazenw8XF5Yknnvj111+nTp2q93UGJuUhLCxs9+7dmzdvTklJSU5OBgAfH59Fixb17NmzzceA2zR79mw/P79t27ZduHCBuwkSHBwcFRWl82YNiUTywQcfRERE7Nq1KyUlhbThEolEzz///IIFC/jvH5HL5Z999hn5KUxJSSGhhp+f3+LFi2fMmME/Q1h11YRC4Ycffrh27drk5OSkpCRyRcjXWjGR1icikcjGxqbNb7mPyprYsGFDenr6zp07ue6bIiMj33rrLWNeTNoa6x1Txu91xjN+n28/k7ZMm3usjrVr1/r6+m7fvr2yspL0nzFlypRXXnnlypUrSUlJSUlJFRUVZnSNZUZpjhgx4sCBA0OHDtV5eFUgEEyePPnTTz8dP358y55OjC9ce3v7r7/++quvvtq9e3dOTk5OTo6jo+Py5csXLVo0cuRI0r0vsjZKIjO/bWMz+u9asnf/pZonYHWSs2qVyY/CdwUsy5aUlFRVVclksm7dupn3oqPWzJw5MyEh4b///a/eq14z8sCyLOmV2dbW1tvbuz19e+ulVCrLy8tpmnZ2dvbw8DD87m8uz+7u7gYuXmmaLioqqqurk8vlPj4+rfWtZNVVo2k6Pz+/qanJy8vLwcFBZ6reYtq3b9/bb78dERGxe/duY77ivijroqIi0kTj4MGDoaGhZLOQd4W3+ZIw41n1mDJyrzOeSft8Oxm/ZQzvsS2p1er8/HyNRuPh4WHZ3lysWpo6jCzc2tra4uJigUDQvXt3Y64HHgAiiQ006wyLAjDQOZbJ+7Cra7M+k3TO9hUVlX9PwoCja0pPT3/88cf9/Pzi4uIsHhkgS9FbTCzLzpkz58KFC1u2bHn66afNW0gXpBNwdHZ2EEJG6ToBBzYa7YpomiZN/GbNmtWVz0D/cK0V05kzZy5cuBASEjJ58mSzF4IQQg8YbMPRtZw7d66iouL3338/duyYh4eHMdfHqOMZLqahQ4e+9tpr06ZNI8/umrcQhBB6wGDA0bV8+OGHpIGkra3txx9/3MXfJ/KPZbiY5HK5gZc7GLkQhBB6wGDA0bVMnTo1KCjI19d38uTJ/v7+nZ0dpJ9Fium+K2t7e/stW7YAgLe3d2fnBSF0/8FGowghhNADCxuNIoQQQugfBAMOhBBCCFldRwUcFnuZEUIIIYTuP51Rw8HqHUQIIYTQAwufUkH63bx5k6Zpd3d3/osP9I7sSGq1+vbt2wDg6+vLvRgT3deUSuWVK1fKysocHBzCwsI8PT07O0fm4/bPHj162NlZqD0+Qg8KbMPREbKysk6cONHQcD89ibNo0aJJkyYdP368zZEdSalUTpo0adKkSZZ68SnqXEeOHBk9evTChQvffvvt5cuXp6end3aO2oXbP8mL0Np0P/4yIGQ2rOGwuqamppkzZ5aXly9dunTlypWdnR2Euoq//vqL9JDWu3fvsWPHSiQSX1/fzs5Ux8FfBvRPgwHHXTk5OV999RUArFy50s3NzYJLFggEtra25eXlHfNmQuutCEKW9fPPPwNAUFDQf//73/vrBplFjrIO/mVAqNNhwHFXbW3tgQMHAODll1+27JIlEsnBgwcLCgqCg4Mtu2S9rLciCFnWX3/9BQBTpky5v6INsNBR1sG/DAh1Ogw4OoKrq6urq2tn5wKhrqWmpgYAnJ2dOzsjnQZ/GdA/CgYccOvWLbVanZmZST7evHmzqqpKKpUGBgbqpCwoKEhNTa2srJTL5f7+/sHBwUa+TzwtLY083MG1wFer1aRZWWBgoFQqLS4uvnr1qlKpdHR0HDhwYGvvqqipqbl69WpxcTHLsp6engMGDOD/Whm5Ilqt9vr169nZ2Q0NDQ4ODn369OnVq5cxa2G8pqYm0lY/ICBALpfzJymVyoKCAgAIDg6mKArM3RQ6aJpOS0sDAJFI1KdPn/Ys1nApt8w/Jz09XavV9u7dWyKR8MdnZmY2Nja6uLh0797dIitLGFOO3Nf17dtXIBBkZGTcvHmzvr7e3d09NDRU50xvUmKO4X1SL273UKlUAFBQUHD9+nUAIAcIl42AgACxWJyYmJibm+vv7z9s2DBuCW0eiSqVKiMjAwBIcWRlZd24caOurs7FxSU0NJS7CULT9NWrV3Nzc9VqtZeXV1hYmK2treHMG/9zAQBtlm/LX4b2bFizZ29ze5p3RBsoQZZlb9++fevWrZqaGjs7u8DAwKCgIJ0DilNSUpKSklJeXm5nZ9enT5+ePXu2lhJ1dRKZnWX+pHr/bCVSW4lU3uxPIpdI5GKJXCyRi+7+2bCdZ9q0aYoWXnzxRX6aysrKNWvW6KSZMmVKYmKiMV8xatQohUKxe/dubkxxcTFZSHp6+ieffKKz5C+//JJhGP4SGIb56aefQkND+cn69eu3bds2rVZr/IrEx8dPmDBBJ82yZcuKiorazHNrI1vKzs4mS05NTdWZdOzYMTJJrVabsSm4xPwtT9P0+++/TzbIxYsXzdvCrHGlnJGRQcZnZWXpzBsYGKhQKOLj4/njaZoePny4QqE4evSoebnSy8hyLCwsJJNSUlKWL1/OTxwSEnLgwAGzE7PG7ZN6ZWZmKvT5/vvv+Zvo9OnTs2fPJsMrVqwwvoxYls3LyyOTkpOT33jjDX7iPn36/PTTTyzLXrt2bcqUKfxJDz/88Llz5wxvecNHGZf5+Pj4jz/+WCdZy/LVe0CZvWHNmN3I7WneEa23BFmWzcrKmjt3rs6Xzps3Ly8vT2fh9fX1mzZt6tOnDz/lyy+/XFZW1uZ2QByhWCYUy0R//9mIxDYiSWt/clP/PL18+H/dmn9slrizA57O9+STTz7yyCNlZWV79uwBgPnz5zs4OHh4eHAJqqurFy9enJSU5Ojo+MwzzwQEBFRXV8fGxl67dm3OnDk7d+4cMWKE2d8eHR2dlJQ0fvz4QYMG1dXVHTlyJCcnZ+vWrQEBARMmTOCS7d27Nzo6GgCeeOKJ8PBwADh//nxcXNzmzZvr6+vfeOMNY1bk7NmzUVFRWq126NChEyZMsLOzy8jI+OGHH3777bf8/Pz9+/fLZDKzV6T9jNwUOliW/fzzz3fu3AkAX3zxxUMPPWTeYo0s5Z49ewYGBmZkZFy9elWhUHCzJyQkaLVaADh//jz/Si4rK6uwsBAAwsLC2r+yhBnluHjx4qqqqueee87f31+pVB4+fDg/P//NN9+UyWSTJk0yL7Ex+6ReDg4Or732GgDs2rWrurp6zJgx/fv3BwBSNcXfRPn5+d27d/f39yf9vphxJL700ktNTU3z5s3z8vIqLS09dOhQZWXl22+/XVtb+8UXX9jY2CxYsMDDwyMvL+/AgQPFxcXLli07evSoj49Pa5lv8ygj3n333bS0NPPK1+wNa+rsVv1lA30lCAAFBQXz58/Pycnx8PB45plnvLy8CgsL9+/ff/r06RdffHHv3r1cZU9DQ8OSJUvOnTvn4uKyaNEib2/voqKi/fv3HzlypLS09Pvvv5dKpe3JHuoEWMNBpKSkkPC5ZZS9YcMGhUIxcuRI/kWtSqUiVwYPP/xwm+G2gRqO/v37nzp1ihtfVVVFrlwXLFjAjaytrQ0JCVEoFJ9//jk3kmEY7hI5JyenzRVpbGwcOXKkQqF45513+Bc6Fy9eJOljY2MN57m1kS2Zdz1kzKZoWcOxfft2MiYmJob/RSYtljWllLdu3apQKFavXs2fffXq1eTrIiMj+Zv3559/VigUs2bNMi9XLZlUjlylxdixYzMzM7nxlZWVzz77LFmvmpoaMxKbtE+2huxOpL6Bw99Ev/32G38djS8jroZjypQp/Fqf4uJi8qUKhWLSpEnkjgNx+/bt/v37KxSKnTt3tpnz1o4yU8u35QHVzg1r0uzGb0+zj2idEmRZ9tVXXyXlwv/ZLCoqGjdunEKhiI6O5kZu2bKFHFD8jZyXlzdkyBCFQrF//34D2wHxdZ0aDuz4qw25ubnfffcdAKxYsULBu6KVSCSrVq3q3r17cXExebrPPKtXr46MjOQ+Ojo6PvfccwBAaubJyIKCgtraWgAYM2YMl5KiqPnz5/fq1SsgICArK6vNL1IqlWPGjJk7d+7cuXP5N2gfeuihoUOHAsCNGzfMXguLMGZT6NizZ8+mTZsA4L333ps8ebLZizWplEkFxh9//EGqNACgoaEhNjbWy8srIiIiJyeH33tVUlISAIwePbr9K0uYV46rV68OCAjgPjo7O7/55psAUFxc/Oeff5qR2CL7pGGrV6+eMGECt47mHYmvv/56t27duI+enp4vvPACGV61ahW/5UTPnj2feOIJACANStqfefPKt50b1vjZrf3LBi1KEAAyMjJiYmIAIDo6mv84cbdu3VatWgUABw4cqKurA4CSkpKvv/4aAN5++21+hZOPj8/8+fMBYO/eve3JG+oUGHC04cKFCwDg5ubGP4AJe3v7mTNnAgA5hMzTt29fnTFeXl4A0NjY2NjYSMY4OTmRgfPnz+tk4Pjx43FxcfyfttZ4eXmtW7du3bp1LftW6tGjB9x7ZKATGbMp+A4fPkyqjletWjVr1qz2LNakUh48eLCNjU15eTnX2+mVK1dqa2sff/xxcsbiiomm6dOnTwNAyxs9pq4sP5kZ5cjtQpzBgweHhISQzJuR2CL7pGE6m8i8I7FlW1eu5ebAgQN1JpHQpKqqql35BoB2lG87N6zxs1v7lw30bYSLFy8CgK+vr84dRgAIDQ1dtmzZggULyPYhoa29vf2oUaN0UkZERADAtWvXysrK2pM91PGwDUcbSHPrgQMH6rTNJsivcFpamlKptNTTfSLR3UKhaZoMeHp6zpkz58cff3zvvfcuXbo0ceLEgQMH+vv7CwTmxItKpfLy5cvZ2dnV1dXkGj0lJQUADF94dYqWm4ITHx9Pel6aNWvWokWL2rlYk0pZLpePHTs2Jibm6tWrpAeFc+fOAcCoUaPIKf/3338nWcrMzCwuLu7WrVvLX16TVlavdpYjRVGDBg26du0aefrA1MSW3SeNYakjUSwW6wxwSOa5iivLMrJ827lhjZ+943/ZAIDsP2FhYS0fM3FyclqxYgX38c6dOwDg6+t74sQJnZRcSF1SUtJZL3VC5sGAow2VlZUA0FqPyy4uLmSgpqbGqt0JrF27tmfPntu3b4+Li4uLiwMAPz+/adMQ+Oz9AAAgAElEQVSmTZ061UADNx1NTU1ff/31jh07yOOI97WPP/6YDJw7d66srKxlqz2TmFrKI0eOjImJiY+Pnz17Nk3TR44csbW1DQsLk8vlQ4YMSUxMzMnJ8fPzIx1bjR8/njvZWISlypFccyuVSvMSW2SfNF4XORI7QDs3rJGzd8r2JLVH3MINKCkpAYAbN26Qzu/1wnfQ3Hcw4GgDOVWo1Wq9U5uamvjJrEcsFr/wwgtPP/10UlJSQkLCmTNnUlNTP/74423btr3zzjvTp09vcwksy65evTomJsbHx2f58uVhYWFubm7kIi86OvqXX36xav6tYcaMGQkJCTk5OevXr//iiy+M7BNFL1NLmTT+P3XqVENDw61btwoLC2fMmEGuFCdOnJiYmBgfH+/n55eQkAAAw4cPNztjLVmwHDUaDRi967ZM3P590iRd5EjsAO3csEbO3inbkxykxtQhkTRDhgwx8FAPCYLRfeS+PzitjVTZZWdn651aVFREBhwdHTsgM3K5fNSoUaNGjVqxYsWdO3e+/PLLQ4cOrVy5sk+fPm32jpycnEzuyO7cuTMoKIg/6X78jZ4+ffrGjRuvXbs2Y8aMY8eO7dq1KyoqyuylmVrKfn5+AwYMSElJuXHjxqVLlwDg0UcfJZNIeBEXF/f000+fOnUKWjwQ204WLEeyXkZWSreWuD37pEm61JHYAdq5YducvVO2J2koakzbC1Kt4ubmNm/ePAtmAHUubDTaBtJDwOXLl0tLS1tOjY+PB4Bhw4bZ2dlZLw/JycnHjx+/fPkyfyR5MJLcSiBX0oaRRycCAgJ0zlLWwHW1aaXb4QDw7LPPisXisLCwNWvWAMD7779PngcxjxmlTJraXb58OTY2FnjNQnv16jVgwICTJ0+eO3eusrIyMjLSsjX8lipHtVpNmp4Y076kZWKL7JMm6QpHYgdo54Y1fnaTtqeljuh+/foBQGJiYsualbq6uj179uzZs4fctiOdspw9e5Y8dIMeDBhw3MU1YtJp0jV8+HBHR0eVStWysjonJ2ffvn0AMG3aNKvm7ezZs0uWLHnzzTcZhuGPl8vl5GTGbyfY2oqQNAUFBeSpM05JSQk5l1iQk5MTudpuef3U8pmIdpo7dy6pdF25cmV5ebl5CzGjlB9++GEA+P7779PS0saNG8dFFRRFPf744wDw0UcfAa/mw1LMK8fc3FydMWfOnMnLywN9d3yMSWzSPmkRXeFI5LR2lLVfOzes8bObtD0tdUSPGDFCKpWWl5f/8ccfOpPi4+Ojo6O3bNlCuvMaOXKkSCSqr6/X+/jrqVOnjGx7hLoUDDju4t5XmZqayh/v5OT0+uuvA8BHH3109OhR7jDOzc0lnRMMGjSInGCsh5xQ79y58+GHH3LxPk3T+/fvJ09m8h/wa21FBgwYAAAqlWrLli2kmTdN0xcuXJg7dy6pPrXgY7E2NjbkRLtjxw7uuf/q6upt27bt2LHDUt9CCIXCDRs2+Pr65uTk/Otf/zLvBGBGKffv39/R0bG4uBia93kAAKR/RrL9hwwZYs5atc68ctywYcPJkye5k01qaurGjRsBICIiYvDgwWYkNmmftIiucCRyWjvK2q+dG9b42U3anpY6ot3c3JYsWQIA69ev51fVJCQkrF+/HgCioqJIW6ju3bu/9NJLALB58+Y9e/ZwNSuNjY27du1asGDB0qVLuYM9NjZ2zZo17anjRB3j/rt5byXe3t79+vW7cePG8uXLw8PD7ezsvv32WzJp9uzZmZmZP/7448svvxwYGNi3b9+qqqqzZ88CgEKh2Lp1q97nyiwoKCjo3XffjY6O3r59+969e4cOHSqTydLS0siRv2DBAn4rgdZWJCQk5Pnnn9+9e/fu3bv37dsXEBBQVFRUW1vr6OgYHh6elJREeuC2lEWLFp04ceLGjRtjxowhZ6n09PTGxsagoCCu+wpLcXd337Jly6xZs2JjY8PCwsy76WtqKctksnHjxpF3lPP7MgeAvn37kh6W/Pz8evfu3Y4108O8cvTw8IiKigoKCgoKCiorKyMV5i4uLuvXr2/Z2NaYxCbtk5bS6Ucix8DPRTu1c8OaNLtJ29NSR/TChQtTUlJOnjw5c+bMAQMG+Pv7Z2dnkye6p0yZsnDhQi7l0qVLCwoKDh48SFZn8ODBKpXqypUr5eXlbm5uK1euJHtjU1PTa6+9ptVq09LSDh06ZHxOUMfDgOMuoVD44Ycfrl27Njk5OSkpiVxHcpPWrVsXHh7+zTffpKSkkLdQkrcPREVFdcyD4LNnz/bz89u2bduFCxe42sjg4OCoqCidd2EYWJG1a9f6+vpu3769srKSPIU/ZcqUV1555cqVK0lJSUlJSRUVFZZ6WXZYWNju3bs3b96ckpKSnJwMAD4+PosWLerZs+fs2bMt8hV8Dz300KpVqzZv3vzBBx+EhISYcbYzo5RHjBhx4MCBoUOH6jysKBAIJk+e/Omnn44fP94a/VKYUY4bNmxIT0/fuXMn15VTZGTkW2+9pfcdp0YmNn6ftJSucCRyOWntKGu/dm5Yk34rjN+eljqi5XL5Z599RiLmlJQUEmr4+fktXrx4xowZ/PBXIpF88MEHERERu3btSklJyc/PBwCRSPT8888vWLDAz8+PJJNKpZGRkXFxceQuJ+rKKInMQm2s9N9YZPVMY1tOYDWqLvFENU3T+fn5TU1NXl5eDg4OOlNZli0pKamqqpLJZN26deuUV50plcry8nKapp2dnT08PFp7TbOBFVGr1fn5+RqNxsPDw9o9FrAsS/patrW19fb2bs+Tqx2mK5SyMYwpx6KiItLq4uDBg6GhoWSvaGxsdHFxadlziUmJ+YzcJy2oi5SR4Z+L9mvnhjV+duO3pwWPaJqmi4qK6urq5HK5j4+P4dCcy567u3vLeiyapqurq52dnfG19XqJJDYAwNs0FDT/3JzJ29DVtVnHKlTzU35FReXfkzDgQOhBpRNDWDAxQuh+0XUCDmw0ihBCCCGrw4ADIYQQQlaHAQdCCCGErA6fUkHogWVvb79lyxbgvZPdUokRQshU2GgUIYQQemBho1GEEEII/YNgwIEQQgghq8OAAyGEEEJWhwEHQgghhKwOAw6EEEIIWR0GHAghhBCyOgw4EEIIIWR1GHAghBBCyOow4EAIIYSQ1WHAgRBCCCGrw4ADIYQQQlaHAQdCCCGErA4DDoQQQghZHQYcCCGEELI6DDgQQgghZHUYcCCEEELI6jDgQAghhJDVYcCBEEIIIavDgAMhhBBCVocBB0IIIYSsDgMOhBBCCFkdBhwIIYQQsjoMOBBCCCFkdRhwIIQQQsjqMOBACCGEkNVhwIEQQgghq8OAAyGEEEJWhwEHQgghhKwOAw6EEEIIWR0GHAghhBCyOgw4EEIIIWR1GHAghBBCyOow4EAIIYSQ1WHAgRBCCCGrw4ADIYQQQlaHAQdCCCGErA4DDoQQQghZHQYcCCGEELI6DDgQQgghZHUYcCCEEELI6jDgQAghhJDVYcCBEEIIIavDgAMhhBBCVocBB0IIIYSsDgMOhBBCCFkdBhwIIYQQsjoMOBBCCCFkdRhwIIQQQsjqMOBACCGEkNVhwIEQQgghq8OAAyGEEEKWwbY+CQMOhBBCCFkdBhwIIYQQsjoMOBBCCCFkdRhwIIQQQsjqMOBACCGEkNVhwIEQQgghq8OAAyGEEEJWJ+rsDCCEkB6l9XVZVZUNGo2rjbyfm4dYKDScXkPTDVoNAMhFYr2JtQxTr1EDgFgglIvFLRM0ajVqmgYAW7FEJNBzMdZmlrivaI2QouwkUmMy03UomxrTK0rr1RpHmayfm4etWKKTwMi1VtHaJq3WmG90kEjVDG18YoqiWJatUasAQEBR9hKpTsbaWeL1GrWT1Kavm4fhkmpzQ/0DUc0/YsCBEOpaTuVkrj1zPD4/h+tByFYseTEk9J1R41xt5K3N9faZY1svngWA6BGPvTNqbMsE8QU5o37cDgAOUumNRf/nbe+gkyDq6M97U68CwPFZC8YqAs3IEvcVrRng0e1a1Gv8lFMC+/4640UDs3Si8/nZa88cP52TxY0RUoIne/fb9OiEQBc3bqSRa/154oWVJ2ON+d6q//vXzuQE4xM7SmWVTY1uH78DAAon56xlq3QyZkaJH7+Tsf7siUsFuVyJiwSCyYF9Nz06sTdv3QkjN9Q/DdViDN5SQQh1IR9dOjt6z84LvFM7ANRr1F9dvjh01xdFdbV659LQ9I8pV8jwrr+SGNZAb4dQo1K9eiLG2lm63/3nr8SRP2zjn0QBgGaZQzevh337+aXCvM7KmBlMLfH3zp8c/9N/LvKiDQDQMswvN1PDv/08qSifn/hB2lDWhjUcCKGu4tdbN1b8EQsAcrF43YjHJgf2tZdIM5WV7184deJORlZV5ZyY/XHPRbWc8fesWyX1dWQ4v7b6j+zbOhesOn5Ov344I21yYF8rZWlod9+1w0e3XJqDVNrmN3YFWVWVy37/HwtAAbw9fPSsfgNdbeR5tdWfJp7bc/1qrVo1/ecfby5ZoXPXwPBaTw0KDnJ153/FaycOA8AAj27vPTKen14uEpuU2Jg1Mr7ED928vvbMcQCQCIVrho9+uk9/e4n0TpVyc/zp2MybtWrVM7/sSV30ho1IDOZuqH8IFm+pIIS6Ji3DvHL87mXooelzxgf0JsO+Dk4P+/QYsPOTjMryP7Jv/5l3Z6SvQmfe765dBgByi71Bo9l1LclwwAEAy4/9+qhfgJ3EUARgdpa62doZc27rsn5OTyGNGxYMGrLxkXFkZDc7+91TZpY3NBzLulVQW3Mo/fqcAaH8uQyvdU9n157OrtzHK8UFZMDdxrblXCYlNpIxJU4zzP/FHSXDu6fMnNF3ABn2dXAa6es/Zu83J3My71Qp99+4NjckDMzdUP9YeEsFIdQl/J51M7emCgDGB/TmTu2EVCh6OTyCDP/v1g2dGcsb6g9npAHAk737TQnsBwCH0lOrmhoNf11uTdW6syeslKX7XfG96qJBnt11Jj3bL8RNbusmt82squzwfLWLMSV+Kicru1oJAMO8e3DRBkFR1Mpho8hwbGY6GXggN5SVUFjDgRDqIs7k3iEDU/Rdwj7eMyhzyHAACHJx15n0042/NAwNAM8FD2JZ2HfjLxWt3XfjryWhw/R+0Rj/XllVlVlVlZ8mnn8ueFC4l4/Fs3S/83NwIgN7rifPHxhuw7ttMS8kfF5IeCfly0zGl/j5/Gwy8FTvfnqWowi8uWQFAMhEd0+dD9iGsrhmbakorOFACHUN6eWlZCDY3bPl1J7Orp+MnfzJ2MmLBg/VmfTtX0kA4CyzGafoPS4g0Flmw43USy4Wfz1xKgAwLLso9pCWYSyepfvdjL4h5OHS+ILcwf/5bM/15AaNprMzZT7jS/xmZRkZ6Oemp8RFAkFvF7feLm497sUZD9iGsjIKazgQQl1ClaqJDDhIZMbPlVxceLWkEACe6RsiEQoB4Ok+A3ZeTUgsyk8tK9EbKADAOEXgc8GD9qZeTS4p/DzpwutDR1gwSwBw5Ha6bPNanZGTA/semDbbpOV0Fi87+1+envPsL3srGhtuVpQ9H7PfVvzLlN59ZwcPntgzSEC1fOARoGuvtbEl3nS3xEnY2ibzNtQ/FtZwIIS6BNW9jp6EAhN+pn+4fvdp2Jn9BpKBWcF3B75Pufz/7L1nkGVJdh52Tt773ivXVe3dzkz39Hi/brjegwAILWEkikRALhgkAgwoBCDIPyRDCEUoAlJQAKgQqSAhitQChABIABmksIIhKBCLBdbNrJmdHdMz3WN6TE/P9LQt++q9e49+pLf3PlPdVdX5bW/NuzfduZknT548mXkykfAfft/n+aDy83/6R+euXZkiSQBQE/WrofNvs2rlyWqb4HMn7z79U3/np973Ia7GrQ42f+vZ737+t3/1oX/2D//9K2eCSbb5V4/U4qau8A++9qXP/cb/bv77W3/wb1ToGBW16+H3Fv4mWzgyMjK2BXpyXbyli0kA2JTuN44t7PnkHeKcyKfuOHVsYc9bK8u/9vS3f+FTPxBzUXpkfuF/+uwP/eTv/+vVweZP/+G//b2/9tenQhLH+44c9+fQt0s7/E7Bwbn5X/lLP/YLn/6B33jmO7/+zHe4/4nTly7+wG/9i//1B37kpz/wESf+Nv/qNi2uNmfwXUEcz737zn8495IZ7Yq9JXnUiro1kTeNZmRkbBfs7YlliwurbV1p/d7Z05fW1wDgvgOH/u/nvqve37v/0Fsry++srfzhyy8mTlH+jcc++OvPfPvLr73y+y+98NvPPz0VkjhuX1zaNSchD8zO/czjH/uZxz/2/Lvv/MJX/8NvPPMUAfzMH33xL955j+NGc/t/dWOL75d+Yy+uraqX/+kDjzxw4DAAXN5Y+8WvfzmWefuKuhWBQFnhyMjI2CZ48OCR//fsaQB4+UrgGOGZy+/+b9/5BgA8dOiI2vz/hafFztAvnXvZcfWoIiQUDkT8lR/8scf++f8yqKuf/aMvvu+oe7JxDJJ2AYZ1/fLVywDQK4oTS/vU+wcOHv4/f/jHq5r+r+e+W1H9r05/7+999DM3j8xx0NjiD8tNP9++cP6v3C+OxX7+7gc+f/cDAPDy1cumwrGLK2qLkPdwZGRkbAt8+sQp/oNfb+Hgd88898vf+LNf/safPS9PjlxYWf79sy+k8/zimeffkZ4Sgnjg4OG//7HPAMCF1eU/eMnNbVSSdgcGdXX/r/zSfb/ySx/5tX/ih37/KeFR7Y3lazeWrukg3eKfPXk3//Gbz36He/RKYHdX1CRwbhZA/ocoKxwZGRnbAt9/5z0nlvYCwJNvvfHHr541g9YGg3/8za/y3z9670P8x28++1RFNQD8/Mc/N/i7/4Pzj88ph3X9W8ZSSxB/9yOfNr1oT0LS7sBs2Xnk8FEAeGtl+d+9/KITqm4SOTq/50ZTNiUkWvzxY7d9+D13AMC5a1f//pf+0Al1ztPu+oqaGhAB8pJKRkbGtkHB2D/+/h/54d/5NQD4kd/5l//txz77uTvvni3LFy69+0vf+PK5a1cB4PN33//R207w+P+HXE/58Qcf9e8W//EHH/0fv/onAPAvvvvkzz7+sUS5M2X5Kz/4Y5/5jX82OUkKr1+/pi6TMzHb6ShDfTrmB4/d9sDBwwmytxT//Se//0f/1b8EgP/4X//6T3/gIz9270PHFvZcXFv9ndPf+6ff+joAMMQfu89Vs9p/9c1FosUB4J/+4I9++Ff/Sb8a/vI3/uzM5Xf/1vs/fGrv/vXh4LvvvPUPvvanPM6svKd+vIq6ZZEVjoyMjO2Cv3zPA7/8uf/o7/zx760ONv/el/4QvmSFPnr46K/95b/Kf3M3GwDwyOGjQR9Njx4+9tChI89efPt771z41ltvfuDYexLlfvrEqb/+6AfVjpDxSDLxnbfP/5df/G3//dH5Pc7QG4v5P3/f52+iwvEj9z74j77/h3/u339xbTD4pa9/+Ze8nZK/+NkfevjQUedl+6++6Ui0+HuPHP+3f+W/+Kv/5jeXN/u/e+b53z3zvBPh7n0H/vkP/Sf893gVdSsAjYUV9TsvqWRkZGwj/O0PfeJP//Of+vSJU6YjhOMLi//dJ77va//Vf60OEfza08LHxk88+N5YVv/ZQyLoV5MOOTh+8XM/dHBufhKSdhn+mw9+9Om/+XM/8dB7l3ra6RlD/OyJu/74J37yb3/oEzeRtqkg0eI/eNd93/vJn/sbjz2+13b/dduepZ//+Oee+ps/a+qCu76iJgSCWFIBIuz05gEAJ3eIRom35L+zA2jQX5uUgIyMjF2Ea/2N165dHdTVobn5beLLYRuSdAMwrOvXrl+9tL42V3bu3Lt/rtPqOvjdgWFdv3rtyuX1tW5RHJ3fc3QhtRtj21ZU2Z0FPvDzEReNvxro/WiLAwf2J0IvX7qMiDURZYUjIyMjIyNjF+MmKxyXLwMgERHVpaVqEEH2/Z6RkZGRkZExGTxlAvMejoyMjIyMjIwtAxG3rox4JVFGRkZGRkZGRhvw3aLi/8D0GkpeT8nIyMjIyMiYGoRSIY/Fkty4mbWNjIyMjIyMjMmA1n9AqRmM7OeMjIyMjIyMjGmBQOgYzH6XkZGRkZGRkTElGKoFA+2EI2scGRkZGRkZGaOArH/Id4QCgPgJAICIiOpYLOIY7j4yMjIyMjIyMiwEtQkipg0bWd/IyMjIyMjImAxamyBh4xCnVIgIiPTJlbyukpGRkZGRkTEJvHOvBMCIgFRYNnJkZGRkZGRkTAOOBaMEIOtMbNY5MjIyMjIyMiYFARk6BxEjvqZyE0nKyMjIyMjI2DXQJ18JDDsGU+pGNm1kZGRkZGRkTAvK5RcHUy8zMjIyMjIyMkZDxFzhKhbcDwcJEweGomRkZGRkZGRkxIHODwS9eoJcx9COvyjv4sjIyMjIyMjYMjAUioj0xoHZyJGRkZGRkZExFvwVFnl/ClPbSfPO0YyMjIyMjIyJEV40YTowr6pkZGRkZGRkjApLfcCY1/ISgPs15x5Hs86RkZGRkZGRMQ6MVRLbhoEIAAxIRNGBeV0lIyMjIyMjYyzErBfMeYuQD8dmZGRkZGRkNCNsoKBwnFI/EhGRd8FbGp66kpGRkZGRkXFrgMyfiO47GwwBUB2GJeX2PJs4MjIyMjIyMtoCgbv5AluFIGmLIAZquYVIr7uMaOjIyMjIyMjIuOURt1YQlASA+UBsRkZGRkZGxvgIr46gsdeCWSHS+Xm2b2RkZGRkZGS0haFvuFqHXGRhjitzouxyNCMjIyMjI6MdyLZj+EsmUs8wLByI0/b8lVdqMjIyMjIybhkED8SS+MNA7iyVsfmqypbpClkJycjIyMjI2D0w10U8/QGFr3NxSkW9tA6qZGRkZGRkZGQkIXUGtB+dGAQATHjhABD7ReW+UQBxZ72I3UoNIftftPSMjIyMjIyMXQA0HH5RwB2oWj8x93BYDsPAcxg2nt4QTpV1kIyMjIyMjJuGKQ7Dar+obZtAcM+fMOX2yyKDiG/rQONdRkZGRkZGRkYIoaUQ+4XwNGodayEi7osUMbsczcjIyMjIyGgA1y2kyoBuAIDYw6EgdpPmvaMZGRkZGRkZzWi4sY10PBbw8SUsHmRvOcWsgmRkZGRkZGQomP6+PK+h7rkVhsGzLNZOU8eL2JZgfX19awvIyMjIyMi4xXADx1bvXhTL+SgCIBN7NfykZFzpplSSLTNy/Pmf//lWZZ2RkZGRkXFLgo+tW2sxSOZurKhAwYquq5KgOFaLShExNZJpbCP1sxhs9hcXF48fP97pdCbPPyMjIyMj41bG+vr6n/zJn3zhC1947vnTAcODOwyj96MVEGBubhak+3K1GoJyYWRtfY2/QIAyUCIBobCNIKI4JWsekp0E+rI411ryhS984Qtf+AKZbsfk3+APBf9NRkZGRkbG7gN6c371xvmhY5oj5DRtHSScfhHURErb0Jel6LEZ+cjP3NKDDkKnfzhW7UQ1C0mV4tepGZROm5GRkZGRsaMRHOkSI2P6/VQo8l8RUGLvRRkY+XkihK3atIHA3XwE80ZErhXxH7yy1Bv+23xpJtwCWjMyMjIyMrYdgqpG+GUg8ZRoAGsob9QYSpGIfAWASKykOK9HojWmV3jxpHqh/oKtYSj1wlE7MjIyMjIybkE4g6C7knJDzP/tjBJCbyjVURblb1RlwPUNV2WYNvHort4EDBu+VSNWidnskZGRkZGxozHqQBbbxuHFmwJtVmZ6JcQ81RotpgR+awoathBjX6drSNjK4dtfMXFMHQ6Ce0WzhpGRkZGRsaPRZiALrqSYjzdkNMTobfKhd+qUSmDtgwgQ5QoKjbaU0gaqSAQYDoedTsdRMhKGjbykkpGRkZFxK6PNHtLhcCjDtoYIMpZHmsBSgRQ0IkwDHmXnzr0eiNV0MiXrHBkZGRkZtxRiw19wxHz13GsAQYfjW0NbJHeuSpSkPXW4Rg4K2j3cHMalyk7+rW9/BwBOnLhdOf5quZiSdY6MjIyMjFsTiYWV4XB47txr3/7WU1tWNvC1D1cZEGQE7BVYlDPIxCYOqnUEko6/WFFYW0rBjBJ9ahFAwTM02YnXTQQBANRdoBKoUC8AzF3FoLkApWu55mzResSNmoaAJA9VoTDLoV5Qs0hSRET5WCbR6QK8Hg910oLHtUaEsN86tAm0K8omQTA+KWc4CfLQqnO5nmhu9PYolKGo8kFA7XBnuh0MUWSIAMAACOpakQcODXK5N9J8CKL1Y+flEQgIajedKI7x0sivFRUBVM2D05pGBCd/0HvjxOcENruhdH8Uz5/vv3ciJEK9zw8kB4sAgzx/ohjpOyJPBGAABUABgNxpAcj/GCWhXWMtgYA1ACEMCWuRn8wJs7ifHFYzAUBEMDjRo/k0GUAEI/BdIkBERPsP7FMhRk8XdFy6dElmSyWPJ07FGnyq2Tl4OHZKCHUMWW7GTYPfCOSEjZGd9QbRzrIGKfzA6x3+4N2GhnScxhy2NAICqE4VjJb+2LRgUJqFftxCI2CYSVpEBvDVyoR7nmj2qUKlIuu8CSRM3k5JkdDAjMthV1M3kVkFCFDDb+rzxQ+lMRC6wzXZMbVEb+wL6DxPFZxIW9OZ/o7AWxCeKhGNNHKukyIwZ+ONbrg2R8nDloA3vHG4lMR6R0tEkmNK7mRsKXgz1/FZMCYfW5dCDJEB1GIrMiZ2JEdMBZNg6zkrTi5Ki9AEX9SycfSrG6Jv8EGT9IiqdARrwkLqj/R9PBKJTW1n56O0DUtj8JjNtC2ZLyf0ezh68qCI9p9dNcOtXju6W7XW7FcXgFrzQEd3URHG7juK5aWShFusB+9uJOUL2IazyfOMxvZmARhgNwfWXSqal5VCLrd4aBPJOBpThE0T+nzWOW4mkFDZOwMu4STGn6Ygv6SHKDF1nQBjZDi5RUwj4OoAACAASURBVKMxdvpTA2PelODMYNtMeicrzxzcHYEi3ziSEC1JObJxys0sCs/iEEhlDoVOtDB5GI2AdgQ17YtZprz8Pd3UTC5+u9YJy8JC5KzrWz4UVaaILpeEMD5n2gtFDjc6OWc1ZFy4GuINqMmgJSMK5AoHAWBQd+ZZOtPdaQurcKm8p22Na/WMJJCACKAmKACggZ/GbB8GwIBqUPosSg4E39XcVErcerTXGMb7hAl63VZLHmNEJT1Kkq9bOG98S1p8QSHAFYHJfoo6GSMqiCfZ3oJh4Uvm0lk78qLYAs63hbnYhzLl0hEAasEbjgaWoCWjNYIaeKwqp1DFjoIdZgyvI4h0pZh3aTuG34sN919TNzukM5QGuG07yOxCIBCh0jamovQFZzHGIOWv2Pni25k1pqdEocliiqiQ8bghIcQl5ITGEscCEfuQRASzU6nRFaWN32nOCeW8Kh298dppBberG8oHSvMPWcFq0UWO2XFeDBSBYf5pm9wO87mubXIzQhP9afIaCSCA2I67OG0E6oZP2Sv1NmD5n9EmskmkvjTrHK0woYBJJRgtZSNb+NmJTaMGdzmLMkAgHI6ORIpXbmrtJKVVSFMHR9Y8thzuRnlr2HDkriGeIMKseseCzIj4byYX/BzdYfQmbhRTZBMQRpshJREBrA8MKCVG/gGC7dCRybMJ8AtGN0aj1tQSlnFecIL7zSbxaP026TOZyggV4akBs8V43MhXfgSzC6hQijQESuuOm9yr+AnIa9hZJZgHdfnWESKz99l2DK1quFVvl4DU4kRaAHx5XFWI3umqMjR0OkVoVj2mjy2o0rjICkuW0glEOUSIV+hPXKYLlAzZHAtiY1okRcZYQAKqramimuSE46eFaTA+ACEgQ6qscYYo3G6jNmaEnACh6P6chsaRysGNQJa4bZE8alfxciDgh2HtECfxhP3EpN0YVrzs0T4raxEqNM9mCUAxXc2UUl5OBDJ/W1G2zSm2oCMzrUyQEoR2qQ4NTtPE2DCYf2QmGC493kebFfngoSn3aVxusWexhno2le6e0QbRWsXGGEko9dDsPlFuK3WcRHlEEDiFNWU0dIq4xM/8OV3w+qw9njAZMxbUJmcOZsh9Y9474Yw7WqzeN9BcQEuTiRWnTf4e506lP8kpLTm0xWbsW6BxhAsSEYJDmEWfMSk30pvznjDkkGWl92IHhkmymRkAEzLS1+QcwtGm34lrFE5+qI7RqGs2BMaVbBlsn9khs8LkplEKJW1JSBgk/il1Jji8ZRG+g6AEtmvRCyqklh6OwPQLuaaKBuOJ2QPfx+HnMAKaWApbK9DoS/uM6YAMwVsLMYEIgGT5wJ9cKUACJnyL8WcEUiv22jitm1r8hwxBaWeoh10ykoI1DBAkuJcMm7Ux+pCReWgODAQG6UZya/gT82dBgDdH18kddcFaTTceMFYVJGcFKAcRXzZMF7KWuYQwXVYoIaIGZPGFjqIAUeOBlmJS/mAggh7vVQNbyoyi0E3J/ys8RJMszvquUD4e9VaGDhDEbVCeImbkQy55Jnch6s/3cwfw2peMl4INbEXCzkp4/VKRInqbCHL+BYMcVIC1W2GNSlbGVDFV8wYiCF8GJPt7SCTr16T6AZYpw4LjEMzW56cHg/lG2iWadY6tgDFeSMllrHkFpexYDYGEalJF3uxqpJwmCG1MI0aLNNdP7hsvZq6fAo8nOvj0gd7fgCnDi2/HCoXGiguaT/yE8QpI34VtkRe1oIyFoPrj5dku83ANpy0UQupiJKqjF7fnoGBWGTcNKQ4aX7qMfpRAlFXab/1cxPgfc7Y3YpEtqMy6702F1jdQTRYRQO0aNmeBk/GEsOIikty8QUixTjC5UWUCOAYMPzz0MGVy7RWTKDzjCQCMt9WvkSB7OCZ30AsSalbhVrdnckRvC209CRiTjM4S1xd9tStYwvjAaPEtRCkqCtE9vyuc8oVzQAKy+79KJpnONMYhGB7jLbLi/Jznk2lMc4gcqa5DkTGZicEopYjtqBRKNyCDgfjd8aOQFqIr0fEMmYXBPp5xw8AFDREg27JhAg2TsmP1DcQ2VJ2ElGqirw39zRPrZOT2FpdE2tjMc4S5743y5hg47Wk8pxXI9uTFRAcmIjQuJ6GX3FzMUPmTEckd4RtMcyp5lLxkYgQMLMd4+aflagPQi5R+DM5v7YFB6SqxdZYs2W8Ioo0/sVgg579tYVo4TKXD42B+LxHGjyS0s1+MFM/qzNuRRXebEq68b3GRWgPU4j4nNJmD3FRjgACQ3xdFADWQcVYvpkHrKZQfJLSR+JCkIvg2gJDG0zr/pglsckA0IiSHjBSFepbtv2/yOTUxfD+XboQG41AD92hfyY2tM1b+xqBoqhDqTA02tW/TiVadPCI10/oKb/pm3tA9x+UCcfgmugWEQUs3o00IEWmrGmgFbEuBvnuQas6Jmlp3x8iuzqSzGSqD7805iyyAWkwfJ0RwEpAahjKmDlnhCPyuEwIAJO7kHAgJdZxJWkRMgZABIN95pLeMmFGiA2rAyNEowdqLOMV2aBOUjJvIbLTSPbjWHzsr9wVKl/FNo93UQPySVkc+OE0U1iMNc0Fc0UzkIIuiSASjctpbnvRjJLlrO0qULoMn+rr2xAe5MXLaXOgZ2GimaQNvakgARBgwb+jrc6QVPQv36WI0bWPEynf0RsFcsd1U8lG+MA4fxGdvIjR6c/SoSHxhuNNOQQHPaA/jlMX4htoW4BMsQLFV2JSrCRt926ybEJLLIyBKYajoljkHosUMGDLUN9hYgTe824xkam36OD9bN0JrA0MyvAWXY4haeUO3H93C2Jpwy9abUC4npKud8yiFaNMR7+DqrEw2bGwZGkbKiUZRL2XoxJ5cCEmkZW6gimAr9CTz8iZX4yHx8Q0VlpWPLYZejY1NjAxMOm1HwyFHIMoUW7q92X3kQreWH3cEwwdqN24QmkbugfBIzs22gWT2Tcm98BGZqZG8lDwcCWHtKr5qpPSDUTq5MQwRmHuJ+XTCGz52BHdvYzQPiungMYSd1CVHy0qEljITw2aO4Lru4yAInFZxzGOjEp+a27QfIm4Wdpu2zkWMtI4hyG0cTD2jbnFPLR0FclcwAmNIqEzi2hyrC3G4JMw0FHmME5gaGEzex9gUUi4yYlwzarUtMEVsY08I0sV7MM86Zu2fFEj8XEMt76T3bC1CzMXdn6QNHGDvGAvFQSuHkImWC8cwywiXQ16o0RwICFCLRvBM/77sRXPmF8vfSi/yJwzetKJbMJge0ahesisUQd0T63YqlZ4BMW16cHjRNpKb5seg62FRlCEV0LJbohktkL49tofs33I01U+jZGnGCDUppD6KpQ6L552TJPFciftzQqPrKGu64S5G/jDZkWwmHh9p5esW4a3tAilILLFRSx1Es8MUlnxBKizElJ0N7TDxS45bBp83K6RuOamw5CQOIepgF1UE67VrOI5MCHSvg2AES1C3r25ju+MWdx7LwaY/z0cjBtnDoYPkxEI0fSQQE21nuzA03quxz2Mj6S3NiCblnBnL+BA0A5ydp4horkJ7G2yx8eucgr0P4YN6XNttTs57cysFXcPRv305rddkMW4lRfMf2Y/Jf7cI2lfIjaklKVcsJhf/5V1Fyx4rVL4iAiJ1PX1DSeoX/xprFjyFr0uMIKbWnnEj4eqUU+ZiLpCQCxs+lQtpHE1s0a6cUbKwPjjaOdIETF5X0RyC3+O+vEFyOWZXGjuH9uEt7l8Jh1ti0Z2puQliBbSr3yR5tsxzlJU2GSRijDK9RdN84VlBRoPIpD35LjEZNwyjVnnA3NikOWgoTiidZ50Nik6AagbDZxNEwNjW3OiW1i1GnSBlHh4falZGKM7HmseZplOzcsRARAYk11XcvF17wVYi/F0Nk8TGIyAtusp43xef2HLzwlbXmlwrsCa8aPyNX6hm0B41H0mFIPEZ7b4w2kLp5Og+uVYrdI3LiQQOGfLrwryhVq4TBMaX0ttqG2hvn/LnrVOBNF2EQsbELSLYt7T7jl2H7mXiyaiBkpgR5NHksbR7RbJw6WzoytMai0awDt3ilrdpwhapYuyoTS+B04aSempVxaLBnXCNOIiOqn6PhahVfwqzYBhHX5mS1TENOSGOjJlmFHsmJH+H1zscJFdbRGhwzE9vnlHnd6hFcjKO57VUf1ueDkqsB5mlx8owU8dNxFEPHNh+T/boHURV11i6XgZs5UA2UZ7B3tK2RLRui5X/tQzb9iRFXON2g9klaw83CF5F80kc1oItUi6Ixi2SEJAROj7e0F5hTxmOt5IZ3VUlu/Q2fLkV1Kk+GmyOFq5DpkeHKtMdGlHuO0fDxO5VmLCehvRIpdGEEqL6dgqEWtknI3hUWZSayWNGmiB5Lg2hjiUFqh9KSiNKZ67I87ZxIIDY929sodDKCX/FgKxduRgykUcNU80Qtg1rK1HWM24uxh9JzVmM14qmxmAZqlGHCntHGTZ8cFO386KZIvkj89XOBAkZxD1HiVGEkJsfBN9MvXkRAFHYOZwrQUkVOmGpY6RttUcgHqXFGDd270fjbzBYHZ4Zt4R2RJA1f47QY9FgSSZ7gk6GZHJUAMdAIgMMjcaXVxj86ZVO0bIUeaZgMwsHkA7W7K+1krc4We7lYOyPqwGM5RWTJI88S2VXdYGBD9LlMl6gmXW4rkdmVt6XazTzy6PCzcVk8/am2Z1xgtXXfjWXMRXdSKl52TkbBQBwEywcGTcN/LpzvqSyJYYmAn5wkNmsZnJuyryRQFMElBPzZgpj2Sdv/MEJa8zXeEbJbksaq33pwUE+9hC206igUP0anDFSA7aQXMaMfywIJahR/0KIcE+zTQZkjOZvTzAnAgAxSaz7b5RzI2h/cWjACZPQ+JUZEwOnXNUeS7XOmiDi+MuYeHikEqSWbUclIWNbQwt0S7yZkmWSf5K/SIo/tHKPSTDwI8SQ7mleqDsmNiZP0yaTRzWmNuQldjrEkt8IUc7XQZKCIE1DIpRzHLbcCRGkwjzgGik/VUstbhdp1FdbJZ8sglN+LH6ERsf6MlWWSa2EZtwITFvPAAB76XOkrFXCUiraMg9SVjVpDCOHt0kOFkCIRCSvGc/cteOhJKgY6ET7YwUwJCrVurydZIyG5xZwcQyRgCEVAAVQDcgvqdc5R20I6eFEZhAjLjiOkxneAg5tGNDJYtqG6FJJ3d2dwFvdHcl6KctG7fFriw2RFKnemA7kPskxiZx1ftMnkL/e61ds4EAHZ19JoE+QOiQSIlQqG/HkOoIXaj3GTTMGxW4KvaGV3G/SP4QDJivQXG0Bw5+SSYqOg1CkN42ipZGEe6BiUHtqUAMSYK1ycb8g+FkZQbTpwzesDi1bIWnP/oq7PL+g6DqJkwejbHU5YSgOUeGLhcxIOxcUnPgTACA6YZM0smAaQ79hembJWTklENMKPCYnsGhECI1Gpvy0hbr6LR+Umm1OqNFPAOJCCUiSbUSW5HndUI1YKhSFNUAoWfHBdEz4BIdGMTsoDEOBiGyREREMmeTrGPJj3XKdkU2fYkkQZPyIDIwJlYooWAX849L1r7pUKGdD5YqnjnCm+hTfwGMarmUfs9M7Lc1d/JmnWeIqlP0Ca3mZ31a7n9vtwBb/bhQI1K4p+QxS40jOPAy9gtmyw4sCwS/S06eU6TKz2s4DkjfGKV1Unw40OG78cc1mIIbImDtxM+Jte8QGzylnChAaSyA1PE2BCN+Uas5NnMgYCbJGnwix5of5OtPkEiVGQCjn0DzKTR7Ir9UQO0JbYfQhnCm6TRTIbpqXFPlEWKafHdJ9MxJwuGWkJnUEBWvkT9cdR8ySGja6jUJaxraBN4wIRcQ0DEzStoFJMyLT01QymdKf6cqgpkG2uWfExr3giG7FSKWPVU27ntpcse6U1tjHPcLWhwnAnXaHDQTGO4C4FanRBhMwAPi5u5kGwt08WigEbV33+zaCIAWjE5BM7j0Fo8a0NWlKHAsh40/WKG4RNHW5RiDIJRWfh1NsRHJ9UdlvU+VnnWMnITQ2EIK4xU2t2U4dYt+ow45Jk/I0JvXNbkLjpdvB6VVIS6Vv7BHG9zeQ53Rc63qTLUPaTSY0fKBHY1Ah0HeURJW3SOWoI8HjKTRKG3BOaHsRGj2eNZROkc7U7I0Ag6WH69NR1lEWETwsMAb0kpIxkyXrRcbOhuxP/nvfUNGgeCPIy9vAkYZCfEb6nM/cOk7WOXY6gu2NNd8FRvrm2In+oZ+JuMVNKxwJq/uEHNUyeWxM0YNSIGP5ZX5uRqxJFANMEnDD1sxjdcP/tNYFR5UX2K75k/pKWh1pYyGKxoipI3o1ckT2Hak5I6S7Kghra2WJg6QV0ujIqqw6PnJk7EyoKYZj1Yp3BB1qdYXSimEqM5xlxFkFyT+yOG7FRRa0PYbVoazx7hgI7rK4iRCq6RcifxPwHc4Mtd9EwXhC91U3r6jUZC1Eky3zJM1ppCOoO3MjnEtOcgr0P+lALYZwmOyojRIbzZ/q9lEraXInQgNCXwRAQNg0vY/VmqEpuYsejvcuBHkCLpA8VbQl66IEhCnU+Su2M2KizlqbR8grC+3fTpBKruUs2lmJCFb9yMrRLImyh6peAlZOIPuv/aGEamO29/WNENVA1hujRvlJaSSwnMtmwb/T4TUiavayXsZe6O7C7LCI4huYr8SWCOMYj8czbjZ4o9WIteIyciXqyLDtbEKOIhTInND0sDBSQSOEjTLMNSSOv5xQEJO3qmD2sCZDZytEE+rx0BzAEa3jJWQn8HO1Bi5f/3AK9EgIz3XEfyI2fW1faKp95/sC0SNrIirQ/aJ4IV5ECobGk8aoc+p6OhuwBEKTzbyesltBws6gWjamKaSfzbW8hD0OnWcQW8bGWMXNOsf2Bno/FLZUlHAhyJh3cFtTM1XWiWfW/IHYctDSer1XdNPUfYJvvTE9zNEYwZisNNSNMdxFWzXxDdamWJ+Kib8/mLkTIU3eJMkhEapFvdc7PAGdpGHSfcXOJ9h+VLKqsWvh9rYY16XA+MRE2vHknAkBkO9950IT/aVHMux4IcQ7VjZ1bGsQWtYyMWoiYA1YARAwzTGTXSRL9l8EKoAY1YgEctOeKsomSaq6SgOSk1qjJ5DzU30IABjnuj3hGdq2p4cz8+hubLA0Jqoyrj5GLkKce5dVUj4aRPYYOP3cOpSOKO/BIbNip9vVeBE11Y4tVJ+UQdNvW8gQRkrMoH4hMgfjE6wr2tHMhagm8e1aXqkseI4qgdnAqMdm8sSdGZFkdYqj4KqWFXkkCjWsOWS2uzUKkyjZ+mDUn0DyjaZN7MpHVY/yhhxxJxvxC4YEhdw/jvp4npx4DNkteOqoSt8Gjos2Wafiv2qnV60qOGMnQY/ndo9BIlLy2GpZec9JaFplsopSMPSt4G50RUPAhII6LHCHfTCfYEjWPLYdyPmvBQx46ZgEbuMToHepSpqiRL4R4x5aT+NjsgzGSp2aV9/gjkSRJQ0hV8zB3wu1conn78dw2CIuPSjwy8qAzHGyiZbW0BtGY5XjpRizJEo8xWNKiTvhhtFUamMsypJ9x0HP65pWLkIKRjiFm1PseJTbU+3sUOvZzWhSK7Lmsd2hxX/tmTQmFl56FsufGbMMtKQJ8Jgtxn0UCmvZIUIh45kK0n1jQoXF3vNgW4C2riv5GqJn5SRJXyCBbfhRDxiIGiNAcYtSKiMy0K9fTaJmN6vilP3DuQJX0hf4en8W1ojm47rxtRjnpyOkLQr86iCj+qcF3XTTnYpk3Cy4jSh7nCuC0U3iqLb2ex1YkupU0YvHyfsB3JZH4hZzJCCn+3mIZe6RGSt8PGQ9ZjoQLV0D1CjXVIgQ+H324zSSc3CRUFjrGKK4T0VLMDm6NLZmLEIyYcDu3yzzk/A0nta6UiMs642+vEBq7Vt/kTOR23RgV0ySBOs2Hrc6tYVAPsW0KFvvsFc9/AOpKp7WV4CLrWiLRmn0XgfrIERAXF/BUIQor5H96YGY4nyX1y+Fn5sWongseIRl7EhQ+FGvGE6iuZZiLLElgVGYvJstZKJGY6m1BdLWmmSijG0BvkBrTF/HFlxkrDdbUzdioNaYNYOjHS1saTfE99QFahttR0eNQGr2k+QRzdv3wzPlrqOmFnEKRPmN6lp0MSaVQVifCFAQWHIIm1Bts4zKf2QLhEqOHu+5Q35YJbT0tdBLo+qEVYdk7JY6Nkr2U0aJregjrmE8YydDd6cA00Y5CNWfUDhL8R0aTOTYTNXPkc3NGOv+GdsGbgOJRiYkgAqmOaihLWuRgKnb4ygQMV1egOj2lFgZmMb6aAnJHFIYQ9bb9eQZPmO5y44/tdGFIkN+a0bwJYqRSXg8jhGfsMdqnbhlMnTtH551QJAXmpWZD6Ook746It/7hCNYvSViHQp8nKnBhBxLTw1GzSv1ZmtsKRk3EvHuF2Pk2OQA45tGfYQ5XJ1kGZ2Ls+axXUHWgGvOpQjsxdqpth4fHBGAma44LRlr8ExCvY688e5zdbIyFHpZkG29s357g4LFzGSVhUFux0ApIXqc/MXII9ISwKS7AEdE02pDGM4xN/EUuKwPLZ/iVpVbCoFJBOnKBD8O2lH1NAkkqzeqlro7xD+6USX27R8qgbqT3td07M5mEe9SmxKnaHzAVrCLrW1k7EgEhR3xTuNNY2RgIJswowMAAGvy5BHsj2Rky/viJEwWlcgZNxNk/RL6pThlt1VFcQ5giM7hVCIiz/FmW5UjXlwiytiZRwpp9Bo6MvOnY2NjjBGB/oBnkKzFU3zJRWmsqUIMxAZXf8UkBbsSmve5x0wEqkJTNt2EKpwqoRVatmYyd2wTaUwgGPdJZ+xQ2FMiaXFMGQy95MlYZSpQgNzJnNZByJoiROYKIyLrHNsHaDYqZyY5lUEhYCZrLim9BQPxR3HXgzENDZbjvTHE/Xhizyw0xs1tc8ZAVHPWYOQdyZLCmSQI8CfHW9CZJhxRYrJr7M2MbjIyg9CaUFEgGnFrlXD3Mu7HSUEbc06UmJKFeQGtp1aivolZpjufs+tSeftQRTX75c/YITDtgZ4dMZ7Kmxcg8D0cRLU0WaA0itldgO9UQmPHEX9LwsMMAAntlox/GTsUlrEJhXsipApqbrgeAA65lAZI3KqRBAEQSfUFiZCIEGoEgLpLUHAhhuIGWfO6Kcu+Z/CpMZo7az6ozXD8p3LbBGBLat4DlMsp33qHit0dYY7yDw9FVR4onzmCEkWeMdKQENBofR46pXOFisiYSor9LohIALW/vEkqnzEh6kg7vKo1d5CuQgDH05U2i5FBAXkbdHgahtLDVdAfGkqFwJArZhsrz4XCIxcKhVU5Y1YLLur+EaPBNalaW3XMGKaMNRhH+0NSbUPW9+q/KtycvQkypPQ1pab+TCl7OfVk0udSR66NQbIYQoFQiktiqZb3q436Tw4GqGpRukbDCrDW64zk6EsZOwIuY6n2lvv4EVRP1J3Ely1mPkoSct71LBwNkkn0Y8nGPHcSTvP0cbms3e5QxCbFxtBr3Bi4Fc0sBi++ZUT5sfOHmXYQUlLJP3MYCGgrzdknZ8GtqQtUXOBVuIYx+rDVEINdKhgA3DrCYBzjt/8Nka+a0vhlaHnovgiX6U7AwvlNSJB7M46hdjrlti/QZ/SJqDV0+kA+keZJ9piMWwjcwiEQmFjYj3oa4AQZPs5RTi4ydi24BDbn4JMgltr1NwoN7h0a3xkahTeLtIqBSIwJvhNjyZvHkMigbKtKN6jD+fOfeETnRyI1mkNqaOJu5REmIOrv2LL3xIl3LEJxJCkMS8h0djKfNunGH7anyCPO5NV4mbWK3Qey/uO9b0pnPolXtqdRvVk6pHJEc6c2N2nvbqCHm03R1KEM4VgD1CSsstMvAwAQmDjCpxYJTOFmQPcI20bhDiGJAT0dwSk+PGY2zvZCydGP5mkgnLw0M22txqHpiOsbkbbxghNvGimQuburHA7I4QMZVdrm3FRkCD1nHdg3C9jKqA4x8geHEe38g2Q3t67inlh/M6rI4wZrajAho4S6CreWg/znaca7TxDeAuBcHTjV2pwqqD9olK61WSQM6TQYDuRbNlKcRbS7zR5FUZRFURQFMgQAIqqrelhVw+HwZpM2BnxzqRKjCACESI3OkdoB7cJMz48MsUCozHJSDk1NNvc0kihroimOvaSo1BGdQYCCNqZlfwYdslggH7IiKxPgEhsse0vQ1gDgbtA0ZAZawUZemLBP6PK9DzWNKPZ4H03umFvsGH4aTZ+MHLjLAfkY25R/BJZ6mTbgNWSYkvJiG5Smcip9l8xf08o0Y7tAbdq3LoKUoCSzx80bYO/hoCjjx7UNIUj8QeoWwEyvd+DA/gMHDywtLs7M9IqyKFiBgDXV1XC4ORgsL69cuXLl4sV3ry+v3GxipwTi0g9roJqgaNJno0Dnv24RCFDYkz994iBVWny0toZzV9UxIhhEjPYpLUCaQjSmg8EcUEWPdD0AUFcybr24l1tVXfpGzCVWXX5uXgX54z1PxGLqSJJCo+2VtmnENhVdb0bvju8meXYQqfjxm6eMC4RDoY3mDTAjaJqUJjYV24YsA0yHKmosCg1KGTsdaDEdb3Y+3gMYrR3o00FO4BmENo3acxPnUKy+OQUMvktMeXfjcZU9exYee+ThkyfvgKK4vA7nl+HVPl3YgFV+sxnCbQUc7OLR2+Du+6HH4OLFd5/+3rNvvHn+JtM9MUSzIxChskBPKss8bZkbzJgpi4XMbMlLHkVK6odKl2cc0BCekSzH4uXR6ocAvEEubWFRk5HRSWsJr2Y0PQHTptNazVb11hVEEDPZhhtXxEfj2SnUFJvR+rNNA1OfWRnZj5G3PM8bsB4RiHuOlJ+4LQIJ5TChGk8fJYOFDts/wxY6bKnLFroMABY6uNDR+wRWh/XyJgHA6qC+2q/XBnS5X13frId1NNsMiM1uotG1jgQL4gAAIABJREFUmosQv5MNAJSFI8LrOqmMIOcdpGJgrWwvu3rdBAAYY8eOHrnr1MmlI7e/O2B/fgHf3KB+DQBIiGTMlc4P4cIAnl0heAcOd/E98wce/tAnH167/PLLL7/x+ptr6+s39TsmBF+yJZqKZAlmQIT84BNyZVbOqpKdwJt+h/xkjybUTXVbCPVU6nRlBMbrVgT5uodvZLwRkEqNO6roGW8cSV1OZt84hbd+os8PpN/71Wpar3So1DXJvQVZEx56abv3MCwYfnz3LiqLbLc6zRwMkRsEaQNX+o4bK8mEHdbnXASzY6B21EMAkLofbxz0Ctw/ww7PFofnin0zrMuEuhU7qzBX4lzJKWTcREcAg5qubtRvr1cX16tL6/VGtQunxJNAVyQ1qsG22u49+TVbamEgBkz3PoPkZEb3jilz1vbD/Pzc+9/72IEjx15c7X7zbdyogQFsAiN+tt2r3BqB7x29NKBLV/EZhMXe/g8/vPfuu0595zvffevC2zfjIyaA18IEVAMUUy8HAAAQiCEyrdQEnGAraJktEievl6OgHDQniXoB06NMKSAqa0sVN2Nb967LUZBHN4q3nFcYQ7hRFzYR0YWY+D1eEwHRqhpFmPiswG5eiwxDfFjJHcTfBHd4oMxReeCQXGJFiFUIGp/QDNT0S9JIUcQMDjUvaFdmHllYiJuExmArb2HEB8XASKsZmNPApmV88IoiV/R5atI0LNwlgyNzxamlztG5YqZARHH7QaPxTEcw+mKHwexCcWS+IIJ+TW+vVa9cG55fHWazh4IQdZEw2dUsdcSf+oXSY1EUHZCjCaK9QIeAZpOJU696TEB+XyxXMME7miF84qD+u2Nx5PChT3/mU7R4+E8vFK+uYwnYB9wErANdDsB4WQMMASvAEvD6EF+4jrOzc3/hgRN1Nbx85crN+ZhmBBpLd1zpQAuBGL+qfhwhJmYmcsQw/4m5GwLUQBX3OyMKsUcV8TtypRUP0u7qDCrRiIrSZxfPn/S0UY8Jdn3IUVaPbup+W+cbjSHHUP4NmkMCXPYsVZgs0J4C69NQXDpskcaPhjczg0rSk2s1ZHrTFB6iYpL8bCk/hNwwBQ44eSAgMl4i6eKE0gYAjHFmBOXyyyRAly4/wGx5kJWoibelJiqhF1J2RQlMTjhCYHqvpmvAEDXAEABJbsP2+Fe5XPPzFmyEiPbhG1ffKxg/80Uy3iRswonSmjkBVgA1QuB8jMBEjLnYZffs63zwcO/efZ39vaJXYonI9FA0Dnhahlggdhgsdth79pQnFsvZAjeG1L+1DR5KOJElbVGKZOCu68zrnxBwdm6WxyDwexKsr60DAkOGaknF6+nJSkdxXFHoz1J9x1jKHa1tIN591533Pfjw6dX5Z68DY6xgMOoWUAJYB0CADsNnrtClNXz0/scWl5aeeurpjY2NLSF72vDkYVjTmgIMHhI6yI2QAOOXIVWkqecfn6GbxRnVNfV6ssZfMt839WjHPuG9TxcasAXcVMT3e0KCPL+O3De2JtwcP4L4hlRXNZ4YWm0i+18cYxZ+eK64b1/n8CybKVinCG0NngYQsGRQAvQKttTt3rW3885adfbq4MJatRXF7Ry4Tdq29oOsgADSquxsGlWef2OLgiTVDZ29Mfmyc4IdrmoAAOKDD9z7/vc+9qXz7J0+AMPBBPKPADYBkOGlAfzJO+xzt5/65J6FL3/5K/3NzSmdM9162K62KS6L2yJodwMAIj4LYQA1kZhSxyJHcwrFtg1+kTEgGKYLQj9Sovjg3D0Uy4d7hEFNe/mMAZmYfiOhX8zEkKMVMcCa1eIghHEcQhkvEgMyQHPbRE5opJIbZpPYYKu5NbGgE5CsZPyOFW9TOAb900Kjtmna0qZJiDYW4YRmDAcHZtgD+7vH5ovZAgvWQrudBhhgl0GnCwtleXyhuLBaPXd58931W2+VJc0okXY21FpbvHq5luIRDTOFjmJ1ZVJaijJCktXliLShdXfg5Inb733gkT98jV0asiGDqRjbCGAFsEf4/7xe/+Dxw+9//3u/8cST1Y6w45kTXgQiqAlo7BZv+GICQAZQAFZA9XQkmmmmsSfSAWIM0yCZUdB9MRKkmPb6mxnBy1rbsIuFOx+cuePeutMz4wd+q1fovogTFgXbWJ99641ysGleckZa9eDXeMhf8lF8o1hOqFVEsH/ZHyx1FxJPpJtKRyaguhqurV9fX18G0yk4GbKtcby3tBErFZls4iRx1RFFqhUnnNwvXCaMRGzB8wTGgpoVH/U/R5CPCV/V9q5tmwgzBd63r3NqqbOnc+NUDRPc4DHP4OSe8tBs8cr1wXOXBrfYrlJlQPC/2md9423ST5L6VbCiY+gYKKdQKp6RiVrtNjNA/YColkzFM3C6d6YWcuTwoQ88/qHvXO1e3GRDhLFNbEWoixNAD/HcKt1/dO9cQW+/c3EiWqcG1Zxkv+HSzGt2RAZQjiPCoiyhtglxbiSCGqA2VVl7iDXOhpu8aoSDE+aUBkYEdHL3qbRd8aJNSzTz2HtrMTSQk0Me7bnt7u6976MifgVSuMh2akeM3I31zksvQH+DiKq6rqmu67quK/4f8Ug1EdV1TQLqB7/QTI6KagKklBMNQ8JpS4r1Sv0XARlj3c5sXQ2Hw033C+TEOz1i+btzzEpAFcETsyT1xnAJljwE0DqXG8117Gxzn+fwwqffL9N6gwAMiSEWrkvpiaDEAQHWch/b5POBk4vl40dnTi6Wcx0swm1zg8Btq70CDswUxxfKiuhK/5YwdcjxPcBvtixz4uDc3GxilN9YXxcdhh8WUmUBmJZm+w1CmO/Ts8SdCUScmZn51Cc/9kZ/7vw6W0MY22NoCUAECwy6dnPUABsABbGnLrFHH3vs9tuOb3OtzOcCwql6N0dX4AIQgtiOHogcJtDPxItga8tOBAz8TmQ1DoLZGgYPOcbI1U1TZZq5+1EvOzlJADAq0fjniG6/fqxt3W5yXF0pXjoNm5vWRIa4IxYQZk7jGwTtaoRV3GIKCmES0HSQq20E/Uq4RQDA3PySWyEymumyHCDenIYaZMGsqHC4UEcSWyiCaZ0vSyXGWOHtIBqfzGym1GERDI/mE2obMwV+6GjvLxztHZlj3QKZchtyU/8hYrfAg7Ps8SO9jx3rzZbbW0BPEXH7rZgHaiiFWG0ojbGCeM2MJ2vfRlIs2jG0TAn4vN6JWggiPnj/vVermScu0+YEbFYCFAT3zsPtMxA8c7UG8PYmPvEOPfLoI3Ozc+OXdAPgDc4kpjhbBz7qI5vW1TRB7jaEMXrxYum9XEYpPBnu5Wlp+nolRadTBv0IOeQ9+m9EPl4OG2vspReg3wdERKamP2rdRGVHauBU47e6u52UscJwV2pczWI5kCUCV4zokVL8U2UhFKy0j88Afx8WQ+1qyAtNhJs6UyIw0roN9KT4Udo/ojxojp4pIscF6b8T7eo+MMM+fKx3197OfIls+826GOJsiScXOx891js4O0U70baEHtPJe610C+u/bsIkCIi1YkJrKgIA+mCMndhX5smZvewILCws3HbnXV9/B3uIlSP6DK3eeg9utC5ATXBsHu5ZhHMrUDrJCQCgJkCEZ67CZmfvyZN3bO1XtUGqoRwFU7U+ut8VrKL2BdmXyU9hm73dU1oRZD7FVe8RSm/IrhFyUA5OPpyx26etoTn0jMGMiqvXixeexcGAsYIVBbc1SQ3CyFDoE3zfBpBNo1IOVCz9GWY42bE10TofY4iTvwJi0XlO1raK0CQ9J5VfQY3B0Ccmyd9diLKVG1/nmAzSZCTbWP4cs5BTS+WHj83csVDOMNi2+/8QsVfAexbKjx6buXupc7PJ2VJEFlRisVvHEzFJOP6ST0ZGhAA1AYjDtSIC8f3wnL0IVJ81BIjeRcg9KASmG9sdjzz0wNubM1cr5eQgFCmpc5QAVQ2HZuDjh+H33oSN+KC1STDP8LvX2Ifvuef06RerOmEySE7TpoIWeTtRaoIhYIGIVPNgUlMeSozW9pBu8yAhKt9djF+qwuWaozpYIwq6eers3ACrrbR4jujFgTyCYxLJL0H/TIQxZzU9d/mjne9YzOmXCS4g6ycCANSb65svPV1deBVZURy+vXPnQ2x2wYqLoTyQYGOdvXwGh0NWFKwokDG93UBWiKwy5WTTJdjcU6rNp6Y08b4g0ASuBcPKxqxk89E4PhMZz52U5kvhU0JKObIYjRTfycHXys+iDEEuLgWUH2PsdqSoZ0yMQCYRncZ6B0Cg3OSQHzom5DKY5ETumY8LylEzv2dv+dCB7t4e24aGDReIJcL+GfbooU5ZwOnLg5tN0FZBa/UGp4vZpSnKEAxBJyafRloNrvcSCHHAnBjkxLR+aXlnS35TWQfBlFJN2fas5GLv3qX33HHylWXoAIzHVl0AAHjPPPzAe+D8KqxvQgkRz8kAADAAuLoB/XLPfffdE4lCsvlRi5O0yjMp3KmR8csc45F7NqOIHx4CFA6HCPkSjHDegnYscygxPxEIiQoA1N5D3QmcosmQ+OaIYCWyv9D5OgzVqpvY7SChGbITRaUzekmisZzxKTwKBTLwcqWqWnvyjzrX3pl7+KOzJ+7rXnpj+M0/qteW40XLolZXi+eexs0+1zYYY04PV2qE0jZATXqlLcLYImoM+ralwqCZDIXP+BJXWyDnNZkPGG4OSZD6PN72qn7tGiYdJ6ABBUUeudxm5u/k0dDwKgOl3TXxlsmQiu/5pJCRWDIn++snBOf7GsDYMTpatiWD9x3qPnqwtzO0DQmGuNhljxzoPn6k19mtqytERic1NA7zfBmA6WIYQosdfqPyxMzgRs3jZIk8r5OYio1+dn9bSsl0R8OtxN2n7lyl4uIG9MdK3gUYEhycgU8egQ6Dl69xD+gpbALUhG8uw4MP3NfpeAcQABiysii6Zdkpy7JTlAVjrGCuf0uzialpVJsy4uqUpEQ4ipDH6CAqoswVev4XEZkxPoTStfvSwDQzkj4e04oyQfjYUtaZRrjdXMkLgsGbZ2YZFI99Gg/djicfgQc+0gWq3zjjZudksbaKL7+IVCvbhi0IZAIyNnKYb5TI4jqE2o9haBTW8oqIZi6zmIqKemlk2qK5o2cc2tR7YxzXmhFHLLxt8zd+qdX9Tb0qdr3IJBAiXUwm0X7dFiWD9x/u3bevu9jdjps20mCICx28Z29n9+kcQbnaQrAiaKcazSiFeh6ytiEgIVnd24mENsPzYvVFFeoTaAIBe0PR7XaPHDl89hLUxpS6Pbgl49gsfN9x6JXw8hV4cx2qFp8+BDh3nR47OHtg//6333lHrYsyxoqCu78Sb0w1jqgGIYoJiGohx7XRXlb8FKc3AdT6LH5oUT1qKzZhUGjE56Z6RH4ZBDnKRpS9LMuFJImb3ayM3bLj8OeoYyYO9bNwHsEFF1AXgMoPsyU2mQyC6yus06POjGiHA8erQ3ew5UvunBSNdP0+vvAMU9oGOoeEhOcvRZilbegBj4zYihwCWz8x4nk1Yd7n5J1fAS+6A0cfcNUDRzMP54DOs/sTw6E2Arm7zTXepMCazHkf5DoioHi/Gx/OvKG9iH/kQPfUYme23L6bNtJAxF5BJxc7gxqefHu8aen2RYAfvaZ1TIGxRMEXnpImLCd2T3WUDPlLy0S0UkOrKeJ2xJ6Fhe7s7JnlmkbfedIFQIKTC/C549AtYGUTnrwIrF0+BHB9CFf7uH//Pj6uFox1Op2yLBg/JobIHUsCE44mEYExxpAVjBVFUZRlpyw7ZdHplt1O2emUZVmUJSsYY8Jjpy2lpgQud4SFwzP7B6RzBJJhjDEIdZB9Ywv6gwhEPsxUlpPfP5LsT0lK3Q8b58EjdRA1SNuU+sfC6mF//cxTVA1wfhE2N+rlKyr+gJUWUcr2wP+urbIzzwltgxVozD9JqrVK5ZCWBqFtkCZMKBb6pImwXygDiEwmLTHWF5LwKSfp0xtZra2qbZorHiHgPyNmb4OkU6uoqhgxw5ERhbxQlQF6r9wSdKIgdSh6DeAWaBu8vwdOMrdIe8/e8tTSDtY2OPg20juXyvv37aI9pM4cyujOYd029BwKtnQS53p66dNcdAdEcP3vyMhRjZaA0HT2NeUBbmsxPz/Xr3ubQ+x0RvG9QdBFGBIs9uDjR6AsgABeuAzXKihZ+wrAt5dx3759iDA70+O+R+XlUnb/RCIpRrg3BDVSc//fxOUZojnKSuuH6ZWp/RcmPh2V9PHcJGnWteZBMe4RqioC6j1uQMRPZDJ34QZlnwhn5xbqFeO+sXNuLw69vjhatcb0pIaubWr5qq8CEMDGM1/trV0ZFGV5/C5448X6+a/RfR9iC0t1f61+/QW4+7EwHRvr7OxpNtxkrGCsQMYU7xgrIYpgU/0xBZOVwNzHYaVUEsYM8zTHsCuOEBzuEq/SLi5UqUFeDCqnprrglh3KIUaAZWeL5RSwhBnxJH1eFG23Cmst05l1EEAt67p9Tzm1VD50oLunO61j7jcTiDhfwkMHukOCs1d3wx5SOfZLvRjltC8kiXhXDu6qcBnXtgWWgYMwse6nIcY0vgOawLjuWxKiIspvSXzpNsLinoUr/YLQnzimUALUBEfn4C8eh04JQHB1A15ZhkUGa02bt/WuLoSzq/TxvYslo6Io6nqor0V0RzN9ZTgaElywAh+tSRYrWQER+O2VAFAA1XVdVRUA1kQq/Xggfp6JjHY3vtkZb1RRySLRzowYAFMdIEhDiy9ITcPM7pKIkKA4/C7W8m1rO8WG9ifzmBunv8mGm+zwCXbnwwhQP/TxzumvVc99ZVB0sdqcOfweOH5XIJPVZfbyaTYc8hOwStswdAK9OVQmJCOC1iwhoG1YfCjiGx9GQm22ck9Vg502UjsG/HZwhl3y3qjMfb7CpgigONzifXQipNhRpkoGk/1b5y8P2Ex/j4HUFI1xKYCgUsNvSNlZu0TTQMQ9XXhof+dqv9olt66odpVau6+1Gvq88dzEyOpXqTjfMB0KhhEzTaHuYLR3mbSIk7NkTK13jLYBAHNzs9cHADiCP6suQEVwchE+chi6hRj3X7gE1zZlq8RvcGcAUItzGwVCv6KXX3ml0+lSDawowbRwyI05ahwgtG9s13sVUO7iEIoHatmGADQcDgeb/aoaAgEgdrszhONsWJHg+9VFk4sDkDjigW4nR3tMQUIGUNiViH7EWEaa/ZTylWJKBEiZ0e0F8laf2KAMNfbVFDHV9UvVtYtsZq7Yd6RauVJcOV9Wm1Ae42nY/FL92GfZ5fO9qxfpwDE8eFsgt/V19uoZpW0AY/wovD72qpVmS5ngL0REM1zrHc4ffwi1zGxKMYnWiK29xphWHk62buDx6lGbIJwGHU1cuZOrKNSkwDnyEy4ubeBoKlGdGYtmM/4UQzkYJXklfXMnmCnwkYPdA7tI2+BgiHt77L2Hel85v7E+HF+GbgeoZvVCRhDlnjXE1Uf8MxFGFFNnNukCrUXs7Dr20O31XhoKp91tvq2DUBHcNgefOAKdQtTdZgUHZ+DTM0IfePE6vLlp3bHLwRA6QPfM1/0a3x7CsKLNV585/dZzREXZY71uybAwVkWUPz8iuXTBV0nk+WNjyqlusVHKIwEg1nW1sbE+3Owb1zzUm/317swsMqyFC5DpSARHoIXkW5yP+acYnhC4v9FgKQnZ2dCAE6hEdvKU8B6rhGDlBXLaOPttvPBSlyEADGYWOg9/Ch78KDv91eri63j7g6woAICVXTh8Eg6fxKAOuLbCzjzLqGasQFYAMq7RivFcih+lCvAnxWmGgqHItM8vawHmHzG1N5WaGVvf7lfO1MROYshWBQWa1lQyPPuHHutTWny4QWV+E/VBS50JhkyrBP3Y0CCPHeoeXyjL3XWsg6NAODpXvP9w9yvnd8UGUrKZ0NMgvASx1qcgJ5YykXVdrBFXhOjpM6BY/0cQ2xeVccSQNEiEiIR8u8GO0WqLohA7BdpoGwBUw4lF+OQx6DA9T+oWcPdBIa7OXIaLAygAfPW3B4AAp5YGe7p1TVhVVB08vjk40u/3N/r9tfWNlesbg0G/qqrhUFyKBWJiQQhUV1Vd1yCsUGKexo8ISWOIGjcQETb7Gxvra0S1OvMCAABIQP2NtZnZuYIVSbdjYRACEFaAQ6w7/Ji12d7yVIUzfgI3zQYFF1eTlHoFAEAMoZBWm1pZb8yEoLb3Gcc7yGRqN4E9Z1dx3MzJCXWt/2rMlUSQUue0QcW0QYUWPtX9y3YEXbAUAypDov7LTxUXXuqcfBiO3Anvvt47973hhZeKEw/X936IvfTtwZN/UDz8iWLBuGpE9FO5WoUAayvs1RcZ1cgK5HuLjQkJWR9ovLNaBqwbEcz1lMhJE/U5ZD76UZxP9sjRT+ZsiJRLFtJGWfDNrLw5SNthZT7qAkoiAttQC2ZOZJwG46GKe6WOr3INTdz06T+dgkdWDd4ggrQ+ZCiFojgmdowCCM9cbsIxIfOpweht3mYw5/HkYnlisewx25S0a4DYYXRiT+fCUvXStbEv3brJEOM4n6NKEejpC2h3U88XoFQeRJaWMiKGBdvCwcWHiBZkDsFkROqq+kC40e+bVmG2J1rQXABUBPcvwgeOQrcI5IAIr12Db74DFYT3n9YERLAyYEvdmjEoGWJ3zxype1GJCGpxB2dd1yTlMhHRcFht9PtPPPlUUaAldRx9EwEIEWG4ubmxvgrkCl4iKoqi0+sVRQkARcEGw2rk3aTiTldr40U0qqqgWDgZUY3f9r5RrZuYo0VLaqUCYKRPJXdIHfUT08zkjJhGJgZd/li8/vzXO5dfLx76JOw7CgB47J7q0nl2/RIC4N4j9d2P9577cv+ZP8PH/xK3c9jEEQDAxrph22DGLlG7ZmxS5TAnv8oa7siqz7C2wScj5leKRKZscirBiWsTFASqEd2vfUNjsLa22zeCWOqQDtVaqd415P+QiQyxPeYoH2SeBg40pPIEukWUIDR86chX8bN4MwU+uL8zV+6GjaIx8IOyDx3ovrlS7cS77BWHmjMkE4ZGLacRKFWB5owtlFaAnvjpH+j0xFhOLonyYOmOYrPhsCr4QacmtkGAmmCWwatXAACI4OAcHF4QoTXBa1fh/3sTOix62oWQCKCqiTuP5x2SMWV+QERgDADEgOHoATObvaquy7JjqJaG42E9kFFdV6ury7apiTcNdnsznbKLTM9SOmUxGIywGmmOON5Qo+M0vnESBcfggmFdg9ChooTEMH1ubKylUARfQ7fH33AOfD+VSLv52nOdK2+WR0/B3iP8TbW+Uq1cLm9/QPTZpYPVg5/snH1i+NbLeNs9jo4JCLC2yl59kdU1FkxoG4ABPUOpF2Q/g8GOVnjgnXwhNAbfHuIer3RJCCg/FPwpxKIlxdy5PQZS6WgR9vBeu4UmU4+HiB6NiSetavgzwSnCrlqC5Mn/+/Z19s8Uu2zrhg9E3NdjDx3ofOudtJfHbYlQ4+h34dYdoUHNDMqwQuHlHdzIZWgk1nSMkP9P2UN2jNqxudk/NAtv1sBYyhk5AAwBCoSnrwAjKBBmCvjMgg599So88TZ0WMzHKAEg1BVefZPNMlg6JMQE6nmAM6aStHyo86xVVW8O65meoSxKIwc/OMTlbk20urpc15XpyxkRy7JbdjqMFfykEXftwfXXsiwHw5FtgwRQWxvjo+dzmnghyI6EgAViJS68c+K5HEZm0cHypj0PifM4Rh8CeUCkp1vZdw6fYFfeqC69QQfvKJYOUzXov/CN2e4sHDqh++TSQXrks2V3Bq1xlgAA+n32ygtssMm1Das6A565nNOprjpiaAuu2mHFc0WIm9itBlPmhPWLwElaY2ofN4agEcFjg5C/NTtzmdy0wFkEOG3satLR/LU5pAV3JmIYZAKAaXWclOlpxIth98+wu5Y6u8wjZwwM4a6lzrnl4Q48sRKxwlmcY1klDB6Py1n36DsAiMvbAiYMUppCOBx0BP1X06CnY8K6uTM2cqyvrS8eBKiBtegkFUCFUCAMAB7cB/tmRUW8cRW+fB4goW0gFuvLs298o3/97e5tnxDjvQQY2gaisD3wH6baUVXD9Y1q7x7Gl1uAwNgVqPgD+xtrg82+1jaIirLs9mYZYwDEV+4Y8jmuUGUKxiqxh7RVm3EOrPnKLgGiJ+uVCCRv34adi5XKC9L3lRrBiCC9knCbX6KMYEkphBg/FCk6qVYfH9PXnc8Jek8gkancDoO9+freD7OzT1anvzq47cHBO6/O1AO4/2PQnVUpEAG4tuH4nVxbZa++gIO+2LcB1j0pBASdko4t4rV1uLouVQJ3w4Xev2z8N6RtuO+k0LASe9HtIr2qcGdATtWiS3AAjcN1NDCujphpm4ZlX/lytIQm6qwMTBMLP0evqJy2Xg0E5uSyAQ/u7y6M5XXj6YubFzeqNjFvWyhP7ClnyuYi+hW9vjw8t9xqKrW3xz5wuNcmpgIiznXg4QPdL72xMVLCmwtLqRjJNJDsaJ5GIl6UAGCcoECrWFJat+7cxlEoMg8SuOA7UJCN6NLiJmN5ZeX2mQrrwnIFGJmp85AOwGwB9+4FBKAaXrkKXz4PyGAzPEkiNljvvvtS5+KZooSSFXNzc26UiM7h/N7cHDBDRxHDOR9vpeYxHA77G2sotu4CMtbtzJadUo5fCABFUaDwp8IbmwCAjXIwGAgAsSaqCDomKeK3wXLpCZLYzBj1lsS3nVnbSVURBi1WImdHc5PeO7lW7PaYWCTS0ePqSCiIy/vZRbr7Q+XZr1evPV2yAh/6FCzstWIZYzvJnYO4sc7OvYCDPpPahiyfCAHmuvWhPfUd+6FAJGBfOQuDoTeuO/8JP0JYYyD70gXrv7Zq5kex9RhHH5VbxUzHAYGmFEdIxIlZtHMwYbkAMPIPw0ge468oPWHfXYltVA0cio6RZarTPDL+eSFuSYdni+PzRTEWARcxLGOXAAAgAElEQVQ3qnPXW2kG8yXetlC0+c6a6Gq/bpltf87fl9cMBnB8vjg6V1xYa6UtbQtICWC+MOZO+iQaumnQV2pdNdhjFOWHIyD5ZB/2OiN/TURoGy6MBMSFmN6CugOACMsrqzPYx3J2SPZ3RVAAbNbwsaMw3wVEePUKPHEBEKEfTkLdK693Lz5T9lehLFjZ2zu/NDPTQxsA1toKt2qovyBZYH1jY26uC6B21QOg2rYpXJGury1zfxvIWLfbLcsuGPMNRFYUhf4+PXgQYwyqupXGq4cE4XKUGSG+2QLNAEv3Dbu0M+IRA2KITDhYsOIZ+xWNAgjc2XCM+jGRmkkbp07MDuzMKdD8Gaprmdrd7gs4u1Df/wl2+iu4fm24uREQkE72a6vs7DOodonqiTBBp6hOHqKDC9RhQAAVEgArDBud5jv1aWhpG75hw6kZeSVkTNtwX/k52NlbQHsPe2KqgJJecF3FEHD9yzOfoJNcBtuKCCldU0YI9xw1p/NjoP/Kj2B9XyyWoXNENdqxgARqMtEg2O/b35nZ1XtFA0DsFnDvvs5OUTjMqapkWbu9XI0CnFgJxdjoSLoXpVcOLDlplodWuNdvEFLfsF1BBCsrK5sb648ssqJuRTQjODELpw4AALx+Ff74deiTcc2smA4QABX95blXvgbP/jvW3+jMzHe7Myvrm7fddrQstYMvX9vgjwFKiZaXV+dnuwAgbtgSezB4aoaIm/2N9bUVBOx0u3NzC51uT557RAQsirLsdO0jshqjygmpbQCZss6NE3sAvc4cH8F5vtyoY40T/mQwRbo12idCU7GiaNDPJu0GnvqGnR7d/UHqLcCZJ4YXXw8YE+U8HtdX2bkXkWpkDJGB9GBLs73qxKHB++6sD++tWUkVUo1UA9TiLAm3VMpDmkRyExHJC1/tm15BsLvTQJYhxJghu2oiycmK+ZYspnBmPyFTgFC7A2JJKfH6ZbBVQiI2HSMVwY+r3yTU7DEylxZnDIRNAWr0IPuNjz1dPDLLxjNv7GggwNH5YrG7Q/atWOpoXEsOpFEIswB6wZxtSohMA+QsoJWFQmnt6KSNEbldsbk5eOvChVN3HXz+GiE17JDqInQRHjgERHD2Ejz5NnTKwEoKG250Lr9SvPXcYGOl6swMq0EPZoigg9XRI4d9PaNxMQUA6rq+fH21U5Z1TQhqZ4f2DlnX1cry1U6n1+l0WVHKVRehkBRliciIakOuG8oln78xpNE2P0XWQtqjxbFaZvsw3RHLdWPT2Dw5JcDZRXroU+WzX6peerLqzhZLB90oBNhf57YNZIwhA+7cq2D1icP1kX3i+GjNS5Q2SQpoEuIP2W+Uzw3VLnL6zgMsHyPmF/lWBGscDX032aHCTBECGj+cMVnPkyIcOxFTtRCX6dRmX7QXpEcVogjQdh9WawTaMYSTi+VMyUactoRRIMyUWEaymim5r7pmIOJMiUsRVaAiWh/S5GdaEXG2gFNL5VMXd8xxFYKQJDVVhoYaHqHWSrERA5GIewJW8lxMafic1RQawo4otAzh4AtqJVmM0cBZAHK+alta286+9Op9Dzx4aIZd7sNaMiYjODAHRxbglUvwzQswAHOXKK8i6l6/0D33RD1c3hwQIGA9qCsGAJv9wR133L64uAdsk0bwlIqjbQDAYDDc2OjLHTLCM7leekHcWFnrdLpFWaL0jM4ntYyxsuwAANXyanuw5ol8pEHHa0sjiBChBhjUgIgFMBTrHlqPMb7H/0FWHJSk2AzCoO7WbBOIEEjs6OCnr9VldpJ9xVZboyA9yonDON5kGcRoq3k9PdaT9Ql8fiBNzepEuxxJEayIoQeSLuEF+VrfRbUX0O/8BFh067s/xK5egIV9arBXX4xry+y1M0g1otQ2ep36yIH64CJ1Sqq8b9BVRRZngGwRLSBM51VKYNiPAFYcvwYIjOqOVDhZcV1XY94GDiuVychCK1f8JRx/8UAmYpJ2CAagmAEFb6GqE7RFsfQYptwiKpVLZ8WNc7WsI7SLEBtqSOsZlrahjTbuhE7QD8RA3QrNBQI4R1adVDHDDdq/UTAwDQErdbOiPKfjdAMAKBmc2NOZll/RmQLv29c5OBPeVLHQxW47jaODcPtCuTeicFzt189d3lwZTGEGwxDuXOw8c2lzuANOq0h5yR/k3a2oxZCezIrIpJ3rBfsryj+OePUdfwUGGPt4SXIECjW60maiqbYfrl+/fu6Vl2/bd9f5t7DEqBeNGYD+EB49AK9fhS+9AUXpaBvE+iszF18oLn53gHODzQrlMVs+0ne6nRMnbjfVi8QyinHeUBwkWV5ZrYdDcesFKZEgNIXhYLOuq7LTAcOqgfyqjKKopVHcUggA+CWyqnSlMrSfI5EY66d0JimUBfKtoy1sIals1SDnyOzWMLWXeLDzKkFxdLItQ8FQ+1EMSmaMuSWYN52Kyg24G+vs1RdwOECGyBh0O/XRA8Ojh0QlVGYKp0gYPnZ/nGAj5nCIz5yB9b7NTmZ+ssbDs2PzCIsNR+kz5zsJBEOxMYYbKRo47pAU32DvlD32mIcA6oiKzstTUGMdi8CgzydC+qltxtG5Yk83fBfBGOgwPDhT3LbHv4VjNBQMl3q41AsrHJ2i6lwdZYoVByIudODwbHF+dVvv5DDVSv+9iZErJd7ypWJAhNiJbTHti4lEPYe1zfLSH8eoxN58PPvs6U995vjZcvb6EBkGHHIwgEENjxyElQE8eQFKpW0QAAIbDjqXXupcOYsby/16phpuOF2PiA7uP7Bv7xIRMcbUSVdTzzCVDDBUDf73rbfeXl1Z6fW63Gyh94AQEFBRlDMzc8PhJhEwxrhhoyhLBLmMQua8kuq6VpfXozW5awE5/VEVUCtXZdPpv3ZpUmyDmlkF/DtE6QSwDx+5oQ2FN74IItlrjCfziEWgpKbzXt5Igmsr7NxpoW30enT0ULVvqe523T23rWkOg3VwcQ+sqaOANh0EgaNJhs3DUSqcp4C2EYKe/LeAJdqoRdO38FQUT5ooXFaVp4c1trOfM8q/GAodlUyrixCQe9K9AXcudTo7apI5dRQM7tnX2eYKh49WYiGsJLTNqkylUypQgHlc7UN3HGPwISQUlxrwoJ1xSPb68vXXXn3pE3c99LtnoCgDB0QZwP4u7O/Cn58HQBiI1wSI5fq1mZe/WAyhKmbX+uvqRniFsiyuXbn2kQ9/QJxHtWGeRgFb21A6R7/ff/P8W51OUdecoSsetTszB0hQE1HNioJRybXEoijLssMNGNq4wff91bV8r2+RGBl61EeSm4W1uXh64OMKI2RItWPkSFsQZPpUlBZT2HZTYB8UCQ6Ndd6L8KAV/F7zZX+DvXYGBwPsdXHfPjpyiDodQsOfXWCobyw6FiMwbGp7h1OG638jSoKtbcS0SuNnQ/NINdWlJ152UO6p16Y1J27ocnJyD7CYZ5m4wTpcH6qMuOcDNNXxZrToLla8uolbOHoFHpsrih2yaXKLgAC3zZclg52wquIZF6z3ev7pyp3GLXvk9lm0TqnIaUKMn+PE+p1YB+8EBSOAM2deYv2rjx+BDgVu1K0A1mv407ehMtZcsB523z07e/aPGcwOoLOxdh2xQLQkQFEUGxvr733fw3uXlrxcXZhKhv5N9Pobb66urDLphQMAquFgOBzoaABU13wZpdvtdTpd8Z5f30IERHVd1VVF4lY4msKEhAAIasBK/NyCKQ4BABTiYiryBiJvydpOGJWxOk0rhaQpQtzgYsVwB82oOhR0Bqa7uzdpJsD1leLMd3FzHednixN34NGjWPYQCiTEGqFG5Et8NUBl/LX/of0bxQ/kf7FGrAErniH4NGjy1G9DTgS0DSOVmTqukhkMYJ5AUTUTMxkH4SivXqiVfyiR6RMs0JARYqKKTYS+EGnWPxlr0g3cFn0A7v0pcRyYYb3iFjsN6wEReyUenh3HmceNBTm72bSx0O6i6EZo4gVX8IkMmCEPwhJTv9EshH5gULXW5+l2FIhgdW3tK1/7xonF/sEFAu7PypaNK0NAcQEbAVCxcX32lS/PvP1UUWK3N8MQGSuqaljVw7oa8q0RRFAUxfHjx++5+5RzIMUjwFI1arHBk4hobX39+efOLuyZl9vKaDjYHGz2WVEo/Y7qmoDKstPtzbCiNMwj3KhRVVVV1xVRXVMdJWMcG7WwaNleMVR205FBDKGIjcLiVfisZNiEYfS1cQ0Y0STRgUeXGplEu5TJZA7p0iWCVcLGCnvtRawrQMbmFnB2nhUdhgUDVgArCFmNSIg1g5phjVAh8L/uPx6BIXeAUjNWM6yR/8UakZjQYKT6J8/QKgWD5JFatWFIiTdb+wiaLOTBW9CJ1W7cgMYSeNS1nFqvEsFCYaBIpFT+PBOV3A8xCEjRl5SVWqGJBfOWwDAVjTNJDL3kCbH9FOLQbNHy2Miux7H57a1wINidCZ2AqKrfxhosZZXDCyVPheKy8LD4ln1Fms4dbtShht3FCN55GgcAAFy+fOVbTz7xyY9+9LfPMKpZaV8xT0aNdpbfnjn3VcaAld1urzc7t2dhz1Jd18PhcLC50d9YX19bHlbDXrdbFMUjjzxaliVJAyrazstRujAXpdhbNwDg3Gtvsg5TA89wuDkcbM7Mzvdm56gmAOB3y3Y6vaIs67rmd83ydZO6rutqGNmxYWKE+YnZuJyBasWtkf0Sk4EYIENEflSFUHUPzb6K0/3hONaVRiejMcyyPCYWVPwa1K90Sv01One0owAAQH+Nvfws1hXf2VNfu4p79rL9+3nsmrhKCKL5AWrSq5zk1RkiMuRDTWgjg5iGYC2W6Mw44UvLA4qom5/5oKdaMihutWjHYcGy0QsOSzgxg3IFYUAiBt+r5DzIF7cJZQKtWP63qsUUQ1Ib/00iODDonKVto+WSypG54ta2bmgcHctd6Y0Bij+2BPJ4y2Ug0osiDV0pkkkZ7S52zAbOJWFS5OSTaZnZqfoGAMCbb55/+rtP/bX3vu+rb9L568gYDGwnRFgNem8/173yNCvmWNllrEDAweYGYyVjrNvrdnu9uYXFvfWhqhoOBpuLC/Nl2dnY6Hc6ZWHcGy7XNSwxHTyc8uqrbzLkCgcNNvtU13MLS91eT5nGkGGvM4uAQtuQWzeqaijWUECYAIJqhZ6KuWpvA0SLGzNQM2VkzB0dRIjIpLwWslKc1VFFAfidqal4U2kPCHSThAYK04VYZyKtbuWNTuploCYJ9Oiuzq2sLRdvnIG60uNPVVfnXq7fuYD7D7J9B1hREgATLjawJigAakIS+oLlEUtsR5aDmX8uSNcYN52Bua3GrYXApJsiT4rrW8VuQDvGi5sfXGnmprPbj0Lv5RtJj/MLU8UDgDwQ6+Rplaa0QgJoch/UXCcY+NUOJYN9M23uobolsG+m2AnbOMLsQi7PGtMQJcXCnBSz1REAllaZKIVXtHCp7xqTSNfBuVWwmExpFX2H7BvlqOr6xRfPriyvfOgjHzlTdr7zDnY6OAS5Zl1Xs68/0Vm9wDpLjDFkjLECAKgmgqoGYMj4KRIskDFWdrqbFXzr6ReKolhcmNm7tGdpz8L8/Gyv1+MbSE1jhjq6Yi6sPP/8i8NqwHdkDTb7RP8/e2/eJcdx5AmaeeRVdxVQBEBcvADelyiRUt+UNOqd6d63b98e33Fn385s70y3WlKrNS21WqIOUiJbJEGKNwEQF4FCoa7MjHDbP/wyvyIjs7KAKrBMUDEjwq/wMDf7mbm7uZxbWCpaLdC+ZomIraIjSUpZmXUbUkqp0YaJrJDzYHDHb9YwrydEPcsUW3C7BB2sMGvMUfQoak+IOZi+z6HoKABIuhVhPexxLhUFT/13Cpqn7yK4UUOs0ejkAAEA7GwVn12AcmhW9rizGmlrg7Y25JVL4vQjYn4RRcs60YhAaLggzHJiVzFKRAEi4he/4whK5vtDhHYLqhIqaogSAoCRBia1eRMLOAJmiz0jaTk3iWgyiIHPTrs6/V91pRDl6x9lvGGzSlKUH5as46Nvmab5tmiLAxYHYe+oU+BCW9zq71/E4Zlk6hfzKoab72PKqf08tQB0ABwEJB8OOI8FQwtAbHtsMLbNtkwjzPXSBUnkbdXglTR4qXtLUsqLly4Pf/azb77yjdVHl39xmQYlAtJguD376c+L/g3RnhcCURRCCFEIIQqBQl0iCoHB8KMWEBCs39m6eetOKWW33VqYn1lcmJ+fn52fne31Oq1WSwgRuDqI6IMPP/7k40tLK3OSaNjvS1nNzS8VrTboyBeAolCODUkSiCRJWUkpK1mVUlYGk+amUUxcI2SftQGp5DosK6FEFCRKkAKoAOd4UBUDu1NjU+Zuk14uCgKgIKisnyBUVYb5ONNZuGGe+BqHORxUR7lp9aBBHGvbojF4bDN6D/2OdfIcTfVk15+YmJ+KfyxUTPYLAmzdKT5/n6EN+8B5yWA4KD9+D7szYnm1WH0QhN5JIAEIkIgkuTkwJIArH8qyT4CyfoCSlBvr7uLcafnQcdwe4CdfiEvXk+1l++fDoin5s5bcsmxjCnGHhO8cchMiHnZT3R3reyOBTRwkdp+HJ0LLXMQTgIGumpEMyAuhDm9/gszMZ2b7t932IszokJqZHEhRfGxtRnIN9NGcQ7JsrTuRRGy4jONoV0xlAcfp+dasOQB2poXznT3XEbMtfHSptWWQcy4g6bh0pFvsQ8Dh2zBG4KizVv0RExxVgTawohFuAc9aOxkiwE8EhNQ8mkoKCKNj2LE5Qkfb3tdow9LVa9f/5Wc/f/z8+e+defjSdveT64P1S78tBrdQoQ1EABJCCFRoQ2iHh0Eb+gOrSINEgNBC0Wq1VLCtjc2d9TtbANBuFa12u9Nuz832Fudn5+Zmer2uOmzl448/e++9j5ZW5qSUg/5Ou93tzS4TUVUO1dctWi0AqGSlt7lKvQ+lqko1jaLlVnYaxS6co6STq5bC1ARq7z4lJqonJe6SQN3i8Vtqi5pKu6b3dgDQqCyG/h286m8XF/8I5QDDM3CMd8xcAQDtbJZfbFRfXimOPyQWVqBoC704E1GBD6t97tyC4XYYrctjn9CHgADy+BFqd2Sng8+fl4+cEhc+wVt3sKzIV21eA3P9kO+PEGGORXVV7oJisJKSbVl5Rzl2Yp803UoWg3QkjSVuNcrBbM0RzU1JTz+00Do9b6L5IHT3fhnqbAsfX2lL857TWodyF6DS7mh6Q6gRqSkVZIIMwYrxbKn8gXODOPRAYMwzbdJNUyrfK7pz587rb7yx/NFHX3/pxUKsvbl5BdtdIYCABoP+zOy8EELFcxSiQDObAj7aAA06nE+oABBCAIAKLT8cDofDwZ2NzYtfXBuWstMulhfnqrK8cuNmt9epKjno93sz8zOzcySJgKAgIqiqcjjoF0VbkiTl3qgqKauyLIlsJOU0ISAIHp9wbC3q5KF1bSFKoAKcK2sKqtkhDkJAASDM+bTOnCOeOqpwZAs8I3IMOVvf6LAJrmmUSOaeZkRV4LnZ2Sw+eQeqUrEYgHMaknGoWPPYLt+R/R35+XvY7hZHTxWrp5DQ7niRpl0SgKTpW4pqV4OcAkOaoEKS2jNEc7P04lO4uS0+/Byv3gh6M9O3I9BGBDV4C3z/iLHNmoW9zdSHPEWKo7D+Rh3sCBPXcBsbwkF5alhwOxQbuCJqW+dXa9xeTcbC0pQ8HL0WjmralKkQOLMHsCYX2HQ/kPPu5Z6E8+KhSBxtGTh3iDZnEx4Oa0baa12PlfjILyFsEhf6eoolkDT7fRolSUp8r91a+/GP/7nVnmm3tMuvv7Pdm5krihYKYf6hjv5pZF39pjjl90AUZBy7hYBCiG4HiGj9zhYiLi8uAtH29uZMMdebmTOWoQ0SCkRUVUMA1Ks2ZFVVpY5Wrn1lyardAbIATi+N0y+qIBNLG0ApIhXBQQQpd/fZnUhF7T1mESBqIU3kFfCu0h+HN3esdtd3Hx9bejQhe8Jry1q2ps9xZ0tc/CNUZiaFOQ3JGBF2UQP5f4CABtvDyx+UNy61HjgjFlax1UHbjwgVGKdEAOPsuTV6cwpHnEQSoOIviTQ3R88/iWvr4tNL+OVtb8FHWH59r9XaQVx8alzqf7cgnxVzRrURLyKuhGvdHDtEuTD5CL2X3v0xAPb8lFwYmqaEUUeb+RdPI+RpoX3wBPue0nx7XwIOixw8tnRSMv7cOYUPLGVWXtkCEFopQM7NmaAcD/DzJ2bpaBACHY1ZlV06cKCIALHXnUFUwKKoymHRarc7XVTODVSByo34tx+i+asjoD5zSU+T6aB9RETUbndFUZgNKVRVUs2dqO4th0P1VKMNKVWUjnI47M3MRZjDhkOHJKs0XkDHsziGlDrqKPrrAiJdOiYpham2awpS8jC7aJlRcoQlW0L+L4L6gRQZuHFx+expIOHy8RkS302IALCzXXz87yArM1OGZBdhGY3rfUQJgHYSw/4XaLA1vPge4PvF8XPto2fA2jWedo+9HJ7doPoKyQQK85U2AdLionxuUQyG4sIHcO1GqHXzFLk0Iqr99mx5Ra4IA9D80uyHy4eTM08DvAIe4hnBmw7op+twEVhq4TRGm4gieJ/WFen2sELI/3FI9wllBSFFd+z9wI8Wk+cCCThQWUMtIzsgdRKlX7Ct0U2dJ7LEyw4J7hvAgYjCyBEQiIOqnJmdF1Z3o1A+A6XEs9IGAQkDEUPeb0rcRiyKlvZBEFVlaReHKjgihCjLoUBUaAMAyuGw399Re2Jbos3rR+X75Ks6avchNu0gUn9QxhNppOXihCdTeKrbbI5l6JoCoWgX2gU7byDFs2M0IqbQQ9Eguxkj4QAi7ykABF5N+3z7jrhkd8AiuNlLO23iqjPLIT1nh01gnWXllferLy8WyyeKxePU36DBtqt4YU4eOwZqw2NaTpgS2x2qULtuTEr7RxYd+fRT4swGfnEVr1yFyh024Q8G77P50CeVfiSiaMJytdlHgKM0mM03r2GTGlAQ0Tw+1xDD/1CC40yC5Phovuhxvj2daYmPbg9v39O1lvMdcX65PTrdyHL2n8vHDMbUoHIUDHIKfqPH8mj/zwQKL0XLA2RTKnw6tr5+tsmEwGkPYiass5Bs/tSrHbC5FQJQKzOUc0CU5VCdwAq6u9HKWP43RyNkTspY1puMiapyKKU9G4X4jjqzboPK4bC/s61cLWU5LNQckANGGOx23KUA9HWpAhzeKzY1aWvrML2qD3IXqKJOqXJZdU3YygyWhAcihhB1GDsutAmha4HOqS9TjOGNH+xvFxffg+HALApnQ093hLfHCQDM/Ae4xzHcJaDBVnnto+G1j2wTAQBQyCefotk5z4zw34Gnx8r9DrIo6SDnFvDcAp49I/74Idy6SZVRLZ4MTDML5QcOOcmXuAyaHhWSKJLskfGZJAR1Asw1oJ4pRiRIeybY2yHqjSmJgzJj3h45MvwsyL7gaJQ0P6VFox+vl5+u5w7qvht0YraYDuCYUodMnQJkAJBycXjPNGKgfLyEWO17mQEBoJVhorhAvxZMBStQgk+Z774Br1/PH50jRPe+JLu/l4CGw8HMzJwTjOSJfrXZOPTsGMHu33E7A8IngCQlcp8uQVkOWVAN8n5ISaTioMvBYMe6WqqqAgIQGmpg5uzoiAEbqc9kOgYCUgVPTGZFEQIIi+kayfWM+TaGBJ6AUhA8aYD6yWvqxp07xcX3NdoIt2tGVktSfefUtV+/q1ogUOrQ5Fqy23uz47zVpSefEttbeOWqvHQxt7Sc544RD6tjUhrNPJmnlLnM88vEnFS/7B4zhdNYZyRFrhFgHU4HU1wfUoLqvmI+Spb3+cfmBZu6xXamm4IMIGHCystJqKZpfU53wCc0ZZVQjF0oB419EUBpOVCqvdVqg4lELkkKQiIAEiYSCVJyh6lWChiKEact3KKd4XAAasurWRpaDodVWQKAXhAKBmwAyaqqZKVmr2QlfQkoCUjFCOHbZWzNKXNyQiFjCkIJJNXqTsdJE0+oJDSxACiArW20U30Gn2m0FeT0lWr0LFMtGx9+Si7S86/GtW+yDmYakCnWG+AAACCGO+LyB863wRpGrokul9mMyiAJmd7y/u+9bMIslgiVY+mg7fGLRo+8N0ewswACZ+bFo/Ot06fL99+TN28my8lqey6hsn1vrDL/E5DXxLSU9VbR1ZplFJTnEqTMRsaBvIZ0Ba7BZAu0X1oQIBICCP9L2oFQS5j49n7rSC/GglpXziEdSIqGKocBYVpk87YsBZNczRikBdrvgG7dp1voF0seXg3YBaJmO4qOYUlBQoM4TJOwJibEfib0h3Chz0WTJPVqOVDfRJ32QYhKGPiuIAr+q6+ISRUgAJJya3O9KFrd3oyaNAGisirLcmgRhsUaAHqlqF0rw/QRIYhOd6ZVtMyelHg5TWyshUtMasjwCgKYCGAAQFgBDhE6BgCYrgjxaHNSMlUzGJEALNRCRQRryyGfciauM0bYseT9B8IR4BrN2p8LkeBkdtDT6Lmo3WWqZWaA8IbMXv1gZ7BjjYLo5KKgrVHwC3Jj1tkUUeWWRdH560A5OZLTrrbrqK6PtYWi1xwQqPj0Co9iu9d+9Hz/5mumQXHx6H6HFbhwaZ5/hgDt/BTvZisk7aQiucbzF3Gx34LCuWIHV4Ozwci7tFuOrQEZ7N7KR3TDyDIh3j8IUAAU3Ddh3iGCPjWfhf80TTS8J411WTd4DumAkGFnO8T9sNO+YPZUlWYBg90NVrADKwndA7YkHWnUFhsaa94t0lzrwFCEd8LfPCdvBSZmGw8AoVk0p6CZipwhtX5T/g0QSBIIyUxbICKiEu41a2RiBXF77YYQxezcglKuRLKqqnI4YHMo7vMTUFVVRNIxD2qlJITozcy1Wu1oJsUXn1wp7aaLvJcKH4VKfXekelcAVBFW3225U0zmUfzm6VIweqBVYFmaRdlWOSaLzSrLYvYAACAASURBVFTJDuvxPn/K1lXBJRVPFoQk66rhy1KtduLjHi3a0HY5IoIg0nq9qsrr10IsHoC4WrwYP3RKcrqK0kMbY5NGOyE+TaccWdQUuL2WaEyH5OZQzrYwNmjGpTPzrXu73HJxSmsvNof7LsyoH048n8qTLWkzY/wvRC1PcHm1aSBjZAU5TQsAoGNZu2rRlzGBANDSKFolOlGr7x0ZU8b6WKUE1LGS1JFqJAiJBCIKsjtkrfUfvy2m5Otw0JdVNb+4TKDPmqeqKodDKRXKIIc01S+SRF4EajXmRVH0ZubUQS1CCOOG4C+UBI3xZcPOiT0n5EfjoHS6psX7dqgOxu4tiASzE9eI4+ZVRa+8a4leA78yGbi9mRDbpP9y/Bo5FhSv6Q1D/NhWAuNss5NPrt+S6tzUJ0jbzLm3ICJJQORilTqogQxqgPY6KJZQSzKrW1/2//gOlMOajnGNiW8EcibAOBA9NSK0ZobX+/J1KMc3vKLH9bdH6GVjUwJzzYD/neNXnCJFEHQ03RnImVax+yY9vtIGmMKazXtOdwb7DHB48+hJxk3cTCgtl7TWDoio5fswiMXRd6WgBQxByIOcWYxGpPm61C3jGK+R+428KV0CKSRIJNQLOoRQWIPMFlkNOVBrgKAsdN2rywPYuHO725sRQpA5Wb6qSikrYM4N/j8p3WSKIgTsdHqdThfVkS75E5WSm2HHiQ3LBTODw+ZgEEKnG7XKmvjrR1wmEAURmnd3h/40bXgEf+0Pw6epmpuU3Lj6EIKbOU5I2CJoXAl1WIHr4SC3B82igqP2mZJISDd7GpKe20MgBb/NuCc3e2IDtWnModBQVZXXvyivX2FHsWR5IwtSY60YJh2tNzUQq3PgRHdiKJN7nvg0ACPRBs9EruNjL84ezUuT+3uQLMJDqifrFkhRvZBjKAODB2hFu1UAlExLepdKkq9yQ18f9ZY4yIKNeIR4weR9EoyDrKmt3wilcmQQIhISqSPMBBEKArABtgRo6cBigiGYOKzuz3A46G9vLSyumIPlSUpZlpW3/dUu3VA/+WSKKliITreHyrPh7YBFBycSFiJL01DHsq/MWVLdk4DmEJcpAEy3TENVwqJx+OSm0Bm8GbMBlJLl4Ugb0d7xHvvuDbeAg30JaQ974K+Tjl1PkU8igTVcnD69miHVS1KWFz9qn35U8XBUjSlCEhBC0UHQrI4ASCCMQFIhGgQBVFV1+2b/43dpOPT9DCGbcIvGg+aM63IeBi/kV1KYJXU4+Qls9mT5LIFbnIMsgbEJxqZRdplxb+zN5LTuuRrllKbN4QG2I/eC9mWHpMRFcjO+eWY1e2p0GvPSLzT0WJgbYWhzMhEOwNiLztjzpvOM8cXK0tlNxFGOdoxp62ZVtAA5wPiDxWwUatGGWq9BKBBREgmULOKFOnTTbmV0EIDtFgEAgO3NOwtLK0pYqUCisipJVnwOhSkZIimDqSobKgSFlfZg5SuDGQHiyNhiI8nfteuqQiS1SdfUxj0wk0jhhL4kgSBQKzuDMjTAGCmM6xwYYXyOuuZOAmi8/Gwkm3kidZ+DiZzpHutgV66Xko1JHknHWyBslbC3ari6ea28eS2qkl/py+KJb0FvQVUlDOxwIdoqObx+ubx+SW7dsZnV3Jgt2l+oyX7xD5oGydGdDHmoIPnhAtkUdj1/En18OwQSWDzR6Byyd1NmmZzogppPlZw4Uh8CvXjBtbTWl5Jg98G/+hVVpl8EYFtAscfnt0miQeWwoQDstqZQ49r+OypWmWoATZ1jaP/ozPZ2zBKjmaRly7Rg3Z6Ljcqi9lYeOHlk7ziT2bexY8ATbo09mGgjCCaibTu1bFetECVEQBQSAfm5KiZqmNMpaIqzoENKKYpWp9tToUKVe6OqSj2XAkxAuQ0q5NvGaKoTqkVadI3U8ZNqzCTfKY4mjjEzWnE8Qh4BxoT/YvXW8VSE6r1njocbNHKKrJtUOKiMYw+/EYBMmcvRTElqdkTlD+wAd+25N+J4fCaPXRBCiT8qjfJ/uu2aAACCkMpBeefW4NIHcmcTwyrspAEBgA7hE+o4ivwfFDyMSEmmmk+pLR+dPffZcwUwqVlHlGkdTGE0QL1pOimR/Wfk9YiRZWhaayQ/v1NaVd1r4dn5YrFbTKXkHG0N6dM75bY552ehg0+sdHZf7L5aNIpOMrs7AODEcz0FmX3hMapmnbblVWzLDQCGuUBj+1izOawrxZjWipqKX/0ekop84ZwUgLKqAEEIYUJKE2i4gUgIKJD0lAu4qRe0O1fNihYz0wJAUnY6XSnZ1k6S7oQ2sE4OcwnAO11VJCyocd4NP+qssVAT5tVUP5FCSdN0+0biW0eSZ7b3HuDYveXbjNWQW9UV5m7UuBAXWMXOSIM5tC4iL7nHb1GBphrrzEDLfZUcfvn58Oqnsr/NJE+8gNxr6qiXYV6QeqNrV9SgxLrn9dlH8Snr9GRSNA6kvSMlsptHz1nry3GWf2Xp0zsu0uhyRyx3xGJ3CsXW0GZJ798a3jIo58RsMRXAcXPfeDiMjWZE/xTkpC9OaHSxZAJ/hcmcKUqhRY/+T3Kmus2rzw21hpcSMtqasIEiIHd4y/4mu+oVQQAOZTno94tWsbh0lKSsZCVlRVLNJCCiNA4Hs4xDIwKDAix4cY4IQEDyAAeRdO4NAxKIQnEL2i8FqCOwm3UAGJqGsDsxmuuYdC4JKIEEoDmHY5dkuFJVSiRQxyEg3xlPLkO6UgwSOFaMNK29x2e/whHjX4UzMqw4/jSEGLoWf5qDJXDyPM7mv2kCSaq93PweGm1is/LDyNHrxXSd4NArEAAI49VAACqHw7Wrw+ufye07fjb9pfxJNr9PEztHKfxkMSXliTWQzA+0Z/SmutMUxaQodwyxF/C40d3QwB/YToBxRZ2bNmf3/KFu0EZ6BU+TKsKM3M5Vpz2rhb9Who98iY0hDSW0xcE6s2KvaFjR+r7apTJqQyzn9QgYsLHgDVvgrG9/ZT4/tcKhrMc92aI8LBF4PJQ6tK5F1mo9IBL43DkwibwJlv1PzpQyUyOtVmews1MOB4iiMzsDZgakKodVWRJJkDp+gY3JgShQgvWTmDkP5jbhayMRpJRkjF3m59ASnssjvgnXlaYbjrWmcIRHrGJoRhipAMN5KJEkhwK7++CRs4QQQCAZPQLGm+aakQBmPH/Y6pQuCyCD3zmu/GAguKsI01sVqGu0k04mDg8meovVl1gF6SnGBNoAszw5fCe/s0xz2Xv6Kjeqk1dJQIM+9hYBYfjlpf6ld/jxbF5GbZUQf62ktKIwZyPCdINZz+uB4e2kY1JQe80ovWDUZImHVARN0s0zr2r6O0CnVgJksTLu0QIOUwNpwKEa2xTP7FS01q96rWKfniByd2mtL8t7jTc4D6EKiuit3zKktyMotk8pbmL2kAe03XN+K8cx7PC2NPd6IyExlJqrJNQLQlxA08iqOQBEyoJDEIggWi1EgbKCwWCn3ekCoCgKURTtTpekwh6lrEpZSWnAB1q4gRokAITTIOD+j2odh6lc70G0QtLabGAxDEMu4D4ZE40us/mmpIuy0nf8hfWecGQXCHoZR5hmQkoxDAKqdaPgYW/3+hMRt/fSN+LkSRSQTwwxCqwfDW5dRxpXxIkzECrYY0b2r+K6DKgJK04k6H/27+XiA3J7Xe7c4Q/TtgUFmENza+69Uu8RyE3TLr+xXjihDAXNc/KuPl0w3RD9bsD0Iao0cKQ2316KTTZ4x67y6lZ1fLY4YFJ9b+iLzXt5/pyi0QLQuNhDfkPzp/5TelIxTBpnbXFbKmwc2sCEwTBCJviRgx+fKC7VlzAAvrg4IKTdCGpBaLvdrcqt4aDv3oWUDhSFEEXRBrXVpKqkLKtSzbmYSRdTmEUhYC1c/b1tIGpvi4privujDTcOOSz5qiUlS3ermb3uCQo2S0dtysmRRyonIWKBWBEAEQpkmrYJ1SzqU4+zLckmYcOU4mQY3mAZ7eBP6xu15ycLB0OJgQkTPDncffSR7Q+LXlj6oAKqBuWtS15dJgJZBA3UYMkikcSrWR9IcyWeAnT1G0Cs/yOsPVl+nMZMjrJpqhyNeIua2UBjmkyf1DYBqmPTOrq+XUmCvV3heUDoylbSvXeAqJYHRoER9P6rS2hFm+IoDQL0PQL+OJ5qdpLIyKVESWpzgYpZcYDght8tZl1Gp9vb3t4oy6GUJETkfUQARAGFKAqEDgHIqqqqshoOy2oIJtIGLxLMfA3Yb8UjfYWlG5vIwr9Me9ldXSi/Q97Pib6JWXJoS7MMJ4Ek6SiTiW2E49bDGkgGcAmj0LiGzVn3CQpeuq4DaFSC3T3H+iXj+W0XSZmAHubwEHEuLwEkp3qd9kzVlHcGoAkHgl7FTJbZrxiXpTiK7+Kr+Z6RJBrx9Uep+8RyZ3J4IrazuGCsK1+P2gacmZHz/N9ekMEcte3I0I1tOZDUEgmz5ytERAO5jwAHG1tuZI/EwQg+r2Ks/4Mcubod9m7ZfJEjwqRO2kh2VsTqD3ZJvlbwnyqtcOBDgKFW8thud4QoyuFgY/1mb3a+1WrrIOLkpQbTkXrOpd2RkqQsq7JUUUTVUlO1P9Cu7lBZNODw6w/wJRoHCUsTiXIHNnyAsRv9b3MjAPINTARqjyQBgYnGgeZ8jl2SH5IBdSDLsTwb9eznbdqsKTNEaFozBrgPgmbl6h6pQkINWq9PE+subQlR6A2bKrdg1bwCcrBqF2rZBVt+fdrkMCDGxxyset49gRvDmz+M3tF/BcN+DhC46njFaLog/Z6jkI3NHjY4bNukMs6VGNuYqPbB7ZmlRvofUu7Fammnoqtb1dmF1jTCWBxUkgCXN8t7voDDI8zOVAKAZ3L62dRd8q6CBLF6cpXaDCpFGPgrrN/aFyF68KtL5NZyBPXuOwKtEdUyU6T619+vxIS49jyLQnR7MzvbW5sb61tbG4UQ7U6vNzPX6XRFq+UgGAT9hqJAUXRarY46mm0w2DEnwYKLYJ4Y8wHUqNdkpKGPE7pxgpDGg4KRHWSqNL9YjHOsVd6TkWqs3o2pnSyRqB+zRtbpvlKxWjSpCHg1of4NcHlN3QiYngqBQOdmMRAlJ1OyHV9ryabueJDEJaCwBzxvk7fqPcWntbdi5Z3ES7p3MboDTCoGDoZ0v0T4ydxIYkk/Z/r72o9v68985JE1aGyPZiPN1LFHoEDGHbIf3S4fnGu1vsILRysJ798adTbQ3SJlvQKkIHvuvsk3ouBMkphhzEwstpLcRO5QlaBuLykmrL/0lm226R7ByMSDtUUFAEA7aUn9Qj0hJDqd3s72ltKnVSWHm+tbm+sIYmZuvtubbXe6RdHSW2GDcQzqqyEWLSGEQEHKtHDL1zmYsPMm9sMgRIasusOMbKXqGPIJ3RseuiUAWVVjyRdWjX/N7M6J9wfW16j7gwABCiFKSVYpkLkfH9RdW2QjisvICGVul2rM4TtPglICb0OkZTOzBKQdD/ZDNlDgyaceaEjvwQhGvbvEIDvbi6FQBpkwH+69Uh+Daq54UxNZgUlBinRxoL3j+VwOCHn26EOkvjZGbt3sW6hhm25/PdktqhZWTRvAA/NtAOlNzuON2sub5eZQdgshpuHGLonW+rJdpKcnZls428ImcUgl0daQNst0b93aqablkCCirZL2z3yKJl9PmA+cuBffSEkLdJZDfuYyZs5W7jEZnuZRX5pytp1yiexvo6sPHNQAAKa7PMlC7XZHCCGlPaG+ULb29tbG9taGEKLd6bbanW5vptXqFEXhhXMAAAR1yL0oCrWeVMMa4/M1UAMh40pFxj4uxEGovGwSfg0B0w2HQwAUY8iXtBHGHxvctHvBGOk0UwmaAKvmbaymmDY1lb3jKAL2qUbY8Xk1VXP4DRu+vqLn4zrxXuinqC+c54puG2lizfuJKYE2EhUi/1mz0mwX8Lf2+/qzNbWdl+h0/Syzmlmdn7LX1lp8MH3zAOelhE/Xy8VOpzONtaNbJb1zc9BeS7/vo0utx1faMw0Ax6CCT++UOcdDKWFrSohDEnyyPtxf8ymKjM88C+IjMonJu0ok0L+jh6wCBFCnxWIao9g6uBTXK8CsC0SbLvoAMjLyhJzuM8aPmyJQtpgOyG0a4rlfs8jqnpLrPmJRUwlAFEWr3RkO+oFxqHW/pEG/39/Z2dy4jYidzszs3Hy70ytaLRUIHTRiFAJBCg0+wKoBIBv3wzWF/aQkDIIm62TI/40qdBmo7dpB5uy3iEUfqXZpfEAIIAhoCASIrV1FIiQAkKY6QUb6AgiiDsEAJOgVHeBCSnBD1Vy6gRTjpbTZy1/X2X++Rg4QO8/rJsQJzNm2nFv49zWTauGbJ7sjb19Q4mcG+KnRGq75IDRPwmKZ4EL37gDuIMJA5evb3P6vUZnkjBN2k3/EWPRhaAZ4XW6SAIIedNyK58IOeTWubP3DRLhRy61SaU1q6droNzwIEeL1L4djrlfZbwRAHc7V9MekwMOUqZZZ2dheqEJ+gXeojap6jJH7yXp5brndnsbSUUmwMaSolzVtlySbtUsCbZd0a49DfxLRdkkf3r73G2IdReYt8IA/xJGtPgjN26BOdjhalnC8GaqQVL3mN0J+DUdivNtMVog3sw8M4lCv5V5NnTqbKmAfu0AoveULW63WsL+T7Q8NCgQQ9Le3drY3hRCd7ky322t3uq1OB9T3F0JIhzmsmcRCn5vyc3ZRiDmAa8jQ5U7unsonbb3ammn0eX2E63OgEYekz1WxrZyUbAcw9EBaCnsxziMFGtPILSwNEsS/Ay3nKGlahCmgNpFkIViS6fxv4RdG9U2gOIlDDu6uG87cFDEZOMOENTFIkB7eXAsnmpnq7ARSNBZRqgZnA2XXxdpvMHoDXd0AGTV4MriJYU5zJ+Rj5bJhY200X+VJFaMMA5AIdn/KLoYoAMDtgby6Vc21v3JLRwng8ma1D89ss3KDrQVOag1N9d8Na5PUMH920WiUD5PlGLET2XZR69x/3YTLQSf7JtTp9La3NtW9MA0KdWYqGvSAiEDQ39ka7GwDYqvdWl55AFEASEAUICQCgFQB0iwWjaV0IGko/ZF0qLWwYdFXqmRVmtUbE3wd9pHTysL+m/qnR/fiyKacxxHEYzQrUHG1VXhlcigUJ2u4qEnBw3SlHFxQ8kGUj6KbIzR9eOn7R73+SHSOlVMxm1HiVwNqmNirLws2RhCD8gyLNW1VJnWuEAvVeYfqWnlDpjGcyNTHd8PuttwP1oYn54t5zMHL+5GIBhI+ur1flovWUCRrcgOJ3x9hJsSPY/FitsUSRo9qucSLgJ4A4cDcNIk188bfzwyn0QbpfiBrBjrdSQAIrVYHBZIET3IStdrtqiy7vRlZVeVwaPdqgPnkRBJBCFEAAJHaCksmAhiqwPEJt2QozLngiYUQcUTImcB2eVVWQxWLXZtQY8mIJIDk7QG1dSQ3LT0FQkCAgrACknF7koqvpqwcxa3HeEj6L55qZ01xlM1pHsRrhJNX+cEUqfYM6siVgHESTP5M9qQFg/n25Outl4qTbRY1Lhu/vHRNDXagjBCbuvQRoi752GEc57KEFBPtgrRkmkaJV7aqq5tVb3ESJ8dyV/RnGy0AWeyIopmwKgAXOniiWbFHZybZYyMBrm1Wlzf32XJRgMgydb+TrJaCI7yXfRnWyJmnf6l9m+jW0CfKi5ddoTZWR3gqjG8+KSmI9vPUSZ7Y+NYzBoQAKES73etvb7nA4kIIxKIoVo6uVlW5tblhDmEjBJDSSZ3uzKwQQkppRB8i6kkYBsMc6jA3Mloh/Vm4bjG/lbwiKsthWVrfxrhoo44FOGOpU9xAz6pNCi4j8Yp23gahABD6DIj81HbWpAzgQpzNs2pd7zMF3GDKOvncj6CSV0eSaqbsKfkzkYjs2ySx6RimO/J+iO7W53XVj+Wl4FXkIEhNgaiepxAFj+jVvCWpp0HpEWdNyPzKtmuwPrI5UdAs+28q9PaXg9WZYrEz9kqOrx+b/uGw3RY+sdKZyhmwaSLaKemtG4O9Kn8isk695G2L1MP74MRakCRt3sSlhxE4dAF8SiVhOaEbK7Vgusb40JAlDMpEKiDHwQMcoKJZmg9JgEgEAqE3M7uzvYmIJKnVbktZHVl94OFHH19cXiEpt7Y2b6/dXLt548a1q2U5RBRFu6OijnY7XRfay2I77TkCiLQYuk/oYEQcOBrSBqZDGyrix6Asq6o0JY+NNqLyATDkBms2SZhObNmEWwABAARggVTm336Cwr1rb5wmFLwdKwmFRsZwwJQFbTfZjFaXyaITPxMp7H+cx4u8TMSTRXk90OWME7dLtqbpzLjg1Y3WbUlskWonQMwZrha0dttY6jT2YNm9YxF/8QWhmM7dCF+F7mC/fpiWC4KTcdlOEW0AwI0d+cn68OkjnfZXINR5RfDxenlte5+5NyzLs9VfYYRIlpaJToyHmRrkbFVgvXkCVl7YIloQjQo/daI0iz7IndKZKoPcOW2JSvhOjwNEdkE3EYEEFKhDTVG305uZnevvbBftNgA9cv6JRx57QisRLBYWlxaXl0+ffWRne+vWzS8vff7JxvptSVW70y1abSf342PnESJRbc1cJugdlHWhoCMIydGGJILhcCD1Im97Sumk/WLdFpbHMEyRXcs3DtVEjCsQBCjIF4ltnRkSgGgS4phmssIyRscY3vY64JG44TGWhyKaUghMoipq+oPr+rE6LMYWCVnivUUuhGhccAqR2/+FkIJtI4qal2zzmOQPQMtg5PwjZsmrddOAs0omJo4xzHnLQcN2MV7e/nL44FxrdWY6MTn2LRHR+kC+dX0fujecsyB6aIeWsYEsHraBFiAYJ1wthcQSIvoD11bgQpsneSovj8ZgQl28D58gpxL2N/FIo0rFqihdCECI8wvLQhSbG7eff+mbxx88KYTQ6RVCkQQAvZnZB0/NHjtxcmd7a+3ml9evXUWBJM38hikaINU/aP6T6zr+wYIZKzOBopospRwOS3U5jfgIeVKNRQRAmQyiMTUiBAwdzmZRo+2YlNJIldW4xkTsO6vw0j2a6YS6qH+mPjJBxBu8RyRm0heUepopwV2nWTPjv/LQzVjfP5meCT2Oz0cHj7GKOr9GYzykEiQ25SfFZrQhNlEeeC8HHjdgwMA25bTGFF8/5MrcpVDYqejdm4OXj3dnWvft6SpENKjgD18OtieJmHiXyeOWmpBdntOygV3CwUs+Mfm7VCJLAUzA0XS7RrajNoHWsAeUCx0eRNB7fCWimF9Y6s3MfXHx0s729tEHjs3NzRetFgGY40RUFiiEmJufn52b39zYHAwGNoApS1JLTjnVO7SI+3H1NApCVVXDcqgQyJ6hjaxwHc+qHl2k91xo50rdKg7XlFQJY7WB2M1G77W7bh6W/Xa7q2vOWAj+rwxeCO/muzXUb5mDVpjDNt+Y8TVjfXoCWQU2ZYJFxquzMeYQ6a5A3vVp0UnhlWOKBhy+p0ThQXpToA9vlydmi4cX293iwEr7GiIqJVzcKP+4tp9ibyiaVmePWU6EiR0VQrS8DXlshah1stsojuDWI5La3klALvyB9lcj8NLUfFES3CICgHO1qbAcNjjHSG16TwihKIQ51hWNOtd/VYe1Wq2iKLY2t65cvrx++1a/30eEoiiEELyccjj8+MM/rq/dFkL4n4ZM6CeNQoois9AbEUgfdG/XqqL5E5BZtAFlVZbDEuzyVP69al88/Q9gRORDwwNmyx0VAhvtAI1fQbNSor1GTiIQSCIJSIiCLbAzX8mCLwbGHQMaw9X5pfiLYDgHz90YCMiZPKjY1q4/GfFHCIDC6aYamVxVg3Z7Rkc2C3ogcRHey3gfJkFm/tOMd2Rk3oDG5AkCudO/TVIigjAsZUC1ZU4AMCtkwjte1XoskOEN5BWp9AIM0FPl22RoucMYDuhYjjUg5f8wskOX6rMeMuaBAqBAFQaI0FS6K5ua7IugBKwACJEiLt692X5jW670xHznPpxYkQDXtqpfftEf7rvQGzZIHXPMq3WTbEWnSghgNkjqKJPGhFIP3BpMBFLCCnmhM7OzVo4ateKMkK2tLY0h9JTKpMQZ0YhLCj3MdQIt/2w/z7aQPkYF3btqXwGoDT9SEmJRFLNzc1Ulr1+9evPG9Var3ZuZWV5ZmV9YaHe667dvffTHC5sbG4tLR5SCc7MpGW+vY4Gx22uma4iGZVlVFdOUd3P8+3s+m5mSaQoyovfTAOE69oL40bg9wa12jJ6k9H/021ZtRisRQd0iFSmrjY0bve6CKGyM4JqW5R+7UHy8FcJfLUTJj6R5KUUZ3EHBcccMp6U73fZozRes5HAw2CI5plnJMeI41Gi/666pZkAENQSQaEpVhyVOSwpvV/TmjcFcWxzp3VeYg4jW+/KNa4OtzBEt+57cAPfgB+S/PdY9tORLFvezBXxU14hnltWoDb/SoOVcUsXzJvZp6uSxRDP3I1nBGwllh0IQAItWgYhSys3NzZtffimravnI8heXPmu12nPzS6w044LIE7KiVa50HxsryWxJVetMaDAYuBru9rAnZUUSoNSxmfeoBhCEqELvN8StVHM1Bu3yjbJQ0ycpq63ttfo2UHTHeg31amHDpLzN3c4siuzhShOTlNVguAnGxWMWETFsY51tCgQRkWsvc02Zd+MJkhR6ppJ30xkyYN8+9T+S7+9KUaDGJ2BH3oy9j5c4jT1kabqxLd+5OXh+tbN4v/g5iGhzSG/fHO67nSkexSwbPK3LGdzwpi90kiaf0n3vlisa9VHyEV5wbcX0cistMdxPkx6AyRZjUqH3NCppnxNZiUlKSNoViTwuhgoQSgCozwrX/dbrdQFwa3N75cgxXZ5ZywnmH5kLsIAmWsEDkOgrCo5XYmhDkhwOhixq/t0b8E6xIQApwKEauxeYgxCEQBIEMjBmEWp9B14po54lE2CYKpkgXvO7owAAIABJREFU+mh2jijwmEx9JGCEaTzHPgKgiGc+x/tGxL+3KUEUCCLbc7Uuh/h2NsZnALVCA2fEe9gE6fLrczugn28ea1v8lO0JyL4ZamHCjLWm1mZtq3U4c6Q9YLmAPlgrWwKfO9qZbx/4BaTqzJR3bg7e2zfH0AfkeCrtbYiHCjFe89IkoEBE2ry2TzMgp0Wg5wciTtZbpJTWNKWxYqwaITdenWHPk4GxvpGLfGWAs2gcgQbdC6E7DVJfEJlwIQCQpMJqW7Fu+svdQBXvC8Au2mDYJeXcMI5oVo7HAiO7R7myy6oqywruBdpQxA1BCSDNbml7HFfDBtUYlLokBAQSBMqDIjV3BpRzaNS2orFxSZnCPK3kPdh17JM8Bca9h1fDNgoh/HOMJ2hUIK9UuYiIgqgC9u4IbpCgxRwphe3xbPbrh/jCZfaLGzEpOZbAYcBw5ISLaf6oCsi+foR5dAwC/cwUNJ19X8T+7SlduDlcaOP55U63OJhBmBQRDSV8ul7+4ct9jDbQmLPxffB4McVCeUZAniD1BbXMpWSKlidatBKImDgvfUL5hHXpw4CloDXtAeM8HVDYnKUJZjUHSUChUAEikgUmplNIWRMA7hA+g/BMkWahqDfpjbxSrxFADEbo++z/AIDD4bCSFck93vvajJQtJfVSBXO3ucgcnYwAUCAUCCXo/jIvzVRWaqj5XVjTtnQjcFSCTGr+SfZW2mueS1WiFjUXRcsuPTY5kPksbV/4T8GJN1te8JQ6vf5gM/t+E4QkTyavib+RxCvmbcL6rY0QNDBVPmfkWjyRe0FbQN0wQGc+mnMi0Ms8ITE8PkrD0O5rU/S764OOwIcW2wcUcxDRUMJnd8rfXuvf67bkSasZpgo8Ivs3FD4R0E0W7fM6S+N/UI781W+1hiMbvwu1TgPm1jdPjLPCaVUzKePVEL8P+Xdig4/2xt8+JSrLSkoqCiGEQKPU9DZMKUGtH1A2vF33jhZnoMcCLowA2X6zd6Kayc+VkG88ExENhwMpJbjDz+9+pxq5qH4jEaGMVxbvksj7LQCE+gz6LBrbDjb+kj2xS+hjsyfY19oF6e2zgWCYNvTQmNUqDYfDTE29mYV2q53tAfRzjkzjU6vVHg53JFUA9e/W4L0pvKrh6fTTvOofgVdqSuZKOUpmNjclCm/SfotHkCWeYjwBcqu574Z8KCX86mp/KOnhpfbcQQvOoWZSPl0vf3ttP25LYWSBhFM2TAuMtJqyzMoyU4gvTCEpYK8ZtmULSmXLiEZ3DLi13cEMh0DkGKcGsed+jZ5iPRjMh1KSpAqgagkhWoUAJL3+RW860ge9AiEJizOQvCklY3LqCz2/BOS2TdpHwFLa/2SFMwEgkRzYRRtw7zrWr1bhDDth7KQnNl1eka7Cy6uHQT56zAjaLdh1lZoWZPUeoW2rBdl7eoihKTpoTrvT6/Vm9xSPzs4tbdy5mRBFVp0GqMviQgWXNedkTJFAUvr+DJ696detZZ7xOCtum3qpiT60XximZgwnKZIAzM7yqVoCGSol/PrqYH1AzxztLHTgoKwhVatE37k52LczKTGN8S2dFRLcSRRTEznPJmej0Gl9syjdWuHsYRqGZEp3gsMb0mGzglkVY3mxzcEAMJ2BtMdEAABlJUFWhVD+DgFC7eM3a2IIAaWBGuAJV/CglsEZAA5uWF3F4ykamUwul5UYlmQlB+XwLi3aqPtQQb1k41go7iLt/9kFofcbTS0iwOIxUQPZGqDkkW2IR2XcyOCpgxgMo++uT+IhV38fUczOLPrafvrU6cx0ujP9/lYMCMai0WjDp0YuEKxN7Tqwds4k9ShRtanCRxsIYOe7uDx1j0U0WKY1qo3AJ0JsyPJToQu3hiXRM0c6y11R4P62NokkwHpfvn1zuG9XiY4gzusjFxPtVhpkxiFCSyEA4v6WYNua9lkQ6b0mfCcLBCHCmJLkxShIIVxTrIdERyaRiCqejb47Okxk7vnUB0q9uAIAwqqSVVUJRCGEKAohEEAoFKWgFJlT57W5hkbiWv8GmF0pDnWY7X+JVyKTJWEjlWVVlqVOlUQbI99o3Ec1CXzfA5qFREMdBEbNwHnTHgSRG8g22ReE2iRzKVDoIGhQEBQEpdobm4Zcql91iWbZMmuMrd6FbAL3yZCVE0AOdJDKT5l4Bx6IzAy36XCwMqBN85FIghrBZN6KAAA6nV6vtwBYVJW/tS+jqMlaxClDKJnJ3pzpLQrR2tm+o6QNoZ7jCQxcj23dQVNmz7jR1loYBQ4MYDYPetzjvH1WLAXsBKkgKHZ9B7GPj256HF00uUy4OOCtC3FuJiQioGFvIhCgjkFGBJCGUWxEsdELUTNEOmQjEkAFUJm1fgoB6/130atMlz5YK9d25IsPdE/MFW2xT5d0EFEp4fp29ca1wf7eAavJYQqiwMwzrAx8bDB5ZLS1VcRmuABop4BST5YZfBZJ3gSFGtQ4ddvuE4MtmdPd82plO1lGMaYvqrwb+5LhmhFKAllVUFVCYFG0ikKA2g1IoJaYoz7MHt2RdpYs0mC/+WOVRj00fzUocUkQh8NhWVXgTs3bv/3Jta67rjdI86UQv1BhcBU7NpHGe9dJNbDYByrTNygD5ed4BwCwaLVnZ5eEaBsRr1Y0m3UB4QIBbkcAQbx8wC7KsXvDMfEURbc73+3MVXK4vXW7LIfgYwvduF28b0yYejxZFZN/o0Y5OUQ1sgDNjb2hpLa4y3RjR/7b5Z2XjnceWtiPy0jVOSkXN8rfXO0frOheYVsdcJ56JaHBUEOt+DFqc4t8n0VUkWd1kj46lkMSbwTFUoyVRZh4epA+riUEAClBymFZYlEIIQohBBCZMPBquQda09sQkfujpA15HUkB3LD7aU0KxLIqFdowDdlfQ5cTaT9ZvKglpEDvZV+JIw4CABQIgkj6sLiuRbvuLh/0cKoTongXOF3jU3djfn6l11vwQm+ZEc+TcfgR/M0+tUIo9dRS0Wqt3bwCwBFBwtwh8KK4eyqYezIgz0U1XU+Z35lPgjVcQi5B0NT6auMmGiFqHSL6FTOl7YJ3nOPG6Q1ij+4abVf0b5f7V5aqZ452VrpC5Nw+d5mIKoL1gfzDl4P9eE5KDXGUTfY4EjN0En5xZ52EdmBcaOYm+nct/xvW0s/ZabHRGIlFgHb0xUzu3sp/B1MZsajW/jIOPaymIO/3FyERlGUFKBGhEIUohNBnMdjAJ/F395Z18B8MZ7A9KlaNoDkhxdqh+7s7CUDq7+71g7WRd1k8og7FMVqd62GGnrRN55nQe537EncDEzoh4jV9OOwvLh4VojDJGBxAw0TuTuZp3FH1Tw1JWW1sfGnQApNzaQTAFCNwkOGR+zboUub1tJOxXG6lZayuP+GFCrLbgm296ThqFN6APJci6UAtyCyQKRIlmkM17dk7+vB2eWmjeuZo+7Gl9mwbBNQD9b0kIgmwU9LH6+Vb1w/EGbAB2WVheiSQjb2Z/7AJBe5iOnBhle8NDEdwDKVb7qedvk6qQns8lvWAmBKZla2b7QAF+vVSunCw60bvN0KFEEpZQglCCH2EG6LzbocT2G5frLVxSHq7V8hIP2tolmU5LCst7BHCL7//iFT4L7CnbE3S3JCb9XoiLTAFoEhGlMkUlX4yHiiINXuqIucEADv0pkvsdYyfwa9ia/P21uZtncJ8gvS8Drp4ui4kB+hWow1ikV5QxAKWG9bmdg+TZpkAIfYNzLc1FVvE4Hcgax+5V6vR52BK9xuQK98WHd6o+YR1/BOEBIuTYhRNerpk9JJXyb0SHjsVvX5t8Ol6+exq5+Rcq1OobVx3Ty8oCTuQcG2zeuvGwVixkSUnZCw1kbRJRgxhvl9QsO7NqwL9n60gs0ET5CUjr/Vh/C5mUnj6wwfvxgkSR/+670nLFCmllBL12lIhUGS2xlkPhr0m0Cdg8JkVVSZVVSWlhD08aH76ZKZUDMvEEhzT93NDJuQqIkQQesYmhaN9nbwn/IjefwwYQfa41uKYHlEDjZhbReJiSNTq7PhxaN9Eb8q6JwJEXqLs/lEDKVIVpyCIa5VBOMKgpahZdc1xb4usLiPzKPHuGTDHWpW7g+DcGyGONL8mZiFuBWfoHgiTGzvyXy7unJgtHl9pn5grZgq4C5MsRCQJtku6vFl9dHt4efMgQ40kJB7ZgYgj5IQqJ2VWuL8Rowdyr2WHLfNhRK1gZ6goE80F+OI1JtqhjBrSUiMsm7eLvGUce6UE7iEZxUNUVVVVqakWjTysULVdwoQYAEm7e8UaigSyLKWslL/Pxhk7KIQEFAbOQY9lQ6nd4OU4pke1th+hso+agPsUOJkSeUEg0NdWe045ha4b4VkMuQK4NdGkcIBYRQdQD6PErJ94BNDIXON1euLJK8++XlIONtWnIzbEQtgDTaxK159Rdp7V/ssl2D2RDvm4v+jKVnVlq1rsiEeXWo8stufbUAiYvsODSAJUErZK+mR9+OHtcq2/r+N5jSSmQZxmj1IlLTn/WSAMol4P+TqVgN9W6f3j6SOB4+v/WB6T8cWp0E36JCq3IyM92thNU2TKLLhfScsYIij1rhZN5lh1cF1EYGZUNN5Q9yu1PtTtPD5YaEOvEnaXDT59E4HPyiH0ZpeyxadA9i4oamU0jpPP7g25GQf/pmel1GrEmOpwCSvTW6mTwgpe7TlnBmtfwELjwLhMWyPXyOjsfNSO0QAPi5L9LnbWNdGc6VCte2NfGHzrA/n764M/fDk4Odc6t9R6cK7VbY3O1ZwGEi5vlu/fGl7ZqsqDjTQCSm0mg4Z8nPCPxK7AXKH1zM9Oi+Wpg8XqDvWQCzOqLHJk2dVdz2jiBXPAYnwmXB5nt7Hcl+QEuZRSVhIECkSBiEIg6hUtuj+k6j0iIlnJSkop2Xb8cTttfyA7ApREEkCg2YkwbsNipeU9pQKhICj53E2iCKcfvYUCTWpnFnoC7KerNI4sRHSbSKdJzqSwMqLGoV/vRMr3BWnL2/dABGjDXNR3bHJxOn+e3MACYHbpBtm4XLQfIvUtDNakhINEl+9J2QCeea+vTYO48XXcZMPx8JYGmYX+kf6Cux/KpM3CROt2V/A0qZTw2Z3ysztlS8CxmeLBueLEXLHSLTrFJI0cVrTWl19slsqJcj/hDK0zTMQau4whHKWOSIeSYTYbKwsYd/JrPSwM03IR6ufWv91A0Wep2LJQQwoNCGw8B8/UsMXzhvueGCfmvJFkWhsNL9K1mR2jI4VwVobuo3HSgKwLiUCSBJIIICsgYF4PQUCVlLKqpHTC0S0mm0BhZWfsazRMjdKapM9JhRuy8+gKcTaB0CmkjUDBPikEUhGTrDlNJi6KOtjXLFm18DdlnPJLq5WC1+UAHFiBLDtfE+iGuLqatiXJYT0gkjqhuC6D1wZ/WyzaJnJ5Q/Ypezu/qwymAiaH7Ot77UTbPU62uGTa9EGIPk1cPqsdwPlv1KdFYpzD5BCZF+Dqn5dANtpWzOY+4glkIy8wJitVA6a3RaLuwySopcSvsQkloDThDGzt0+bHaVIp4fJmpRZYtATMt8XRrpjriKWuWGgjAMy3xXzH7aTeHMo7AwkAm0Na68vNobzZl+sDeT+BDEPOAOLMoR0dyC41Z/nfGYOcwM0hHp8wHodos6fb5FIBUI1/Kua9ALWMmtccn3n3M6/vMTGUKQEQ1ApT609SITR16Ir7yA8UKYs6avLaIRhAEHqHBfLqTBTXUOLXV5EdVeCNrfriAst4usTQhroO7ZapEPpCLdEI1oJc7Q4P5J6O06Bxd1MHYCCNJUAnoiTi8YQ4o7AlY2NKJ+gZypu6bEwWeIAkcClhrS8P+pKLvaEIwu6yiGmQKtCCQTcAnbgIQU8N/oiKjq1A94zbO5nS7x+VOhYpZcQUlySSRFIPKkTcO11194kQ9UFuRitl363BS2NK7COiMGYsX5FcVw4kFFGkRGquUjfuEdW0oylqrTPQM3f8Z1lAERURyYyEH5U/qyGG6rJypSb0IvNnkFcXMUcXIAByvIFeqmbkJ43xTKqfpkOq5pFnSBzSgaXsjmrrXRujHIB6pq57xgaGqEmUjGlj8XoTFeA1BKNnGCTdA//yQSWDPPR/8YAtCh1F1qknEaS7FybglwBWRuaLpZDfBIBAUJUEGtFn71SUKA9tRNDY4+ARWiuB1XFv7FZXhTXAaz2RNZ2ZxA32Zg078kUBlH3k6Xv/U/A7Wf8BT8D9OJRMHV3pz53tnXh5itc6i2hIs2TACsbP7Hawh+XXCnFUzrm9tLxobK/QIe1nMgC14cQ0z5ZmRc3XSXSSRvHZzU4O+icBRxJRpOwRby0TGhkaiqaw6NjjzIX5IebwaO8snHtOCGoWObkrz0AHwvR27URhuToiVsUITjugEgDh2EqOUHKiGaashIltqqhb9D09ImKvliDMDTgHV+pxURwyyxQ82hWHpoD0w2a+vABDWD8Zet+i0RCK0GpYfiQZ6z0ZPn+lnyeDpbk/2uKgqUMDYv8O6f4gLm1CGwlC1ZsgN1IyqttX7ClBSLnMljjgQEiNOL+VZLQABMI1ZcTFVitLhsmHh0Pgq0GajVAC+HOwaXZND5YkmnDFqyQk9NHeZvEjovWSp2xYD5mkLPXQxk/ja8qMIPKK3RNeD1uSfJ84Xb6g9MhOA4LAv5CYb6gx6muKS9g7DIvnYXkIaIxXBZN8k0iZtuWC+Rr+QTFGrckXGEGEo5u4G3LewLwX6JAOFHnj1TrdmjLeCP+Ht5ErlTZyAccJyAIO9G/HMjRIwG+PqDz7zOU1d2yYiUO670l/ahV0yIO04zt0aq1EEMCW2RqQQOQ01miOY2ovrWSbyOygCY0qnpys8KmrJI/uvCJG1RWIi4QSrqk+8ivUOEiJQ88aP0ONDZYsNH3Dz8Mxjf9qiRdlcKw2iGo94CENp5MuqHzGJnSINu5HiplirIn4LC9EwiTpnQ3v2MQcPNSt4WjSKj91NETT2TNsTTBCPh7SfUdSf/bJ5WfEMBioPkQQ/saeGNhm0X2eMk8bDIGRRe+CQr9iM49/nhoMx7Q6HF36bvpgpDrPrcBIpailCMpwvEiWccPPnvTfRi3IN2oi3huPCIAo7xo6pANMCa9efDuXLeFMHJUda577uVvqJ7Fz4cDcMiCcWCwO8lqmoh+4KzBb3vWhHmglAvlA3dTmVqSQKR4JVDSOXDc1GpIpmkz41gT8GA+TNahr7NKorri6inIO6LuH9wxzIxGVCIgogHINqDHFI/c18RsIJAgKdQCZfuI42zXDGdlEiH6/+tDEj4jn5gBtQcgOWYwjVCDCnm01su4bNa4khevH+PmvunkJq8YblMCiBdtLDepM9JLgE3iXXIYx+0jvY015FxCs88lvv937aiXAiIBmLMCITcjekPR5CuHHQLPz3Oyd9trn3peY1Eo1RJ/WEBZPoFaBE8VA20ZIM/8M+2BYRBNC8irQcRUQyCycio74PgQfB5Xs2CeyPGpHixlKFqVb+Wd3I4SHG3g+DOZ0tGF0DKvUOuoC4w8Bg3XQqpkuTFEC26iTIxnICCmNDzLNiUwyYFM6rETzb1cjgvL/Jitt/IomaP+ILNOr6K6Sg40EUOlzVYwejBtf/4nib8hwgAr/xVSg+xUsqTTc7zgzVorEEQ1BA4zGlaTZboQYN3mKZIctpTbfJNsHQUdEECFdSe07eAOZRxtFK7wSeEclwOBO0A6DGGJh4QogPwt/GoU5YmXGrfHhY0QEyaqwrnc0nkkUBaZ7hLH34pY2IRu2KWIBzXtyNGsc0sEhF3Y3xYxObHn3mV1Ayfsps5rQY+4aY5D9Ntcix3G7kYbutSPzMyCHw/zG7Z0sPqR9QZmNKXtVG99h2MwzlYDa4aP0Zar66GLvPUk6xmD2+e41Tb02nbAqKzAi8ypbmruRBgvJOrLljWwsBhyUranG6hvN6y7RFCBBXNnhhtj7murwQgSj6woJLA/ft+GXmmCyVGKRfWIzOd5n/pYEHgoxDX+WIl88OGhyuIzjK0Jk/0NmMYfm66lygLUXha1h9JxGjIQTCRLkHBd1nr295fCk+R6TsTtijVsTEQtYhqRdUOPyxCBFoxYm648EDgaPE3AxXVggtDCbnXtfamiUhdWIUIfe2VVJvt/FfQM7BnbVxEPaT2TcgRwWJIY2F7nJ+8lirX9CDY60hyQCBOFgNz+DSKPJSoPhXWsgQJQ8dzPh+LGeEVJrQ0zew7FxnxMBmliqUxaEGiCjCv+VmiPJjDZKPql3I7Ja0458r6g9RB2k/2XkyGjLpkbZq7+eyUHA9Fs9XqFE9qiKfAsa9pmasEim9nwTtcWlPj56lxQ89crPrkcaLc+Q/fPKHJ+CrGqGhRp35CEdDLIDLnHQM0QIU4+vFLDGZIZ8nWH+zC13pQ8jTPhKvPhdYWNZKZ4DJKo07QAd4dY5nFL5ChAqc4tIoQ3Sk8q+VaqYb7fcQABQaF43eDZO4TXMG3mJpuuH+U0SydxuacIewg3TiaMdCPWNID8qTqS68pCkybREXEJkgdRvKB3l/0gQ8QT13ZP/tLoBRuLFMq4OMDG0Ue8/wlhSjhsZNPoQZNwv8hBw3G+EaVtKEWdll8oqdnfJGZcPxNqRUDdQ42aJ5ABNS5nIP5mAKU7Ukt/wUF5FoMov9DDg6H1NzLWnmcgeruZoer4OJBJ6vZJdJ+rL82Y6kl8EIzeTNlqMFR6pvjdkwULaAZl42yY9r7K6OQdfIAT2vqeyPQvDt1lGuUhzfRVKGPtbtZJ5S9Pl88I9xy/6l7GAa8SXtZ+4tgR3pMHY5TYhZbweStf7hhyfOAOBr5i2w8N3z7GnKU+BSuA8J37OupZQaljZXLk4HJH8CevhB24HVcb3kmOHzLMYyh+ija8AWa2PSABRyFEzZKbECgJAmN2OAFm9m2iBpTB55KeLJwruLh+b2tSAGiEjcr6b0REsRlPahTBJ5yTAXBMXSlR+Eibk3L6pO06GYuqx38S6p36J+a/QpIixidy/6cH5Q9oPlD6DwPdgsJs8Y3NOUzwb4InAYZJsmn2QPR4oGZM4cyPbtLGe+vUdQo77miiQ5naqYU/koNKjwoZ34JMbibZF95JOvAzVM25jbbkLaljBqBE24vnEAzTp0kgJyglkCCtvZPN3+f7jUqPi8pjWum7uVlMO6aAQA9OZL1sPjZswBKuBuXbD/FnHgquhhQCEYQgdvcCOSJ1TymOGGPPQRpFBO1Njn3K3pNcX4byKKkkfqujVAEBSojAOGPdq5AcqmRJNVtp+aMPdKW2v6rKOPpQgKpKFCgRmGZRjaZykIhWXDgEQSRAIAqlCYaTWFCIod4s+MMgpwsiXEbTeXiNTCq4CAgBC1If+EgWunAkpkDKq8Xrc+kc6o5cLkz2JzOUI5Maj/QJ25Af4AL0GAD+UzvWP+QpMxLGYWuTKsrM1NugW8oLsNQ/AxboA+WMrNqw8ROMgoagEv1t184ykiWFi4IW1vWcbEPKGu0LA/IwxgvC3cCcaF7ifaXScXhWJjsxZiRAF/Dqkg0xuFTAaXeyCC3qLF9RybZVA3zR864k6o9bBcqoaLgjIp75Jl8+0s6vLlkastprj6Y3zLfPEtMGVX2eUJCS2bUs6fWpEHi7suN8IOa9SHcvB7gwzAj2rUl+WVUC1mL22XWakRXdHmSHTIspemJYApk+Irc1n0uQ9Q6kDRCI7ZqRu9PODJ7pGH1DCH9dWNdlHcPO/EYM04RQHgDL8xUpLN3CSZh8Kza8UOe7KsGQoIKjmsX+nblRFFozzC/AsdYCDZYZ6ZzAmfjFXCsNE7E7ga2G9lJdpAHfXdj+kvSM/GAaht4xDsQwDp7vYuWRXUOlDVQK+G7u01M+RWSwinzL7jsTlYQJKZ1IULZj0SmGQKeEgcb+SDqEcnNmb0VwPNppGEBk7xRQI6x0Wu2iDBfR7M295SPeQKDPqcoZFkgOar5cbj0N5saKuAS5xdut4qolk9IOVbailfoi88lqk1tQ9pINOLigGu6f3x5rw/lORij6kMae4sXDRaOoeZ7xFlMyZkgB7yNSeZyZdTzDFkCwBALiT3vsxpr8nnTznPPJslREOjATx7TNJysxwhCXAKOEz8hOOSJAv3awxSrk3iN31v3SzcXIoUO9LctMmxG/FPKHlLRd6o0pNUJQ9I2fyRQvOxBYcuPbXRc/xfJ3p6hzcSJFfOIYPD6dQ7meKfecEULlRUY/Sx64IARChQBBgj8TSpQenCo4qDXWzxxhrueiVk1PNkOYwP5OvmTqvMQZqG5PewMaSjjjiNYdI+K1aQNCw/Fz2oCqMWlMfUmzCeGuGRYX1wMW+KbROCsSxAbJTOYdS9b6i8LSdej4jT32H2cwMSP0kA0BSnDXhq2BKJS9s3IGxviYwTgu06YLiKJYfXiMpLJUl4zNAh+DjfiVmlUsb/ss+3L2jg/R0ovJwCGtBxue5jKzLDsqYGbOw2jx2vpWpkWfVmCkbYGecjvK8hE0MXiEQB3zR2QQNbXQ0qQngkbLR0CWZDJBq74HvaOUIN4OH3OvXel84qqxDhPkCFBM5Fq2jkXamS0imUYcy9H6jlNPScHKakUfwTQ1328dsqNS2KkEiaoQbNGgQA7LbPvD3FsND+BuZvVBzfIVqQBRNKHcezGGk8/uNyPjV0Jyo0kAzNS/blkAKcyTLbFyHdQVO0rC7IfBrdkDkYIhvptj9G5nsqRLSxaX6Z0QEz4woydWQ9pHGZleT9apxgpw3wPfg5N8nLcDSWbg9F+4ZrGvnaJYiUKFuwHuhQyl64MmO5hozRrFqiM5z0o/8O6H/I/T6BXnCi9QdMconMpKfa0FOYK1gShgZvJEoMuhIM7t/SPcDhYyj+CVjhO3qsxsfNZDw1W569AF7bFOMcGDUkZ87xPeTFVhzn6JEd1nNpD1AEAz5+Gf2Zsrvm30VilfGx6U3BEwBsU+YMrScwGtE+1A+AAAgAElEQVRKvnHGMUfIbiPbPLoWJKiHe4d08KixmyuVrwEz+NB6JLrQhdcIS3NabNrsG1NQhYLB3bfDyXOUIICJ5wHBpgUrWA5nUu5zctrBBXuZnisgNoAx6yMbQxkHlkDTIqb4YuMUH+iwEU7ThH82rGaXL5G073cNwnaNpZoI4TErCTmtqZyvr7puz3WOKPp7SPcRRQyRvJr2hx9RXupxy/ggEBCRuMwy0p9IBxTSIcC4w0LPqxCCjTniuWP1TS/QDBqsDWDwRr6HJJGwJavJnQPt5DjET5oI9Mc3dqE2jIshlQL1WgEV81yHn5us7wzUVUsbCqQewQ4QEApzX/KmREuwdGMN55G3rihI499265pUvC+VE+PiJyCKAIQaaCQlb4SFEOq0cxUSDJNFmXMTbC8HWM0GAyTbqSwlIiAKAJKS7FNiqQSYEILqpjFCuKwA0CG5eMQtsBhR1S8d09jXNn2BRNLm0jEC0dUVtp8X4ncIsNvEXt/KR/8R6RnjEPGxeCcmA7kOMG9NCACCSIAskBCAMOSsEFD4BRMmX8a5uiSgBKgAJFq8fSiIDjYpHiYiM2T08AQE5UfQj5gA1NlsRC8tkPRTM+vIYu/ZMWyZyowEcoLSuRCIpSHPW2DjdabjcNS7FB2vZywqrhgC8T0mVuCZD4Pj3c/kWInIO81y5Oma9eQwhMELgCBqFhQ1bGyTNHsMLhOlj64w6VxokCOXqHk3+nuDMo3KnCnftN503iZtHMEQI4qIIVwyRbYUjaumI+LC2pm4PpSgXwXi6LNZ2vBGzCcBcE4U4MmJfOUt9dhaPaj5kvh1TL4VpFETucTkt8T5McjOoSRL5k4SDKox183k+PLK8sryclGIjc2tK19caZKlhs6cOTUclleuXB0r17PPPfONl17c2Nj8f/7L342VcWFhIbhTVdXW1tZYhUzW5ntMZP84arBiv65Azm/KFhCIWNUr0gQtLiy48gBI0s7OTlmWtpXJsnCsOnZBtUcejmqCQ3VjdjUBALRaxdzsHJHc2NhM1mqLD3eIQEIIWNnhN1qb5WfPnh4Oyy+ujBrRxMriATZ8mUhBLfVv37Rvcr3N3x3JiV3twjCyfvo4VcnUlZXl5ZUjRavY2dm5euVafzCYekUHkVZWlo+srLRaxfbd7ZazZ04Ph8MvdiefyXE6MUavoezzyHPnJefiMnTsJrnWd/XZX62wMUkQ4LybfqJQaJtDWbQ33A3tVGa/ZbrV3nMNVaw/phl0e/iRh1547tmVlWV7Z2dn54MPPvr9m//u1MM49NBDZ7796l8S0ff/8UfXr9+YoISxqNVu/+//2/8S35dSrq/f+fSzz9966w9VVdUXcpfbPBUynxcN5ow4bdJiPcAKUAAKIOnr1xoVCADtdvv//D/+1/j+1vb29es33n77XasCPVciwF2YAdQuT1Px5PWFfny/qHy5zz/7zEsvvSil/K9/99/X1m47C4M3L18LAQgGCPQPCzrIdeFDD5357ndeJaK//4cfXLt23ab0Z2z9H5StPSMSQxnl585l8t2xDQhZJyHYc172xCv26LnHnnr22aXlJXunqqrPP7/069++HmDErxSdP/foc88+s3wvuuXhh85859t/RUT/8P0fXtutfI6HDQV87g8KcyN0HvOVDyNdoY0SoHeJwABHiFQizR/fHUnWiKDE/bCBun3EnBzKKFVnyLEMdS144YXnXnzhOUQcDstbt25VUi4szM/PzT377NMPHFv955/8dNAfG8AOy0pKKSWVo9T8dGljc7MyCAlR9Hq95eWl5eWlUydP/tOPf9Lv92vy7qbNL7/89VMnT1z+4uqvf/3bCZs+JgUOsYqgBd4ooYndwQxu6NIFCABBIP1UsbmbpI2NTQ1bEdrt9tzs7ENnz5w+dfJXv3n9wrvvRb4Z9Z89xBxeozMjAxG++crLJ08++MUXV3752q8TCWoUNuQ9BKZvH374IQAQQjxx/tyvfvN6qnSTPdXCtI+BfGmEAARlWUoppZRpyyEjZAHgm698Y/TrRztMmNhDYFLctks/5T6TFJnAuXWBDHE3zrCEjHX0zIsvPvfiiwCwtb29duv2sBzOzswcPXrk4YfPrq4e/cGPfry+fmeyag80fe3F57/24vPAu2V25uiRybvlmy9/XfHYa77YTN4vtXyWk+sUrSgjBIzBNYAduMhHV/SLZxmxeR0gM0UxYo0aQgu0PyLwxdSqdh8yUb1G4E4a28a0bI9eIakHorNtLT3yyEMKbXz8yaevvfYbq5KffPLxb3z9pePHjn3rlZd/9q//lm5nni5fuvz//ffvy0reuXNXR+bvfvfmhx9+zO8888xTL33thdXVI9/61ss//enPa/Lups1zc7PLy8vrdzbGbvH4ZGGwW+uHKNWVEqM5zh6/InOSIgnAAqEikv4IrTnF09Lrb/z+gw8+tJdHV4/++Z/9yerRI69846UvLl9Zu317VBCFqZFfMlLtAoi5ubmVleX1JDMYpUqsAPIHrrmZqOH4iWNHjqxIKYUQDz109te/ed2pZQhAQMYBg3akB1ZRSBcvXv5//+7vK1ndCZQByx6Qcp/UvX6QGrVkTndljSidNDCydm8gjDhFpZ4yaPnI0aPPPP88AHz00ce/+OWvBkMN1E4cP/ZXf/nn8/Nzf/qtV37wo3+euNoDSqtHj7zw/LMA8OFHH//il78aTqNbFI/dicRm8v7FS5f/7r/9Q1VVcfomFH7qUHdbLQvmh0mhd3EEjBx49Ci6aQoZha11/kiN2xvCZkeGj3z/It+8gt4jWz2B8k34xlwM2dMDyr1+9JwUiGs2lL/24vOIePnyFz/96c+5A+DChfd/+/rvAODRRx8+duyBJkUFdHvt9l1GG0l6++133//jhwDw0NkzvZmZ+sT7pM0jCIP/AgGY8F9A7PHkmIMPEgQgEkBFFNKF+9Ca05c3vvzpT39elmWr1XrssUdMWXcpYIxR7eYNQynSeA1mUGBMmbchgMfPnweATz/9fGt7e3Fx4ezZM4ly+FcOpAK3dKzfwEGQsIi1tTWONsKKIlsofk7uuW6Pll/WIxs33rMUY0rMnPtbQdJT69yZNKKGkZT5QKcfflgIMRgMfvFvv7RoAwCuXL32u9+/CQAnTz7I5xS+IvTww2dVt/zbL14b3qNuWVu7PRnasEQOo/tiNDvsY3WcEoLhuIt8JiO8HxCJIve8ZRFJkmOdlUKA3gBWSIlhF1ME3/wWNT2iEIRp16WBPVoQNHFynD17ZnFxEQDe+N2bcT0XLrz31JPnl5aWHj9/Ts/+Apw//9i5c49ubGz+67/+gid+6aUXjx9/4OrV62+88XsAWH1g9eVvfA0AfvSjn/DFE4tLi88/+8yxY6udTlfKam1t/cL773/26eeJ12SkKgWAt956+9Kly/WJY/rwo4+fevJxIcSxY6ufffr5o48+8sQT5zbubF547/2XXnphZXn51trtH/7wx3GbVcrbt9d/+/rvXnzh+VMnH+z1usPh8MrVa2+88aZakfrd777a6bTV6sgHHlj9T//peyTpBz/8sa293ek8+8yTZ06fnp2drarq1trau+++x98i155xXlGt2yHlN/MH0/ji2NisaiEQGvezgJB/J6a1tbXbt9ePHj2yuLjA2bLT6Tz37NNnz57RfXVr7Z13L1xkfXX+3KOPP37u1q21t9+58MLzzx4/9kC70xn0+5cuf/H6G28OBoPTp089/dQTKyvLhSi2trc//fSz3/3+raD2Xrf7wgvPnXzwxMzMjJTV+p07H3306bvvXrAJvve973Q7nYXFBQA49sDq//y3/1GS/P73f+S18xnVzpmyqtZurb39zoXPL17KvjDzZ7ZaxdkzpwDgw48/HpbDx8+fO3/usc8++zzpajh/7rHHz59bXFwoimJnp3/12vU33/r39fV1+4UI4PHzQZprb771B4ubH3hg9ZuvfAMA/vGH/1RVlfUUnzv32OPnHkuVDH/9ve90O51F9vqkXt9w1YMnTjz99JOrR4+0251hObx169a7777/+cWLCSdHEovsin+8/BND1FQrtATudrsA0O/3y7ICNzFNAPDZ55fUqF9ZXlpbu62yLS0tPv/cs8ceWO12lUy7/e6F9z/9LJRpD544/tRTT6hOK8vy1q1b71x4/yLjmcceffjJJx+/vbb+m9++8bUXnz916mS32y3L4ZUr115/4/ebZv17w2SKOp32s888ffbMaTegLly4ePFyUOmdOxsXLrz/9ZdeXF5ZXltb+8cfJISP1y0+JbulvurvfffVTrejVvo/cGz1b//mr6Wkf/zBP+XuA8ADq6uvvPISAPzgh/+s5PNYXXH8xLHnn3v2yMqyEGJjY+Ojjz65fOXKn3zzle3tnZ/8y8/i97Ue3oDS/GvhtwlIkS7OFZDzIyQetGyBtoicMRmPDCuzbaQNZE7yqG6jPZJ2R2TpuofKyTHKZDxx4jgArK+v37jxZTLBF1euLi0tra4esXfm5+eOHzvW694OUi4vLx0/dqxvVnt0O53jx44BAAoBBnCcePDEd179i06nAwCDwaDT6Z08Ofvgg8fffOsPv4+0gqVHHnn4W998uSiKCxfenwBtAMDOzo76UYgCAGbnZo8fO7a4sH3q1MlerwsAM71+ss0q5czMzN/8x79eXl6qqgoRu93uufn51aNH//4fflCW5erq0V63q1bMzPR6vW5XSrfUYXFp8dt/9RdqNe5gMGi3u6dPnTz54InXfv3b99/7o0qTa09zIlS6Bw3PKNrFijrj2tD/IUCAAtW5hWRc2uSnHdMxQBJ8l/rS0uJ3v/1Xqq/6g0Gv3T19+uTJkyde+9VvLpi+mpubO37s2Pzc/MMPne31espN0ut2FxcXjx458smnn33j618TQuj7ve6RleWlxcV/+dnPrcfzyMryf/juq/Pz8wCws9PvdDonjh8/cfz4mdMn//l//FQtdHhg9Wiv19PfdGam1+vxb7q0tPjd77yq29kfzPTa86dPnTz54C9e+/V7F94HPh6Zc8D6jM499liv19vY2Pzss88Hg8Hj58+dOvVgt9fd2XEfXUmGb33r5aefehIAqqoqy2ppaXFpafHsmVP/9OP/cf2GXjT3p3/ySirN6R//+F+u3bgOQN1u5/jxYwAghKjKSrWkpuSr167Xv/4zTz/18jdeKoqiqqp+vz87MzM/N3fq5Mlf/+b1t99+dyweiFiCXRizkNwVcJZEc07sxLX50t3VrbDa/Pz82YfOfPLZRf50Z2fn//q//ysv5eSDJ7796l92ux0A6PcHvZ6SaSfefPPf32Ay7emnn3z561/TnTYYzMz05uZOnTz54G9++8bb72ikq3h7pjfzt3/zP1lp0+t1z52bX109+t/+/vtK0zdMBgBLS4vfefUvLaP2etkBtbCwcPrUKSV8+r20G1itz5ifn3/o7JkATsXdMrLq1QdWk2Izdx8Aul0tn4VApVKad8Wjjzz053/2p61WAQBlWa6urq6urt64cWN1dXVzc4tNiHgmP+cu48qLF/5g8DPj9AOLYGoW1yWdJy3mY9CLMwnd8U/GPtRNR0BCu6GeIQw+lnyvBxAgoioQUTlK1B6WoPnGq8GdKsaX4UUrynhrFhbmAaBm5cHt23cAYHZ2LpegObXa7T//0292Op3r12/88le/ufnlzXan8/WXXnjyicdfeP7Z69dvJMHEmTOn/uxPv1kUxYcfffzar34zWdUnTz6ofvA1TTMzM/1+/623/nDj5s0qwuycFhcWdnZ2fv6L1z768GNRFM89+9QLzz+3vLx07vxjF9597z//5/8CAK+++hcPP3T2s88v/uQnP+V5/+LP/mRlZXlt7fYvXvvVtavXO93Oy19/6fz5x77x0ouXLl7e3HTrupu3x2cEzUSEWBEVAC3FMrv2RBjfmeYdBCoABJCwB7gZdGOHkacbMBqt6MbikSMry/8/e+/9JceR3IlHVPd0zwzGYQAMAMLQwIMACYKgWTqtVrp7e9IaSaf7vpV0+vfu7r373rvv6eRWWkNvliRAC8KSXBIk/GAGZnxXfH/IyszIzMisajMkZrbjgZyuSheVlREZ8cmsyIkJAJiZmdUntNFLLzxX9NVb71y9eq3RaDz11PH9+/Y+efyJS5e+vcv6asOG4es3bvz6N69cvXZ9cHDwyeOPH9i/b2pqy5Ytm6/fuPn2O+/euHFzdGTkxIknHn7owYcffvDjT07fnJ5GgFqt9tJLL4yMjMzMzr755jvfXr6SZdmhg/ufOnF8166dzzz15Jtv/Q4A/tt//5+I8KM//uFDD+3+/Vdf/+pXv+U989KLz2/cODEzM/P6m29fvXKt2Ww8/dSJ/fv3PvXk8UuXvrl79x4i6Jegw5noriGCRx55CAC+vnQJCNQWlonx8f3793788afaRwJA2PHAA8omOPXBh++f/BABtm/f9uKLz42OjDzz9Il//Od/BaAHdmw3eU6e/BBUnheeGx0defrpE//4T//CX4iZYXfsNDV/9P7JDxBh+7ai1DNPn/i///Qv/+1//E9E/NEP/6h4/F/bx9+8aZOyNs6eO//ueycXFhY3DA+/+MIPdu7ccfyJxy9c/HxhYZEAMn4wpW7XhNqyYZMiAw9Rx4vTw5hsTUWHamsjcopNBRJgagIC+OLCxf2HDg0PD7/44gubz547ffqzubl5sYaBgfoLzz/bbDauXb/x1lu/uzk93WgMnDj+xMGD+x9//Oi16zcUOLd58yZlbZw9d/69904tLi1tGB5+/vlnd+544Iljj1+48Dn/rHRsbHRhYeH1N966cPGLWi07euTRY48fnZgY37937+kzZ9vK9qIWqDfefPvqtevNuEANDw0tLCx++NEnN27cbOWy8rlw4fNHDx8cHh5+6cXnz5w9d/r0mXvxoAOlTf/3//H/AsCPfvjSQw/t/uqrS7/6zcuqYOx+gmJdsW/v3s/OnAWAwcHBZ555ql6vTd+aefOtt69euTY0NPTEsccOHTpQVBEe1mwGhu+0OyMm+UWtjvxp1nE0xmCma9S5KNDVOqoYgg1tXoVc/yY5AUQxlmokFi8pPTAwAABLS8uxDGpXx8BAPcvEcGdt0KGD+0dGRhYWFn7921enb04DwPLS0ttvv/vtt1cQcd++PWGRbdu3vfjC8/V6/euvv/FWcKqTWsQBgJmZ2Zs3LZCT5/nLr7x+8tSHX/3+6zRwkuf5y6++ceH8xTzPV5aXT5366ObNaQDYvGkyUQoA9u/ft2XL5uXlld++8tq1q9cBYGlx6Y033757926j0di/f6/fSjV+YkR24Hbh+IXEKstMcE2vkXDLk8gfAABs37b1Rz98sV6vLywsnDlzTt08eGD/1NSW5eXl37782tVr1wFgcWnp9Tfevnv3brPp99XS0vJvfvOqyrawsPDGm+8oIHdpafm3L7+q4Lo7d+++9vqbi4tLiLh9+1bV/oED+yY3TrRarZdffk1FW8nz/NPTZz766BMA2Ldvn1pHSCCDBw4WfP7m5VevXr0GAIuLS6+9/uadO3ebzcbB/fuSXQljY6Pbtk4BwPkLn6s7X331NQA88tCDXs9t374NAGZv31aWBABcvnLl/fc/AIAtWzY3G00geGBbkOfylfdPngKALVs2NZoNp20NqKpSt2/fPnnqA1tzUWpzs9lIqNFt27bOzc9fuXrtjTffUcrh3tzca2+8RUSNRuOB7ds46sA32hXekLP1LKWd0jvQusM2Smh+fuG1l1+9e/fuwED9sSOH//qv/uI//fhPjx45PDw07OU8dPBAodN+/fLN6WkAWFpafvPt33377WVE3L+vGLTbtk7Nm05bWgKAe3Nzb7zxNhE1GgPbH9jG61R64Nz5i3meLy+vnDz14Y0b0wCwefOmtrId2L9vasvm5eWV37z8aqlA5Xn+8iuvvX/yg99/9TVfcHG6ZWHhty+/prrl6JHD//mvfq67xUdE2mq6e4p1xRbbFXuHBgdbrdbLr7x29ep1AJhfmH/z7XfOnb8QrdT4W4oEH69d6mzAEgDUpbLCyg35UpUwKaQdFn52dBS9CwIplIWbX86iiol77FItywCA8hwilKsY1ohZrZbHs1WhHQ9sB4BLl75dmHfchQsXP89q2VIQOmbT5k0/fOmFRmPg8pWrL7/yWsVW9ux55IHtBZ6BiINDg1NbNtfr9ZWV1nsnT/Gcc3Pzl6sFN5ubm/fCoN25e3fTpkm1qJmgB3fvBIDLl6/MzjgrUJe++fbggf1TU5s740cmAgLIiy8vVksdq6PqyToExdajqLsKAABPPPH40SOPqt+Dg83h4WEAWFpaevW1Nxf0PuWHHtwNAN9evjIzM8Mn/EuXvj14cP9Wd9vy4uKC513dvn1nYmL85s3pe/fs/ZWV1vz8fLPZGNRvateunQDwzbeXb92a4cU/PX3m0UcPNZvNhx9+6MMPP070wEO7NZ+3ineqevvSN98cOnhgautUuucPHtiXZdnNm9M39JrIufMXjzx6uMB4WXQBJRHDQ0OTmyaVgQ4AX3z55ZUrVwBxcWlRzoPwxZe/v6qtW1E1Li0vAcDQ0NCmycmbpuYvfq8ssMXFJcHg0Nrmk09Of/LpaWQvCAHm7s0tLCwODQ0ODg4Wt8DXhqLHVbKvPZKK7F/HIJ5cTqvYa9eu/cP/+acjR4/s3fvw8PDw9m3btm/b9sSxx7748qtTpz402MCOHQ8AwNeXvp3Xi7aKLlz4XO2vVJeffPrZJ8Fi0725uYXFxaFB3Wma5ubmvnX1wN27dzdvnmy65mNptgcf3AUA316+POMpH0mgwtpEunrt+v/3D//02NFH9+55JNEtbTXdPQldcc/piu3btgLAlatXC3704J2ZcZQARK1gcbBUVLHm4LPked5CC2j+7wb+ag/RCzZWuDcK5sL6MPG1Y3CHrfikt3G08hzUloUIKYtEefaJeqqQ2gd0K3jHn3/+xeeff+HdzGrZH730/OBg8969ud++/GppzC5DD2zfFt68fv3GyVMfdjWdu6RsL0z2LegVq8HBweeee4bfVztMNwz7DlM3pCzOHCEHzNRSI3W9rOIvcmOGkBG1tJVL2lhO4ypjQRDYK1evvvbaW/yTy9GxEQAYGhx8/rlnOdsKchgu6yuFA7dyP9REcfaBHuHjY2MAYGZZQ0tLS7Ozs1NTUxMT42lpHtN8vvD8s+Tc1+9UhdAgx7/X3BR2lVoCV8mzM7M3btyYmpo6sH/v9es3zGrshYsXDx06sGF4+Kd//uNvL1+5evXa15cu3bo1c29uzrRw4eLnhw4fdPN8c+vWrXtz94r29DIrpwsXPj906OCG4eGf/PmPv7185drVa19d+ubW9K279+ac2D1xGhkZ2fPIw5OTGwebTYV9NhoDRUm2gGPsiaC+VANhYH4MMtgsPVg49O8omHBxefm9k6dOfvDhg7t37d6984EHtg8NDu7b+8iOB7b95revqsBTYxGdduHzLy4EOm1kZMOeRx7eNDnZHGwUnTYwACWwPIDVNiUYs5dtbFQP1Oee5dlGqwlUjJaWlt97/4OTpz5KdsuqNF2d8pbTFRs2bACAW9MzwVipNnELA4zMiok7Ts3qnzfL++0VN+wO0xTaUDd3SHbuiNk1GnbQmzIMQ4ILQJL0ONE6XLhErfNEDR7SX8lEu1XZ4M1CWQiknPgQfuiA6vU6JJdvOBmYbsOG4T2PPPzZZ2fT+Q2dPXfewAk5weLi4vXrN+7e/S7CY4TUaDQBYGpqswdmKKrV6uHNtklv3VRDJ7dDvhhP3ZPZogFAGWAWjN1Snf/22+9+8+1lNfsde/zo3j2PjGwYmZufA7A2cbPRAICpqS3iN9hq8HRPAwN1AJibmwsXTefmFhQb6U5rJPms1WvhTVPhrl071EdhQKR2UfCmd+/amWWZ2ksLAHP35v/lX//9iWOPPbh79+5dO3fv2vnUiePT09OfnTl39ux5xf29e3OpPBGam5//13/91bFjR02pEyeOT09Pn/7s3Nmz50rN6MeOHjn2+FG1Gru4uLi0vAyu8c0jnkGoZEHrruigSa0/a2wDMzW8O7Y24k/JvdE8z7/48ssvvvyyVqsfOrj/8ceODg8Pv/jCc//rf/8DWJ1Wrh6PHjl87PHH1PBbXFxaXl6CCh5LN6SVz6oIVJ7nX3z5+y++/H2tVgu7ZVWb7oDqSuoX5rX9HfPbO3gdBuX177I/lcaowJNmh/cX41K0FkLkBL0MhOHnsl6DtvbYug1qw4eckjziqERqE2WhBCWaGB8HgNieqbYoz1sAUJc0skgzM7PT07ceeeShJ48fu37j5o1qsWyvXbvuBf76HkmNxPPnL167fj1MbTdmvDEshJtqXQOhBcV81XmY0UjTeoySY3AwbCMhVYtLSzMzM2qknjz5wYO7d42MbDj22NFikYsdknju/IVr12+EdXUWXz8kBek1Gg31HZdNwMJHd4MYSq4NEQCcO3fh6rXrYYaVlRXe7V7y3r3FRqXjx4+FNQ8PD+955OELF22EtNnZ2Zdffq052Hxw967t27Zt3To1OTn5/HPPbpqcfPOtd2yeV15rNnWebTbPG2+9HbairIHZ226prVOTk5MvPP/spk0b33rrdz7rZP8+9NDuE08+AQCffvrZJ5+eVtGsCeDv/ua/DA0NFfVHNCE4K+MlWjgalAAAATJtk3QJcAjtAuQqhpLrq7VarU8+/WxhcfGlF54bHx/btXPn15cuKVytXivRaQ/u3lV02unPPv30jFl6+Jtf/PWQu57S0wchUAJ1TdCcKyvdItaKxG75bpquTgrwaNQHuG9mKPQ9QGczGWKppio9N8vjUUL6CPg0Haax/HXbks4YH/cExDfa2ZoKtKNAQySQxLNPSswydxeIjceQMtwuX75y5NFDo6MjW7dOqR1wHm3bNgUAV1iSxknbns7m5uaHhobU54icsizLajTkKioAACAASURBVDUg4pPK0tLSr37z8sL8wsTE+OTkxheee/Yf//mX3S/rfMe0uLAwNDiYU37+/MXy3KWUcvwAAYypsXqkdH2GmLMFg/QGDk4EcOfO3fPnLx4+fPDgwQOfnTlrtlwsLCwMDQ3mOZ0/d2E1nkBJz9y9uaHBwfECZnAyqJF5t/hiyxU2drWwsDg0NJTn+bnz58MlAwJ9rC75At8YaOwslvwvLS74PvHmzZMTExN79jx84eJF7TUV5RcXFs+dv3Du3AXSH8Hu37/3409O375928j24sLi2XMXzp67gAg/eLbI89Enn965fUdeNgCyNZ+/AAQ/+MHThw8dPLB/3yeffnbnzt3YONu3dw8ifn3p0tu/ezcx1dvPc3S3gLY2whUEf/+a0pZkfpo6i9TC5lidcZ5l2S9+8Ytarfb6G29f+PxLrx8+//zLF557NssytbI2Pzc/PDQ0Kum0Wi0jIvVZ5t69jyDi15e+eed3QQz7VaOF+YWhwcE8z1NbIytTlmV/+4v/Uqtlr7/x9sVgtcjrlt423T3Nzy+Mjo6MjIy0bZ06xnGwLmEX9mKTrJn4mXkRZyJU8Kq9jNcutM/ZCCn+yBJCGEwf7fVYSdTEb775Vm2cOX788TD18OGDY2NjrVaLjzAVY87fAK8/eEmQWt4L91gcf+Lx//q3/89//A8/4jeXlpbv3rm7srLy+ptvLy0tT0yMP/fs0+n670NSj7xr546Bht9dY+NRVKk6kTVki4+m8wKGsKLQK1ISU6DZqC3ajlr54IOPFhYWms0Gd/TVaXm7d+1oBH013ou+UqSs6l27d3prHw/u3q02YRTBu+IG1PXr1wFg9+6djQHLp+qA8YkUn/v37200GouLS7/97auvvvbGK6+9/sqrr7/y6uuvvPb6K6+9/uFHnwDA9m1bzez1n//yZ3//d3/zxBOP8UpUgL4syxS3f/1XP/v7v/ubJ445wqtC2mRZNh5BLv/qL37yX//2F+pQjLDm8TF/ww2nocEmAPCQIQQwsmG4Xtfij/Y/uRdd3Snhr4FF4l1qmwXl7F1RnucL8wu1Wm3Hju32rh7hk5Mb1faLxYVFAFDhELdv3+5V8uTxY3//d7/48X/8U3WpYAzeaQCwYXi43pNF1QhpgdrZCFbMOxCoPM/n5+f9btHkdUtvm+6ebty8AQAP7NieuftgBu2uf+6qB5TWb+Rnqjweq2bMrMFS2AjFpQY7NMzsqf2YCAa2vOsE2POP2OKNDe/EYqizB6GCDydBih79/skP8jzfOjX1p3/yxxx+OHz44PEnjgHAxYtf3GRhwVTEoaHBwQMH7BeAR48+qnYCJ+jM2XMrKysbN048yaaZrVun1AexlyIfgk7fnDYR1g8c2J9u4nskFTnDA0g/O3NuZaU1PDz8/A+eqTHc9YknHvv5T//s8OGDfi0l5A8gZCNHB8lHAmgh9WT7hkGVzY4kKKJxOCz5468MM59fXFCbcvY88vAm/enap5+dKfrquWd5Xx1/4vG/+NmfP9p2X8l0+szZpaWlocHB537wTJYVwPzY6IhCvC9fvnL58hUjXApyM+9UPc/pz84qPl94/gd8ffD48WN/+fOfHnn0kPZqrNAreXz4oQcB4JtvvnVWbfRr+vyLL5VCN2J169ZsozGwd+8erqNVvN08z5WfoPM8Mj4+hnptdc8eJ49PCLdmpJptqVkAIiDv8RWzd+/OAcDOHTvMydKTkxN/+id/rHYn1OsZ6Kc/fPjgsWOPKcMOAfbtfeTJJ48NDQ6q7j186NDjjz9WCxYjdEwW5ybDNgitmd17LC8HyAHPnD0HAI88/NAzTx3n391MTEw8/4NnAGBhYfGrS5cA4LOz51ZWViYnJ048aXXatq1T+/buAWO8Aqg1lJ07HzCdtnHjxJ/86I9Up9Vq3UYcEOn0mbO9FSjTLU+fOM6/rJmYGPe6pXrTK60VABgc8teVYvc7IAQ4d/5iq9UaHhr6gfVacfeuXQcPHnDzcshS27R2cTqE9pHfIO/aqRjArwVRT+PeMEaLBSpwhOpuqolrAwD2q0S2ukNYrKuENgACkgn2oyN2AWTqm5RiXcVUT06T/GFUDoRiFylbE1KHqjjHuTgI5tdff/Pe+6dOPPnEzp0P/OX2n8zO3m61WiOjI0rRXLr07TvuOX7Xrl6/fv3Gli2bf/Ds0/v27llaXh4bHR0Z2aBOohL6WtPszOyHH33y5PFjR48+umvXztnbt5vN5tSWzVmWXb5y9ZNPTscKnjt3fmpq8949j5x48tiNmzdvRoKifr90c3p6z56Ht6gw2Hn+b//+m5WVlVvTt06ePHXixPGHHtq9ZWqzig+xcePE2Ojo0tLS9PStDhoiDGPdEQDmAACYEeRAywjomAURihklBWbiXIKWqFoB8RECImGuhMLYuGaCDSWJNfjRJ5/u27d3ZGTDiePHfvnvvyaC6elb75889ZTuK+UkTW7cODY2urhYua+SUxAC3L1z5933Tqqhu23r1M2bt+r12tTUlkajcffevTffescesUJwY3p6L+yZmtry85/+WSvP/+Vf/73Vak1P33rv5MmnTzz58MMPTk1tKfic1HzesnyS9UlgctPkli2bAeDzL7/0WVXfM+f515e+3b9vz0MP7n7/5AcE9P6pD7ZumxobHf2Ln//k2vUbS4tLG0aGt2zeDADnL1xUmydOnvrQyzMyMrzZzRO8ADx16sOtW+Ol7t1TvN2Ynt4Lj0xNbfn5z+zjf3bm7O7dO4eGBn/2kz+bmZnNskwdn6FDuw6pt79z5w6l3PM8/+ijT8bHx1568XlEbDaab73z7u5dO5999ikAyFutj33BRyLy1lNMV2Ex8ACBAj3YJlGh7q09jUCALYBPT382Ojp66NCBI48e2r9v7+3btxeXFgebgxMT4ypU6Lvvva82v8/MzH7w0Scnjh977OiR3bt2zd6+3Ww0pqa2ZFl2+coV82iffXZ2966dQ4ODP/3zH4edNlR2wFNnND19672Tp54+cfzhh9hAbVegGH16+syY6pYjh/fv33f79u3FpaXBZjPslupN37w5vXfPI1NbNv/sJ/+plbd++W+/VotQsfudEOKtWzOffvrZY48dOXhw/44d22/fvjM4OKhOT+T5NHagdYAxflnIC3RHI1stccuCY4i4EAIzXIpPufxjYFl5IiB1WqyHQhQb97TeFYgj0AHk7ZpHCTFKea7q8cmqfh3rMFUI8fTpMzOztx9/7NEtmzdPTm7kiUvLy+Gm01dff/O5HzyzfdtWFWSm1Wp9/vmXeZ4r9ytBH3/86fLKypHDh9SR8QCwtLR88fML7713Mh3k4+133ts0Oblx48QLzz37T//yb/fhZo5z5y5s37Zt164dReAd3WmnPzs7v7Dw2NEjGzdObNg9DABEdOXK1XffP9WR5RRaw+Qlr87SdtGY+aHHqTbd21T9Kysrn3x6+tlnntq5c8fOHTu+vvQNmr46cmRycmLDg7tB99Xv3jsZC73fwUOcO39hcWHx2LHHJic3qk+1W63WV19fevfd92dmZvlgP3vm3APbtu/evVNNxlmWqc+zT396Zn5u/vHHjk5ObtywoeDz8pUrv/vd+zdu3kTpnIMD+/ciogpnHuPswsWL+/ftGR8f3/HAA5e++WZmZvaXv/zVM0+f2LZtq1mIXFhYOHfugsL8AGBmdiaW5933T8Yampmd/eW//fqZp570Sp09d+F9E6uG4MyZsw9s22YfH7EFcPXatVdeff2pE0+OjY2qoX77zp2Tpz48sH/v9m3bisFPMDc/v7y8Uqtl6qitxcWlhYWFoaGhO3fvAsDc/NzKykqWZXfa+nxM48ZaUbqGcEdk1C33TQngrXfevXz5yqNHDm3etMmE0srz/PKVqx9++DGP+vDRR5+sLC0fOXLY0WkXz/+O6bSr166/8uobT504bjrtzp07J099tH//3u3btpbGD+yYTp8+szA//9jRo1ygLl+5+m6nAvXWO+9+e/nKkQrdUrHps+fOb9++bfeunao2M9fE7ndM7538oJXnjx4+ODo6Ojo6SkSXL1+5dv36sccfKy/MiC+cWNg3UMKxuZwhKG0Q1gYGwZo9RQhSA4AYxILBqmYtg9iOVM68zkD2jBX2PKi/+TVgo6PgNXqij1AxPUKAAFmW+ZE2yClsLoeHhzdunMiy7PadO4cO7D94cD8ATE/feuW1N7zQVQAwNj42uXFieXnlxo2b/JjZKrRp86aRDcPLyyvXrl3v1QcI9wNNbJwYGx2Zmb19e/a2lzQ2PjYxPt5qtWZmZnlE8+pEBYLFrW21d4NUoGdCRKIM8hrmA0ANAkibAdUQDgOoFIH0KVsCWCBazpHUyHWGE4QYnO8X8AymFSyimBLROOurux31VUgapVQOdE4EExPj4+PjrVbr5s3peR2MzgaB0AxvnNw4NjoyMzM7O3vbKD5l1o9PjE+Mj7daK7dmZouI5hrbpOIoPcc0K0KeGyXBesKwZ4qbHhsaGtq8eVO9Xpubm7927XqRwYAAxPIM1Ofn5q9eu+bUwKBRs2VTMaBrrs/NzV29ek2rsaJ+xdXGyYmx0dGZ2duzM7PA+N+yZfPIhg337s2pfQwFVKA3zBLRhg3DWa1mTqltDjaHBodmZ2eVGhseHs5q2Z3bvsGBiPzhdG8XlCHVAWoINdOnEB/GaSKnAQTIEVsALcCWtahhsNmcnNzYbDaWlpav37iR+Kp/s9ZpV69di7njU1s2D28Ynrs3L362tnrUc4Gq3i1Vmt64cWJ0dGR29vasqzZj96uTWTcgACIaGKhvnZqq1WrTt27dvXv36RNPHjlyeGZm9n/97/9j5MQ7RVbLga+/iv9IO/mmAIAxCUx5cOd0JYabN20CgFwrGm8U3yxwICIi3+BgBoFocOjlEgCeIW5w2OZtDRyy4Cm6MJh0JqxK5WGW+YsdEYPDo/379z514smBgfrMzOw//N9/7jLSaJ+6JGtwgMHxCjjLfBaLBFgYHNAgkJYIGSUNDnClpLgkAMhWABYIlnLKEUHFGQMuN4HB4TfqCYeSIMRkuS4JtRzmlFMuNxKY9ZYKc8E6wf6qprUY9EPYxV/9XOYDFs8aEA0O/8PmQsQR0LVXgNkTfEHIshVk8BhwesC1h6TWfXOKvUmbIexBzn+y/xMGRw2hhlAHyvRjdGhtgG9wAECOmAOuAOT+amQ3dk2fvk8qRhTRtm1Tc/fmZ28XhouakX/65z/esmXz77/6+le/fhkArHtvMpnZltdpZltQobXC4WEMjtDs1zYN4uZNk6RFNRhbqCLlq+S6Zo4NWNKy5nmhjAmPJ8f1MHdUfLAwQiiB/nqWrKSldDOfnIJtHNXo3LkLMzOzx48fe//9U31r43unkvjhAKBHRE5IWCHAednc7m0W0XJICJgRZAB5j8yD70qXl1o0UUZc0ZUrcUJQ8BnfnT4jbBm3CeyqaFg/SPrNI8OAZ0zw4lIR/vm+bUTUM7I5AZZ7iVIMQLl+UrCDtgXK+rRdQgD9YXmf1hEhAIyOjPzxH7200lp5772Tn3/xewBoNptPP/2k2lZ1/pz37S55MIcwYK1giNLoj0txnHI3Tarf/lQIh3Ysmc0SGPceRFMYFgzF8Eyq4oxEE66LggxFcd9cMf8hUe6bIwqt5iBHNYSjT/cZIZiJiE9JSHrXW2F1I+QDQE2ADAGp11oUMQdczmGRaAlAIxx6uIVuaVDcPIDGBgnRRHJaLUIwxjwJ/nfBmpHQSKqHT7gNWPgBmOjyLFmAH9jO0PiHCDCE9YMIYGRWP4D/LlB9pKaSAwYc/INHIkJefxCy3UNoTAYI3iXnX+7eoroI+5BphKOmv1XparS4vUcIOWALsAVAfYRjvZBB7H74Ry888vBDALCwsLC8sjI8NKQ+n/n4409/99773lgr8Am7muJMqBrHtEOZA8FspjZjGflAU1wh4OSmyRDe0KKEN29OGyVSy2pFDHxHm+gvXQJrB9kvVIwarnk2tkJslZ95CiweQz+5SdZrO8bo8aGT4hEjArOa4XX71FOyA4nQuTTb7Qs3ECDT368KOxi7Y6GYvABaBCsAmhXmEZQ8gTvsi/XG+PjsEbEFkWiHmL1QHpG2V7h9EHoxXgsYCCJilngbKH217tRvl2VNjXJxEnq66GR/tvdq8FL8+n2W+E+VIbQmHHMkThiOjSBDDYsgSEjCA7ZNjvqGHLK8OP6QM0pS7j6tDcr0XP/Fl1/duXOnMTAwNDQ0NDi4stK6cePGe++d+uT0aeDqCwCMwQEAhefvyBXbkQlSWVdyKJCrQlBwaHjIFnFrQMT5+Xkz9Oqsdf3LNlNNvxubKWxNriAKkBdub2HEWMvfyDmptfyOVlX6dL+TMGCQDa/VahMLYc6BAAgpq9qamZG/Y1St0B9BuDLm4XOKiluFdsph0pIM7W9O0PamwmnL6u+aSthrj3s3d8IgC370hPD7GI19+k6JAIAuXPziwsUvwOx+AC80d+kY8LIkcC+MDyovfyVRYYG/TCVYQJHauDFIC1sHN8AE2hwmyapCjWxaIDNk2vg36BQtWjAKizQGH/odhgf9u09rhgjQiSXqT+IEqPBh6vWb1XA3IUAGlJkLx+YuxpuBIPlqC+lFCY3F0OqjG4XQFRu8iN1kGfSKSWwXF38yQW0UebwPdpj7I4AnaKtFU54C3WI8K4huAkadGDVWGPO+2iTLhquIwJZhj8+3izKdZhWyZ/RoXWXKR/gPFKphEIAQ1ZCzqx3dmgiG26Ix1MpShLn6GnLtESKSkSjuWSShAQ/AcARGFXRxRCORwRDxsF87aRdWQbDLzqynmCbV/zPOQ/FoporCdOI57E5WlzMXrKNCnTPRi/WI9HSRfGDZ6c3ZoX36/sgdc0Eymr+IVOyAi7zzLoaCmSUL7Y+ewZqeCNA3fvls1juSqhMM77ZbJesHgPuoKNXvtMQsfCGTO8EKid40yLVdbLWIKR3fXhF0kHMryY7AH4Y1+g8gE/mX0oOYUWc+vOrVeCnmE6QwYG6f1gc5sCabPYUvtSgQM2D2s/UE3LHOBw55ZSILLpAYa6EgZcXuJ78dZgy5BnukVnQvbVV6KZ6pqArCYL1KwUSnvjitI0Lnj0+khwJGPj/svuViS0SGGFrf7Y0z35noDQlVEUUSyql0dvNNAdfL508ofIFSylJyKvco+RHOfagAQi9INjX4j3jeLvhIVdb31NYwua81hv3FUIoqdZbU32YeITVjRgpplelIujvjB1WI5kjgMxki+1fZE4Gb6KV77fdtjXVF3B630blsVKkizYAcPW7bNJEhZApLSQtr1bG3WmPUSFtiMjYCnf5gi5w4KGF5D4G1PaNXVwPLjFgWiO/d0K3aGtrSbPHMnioSll6Lf3GrJ1m8QoYK8JhBwb0H6dFSXODUudBVn9YgWYkB8R2WAnF8aTNm8fr1tjFW4kBmWKE+LVZ6FmL4p6ddyP4/DLLhteypCkkQ3EsPKTYKguk+9jVgf9PG+iHSIGExJs2moVwZHOK3D91O7oWtUwthOvKuk8RZW12bGGNfY+r0EjyygDT92+yevuCzl4fkpkz/QF/47aeJ6QkfPmEocMygQklh+ZVDNAMPsEFekSBDWDWGukr/31hj5rMB+xq612FsOiGp8/q0xokiYyXp16vf1SxnYf1B8kiCVKFOt3nnOkNRBTgteQomsBh8UNxMGFxgxV0XhCGGYdtjrQvaR3Bf+rSGKTjGjY/THDCHYgWT9IeEPSA2D+hNfMJkXq0xNADhKtob1Z87wUWpQeJO51XaJOaf6OIBA74eqlBpwEE64hYrKlkLxl7Ra97cDxMsqhTURfFUhPQgMF98h05Xd0OH2L8+rR9CbyclAB+65AxnN1Ucodx0ITbOyUE+uDC7xTswk00NWVHQl8tgmpe1h7x5E2VdoX6jhWStRRFTIrLg+BLVD/a15ilmbRAgELpLKqgn9xAX7KhNtbiAqNcXMcxiKZmYut0jMkoiaU/EI5bYDaERqNHTUwbjdEnQOTpn2VsRlZjLHjCLx3e8wuKerqlgTsX5isInlZWTULGnJZFr3F6PFrNjlKAM6+rTmiJplku/X09UQgMkbk7Lv1MZQtBCHOGZZsOmovEBUlxR2ovwPUV3E61r3aPDAq+Mgju2cMLD6NMaJjaX2ldMCLmZBlhc0h60p22MDOQVG4+3ZDXfxYj08QcAcBljc6rPb7sQg9Q68w1CbMDc9N5imE0UbacK6SKsQWTPZUDOzNmidl5c4EIlKFRSSaOoN6NH7vA+rVmKOfCWSqxjArta7Vbk5oybI5J9nyYXQzB1ZWCjCMSGOwq/wFcZZY6DQFFYMvCR2nAv+mjH2iNhhYTPVqT8NvReOgaZ2yG/RcIivmWZ0QFRrLJ0zHZJHrjSbgOVHSTpLgbdXZYrTq67EaOURdIlVay0hMeOX/CqGaWO39jXg+uDmNyVvNLOxlXpUIljpVVb4E1kkq5XdgCSCedhTkbgagCLyhCcgKes9gIoMadnkv6O2IAfPGqSj5fYhSnMTP0aDCGAPM8t6KrPVqjaCX26r6g4UAJALwgg6Z/FRh8iwgWo51jLAJGIICcAExedHJw6Tqhzkv6tBhOROi4c8xwd9M4pjGaTtR3AYDnFdj+9SHMqE2nNI3ra5oyVsA5kR7wCW65AlkGf15ATkTW9TH77mDqoFgGgF14KrQWp6jcOjdnPSYBGf3qPURTUrgjz1rEwaOxH/ELUbqWUcvLfi9Oc0ULsJRddof0yAixOU2G9hKZ/9PfAnoOoByM/4BaVsVz0AGWg/uXBBNL53iQTHF3trSZABMxAHUXUpzVMWowkvM6msciD3pSqIWFTkMkNstrMjA8+3FcoWWPI6pNM+NEErBauJ0SyR/sIAAp7xtTZA4n7HoghApsJzytiP9i+rTbL9Ol+pfD1B5M9AVJxolse/zi2vTHg1Q/F+M4AMhXSL5IXhEmuoqXTNvntgjMZR8kxh9ok6x5XzywVT1Qg9hPZrlTXfgVtoB0p+CSx4dQdEU6EVJNUoX1tzkTyo/HdtK3Wu4GDQEjk9GVfMa4HwlBAxAnSSn4QScKvzyFRWhLuTnlhId3Ul6WE2RGfMFPl8Wy8D9Ep86/DGciXTGYP9SGNPyAqjGjkN7qtkFOGWGt/n51x4LtkplpTyWdOs4CJK/duNR2EoQgWEzp5d0QjRFIAKU8j7YVo/IPYpQzkcCeok3dWYdCh91e7nfZur23UQi56fLxhn75v4rgFqN/hdMwdEd/hF7ACqQm3gHMpZI7a7XKlnLJIMRcosXWEFVGgXWQGYurOgjxWXbAqZYyanNT+Zuw/DCIwoDEHEXWajJaV1MgsGEKELMMsCiGQ/+2uN/RXQdkHIzv1kJqHEj5KPswn75pniWgaCaUSftvmE6hmlW6swj9vTmdIm1zM2ApcSX3VLnjDOFImURbN1TkZs0qYcvq0HiiQGPklS766c4HuGKmosJzczkwem/utnvCbyJwsEmlxDSt0lVvi2zm3fvSVQxUIkFsktlry54a+sK1zyrmBK45ol9jmEIEC4x5q6pv3yKRrbW4CMEuluFomr1CpFO6qPTsnnrvSlk8ez9yFFNLFRfulTbIhTA0zIoOha+JYM5JaQv1H/FzY9fuiEEuQKgJAq6WkmMlteekDHmuXHG0D2tzlqik2EpFfQHTEkZvLubKSJhUuH8IU/FCU2fVKATJFfuBiWZuiegSIrjl7YKv02W7CEEtw1qd1SoRotsVxS7etYRCbOAgIgTK2qdQTN/m7cjZX9Zwo0AkEgpXNMqRwlvBDE/930YRWCO7MW2ZR2Opk+EKX9wEO3jxjQKhB5N5aDCXbzHzPzLzmsLykLI2GjCuddOcXuzeE83p6QdraEMLneWz0aY2RIzBKNhkWF5gUvpkim8Jcl6XEJjmcIjglxjQlgBr/nDHRIDKeXATDID+nTWRWUgTDKPFQedWuuQcAar85Bvn6tC5JqdTUybGG0BuLyWz6pxpLtVhBNdv75cGV3tUjuRXykqt4tUEZIRXdnGEGV52Z+ZrMh0PhfC9pPj8PyclMebSrAxmXXu94/YBhjkCTl7aZApAgS/mbXRF7J+iDOn1ao6RUknttPwlrR9CDam2iZ3gLOZL1VZFGPhSzErYd86ptc8HNJYmABoni4hFAIFKaZbAvZ+uWEFSAc9+N6/CVa0vYqS0DqEmrh84vU3I1hxuvWX+eGobfbJsBcU9UzIgJGLK2vaNL3J6Ra474Gx1S2ITLg7kZuEB+NnIzxqDgkttlrJppYlUGDHPEhLcr5O3TGiE9PxYXJCMCLHOKyl+9LyBhjc7ZZuSnlXOU/EolUm+CqgN6shZoq0ZyeVtlB7NP3zuR86c98RFv8dnIzAeZb9neDyq6mAvDJ6IgT7IOViTi1JSJo4QQgD/fR1qOZigr00Zp0XgS14M6dBAlQqw0TFYLCqPo8OjTmif1Xv3RZUK9AMhDr2RxLUbVR3FnyRkiAhEV0QjQwMb6nCwFuBAAiwJkg+ggAFGu1zU0pgpGwgmCky1Rh/9SdaIFjlR8MNRsF2F3XB2Hjt4k0CvaqLGYvsytV0JAxJxghbBlxoFeCCFksb9Qr76QjYlkyfqAZtCYQUZIrQGkGuU8whcZDxIzYCBDMe5Rhdvq8eMSB1FM7aSFiz0KcvTPddwNcSPKypCJGKGrkM6AYh1o2bA3uHDabVUuB5Z77+AnywCC0kOsCYd51O+AO/KoAw9mpp8KbcCUVaAC9bqNE6+sKE2mHA8lmOlT+cQdu8zp5O4PGf0FhSFLRayMXlMR+J/MmNECYP85DPfp/ifEAnxlMsrwOjL/mfeJrCAYOVFTbXF+GTH5JjN01Vg1xgs/gRLRnX+tciWiYNCzb3eNpvIt/Xa+0jIq0O8b+6vUPpIzlAuBlloIj3Tm1k+f1jlZI8C9WeJhygMsap8iuiOZjDkbAhOQ4wAAIABJREFUq2j11TgxISgj0ePpvGkXH4jjPyTeLau7d1T2Etp7TdXyJqHh8jw9IW6DSVQVTe7T/USdvCt5DSHy05otcmqKFZTTRTXsqIXMu+u7g50QOorZeIe25rQAMLMp4MRhz8bs45n7MrW+qTg5NjX5UvIyqC7E2msZIuovaoMZNSLVvSdrECHyK4l8D1tkLAyB0RP+/Uo8wyNYz/DzlzPhAjheQyhnTfCm8RA3Q9i7HYYaNy2jfLEKRILDhT3R5n363khwb1LuvjPVisZ/IInBooAWi4gjlmo4xqBbg/5KRTD+A1sIQMOQyDhKzPNhoCBRG6QsDK95/7I4JaFvZPyBUCELefg1g4gfV1S2wfCpIfojF/RxQJwchHMVqWik7IDqKBcukxQk8jNEHCLWQCRgV8BF/F66l2J6LmJsBI1Iqx3iZQCOpYdJVXOI5KHH4bdVCgSaJwLS9WkNkpr2CYBPi0wWS6E8O0EGETcj2IRpN8oOsAUGgQGuKkS/QJGzpILsP37bayOlY2XpZSEzAo/DNVi8/uChhUhWL31z4w+G1AgghBwwV2q81Odvl7D4XwZKbovxqQPPOfE/Vt9xtS2lBrkRoUgm2ShB9we5eZi0yTKtOyptEKSI7/YK7LuQzXiG6Cvw6o+T1vBeJ7gclFlb8f7nH8uswnjRlrbvInYF0PTpfiDfqfKJy6735bnrLBTyGhvLxRQvoQcCgOi6Lh78ELNIFCmDw/nY12gSp5QQfdE/7RDd5NRgLzXI/QzxA5EUI3ZVpS9j65Ws4ZlbbzzyfUBsFKD7T8xCan+fORnW6m1vzljVkPoG/cPidNYS/KK0shRCAQDShClYJ8kpGVzt4+hBiktxmcFk6wr1huODRNRzpIMse27NzrNWesUpixD1S1w9m0Nvj05XHeJXfbpfybUL0JEq9Aa6O8HbwRuKrIBA2BHJJFMWRBEh9NguH9l8D0cMs7BteCZFyE8AQTi6xC0uHC4tNe2lY8hFX5L+YEhZ6sU2DojD8Ca3eJMiY4aLYca+dHDdBnAmmFWzOUqHtDdFSjOySUxROQBgtFDC6K9g0JQ0EL3nfZQTyVnWdLsrQmHzJWUTeniV3aDEKcoB9TXl2iBtRkQW6sRrCb5wzJFCUvzPLDys05QLWwuGsYSFBBAHL6UNDvLTKkpINWEvy8FVWbpPwzp1J5Zm79PaJj1IRAC5N8SQjAyLXRu2fWnCXdXhhsDCBJeuHHqfr3kVFVkqlW6LUsshHjMl+MqqUPnHa8ycKuGhsr3iadskoNYrirXQV4hrjBw3O7AdZIp4P2zq91QX963CUjFoT8A/pGwpZDCzrDowi69dk6Lo5nGaEjpMWxWhh+Z3CjeVBFzIFEoo4/5BsuuKihGiXnteNpH6sW8qjwUkyvTBnoT+KCJKSVQPqRTEDA30kCsJJtTIkDcTMpCyqgtR6vzbVyS4BMjtFa/JQOBJVgFB/R4DXm1Jkp8mqQJR6rDwVg8MjgjMHewYjRVD9v8+rRHi4yYxDqU5N4HvRqqvjjZ0AKQWOTIgQr2XVetRJCr0EZNYcr91tWpYSxfZiBjOTFBoFSLS5yxwlwhNBBFm4zAdQyoeGDoMFA0zO4WISMOK/sZTz7rp05okG00RESFrAawgkAmP4wfOEKsAMNHApHOuUIsjAg2Q3R6isqMd6oVwIKBpeJVCcRQh8vwjchWT6v9KdqwNRDqTlRZXOHk9AgBgplBSwa+sQRDab/wIFRNVyEYeCldrHMk2qoIccwQVy1Yd6X5wH0BdIcvtGmho62fshfzrIqHfpjNgyqdBB3vzmAMARHUiYF7k62CY6FJE/kfcOWQ2CF459a2NtUBa0+hRjCpylxnq4gjitrUZ02wAmzzFVksXCSAAQB32k8uFkXsm1hFrA6NHIdkaWByOUpyE5SlxLKuM6zIjwK1CcB/cq+8i8lKfvlfyhMcfrj1//1iqyJOebw/JbaDDSSO0rpKplZICEhAFkd37TVhL+OmcXXRhntWg/kd665AoRCJAGkZpMeNViEhc+3z5N9q0dMk5LbawZhBMxHGBPXSaMbBDCONgwgiICCH5Pai9E9dt0z4Ns+U6dB36tEapcPggB39EqovuTRAEyBCzAvbw3QLp25jezyqdPYUDjErWeUXAlFsPsix7aElpjUHp9AaLUj49uMRv0f3ctt03xnuv/CXE8GuAAHHtYmT6bhj21d66JDPbVcrpjAuhaMRx4kuUTrgOedJH/0aUG7G4pkzndEDYoAVHMyj8pNCGYt+E+1+dZuy1306I8zp2mUVYJNyGMyAAr31a6+Q55frjWIyMiG4byoovY32t7tncAm+940E3kBblpGWfzKASnS9QuB4S1Uzlni7Z1Z7oMqsH9IoFPxPHsBqrQdSvFRiWy8ZL6l3F8hhQ620VjbwOqFhHwg6P6erTfUiSm09s8PC1Oxnq98q6Syfm/8KQiesZdDPIY9lkSiQTQOa5UfqXECEkpfis9LO+SMiBbGgE3FGQSCyH35QUq6APOK4rcsxwsjHOgyxdvnYCQMhQnW3otMi5WHX/sniW6AaCCs8aF/8qM2GVeVLbK1H8wJgzoYkQPgA5KQzjbI9CEyBkz24/CfW0yeJy5VTgJop+IUIY67EXpDu0j3CsN4q5TsFIRCF33JwPEQQAZ3YsH6MOWOgX8k6PjBUHysTW0Ptr6vJMK9Rwh2sFRfwaxyIJ8qBuIKjCaEauudx0Xdh52r4ormMiQBb+S1MvY0cTAtTU97G2Hb1Rmm+YXvVxFnNHwEiFmMHOiFxonDk4qmZcbyAwF1AXFw2ICrCPUL+Qp6R7wwwUpsoWhc0UPdQB4xmcrKn0BArTEZGdJJjN0af1QUqqlPMcf60E4aDy7Qk/v2Bh8NRUcZ5oT4hNtCSya6BAE9/IgyiCJnl5iqYm2EDnSkhJcW0eumhec80mHHJ3kgeO72qAmn36DsnD2lDZHBgas+zVd/HSCVAtqaiBxmatcOZePSIQdyiUMGDNETGPL3AlEb3Kqa1JL/wYLVVbYHOI4UaiDMhN+IpHdpMqdEgyg4E3XNXHFFf4r6w1b5zHGO/T2qb0JEyRfDLY62VI4iflXJH9GZZPzL+aMlOAuQPJFt2GgtPnPBbaJCtAUYAWNLc+xB3tzT6tE2I6GTmevDpvvQjAkbmYAPuzyoq+SvUV7IkqFFFCzD8PVUnoJrTr+wTtiZcVwnFFMogquoPRIniFvsov1+KhFVWtrVi1VKC6fZW3jkiQtjJKmxxttxxNF/CCau3z2Zy8w9tcofDQQixQBRM3Q13EWQw9QScYQPHZLrnoL2Mj9MP4L9E/Yogj6laI9Bp4H+RY62RtSgNyQHiKG3NcO9zCY0ap2jRqVxLIy7Va2p7JTMJ5jyIE6HaCl6pumR2ZoreSMCDQz8nySj6WfCRaiKiSe9+UDhpWykd8fMMGVzqCn8QvpB0cTnGhFd+WQam3sAiE4DbsPVSKs2gSIgJif3/auqPw9XMMy2KD3LF3/XNKBHspixFqsE5hZHmTsiOjkmXvCbe+IvtZLLkZBAvAMu1vGXc1e6GAlEHhayL9hbHJAMK+VsmiCHVZ8O2JP8GU72Tp09oiRCzC0hECEeaEOSFpY5hn7KYZI7IIUCPIEgZrMZ57OcA0foJ8HcdjjysYft+vyGXNcccRADAWUIuVL4o4Uf14GfLy6lzeoifzNrjWEjfEksFXRAXGD4CVXC5uAZG4Mw5t/U4qc7JKPtlFXX0sAzM4PEXW3ljh/BF/PCRA6h8Iu86ocI+tdw0AxrknG6WTyFED4ObnF85epnbRNW3cm0vRkpfBNs27g45kUiZjVSG7ExgrVfhG3mPRspRK1IUdiJX1nG90mE7gCX2pXC8kuOtsdFIkX5vkhKEpIt2CK1+SR95TSjsjnVH1ehyAxIVMtHoIKpOdGu6i8byBryS07jlBlR5Az/HRrJ4/JiETnrbpnFZJ7/TYwu3TfUsegOAmuD/iFXSUXmWAOdwlC5jEjHsvRRLfQ4bAhc5T6ygoouKHq5tZqveA4iWFSeiken6Pwzu/jLo6fVrLxNxugBxUTHttf/YCcTAONKqPY31f27NlV8noqPAYbrrDFqZKOzO6lREX2wnqN6lWH4hNEK/R/rXsOS6X9KCVu7PEINDt+jgrK54q380o0ivQ7ZWqpuZ7Mcb7dB9SeAapH58iLijeSA4mUb8Cx9oOFIls5lczKkT2CsrCTAzD8wKQkdElASZhWGQpdsnD117kPa7AnqOi0E8Fp0M9K4NY1xL1o36tPyKwL12dzU3Ix5s/b3bcBqrwXybM3arhGT4hJtZqEKosGclLDuQlhoueDCFIhRgtJE9Ojh2hYhsqdYwS9XtVRcqWTMhJzyeyRaSN9pkd6r3FYPkvUTtH0axas0Y19VXbeqGkdUqFyouCHfKHZqG5AXZYyhCjOCcHSKNfXmRcEnHMwuRiMEuaKKjShZqNayPEN/PaKbpHC3ZsJRrF54kBHLqiAEzpB+NbF6TmOXOKGwISQC4G5LAFOiTSY0nPHFrJf3fma/R7WJsjlsG4RTF7JdI11hOo4p3z6ZDfI0/KQwY8iMNnOxWBw2krZg1Vs4e4O8ndJetURipgBleMkOtWsB1SVRFV6Pu+tbGuqJiknBdvBloJyfCHqUJ0z8kVFe8wZnTLm6FbMi4FWWcsYhHWyOMIgmA3wnMH6UGCKSTgEwLblgGjB6yL4B9mI++YUUms55J6t09rm4qxSibeqAOKBbhgO8TGEKkTDr2IvNLQ6/UYi8AbDgtl9kZZ6WomRVgWAdRhSSUAhHuOqtNryG8SK6NvtjOdVvDSUuxB0GXlPRh9PwgaGrZH2bI60681gs248BPYMd+NTd2n+4bstCy6Te7NYIb1IA5PotDJkNplnB7sUobS0cePnQUAEE6LRU8tKIfAGA2mPMYF2RMPcO0IgWv/luk91neitxRw4L8wRPsdb5/WC6EVLA13FBa7tpgFI7f9JlCNc1LR8bKwwgSQ1zVV2HMkpwf4XkCh1Oj7rPuEXSvshj2CPtVGaKChexktr1VkugsiilhxXF48Dp2m2HMeIfEAHvob1FCZPN+O+tFF//AoHpvPMY3LRhb6vz38IlaGJfoTbKR8KJrqThblkWJPWIUoZkoFT2xLxC0Y7RX4HLlC78AsvsvUp/VI2g4m+8Y1Xt4bC9NEisTiy1u2FuEPrNW0aUM7OwVwFJRMjUAcrPOCr1NYltizovdXSGLsdSuaVidUzBxjRrCeqr7NNFqB6RxtkqPhelZrn+5j6lKppEZMxDFpr8US1yGsLGPtEljRs3c9FWsQQZ0DAVCDCKx+MjaEPqfeQysUbO3FVY+wiw66wnVVGIHBPeuKvN2EfVrTpIYoelNEDriMSCpIh8U7uiB3Rq8B1NWiHiLqLSSA7jpfj9xOHdPJXTJ16y5C5kXQ0UyJSqQPtEQT/4bLWu7EL9hNcBQBGKH2eKPiEQp0AR2ZZfW75o5rItpFXs/BIFs/oF72YjoCHaWklZUp5XWE7sAir84j9o/XgaD7H1zlY7oqA6pFFj0QCY0lF/4jcLZmaG6KHtHwRluWVp/ucyoGv90lXgy8cMSyt554/cWoY0cPkgnBwadCNZLVXOyVtlw50z2aveQituhbH+wLG6NXMjfFJdd+YM9oeeDnL3tOF281BsmwbuXWBQinuHkdkJxUosdr9mmtE9nBwYWvpc9VsZOUPF+005CetjOCGtiZUI1CZXOsht5HcEaw96SGg9IqkqnBnQqQSegwoa8ZjPaEWNeULMcIToXNzZRhL+Ns+jXZFyy2gXYTOlOc3HxD8fM/aGc8yj6Y/j6l6jjo05oix5UPCL18qRyeK+GVEAxhpi09aZYveLl2tGAGIj7Kn9xhA/2nFoXVpyoKMuCZWCK/lazMV5t9bGP9E5pB38PZnxn+BAiIWBNnylUYX4kHCVVCu5QWiPKncZyW9quw8tnJMzD1KbpYBSKA7h1PD9svfiWooJLCMMaO9xDl+qlTYl3W96XWGyEAc5Zcb0GaGYtB7W7IdGc+yVjlF8EXTqlRKyg8X6zirXncZ9ZxizaCwS9X7/nGuG2L3OsYa7EMZNKjxpXEQDH/kJke+oDHOiM04IO+4WEeDAbriPzVCkKEWob8nHqJqR5RJNq3207y0Uqfm6Oi3IzyPhn1oZU4O8JFxHQKIE3/woOnPIMg9Mw87wg1CsZfFFfHoWsnPF+p6or4Wwl4o0vir8U/NLNPa5uKd+tsPSRHMIGlmBJ+si8qifKJDODZE8IBK50PvoyVZ+0jCDIXbcVO+E43MI0WFCVmspt2IwCmrTEkstWzDOoQikrmTp/WEmFsPJL5UBD9odhZM/4d/ZUKleXshpTYhU3wxy5BEKoyJCME1Uv4dyyiEOeAQ5VRfCSpDWJ+U0SteqyIpo5A8d7wTmfCoDa07mdHxq7j3fr8cKu6f4jK+iA1hMhYyMzSrkqVFhm8Ao4Z3hFWmcqgHsp3IgCg2GHm8sIGOPnZIzmlqvlT8A11zk4Scsv67dlDsyL6lqJPbbeU9VdV1gnJ79Ho3xwgZz5BV2GRAvsZAWpsizUAmFOUeg9yszD8/pSpXY+yJmVQL7F7IgA44kGzoPOHFg6SEkGUhK/AlKSvdtwj3RwGXXvI7Mn163Y8uwTZ1pG1he6/DildmPpw7fojUdowHODOhfrPxyu8LceSqKi7/p3YmIvgHzY9YiIZEMAdr84ejtD4MHJq9kozJDF2MBPoRFtBifhFDZpEOsNMPTXB4n31ZXM9UczHdoI9B8ZCh2SHvGqDMg8qDya1bhvUtYqV+ohEquUSEKSclUD2nNZSEEYXUL91uhKek49vFdoOw7uRJpQOc10dp5B63mj3+tZeBI7qvRnahzfWMTl+PpAzh0UHo7HdE343q951+z1PnyN3lazuQNDTl4bC1UazSIFefE9krmNV80g/WVw5M9nxzZdgTSRai2iwWF+gL53rhhJaPOezsLJ2O33xxYIf2ZhxCJABZXyq53LZq/mlCBYlqBg0fzsE63lFEUvcMbASxSGKwETyu5f6m1Jf6fGf8le3nINEQ7455romtjT6LIT8CoShpiqepfjGP230tEdClEkREurTGibycQKLYxbvm7QSipUvp5jjQO5lWHdXX+K5lhQkNo36VkKYx2EkglFQIpkndtSVyeZN4wjQP0tlPRNDNIq3nBx1nbejzwH0WgkvuqS0CiizOCJzePJeW1xVyZoEP7umICK5o8KILacCCPqS6zVk/2c5UuvaSbUj19chRatZzc7t0/dAq/J5fbyx2HXpqkIb6ZGsGVFujHO+sZsA+BmZGpAhkw0RQa8oaluJNLxjgiPr6DiIOuQI1wZqb6fGVFSFxqUkphpUcQ8DVZ6a+hrFJhlIlM0L1D/naD1Q1B9FAMQccIVwBdCeCdhFQ9YH1+MoAxqAHCln3ga3mXukMohkENE0mYD79ZKBjiER1FGEzGL5QZi+wjPVEFinqpBZfPOCy6K7mmptfw0oEJkD+IB1JJqzINkGOhbXT2sAckAmBCDIyWgkywm5LZjRQ0DONnODWCAAoIK1xOGD6Jh6pn6yF1QEhuuaqHhQPhkgAeaAuX5tfZ221snKX/HpPbIE9NAF5M6GD6MRafkiPQOzDOhcs91nGllBR1IAQAcE43XZOdtW7RvvGju0SClxQFRvg0spuDYpdM+qKeKyj2PLOAqac6y1vmyuV2IiSaCPmdATSnc2QCAUhOq0Q/J2OycgunYpyXGkkR47R51W50lwtJowod0WKXElU5XXU9mlkxs0g6DLJa8IO9qkxR7atn36vqmjcVlayHpEbrzikBzt2Q459kwsVaKsQlvaaglvOSZRvKH2FL/vvlQtxfPHYrD2aQ1T2avUXmto83ZLrKJMOJSrB2PMFeA0435zkdz+bR7Du0L2aIMVP1gNmpfqklqXt9VX9l/cYxnSOePcChxKnozLYHjMQlfkWburMbD79P1R/CUKKRpLi9raTpmk5a+BEDAgqOObR7lixWWb2hdbhppYuWCbRhMWQ5wfJgaRw+ANYButn8M5/vPzltMQSJhOFFGOfVpfZF58rqNxrNI2fgQd/ovHmiQ7dLun0gNSoya0hmHLW7B18bIRRULRqbvzB5YtFvTT0w0wUDmqob3MEDG5KjxJ2uBRfd9rkMMS6Rr76mydEV+YKJY3eAqAEb+4UITy6S248FHPRpBjbXvYgfeT3Cac+n3RMBvdJGs+4/dDoVLFiEkUbyyhhUQ4xH8wr7EoBQtMflpUCfQBjvVEYvhytLcRtM2hcvegQaBi9tCjr+Z6sb1FzxMWsiw7QiUl9kopM4kzUEwFvj5jHKSKY/IJEwwG+Eek9oj9ETenrFpMAzBx/rxpoRRWqUzCbNFXZuuTKDVo0Bdtux+DZHfAZpfxEB//wKB9Qb5R+CXWXnIvi03YElwRwSfMvlFJ0MmrI0GOcVd0LjeUBO4KBkTuqPhno4f1aY0Tgt4hLOp2JANy9G5HnSd2NaBMu7C9nwBi/nr0rpAjHvIrba9U2mfr7WJzikcKFFnT+CSvjtxUYvWLOjOsKn6fL7hwkr6QdZLTVAzHMOZxTwgBCujO2b3R12hrm3wXwdgP/l2W14MBfas0GMTi1Cj7C/4tARIpiqeN85QaArCRBYRHSpaMMurXIybajmBuq98vgvR6lTlOlXECrR/sfN/WtznWO6l4o6tx0oQBOTK1b5RhnABR2Wu3CbNeInvxFVpLCSuWZeAN+C4P61KVGnMDAml27YcS/yWFf0TeqeB8OIiIuiFA1SIl+0dKDPDnngw9AxQTw2XISenjt2udhJEioafhWxZ86xj2hm6gbltexhojH2jpCsm/kxqCYlLsmKH4w8ZqjblQ6sE6ngJCnybmohT/55KofvfFcl1ReoiTNGR62DgWCIeu3LM82ic9cKtxG1+x6JaM7d6duFTxTiQNGpVvfkkBgzLeEoWD4/x13YEO5tZxHxKzbZ3b/S9T1i+ZWBD2jpyRnxArOeLMInWDdvKM3Y108uSS8ab+RMFHVYDv4eAFMcjPE/xVIL9VsUEhOaYuIpnayuH6in1wY10ThxYxHrapN22gG/Gh19WrJhKZ0m52jLo0+GPX5ano/U3MymlgJ3VndeWbW0OyuRNy1RVHApAbmUD6tCaJiUDg20cX99gMzAoGoGhgErhrn5ZSvktsTo3hrA7ekBiodQRUwbdQBdcqzjUqPpspYn+RlmksTCQqAoyw+gkRkYAg5zpGBRqiHCgrAvcQka62CAGERfMKDLemGxEAIpLZhKHyKNErjDnzeQ8he4kK8cWiKtsimPrd81b65siaIO3l6U1DjrVOhAiASLgMOQIi5ll3/rox5rUwKDHPm5AtF/czJ0cn40iNcRXkKY9lKlBRsuOcwMqjaToG5nmgajjghSPZ/ClPNa+FxVRhnrvQEwxdIlYUrOD6T8/YKxQR+EqPs0dadlXwMR9X1TvcubLS3VMgwEaJoK1de4XR0aJB6FAfE2ZAemdPUUnhlXWBrRoVjIgE2CIk18gliHqTfVoDpBdlidz3qAaufLqgJ7hmJKL+VNXoRdME91AQiDDLCPRId/dtERFmugzbplAMZgRkAfPsIPfbAEBQkfgcXrHQDnZJxbPWI2M5uO3InzFMCgMsZkLJWE+siYA9k4vY/8jNVgmi6tNaJYwEqysosPp72DAAsNB93xlJOGQbD8iksZqAtU8x379LqtLR2p6I8iNRj3js9WMHGHJfea1HImnkiGO9MzemfbJTancUl0IU9nB4Vo91TIjfDDuI1etbPWACqUa5cgt72WJftSfAVjYZRTbH9KV4PVPsy6UOyDtjEaAIQazdbO1TdAOlhHsTItk6eCLuPlWVIyFRsnd0H/MvTqXKfBA4SOz0NVUBJ90vZtOVdUBqJCAGq2w9UTBolG9fX6078iSifFuzkbooDhnecjzwbtQhgzCqDG6/KY01coPDOfNIlyJTgCzTntWi1KW3Q5xYDrTwg/ke3/NCS/av6/zWHkJeTP9PknoxeoP3AH1aU4QhCMeHKgEQ5L1W0XbYIWT62I+uN/MJSiZSY7Shks/UbCslMUJjBkHlCbuk9gRnQv2+jgE5Ain47KUbLC0uFDFlynpA/CKgQ7J6t1B8fYtjXZEgLaK9oVdeUuOKHasu2APOROzecYSPfRlOfjK7jjkOAOH0ayq3wpnZ0RyovIgeszLlSRezSERQIuZ0+s6TvBrid0Kgn0I+0c0gUn8ddO2RvK5nRwaaeKM9bYbMjiHKAGrdVd4GG+VTqODZBFSyQaEE9EtjMPEpGdmfclQxZvBEao7oRblm8jUJKxt324wx5z28h6UaxKsqP0lWPVVM0D+obV1RdF1A3wmMZ/cG+YVCIvG3mz1dOApVSmX51C42bR7AX1Lx1ZcEpIiMMoGMzPPmMSTxJnAMNdeYielTtBmdgD7WnzNGo1W36Gw97NMaJ306p+sR6n/Y1VdgcfwiA8gcU6DDVsxITWLmCO5oDWdM/25nlAQ4/OaslqkOYkSS0RoERnxJA6IVuzbsQIanuhx7TDP4JMphkrCHZ6i4qJ0agH09td4oxCR9ZzyGaEgInSlfCE+oHrypV65IFJTS5oXE2MSKAGpJJTAABCjFQCDI/osZYo6lILQf4h8YPCO5Xis4hr5Q3NyVAOYgQElfhtcihX5e7D2SPlSl9zxohMN8lRCH7tqsN0WVJL0DcnejdFaF/iHXkEwu5dzakfLBlrI9EbTS1R6ICP7BHaNeAhAGFDIKvK+v1ieFb1XNqiIkQcFID12QyPRY1qyEn/i2EM8eFXRXDLiYov5/5mYImpGFSTToC7Fm8uKYCyX6JjBefN59gyRgRuwGrPAW+qsqa4eSpndhERNCbnbbJd4txv+V8EBgP4N0OOiQfP3Bb0dI8lU6mpYq4xMVuCForx+Q/43JLyPfID/IAAAgAElEQVSSkzrUsz0j7hu5Xk9XxDaf9Q2OdUN2VicpAUyytWjbe/3k/Im10CGhyLrUPivB280qPI0VJU+h2B4RIAqZU17GS3c+4heZL1BXjOs31oRXzq0JQSuF/sLKGiI5aHnowCohVaEL4qd8SG++kplCgAQM5OiCkjM1k9XSURqpQdff+SgvjKEImmnrT8azSSAMhUIVHA4MbmGQx2EmWn9w2Z5xl6y+5BSWLggRVi2KXZ++d4q+Vhn40H+IG6KlVUSWV2ItgBFVCWaIlMZAKySakEObow4aYn5wJYxMgXBF42klYvm1Vin2VWj4g/cLFhl0CeKNQJGu2EDMjAFDnBlnFwhjiyJb5vphz9cUuRiznmLZVKtWvBGQAFuAeTGQ3IVwNjiJVxZ3OMhdA1Rr9hlCjdnR2Om+PuJRfkLITzpQyJf86JEGJNbg3OBSzTIgdwzCnjHxtVQ0PwJf8txqyRYobuoMOtnZAmblVwjp6vJpI5IRY5ZVoBUL0yUa/SpCCRLf4eU2VdRIemSFPWGiwZD6zfJ0p1qQSJ1EiGb0ehWWzjp9uu9IOboUxh33Pm/SEmry+UuHEoygHWgjaUbEQ7WifpKOvelncg0Iq0aMoMtGEQE/NtNlokh3DQ5m21DBfUBMUcVFy1FUoTKV7CenEvQyyT2WIMGvNVqlhJE+rQPyosd08JoT40zLVeHdSrNBh61ws6Ca39BVmyjetZZ/JD1SW3gzBkXIx6mYLF5yxMd3tYtfz3ci2IK11vt2VwtA6dP3RIK+ELyKBNkR4cnJ90gcIokkAICDCvN+kL49J+ZJIbvn1sytqpRZ4WZoW6JsOA/J8JdhVO9DFRUbGWSzqk9rj9TSSuFDF0fVx4JDKKPep8hAEL91Qf2tCkB3sHc3o69EbiLJ2pgozPoQ/+NC7dn6RoaC6sUucmsTm4jlsIlC95KjmFKtd/l2/Nq40xmoOWvhdtoiA4r6CMYfHoVDWQF2Ja5HxZhhMfXmM+CnMTmuUH9MJ6nUzL1FLiQZLRZirYYz8jOjpF24vgo62L/rOD8Siev00nxCnpriplWf1gUx2C23x5MEEJmRUG/WJL0GU6GZDNB+q9JRZCZptIfucrTmMjVTJJZF4IiTmO7XplFZL48S8ThrfpAstFpFg8IKP3I9QjYPp77IpRLNh27xko6Qe5D0mg+zwnqkTsgsD/ZpnVECKkxEA1M55BWHKoNEzOPMwsHELWQKEtslCpZUtDqOQRyGDbQ2Bju6ytegDucFruBk4OmsCFrTihlZzMyJFfeq50CxGyoEzd0+rRdC82YJQSEcdntEL2YDN1ZfL/aNdul/pxq3p6YlGSjVILGQX9EYndwt0hVIOYvi5Ko6F0QV8GebjlH8AxwQ1G/TbS7ydFrRJsw1M968vZ0lTlua9BOTfTd9r2j9UEIU3AtvCDjF/dy+pIdBJdRtKUQFMFmrrIw8frEC/qHqNwZHsZnTqp8YZhowrdRG+CSejRD4cDzdMCG/Cqe3LX9xnAiDS2UNsVUVy3VfnNcZkRrJSMn9FR28dR8cQVLhvzofQfHpvsKEp+voyGLROyLjcXqY5JGVN56jqMAmk5ssCijyHwHypFP8z+rDSkzrQgUue7EaOiDWC+q9r57u8KeaPq1xksc6mw3JvbTpSlIs1hfKojDW28E9rKAKQIO97aMFAXiQtDgIACBDzSdz3sznp2Et6P2RJC6xX5+in/S4TkGshniHVhJL9z2jf6dP64DMEWcIZEEOQXV39eq1yGPUza9EFYrJWar50CUOeqokBxCMIqwCEoXNxR8yqqjCVoKm7fYJGeBIMVB1Do/nQ/dfr8mqpjgg3Kc1S1GJKNUHlLiK1mCn9tDQESkBWAQbutsk77NYC3FIgISrH3x+KZpIfqpQOoqUuOnSBf9tq49k738J+4dB7kTgvfNqQ0A2jcmRXtNMpysj3UX4TNvMokbxgcUygUw9VySHI4R+/QzgkPgzd437A5E3GRNxz23pgbhT5Le513uVIgPvfVrTVMlYl9YPTMkuB4RoRQSICs/tpJVCrSXlAQAyKWaSWbVIyy4ioPZ/HIzFFFcZjGr0+SpifHgWirmDbm7pobCwkdj92M4a9defRPqOw1on/w3ykYiYA7YgA8yQAKj4SFzF1SjdHyo4r1QUVxM9OjHOIbVAIrNdbqUkzyVIhuxOgoRGIomc+1Wp2C0phxsHKHY3BPsabIuoo2PYI1QEHjDdQcR/kVuJekNW1fjqRIGzyVVrE1+ElbQhWQj1q4+Yajo0RwiDYPyf9i6LsZnSVauDrfRpFUlY4fXmxoCS4X0Ka8TsDyiGPhY7jtXYRbFd75prrth41hdckvi0nlJVoGN+ZMY68HkwjkYEQkEwaqPYoqKtDVdMCYxlAYWQgyfFwN0V3VWob3oqyS7K2AUdttOMRR8LA56Qo2G5WdOnNUEkiQnZt2vuE6l9fDngCiCx16xPdHMtXD3M1SThSbm5YyYDU4U6NhadPUG8Ym9WLPKYID0hQOk+oSzDBM7zhKmgJY24U6OdBq0pmDDG8tisjDmt5oAJHmvGVBR8omLuoS5ulaTLffjcumkHMyHiibZz2OOHI0bx7mjNQAfYI2ZULiRdLZgz6LHYck8mwfaVSKHlIWVRf3M2SkPTw83cpzVA5s2rKHMuZGGnR2YCl75eZat4zo435blffzDrhukmUZVwQ4jN5G4DygYQGbV6grNHkHnWi3ch21/twMfV7HDuiZRVp7Vfsh4xHZ372NGHjH1aU2Tmr4T9bqaKynU6ZjeiPXM5Vjm/RsaVSJU0jeHF561aFTqvL56O29KGfEgNBkZIzMWKulTkZTSJoZowmgrtdYocKyT6oGLCqp8VHw6PvqZaB1TqSAD01IoMBbu9xqqqRar+PAh1fxoubBPh03qWGq3Qz+bXbQro+nn04KAGnZ/8FHI/oY98JS+UVjqQCLW1QUQRE20VCBGzrFar12q1Wlar1euZ+l2vZ1kNC8qMs5xTDkREeavVylutVmul1Wq1VlbyvNVqrbRWWkR5/7PeUsoBcigmeu21xsaMNGAl0p41IWIGmCm8UBhH3rimYC7tmFKOtEyh66TdHGn2ZiXKOiUlP4HsJjK7PpjEpMur8wmt8adiykBynFLk2F4+WwY+TTxOB2qFOUwaz4HoQ/Ulf60RsV8GMvNSHGJfZXjD0SnOTZkgukxFRZEaTVHuSgn933V5MJs5PaprjHJIr7OivEjOpElET1HnQL2CovvOhU7lxq1FgoDE8pAt+V0SZrWsPtAYGGjU6/X6QKM+MFCrDWSZCJRC4XoiZoXnXKvVB0wKEbVaKyvLyyvLSyutlZXlpZXl5Txv9S0PkQiAAHOgHMAcwFOMrrTLkZhl9bytbIziy1hiFgcfYfa3YNlHCW0GwWapBkH4IS3cysMr3pCINDKYFAWcUz9fiQEf/+DVb10GOEwFZNPQzyFQqLFTihSBIx9+eDhAa3P0XO4wZxeyEdanNUfIhhybzyJv1jVHINxrhIVtEczoMpWiqUEG9P4GuiRkvsogrUe4Y7LvVGh1ANn1VPRKWYtBWxxhdQEEwj3EtL3jsIT8O0jhpYQlicMaqzpLY5bV6wP1gUaj0Ww0mwONZoYZaa4S1gZTpcEjINbrA/X6AAwN53m+vLy0vLSwvLS0vLzUWlmmPIc+OYQEpECODFwfQ/3xvAAyo8SVH1MQEd2hikgZEBKQdNCayBIwuEGcKxMwCHrcSjkqhYdwlRiCtuy5iJrp3BOlkupNPyT7wvUdpAp8+8xvttTaEDsw0blSfeYO7ww0215j1IFbQwAIOYFSUBbWoXCY9GnNEYZWgyYe38IRyeI/f6oIZtTI4YNemfjQjrHslE64YGXurtWedWN5kVs9sxgkH8vyhNxPN5OpZAKI1SDvTgQgVsgxcIrF78K1wZg8m9lCzIAc/vAa7yVhljWazUZzqNkcrA80a7WaeYzYmPNTAidcaAWx0Wg2Gs1W3lpZWlpaWlhaXFheWuybHZwUyEF6VPNO7eDd8+JmXs0AMoSKnY5mrk+5Hel37xtIJjAvAWTemfSBFLA1RAEh5CuM2iZy4BtENJLKl0IRkQXwKSSN2Cm65BQvRJRt8vbrN1qA+OOYnJxxN8lsNuc6wNUHCKkP5EucEdXh2uaQqEw/R4oAAQKiH61I67w2auvT/UQeSuDeNEkYT4UguF7p0Arwj0RjoRIIC4j3JUkR8AUtycgRDrcoGYaNAcF/lwx/rukkuaMw0a2RWzwRZzMtfvr1aLPSaDOliAzG0XMhxiwbaDQHB4cbg4ONRpNtKPTZSy1FJQdVqClrWa02ONRoNJcHhxYX5vtmhyE1T9qtLsrORwD7wXY5hT4zG4KEgMrgiLJgLFxmh1eyJuTqHP2lmp4YxJ0T2egg1mup4jlBVhsJlVmseSLC/F6SnYC9bAOGSz6BmWZZas1loanGdM1KDncW6JuZfGaBWmTLewul5o0IetZzg+wdUuaN8DIQKJSe4iUqJipgDoGiivSB75ZJY2PNWxuYYfGJwnpCa5QuJlBDsyxzZGInYVLVF0yUkNgGBeRWrXdTaFhXEev62GRUajWX6DKXAwBp02iF1qKC00YNFNpfgUNS4mn4eqy8a0zVBWiprjtwdMUGsD4wMLxhtDk4NDDQjH8upP5IjSYZKQ1Zhlk20Bis15vN5uLS4sL8/L2V5aX+3g5i/5jdCW37oF6ldqgWW0eBoPQLBuUcE6kJzVcx7RICDNXh8R31w9trVfLnOWWN4er153kryxfaYinPhrJMNLIj+ZeXM1wpzXZiN5y92jr19cp8rk0FM53HIu+IHep7NSn6jlCFtjXBGqPaUG3kwFhjspkN1rI6WghujRMBQE75CtFCvnRr8e7Z2ytzqZFsDWPu6pI3hVVQSsK4DG8lHCAnS7K9dl9UqjJVV61WGyi4KEBCjReaCb/Yu2lKYdFhqL9md4BF1OWwyKEBQZXKXQuG3qIxfY1Zp0MX6wjkOryJbQk1y0WsDwaHEOiHQXOPxzJXH4QwprolrGXDw6Mjo+NDwyP1+kBgbZDzx78dJYXEpE0N1zsCRKjV6wMDjXp9ALMsb638YQdXLab4DLGmws4YJ1cPanb2oP6rRqE0LtiZhdZsAQQCXFEaBTM0WLsVJlWhjpZF0SAwqEdy7JRDVM4iAAA0M3ju4fq+qapHyCEg1NowOJByyBer5wcAzIbaEiikpQJMKNO0mzfgxBB+M0M5mQUyXYn5oZWKE7zH6CSTgbxyjB90yoWUAdQQaqi2BEVAMmT/3NvOjwBbIhWBA8EG4QCTdU1O0wNjA5temmpuHqw1a8WneN83S70iJapZDbNmNjDRGNo9snRjobXQEnIWOtx5iXa+Bfc26PmueP9cEeihTCqsJgAgW3tErdTMfFnURqYYP+PMfCJKtqwx4BF1bTxwCKsPmWEwPDzkPoA2EQAIYH5uXkMHKnSNuXKfPdB4xC8SsIiUTMFv7YMwFe5mcpvzyJa270jMYOyf1aNGc3Bi45ax8cnBoQ2ee0dFhDXX44q5Xy4VcF0qSoBZ7SVzS/1DzJqDQyOj46PjkwPNwXUFY3ZC5jhP/6MpY20U8ITrAct1SXeydsIzxMZ2hcbtm8wAHhjLdm3MirBl4j/wLuM5qxSP5XG4pjarzYofeVkThA9MZLsnsqxKAB1P3xhdUda9Wl/IGRDIBg2rIsPVSSsxWTdQr5v7Tqg2VJt8fkutWQl+W+uUDeDks1tqw/7DBmIumbnOTdcudZVFxILlZKL9mQ8j2OwgZU8PLSXPgTHgtx5WoaXEmcAym9j+lGQqihT1dsHHiBs0nDnWxxHdLGiSqk9hYrJ3t28UcWjD6NjGTUPDI7V6HSxTZMI2e80yBRokEhkjI2ZnaJVEzjAqGvQz12r1waHh0bGNQ0MbQN5Nst4J1SRLZBblxdlC6uzoqBZSCYttHPrFiUawKZ+c78qnFgIAqCPs3ZzV0qak95TtxqzKq03tfJ6ssnGI+M8KLOnKM8CHJ7O6G0PYUJVns7om8WSph15dy11QaEWzq9nqqtHogfH71dpYlQ7Nmtno4QkphaK/yb8F4BsgPD/5ybHBGuAG4MyoFcjLRbZ9i1GAqM/iAoR1rzi5fgBp9CG5xRF1OXLumLr8VQEO/LAKyGhb1IJNPAp1omspoqbdyYFA7xEjcQ9Jm5TVaqNjGweHN9SLOBkk89mmPZOENFh1VavNBhqDWa1ebzTv3Z7JcwHxW8dkBmXhRTM83RvrAolGu5J4KUlFAMtNMalyR2ojDKdyMJXRyGD7WNbe6KLodxVyW5IVW6GVtjK3wxLA1tFsAFfaW+YxxNRkKoOUhbTjY/51Q+JSjB5ZMQBnjRkdmOHAZOP75iJGqwUXNSYGsoEsX3bsbrKTspmRYm+Tqo2vJDzq735kn6WV1evlj8xm7IOSqKbiUzKZwyXqhg+yuo5BhsjSBbIWiZhOXjdEMpDBGXQBL6uunoKWCMyjy/MHgbGXigy6o7qLMVobGBif2Dw4NGS+BpRaLqeq5kX1ah33sbio1WoKg7kzM91aWa7E2fqinCBHdMLHiKTVgry9Ik4IUENoASA7LCXVRHvV8zzKwMZmDepZe7N1e5OWCljTvrnctlC100QdoVnDe+ajAO7aKDXIaxNedertx/xG7kilvobtmMynvz2u93ulDGqD9ye8Aelh0A1ljTrWEEIV67QWN2zLk4ntQWAqPizt1kHsBtpcxIuEk6s7m4CZT71W0CslKBpSNkhm0iJGTVR9GG7U00dAQC9mOQWsJN86F/RUBv78rtIw/eNz1tVoqzea4xs3Dw4N+QeykP5XgRLrJqy6oPLSau0/d4wjNhqDoxOb6gPNSvytF9LmKOZ8wJYVCYmk4WvyY3B2qIhElbxDpgkSRASA1Ky3PbMjtLms1sFqY5sl2mYJYLAOVrhlU9/hm6wa0Fq2xOQQklHjrtgLBSJqaya564EQAOuZe8P7v/gDJBFID3UMqk2khq9YZKzDVKw7002gDdhNvzJhlpLsCTE/+t3H7Alp7te3BYUY05GyUvTY860NtsCskuqu2++VJDTROASLMAopaBVfFC/xMzBk06kPi4MTyStG7tvOwW0KOYc6DLXbPwXI0eY2jkZzaGxyslFvppAnrzPZdzRlkAaEAyJN3jMlKleBwsYmNt25Pb282N7njmuV9GggVPFGMba7E73jgyIdKQx6NH8pE/ET3+i2I9TLiXIJiVuAZq19T7tdRKSz2a/dIm3mb9YDSeeeScfTdbLHidkcNq9jIHbUsEaejftoFltKx8D9ThgJQqSTkz1WmgrxDOnU7ptOpWLmAufFd2lapZu1NGZl6r/I/7KGzNBj7SIvTXxGR57DnxpSA8pN5n2I7rUT0j9UmaE8IICBjJ1zLsvGt2uZmUitVTZDyNab1yP2VVhFZzNw/otHLl1hdpOROakYnFxdiRrNobGNk40BbW2045KUbgX1NU+6WjIjucQ1MgmFjTkwMDo2OdAcrMT0OiJ/dbwddR4D+kzfqsPK0UoHtx65n8FfhVNPNbJ2dKPmvvkq/9qGEyp8cuL9q7LP1KGs3SaaPLiZoyN9LS4/UiS1ouHAXrGXe/XMg45tqPuBkPWMiBOgm9Pz1cNUM3uEmaFHqaVslz4U2LdG7lRH4Ob3r/mFVyYkd44XpoCKUyTZn0JfBKyVCVpwzpB5uqQC8rNXmlpdk0ep2pgostrYwpR5GqH90ib96imWTnHVE6N6ozm2cbLRaEr2I6s5oAh3ZP6FJke8cvWPFxQr1/+It1Nkrg8MjI5trA/ct1u6ekjWJFBvXJLvnhEC8EgDthH+lqQ3xv0SimVyMzfFc5BKGWzPeuigiTZtlPapWfJlTpzQeyWp5sU0eW7p2B5wK/IYqmQ93e8kiMJ9lhpmCI2Jziq3N7i90RkFM2AlCfDaDC2sCs0l6kiYGzbdQzLqRFQE6ECD9utdkFjstdTRwEw7BCZoF+lNpsXBrNZ6tLtQixp4AJHCwCAiyNUpDEjqFHFmWqFjbSKhnS9I3aHicxOF3qlL+5S2fdWE1I8qspb5Jsb0WBg+fGBgbHxyYKBZ8WWniYRfUjbnlceMztJqBKrVB0bGNt6Z/YPYQ6rHJqwgZIA1zIBy7y2SmUxEgyDSv8ZAAIAMqIm4TDkhEmSkTsWwAxIIgHICHeQ2NzWo8axHJ5H8BRVfkkOAgQ6WVNoeuh19pdIutdlEo8b0UeBD2SNU0LKPRh0EXgwj9TKtCrFb2bHY71ZEWDOKEqIDBkju7IJrHV1fKzrMEVuAeYSrPq0hsucyaoFVa/doZjVJuN1fxqE18x25uQBsIuo/av4lvZRFbBYGM62rgGOeV4M2A7ofmHjGvTCsuUSRyVPM0IVjb8rUwyo0l862jbhYGeVosrgVMgOEG+0RYQwbIfsKolNtQiatPRRudkCHf48X5AZSVquNT2xqDg6JH7ZUCeVJ3pW+Hvj/2XuzLllyI03MDHD32CMjl5t3qSoW2exmz/AcaUbS0c/Xg971oNM6mtF093CKZC13yTV2XwDTA3Y43CMi8za7KuuCxZsRgc2wmX1mAAx5djabzGeTm7uH5XpL0m0BEhHn7Pfffr3ebh+Xm/V21xr+VOHHurbHvBjMzi6W9ze/jruyegZQ/4x5hnzVywDNeaKgUOz+6vIeXz8CDPjn03671PknXIvtSZ+OOhk2tT07uN7sVLpSvzjueCgEmtK/SSArX74AjBcWfKgQ6vvHTfweSNuDaYN0kYDHpPHCZD6VF3UmDLRqXapvlu1UoB2QCrxNtWEKtFYNgT7diVH29kX0EI4lQ7rryR/OpOnA10S8Vrpjrf0BcTpftNAGwbHCnfwvQRTB2+vLb795OxgUk/Hwv/zz/2gkGZxDiPju9dW3v3nXNM2nm/t/+i//igyiC5sU/nOYmDBZlheT2dlqef9in1xBcOcvCEjbyfDA5dhn1MZ8dO2UmnZliRWU+NhRCwLk9gRoUu/xIb6t+ySnF2Smi5+lzY2wleWkfiWrzMVqSVcVRRYvgefIaAz+QNdiRWPzAIDAAppkOIdDrwHkS3gxwcyTxFwm9wvF1oqgiHAZp6dIX1wQkrwoWV+XFhJW2VGtZRyoEY4OwSsMzpgTFZgql5wo7aPfiGUfjtlcZFumuHPQ9Q4g+A9PhOT5FGHrAx3RtWkIE4z+aDwdjibWTmXb1COjw/MZncQQSOUJnUheXiw4Y76xBBHevX0FoIxykqRUVnitptPBgxyuNeERDq8GxHwwGg5PeF/jlxUI/KOECACya3vk4GzpDVZuMeWnwd9Mcdcx1aTtxTrH6eioDo36lBO0F0/cKOrIQmH6djnQytj+pc0MjqwlSXN3FTkL7wGAVWjAbogkKAfwI6PYHi7uX5GL0zs2f8LUadWM7V7/El5E0FwAIxkL0EIg5E+mnrmAXpJwpiekSzp7KENDlSSe1wlkn1oqQWPiR8+CoIVoFJvWobtqsWw0DQY84d3dmYY322jvc6LycO27y76YGFC/N1qd1d06HfLBcDydcZ7ZA6Bk395yhUQnM02pHhcZFvl4NGAKUqh4MudjEAAgy/ib6ws0CIKI5tPxfDa1V2qJJHlVIeJkNJxORtFmtt02aIEMR5AfyTgfjmd58WKdc9i5iPGYBAHTS+mEgMbBOQNAf9Y5StyPHXOucypGq4khZHjiCVBfnB9TOQHI02+phGegj6rlxP8yBB6/Cpnsq/TX3gydXN77jzQI0VPryTjBMa3+DvsSTggECDhk//7H4cPZqXl00rwR52rhiSiLNZy2BLcnRYHM9yPXYVh7K57CVHGuI/GO3lKx8h3tuZGwNIrWZEcVHb+T468YdoqfpYsteAk0eR1d4o1D/IWc+aQVPI+jrbOiyNhkOu8Xxj07JroQxIvF7Jt310WR//XHDz99uNVHXXUVRh8GePv61V++/2BPjnz91WtFX7Lsi8Xst9+8yfPsx/c3P364revGltk5VZIwDCDL8+Fk1oiaxFOuJfzMAwKYkzxIABJIAvCu6fDswAE4YJNYRG2LmJv25hChRUftJaHboT4hQnbSFVdV3MleQP8GQhDhxLHgqJ7LDbOYMvx+80Bfy/4RZtXJO7gmmj4Pcj3vFSa/CoM2nol4f5WBzNAjAABD/IfR78Z8+LG6/aH68O9OWiJ4qkNrvA9OgGOufvsGhpY87K7B0NMl3CMCuxIcMPdlYfMxWKTa6ZYX5wEGsxSRgJDAXVtJsQ8P0vjYjmy0NsOkOI86aYEIvm3TB4hGeveNpKEVLdMJgGD6JXIcjiZFMWwbRgLkSJBqsUvKOc6m48lkRESvr87LfXX7sLJWDuZdo5zNppcXZ/uy5pxJKa+vLlQRiMCY5ZiICGezyTdfXU8mI9GIYZFxhCrohAQ1FIPugPQ8HwyGk/12/cIOc/iLT32S5l3SfxPuTsQQ0+6/wFdIyJ+AHavYi2npQRwgR3M61UrF5FSMxO9Jw0utnmp/jep6zjnTUHjEzTFRGQMeTvMDbPiYkcYE3nA1G3+on2XOBIwv3k/5gjlODFauAAHBdXF1ns0Fiav8/LZ52MtSj2vkpPFv0M1qmM2dMoojWnRYKQshkqVoj8J+8fEDedm96DRZLkdXZCqQRd09pUOKA1n+BAjaSzD2jYFLH1KFiWTxM29Wqwq4JyZNyuiWXR+PS2VKx/iVaB037GZt+E7rfVmWD0cT8wasJiT424poBwKq6maz3dZ1zRkbjQbv3lxVTbNe7xhjLONZnvk70v/bf/4juBfmpNWKM86Hg4IIJMFoWHz17tV8NpVCNKJZb3e7fQnIIkDRJirlk1T/xBgrilFdlaKuOhvzSwzhcRxlRaC+EXtebQDKc62aatqTrY7pDyn80Z2UIfBor7QLTwS/9Jbdrrt9aDRZhR91sKExZAnPsUatSEVxUFsq6bLToUdtQ2Rfc6IAACAASURBVPsnsTxcoiPdih0RXhSi/3cMPjwlAIAM898M3mXIASAH+O3gq3/efSdBABj+b8+L/xsHo/u1OC6zHwlaS8FXmw/jgQ5OEcLZKFdbZHcI2vQcjatsk+ABniihjrQvqsfX2gP6yF+WLdqVCYISLtARIDwXCmFUrMC4iI7uTitvtjlxCldWN4Ah7xaDBZGICKPxpBgMIRr7Y/ip+6u/7HblZrObzyZAMJ9Pvn5zdfe4nk7GVxdn4/GIMQSw/lC8kgik9tuIs9n0f/9f/nj/uFouN9PJ6OpiIaUQUux2+81mJyUx3ibBfukl2kRmeT4cTrZNQ/QCN1ZsIFDuXAJkFvR7j73qiOKty9Go8PTKOi60UzO7pdJeEiGkjqP7m9bGFgd7A1MLrD8cQEVesdEvAADAGbAUnztgWjlAVV80Ou3R8+wBacOoT9KRweC0L+aNo4M/M7WnJfifJn+Y8LEkSQgENOajV/nF++oTaAsIufn/b9nT8VutXeEY3cJL++SQqqeNRSAwYKTDMYAnKL9dQmbiCbS8U0/J2692aLW7IkTPQZguRFPJAAGcsDIOv6zJAw1rCjRxLWwBLPi0/kn08TNnh0Dz0r2iyXgv8U0nKjt5RhsCAHNOQ2+Vp1e3oRIBIMsHxWCEzBB/xIB3nLUAANjty/VmO59NCAAkXVycXV2eM84RAYikBMQAbAQWNYMYBkVxfXVxfXkOACSlFJKINtvdZrfXO2f+FDiIM7x403CWF0WWF3X1gp5ZsXNY9Q4iEEggiUwSsJQj7lP4QFyR2rHjiBkBEQmzo4mEnttOBM0tCYzbOmjJS3TLCwzDdAkYAMcOT6Btq4BH4WmBUpMIUwksRzh5Sw7TtUAL7pgqOIDviQONpccua/K6GE0Ce93c17fMxXhzVtsbfb+VTNthDA8h6+7QFQfgWVQjuZb83Yg/CSgA6Lgb+l8CQDQx9IR7lV1eZAs17tycrn+VX9zWdzWJBMx44jo/LiD6PqZj8e5NeCvaYjO7lpSowJMq084nc5TRk6So5rl1JudLQ/WCMyKYg0eJ00yB8PDdU5mI+OUwn16fVYG3wMjFa7jX6x7ZX+oYFdEeLrJ9QDFFUdXpSlrkd5LTFw6BS2+iOvajPcHZY2CIg8Eot56/+xUnJ9oRgBjDQZFXddMIaeuq6maz3QshGFcOKIGApBSqUlGLummaRkgppCQpJQBwzhGBMZ5lPM8ynnGyuyxS6hszkjbb/X5fIbOmOuKcaQKaDnde3QiK8SwfDOumAvlyjByGsaP/yzMFcU9dYZnkY+hWCBfDgfntolHfUulPlYw6ta2p4vqrOBVvdBVIHVEEHIHhAV3MhQMMwUW3uF2QItFxz5RYLSPNF7RxbPCWsho1jvwfRr/lyAiA6wXPJPAhK/5h/Nv/uvkTgQT3PiM+d+yeTfdhw2Ff5hPzRxrCseWnvx+stYu1qs9ZV1pM/Rj+YAeNjA7X4rdhvh6/Xg6zInSdHT0EUG352M2uwnib0d5UQQSiohgUg6HShntCS5cjRDyfT69fLR4e1w/LTVnVQkgAyLMsy7gkYmAUVQRRi91+v93ulsvl/cPjer3ZbrZVXdt7sEVRjMej2XR6fn42m83G49FoOGSMkVbnSAjBGSuKrG4ICBjH4WCwmI8vzuf3D6sPn+7rRvpbZYfmCiFilhd5XryYt2TDW8EOgEvNe8wYP0FMdge0/9HBldq5sPvLLzgyOLQ/ksx6UpandMuph0Y9o8NxgQEOOEP9EoKrtbWsezoTkx/T6VD/icwVB2VWl8IV0fhZp97PPURjlBSbR8lSb9UiwB9Hfz/lY4PZGAPgwAiJgI/Y6CJf3FR3iNqepdWA0OjRX+lzYv1kjnTwzFz2mz/D0gK4c8ZFeLU9Ob3y+0IAvVt1tCk6Grlp0ewDDgKnNkSLKyg32b/uKHB4brSVMohuGTusjQS9YaGU1kFxTpMbgVKnQHvnuX+WGLEYDPMifZM7FGC2NB3yjL17czEaDoZFPp0M7x/Xq/Vekrw6n7+5vszzjKQkAClpt9nd3d1//Pjp081tWdW6YkW/4WxVVZdlff/w+JfvfxgUxfWry+vrq/Pz89FoCIBAxDi7ulwAwKe7JQDOp+PLi/lsMgIgdj67f1zVTWke7uhZEnqOqeZznuf5oKnKY/y1/1KCnT32jWCpPyRA5TM0Hz1X1cs+6PoVkt3vVXSysjPJnoA24HTAcXodT7ulcmKWcebz6VicxyPYKewNlugN2JOMNKc/zHZT0eT+e7HWjYjV9o8zHpwLgajTWuUiW1wXl06kIiAhQ8YIOJAEeldcPzbLWjYKcwSPK5qRo9ZvPWQfgTA6uEqH1uHNnyNODHbWnWQ1wfQMtatQpB6eg6fNUq8b3QZN5uCFPT2J9nCET1wICL0SW5HxYCGgPogRJIj6xRMK5pC/104vcXwRJmodBj/4qQ2DibOTfrhOn97I8rwYGL+iXqoY4QSf7fe6bvIsI5KT0XA8HKxneynp4nxe5JloBABUVXV3f//DD+8/frppGr2rEh4/c0jSPgNTVfVff/jp/YdP19dX796+uThf5HkORHmevbpaDAYFY2w+m3CGQgghxHa7E02jDt6k2BklmqGmAiLPC54VTV22cv3SA1m1Ql2OZWqdeVutn4XxIwAqs3/g483FxqkPlxdkZwCTpzwVe1RlQXhCjzwBBiEDOu01n7Hxbm4VFIiYkNGfere04taluApEi/MzBEMoWa9hR6qfv9iAIYPuEol98DwOZPKyP47/PkOOnsxkCECMITBgHNiAFb8dfv0v2+9IP6iIWhqF0/sgYSfEJhsQJLJfutZYVKR/psImSGHp1Fx3WCyIDkTygb53NXQlsDdmkzsUuoTMLEz3IwV9Eaxg7yaKumLkyXAAe7C0GwFS60KsV0UAOXx6/MTo/5YYZuypPZ0JNOma+CzPM+/0BtlPHYG8pGVZ//D+5uu3V0WeARAizqcjxjlj2DSNlLTd7d6///jDjz9tNlsA5cAooZWZ/vCGBQkBGyF+/Onj8nH11VdvX1+/Go2GCMAYW8wnAAAk61pKKfdl9eHT3XZXInIzLePJlEAcJnCe8Sxr6upJ0uNnGdB4iwE9/hJQHWpudc1TH5O2E5m02wYG2sm5nUUYpA0G3t4/7YQjnkc+BBjn7G80OH+DWk564QUAFODwWGXsXMcPh7VRBHts3WPqaICjvdis/0ZH1VPyoq/CFvtr614vJmDvv11poNWjncyK6Hejb9RmijtkrcQSMk5EwAi5BDnPpots/tAsY7gRrsx+gvvJ9mOV3A1INfI+UJ09Qab/7x0JDKC0haSGD3gR5MGRZAjgiPknEAyustQ6CuZ4EpUfFRDiMxzhkjOpzJL2cvquSVpILAEC0MGVIymLW0HQ5SzEdVQ4beKV3XsM3EBjxvN8wBg/BmoEcXogabnafsju372+5IypMqQQaifl4eHxL3/94dOn20YIdaJYzyOEoiiKPOOcK2sHagREQoi6acqy8neJ1pvtf//Td8vV6jdfvzs7m+tLnpIkSSCom+bjp7vH1VZds/W6xVu2vfCJIcuyvGbsBbwiG1jrTGeQWfmSgvsOESx4etDuv9Tz9GB8fbcL7l/IncQgwjg7lCHFFzrPC3Tl6tlS6clyYi1EmCAs5t9BGGWA4WgFSdr8I/pqEthHJbuWhGPHETOOUWpf6JhXmuO/VLTxmUMgZvWyKljx7eAraPnWYIASCIFxdVkEOAF9O3r3uF7Zx+JdauxYnZ85BLM/7YnKRndnNkmUOQFTsRC1x4pFPG6+dXTGgVPaBjccKD4Lio8YYFizRYWuYpcgorCDNgc+upJ5JhBTeATz0iHEI8dpNT5R2uqd5XleDCC5aeNVFbQH/F5mksTdw2o0KC7O546ZEa1W6+/+/NdPN3ckyezXIGdsOBwURTEaDYqi4DzjnCEiSSIAIimEqKpqt9tXVbXblUJdHkFohPz48ZYk/fZbNp2OFd4AAiHl/cPy7mElJTHm/EF0w6c0XuVZzrJcVr94wAHRZCDtlkuhjeQ0OTx5OoLHBggAUbvp9ZSYZPqOCnumOwMY8w7H5j2k9/g172F+XZlO4pcHolJ19I7BiDvbYE8wqCAuK9njbYjiQYtECQdqhbj32n3p73X+LUTeLzO4ZWoEg1JfOfD/dfrHguVpUK4ejSDGgBhyDlRA8c3g7V/2P9piAyPHKQrxsWT3BjsJQz0ZPEZyUj0WTwTKVSp1rOd8jlYfLlCRl0WR5Ee206sxSeKfsCb0i0qnTplC7K5NTD2C3486u+0+yxW8OYNeAcajh/49rNkbZ+I8y7I8QZj5YH7yCfSKQgBgQsq75friYm4NFcvV+i9/+eHm5p6kftQDAEbDwWQyHo/HeZ4TQFPXZbVrmuZ8cSYkLVerIs/yPBuPx+PxuG7qzXq72Wy3u73KLqT8dHMHAN98/W42myjMIaVcrreNIGQ8OFaflmjpHwiA8SzLsqZ6svD9OQU9o2JMLAHVMQ4W+h9+XoO17QTB7KpoZJOaRb1L3Z/HsfNehFGXhaOftpOznH4C9AlZ8OTtoSG3y0jXGZFgi07WFzL6A1pZzPDabC5isS2cEZDiTTP9n365waZ9ucCjX7gd3XrF0L4avl5kc2yZN2xAQIZIwDgRIZPALvPzT9XtTpaxkeOZZPeX5PxFPLEAFQ7aJ5Rqe2r5aYtBO4EprF1ab+NMEpOgffbMnPFMNE3LeIUA0LAW3U40ur7aEUD90AO65a1Zp5kixj9cihF7CM8k0o+26EdV0O16B8QY57Xa14UhN2qOotD6DzN9jsiz3Pq08DNQ+E+rz4K/nPPpeJRxLqUkSfv9/ocffvp0eyelVGySMRyPhvP5fDgaSSHXm21Zlk1dN6KpqmZxNiOCu7v7PM/yLMvzfDgcjMejxeJsOBxkj8v1ZielBEAh5afb+zzPiuKrosjVKZTJeLjeVkJa3B6NYLisvdiwgxjjGTKkhGesX1bQbuTQ+6rwh0BsADmQOZSkJLJ3Ze60akDb2NTpJiBOwIkaexI7IXoMIqQwwqYzF4wCT3UEDGDATifyCWcfO45/9WY5uZInIKEBQ4bAEM0DyqqUqNAEZ/FTooGHunejtxAAQDlYA8DoNlOb2vCXGNFY1ulq1cJDOjLbyOWXHbRs8IcAWykOxbaUJX3ahmP2d8NveroLjfbKAAkZJy6BcqS/G//mv67/uwRpfDt7fU6egf05ZAN4KkxqZusDZVb3pVg5jE4PWCFFBI5GJRndi49kWgBxvUYoO+3dUWp+6L2eHWw8Oqd3EUczeMiKbL+H1J5k2/EXeYejMCCJvDSfJ3hSD8MPPeG0yhPFdRRApNT6OIW5vNHOp6b+ZDwYDYumkcp5V92IYZG/ulwAgBTqeW8YDIrhcLjd7gEgy9hsOp3NZlmWbbe77Xaz2+3rurHEqQobIYQQeygBoCjy8W40nU7Hw1GeZVm+fHxcCSEZ4/PZdD6f5XmOoF2wns0nq81+XzV5luV5lnPOOa/q6mG51edi7cTp7TnGOGNcvCAPYDY4nhB6uXyuPSfqVDSHaILwXImCCDmDk16KBUWXQtIBrjwi16n0tp9fOVzCia0hYAAFg608YsSO0BCS4W8g+XXtn/sSzM8otMcn4vUnxWpYDwjsP03+w5AN0NedE5UjADBkpP3/cgk0ZsM3g6sfy48UKtBeBc8mOzGtQgGNUbaw+thicHB6tC+wpEuHlH0iQUCikJOmaF/i9O06r2MoTUh3FY5Eh1daKBISw2Z+INPlwUGK5BgeYjZxkhA7GgBq9AvGGM9y0+Cw7A6rKwFdX8wnk1FZVkQkiaSkLMsGRdbUjZQCEIui+Ordm/l8fnt7f3f/WAyKs7MzRPbwuFyvN3Vd2WN2gyKfz6aLs7kkuL66fFyuyqoCgKqq67ou91U1ny7ms/PFGRA0jbh+dXl1dTGdjICgaRoiAqCM8auLOQAWec4YMoYMcbsrHx43AGkXJcl2MZ4xzkVTH5P+FxSsOQPasOvZ/hDc5CJCRIbIkPR9mM4Je2AWU4v9FE8wb6isbUZ5MMOJFZmLnifUctDDXjIMWHC3LllqG1d3STGIE2qtMmEJ/EyhVeLLhR3t0N+dPXCQgICu8vOr/LxnMyUKCMiAMSCOTBK/Lq7elzcSpK+s+5V3Fnok2ZGX/BgPtOfggVnWstMFubpivdWBkBbGCQJItyA+ROIrUjEawkSiVtE6BIAjICXt7gKswUQxbqvOpABB39FLyxDaoIB8IhKgjDwTj/4lwdA9LwiusBAORcRxnjGWHePsyDpu4Mhm0zEAZRwBkKndHMSqqpSHcoXB8yw7X8zHo+HF+aKsm7pqHpaPy+XKeh+/uli8eXN9Np+Px6PpdAKAl5eLzWa7XK7ef/h0c3NHBLv9vhENkbw8X3z91dvBoJhOxlnGRSMa0ShP5wRERONBgUx7apckpaSMAWdYC3lw59L2GUPO/BfhXkQI4RYSkQQwllWX6gklJ7mI/S9SbSCx5lu/dC/jgj2JRt+1zDHZn2bwCd4BOq6WNhI6Igz4k3BKULVWNTxrc0AY6hPGnxkLkPm3jc1eWkhaAuy/Efe3/WKetgknoGb7BRb/OPodePy7C3Z4CQAQGAEDZIgZ8H+c/N1/2/xJgsSAJlPjQbLjWL2NamLtnyR6ifmEMSGQH9uSXC59m7SoYOpJHQt5P5ZaXxIdm7K9pFkVxekIOiwc5PPJ4AtoQKD6yD15FOT0m9Rqb5zAr9F9MIAmigVyJooedhiT3CIkHRjjneI4GH8XpJQ/fbxbTIeMISBKsO876ZfmjEMxRMDhcDAcDppGLlfrh8cHIQQBjIaDb3/z9bu3r8/ms6IoGOecM0Q2Gg3PF4vyqry6vPjp/Yfv/vz9viyllBnPLs4X48mYITSNUMiGiLbbLSIrilzZbaQAs91JZVXf3q+apoGWN7O4ceFUdU+0/LJDqGB4Qbn/UpwMye27Pq0SvavlFcJQnRsli3Z9gvyDgp1Et+IRoHiaEf7Us5kEiZV6ZK6T0ndMy/5QdF/TQbMMzRoIAnr/gmNKrRK0JxU8RgPpIyUZg2g1qzYBLyu0YAN4P6RfsUh1uPG18ofxb0d8SCCBGASb/hiktf86r3vaaIWAQ14s8tld/ahSWDXMG7FesuPYDvFgkobFYFRQQDQAhNYFtP94c7nVa/oHzxmJ15ynzy1Cv197F0LvItETndp+OKyJCTsmg19Gx7wwl9vTd429BB102yG3az3GuY6CuBgPkaRDjz8OxhMKPbXniKsKiOjT3eNqtT6bj+fTMUMkfeiWpKD1elOW1cXFoshzQkSJiJhl7Gw+zX/7zafbyWaz++qrt+/evB4MC4ZMkgSJjCljMRER52w+n+Z5NiiKDx9vzs/Pri4vxqOBlLKqG/XWW1VVN7f3d3f38/ns9aurLONkoIaU8mG5eVxtdvtG2V+irnA9mhoMhi/AwuGjjVi3ICAJIBGeZjLorExXqXZV2mewLWtAn80kC2tHqjMcTyH3aaN5akVP4G5PMlUUys9Jv6eQnmI7UWhA12c3b9i6CdrG2xeJOvqH9jRwepbNzrMzQcQQEKQ+ExoLdY02CIBIEgCBlEQSJJnXoRHwzeDVqtnU1BiR1CrmqWR3bb93GDxiG0WXpmF+DI+5WkAQlB4p8PZzR7VeAQjgsSunGaUsCwni2sVGSVIWjthAEJsUzDWR7lIdLouPQgSUpjmCriRl4HChg5lgr1IWAUeK4vQOgm1kDHDjCgkAEKWUm11VVs1msz9fTEeDAgCAsCzLj59u7x8e7+4f3ry+ns+nGc8IiSEyhrPZZDQaEsF0NuUZE40gRoDAkFklUb8LKynP+PX15Xw+LYoiY6yuaymEkFIKcffw+PHj7XK9buqGcX51KTPM1G7Odre/u1+td6UQhIwz/b5HC7YnWmYa90IsHOmpYu9YUe+keUJdXlHEABii6Lj3dVRxYUCA/EllITvdOekTKKaTcz3tWlDRzoZuoR4xmmmlx2cQhlV/Fizq1QtA3vT7dQRf/vkqjs+x27EuEABD/vej3wKCgEZBDqaNUMzUYVEkEZEEkiAlSQL3WX0loAz518M33+2+JwDo9AnZppPC2ANkBw1wieNadM5uQEJG5EcEeWR05zeRByebszU8wTLSCf0DUZ64FhvUmyo48JDyGVm1LRDaZbpqDiMWCKPb8Ae9f21PIHLOHbJIoYvkF0QGDBshV9t9lmeT8Ug0goD2ZfW4XJVlfds8bvflq8vz19dXRVHoy+HIsoxzzqVoGpKMMQK+W+0eHh+rqmGM5Xl2vjgrBoWQQkqJAIMil1KUTS2llFLu9+V6vfl4c/fw8CgJEHG92VV1Mxxov+zrzW69LQWprSLWAXM7Apmm/fLDQVUlllr9R4/6qqH4J7WdRnhgop5YT2Y3Y9rl+gvT/4WeauGA7irasW0V46iQQkJd2qZpcsawM31MX3fcv6fA/3W9E9sKBw1QsWo0ZAVH1lCDgAwZA8aJABmjgFOpFa0QhiApQSjzhjR2DoM8KGcZR96QOEY3P5HsDjCLUbIDECFeBUaQnUoTeOjkmFa6Ag+mPjqBKjAzTCJpING2lESvhGYIn0mTMoE4XEMG1LvqfQwAHjKNG4BgNk18DEiKk4eja0tFS0ALU2g109buWYoQgNTL72ELE41OfUdkDBGKvMiyrGlqklTuy31ZIUMiahqxL6tPNw95zuaz6XA4RCR1t1ESMSkR8f33P9ze3gspOeOMZyTFDz/8dH19eXV5IYmkUMBDSpL7/f79h5t9WY7HY8Y4zzLSz8LV+/1+Nh2pfmFMGVPs87OHpob3hplu1YuwcLgJH3SAfi1Wql0V5ZBDJXuGHGiLZobqKSmKZ7beNjupPAAASVATSSFOFpbl7uQbmM0TXM0KKHen5SACcVpFiNBIEt6I+dI7ZMu9DD3k6h5IU+6CnmR7CUtz1XsTUXbxl8+rvP37B0x9xeO+RoiDNmL33f6HERuiWj9K1QNkgO8G1wUb2A5WNgxBUkAjSD40y3Wz1X4DjIMmAtqIXU0Ngl2fWk51zJ+uGZVshffFihknLsGdVDaGttZ8MLs82hlJWvgcqUVSanKZww1KJBPEu0pahjpFv9XmdojoQZdSsVtl4XB1qa5Xl0/cVRQwZztMTzl5TtBuijkmoTpbEtous0dQjH+wqFOitkL4aEu7beQNnUcG+YddCA0eciDEgCQfxRAA2r3xxKRPrYNA80LE0VDtp0AjxG5fkgRkCABFUQyGw6puPt0+/vjTxzevX12cLwaDgohQSon40/sPHz7cEEBRFLPppCgGDw8Pu93uuz9/3zTN5cW5EIKIRCPu7h/+8v2Pu105mYym08loPNzt902zU/1RlrV2Z0M0KHJkzO1a9gW3FX6k2vjLCdT5TTMCxf3JzohnhWDBIQAxQA7E9OlUTxXxDiD4Ak9zLwymm0+VJNgKwNaJnP5AiJAXp/puJs7xRFxDiJgVh9P5WYCgOrmijTp07XlyBru+DW/qKhLRShmfDButC3jOZIiLDviuFTDocyqMJ+uXEI4K0E/lR1ADSyS1G2dJQIt8XrDCY8wkiQikINmQ+Kn8+MP+AwAwdYfQIBXUJ/yRrCuY9jXZzxCU/PE9avomTyvvXYutbDXQx5xnD4IHF7zDjj5a8o58UnQFOLjCAyB11mCm2tOO5HK1mZVO0DN1ydCHgNmhWX7wlHZ3AYYHkAUHHl84hOYjo0vbBuOYc+pHV1dAqRdHYW4Py0FS84yOp9mrymr6DIpsOhmq45wEIIWsqsq6MM04L7JiXW2rqq6q6k/f/RUArl9dMkQC2O/3Hz5+qup6Mpn+/u9+e3FxMZ1OP366/Zd//pfHx8e//vXH6XisukxK0dTNZrMDRCFJCsqzPOOZbUYjGgA9aKNhcT4f1w1t91XdCIu1DUtuNanVaS8AbvjBwEzvJyOWpOudZ4Wwx8iCdgU4TPkEgNrCcnKZQAA3VRuuHwiUD+RglNUneFWRjInJIt88nFRRMz7jWc5O8RcnshyrktX7kyr6VB1EKL3x3XqMZQyfE322lMcgzZfQFQyPJbd8tY4IYP/GYJUAwJ7bAEmRvDbOhNEaENAo3YcFUxeNXTEemeZTQokNvidF25ODkbuJyiimzk+E/leC/uXUGRfXmqV+bFPYZm9OcJnHpdPd7nF49JCQk/MhtguKtzDFxcaL1h5e7fPZdBgwaesLS6fsyD/Is8uL6WgwGA4LxhAISMq6qQFAEjWNsGOGyBhjopFCSCKUkoqiyDLtHOz29n6/L4Hg1dVFnmcAVBT5eFS8fv3m9u62aeqPN7dvrq8aIQiAZ4xnXAiSQjZS5KxgjNmur+tGSmIMASDj2dXFLMsyxpiQVJb17eP6/mFzcPJ4ffOS2aHtNKtxdt+denIgBOX+C9yuitWnDlTVKVCXjbyv6Tz9alU6yNGsnl1k9x9OyJIPmsV1vn084aQDYnP5FvcbVm6Pr6ienWdE/OEEwPFQ011Nab4TGJmSROq/kXnJj0c3VE8MyZmk6FUKH9lK/NgniLufcWgrluSNT1dsZ6dblKGfe27LSx0LmqcrQ4hy9+wr+OTeqIeQgrDzW9p8H9kQ/E4e9+zGtuloDP6kUiRloTWctFWUjuoPWDzdSvJktOcTzDeZJEV/YjJHm/SpNRieELWfyKqMbpJENokE9a0EFoW0cYctM3RA3WIFHR1KhvieOaw20l1Snc/9R0YTDUpQt04X8+HV+XxQcNHU5W63323Lai+FAAD1srwlV21HCSmEkICg0AYAEEgp5Xq7beqaZ5xzttvt1us1AGy3WymJc9Y0zXa74xkHkKjcoXIOCEJK0cR6pNp5sRMWEYUQTVNL0RQ5Toc59aqeUdNfbrCTFwhAApJ2Yaemw/MKhkBkAZC6++869CCusRO8W2/4P26a6uhndeLI/AAAIABJREFUbgixuXwL+UAMRkdmAYBmdg550cwujs8iJmcwGDWzxQlZ8iEUQ3F+TUej21rC/3nbdOhl9usROlfquI4zbyD1l3MgKHabFhVWQLRAxwtCGyokG9Sp4vfn7RiP9uhbh5lkODgEbkmfqJv2k53O2l1VDxzppuLE+dGR3F865P0QQq92Zj15PQtC37kI71f3M0vjEJPKhxrk/3WFH+qCLh7uQFqCXfjctt0LkQu5kBIKJ2aaPAIP8AQ8KJC5iYxm/ip8LaWsqqppGmW2cy5mEmNhEaURRFIq36D6IqyUTdOUZXl/f/9P//RPt3cPdVMzZRth6nKl2WdUFkJMmNU554yzqNGGYBBSHDgSaRt9tMH/lxL0jAr82IJ1I6kOWHyeBofrBEk/Gxs+ZJKa+KlyusKylv/v6rhtC2T113+AwQizvJlf0VHeY7FaXOssr76R+eCYeigv6tffYpZDMarOXx9jHiPGmsUVZjkMRtVv/sNxtMF/24i72i7EZDeeJsja0XptkWEnT8cBLRuGLjU6LvSi1lpPcHiuOzYIFH92eRHTJTlcEZkhjMDQOC99IDjJBY4hu3OamGnqmSUi2ZbaEXIJIlVbMxhfkoD9JVEEOMtAV6BUppA8j3hboMvfGiVXgG8+IMUGe7spEe+TZ5scd7eDDBoipBQSTXfUF10MpPuqdGuM0hQnR0QVjeoEUqJ4J4Pj3Z/lave4XFdVel8cMe6SPOd5lgGAunCiUQNgMSg451Vd73b7qqqI6Pz8EoCX+31Z1VmWTcZjuziElMohOucsy7KIZM5Zu5eklJvN7uPNw6e7ZYQkHLZyzXft7POq9AsLapZhggfpd+pRupSfs1ZVkTuiBuRf4TuW7frz1Uyr//uxERdvDtJQv/mdnF0A48A4DUb1q68OyvVmdi6nZyoLDEf1t388iDkoK+rf/EcYjlUuOZk388sDWZDVV1/RQGehyaJ5+7uDzZGL6//roXVDB/2P7mB6f/3JX1XvskNmkoMhzunps0aTwzjtizNvfOaA8TfXi4e7TqcLmHI71+cagjSC6LDOhLIyjMQ4cUoedyr0rVkcUNIhdXsktd+NLsK3eARFBoBIRWYeCjm4ugJBFbQ+mZU0RqAgg2eIsNoDBemh3RUU/qQP0ILfoR6Ysp1N3lWUBG3RD2R93LaHMDWBVtvycbWRUnKOw0E+GQ0uFjO1V8KQZVlmWymlJJLK8QbWTVOLfVnpt1sBzuazh4dlWde3t/ev37wdZaO6IQS8vbthyIoiv7hYKFgghNjt9lISMuScc85Ju7LRIeMcGaqbKVVVf7p9XG93ZdWoqyuMcWRM8ztqtarVzhcEOMKAoC5j2R/Iyacnu+gCaOdUM5MAATjDRpJJFD3z4/IfX5EkEN/8gQZjfvsjVokDEHI0a978hiaL4M4LG9evv8kebthu3c5CWd6cXcnJWWA9G46bv/uf+cc/84dPCTGOKM6uxOtvKR/4ucTZFWVF9niDTZWgbThpFq+oGPpZ5PnrqhhlH75j21WCtnwgL9+K62/k//M9tPBEx6C1+Lgv+BPpXZLPIXoSRJF7yS+iscWSfuUhlnvB4ynmziGhWU89wWgbgXjR1majyjrZ2BY3Tw4Bg0Hv17a8BwD/GgsFM/VwBYfBtak1oAQ7FgLFmMJ1nDssGRLY22GO76Vfi3XB65yIlZIdrNPYcxJVpktosZTWz31emg7MGvKO7ikKpNnJ7w2O0TFkyDPGiIB2+6au5dl8NuBMCIkMizyzJEgphZB5nhd5vt+XgLDd7oQQjCEyHI1Gi8Xi7v6hFs379z9NJ9PBYLBar5pG5EX++vWbwaBo6hoAaiHWm63ajcw4z7KsqmrRNJa4PM85MgESAHa7crneNUIylilTCloV/4gD/pSeii8l+JPOvKPyOfhMYjIjANM32MitvCPKOkgPZrl88xt5/TW7+8g//BnrPRAQIo2mzVe/p+FUjbrlrtq+xSf19Rhlk938yPZbIAmAlGXN+Ws5nkMiCwDnzdf/2Hz9h+yn/8HuP6A6qMS5XLxq3v0e9C1dTwUiACA5W1TTBduusvv32DQABMjkYNS8+opYZi72op8FZot6+p9xv81+/FfcrpAIECgfiOtv5eVrYAyVeaaLZ1gm2NG/2JM3SvYc5NlbMIQj+1KBxnMbFTjUVtgCzMhonEH6qZvDd7YUuEDQhkZ9IRYQ3DsqnjR73mH5JGDtmUufi/U8NVCr+jY1sQVA/fVAjPmhvfDC4jME9ZKQ4oR6OMm5JbIgyGPPuo8UElGuFBMkg+t6Y+S0t4Z96u2zWaHvAQBC/Y6nA31m+qFfCmIKdRgKjHcFCohSR8WVTcU+FSolJKzNFH8iC5HJ3D8gYAwRGyGzLBOi4pwPB4XuTsCqrsuynIwneZ4rL6IKgjCWISBj+Pr6Isv4crkBACFFXTd5nud5fnlxfn11IYUUQhBJ2QjG2GBQCCGzPGeMl9WmqhvVQ4yx0WjIOGsaAoB9VRMg45l3Xbs7kP/RfHkJFg494/RQRMqlXuxIiA0AIrBjHvYIU2BrgrQXLAPgREgEyAgYEXXVolxEqMM9fime3uV4l/LMRoDy8rW8uLaWE8da3QdNmHJ6hEjAWfPmW0e1Zsk2i1tlLguQ+Or34t3v7R1FD52gJt1WpNpIRNOzejoPOQJiRxYAQiIYT5u//09mgYLeC0OGjOkmxxcdddnoffXqCwfPtMrox14fIDEAbuSbhK57a4cDEqizyHaGASKZ9wJ9fhkrjC8lPJd3hIqu1q2RUAklAgBgAETxxYd2UFOUmWmEgEjmCJyeXiYlmaqfMRrh1ATy/rUYymFzPT9smoC1eCUQRF0SztyIgNBFh5ndAGC9iYVT3wNz7itqMJDqDLd34fkd9+QFBpdZ3M9dFg4Ca+MLsFm7aqezRZ4zPMrDLgpjI+hHfk8qVhb49rHVpXo6LN/6YO/TVPT0lQAgpeCQtwppF+wYvvpirHOsaaTaoWeMDYeDPMvqRgBAWVbb7W4ymYzGwzzno9FISnhcbs7mE86QMc6Qvb6+urxY7PaVcjZaFMV0Mi6KTF0zIYKyrB6W6+l0Np+fVWXJs0xKWVV1XWsLx2Q8Gg6VIxACACkJ1WNyyU7yVkBXY+XR9yB+zqGDe6B2jaFUJfNsLPTPlqND9GiNMm8wBIFwQHO2Ur4ngY1kXHMWyQDIXVCyiEHzVR+4mOPNyrrveITLAvbASUcWL85BB5+JAej05nIiBPpBRxa0JJksDp8AAlMem/Tp2whtBN3XNegOfBIEh+wCPcj7gv1DcSAo84wtkEBdfXGHpVQVL/ry+fMC2tECwByzDHkwEdXJfdBem7tCgfkkG6GeOsoYpzAHSKKK6oSYfwbmiIU/OFe46alERrgfNdUslwq0kU4iOotEL7ItuH04crgvsPU5YVoAQO+12DQTdLgjEEst5BBU6u9LGNSgcZZdWxg0BcPl7/+g131sw4hQEIb78VH14ZdWHwBo0CGlTxX5GRPB9AgBAOQZn4yHi7OpYtUEkOf5ZDJ+eFypNFVdV1U1GY+EHNVVvdvv3n94fPv61fXVBc+Yeqg2y7LxeJLnGeecAKQQQoimEQRQVtVP7z/dP64uzs9H49F0NpUSdvt9VZWWntl0MhgMSEpF0vnZRBJs93XdyHjOaOxGSH0PhxCd4L7pZxu610owjcmIhM+BNxL1qonBtFM/U2ubum5wj279aJmFjJOW22QcBJslZdU5T5tS5aPBAZE0NVlAbzb2ZbHCEhx68MGD5hFSd2t4ZLwrC0CyIlMLQwDW9wRdC0F0hDawdAOBrbhnBp/xxj3+osOTYZTWAJyCDACQIR+yAhSGNUiOUBIBgwNsiiHLINPmOzOTgCECZIiM2F6W/SWc3ICTW3/SrDgAUZ8Tm0qU/HJkA/07tAAAmbf4AmlM7i+m2bAPBNHtdhhZ5pJhXJr/xZZP3uxKNqYNKSz6OcQfLFAO6g8+EYAUjS2c2kzJhQBqMIajYXF1Prs4mxJQXdcqelDkZ/Pp43KtDMO7Xbleb/I8A4LH5eNyuRZC/OX7n6SUV1cXo2HBGGeMKc1SSklEUirvvXKz2b7/8On9x1tE/HRze76YX5yfC0nb7Xa306cFsyxbnM2KPKtrfUZvOBx89Waw3lZ3D+vdvhJC+tsFhp339dvLABydIRxcpV/Yo0nHlnEsoyAGyBkKMqr/oYIjKvyZ6xYxU1tAjFCGGpQxutlTO/7ZHaMiGuKT6MEUEmXxq7e57K6KqshSQqxVkUY/cRaPNr2D02oOIjMGm44uC3qrN0FqUaPRjT4b5kDvg15v5MPGlx2e03te56M6+z/mI6Y8hAOAtbkRIyRSR6SMODH2NHPtjoAByxj3rGoG6iIggHoQTpAwNfvi7On0q6rD7+DWGkQp7I+qfYm1bhMHs8dIzdOmlJHdprpE9HEd0K2sdvxoLBzOhkBREmelDeKw1VmU+NTqi/Crc9fertocKHGAJn1QI2YPMaM2Szx5miVIrB5nCAiJvwflAgBjeHE2efNqkeeZaJq6rqWph3E+GY9Gw2K7K0HdTd1uh8PBeDweFAXPmJRSCPHXH97v9+Xr11eT8bgoCs4YQ6bWQi2asiyXq9X3P7xfrtaADBGzLMvyQhLstrvtdmvvVpzNp9PpRL8t4IXpuBgPz28f1jf3qyO3SGxPSfmEt7t+YUHr1UBAILWHuUOyps+rbWdABK5BfYIP2TSOqJDItGLBGBIQSeOkyuPS9lgcYrwCfejQlcWvqiuLnytlrlDoobOiKAsYxAcG4vhZVAZkgD0ouaP7WiHSusDjIt7gn8zGDwaZqvpL6Ap2KHKWZ2r33+7tIQGANEfxCEhah0ZA3n9AAAwZB66fUTHyBMGeGsQJHy8b72LUZ0GanVzEnh05pCR7Mz0uzJvpHaU4+BJlODjzwsUfBCuOk/V2sikvZCYZGh0P0l2VENn6XBRhqjEObRg3smGT3A9E0U/k9RYG5LVbqPQSTAgJr4jDARGApGhIUqhCtVh/+ANn7Jt3VyRlVZZN68XL4XBwvjjbl5+kJADc78rHx1WWZfP5lEjePyyVJ/L3H28fl6vzxXxxNn/79rWC4JLk9z/8eHf/+LhcSUmIDJEVRb44m0+n03JfLler/V4bM/IsuzhfDIcD5YLMnudVsYzhxdn47mEtSfZoV/HkJdnvlvQXHQjiC9Nq9kvlCy+p4PSzIbsIU3BEzWCGyEhi6qAbeeucugCNmdJuUjMGZBrij59vojCaHHhDjE6uh4Ufm4W8xGAYOLRyeYaKREXJLH5FXh4rJo5Zzp0jFcKyVhzqOsicYz+iruMCHZo+Hu99IeGZLfH2enHMRxz1Nh+Z/xEAM0eKCEiC1JBYvT5vMAcAISDXFg5oWzgAkCMrWFHJSi1Ehzuf2Aa3gA86WiRTlzmi7TrAwva2Vt3S4sNfPNzfirPyNEEdRWmhvQj87Ik57SOSpMTWVzdT8pzUoJurIkGwBYZwwO8a22IEBSZjEwVaJuNBKnUX2RtrewUq1a5kV1MrHaZ6LioJtD+uhvPWQdqOWUNAVVXt9hWJpm5qIUm9H88ZG40GYLY51pvtcrlRjdpstzzj54vFfD4HwOVqXZalJNiX1Y/vP/30/tObt68BtFXwX//0Z0T1vDxjDEej4Xw2nU5nTd2sVqvNRj9XwRAuLhbnizMikkIA0Wa3F0Iyhkzt0zDcbMu6bvTbtV7T24DKDoQkSS/OwpEaRz1jybxTT9F5oihhEor4SkE4BU2UelQFmLPVnczMEjhGc2ECaBkAHWZwQtpwUgJ0VDh6+7IoIJAiXOcKoIBjSEZCpCsKjqbaT3FF6P7fDTgcT+5g8Z1MMk71+Y7xBBxRS7+0ww1qZXgxIVo2VpJTZyw5ezsiDNmwYLnNRADmACaRsu8BSCBBQpUlAaTBHOohFUTkyEHrEg7q+vNrzIeVrDTiVzUoHTtY1b1kx4CgQ2lBf1FBOpnDA05wJUo8apaePpVTs7O16GM0lIpNVJ25DOgd229VFXFRt9MdbnpHiIPsRZFWiejjQPPFU+1O2UyPz5RGkANibmd6w+7nKBuJFKKpQ8Bx4IwDAMBPH+44g7Ks6qZphBRCDAfFt1+/ZggEMB4NX7+6rOt6uysBUEpardYAcDafn53NB4PBcrXa78uqqqQkAiryHACklACABmsMBoPhcHA2n+VZUZblarVWhagwnozfXL8ajQZ1VUmisqp/+nC321c84xnnecbzjO/KmlLLItEe84GkkC/VwuHYhc9zNIB+sqZ5QJIR2QMIinOyDkOKP1I+vYYb+pdEmJn6DiyEtaL/yXFxJdaD1sdZjJ3Hqj2IXbaXYKWaitQqJ/IpO1CRGZeOxoDWUbtZdDIcLcMj6yY4XeU5QevMSK6oFwYp+kMkodvdSUGsDywAGLB5NmHA9LBrqKHXhyQ1V0iQqKmxZ4EkSEFCgJSktlqQa7AB1sLhcCwgAAzZcCD2pawctWohUnS4MdmoKPir3BN3KZ0+FTBGx93zpaPu3gzMzOpE9eFaoY7fU7V7nxMIxK4js6XyzIVlsaVGhhFVqKS6+n8ESvzGRFBOsSHsIs9pQRiPjD+HPfZskiaKQwAphRA10BCO6AxrrLp7XJOU2kspAgCWtVhv94vZWEiJjM1m46vLi/cfb6qqAQAh5HK5aurm7Gw+Gg2viouyLLe7vXqTxWdxo+EwL4pBUahjH5Jgvd2slqvNdmfJGA2Lt29ezedT0TTKY/r9w3pfCUIuBDRC7Ev9YL3Whg9Pe838pRAvzMKR8DnrI2dzJO3EY6MnBDQnE91VP0fR8WLRK1CjZQ1EIIrxeKohQAMrAgD0IEhHFse80lkgOmiVqAgtr6GeLEFFRuy3K1KfOnvqqP7rXtkhq3ZDc/TIfAmp4LPzHpXHSHdw94YBaMSHmfHdYPm9vWbKzUnjkipOzDhccg/T27fpmXYz5zt+cQOuflnkZx/LG3Nfzdvi0GZ3n+z+RlHwJ90nHUmOmWzRPQzqXRT/BiFEQ6eFzIwdmnaEIBSBwNNR9MVBc1oY1I4nkToPz/T1aEOV6Xel2ym04apzXYWgjnmgvoXveo5cpajdCIFlYdY6LaW6W20OTFqeZpClwSzkb81q3mkiEYhINI2UUjkX6gnOfo2AwJChxydBEq3W+4vFTD3Oxnl2sZg3TfPp5l655ZCS1pttI8RkPJ5MxsPhcDQa1XVdVRUytKc+F4uz4XCY5wUR7atqu91ut1t7bgMABoPi7ZvrV5cXANSIhgiklLuyIgKmjvQTqC1xtdb6JnrU5UBSihfh2tyDswShK1nzRJc5CkSEAoADMpIOGfsy1nRhZJpAs+Y7SQA9K3PACtU0ZNI7GIUeMZBkO10y1kx1tBS0pbj97lHicsWVHJElrqiD15mkcbFHZElW1MtUFYGesPIWuq3Riw30HARggFwPo030jJMcvgcOQGlcfkEEZ11bX8Baawd/BNq/h59bYpohm2czROZPPGs0J9DMDYAemuUatza7ljLG9teQYEztJkebKeDb0nLMRny4FTtLR4vuFNmtX8xaIW90gczPgXAjTYHxA2i1Vq8j3Fe7YJ3pEW2veAf30PSCl0WX4HnlUbEW3FsEYKq0bvdaq9UbKCvKXRegLd7LYdlcZmvTydrdGCzMntCL2vqC3lJO1Rj+0EbGMbhMYudW+lZKy9ZEUzdNnRfxU1WdOzbOPIdgpEeW8bP5lHMuhRAkEWAwKK5fXTLGbu4eLGJQOym7/a4oBoOiUO43fMbDGKsbsdutqrquqnK325OzOsNwWLx9c/32zTXnTO3IqCzTyWhfCSHd9PNEYapzUi2TspFSPA3D/sxC16R168TXVihcPAAn9AEmZm4iDQtrBDu3jwoR0gn+dIKS+GMsxk/OcrAisLmOZBodWdK5O4rt2QA92L0dCEiz5CesA2coO3UevazgT3Ey3AjDBG4BBH19ls8yrft5sNqYMfRyU7gDqKEmzaUJmLt+BWCGuiX/AQHm+XQn9rYcQymFp7SOaFRH8JJEl8t7pkdHuRSl+UzzK4YWGEeH+w0YJz6w3jObuGetRrpCR9DKgFdOC7YfGhK0pfSk6P4lrt2bdK3N53RzhWiapsqLwmMT1J3cVoVgUBxn7HIxvVxM1furdqYPB4PX15d5nn34dLfb7lV5UtJ2u99u93me5VnGGPpGhcfHJQCosyE+3QxhMh69ffv61dVFlvG6qux1EsbY+XxS1eJxtTcXdCOpmm49hX9l0yivJC8zdI+mBJDtiQwAVi/oLzbJebzCUHlP18pHUty6utq1H/vzgfCEXD+rio4qFhOf00NrmZuD5gHzOKa2vkCu4n7WdpzU+gWFdoPaiqVbV57KDMQxm/Ax85zLawcvAcNXap4+ZdpzolgPsb2R2gHVB2wwzSbLZt22rfU1KtHA5KTxNPsOOr1/KVX/gVtah3lUIvkJCXrLjxPHAAQBrR8Oy+c6XU+mpJW3KjuP9vt1x5PLFUatoXdk9sT5RbSgVuuLal3LdGnEBACAlKKpKyEE4/yIcbOrw/Qf4nw2ur5aAEJd1XYDSP1bFMWrq4uiKG7vHpbLdVXXlrS6buq6AZIe4MDNZouMRa3OMn6+mL97+3pxNgeguq6llGAfpAHI8uzqfNoIud6U5IBWhCj8b60OISlE84LvxJpATnMCALNRKM0eix+OlANJRcMoQgTmKA1TvvS9tCnp+CUcG5yJ/ARwoDU1D224xaz1hGdCDbO67H+HhvYljnykC6PH8qMEJk4JoLN8mrMcLM4wRZiDHvpnMjCi/3y/d27DCaLIxKE+LYr5Vuwac+fFoxIdtSkFP90oDL71hhDIJBh1HE1xp/oNStaJPj0nw43g5wSwMoyur6zM6GQWjiSNJcbZRoqhUjRo5kScP7XQj29TYxl8J+KxTKALDVny2kkodeqnnUCzGNHUoqlZ4hU3Pwe1PwHAcJC/ebUo8qwqS5JSSLnd7iXBfDrmGUeALMsuzs/Go+HqbHv/8Pi4XPvWC68JicA5m8+ml5eLi/PFdDJumkY0DUlZN2K13iDidDLinAPAYJBfLqZl1VRVE2kEfVYOE6QQUjSfQbP7+QXrD9f+QuGUJ9LemciwsRPYhasmlYlAPeHF9a4KmYscLkXnmRk8lOBXFloc86DqhRCt1TC5Bzh0DPaXeXwwp0J+7UNHrX8h6hS3DjPGF8XcjgLFY03onnGzJ20Ow7XWLaToKxBAjtk4Gy1rdQ2wdQkz2aiu2A4qXOI2yQm4EJnnu5qJqQRxA90vHYDkWCtG+6imH+Kf0I5hpr9Yc5SR2djCjEYfSEt86y0Dg/mBeq0ZIBrNt1SD+hBFqzmmdzQkSnoU7S7N1OYDFiHquq6yfBA7UQ4LTk4YRBgUeV3XddNstvvH5Waz3QNi04iL81mWZQDAGJuMR+Px6Gw+Xa03y9Xm8XG1L8suYYIIw+HgbDa7uDibzWaj0QABm7oRsiGCfVnf3D3eP64Zw+lkfzYbT8ZDxhhnSNqxqDtj5bmLTs9apTNI0Uj5cvZTDPants4avXgN2huHu8HYibIP1Yjpr4RADKw3Dh1aPn/i8DQyXmro1hs60/fGO7Th+2Ax0iwezVOJJW86Pa+olxXiUbS8iQDgLJ+hdhpE4B1sVP8PzjYGgiUxxhj9DXICquvhYaLLwfm63sh+o/2hRjmTg9JfEvayYwwN3QI3ldThFa/6VEgggt74KGHKKhHmT9oaANXz9MYjhdc4f9lBx5kZn7q0CSPRWykjhK4kVYiPUVJZgyq6Pqv8iFF2f3Z41yMlNVUpikGWD7zGJpBn9JWI9vvqw8e78ai4e1iuNvuyapT579P9ijF+dTk3byIjAxiPR6PRcHF2Vr6qyqrc76vdfs8QrXP0i4vFfDadTifD4XA4KAaDAQAJIYTyL0ZQN83dw/LuYdUIAoRmud3uytl0NB0P7x/XVd2o20P2bjulCdcdoFophbob/KuQbS1dQCMzdb8bMXbwclhidCTwy2DKQbdWer05n+pzCgn7EhIhxZYsXAhTRKlcAWgFQusswLMggpGZBnNYGdoSNr82MJKezRpU5Cw3KNx1Ctr/6670LySpl+ojRTLSexGCH8G42I+JyJBnLKtkHQqm7hGi+INVY2Mx1MEcMEphPN+FAKZ9WaRd3DO91kV4wtUEycpOqF2ndYdGHV5scz5TYVjcCevDu5qaJKk/vt2z4S+954XC2FTthivZuKap6qrkWeHl6RtEGyeEfH/zkGdsX1ZSgvIQCghCkAQo8kLYu6bqWS2Go9FgMh4RkMIRDugD/OHvfzccDvM8AwAppZRCPepGxpkSMhSCGkHIOAJIgn3ZVPX6cbWta0FBp7S0iRYGAQCQJEUtmgpeUkgvIkhPYETtGt6wNX8b6jki32eC+o0+p0E5OOvT9AVhpEPIhhmkl3UX78PQRu1/UrcsAyT4PP5tA2mV5zMW+dICef8u6/UwG2SYsUiIq0/xDRPdrwYcUApFBCMeaugBPpEgV/WmkrVP2OlQkKAvV9pC0JH+qMoPYGovGfUmaAc/rWWlT53A6LvxTnVsEtV0gtO+rnGw/kBB/evR4qG2raGjzxECC0Zn+QZCEpCUdVVmxSDLinZN7WwATnQLSU3ZADDG0ZI0HBbTyZhxJnxXWtr3gvbhkWcZMmy8uyHT6YQ01JCgffh6jSLIOB8OizzPhLS/cUmyqqQqvT0irptSGEpK0TTVSzVvHDgD6OlHymey0UZd/POqV6Vof6N4hOCJNbKXOSzPCsdLgkgLxZBFoEWYnzu0ufOXYUwG1PYMAoBNvfmu2Y7YyPqGcowW3F/j1QkAfHMHKXBnmL5xj2frMb9DqKgioAS5FTvSvBmeaXSi7rVL7YR98tMBFCWgUip7rKv0fH1isAyREkX6vZXGUwAAkJEZZXP2FwgBpPV4o0bLuBDR2xJGcb8IAAAgAElEQVRgtTPUK4rQ8xMOFFxS0tZKe2UjsJgcNE8AWo9N2vtXMFzeNCRANI+2gMGYugpzssgrIcTHpKcnKk9mTVM1VclZ1uUEzBvzGALawx+2saNhMR0PyTgeu7l73Gx2k8loMZ8OBoVzzGJPP1mSjPcaSbTb7R8e17t9eTafni9mKtloWAyKfLOr0K0t5h74tTPAaOvdthoCIilqKep0/C81tK8lQUprAvAQSYkMEAqQ1pk3ERAoB2+pStDhaVuI3obUcx0JiEmQSAiUA5REItLTNEF2YQX0WbOL4cu/4uCOkilHSS2mAKAMfno9ox4/k8h5fyIgQEIk193ugIB3Lq6XGFdl+DOSdvalKmUBw8ZErs8jFn5e4XhzDoWfB1j4I0f6n4jt+lpY5GrK/qscd6AZXALt1l+NhDWXaPxRYFFSpSvotjkcapQWjGQ364iQaS3DXIo3NnXjeNB68vUcgZDx9GWcFPtiwnUFAQEwZkr3qABHiH8qsd04AmJGO/d72MlQYIAIJKNzTWZaW+oNdnDximkhQ2g9VBbRGlLkN6E7HBqO4+LbjNWDs+ngr/1nqhFEsix3PMvzYtiK8msLuwn9N0gNnEIYDQfFIBdNAwAPj6v3H+/Ksr5/XL//cPf73341m42TNNgH76SUd/fLP3//XggpCcq6GQ4Ho2GBBKPhYDQsNtvSoTnveD2FXdFxSAAUdxWiaerypZo3Tg1txfRA6hRvQte7evEYKIpmV8UU8KXXnxKOk88dKNHzH4sJ88bzRqSXBXXLsZcVMGRB/tewf+Ku4shzzMisQgKIT1MlakoNoovu/B5pvDnLalGTcUfpX4bwye1qVB+FNnNAwdMm3jEoOOFBy6HuRInYGXeYOOyODFipARwR/d1IyDQl+eahy51UwkwWLRBbj1a0zA4pgo7CPIaKLkEQPKXkag4IlE1dlTvGc+OTo4Nrdf6qowZFPhkPEYAkrTe7D5/uy7IhZEJCI2pkjHNOkgChEeL/++fvlB0kz7M//uPvdGkEVV2XVYOMIeB6U77/ePf126s8z/I8Gw4Kzpkwz7m4ijsnl4dgDcaWJEVTvaTLKc8M5CE2sLOoF9ImT6LHQWlbiIwxJqn1Vk1rttqb84Ha8SUcDknuFI0bdnOcZwYy/3pqWoqCX0GI2HqKJ6PXYQAEOQsdREFXp2mDtGFlBywSnvRpU0nG7zfmmFfKyBHdhzmtUUk6OolryXvHcizZ5P8QFdL6zco0p+sokRjPyF7qrIoUQ4poN6qj9lDKEmGWStaW6EYuBd/iWGg59PT5czqDX3HgjSOR3gI2r37SXRE9jdC3pMNTsW3gaj4TUFXus3xQsFFPcV4zEqiEiJpGbLa78TDf7fbvP96tNntEzrR+q16E1e7I7u4el+ud8WFPTSOzjBMJACIiRI7IAJEk3T2uM87fvrnc78v1Ziuk1LPLR90JKs2BOb/fAQhIikZ8MW+YQADSbCImFWQyMSeU6U6FEAJwsz1J8TLp1JcM3/kyRmEggIMeStqMXHN5+1/QsSeAj+6kZB5s6OLwv4aQko1PyZVMo7md25pIIUrt7qZHOuqFZX/PWVaJvl2V/kaFM9Hq1V16cnLixmIUuwvwLSax9AmKw0SKsFKronYJbhOflvLtz20UZAGHYqxo7792EGYRCdmutGPqpH/rOqGJPAwETWmpgTHkGTDb7nuPIq9enSUisUtntDsZAESi3G8Y41ledHVGD6tTEXUjfnx/c3v3QES7fQXKmq5eq9OPD2niPt4+EAAyjoBE8uPN/TdfXUspCMAgCjU8SJI+3S2X662Qoqoa81xA1GZotZHCf3SQQjTVLjiU+msPyiFH33xte8uPi+j6auYgWniYnkJuZX+BGMnQvopwUgKr3diDaUkV+DjlNRHU0u6ysn4J3Sy4xZLtScNOXOg9Ux729sF3TjD8S0Dib8UJrWxykIiiVe8T3iH9zQ3PpEQMMvbykdCoQJYuE43JAqwwsW+2RfpsOCbUcYYjpN3qYT37KGHLXI44UdwvjjaTOoCibb87ESLRXzGsziEeh5A8+rUdrmMEg1+bqqzYBhlXTjwDko/y/IgAJCRsduquKXPv9SGABLWZAgDL1Wa73aNy0wAAwH76cPObr1+rQoyjcdKnRAClpO2+AgLQHnLaxKeJi4GglKLev+SXU54UCFACSnXrMtmTp9oafMZHxBA4gujfhLGDGSyYg3L2VxWOQX2JPtZ8AQGTvLpPxTuBNmmZ+AHB8WsMLQkDYMzPpawqrMjartwbU77+7brWSJ/EQQ/7I7px0B/jz2gUAZBHoNmDoSVEQcuz4HtfsELVLnrXkFR1AE53Qa9bjphyTiFPEe8o6icg3RxHAOnn6dEDCMo80e4ON16H7B/ppkSAIA2W7BRIo7W++ywRoUeRR/64eOX7SAehqvY8K3AwYsj6HXK4gsNUCAAaRnjPPhCRug9EAACfbu6FJJMMALCqxe39cjGf1HUj/RIN+sREf6Tt/5YMD4QpEkCKqmnKL1q0HwhQ6udOEnP65J6yONt8ACAGyDrPfHRh+1Mxzq8kdPTJIb0Ovf8ihemzkWUVwDjmC+iIZ3OkYUtz34Hs/1REzMOAzEaxBDJmguAJe62hok5sjJNWZUWTUKV69n3YbrFro9tgxIhggg6sowi3CrQrzXEV14MtQes1OE0aqh6MsgW1x41syZ5WBRHMRohvqVDUloSADupvpyfvYuopgdI1ptLFoAcTuZ/KmknvdUQwer9dMc4xj5+tTxSQqFaBA49cj8i//vDh/uFxUGQ3d0uprpqoCYQgif7815+2F4vb+4f1Zq8nDfnFtjzat8ar9dV2FRAByaYqt1+ObsQB9ZELCcC9H598KdW7OaQhLgLx8NWpk0r9IrIAwOllKZHO/C+tWJ27+1TgkaF/IOgLQjwpeDACAHzd0zdj6BiVDtVmCiE5IwCzbkr1xRVznL5jsFUcRh8NFDnd1nH0mCe1mfQ+Qkpvj+JT8j7kVnEKChscFoVhmuhzSMOhPrKoLms32KrNBhIm7QrBvAA7NeJGJbxd2hYGCT11xBkZ2g0jj/YUxmplCSpyPtoxLMpSbm9WGcCpgiSx3TyOJ4voMIc535kkIww+LHL/4HqzX6236oi02kwhA2aBcLnaPS43qh3MGT9atXr4vxVSPxEAgJRNXa7hy9GNVrBDQP7NMs26dJr4XLP3DIcrpbsGBPVsbGshJVa1N38hiPg1h1jtaMeC5zUqncDnOs/RT0yZHvshu5/i16PrsmPsV/orHVIzhlY4qoevjd5nMUUrhAZvtzHGdKwnBDHcX3Dj5tRn99nurhj12aP0eEXWbhRQj6ByFWPws1cjWWI6A+qEdFB56SfdTkwzHkEVffUfc1aKEAjRf55e81O3raAfc7det9r+u9yY6wRuFiCC1IQbRq3PYiq0SYhAZA5f+FOHfJTgtSSEGWqzz8ETrSvaF+FVUowG0hXq3ULyuA4QmT1dtxCUZU82zX63HOMCeQulJUeyS6/yPuqToxqRuz6wpwlR+VqxrVTTgSAqPayqE2GEv4i63JBoXcz8ElRAIEJJIBGYAYBg2JCfDMCbR10MiUg77rFjQcQROEFjXLfEKDIwk4K1tXpc9HM19RcWyFvBxu4OYDrETXXztcXvtRhAzSvJYgZq+XKwOoKDB45RmQoSOhsSgCAARONi6ktIhGi5GAGrn6C3zkKjjQbFAZkZExaW4P/ox/oChrkfHLY30t+/0PI0tOE3x6m0gUsuN5n0B/KOFZJDEYqoWG0G1y2gjyGBnes2cTDxUW05Ob3JynArzYPJDsEXLbv97nBV+AI07FYn51T2DsdfCUTWE905BmEZx8AmDa8syS1mQUbq2gQQtjP4m+A1Qe1dlMe/m6Siafa71WA0Y/oAqR30nsztFK3Se0SHOSMalR/N1nTFHnCJf5cKbXw5KHogmCVo5ZBTxvoypEIrk8boTpIFab+Ew+EA9+9c/E69TCuWzw0tVSad5EsACNYFQryBoiWV2Wg271CFcjRZ5uFYryar0yXwRQurHtemQ0JUh8OpPMkdQmmABFMJpF/Qoq7iWwlOm5onpEbA4AyHR/whtupX1e4yp4H4x4O7g6+w+6Wp7NFVV3+PBwl9N/tHdF1b9HY1CMNorRSRaKpqvy6GU8a458W6q8y+dj+Ny1Hic0sn68FARASyLjcvzoX55wwW1BOYYxyh9xYbgpnXP6JGWQsqMmZDNed8bBqqDV/C4UDtxdwh9s369ixGp2qv/ZSYMr8M3jEhgTkQ7UN64aEN7wN1jFqIWeI0BmGQV1TkTdTW5yuxT4OI+P+z957/cRxXoug5PQNgkDPABDCBOSdFSrJlr9dp195w9+3b+/639z6839tre9PdXduyLCtZEikxihZzlAgSAAEiEQRmBjN93ofqqjqVegaBsgjN+UFiT1fVqdPVdWJXnZLoybjnsrkH3CfjmkWGG2zZg0Z1PXSuTsAqHsqv2u1yn9PkYEDQEQ7y0pm8fXU6DquRHFOQuO9k2XTagyDvAhg5WMbIG1doFBo4jHlBUsxgiDzvQJhRFH8FUN+AlLkrsJVKxXhhtiHXEmWyaBqI1Zgaqbm5wHhoP+a0e5XSH1FMtdjGEoAAKDkmaJXQmb8jFHtViFsj8sonJxQgAGAcx1HgrJ+1CnEcJ95Mqj6v5n0lA7fqRoF8b1puGtLr2wJEQDHpPfup4LE5ErHLHSh1HICOS6QFMVwbhf00IuXyH3mJQDqHQjX0K6AYpNtgp9IOvnvLuQ1FvLVnYjb18YEv7mGYXa4loar6+vBDSPkZN+QYi8qmtEL7MiUiYFmAItJgutc80Tarrt0OZJMslXajmmqPCNYLNWU0mvdVYynXvSPJdmBZSAQPEQDE5VJh4Um5tKjOVyNQsRaPkUPSNNIGgbeKOrWHdBWGjsw/eZf0nx8S3BTHpcX8XM3aqBIIErFDVTkDSwYkUOtGLSUFpiNn3tCQzxdWnapvOBQK/JFT9LcrZJPfQhyIfDhs8FftDStmNwj5NgJRaXkGVqIskP3L/gKqyYslfB9VL+wPROpnsQ6QWyBVk07lGPyr8Im5EZXxOVrTop87rMlU13qVNzLkiPb/PYLG6T2thlko9JUZJvC0R9+Cmwo9WSZFgEi1Qq6SH+/FIgc7/KDGAhbva9FvJdiVQ4jxKuTKUbB1vriO43Jhfra0mI/1ifPhRw1EWrT1wLswrQ2bAtDV0owMs3uCOC4Vivk5imurRCuD9BmQAGJ27o75UiqgsCSZp4KUpqaZrAoBwq9XVJiZmamGlrUEM7NPQCVWTBkgAKj0plI85KUAmtPCeplc3qdKgrUHMZQLlrQRkto/5CavqHQYwtoQJ52iyNGc/FPpT/BW5FQGwIhhS4yMBK+zecVwq0OE64eKizHFpltpKBFlc1iTRFsPzJ4yVGqoY7crqzY6F2YDr2lOfDqnQpUMlCQ40QaHSWsKU1SwjXSEAP3vSulsNxxhLsxHZWdqc08gJTCHIxEdzMJKo78qHa3JkvpG25EkEcWFhbli4amVppPHM1h1Cz2zMxyzwglpGNRXCGbwSkQAFMflUnFhsThf2wFbLSSZglC/SgBYonIi7/sT81nzBUUAkdxw4UEBYM1YzlL3hx8shaK1AA8fjqjrEBfopRlhew2VKFHYVoU+KdQIuE/0bbExOFBMxSkrAidkf4XRQH6ZmA3Jdj4AQBL7TV0Lw7QgALWZom8KfGKHpkQldAbKrzfmwh5GTFDmsoRIUJwuUCk2RUXI57CfNr1GFaa1VzUrvaXreCxtshvYHaa/tEDObePJEcD+pMJxWxXdrpds+5BzoauhtjbINyN1n24owwmzVCSQmMznLZVxY+kXUv0IUaLbEpWK+UJ+rrRYjONYWxjB1yMXwjJ7AzwtgiGNNEjYmdSvmOJyebFUnC8v5mvZvZYBOiVhqsVhj6xbDcM/kFimX4EulGzI7ufu3S+fzs/7aVqLkM8X7ty9u4oIVSKelWExXE0O33KWm70+HRe5FrTUsAWGpncKpYmo4xTWn3JI0UTGb6JRTZoipsdqt3asB4tofSdepOkrk89E0GoZ5PSvyitjWAaElPiyECFkokwWdGYNNF8OsAVsvAK3DwCMa+WAyQQqRohKX7AVFMnCVOOtovHK1e5hUJKYZctQloouTaIjDJ0t8lFPPh5kkV/u1MPrcuSPZkxfiuNyeRGAdLRPPprEaxtRIWfWvlvN+3XmohirOC7FpWJpMV/7jLJUkMlikvkfAUZAEXNZLWvcq2w0q4Dn9GN5hQgYE5TER8LEIYMIk0YkibA5DhEAisXi06dPBwY2fRuWjpZKpU9Of/bw4ahwXeW0dxVAIj4oVANAHGQTiTXtSo0xFtfYTEHk4lLr36VcQgIsA8aWCGIIAlMm7B89txCX4sLEQtP65igTgSFcLTtPKRcyVYwefEP9OC1TfqLvJ4Z/+kwNXm7bT5jk/ENapPFPRxdnC6yaVoKk3XipDlCqIbB8fKU1ksAMfwJex2zu5udM5jSCYgNj1aMu9QAa+A0dI20Coe8AAaCpsZHRzy4QECC/MB/JVVOZKJPlA5NUFWmKIlSqktkKXlrlY0vVrplYFphITG5U5RqdfBaSAwdG9hdUX3GTxuwVJkKaG0yuVFLfCN1BYhVYlnZmb0jyOPlEcVyOyyXS5XomcfCZEKa5IJVMxS0nAUREcRyXF8uL+bi8WAtsLAeSqafnfAYoUj+smZo6wK6INEoRkTAGZXBkACBSAQ415RgekuaIeNvT0zPj4xPr16+vr69b8mM+P/D06fwHH350795XAEmsnGSaX2uALcYE/v1K/hMhZJAilXdYFYcUmoo9ObpICXJZIYrlsX/MfkHnz72/NqGcLy88eBo1ZDATgZLqoMwOJca5oCZrTDg38DLXUKDUUXaxuT8D95LOOdli8UBcojhfXni0MHF2rDRbVIwJlkGg1JNyPrVP7qgoZo6I9pYWVvgNtzpBJVNvsv9UFfuRGH7bFrHsFc/4ACZ7kEgYHGCKKUh0JS3ML0QIkRBb2bpGYptfUXNp8jCxSLLt5lcUgWAiMj5isRcjSDUq6DmDSRxZlKuXwewbsYInVtnDPQYHiQ5AtkM9DzBCu4L5quTL0AQ4FQT9sbIABBpEjKKIyRgp+DDJjBdl6rKZuihbJw6aB/YCUkJSywtmWMipXI7jUlxejONSzdRYPiCBcFIBIqIsUD3E9UDJYeNsXBOVteyRRgTCIsE8xSVC8YkzgiThJV87ojiH5FERxnYqhE0bN/b39Ta3NNdl66QcAG2OJ2iMf7XKZg+kxZo/bRyrYHTBH4qXqv595oF33BRjxXGpVJ57OvdofGJ4+AHJTI2REGNEIn1ryOCQSUgNg0MQkUXIIGV0hEO2MM0LjdtrcJBso+MpEGMUA5YITIOjBhDVRRjJNRU+WKWt56sPmq5kCur5n6SKKsfxYkwxIapIPCiFrRtKjaNcYmUQyJkMXFUxe8U2OJKfKnJP2mIwTAdlcEglZ4+x1sI2n1vNTdqUMZM07+7qsoSF0sZINPV4MiPSaRNlmTKXJDgcRxYekyaZpAC1IWcRrSvIsTLyiYL5RcXsX1k6pIsTNOhtoCstUwsQ60NG/8iuEj63liguFYvlxahcl8nURZksRhl54rzPVuDWTAXCdHObHoqJYirXTI3VgmSRmpp6BBD7VjyJcKptjy8Bks+ZEWBEECe9yjMEjHqepvx6ePjBsFhDKr84BBZyJRWIyEKqnZLkQ6FpcWhnARAjEguQmcWjfqrYpEoMCcxyUm6bS0BCGyh7wuax6lUSM3WQs3Si77zcu0yFR+b/lit21jrEi8/rinU9tYnMicx1WkoK+4ozwqM33e8jHp/ZQyaYeFwL2i6sfroybrJ9CjJ/GiSicpiIgLLSwki8fO6GkBIQhmQQxg7KM4FdfUxGcy23TXqIncni8HpCCyn8ZJQ4w2AQF6ho49eP6pxuq2I+Uo2gp60hxZwOKC4V4/JiFGUxymSE2RFlVQDLqR4i1H4gUwsRUTmOy3FcorhMcblmaqwOsPOClbWReCiBEV6JzYGAGcBysn8/aMomUEkvJrwXljLqs2MabtcYkJLW/gDvyj2UCKQPYjowUs6lDFdKEbds/GNhMArqNhaB/vpLBt402daUKnpq8NyA5bQD/1nxBZvmSAgN+DgNfNPWVyFgTxDv3ddlCF3gtg6E+vnEEQZWHc1xRFm0pRNfIk+ysi90wajQ0UXT7VKWhORp+T91UwY4/I8hZBsGXj2ZSc91KTooAthVgc9kMN66peeFaKk46Yji8iKUF+NShFE2ymQwihAzGGUwOXso2NBaxMEMSaKYiMpEsTAy4sTOqJkaqwicZ5GA4iTTObq62nNO7JL6AUBIMoCVgZBIBDs4h/O5lpCVZlkm3kRaeaiUfdkM1uIcYXk6Shqb3Rv6X5kjYfCKaDJ684RnDCHrdULkDmTtdHmqLBn0Ijr2V7M51hLI8AaAx+sDdtvSCqYm8oBG5qth6x6jjm+qmxWRV/CxMzeIHAIM/F7q/OaO2wcykZTl/bpkk9bXdn8iCIHJZmZfljFH3fNrKaV1O/eZDJ2P/hfjeFvqU1ayx9oxg9J/uuBUELNPr1oVtdLkC1FM5WJcRrEABDFCzCTn0SOiSk7DEImQtVx/EhMRUQxxLFKGEsUUx7W8Gs8OlImM0ppLDlURsAKX2ABMplJG8Uo6FxsiIlwhrTyxJ1SVoKAJNze8eM7eFn7OH9UNmA6gcPIM1yDkQmgfIhTAUTac5xFXYh6Q+h8Q6AV+NVgDEHCyjTLmthI4M99vpijt4eFlczuD6+s6rrDlkLjqyvMMHvxJielqVwJT+7Jr5XwYujGriVTLMP3mmHVTVEQvaXbjxCEzFWryYlCcUs+WpXAMlqMJyoq0/CvP07uv3SSf+JCEjC3dvzFtiJ0gtxQgIKJy7PZWg28UqO8j/Hg+5b+4KxVXFOQQGBAiNsv010q3plT5fjypvYT8LA8+y8lAFq50hKTBjHLRE7HRM58EAYwldMkDkcWgzmoysN224LMYAsfEWcE1WDK4PpLnbg2eR9AqyzULbHWivFwfFrWhQU8Px45ZAll8E9uKVUkaAtPyr4yCwHhGpxpBIPGX061jaRilQTo8pCIrTv5RFoVP6/N347wkb+Ql3GOwdpoQ9lpeq+Pd1uAbDGxJMnLVqRXeaikVBBQBQr1nUHRg0hNu7t4hH9tbGKzJbVyS2dz25Ng908JXYjeV8/30hKr5IYUBw44APoO3x9HbaeJqsKbAnf6pk6jyDPPwlV/dVE2Wt/9l+SYcPYvgsNY6wJJOI+qlmoAg8rEAamZUhgD/aMWKjHAMUNhgSNaaa5GtU2UKYUdJXAOTygggdznLjJ1yy6naByhRyZoEJDd3k3561YvePiQFpHhYuZ1HDaNP9KpojyDAJJcA7B0mwV0BNXjOgEURSOaPktmcyBOwX/Z7J+mKRwgZgAxjX0I5gdkERc1Vvr7V1CRPKcoNpVZb5cfI/Sm+7StqpstohMbtKngy1TkLYKj9J/oTIkhuB8166vn8A2sGrdULQSncYs2mBgjyIxIpVZQ40eItyQCMzB5hlKgt0OLPJgqBksXFQM6Q1OD5Az4HfBu2ZCH/PomSRxWriNuJ+tMNkylHQoGZ0QreF7f8ExlgKFwy6JOVrY3rmlhijMFmvWzlPLflUbCvhfqDg8nKnAyhrQVTxaIDz1kqJpBTbvlgZN30QrBYqfBgtdQKagDQakKsONi7+2wBQPflu+YF2dVr8DyDwW3C3sWY7KnGylcKYt2o2jHPSQmFPTxUYKVKEApBpFWHwCN6bQ5PaJN5LuHtLx7ThYOqwDHwa8MN8jUHkVQNDJtqqcaiIYHR+M29qdWZEzX4cwKa7JQu1n2KiDc05plR0aO+fNdo0FBxdqEzMc1io4Tsqjb6StaBF71IH5rwW3I/qiB8uFtfVSdLIKraCj6R4lSouKKiotVRucz15NglPyC3FulYU0DsDwASfbIaL1mZCIIzI3bEgNE9b5DeLyfR01nolx9JWk2e0i5gktjBF97OHNCU3v13ZIHhimBqXVmH5//UJkKqZ5JWpN1CNB+oJgTWGggH23jF/pcc9ElCtrttjSwNqm9geC62MZMGXlausgX7vqDyNVfkVacnFY8J2URWp0pAOfabfgnokZaV2Za5oWEaVAyJrELWu77tynvHdjXELE97XoM1AD4XPQYQ+4+t7xL6S8PKQGZ+hvAmZ1xydMIHrphESxSpu/yGYmGbhUxETgU7XiMp4P34IwJee99Du9kkMDzIHtN+g6lQzXAb3daEwFoBjwkdNk6V8coms9d2Dk4PCqEOgsOr9i/bwvEFSLzdeZjNUZXB0CcyJ8oqjpwvOAoTGeJF70cJDYfj/4v/OZ81XHGkiUzF6ZdIKS6dH5c9CSjYO4RCtrJdzYn59gDG/Au9s0phuUpG8RglG1UA1Ne6agINulhFS9LrhYqtbd7h5v5vIhXDm0vBz8ezchtyRFcIkElAjnfFfCwCwSRpqVkcawt8W54gbJqrX+S57ypsS4Ol2itGd2HzRIcDjJ6s5k6swLSW3HKXgjTqrCiDQBbZlcyuCIwFXVUykjtOCCkIQuzO08uH+maFHkHCMtuzWLVjKVRcsk6GRSK1ARFQbaHo2gSe+w4AkoWEyaFcYIiYqi1eD2h/iQhJL+OQt01Vju7UXQKEdsBYXkwoiwQ3GLzWgBX/8Dk+ng5TgMwLnuHDQ54tXpxeNPmmYEmH8FtVRiHJ5zYWy9bkwpqB8Ks0Nb6cEabJwOaEE41jP9Qk0jWrdh3SRU9aRMVPU5pxxW9pFvB16u034qeoeFpxAeSOnM5R5gWFO3kMk+GlN+Y8Nhdr5N52+mAiTh/cxGt4GvErPsgpg2GBmBKyc9lvTcysGUDnJ1U60WQAACAASURBVJIMcnhqLe/NW0IH+QzWit/2nPxguzWVO2WGQ9r3SO9NMhlV/EOcH43qPGOY1bkmQMkbV1xVNucUC/K4p6YCxfB6n2ZJtqLP2jK3rSzBnqnBNxykNvWE6phL4OcdO6e/RuM1R4yKqkKVgC5bB6WG3/FwSCCHQgo9q4XaqsK8cozCNk2QKK+dZveRXsyJqdCxYT/Z9o1pEToOGBijlhIjsYu0A0v+N2WQn+QJrX27XUvgcKVQKsSCWsTKVhJ6UFwaAUSIUfrXh+qsj3DrcAgi3WJJWIh97iF9e6lZ8BJkVRs5wOqHTAT0XHmqcotOy1MlO5YyvNZQknRva7CGgCsg64NcaK6gc8eL1nct9EmgjXF/KZ7FksDnQy19Vmv33zABnMRfZicmxUt2OhRGnYjNExJZpqSuZKksqXUVz+ITXGSYbzWnZq2A11AHAPHGV1Wn8AO7DaOV6WPTgvbNsmoCcpYY9KGpKMTsYn/EIEBAAP/SuKaC/+Ova0clUuXaUqmwnasarDGQJkd1Xxq8NT0yo7rZUp3FuySUKjrvNrER+K2idH5B5k24u+AjYCdBIyKaax1kShK2aoZI5TDRx0yDbM+fBfQv0ltyE7tDhCT4xvokG5fOQyASi6O4o+WykpcixyuKB+CjoI5jUElZku9qmJSh7DqhnyiW2cCkWaQCJwSUJBJysybJ/GTsTdSEzloAErMHKVkaQBFRRAAQFSFTgkjMX8Qk6AFAy4tvybPgki+4EVA9QJS48MnS1GQhUiSYAZA54Y5CtZcUWa4ZyQo6hZcmhQlWNKYy6lJyb5oyyVhe5zXbNA6ZaAtViERxqsFVEMnPLXqLfkKnNNQwERdEgIDIzntUsiVKDqwxkzSR7Is7WuwDiTopihCQUPyJbzOosnoAlBHKUjz4rMQaPEegPfLEQ0ZQmbt0kIP50aQnMCmdaMbhUKohlFoTTCuEz2RRKJSszu+frBhMslwSP5xDEU5AaAgifbCPpbpAJeKzhIAkgGSsRXOovCCtpgGAkK1dIkSIACiOgCL1/TmRpBHICIfJcAZhJkHGGwnfNBiPFwYir9V4La63In/5dTyaw+xUIvOHnmVh79bfi3w5NVhTEHiltLKVm75urDyFwvIN98BVYyXUVYKNp8qWIbdvuWB5Q6ursdERu+C7kwoVYhnkuarBcwnaggdud7iazQvE/u9Bu/zZYRsYS2tA5i1feMRbWC29IZHJqYjSYp1s3PVvL48uYQhloMS8E4rXWIi9rxrtq7BxoSswv8Zobz+xjcKZMquqfmrwHABJ9waAR72WOwt4UgoiRMxEZvDB2jHjGNyeu/JWUDQykehnGsd/qAzpNr2vgoGfKtQCN35jOQ0BpClcvRqASqAudSFLDb4xwKU4Myrs+RJU1gknVXj/FafHyirIpVRJVIFFJqpGIEHaWeI2V34p/o6SJAHJQxA4vA198iaRdlhZQKUFMdApR/uHMWTGpdVChrNENdfdQv7dxDJOAwaO8Ww81MH36qjx0A6PeiO1haNrD2wTWCbkML2HlesyOUEzRoQDAeS3G/vwHovAIAnm4q1w32nFgonIU9Vp6krp5IOILEOjcPUgkNFcxo1WsSfWpxnirLH/8wqGigXDtkgx6u0GaVWY7vMYx+SpoAxZ4IwftttZ775KgkKhUNn/baK9+H3kBXqwRSNvIDON+vQvGv/4dmt4+Zurad6h2Ry5xmY+HvpeGzOsPLkAXFK81lXQ/0KersML+nFNqVVJ0Ndg7QGhb3NsajQhFazpTIiQQYzs48MqCTJWNQSeI9kqta9yYvMMGUHaglFUw5rxmwzpvfvDFzanSs9j+cyqgqLJIg8ybtakwHMPcgK6HqUG7n86jasVAcz7Zq2Y9vd07BUDLr9V8C1CmltSxBWcRR775dO23Bl31jvqPiL2tGohpwOm5ecyOFPYlr3hINPn6Jn42SqKwJC71pg5uJQs5HPpTxEFtrAN+EFamDr+HZET6q3B2gC/HYoivEFB0bA0sNZtIYnloUlMQIkxBK9ClzgqyBjNsq4tr8r8s1jHaat6VJd/PKIHTQlh2lY+hFjFQIesGWZtLBe0TLVH2ntwLG9Tg+cC/Eelmu+anIsAqipKyawX8p4DBrynghIUAbPdi8h0B5gm9SFwu5I/HZNEixyWqEpcRKpVuAPxg4k+LzVuAKRic7IvPUaR+ZZDL6nSCDsjaIyKhcBHoS8E5IfaR5U1AkHDm3SO8xUDGcpQWuuUwbA4CqMKGAysL89l1fidZpJnfeENtHlVbRhL6Sx9PMNWvd8c0Tac2pmWij+1b7M3dpv0TPBHWmrwnID5RUJb+87EMdJdevx/S3O60QTuyPiCBX5kmg59WggPWFQKsaDUTeTfugL21PZg4CShdemGGWwcBMYajgrs7tSo0pQKIbfFHx/YVAjFIKxCR/46FlFF0yAYpzEmC7nJFWuwloFcabESVWbFUYgQIJLbccHoy/IBqu7aV8eSdGkzeJVM6ApMErSH0nBU+fSr4AX4FAQYBkcNnlMw2Ng10MPc47721Hnmtf3Nex6LJYDDZ0D7faSqYpPVhy+DLIj8nmstCbAXjaL3MkiTpqCKEIA0wRwKqwlCWT5ZBVOO9Wj34F1KzD6Y2NaaJiAQ3xIvtWZzrDUIvdAkqm5F3Fag0TwcnEH/cm4/NSusstQAhxt88Qoim6OWA+GQqqohvSnbILNbJTQui5iU2Ir2hJ3OavCcgDfOHRT3qaH8UNsU4DMI+Q0vNgtzRVeiUuVgeSrjBj0tdqyln4woyS6CMi4KwM5BkkujUA+FHnWmuZOsPSK7l5DISWaSBB0ispTQqIKxIpmJzLjFh13GQY2QRdJOmSCo1u+rR2TmCSapw1QkKTYxkrb+kAUq+EgjM6d0IT/IjVj2M4W1BmsBEEiu1EhmFYokPxSVAUsAYj4RrvSlK3eJAAAJKM4iZdiRQ7IQkTE0/9fOM8TQiituECOb40lmHznJiddImNARIHKNN9ouYcKAAqesYBgjWqiKCuYCEc55tuSRlKkjBIzsJaYppMZCdBEBREQA8QpDEY5wxRgwJogB9CI5ApUMrgbPEyj9ZL7mREfwzJF66iXz3fBSSR4bbKPRvCCamPwEiBEaTMZoIa2jQWfc4jVZijDLNecqDxWjuXMZEVF5znwvqmpiOd5KZkhlm9xW2TzBOVObeITD9A7Uxg1fHmd+ywxvVGIzJhh8UdyQ4eSOo+g20F0yB3Qd/p+B3Uac5tVWCbU1HN8OsCIcq4oWAIyVB8okMBPbrgqs8BHSww/VFQbZeEXNRdlqvSEXj9/Ttc3BGjw3UN0rC6uI4HfJxPZOmeYpXVcoZr1XrrP0YhUyEOBRwuwi9cNsUhRBEjpQlhyrYThFoliZMwhgVrbIRF+Zl54KFo1l0qgXQFZtgsRvYjZdcKudcvC8ReghILl0HUlya9Vg7YIKohOhnG4Clj8BvLMwE0Vo8jAxX75atEtR2o7XA6yYAiWq9VJAxyYqMT/YTsGSQgcGk68ig8rwSY3n1xQYLrypTdFXUxdbdq2Hkxwn3VPf60VX9IexEpcb7atzqcktqRR4kLzm35irOD5y6ZCxI087FedRoZ4AlcYhKWC/PSFptDSwNbquScmlrdW9Ut56Rq8LRJI8YKFYr7OK7L5jVKBzwaPWtSDHtwBIp/9ahddtxh4JQWTj0J1RZcs8Ba1fzLhcZOlmzweRUO8mD5HJfjoo7eksTGLg6fjnlWBbeYyzihKtJk9KArTgtJ2qmgR43sAyz+0pxY0RLv0poIP4BEB2g8xqDvg9ZEtLeqdXKIJSJZj86jPsuR2Wbrfw4x/4c2Mg06jdDWvDdaovesj23TIEnAnd66SBMdTuiNphS6eGiMBI8sxXRKyOddPCIyM4zj1zxqA1QQmgtm507YBXQbGbBBCznNbPAFQ2jqQ7ToVznTLxbFHl7Su1tR3eMLpGaU8EW6cgVt0HF2TLI93S0fiVAwCIFS+rZm1w6YQoNxfWbIs1AGTJdwsqBQu1OrA8d4bS4iWzHwe5rSwt7WOi9jvXBjq/HHCaG4W6vqIgsbf8DSryGiFGqoI62pWSZqGGJpF8WZlRhImhw4r81psjU8zwg7YuCJh3w0hIg9BM8XmLjDz/+1eS0TRHanbGWgMK/0nAxOZYjUUCynIhuSYUCRAo8iTBsyKWmGLohj69WqCnvROxCP5M2M+Qc3424wnLwl5EkMBEJoWK09oKGg3PaOWcytSFcAO1POAOYApZNfgGgh3Ds2acMU3VbDItFINTbQMgNbxRnS5zJEGYQqvz9DtGc8e1sfClph40EIUqRcmFt6Jl80lR53sZaNEX6Ji9HHOYmRj1Gh+Or2NnFFXLNgy7zNhRwryywDNX+bo84Q8Q4ZWa8bH2QShofbC5sBFWang4nhECROKTQNJH1epSiyb79Okq21ZHpu+uP+IQ6irYmWT4pVLv6WA1IxwcdZi2mgh47sF9hVqhV3y9rpJwoh++MIgokNa/rdw4dquJD49ZbJg/fk9Cihn1S3+uFJIEWWvb9kHrv2TDj9GZRJlFADIokpvxENGIddpxCN4XGpGixDbwNmDjVanc6EXZPpTYGuRtkCJYkkZod0GMZH/3nV0dXV1d2Uw2n18YHXtULC56+tIDt2oSZ2Bg4+JiaXR0bJXw1WDFQPwSV93AbOvsbO/szGSyxYX8+KNHi4VFwb8AQAiHDuw/cfzo3NzcL375bwBS6zkULGMGOixhMqmJrqOjo6uroy5bt5DPjz0aKxYWg3iZ3xXAL3+nE5cOgQCK6dXQShhzte2VPzN0dnZ0dXZmspl8Pj86+qhYLP65KXrmUF9f19DQQERzc0/d0rq6ulxjDhGfzD4BfzgPzPsVZsShQweOHT38ZG7ul4JVue9eYRZWnu6U+hnPq8L45A8EI3XX6c9ml9rBnFCrxGLJ8lZe44etVkgkLFr+lrUjnpgC9wAv9Tltshy0GWMNMQHZJoc0JkCTJ7YVu9gJlRji8RaGTT0u7BgaOnhgX0dHu2pfLpfv33/w2dlzc0/m2AoikZ6B/Gv7WJaR6mHz5oHvfud1IvrNb98eH59YUtsarBCQuIhAadbbgkgeG0von8pLgMGhoR3797e2d6g7cbn8cPjBmTNnp2afkMPWKS62pX1DdOlsOyTr+WOGGrZu3Xz40MGurk51p1wuf/nV/c8+O/v06bzdmZIpznJRHmms4DKGC1OEruLlSKyKF9y5AkdAyTsx5oRA/AA/1KP3DTdNhoa2HdwfEGg+TbxmYM/uXceOHl7I5//5f/2LW7p588Drr70KAP/3//P/BhBIh5Q8sUzGax7zP0VDK71mBBjMHOs6zwexYIOJzoxGuL0xw9/XnJXaZcT4WNVyLHvF0CgzfXh8AOHPZxkiko2TZwic4SItAkRIsnsh1/reZzEfgUB/irYIQ/VIiPwABkaKshkQIHY7SoqTnuQ7suQvAhBiso3WXWCKAIhHDh08euQQAMzPL0xPTxcXF5ubmrq7u7ZsGezp6X7rd7+fmZnVzyTHBoWyEshNOHHi2MYN6x6OjH322dmK9xdL5TiO45hK5bI7jjV45sAmhDwcXk2iWJx6GAOUEDOAGUAkKksz2QNei17C7kOHdx8+DAD5hfkn09OlxVKuqam9q2vT5sHO7q7fvvX29OycOtgZEotbmhzeKKHqlIJGiUglFMdxwN6wLRrhtCFiPp+fmHi8WCo1NTX29vRs27qlp7v7t2+9zTUWakkS+5+ZmSPAu5YhFSWDAODFF49v3LBhZGTk1OkzSS1DagNja2XexBFgBMROgq50KHQqkDLyQFkbqAlHPugriKU8Szhy6MARIdAWFqanphcXS01NjVygzT6ZW8XuXjhxbOOG9SMjo6dNcffNA0P2g851E7IeSU9N4KnovKE2Yx2WUv9KrzF9TeLmiy+eEON26lM52zWVxL8zSlUt75CuwBtqulWaSqO5fyykJaSVqaKdzXzxwQDFWja551VtkU0wIgl5iUSUZaJGDCLLb+iYEDYEHo2Z+8RrmC/WaBuwitIBLb+FnAuHpCp7oZ7u7sOHDgDA7dt3Pz51enExiRuv6+9/443XWlqaX3n5xd++9XunMzLfuAHNzU0dHR0uV3vvP3zw8H//12/icvzkyZNUUmvw9YLJEwQUK2M9hVfCRR3d3TsPHgSA+3fufH76VEnOtK7+/uOvvd7c0vLKKy/95q13VleJpdg/ZNcgANi8eUBYGzdv3T516rPFxUUhufr7e7/35nfa2lpffumF37/zXgjZEkDaH9zaaWlu7uzsmE1lBEtsPrtIA7G/QPk3MczR3d11SAi0O3c/OfXp4mJJ3O/v6/vOGydbWppffvnF3739h1XsUby1J6tqxDwDqDhFl/g2TTOdd2TPDK9DjiTH7TkT+2kRR7ZiIVIyhfkMtk4mZvXJO2BW0f3yGiztayh0w1eRq0LzhSVWHLrdObrdFxXyzQAdu7IcEnm1ZfNgFEXFYvGjj08pawMIRsfGLlz4HAA2bFjf0dnh9s++LynDc5mqYmZ65rmbdt8CIPUPmRfLgw2bt0RRtFgsXjz1ibI2AODx2Ni1z8VM29DZ0W52kpaBQtdIJ8vlC/tJdJTz6JHDiDg6Ovbhhx8vLi6qWmNj459f+gIABgY2dXZ1GE1TXf0qpXgFd4eI9NcmVHdV/9KBW9WAg/RmEwK/kcEMF7ZKgfbxJ6eVtQEAY48enb/wOQBs3LCef2r5FkGVPnU1L9qZ1t7wATnloaio0FDhMGW1JCVa1WIV9ssKbFgoAqFB5Zs48QOTPmSiMusiIfSuG/U8Hsp4iUUFgpYD6LP5ZcgU0VLGKspkdqIjMBJ/IlG5UHMjFwhIOgZiWBUsNuPQT0jYkGsAgEKhUCqVLOrv37//dP4QAnR2dkxPT4ub9fX1B/bv3Tw40NTUVC6Xp6anr127cX/4gejt+2++UV9f19baCgC9vT0/+tFfUExv/e6d733vO977ANDT23Pi+BEAePvtd8vlMgBs27Z1166hmZnZs+cuHD50cOOG9blcw+Li4ujYo/PnP5+fn+dE9vf3HTiwr6uzI4qiubmnd+99OTI69uILxxYW8u+//0dVbfv2bTt2bG9ra81EmUIh/+jRxKUvLs+KT0U1YOCaumI+xckXfT7RloKUoL6hAQCKhUK5VDKKAMbuDy/MzxNAV0f71PSMKsw1NBw9cmjjxg0NDWICjJ07e+GpOQEaGnKHDx3YsGF9Y2MujuPZJ0/u3Pny6tVrCXoEIBjavm3Xrh0Tjx9fu3bz8OEDfX29ddm6fCE/PPzg4sVLxcWS4M516/rEug1hW4BS5AQEdO3a9WNHD2ez2c2Dg1OT06pCfV3d/n17BwcHmpoaS+Xy9NT05SvXhocfqCfcvm3r7l07p6dnzpw9d+TIoY0bN+QacsnjnLswP78AAH/x/Tcb6utb21oBoK+356c/+WFM8W9+87ZAQZLv3F7U9rQt27YO7dr19MnczWvXDx470t7ROTsz/e5v31riqwLVI8ldzOLalHPGm/1GARNo9ifa+/eHn87PI0BnR/vQ9m39/b0zM7MffXya19m+bevu3TtKpfLv33kvjmMAGNq+beeO7W3tbZkoyucLj8bHP7/0xezsEwD4i+99p76hvlWItb6en/z4B3FMSTwYAADq6+v2790zqKTl1PSVq9eGHzxUFYaGtu3aOTQ1NX358rVDB/f39/fW1dUXi4XhByPnL1wsFhc3bdywd+/uzs6OTJSZn1/48quvLly8tILh0VpSvLeh7dt379rx+PHktes3Dh862NfXk83WFQr54eGH5y9+LvcNgDAJ+vt6Dx7c19XVlYmiubmnd+7e9fSQsFL/3r27u7u76uvqF0ulqampq1evJw9O8Bff/66a7b29vT/58V/GZI1b/QHNU/H01NSVq9eHHzys+vuA5dr7g/H2hwlZ3W8VyW8hysVwAzkJvxABSYPD+AiSTjmyFsk3jeQjt0ej20sZ9EePtKRJbJWGT4zzzxYhJCQ9HGJ3PM/CLCoDleCclpaWzZsHv/zqK454IV/4xS/+leNub29/8803ujo7AKBQKOZyDZs2btiwft3pT89ev3ETAHp6unMNDSIK3ZjL5RoaBNOG7gNAQ319f18fAGAUQbkMAE3NTf19fY2NjT/+4Q86OtrL5TIiNjQ0DLW09HR3//ev3ypJjbVl6+aTr7yczWYAoFQq9fR09/R0T0w87unpThb3AQDAiy+e2LN7JwCUy+VyudzW1tbW1rZp04Y/vPtBbZmqCeYMMSddTBAnG7CrVjIMw9MnswDQ1NKyfnBwRM40gahQWPj1v/xLIaZirLk4m8n89Cd/2dHRISZALtfQ2trS29P9v//zN2oCdHZ1/uD7321paQGAfL5QX1+/rr9/XX//wKYNf3j3g3K5LJi3uaW5v7+vqblp+7atuVyuVCpHEeZyDR3t7ev6+956+w+FfAEA1q9fDwALC3lmLoCSFaVS+ey58425xqmpKVXW3t7+5nff6JQc0Zira9m0ccOG9adOf3bt2g0hpJqbmvr7+xobG3/6kx+6j/Of//WbUqnU29Ody+USBmlszOVyikEAoL297Xtvfsfby83rN4QQbGpu7u3vb21rW79pY0MuBwCFQq7a1+SD1O8p5vB8k0ALtMFNX341zIvyhUKy7wmgsbGpv6+vt6fn4sVLc0xWbN+2tb+v7+HDETH+L714Yu+eXQBQLpdLpXJ7e1t7e9vApo2/f+f98YmJnt6ekFgDgPa2tje/+3onl5abNmzYsO7U6TNCWgJAS3Nzf19fS3PLls2DuVyuVCpls9lcrmFvW1tPd9fde1+eOH40iiJ1v6uro72t7f0PP1rpMMl4f4tkjW3btnDWaG9v7+/v/e3v3hFbexBg65bNr5181RK2T+b4h6REVezbu+fE8aOZTKZcLhcKxabGXEvzxo0b1p85e/7ylasA0NvTk8vJcWvM5XJ83Kitve17Pp46/emZa9dvgnfDggzxCVZ1AxvswclaDcBMAmARCj+gCugH9Lrimqwde2Wx2iSEoL+36FCBDENYGl2fPWnuZDFoUM1ZZTD60Z2hmgJM2Bt3pIlknGqJRjH6zBvXIjFKbt26s2/v7qampjdeP3n12vUrV64yD5KbZwhAr7/2Sldnx9T09Mcfn370aDzXmDtx/OiOoe3Hjx1+8ODh06dPf/HLfwOi73zntS2bB7+6P/zuux8IRL/4xb8CgHs/BdpaW/P5/EefnL5z+26UyRzYv+fQwQMdHe1DO7Zfu3odAHK53IsvHM9mM1NT06c+/ezR2HiusfHwwf27d+/keDZsWC+sjYuf/+nixUsAsG5d/8lXX2ppaXnhxLFf/+Z3FSlZ2+CzumVgEo1JL71eMLZFVdJICv9Xt29v37M319R07LXX7167dufqlYX5eZCBTkSIkg4TjI2NjYj4x48+uX37TpTJHNi/78jhgx0dHTt3Dl25cg0AMpnMd14/2dLSMj098/Enp0dHx6Io2r1754njRwcGNr3wwrFTpz7jlLS2tExPT7//wUcPHjysb6g/eGD/wQP7enp6Dh86+OmnZ0QFAHj6lMlQc1wuX75mPd1rJ18V8b+PPj49NvaooaH+hRPHd+4cOn7s6PDwg6dPnyoMbW2t+Xz+jx99cuvWnUyWPc6OoctXr/1///wrAPjem29s2bL5y6/uv2MuE3n9NaOX+ob6F2Uvo8MPFub1ItZcY2MhX7j8+aWpxxPlcmAdaxWgQqqpNodH8v/ZQQm01187efXa9StXr4kYkl3t9u2jRw7V19dt27b10p8ui5vZbKavrxcAhKWyccN6YW1cvHjpvBQdr598uaWl5cUXjv/3b94SO0He/M7rW7YMfvXV8Dvvvs+7eO3kK+KtffzJp2OPxuvr6184cXTnjqHjx448ePCAWznNzU3j4xPvvPvBo0fjuYaGY8cO79q5o6+vt7e3Z3z88elPP5t4PNnS0nLi2JGtWzdv3br50heXJyenYAVgvVPBGh98+HHCGvv3HTiwr6en58jhQ59+dgYIck2NL730QjabmZyc+uTUp2OPxpsaGw8d2r9n964EhZwI3T3dwtq4fv3mmXPnC4Vic1PjyZOvbNq44cjhQzdv3S4Wiv/8v34FAG9+940tWwa/+ur+O394n8cSX+fjNvaovqH+hePHdu4cOnb0yPDwg6VvMiJlJwRmMpvG5jcTp4n+tsLvo9EiYZnIi9K6gwYDoefKbuLLyOnDLGOT4tIK+Djmh4HdqMBsMauyh4Rq/NCF/MJ77/9xbm6uri578MC+v/+7v/nxD39w8OD+xqYmC/muXTv7+noXFxfffffDsbFHRFQoFD7+5NO5ubn6+vqdO4dWN/lxHMfvf/jxrZu34zguLS5euHDp8eNJAOjp7hIVdu4caszlyuXy+x9+9GhsHADyCwunPz1z89Ydjmf9+nUAMDs7e1GGIkdHx85fuAQAPT3d9Q31q0jzcwcVcpaTeqMI7DBy4n8o2abSyy8sLHz24Qfzc3PZbHbH/v3f/5u/O/mXP9yxb3+usUmgiVAs8RY9QBzH773/x5s3b8dxvFhcPH/+4sTEYwDo6ekWCHfv2tHV1Vkul999/wORxCWO4ytXrl269AUA7Nyxo62tjVNVLBZ/9/t3Hzx8CACFQvHs2fN3730JANu3bYmiCADq6uoAYFGGT9iZ9X5O2rVrZ19fz+Li4h/e/XBs7JFA+8ePPnnyZK6hoX7Xzh2c7eM4fu/9D2/cuOU8Tk86o+7atUPwneiFAAqF4oeylx07d/Cxj+P4kw8++NOF88NffjUyPJyGtwKYodznBxbyeUOg/e3Pf/TD7x/Yv7epsZFXKxYXR0ZHAWBgYKO6uXlwsL6+bnGxdPvOXWCi4zwTHWfPXwSA3t7u+vo00bFr55CYG+++NbnACwAAIABJREFU/8exR+MAUCwWP/r49NzcXEND/c6dOyxi/vDeB48ejQNAvlD4+JNPxSfsYnHxvfc/nHg8CQBzc3MffvRJoVBExA3r1y1zdLhjz95usVh8+533JGsUzpy7oFkDIwDYvWuHELbvvvfB2NgjBJhfmD91+jMxUBzW9ffNLyyMjo19/MnpQqEIAPPzCx99fIqI6uvrNqxfn06amu3vvqd4qvDRx6fUuCmd6Aey/nXLyb7h/nYao9a7JL2woOoX60Dd4+nVtxj1U+MPUeOSX6ncIEpVR6v3QAzC24V8dtseqqztnQESuMcejf/Hf/760qUv5ufns9nM+vXrThw/+g9///PXT77a3NysutiyeRAAHj4cnZ6eJtZefJnr6+up2P+SYH5+YXRklN8R4buGhgbxc11/PwCMjj2aYV/9AUAtNxEgQoKNjU08rcK9e1/+8l/+/Vf/+h/FwtrPBZQGOhTpgBlcFHxIPhsl6Ac7iCfHxt77r/+88ac/5efnM9lMz7p1+48d//7f/O3RV082NTcjaBcBAJ7Oz4+wCUAAc+YEGBwcAIAHD0amp4w3fvnKtUKhkM1mtm7dzIkoFItqK4F47mvXrgNAY2Njf7/4qIcA3HlJtubpRMemXbVl8wAAPBwZtabc8IMHANDX38dvPp2ff/jQmM/CV2toqIdUQbKZ8V3FXhbm50cfPlyJoYCgtr7od2FuhvnGRTUssAXaunUnjh/9+7/72WsnX25p1n7U3btfAkBvT4+6ObBpIwCMjI4KoSFFR6MpOr76xS//7Ze/+vf0NGLJWxsZnTal0/1hIS17+c1CIW+FYWZn5wDg8ePHfMVSuVxeWJgHxgKrBYVicc74OAJXrzLWwMT2GhkZnZlV694QAETGBKaO4YsvrvzyV//269+8DWyizM/PFwoFAMjlKlC+edA/bsO+cWOQMifD4QI/pBUjr+ITnkpqZmW8luQ3DuIcJYbMNAic+Io4KJV3I62dJLkQxUr7S/shyQ+GegUsNzLNgIq9rFM/HT9YQrViuiA03CxXh8zGIW7IpX/J72Jx8cy5C+cuXNy8eXDzwMCGDesaGxt37Ni+ceP6P7z74fjEBAC0tbUAQGNj7uTJl/UoIbS1tgFAs4qIPLNDnsR3PpVqpKWlCQCmTGXjwu3bd/fs3tnU1PTjH/1gZHTs0aPx+8MPpqem55/Opzf8tkAolzhy1gAAiBFjtdZI8oGYfEmaPGsiSgNXqSsCWCwWr5w/d+3ihfWDm9cNDPRuWJ/LNQ4ODfVt2PDJ+x+MPHoUORaNsgDKcQwAkZwAbe3tAPD48WNrQXaxWJyZmenr60v2vBCFTmEZHX20uFiqq8t2dLSPjIxSTGDP3yR66p3TbW2tANCY0xzB7zc3NaWr5nJcBjmfvRVFSVurzXe8l6amJiRzRXtKKvVKILN+iRcNsZRu9gJ37R5Zc+SbAsXi4tnzF89fvLR5cGBwcNOGDesbc7kdQ9s3btAC7c7dey+8cKypsXH79m1imfC69f0AcO/LZIHRrdt39uzZ1dzU9NMf/+XIyOjYo/H7ww+mpqatZcteSN5aLnfylZf4/VY1N1JBLJ8vO6mJnHRLVULA15QgLQaSaTNgbEyxRsfI6GhrSzMATAphq5JeedUtAgC2tDQPbd/W1dWZa2iIoggwCR+K7RnWEgqOKtEyudzJV19mVVDzlMmgamKi0rWeZ1cHJ3j9f75KIRlfEznz7ZFVkziSapi4K6IsC4xLVG2Zl9wYcPZESrMnt2JPMEKbHEQi/46ZVS1pj0gi1kKabNWF5HPzSawk5chC2nZQA51vM+p5rCGTZdLm0LYTxHF89869u3fuZbLZPbt3Hj50sKmp6fXXXv7Xf/9PQBAhxL6+Xq+Zmclk5Yh+TdInk80CwMKC5wMth/n5+bfe/sPhQwcGBwYGNm0c2LTx2NHDk5NT167fvCGXbn2LwaOJ1bFqcoKi4qsYIAYUmaYgKbUAAYhcg13VIwCAOI4f3Ls7/OXdKJPdvmvXzoOHck1NJ1595df//h+RjSxIen1dFgC80n9+Pg8A9Q314GZlN6kqFAp1ddn6ujoAKC4uAkBdto73H5PD67Ksvr4BwhyRzWbtJibwIXF5BjFxctL5TiziexbfP6TsUsLY9LWeB4jj+O69L+/e+zKTyezZvfPQwQNSoP2XqDA8/GDnjqFNmzZ8fumLTRs3NDU2FgpFEfkAgPn5hbfeeufI4YODgwMDA5sGBjYdP3ZkcnLq6rXr12/cSu+6qrnxdUOld2dOoYQ16rMIKITtfLLoConYviXdnIAIEfcf2Hfk0AFhYRQKheLiIppGksd8lZ1X0DLZrFTJxD538uPluD/OdJtsZY6DqTNlAm3Tn1co3D2k2qVS6Egq6axuGOTNgHjzUG614pcIfgmiHpWFUZhB4qeoamB2ovMIphHoK7RrlMulLy5fKRQKr7/2ant7+8CmTfeHh8U43rhxS3ySFLUhEmvkoVRaVAfwfj0Ql2OQ393TYXZm9sMPP25oaBgc3LSuv7+/v7erq/OVl1/o6uo4LVM61iAMJP18zWnAAhv6Og1FYjJbUC6Xbl25XMgXjp082drevnFg4M5XX5nuT8iySfw/7yqc+vo6ACg7GyNdsoToF1lu5+aeAEBra4vRP4MD+/fmGnPj4xP37n0FUn7duHFr7NEjF3fl3qsDEZ65ceOm4js1mBEAlUsetl6Z8aGkkoHG8vqeKyiXy19cvprPF15/7ZX29vaBTRvFTv7bt+/u3DEkvqoMDm4CgIcjIzyuMDM7+/6HHzXU12/ePLCuv19snH71lZe6u7o+Of1ZsD81N27eeiTfGocS3xm+qkDBgJy2FgMBP/tmwhqlMkhhW6+EbXgKbN48cOLYEQC4fPnq5ctXnzx9Krz///Mf/74x59k2ZfjD0j24ccMct4R20pmiNAWhgJ5yedC8mcobQZPak2GPrH9NSLcoZVBE+P2+2LBlVhi3WWiG7OrI6zp7Xw0mJvQ+Fx82MyghGrIMqz78WmbzcvFPFEX/85/+IZPJfPTx6du370gaksa3b989+erLURSJcFY+nxepDm7cuCkDQ4iIYsEd2P0+c1hYyLe2trS0NFdZv1Ao3Lx5++bN2yA3yu7cMXT58rVazrGKoCZVDPqrIiqPgVm7IYii6Mf/8I9RJnPxk4/v39GresWsHr5758grr0RR1NrWGkk0HJtXyz19Ot/Y2Nje1uZ2JzbKpi1oRwCA5uYm8VFZ1Hz4cPToEWhoaNi8efDLJK6u+amhof7o0SPZbObsuQsCQX4h35gTHOH4uypVcop3Ewb2CZXy+UJjY2Mck+hFocsgZACyaJy3tFqg8QXpfAa9rhiiKPqnf/wfmUz00cen3fWMd+7eO/nqS0qgAcDI6NjMzGx7e9v27dvESkxhSlpQKBZv3Lx94+ZtkBtld+4c+tPlKynZRfXcuHl71R6vCsgXCgBQV1eXzWZYJpLkLTY1NQEAy67hg2SXtWSNp08BYGFhobm5qVWOmwDP60cYGtqOiPfvD3/62VlYmiYgYFrm+s1bmnTrgBCjQz8xpgJOSfYf9sXdQIxvNy3Ho8IbINa/K/3OrCpDAXNs3tEMjR+PWgTwAXs2s3vG3OjUXgrYVg66ZabzGMfxwkI+k8ls3LDe7a+ru0sYE/l8AQBEyorBwU1sebZ4j2QI/a/r5PqJx48BYOOG9ZbFY62o+vnPfvo//+kfRPp2BWLHChc9NUgHQoj1UV5oRPMAAI0vabaeJYjjuJBfyGQyvRv0pgC58IDau5KZtpgvROY8TJlMYhH74MAm8VlBwebNA+K13je3aYguGKvirl07AKBUKo2OjgqEYifU/n17DFYEAIA9e3Zns5k4ju/d+1I8PeMIO8zW3t6eTr2HNwPwaHxc9FJXb3zrQYCO9rbE4zFFE+FKcp4jsR1JafCNszeEQFtIBJoDIj0gSIEm4Kv7wwAwtH1bW1vbQj4vdmcI+Nuf//T/+qf/44gpOkT+5SiKvJaugmRuDPjmRmrDFYLYrpXJZIa2b7eKEEAMy/T0tDVhoiiytPnunYo1xgBB7KjauGFDFGUYPrB1AUBjrgEAFgp6hAGhuakpm8nyhp65QwAA43K263GTdLa36fyw5uz2L0Jzbzo8EVw/5cb2UMZSzI+0qP4TLKMshwhUqxT0xkY4cmogOisUbBPIW8pPafL2bRzZFiAwbO7odW2+PkgZXvxTl/zn6vUbALBt25YXjh/L5XIqQtXR0SGWO+Xzhfv37wPAlWvXSqVyU1PTyVdflis2AIgOHz7413/1I7FhXYBIJekG0ESQ2RtYWwbcuHmrXC43Nja++OJxdXNgYOPuXUYejunpmbq6uu3bt7W1az7fvn0rAMRxbK2FroEF1mSSBofPTK+kfu5evw4AA1u37j9+ol7OASRo6eg4/NLLAFAsFEaGhyP7wOQAYQhXrl4vFouNjY2vvPKSMjpbW1uOHzsKACMjoyMjY5ys5qamV156Qf3s7unetXMHAAwPPyzIzUrnzl+M43jduv6TJ1/JZLQdMzCw6cD+vQBw996XMzOzgsIrVxlHMKPn2NHDf/Ozn+7btyd1VDzMXDIYB0U46cqVpJfXXn1ZkYQIR44c/snP/mrX3j1qqJKiFX5PESaMkBoVTqr9OgKZS4VrWqAdzTHfo6Oj/VUl0JgleuvWbSJqb28DgAfDDzmqqemZ+vq6oaFt3C0ZGtoGiehIlquLt5YzxZqSlq++8hKfSEcPH/z5z36yb+/uVXtgE2Znnzx4OAIAR48cGtq+Td3PNTS8+spL69b1gxwiDk1NTS+9eEKpue7ubmGLDw8/LBaKAHjtxs1yudzU1PjyiyfU/No8OLBL7e+VXz7n5uYBYGDjxs7ODnGvq7Pze2++UVeXBYBMJiP1GMlxM7YrX756nWmZjAoNJONm8pQ5BxPi2fQ3v6hICo1f6o4tafiv5FgSt6XRv2Gmoz6enswL3pKc2/ohfMylbBOdg9xTi3fgqcIPhQ1ZG3zdqLxjNxd9eA5vlQ3kAwLv5/LlK22tLXv37N6/f+/OnTtmZ2cKhWIul+voaBep4j47c65QXESEycnps+fOv3Di2Natm/v6eoUJ39XV2dbWWiwWp6amVQb3x1OT22Frr8jQHMdv//5dMbceT05u3+65vzwQ2Z0PHti3a+eODevXP3nypKGhoaurkyf7A4ALn1/q7+9tbW3565/+eHxivFAotjQ3i1wOt27fefp0LZ9VvWqg7WUCgDIQIiKhMnWr0Ty3r1xpbm3dtnvP0L59W3bufDIzs1gsNuRyre3tUSYTl8tfnD1TKhYjho0fkOoAPnny5LPPzr3yyos7hrav6+97/HhKJG6qr6+fezp/6vRnCoPQm3Ec7927e9OmDZOT03X12b7evrq6bD6fP3f+okJ6//7wufMXjh09snPH0ODApqnp6bgci0MHAWByclImE0PxU3LElr6+Ps4RhUIxSc1UQSIY8Hhycgi29/X1/vVf/bgcx7/73TuLi6XJyamz5869cOK420uxUJyenKxi7KsFkv9nMp2FtKt4hD87XL5yrbW1de+eXVKgzRaKhVwDE2hnz/FvClPTMxMTj3t7ewDgzr17HNWFC5/39/e1trb+/K9/8mh8olgotrQkouPmrdsqc9fjyckh2NbX1/PXP/1ROS7/7u0/lErlycnps+cvvHD86NYtTFp2mnPj2cCpU5/+4C/ebGtre/21V44cPjD39Gk2k21raxMbsL/44sqt23esJkHWuJCwxuTk5OXLVw8e3L97986NG9fPzj7J5XLd3V1sUUUiJK5cvTY4uKmxMfdXP/3R9PRMFEXi5BqZLFWZZWiN21u/e6dUKk9NTiU8tWVzX2+v2E/Ex839qKKVopJQhio1VF6qjqZQ9MUwODRW17dPKMLALhVPZ9al+k1BgwFspe/FASTWeFk0Sw5nJ80Hv6gkxgQaEoHZH6kGC+oebSl+6vRnIyOj+/fv7enu7ulJ0mnEcTwyOnrx4p8ePhxRg3vlyrWFhYVDBw90dXU2Nw8CABGNjI6dO3dBZKcRNF6/fnN9/7qBgY1JjiYprm7cuLV+nef+suH8+YtxHO/ds7u1taW1tYWIRkbGxifGDx3UUdCZ6Zm333nvxPGj6/r71q9LEubk8/mbN29zTVMDF1CmGlV+BgAQUExASIRmll0OjhMgblz69NOJkZHt+/Z1dvd0spk2MTp6/dLn4yMjCFEEvrkfgOs3bxaKhSOHD3V1dYojLcrl8lf3h8+cOT8zY8euns7PX7167cD+fVu2DIo7k5NTp05/ZuW3uHTp8szM7OFDB7q7u/mEuXfvqzNcVyEAweXLV30cMXrmzPmJicdL/epw7dqN9evWDw5uEmyoFvZfvnx1fiF/2OxldHT04tlz0xPjFfycJYPjyAXcrW8snP70zMjI6P79e3q6u1WauDiOR0bHPv/8Tw/N7D4A8NX94d7enrm5p8NmhGN6Zvbt3//hhRPH1/X3qVxb+Xz+xo1bZ5nouH7j5vr16wYHNom+1Fu7cuVafmHh4IEDXV0dzZu1tDxz5lwiLZ8NzD6Z+6//fuvY0cNbtgy2trYKviCiiYmJP31x5c6dewDqhSb/zM/PX7l6/cD+vS5rICYa/czZ8+U43rd3t8AZx/GDBw/v3vvS2r869ujR+x989MKJY21trWJAnjx5cv7CpZ07h9av61evA8RsN8cN5bh5tcyZM+fElx02I8NTE+WeUkmaqir5xd9Wc5NW+3qkGK+h1YTknmJxC+vqmwTpyjpgQRSxBw0pqUEONpTjzvW1xoNiuBAoVhtxbXUaRVFM9i49te85wggQKY6t5sr6iKKIiGKK0YoaSeoS+khvnZUGDKkKmjz96Mn4IGJDQ31nZ2dDQ0OxWByfmCgWi6p7FFElOajt7e3ilJOp6en5+YUoith7Sqyijs6OttaW6ZlZ64y00P1lQ7aurq+vN5vJTE5NzT2ZO3786P59e2ZmZv79P/6bV8s1NvZ0d2Wz2fmFeZGZtAZqB2zgJjo3KQKqg1IdYlbE/FVcM9WFsCyTuoZce1dnQ0PDYqE4OTlRKi7KWERUAszHcREAICK2J5VHRlGKdZVho7Ojvb29PS6XJx4/XljIK6Evyg8fPnDs6JEnc3PiKI316/obGxtnnzx5/PixV1cLcSCOz0aM5ufnxycmuJQSzJ5IEwAA6GhvE+ekTE9PP336VAnE0EqIJMlYbJ/sAECdnZ1tba0zM09mZqYlM5HspV30MjM9nZ9/mgWIIFZjr0bY+1qrAQIAjGKAMkEZgDASDg3LxwYqBK0uv7HQUF/f1dWZyzUUisWJicehxZIvvXB8797d167f+OSUf+NJYy7X3dNVl83Ozy+M+XadAEBnZ0dra8vM9CxLjZVAe1tbR0dbuRxPT0/Pfb3pf3p7eppbmsqleHJycn5+nlROGqlGDx86cOzo4bm5uV/86t+ITNYQNVAkkSKKCRDq6+r7+nozmczk1NSTJ0+Ss5WSiU7qzC5E7O3taW5ump9fGB+fkPqYQPNOojc7uzrbWlump2enZ6YVI4hJ39be1tnRLsbtyZzY7SJwMM2LEdfLoDQfgCAYMQJJH5chUq3LsUj0Pk+gJRx1gYKyABFCV3enPYLiqRFiwkcTj2MCwAiRshKBOhgW9a4NIkAWwzCEpopBJENFOreHBqWXQR+Tph9QXMWkk2+x2I84sjZJmCF8StKRFC1JYhIVIiBiA6fWnBi2GFljy1+Feuva5ErGoVAojoyOURwnTyIfRo9X8s2EZmZmZmZmEmyIRIQ8twgAAExPTU/7snKF7i8D1q3rn19YmJ2ZfcgOYOzv6wWAmRl770l+YcE8lKsGfp3EbhoWuYAYoAyZDCBAGYikGY5JIhqQ8sAJcnAoFvPjoyMozXbQGo0ihDrARaLYyYqjUMlEvdo6n56emZ6esdQgaSljuCljY2NKawZcJASAubm52Sdzhi2QWBvJDy54ZmZmZ6QBnXzydVOAmNaSFIL2801NT4ulRURS1wvnAWF6ZnZ6ZjZCyABkzCF2X6UpJiqA9HIwBoopSfylbUj2D+io1zfb3AAoFIsjo2PpdaIoGtw8AACJ6++DhXzeCn64MDU1HUpCODPrsUKeJehJPT4xIY6n1CqNe87WFAIYHRvj0XDBaFydFxcX5Wm3pKwN08dIDpofH58YH1fKn1jXRobN6anpqalpIsPsFtVmZmZmZ5+gfB7R0GRnwxBWbZmfnHjCSuebhErDhfQaRzV2yt4AoAgoQiKAmLVVYw0IBBirJgBAkA2JFtVMFTo+mt9pCyOwCwxUKsWnhd3nFhpGi0f26uY+f4NIGQ1KniTCxxh2TYD3CczigANLxGbe1yOHWlpb3njjZLlUPnf+gsjV09DQcOL4UfE59uatr3U32loHbmMnrOVWkVJB1EpjGl6ICrtcqRR51LDuAbRTFUCOvAPvtK5+hlbffCkuf8AcCWG3ORaSHXpK6llytBqBZWHXXopeaW8bGg6kitTnATKZzIsnjrU0N09MPB4d8yRTeS7Bfi1chyoIzpHEJuainEz+d/UFGW2BxQd4Mdq10ETBTAWje/Ayszv5zOdkvobzoKxhoh0raD+bbHs0yBkTTx6OML+TS2YVvFXxdVoiKU0mJAyfGhUVw8pq8PH1+FYkHUMyuifzxVcnQ4LT1Z3ZzwrmnsyNjo5t3bL5jddPvvjC8VKp1NjYKBaEf/HFlfv3V3JyVQ0qgJ9FSf3PUz80rcyPCgSAiBgBleO0GVaZvsrVA8axMYXRLQmAW+ihf6lxAYMWbgVYfayG3hfhyqpG7vmHTCbzNz/7SUNDrqGhvlwuX5DHs60FMBx1MBQ9sCK9JdOu6P9tofFxDlMLabPHUTlcWVMSMbDKOOUugXqhgH5qZu1wBnIbe8lFrJa3MDH4za82Wf0Dwd6lLklLDT3KrN1JcycoIMWB/JClv6jqPlQdo5G+FvhF9jEPBZp+566kA3kEDGVsW8h08QQIQDwRCjqYUHpfFhVkBrTAmAgauY/0ZwMffPDR/fsPhoa2dXV2NjU1lUql8YnH16/fUMmJa/AsQFr08nvgyoBvrEJ5JwNYgjjMj0ubZIuLiwsLC4V8XvcRRlHBIXAmv11eyeTG1FJmkgTxo5LX1YQY0ofKbC5eq8dZWXPWBxG1trYi4vz8/Lnzn99fUx9bbSls6WUl5wGgVCot5PP5fD6lVbiX6sAzA/WM4vaAze8efaLPzhCqyIxALI/ecOSBbSDlo+gxVdwgSqYul6x8BOAHQKqB5l+kiA2Dyh8ql8/IcuGNSb9ONJeWiH0AA+rxAfHeWV531Tsw8nhzWYCgCJD0sRMvktU4YK4MwqROQp+i35MbBH2PzwYWVXpJjT/xSNWy1UB8pQZrCBAgC9QAcQZJHuSk2U6n1eOTGO2wP4G8gyjXJyWsEGNUICiUyyVAML4jkpykcp5z5lK4jWnsEK8MjpCcYfhTSlPxi6f3JxFRXgvxT6ZVNE/8wmQBB0RAmO4igT8oYvanqwFAjFgmLAPEIDKYgnOEH5jc/RwbIg319U3NTRVPf3w+wRDvgrFILrHSTMCmYtKK3QXQ04NvZWD6TuJmM5mrVbWAQzfxNOf6FDR5sj1TlmYFyenEqvBVHcaCUPfRNBoPI2NCZLJ3JgMUARFAZ3cXWJMeIwIoE8UEExOTak2sWKrq4Q8fx9j3kocIZiECkHZGuDypZdpKwIMEJnby1GMEeIaIS37LBkOHeLu9eKGkzSKfm2P7OpoaMr3U51gM1aAikDjFDb38pOtY1/6oorhG4y4CRZXmkLJ4Q2HhVFYM42b2RHrbdGsmKCwqc4eW8W6B+VdhWznaCUg1uK6kvB9wR7+u9MFfJxRE9qC1Ccr34+DVHqEtEI4SCYFnqrqBzyAzWCYK68hOsAGh6SyXgLnrrxl+qy1Tr2TcZFfa6Kpo1cuM5rpilCqBpKHEToTz4oU0iZEQ6cOAZhXnvg8/sjqGdJbVmaVmSsEgiebhajqkQ6x/VsGdiK63g8gt5xp8CwBBnl1O/N4KcZqqOgLKVNDNfs3IkXj7SZg9FN5Q7StM6JRir7lu4SeXkyo4MwwDpj9DCqAOWRCI8JRBGbE1dF66a/A8gdQjZN3SlzrkYJcqYFPEKUamO1LdZZuo5ELpXanU1TcIf0NHMape+ZYsbSI4+L2EiB+GEpTliGrfqreZ3xonkKnNFR7naariMzukYxWmRkBcfZ5CQchcsB9eSupkYKU9iJ5nTG7ZJk8aWFgMS9MlLWWO1WCtgZqsq+H6JhKPmwsoziG2K+l//zw2bvXzW0pxX5xCV1geCTwgvnwIKBdi8Y+w71GDbzzY0lvJZ/PF69C6G30PTbDgbvJgS0r9GXRtPUWonywJYOjK5gPYqiu5sCP14UdJIv1qrYK3DsOPyhkDYXCQp2oQhwfSfaowCubWpOr7FGNDVrD6c6IpHq1vvAUjfGW/Edsk0r89BiK511ZsrAZrF5am7732vbp0zBYEiAAitMz6JXRYKcDwLGGJfXhJdW+SU7L8Z0GfMK4QsqnBcwdee91jblSn15ZhcnJl7PQcbhDsuEJxVV1UCwkmkrzif/zEUrOSdQIAJuKLZC4gVZRkthJrHknpdLZlyFC7ausLauWOAqHI2ZXs5UvWZooigVau6ExI0ytwHdWNMn+Y3BJPJkWqubZfjNVz+jtJsugGkyKZ4MTeT4LJeliS6/DUUnhFQBI9kcv0Ir0yD+Ry0ZjiZHDW4hffGigQs64MUZmAMBIzS8QkxeJQNLc6JHd8WEDNRkM6EQLVAUUUR6iMGwREjFAkmtPIZTs5bZPJX9EkSvEVjFVkTN7oLHu+xmx/iiEzLFSq2PIvEPRyV9u1SJwGioQpJmjAwL5hE8TJscSGSb0OlK9GpEqOEWOAWCT4sxP5oUMQgvm6SbKMAAAgAElEQVTOavANA4/zScbcsqan2N5IILJJ2okcpfaUeSM1o7FswwBS/epcv0DJfgs97RERuLZ1KNQKmssNJ2CguFISw8hlmS3RYDIgIBE+VZxKMs5halUChAgBIQYyCJGVEFF/WeZ+E/FPKqlgmWPkLwTgtLmijYV9fK2r4dBUa44Rx8QbryLNBTLaLQn8URrnUdF7uwZrHNCe9pUnQLCG1zaQX1V8vlY4gGEKBW+VZwtp+FehbymJlVxcHvgd2PRPwsGmNVgLsJSwe6XZ58bPlgWpbSsz00q6RlPXkimkHH/H41kYBgeLTYBrFziE6jE3IxLOHUZcGHihb9R0e00eMwY5fUY9WZJQa/qMmkJj4MyeeQN/PM6q7i5lkSlsvQ1qsJaAAOIk6+hqaFI3/wNChh3Rw/r1cxA6FcJkeZy/1LrPxE5JF/FLarJyqBgQqsHzBtwVNEW+FTRwYxmpWD3ltqUfck+rQZ+gq242rnzOeoSJ34hQLMIUJIto2MANDlceyfAOtxzQy4XWChU/xeKSJxX3kIXm8xnPBMA8GRY9ckIw+pYOxoK1K4lMuhl5qnHABLGjqk6ZaiZicWy7Ss3mWLuA0myVf8/qXWeiyJY8TGAGA/rLlUKVtplWib7iB8WU/BwavUULGhJwVWwD5rggQHpW4xo3P59Axj8KKn0LC4Wt0VeBaQlTFQVbOwaJHR6oAKpHj2zw4rdao5ztQd1t/GuqVK3/PQcsqDUfEImxYVSiqsHxGDaMVYaJVULcjEt0rDzVkTf3gl7hyyvwOGlAYJHxaj0WGCp7Q6H0Gop+8qTTJ20G78E45vxlE0jWra3e+LYAgsjGwebyKr57RFBLFpCxcWB/mKIojQql0UMBO9k8tbwC8jAJ0ompKOY9zZkoXSWbw5IiwjVahs1R4/fnD7ivarvP9rXbjvnAIUYJ63uzu8DkwUoVKtskxkz2eNEONTyUKp9QHY0aVMjiX8fjQvCv4XANGaE3uaVk1TFNMblI00MICyylyQ+GVApV1tw1/KTBo254oiRmjMRPno8ky6LxWHySAC+GMO4arDGQBwDqP3dLXZXgmM1mIaG14suM3oWtj1BnHseIoXJdFl8HYZMmvaVCsIxChCTpYbIAdDU4jZy/GqwlULZpusL0BRiUsrGbo10dFA+TWSsAnngo2nNPWhtBe8X3y9N5gNfD6fkcm8PnRjAvPg4KA4zAeA43QuIhOzxsbojKGbQEB7tJwEMsLnJOHr/BBK5+r8wisSwDdF49fxTkzb0EVAt6BMXzyCMxakGONQ6aK+PQybEVQW6d8Oo5NeMjoAzKDzhCBpJ3fhlSzO/cVGR4X0RvaZDKP+kum4bUGnpz3bKsO5sa9oMAjFdZY+LnGGS0Wv9yrplracTM7Fnl9Y19Jak1/Fgq2BNeSB5N6UqvCWLiD2El58Im0n0WfTOhgKwmqmbkNwi4DaSXNfDAD6+jYy3EqDE30HrTjqX9Bustk/eSxT/0pjzroaUVYZhdbu42iwCXvmW5YGDSUoO1DAQApDbOVXzny9KNAnuUbMAmPbnDAiJIa8DCDtZeVagWpY8827lMLqT4W4HREZAClTVKDZ4b4AqQ33WMEa8FEH7/xrxzbV8Hm7/cgiVPt6A9Ua1tb1tmurG26/mzoFEJwV6jaUDkpwM9V4wQfYqMquaJJ9m/OXVWsdt7UMygSXF1sqVKLy1Badi2LiIMjo++47GvaoLqWwDygz8PcmCVer1KNUmAABkuAsiWMqbD5me5JfYaaKzsnQqz25+iQxOQElCtSMPKAxsKSL9BRZQbtq3B8w0hXZwOWsdaIYrKrvNSp4yXG0Lxj6QwTQEH4zNcQDmxTltpqsw1KfoRWHzFMjuEWhUb7GS/xuFyqK71bVmXAMQhsOIXJt0Qwy1jCsrMIJDpU7j8NZagyr6No0xI9gaq+yScTMbgIBh5xGUARlknKEkVH31jle1Mj6espvYbWO6TTo/G306SDYjk07HCBIvsSw6O968GzzXIKS90fBmghBgjUjJzgEBnmvLLDqnt3BRhSQ+UzOMMQF0MYiYTRjFGoOeQ5ooIECmZmbHZoeNGeGSHmNk+QvktexG1x3H0fe6Rpj2ima9MhyxlLr6wt0QAECU5iAg0h5nmBxmST/OzZ5A1Hwr3KE6+p6Buqo03y8hJ/1mDPzeY52WZh04gu1Cax7A60ShKIPnNKieMTgl2wxwxpqSelJQczaG0oEprqbtXPn5Ct7UDhD0FV8CqL9VcUYrJE+n0ZBybz/xI8oNGBFGSCjMWlOmvtgQiR2hSABGnQdUKJP7SxJvMbo2eIaoM2VSB21I8vioDAdX5iwzZEh2VpYgLcq/9zTk5ZPzVYM2BEhvuXEhYa3laSUqIKLGCU1kmdYOFRc9yCivWsN0kdjtpG3LZKsMqq3TvWNVYc82BFNHeGAB5hHk6nqX2a4PU/v4KlT1Rs0LgSPnqGoeIsOyyCqik9eX6UwAUMYsmSdOtLXndQvlOyp5aOhgo+RIKVHesGIyFgJs3RkZzs46yCS1EiT3pkOTvzIPYvEJPkUKGyiZWPVp2hXXWfc3mWFugrHVCuR55NdUZYXIqAQLpRY2BQERYoy9RFvlLKXAf1EHaVeKX8oX5VEmowXHCUKJfqtdSY7MauFC18+k1CQC0MiJ9x4+8mgnon9eWNnYp9Lo31k9yLsx6Hl1mIalC+9vHpHNVHWkF7e/P6Mfan2xaAGDUQADrQpGTRqo2P6t4sID3JNonFdLMSj8FSbmTbsR85ba9o1+5FfLRbd1QWJj+GjyfkEwDBHCOa1ztjiLEZAWWziznfJxL5T49wZc3C22fZlngD6FyOecm59MXCGB/Wl7RYKvPz0iA7AvwM3iDNfjaIe0tCmXClHbINU1DWyHW50/2qz38kMtQPaMpg6dq+qQiSxcbRlXlHrvxVXL6QF5IctGoFUdChd7ceCI6Yw9Fnnfjs7S0cjW3kvhY2ePsc9Wf0KMtEt2di99GrfFbR+uS+o/1zrOaWo8SstD0lPWJela7FtJYg2BY4GTYHKpcXq5AhYmmGcQIvRPJZAE+oV0sK7AWqkMQLDV9Cv0YIXqtUnR42EW1VNBxqXSHsgbPLQgd4Z8hnkChuSjPNn0t671SNC9gTli/VF1vxGKpHTj4rWfXKo4JL7+Bj5D6gUccO+c/v1FfRrIvw66wjQx/B/xKUWqeH6eBeDVXkcsBY4tMq80bH6TPT0aVhqshy8yJ4DEjLUr98SrjwHHUy9NqsBbA8V1IblQhM9UcNzVW8vYjsVdFWdoWwrA5wGqiwxGMtupEQEi9V7+BRVb3hAy91KXYHFS5uwp08N+25VGDtQVaAqu5mtww9HclPkDnJzosHgppcC2QYuKieW2HLNAM0LgUBh6B56+xrA0HU5LEMJ3U1EVlBOAsGkVtA6E61NqNGSiZKUO4/oOjjUsmQNJYOD28qx7Hfcm6vEo57nOfTFnM/kkhivfpeLSmHWcLQ6YeaobH8w+MDUnmsgtNnORg+uU748lHhNR545m8S7F2ZPPlEOka5VaZ5JhU5MT+A3u0NM9UtzRW4kT/n9t1zdRYS1CdhA1FFpS3nObBW8kzLcUc3B3g9w0MNcfVvP0gaa6vgzEVQvaKvkrn6CDXqGYU8VqW8WKiS+wbxv4p5zcEfvpIsOvr113FDHHtMPm/EH4+mwKRmMrGRbA174ND+qPUrI01AQZbqMghhafjChQaAYlDVaQ/tSRcZF15GldtjVTooCok8pdfoPipQ7ksu7IUqp4W8dYQn93BezX4s0OFoL/rtT+DzrlP65ZWaJxm+6Tj8kUmAqRwYHaPljU+VV/ZN4nco0VsjU8WV1s+PBgfUSxLzCsKdUgUg+vBHJK4EUkKubQ7Jc3VCB8ekfVVM1f2sG88vHtZw4p1+frjHcgd2rwV1tZzrA2Q80UvbCJEsUvFZs6VCTG1iio5xY38UzohwiywIw8VnJrgzPQvnzBKgxWkkeR8NPUFSYOPlNgc5uiq0Ks5JFWNt4hKybiLG9etwXMMzjma5nslCKz+43rQG7Uz3AsvX/i/AYAvmsKnrWN+m92zlshxmYQlBMkHZyqTIZHNfdwo/Qr57VL3wzlcFMaOtDCZjyhZw+HfkQweiSB/J4wplCUBz2Alnk0QixIDgrYtSIYg5HsAm3KBE+XbJl7GsBgWDZtGzGJQ6FB/U9aN7bfnzBUVzkkEqCPc2G4V8+mSITF70SPj3KnZHM87IECSw4pk2n91qAomocRVUl/K/o4QMsp6kTORJariLORY9mhj8zxRysTkroVbmEg2zxoyFgcyrG8lQA1ryO+NJvwbiY8hso76yJywnZIbjhuDYCRYMzsVhTLlly6gVf2rwTMAb04jIrX+ABwNDyANgkTWq63chluJyVy01l9xm1inkdQvmO1xoth2y8H5FWBDpvWsEt4qkTwuDpTFbt4fNhVlGjRl6HBr6P9v7+2CLUuqM7G19rm3/hqqupumoX9ohFpqASMhhEBhWQoPNLbmYZBg7JAeRliSwy+CGfygCAsUKEahGeFwEKGfkOyxI8YvYCksjyRgJkJPomHCoTBh0YMEakQPtCT+urqFqqqb6qrq6lv3nuWHvTNz/Wbufc651ffc2ovm1j47M1eunTtzrW+tzJ2JabgB5S0sFd5AGL7qgmxaxXOljt8xPQXi31obOLTiMGrx1wa71Da2tEPCR6rkqOzXLp+VPXzQl9xiMx0jSji6qDYEykd/GVy/fm2pvny8vNCR/a2Kngp6rK3lMGlUBUZPurdivo6NWV+omY4gYTDI/GCBuAhvVO4OVVblabLLwH1Kt0PnapXSUXlr3jwFNratuLXuyhZVRT0RyxNZe6auKjJXUkvkoJDAoQSjmhPFP7J6Pwlso6xmCmznxvxICg7zumeFdmxJj0iOOVg4zs89vhYsF90whocKqYw5v5sJr6im5IIjazNRi0HIV3Bw28BuAmiZND9iW2HeisRjIVN085jdCmLjIEc7xuB8ci/VnQD15mNMUeUrt7LLAbI/sR3Tmy40mbhLTWZPfkvuvg8yB7uI8qmIiCknsnZyvz7K7cGldCSuznHKirH6yKO0rkUTVN6gy6DSSSpkojwWzciTdLMwYG4WDgYuqpGwQcd3piNFBLDUhyynUP9aX30PYxwBELEDdJkpDTWZfSVdBUlcquu5hlwVCdLcqIRvOmg+nbJVIK09Z7SxVeRvBeF4pM33ambMBZOoeIk+gh3mfa+dMB/A6q/FK6144gbz3jM+GBN/KZwQrS1L+Yc9h3wZWDboP4stbrnMMERRRPhGAx32g1UKZSGp3wYar4jjm3qT7EBGhxRcslfhpIlsHzRdimHQkbo7seIotJSvdJz5K5VjQroH9OGNJcGSjYbc8yd9zGmr6ftkOr0MIO8ozEKWxnZyCk9wrcc/aocpiwzNx4v4+z4MH5+YP+g3PEIUP8K85IrSsW4Vv26mLaPi6TGS9stNxGzOmMHltlfYjqTppYvvW2OzDtOSHEpqSVGpm59a6pQnccUZCP7Kzy57hJgBbVRXeganfZE3O3ZujMBYRTIXSa7kE3iZ24PVvm8bkvBVh2xiVKkAYEKqAuLw1pYG34QrwofInpbbfm7ZtPfX7DMdN6L+ZNakQ3DonkNEIx8BuaEXX3psB9ABdlNAa2XCgo8RD45IJVt7mIgD2xAs5h78LhwCZ0YXndrastQMNbaTRg+F8S+YAguYzThzj/XcB8tqbdZYC0lyQag1lqo+33qnH9y9V/Lbzp/CDNGQyrCJbJDBPl4HxQ93WiDfUo1oqs3plB/ArRNl7ipVMkRJw8uODL5BeTaLyMAcHPsGI/9QozX1CikuOdNWU/GMCYCtCSdAdlx1AsJr9AH2AV/a/sseZFbDA0yBtKoKGTRyrM5bVxAUbmKO1ah/dexN0bo7Hs90k8lVr6TVcoqEsViFNQztoZo7oAuuRzAAsL5xyLu4CsJ52UQHrT7k4KPIU01A/KjD9Mw97zSq1o9Ym02SV66iOuTDRKqX1hAsTg7519iZOM20Ckh3XaPtaw84w41biDDj9d67Ed/VrWOr2ahHtwOuQy7K1vENJ4MuX0ttKmH3MrGwJyGNas5RjVSA40zHidZRvE0nleULDYrwwkPMzo23YRXdaIQLo2DlSKWRYqKOEzOFDQBARwBy1rQ4ZgzDJDgoIxQ0eFdSrpSvh5Riuw3Oi2EkTJHnUiHj7zwOW0GPyPkXruWWCVPkKe9RvSh9g41yb8M0P44DRI50s2nc1HbZVmCqZaatprLff3+FNEysHADsAy5RKwFa+aXjMLIIAIEW0O/GIca+QcSsLDh5cmJy+ciqErHDRUrWQcR0q7FnudFdaNLdOGX/YY6IIw05yn4klif3YbmrO+xrDhnC5b0EmB7cfBgFksqw/820NtljeVB0gHKloK/znotF4++GsuZnDPKASDtTspEwnAEn+2NkcOTP6PuNwWgOvVmrEsyDdeBAmlUZun2XR3lO3fAD0243XDgrYX7Evhtjb7oLTimSpwgHmrE5iJLTXBe+7M8lc7AzWViKcUr4o4kCMpf2NtI5tuy16ZL8kzauFU0++SvHP3JxNIUKpiTV/oKZ2H5MFjaHiM6KZuspHWdOhNxEDbbsAId1o5h7FHnmeiyJADHmLUfLDa+MSItmmsHr8jLNS67d8DCQe4NlJHYhoE2C/JT3V1XxaDJ3+mIjv5ItZv/FcQFmVbARMvstaPdSwLtKErumYjqF5he+bqk2ed0+bgZQKMHiTTXWOMoX5QwiFugg4FqcfNPjszuPCWilc2A9W49ABEtbgZG9v88Ob7P7jTpKwxJ56cTaJ7L2VIxyKU0uu6BBWXJVO9hEhfVKPyrZWQDJQbJuBTbFB6cAM8i4xYh099qQPRscpw65WxfCiE1U7BevMeX6b0LljrbIiMrZ+HltosoAn2kbyfrIXrL3utFAFlZEmRuSqUHdLkWg33eiVZagho30XvdJvApRChuc0M6oS/kUIAzrd19iJT2JMYhF3JKXxbHiBVaQp7pMoCZse8sgwxxpAqJ9RXru/RbtzN9K77sUckXwwO2IzjTT8aN+d4e8BwcA2EjXaF7iihCgQ+w6vw9WO6ZJlKCl5Wa4laEZd1FxT6PLZ0u5hVK3C2RXp+yCIaSNzmc6NiTDeelHYDMCC+gf9xX1P+Ewu1CkMbBkkWqgMZJEbkmjoxdeGR2DzHiLkpNQGe9VP9s8bTfcbmzAVeCCYhy78AN8I40ISef20WK5IR2jyMEK+8HgA2q5WIagUAFGvmvWkilXp4rnbQp4c84Bj+NLxP7bnKlk3IGGlQ35C5hUU+hzeQMNpOZxerxWTCZDS9hGBmkg1NIuSE+0Qbyh9IKOLlP8qDNtD5l3yBzsxiYFovcJX18Pp2ioOeZYFG98PuHyDG/50ZYaP2vSSypqbE/mAqVyC1syMxFTKurjup5FLLkyoqjqqwAjzt+yDEI3Ljs7MwfV963jF71m4xt0efKl83Ocx/GMiOp+uTjraNTo6DNtJQk/AgBS/6B+BzD5yld8/WKADn20HFU/xnFQXo/J0Ua/jXFdCXFgRtoRhPeKDiNHfY+zGuxQpfJqr6I38xq5tJvKTFtCYbfzeySVv6HlqbL1TLz0pD37JLK77IqlsBZJ8a6D/8EgIntKgXAcTcBvlY8+oipoWLhqHkcDmuF35x3KmwUKTuTl5CinEmygnKGsmU1a0bQnFpUypBBLMEKW4syOF9yDLKCEwNu4/CkHAPIlveo5nFAGFd7l7Tif67MMNiXc53GmY0WpZy5zZyx4dKUAfoLArHdRf6frr+Odk2OL7lZSY1DLsHIAxK+bje00nNcEARSsIV0CX5Hvfec201EmG8oQCWjTyuw+Y5IMiqPSGS4R5XV8Q5hb7oCG9gDE4CmCUynPh7XfIa19ZHX7sQOujeRpr4AlIMGkyKOil4nZMSacClsUkhGOikoSLaglZ4kFUvW3EvopL0ljSY0FOJHqCv5DeEUF+nMgS3mDClMZxEGymPPWxK0AkirhZrRxSxFBv5abKcB1Vz3qNd4dQNeFTIVbIdQQTx1TbZx/3AO5ZdVSezs+MugQYk8fRLG7Jptopu0m+TI1APdsSoORpFjjqwCBby95Dk++igg6n4lyoLZR61oaPi7Vg1DSbLYMs50iuRN31MexI0S1iAu19S5ccpKPLsIK6nFioaoyZw85FRmVAAhWHHUiBIpMKsBRfRiFZWZ9dutQ2SUC+8/cN4kzecdE6E9xc3MFJt6SGbo6dT2SA2pNJs7XgGtSbqnZF9h+Eg5mCVn5eRhRNbWeMIXWYlIZpKP5R4CAZ2iEZXQSOlfmhqejsoVHpBIyQTURIqNVADiESFgYgiB94MHCLzpMSVTOoGB4b6iUciHMGKA8Yw4fJw5EQjaAvGMBlsIs2DKIhZi3TRKYSy6Pz1siZYQiD0HGFC2XL5MA0voYyFukYN8atEztPNMxIf6pw3CdBtA+4gFA8m3IbFA0mjjWHUYAdbBcICERA9NDPhXPKDyyzABsDPoYP3V5+T0+Y6UVgl/eyUQwaAkeyLDBTkTqIK+HCqdF2pTaJmkiHF7UsAuYeS03e3DSRv+7JcmG+YXjL98wAuaVPAjsA3OSY0Gced/fcJYrqbGRzkDJFg0Be4VP5S4vI2xXf4RKMljFBCrsbgYjN9MiqDecyYJ5oyxmjik7L/1opN5oUTKh/BsuBCTAZb8DBwr+XH6lE9ABHEonyEdCmcnEL0pJpVCiVNLn3NX2I3LVi8YvgVbLrWiZe5UJbQ6qCwXk5CkK38DFoccq2Wc6BuR1/3Q17JCz/vkcGkQQDNt/WSvsjNoa29L3DZ/GudpCtQVCxIVRVOrnT2CKwhwNYvKb5hs8l5m2lkQPl/2p5n+nXOTeZYWUJSt5MgqOGdiyUTUr+yGMiRVG1uGSGFWhVWK4g9WiAVOwLR900FvVvjmGVRxY4gRsE3EP91O5LLcDbSDXg9qXwepQpf2W8zi4YIO/avUiGL5JHhg5pSRZ58uVD01yciSV2iaI0NRMx4qoxOPS7zXI9hgE6Pyd9osI6/AflbNRg5NccSTs0PF2qV6R1AB1jIWMysy0NaSjbcbi8ESfvFTbH9AmWr2vczYFaEGFWp/ExoMF4vloOzLlVsWEIqucOsKBxeqKOL9nfsUKX68NUigphW6cE5f4VRTKbHg9xWVpFPeqTnCLWHENdGMMZSh8mzmZAx/KIZ6ZjjHlyTwqn63XggFjSSs06rcchTwFaeMgRe/q3qyWLFUqXdUCN+MfIePshQjvaWUk4PizSOVw3zniuNXEwhviDlgbpE1mDV8Gw8bcCuOL4Q3XcYglqNxoFNGPx0N93OXvYb3r+ovxr7/wSUOIqZI0UAvs6Eq5vgLH1XYdptirSUGEXC2BfJsFCSjMUYv1CJXEwmMqcGYhFYiWdRpQbvCliEscYSp+LdW87Ns2brPqVpMzbSURwJJw2ffDzdk0YsOiS2uFdMfsc7bhREAtOBLhlei3q3WJzypr/quvePEFSiM0QUCujOZBudXkO546iXQa8CiFikA7PPx+Wv6GACFwbP3sZnlf5h2Cd26zYiFrLIZMGGZDSt/560igXh6jB20HIO8hsn2wEjGuwvYOIc5cb6RJ+Sj3tEa4mUdfOGoXg1xQvkwD56IARKAGRYwkgr9UcuYFbSJZoCHDad6O41ag/N6XbEOOjUAOdkZtDzi8QJ8Zl569x8pQk55CmCUcxu1HdRwYM3AAgXCD6yyYshj+w9SOgwSRwphpa8h5czULVZK9V57xRGyUzJcNQS06ZBL8jmQIWJvww7jSKpWwR/gBKCnec8NwOuR8pcK0E3l6RPgI5kwRU2XyXXgZF3l4Fl1Fw3wK4g+Ytkbuj89VIZZUaLjDPUL+RAT+u6uAaE9AJWJ5+lmR3QLEvs1KZ3YcCmG/bhSdMKWrx8ikWhIj25PbRDcr1Mpr4hs8UJg+k6upgnGkwY2ulrsvPo6a6ahT0q/s3RYlzI77qfWkKP7Bk4UhM16y62zWqxOW3DUzQYCCOb3sjum7oQTcJQ9GmR4l1nHC2GT2xACHt+eoW5MckT33JJ+06gWUqHmbUglK8eRnP/0lZeTDn4u/fbJvq/DRYMf2D7FItvQLgXaYF6hpqj5KPaM4UrNGO/bUD8Nhj3PKXXpj3nqppEsfs1lFy34aChFFXJUsO6ZIpEf6X1Kt6JCMQenrtJ3FHCZ0Mk93biNZI+zBhiGx/YKdPlaP9mlAkrp9Bq5reprTYm5hpgKH1ChzrgN3u+V92LFOwAEHc3dK+FW0jgR44ooFNFznajWb7MndyB3mIJJAp4Q4GvJV+qu+Y1GR+umpyGwY5g9VbgGisj33OhQG+xDAX+xgdITNY3yysVK42N+pvAZ1wjE/j4qZplLUZ9p9iXXjWo4EZLJOXwE/rAVnPSTl4PDYi3DD9sw1yQ3hlnZjtMVBrwz1fs4XKe1PAgBpJxwYXP8Ez9IGV0PUQMYshmT+sAZr9qeWZPeLgC/5LLMe2LMf1pJkN63nP6wdE+Cxr536bwLl6jVKj1PaDoc7QzX5e2F+sDBR2aoLE/9+vyN5TN2wG1jeDwZKOBszdEvbkxXJUtSJAJZERGauGNnmMDNtBw3djJD67bfS/ljl3faLo/YB9hEJhxectptKO1nlkY7O3lYpj0HBJTq53AFaQN7+K/ekoQOD2L2nRPbYjnSsugHBiEBhLss8JAQqGkCFARGHSkkmaZzOv5oHAhYN7xAWSB0ssb+JvbZaaXD0rwioF2gJeAC4pPQe+j2OMOfI+mWVqo4G0Ub/O9qkMGvfgxAh7UCZ0pL1Kbo6x9Syqcs7bg37UqqAoawzNY7XU9KIoPjsEBpkwGK91JwPJWvCXgPfo5LSMO0femCYzE8pNHAjxnGojQAJATqCDrDLVh6H04VyQcQO+iGTdHUSAmoAACAASURBVEfqHFndieBIehF9XdjZp89iCTVQlAtwjlVqd9Awh4FpsYPULO/XPHH0TBlvgfMoUg0cA9BBjtm322IKO0sypylL/S2jytHqgzgs4xDew6ie5HMeUdIGKFapSqEZtKmoc61KqwyyeSwefxqjts1tlV7pJ5PHiZczjN1gJXVs5+WOdGDvJMYZrsazT1MqyeMuaXwthXK/1YEr5ZqDL+chHLkjWbXzY3wrtwnVTrRCoRtg6L8EFP948kzRPSR/EACYr/sGRE3L8nPIn53PWdkdE6LUR8UO/DTsgJ7cqyGzWFPAkL4KfDlfbSB2fPyKiURNtTQr/TqU5OQ1Ciil+ZexeEgDIO+GIpwpl+YhuIVUOpQKZGhSWIF0cWCjVSYFY2LqUPFVvHW6x/OPggh9omNCmeoJQY0xpt6+7g3p5FcqFi/w+ILDyIsTOK+VjHT6cSlna49uvRC3XGr5LSJypM1/vViZ+O22ZN8Xi/zpZY7pdKWPZ7NR4mLs50xbRiYoUSZHBsCwBFiqoWJ7KAvX1rqTTOsAujJZuRZMYIppVCyyfnNCeZNFxqrXDnYkX2TpDXMXD820HVQ0uXL3lFFAJzWAI5SzlOA05atSbR4psuZSn9la0vbh2ETWuuPYOGR1brDHE63tbvrpWQDgKCz7xk7LJ+YD107aZGbnnKBmFlzcMZmagCEIT4WIJOuXxjyIBCwG4GrE4CDZJB7alKBzOdWzbiVbjR2dwrkRgNiOIzOY0cZWknKYnAwZQ0xwVab0hQ77Q1XKvHNrBrGOJ9rzj5HqTDM6DbySV4RxL4pniAquRrzxWbQJudYt36utDW9muolknc1kHg2moNolin+yxW72BGEn3PBcgIS49+mTeDQT1ywsySRguSbvsTEbm1KHWfmRr4Y0VLdjYk/onxYLyewqncjq94Mg6oYhH5Ho+IIPsgx/Lw9WkyFGsuxcKh194e8ZxR3JoPy1VSrp9eZMNnrSoxCH20xHlBr4QayAhpXOV29lJ+z1KnVsy1EXyJe+KMdD+AArIA5WYdSRMxzxIjtD4XxKNQrth+sODkQAXGpJU/WUHdl1o0Qz3WTyvdmcUpw+t6j7rl0Lz285OMZmrziptgR6mbShbPNnKWzk5zaQQibMUQtyxHsIqdi8T9QliVItUhWl8Za1pWzM0Lw6L5RAt5wfcEjJ2v5b2Gbyhx1jYKCfTfOrtBWpBwgEr1JtsxkSr0r2yVnfbRtF/v5ASARpY+DUu71vUtpseWIeeMTsNPMZVomVjMoaD7iYZOiP33Y8xHWCGQ0Z0sqq+ZzY40U8ZNbfYGn2sp4KzNl0do52aq+mhpSNkBk5uXotQCALeQna6nG4JK8F4oYUAchqZMlPUXFljaXrDOIiIQFXilB52rimksBfQxRrig7XJvnbfZXGj3PTHWhByG4Jl69h6wUilrufRQJM9CFntHEcyHuJDH76B5+sQYjYeccihQ5CxIdlqOuRMMN0Usoygye/1vVqmcMXx4xMZx39eotRZdbdZd5A0nFqCvZFIZA291ECNPJQYH2R29+gNLdgCqMrntGA7SJ/m+3G0ZcIAz6ynAJ3OeYwTkeMgm+OsLr6ahWGXdGrGXUMnU/FzKJoVU4qTx8oe9fN7GNHAbaYFeKWUaSv2MhIHkTqZWy38+h1T7KxmL6MjXwa9bse/Kj0wKoKHisyX76kuAXhjdAkNEkNO+VsefXMxOlItUhV3wtDpA7ZIp0VQU0WaL7aTQ1MdkUU5Av3/F29szl3GMXdnSq/lE9srisGzf7KkIwyPoglMXGgoQW7lGxiUNDvfcW/wuMLbof/cpiJXfYZ8p5XFSFS3akQCxJgUct9VYjppPtBADYHRGVKqDzF8LPs6JUQLK8a0itBkPxLFf3GXIgchCQRh6ZkD1aaKMmuJu9ZC7LuwHdOkx/EbsLjnenmEaaOUXQU3wsu3SXsloBLGecsbjdyhuJT2H4fIrVLmCQCoJ1+bPc7WQGSySvwj+zAUrH6Wp1K90z7KKlUyN+AU8AjItZcAF1//kwxFARI60T+BsHKKhAkECaAZIsfKRt7BIhu1n8tAShbv/Qi0156uXCyUYTYpRQCvk8eQDFepdLMM4+SPmdvTcqqviJl2tASJKP8A/UjDRtdlr4eUz5Pdaje5k67YfZ7SDpffCRLJns1FeEQgW/+yZ6i7LSZlj3JiCxmcyeGqUASpfnUotEx1k1Z9AnFh1ob2Wlk8oi66ryR3xvD1m3NEBQk9gZ08S7rFpwxxrEkYceXxmaO1D6ck99pU2xjODk26Nm59x+uQa1wH9HND2kkCJum/I+Ztpksqg7Qsl+sPlb4JS8xxuy1blu/w8jTFq5Gzc4tLXp5Lh6JkK4DH0ChFCrBfqVSdvvGYvtI2cygBuIm2WYJ3/MIQceW1fnYclchHP9eT79WghzeKBxy6YQJpQEpuCOnt3qCTCdiLT9qxe9MW0LKtUndaQmwBOh3POf9SYz84NP5qG9lhIEIHXQdYGU1qkDc4+toJwbq089gcVe5QnYrUMNrUdn+ZmMsZzoaVDp3q7s47x71j3zD2Bee4tpEIUw6XsAuUQhjiRPIF6Gxs0YSoIhV2XGqhHDCLK4MlKTrvAKpUDpzRCSRV8Abtp7NFR+HmkKoshi77omQXhSp1H5veldoI2zlhST4xiFHEY1Fe+QhLhzQqMotdssX7jqOOeCxZUTsP5uWR2x/hEfZEAzA2TZ0NQ3UK7ZuGN6aR6AZCykk3KrLv8OPhTA8/TtK/6QtgX0B1tHN6g3xYzZGmaiZjhbJIJWnQ0cVr732DORVXnsTs9liO18LOFGRhlxBWgeMwjAt6MnUqFPjewzBxJCgHqISH1R2vKdwHw4JPbxEeYwZF0pqNKvfDA5ywxfeo8gghRXODfJgrrBfpUElg+uJafGMI8hghsEP1XYTeMUCT1XxrPaOK+UIBwEsvd3JjcbxWLicE57BtCC81yDWiqLp1l6dpIKWpUwefbVJmThGl2oPt+gAAICu5QqsQAnbZ+VeZTR/L3vkaOQLMQo88DslhBAOJRj1XquLzQxE2X0OmGzUCGxfD8f4VeexFnJGyPbMk7O391Rl4SYyQzxgr06nDkWVn57lIQK7Y9FgdwtjyU9adbt/lyjHYZH3/Nxhcnx/qx4rgQxk/y8Z8ptHzUhtVZLfrmxosr2Wv0wH5pbnFNMqMNOWEdo+pu4MYymttFr2aGATx5GiGCR9LdxguzXE22ehYmk9Jj3cbfFGujy3toayPF9p1djP8NcPZegXgcE7nenoUm8CmKlrdFVZsBQrt0tx3+Rj7aIYjZq9Z3YrB8tr2Mep37F6wtZUEQ1CjoZaQwygnwLFAKoPESlKJ2872TFODWIfkZpyNK+pCPJjNFRlSAyRSBuPJTlCJFqkBqRjlaZsXghm6HSok1Vl/dS+WlOLOK/k2BJy+5G6yTbfQADAZdoBzGaEcR0/2iuM+v1Ghy9FfLSRqworGi2GLBGOKZKDg7F2hmTv+BWvhDswa2KAyUNqxhzbQqWLYfkbWCqer1guNJl4NBAhsB98NyzJxwEEZOIhNgppVYIXeEg5/UBj3ZJKi4z22aSAScb66KmMfahMqUAe4+qNOR46mJcUq50xtt55oEAzrUC6ybQMUacLM7iIsP5u3T4IBlvMQY5jQiLGh+XTNSTIW44KUncEhK84St7pjWIt02hZJ/a8RudfgUmPRw5jAIggB1aac6YtpKbVluo6GTcdf/ZLR8R8WRAGwjWLuRLT9fJ5L661qEdJRghYv2/RBvmgx2oIF6j4VXcgWknwJoDeQULpIgkMSQBpR4ABTWFpemlWqUS3GDjT/opQrtm9QdYzxG4c7lMpUMTao1xaP0lD1WQVeLrszMiZDYEVUk8vRBrypT03PODdh9jz9Qw7tpqCwVWScak2yUib2pSYGPkgIx9qL24iAParNwgBFv1KDuaZyXEgvCzSKq2k+goQwJ3/K7L7AEi1AC9VhgkidDoKUoTMMliGSkJxk8q/lMQe6tAF5kF3lMmP2fHeTGmji9S5U68RnmLszpcbaLOiuFTrL+SEiA4iOM+C7jjMNzBvQ2PYsScR/3LhkcnPjispQiKgAN4lVZrlAJr37EcdDkkgIxwkcwzCIKbdSIdNR5BVoDRC/4qH83wReAtnNIKZO1MWCDLE5NpjLG+EIY50ZUMN+a7YswtSVakzRq2VGz3rJip5S63pggGYwp5PzhHY7x95rG7Yo6mULkVn2gIy9rrct/eGdZxLwCV0lJH7kFw6vjaonsWWn70i9WdAE+BwVL1iyfbIc85PVqPHfxL9RZbzhE4p8RRD/Tm9jLb+O94O0m5HVrT0E932Thm0VAxtLJP2zOaiLzAM0bymBgmQ7CTsTDeFKPjPJ0w2hC034JYpb7SVU1NBxoOZ/8SKnylmXMgyHCU3rrqzzTL2grGLPNC861a/+aT32MwG516NudOmkZ4Oi+T2Jz0dAnSD/ikqgdtURCSCJfWf8ANSRiTDAOJaQ7yh3HrpXdSmVABAaKTxrkQ1Hzm3FdbhNZcc7J3KTqLJKicJjbDwR1tMdhZp9e13yjxmw7cprYhXpEKbIZmiWtGZjg8NwzVHNdLdgEaAUJZKiNAhds6xKnWhVu9600vWH3rzlr6l0WbaKjJu/thSDMquSREHrKZuijh/3aFFQGDlpenIsZ6MI1SL6R8ITcAhyxmAB1JNyuSSgRXpFSYf81w/8sLs8Vw1mxGDZ+ELXMkAAXm6KoIlgTuawBCbflfcL9NpAg7xLOwB+U8Sb1GD79m5OtbUcNzcAvF4p9yBBx8EO0TE+kERnCbY4NjZbFcDwXNgcjNtKGcyefXngWeafQYfW0XmdTlv23NypXlWaEXx4BEIl7tej406Ay+vpcneZnWcTO6WzDAZi28uUQX5atWHedrysEIjAAeUGKyXBgw0RLn4R0pJJZb9MPjQ57qKhrp7q9/HlWQ18p2VeIE+Q9iLr8oKVQapixyoQ7JO8xoqm6fwf50QRx/k4Ckz4jjOlCwf5r7urH2YyJEw/0sdovrgjas5lKMJy51wh4zS54MMQ3HDX2VoPKMOJcbkza04u6umO2k+ZcwGjDMdfbIOrUnye5ExSjLV1c2cHzfGPCItU4fO7hmJFpVxWhtpfbqE7zk/6uLpd86f8T2onCAKEdj2XSWCMwpwAJT5I/NUlV24M2KIvTK+J7gqy9Wj9UT0OpqwDxjeGBaR/JLM5RQ6r2vz6JLXqezjCV1dissgx/wt7K1CBLiksoxxBQ4IwYKugSN1xYlJfhmMURR+5G4YH80wSQ2vMI2YauIAhQ3bseMgbARJdg+0OcixnYTOFQAw17X+Ohkg0L67CQYIqy1NuO7qwqhoj9Fe+IOp5cB7klaSauxivzoVynjeBfG16vnykmTbaoCjHKBo5mxynCRywsUGX44srBEqSJLb61STaqHkFA5ZHFWCugehjPO4zprsEb54Ck3bSEVhwLs0eaVVZ5zxxq1B/YcmS+w/jkXR74ztHUn91i2pl1EHsHB0aKrf+C3lPNvVYmse2CCd3mCNDCFNrZw/3vAhj1hhj9q8zLRl5Dh1CJCQpOy20iRod1+56ARRvzABcf4jd6gScBAmPmLJ4hM8k2tLzS37y/V1y/1kRYUmKDrGAnx2zhAlD5jl4rMWdSJiH8XUIxykRDSokA9xtQpXJjqtXoSOIIdCZmJ9psnMKkIh6eD8qL4o4x9MH6W3QEOTo3kX6pF5w6ca+i5kIhvs30idI8pg9ux1HXPqO8IyXfeEWPrr0FNNqYBKfDSpGOoAuniQmZurdDnlsrXsuaiCTBoW/6jJR+aiAcTFchKlD/5DCWY6yuS8LLenlJsN37eGNJwao26JKnVc990I1QMkFomIYM2wq4U7j2sNLhYL5w3Q1kjSx9M7lYVFWTa3GjI/mMktB7AahcFfHK9EAMLSi7ynZq0ywUVE22l4mrjih+W4NXiIGLy+i14a8aebMcexJrlkayO2j5LZ7rtmN23rL85mLRlWzDAg+PG1r/Bs85g6DkTBNaORL7oSYNB3mdkZh65zhiBfBe7E0huBphJC3bpkY12caGWBx9Rgnq4COIh/A4rpg+AMb/IHnAiYNrrIQYu+OrbZigYYg/RE5TFYaAEGbsQDLPlFDx+VcOZ9ft0OQ47Q6CdQ0IuX40YJyxAQ/37ExJQyQxzyypV/SaSyMENKkhtkaD3ROkC0NPLOdOwo9awDwGW5Sznuj96KSFCdmgfE+iGZ2PY7x3Q47AAGAJSWUOcoKS9dVAqBOjqNDSYkb0VpisSEcN1GMtQFJPCuY4oBpTEbTkCKIQqwBFgSEq8h6ytiGhXTQCZ01MdMLy5l5Yo5+pw3dJGKWuypkW6ay2RmSgBdbplgnV7Z3ahUnU2S32fYgj32GRZx09CL2wuPARYZrKKuRMKBPIQIwFl60VupYVVGb6rRG2+U7Hy/TU1pBBb390cfX/TJHrw6pYJyyLInTE0lMYET2SkvXxnpnEUv7vGhG8qfCa4U2UQJkzP/q1btZiwlNW1hUjsskoC9AsrMwLyKAayZ5kubijrxEf09zkzHmPq+0y/jGLOb99hekUZDWjda/i9NNAqWaSOfoJbyKaBVNJn9BCFdJtPJQ2XD/ZKBoQ3/YLqWozvTkSD1st135WhhmV+aDMx/PANvvN5oSWqt27gI29zxveZ8bew7hT8c6dTAZYDagnY2mN20USTAD+CoRaPJDQd3YEJBllIMbtk9+fRDuF4Ql9iHjXlHVMOKJbs2Pf+tCNlM9eqUBWWyyUY6h02dUcdxp7TDHym1F735yLrG1CF0CEggDw8hZ5Q2OdczMI0YhDQiz60AH1yv0/vRF097eS4vmVwzHWmSPmRPEiCATqy552UMxhxCMUbfzoO8hRFsyQ3YA88ciTAQGwQOomm1TkXCxqJRcgYnF0zEY10RySgyNrIpnSqCXh4hdggHdJTDqpU4SsGsfR2wjoAbwVl7uXh9UtoOELMyeKbjR9my5giHDeZlGnuUmZ2FIUDALu3O77kzvKOPVSIY/WQWQNsBM6uoeQ4HwaxIFSRGqWFKXWNZznQ0ScUFdATZ0uh3We8a3NCMYjmpP/MT7cOyVY6tbfNQ8QhCL0jIDaxfbQDYcpLGVBHgKBJ7e0ZwJsTSmP6UgrDwCEsg9o85H05c+LEutos7a0MtZemLqrn8lrQAd2AaHBikugWBEomHMMLeqebkXGU90/ElsXlwNeNq/Ps9zoF9SE9qxJasHh6RtTvIpyKX47Kwgc+HR4LtVfd0JJH65S2GmQfYVpLT19xocvy2ow7GNPdgxySQ0Qy4mZN2YGBR2bkOg+voTkB5vWGUzP8xFrwfbGxFlg6fLCPeEm4ZccMYSGvjL8YRMa014eY9QkDFQmuEwd32fhWIjWek36RepIcqxQfB5snLmYEsCVUGr+qMD7gABnRyfWmk46o29uyoZGAL4HxHdKbjSL3zvfTPfy152hSoqX7E5jMYq7uACk46PgEgtJNTpo6qQXLVUKdgIAKjO6YQkx4ZPpKeQFWWmbaJWt1Emj/ulZYNa+Iy7GfGH25qZGJGyOPLEIilbY2B9DEko4Lsk03X9qzY575MjrwWACUKeYFXBteUhC3AUWs3FyLwnwziIeqFNqlttMlOUCS3EAWvBBNeycwUECgOFHtLobbxnlRuX4YQdO2+C0YMtGhKAJshfbVi0M1Mx46GAT5Y2GVFc0b9gOsPN1tSkP0yDgUYRKGKnwLxIDGZYzgjRpBMLSdiC3iwQu+XWp/rvB7YeWMYA092piNN2W31FXNtZ/wK2i4b2TTgqF4gaORo4mWvK04oH58ugCZZh/yMwuBrAvLNZUnNbIMqvWsrXgQ4kiIcvhlVPhF34gnS/leSO7IM+QY6WUTYSvcDBd60k0SKv60dIH3f6zyi6TK6vKM9iQmlAWajh7QQLHvYXNsc5Dj+hACEfYSj8cLdRJL/Ma78DmHa/ov3W8uQK1kLTcgUYXd8RK7RjDzMumi9otKSr4Hl71gKMhe0USEzmp2fMx09Mv3Yfcvov8sG0rQjQGcwTEUvC3pTVONYkB3XAHVYoAqrnCSvxZLycp/MVVyBoVFnqcRufZgT5S10cuUojeBp2PLyVcDqC7LeOVh+pVhJ2yTNaOP4E0EG7AZet2m0aklBEMwGPu2AY9yEjXY6NBcuOVp7VLnxAij4Va+9enumo0etVzWhFwm/P7aodY5VQNBOcvkrX2JUDXWy1WRjGwF3G4932dqC6aIGONgeyeliWMbBwi+UbTo/hIGN7bKys3gv0n/PT4EEw5ZCaZsx6OMrMOzyInbRyNg0fxnby5JqKH1mSZS3Jiuf0WIKkFAWTyOJfglbfj551nzKyCd9WD9NqzKyRFg2rE7qH9JOyyq6BcPBAJSaI01qpybM1zNtOw17cxEBwQ3APcR+VPYLOgjS7jz6TJChcL5vDg3pi+Y7tCDaheE3YccQP1FaP5G7IgEsE/xIAy3jE+1OYumMQ2f2TPswAPsHSrKLAdGxAdbn4E9EfKMiVrVukD6pIB0k6JZpugrzmC5CAWbIx5fQqJ8z3WSi6L+sjftsBETD5olAkA/KIM2rfMaYzhslILbrovB8CQZIzkwGDH95FG6QAPLGYa0vRMh+kskJU+1pB36ZlGYDaJB/MIv8iwMUrUWpTcrWnADYn6/UQb+FX18TLiHtQQlFc6RJ3myAymZrxdiy8c4sKImfaX1il22f/S/xEm9CNx9P0NAoFRUgw2VUA2la5cWlkf2uYMyir9hD1hSLlZ/MBWRl5pa2QnukeqIXndHvdaZtp/IukQCWq51aNqISqwj5eOGXtndVnB5OUvJps0MSS/D7G+js3spwBd88jDTTkSelD1VHTXhS3YkIWXdLBt/rFFFHcc2CTK0ZiPY4GzMUGPQPClFwP90kKAhDZnSPWo2MlFtLc0pFoyzkUml+yun2dIWj5OoFhCAmucZOYg7KgCDUKyPVKmOZuQnp8v16x1R6Pm9SShwAERGx2Auh5jLTNpNFzsSHuvDm168qfRwLuYbBWxwjo5XJUrNLBkzQ3BnPslKKyjCtatmZtpPqfcODkMHrt7eNm6hZke7KBp44vmFo42vCybzTHJLQILPH4jCJkiUafrtk71+8eDHKdvHiJS5Nc+MvU0Xe491p3JiRCTuo5JoiCvmXN9qGsKX6CsY0gCmlOn0XVbpH9sVNdBOHiBekkBifvll/dcpMR4CUW5860yEYRgQEWPQTe0HUzyBhRXXQUUXypcPqQEYelvxERIenYe8PvJHZZtpeas4mq/eNAHo2kryM0ZHrcgYulUvjNBugSQM3NBmVvlrxNqWNqRlbHsYJTBOWWU+f/I8tSuv56gUBYCdiyUtR3+R5hhXzuoaUqrlT+WfIQMnFqhpKHF46AzqY/x0SK8vWEZHyMTT5IQmofHWHrK2MeOKpM91225m3/hc/escdt588eTKsejtpb+/GU08//dlHP3fluSsvtiy3OCGlU46XA8D0h4kZblPqQOgAO6AlLBE68rjx0aFSWxuC+cKOCZ9gjrsQYFAPrvTsTE2teGbuTEeTCCCv5xgHKMmd9E4wod25y1X5OjIKmbtWjsr6jyY4D8mTx94q4EeMmzwCooNCsjug3eySxNsq6wm4ePEiAr7srpf1uQng4sVLvJJhpH/v970xfjZQYxyHs+NIKR9Mj0CpMdEpj1kUZEnM6+EwBlQ2C1aU9kF2MJsrQOavUnPt4HWT28+de/3rX4vHXVWdf+rpr3716y+2FDMRAuwSdQgd00sqBLLqMg8kxAOC/SXtF/1BAGnnF+DDugxN+Y02l0hkYGpUiCe2ak5LwpX2QByOl5Oel4uFeDnbDmVkYw8yAJaASxY6OpxFMjPdTCpR9sDWiJ/Z0FSMLOtwCGboucMQAoYRpSGH1dh0BfpsJgNCPkCAEnISTYiISwCifsuvxDGdaKu4GxjAGHm1N9dwmFLST6gEeWwCmjsjh/6AJNCTRwQqqgIExWUGIdW5s2dvBbQBAPfe88r77n3liy3FLUjFi8g+yWHaQ3XgejLB7NcIGjMcfB0R5UWBNsbX0qYZXBxf0pEw22O8t4+tDE1C8Y82umMieg41EYwcq37xJiH7a5KYIpo+X4/q34BG7cORyRdCCFe16G2+gbgbUhuNty3p1KmTtwja6OmBB151++1nX2wpbnUi9t/meafT4dgyZOu2hYI1hGpKHKkP/876DYCJXeSSzbTlROXfTb3XEtKoetAKbaS8DWMR+7wbo4nszUMOwcioRY1fMIppoWmAA4JzT8YUNHGEJppzaMT7nMawkv81r/mOrpvYPttMiHj/ffe92FLcwhT03rGIYHQtWPlZEWXUmKyHOcmp/9ABPR5+3Gimm0rr95hKZ1jNsy9/m+HCNnJv1FWnCL+P5Il6da2feYz8bp7JBjXtq8V31skVFEiRARKy15CDxjxDf4/Syk6229hQpASBifOxitiPk+Ro7bCcNGkfKpNqZTqLq79zZ285d/+2287MmvnmUvEYcs9bIh6kbSJQDBRaef1BGY9EHcCizM3mDGrmM41lNf8iU0GMNW9uM5ivYXfJ7MDB1RoxtvaZcv4yyqVqQT7SZzoGlBfb8e6oECXJzjosQUiXPE8yDTlz/iU3giypopacVIZoMEAJoEtbU2pGxczJb9b1ZE1/x6kgx1fKJ6Qyid/KH8YTUb+1Hqr5FAB1tDKXOMsvDOgg4dB6NgySXgceGQ9+hE/V1rXjtPEY1bO7s7NYLEaxO0a0WCxunSmkI06bxX3I/pSdCTdXx3hOM56daWNkEMGonIdLm+zgk6WuVh5xIz+LzR6K4ya4N1cCHMjxzqQGnpC3Mu+qAyQiW5649ThUp9rytA8C3NjfHy/qcaL49PGZDpNkjxycCDPlu8a7EUCyy3zHBUmDRKkIxlIeZ+UpfMKzWwAAIABJREFUq4p1RVtBRgm0Kppp+2jiiNDZc0y+0o/Ju7QmCap3RsGhidZ0PP81abWB44VnVgMchUO9llGtp2ZG7HSJSHfCUSIDn5RpCLdC+kwzHTohs5STtNboCgyOaVM0MhpDrRIu45MyhwsD5lF9jEhNnvB4vpcVADYxoTbK2o3qaY0sVfPXHoXR7KPNaTNRGq7mFJe2AG6qO2mxCuBIE2M13yvWlOLtG5n0E7lTQW6eyqxynQHJv4et/maaySHp3BBAv8e56Yxrds6BZd7nw9QsK6nNrxXpgqBYRbmZHEUQPjW8TkgCgT3aGq7jTEed1nyzdTgyEWnXZGnJqe2Yl6H5rI0MaUSFSImkQZzIvx4PQFgtwpEjoQFr//YI+JMzNmIYYyjKpgRXUy2zXprpRad+xdby0LgDDYHAGjIHAIEnvAyt2Z4xiANVzhE0MrOsc/Yijgn1k3FeJADDHw6HDXSIJkCYyq3OqiVw3f9Hkcsb0XUBMkwhdqdSJLq/0pTKeoc2b+JN54PO1qrUD58Eh77ONNMhkjyyrR/LRCJ4sCHVlvyF1kHaI0OzNQpVMslch4XymxHmmbaKboZajntLs/ZahsOzKXX8xKacykwq6kTDzuGgJ7NMiVHLVNb5SmV4ADWBVKl75Mhvv5n6zLBsgKrntYYMM820KUINNsiZSd1Il+SzmVoHTh0WXoBk2uzzzRplRc3O43qrqRIzW+HNTur+kwIMPQkfYpR8E7Cxl7W54L86BIbzDVbE55G1zXioz7Ai4OA23UyBUElriBf/rlXqs0sc2DfVhvPYqdxZLc30YpPac0OelrgiYfrThzdag98Og5EDiMIf7E5GAVNHW4zDdL0koFA0MzTTFlIK8VdW9fWk/G9ykpzibtdvidOkdXpfaDFHB16yRlG4pB8XAsuZlQY8r8+/udilz1A7LbZGNLhIS3FielnuBeYkNnZN9e3MbIyIe4B98czf9i0EQkSSGpqFkigdKDFsUZKrGxqaaFN7URDAczeWf/vc/o3l4Sq6e88sXnl6p5tx0laScSoIEGCZTqjKs6frRWWJykQkIUHXD0J2+lWSIg0Q77R4l69P2hslppqwzOwEXA0jN6MfvqS0bRoxnQCeYpnpaBNX/DmkTyWByqhQo0jF3Jh6lwNpOJMMcwZuIFnPE2MkMPbiJDklfeM5EavRCf9gVPZTn4aoMmCyeQhie04pYW80SzPIRV6RtS3chMQitjG8IlodcHC+pk4T8xBSVqAZmQfwWVHrXU6174eghL5y+ca39w5r5Z+i89cOzl87ONHhQ+d2Ty1mjbql5EdlU1LxOlZ4wUlTC32Ig8aJ3ZYarRYjzhrisAw/sb+K5oFxy1JoEFaYKZlCY4tvS+Rt1ebIz7cu4AhgHIVHu8aiWKYcvnAEyu8A06NKlAroWUWm0fTs3vKJyzdGZu4Azp7ozu12Lz3RKaywv6TnbtCze8srN5YvjIiR7C3psWf27jq5+I6Xrv9aZ7rJ5KMNWhVhuCTgPgJSdFY2i1RuWBWyMXrI9n9bdPhMMd28d9iqqZFuo+lTK1jNg8Z2lgorYTCJ/Qerjk4Mfw4VbSDCAeOeVU6LDDfkHS4cBlCmT9NxYBn+0sUyRmEB6oKHdNhuvW7+jSv7f3f9oJkNAV5xenH/bbX23+nwjpN4x8lhqv3y3vKJyzeaMZMLLxw8s3fwAy87OVbimV58qumoYTZlw7qXoN/iPAoWpmHGBJFpPhrxw9qWKtMkq5IdxGiSZjpeNOEw+DrMXb+HsIme6RWMrH4F30M4GIZfaZR1h+JYtLQG4BiAEPJZ3MosiQcpSikr7xjbj3beTCaqmurirYAWFZ2/NgptfPfZ3XMnnBV7+0t6YUkHS+gQTnR4QgY8zp7o3nTXyesH9MTlG9cPahIeEHzh0t4b7jwxVf6ZXgyKxjoC0LJf2rn2FIQtjEBY2dirNfzK6GpX6I1vreI2jqcwM51nUrafNHZ0u8s69nh8/pV6ar3cmAnTNmIZJZjIJHxtKj/GtorKpzC+tae4boQDK8CO+H2bAweloAuWUIRJrNxA5wl1q5lbNfFWoKv7y/PXGmjjvjOLe86UNl8SPPvCwdPXD67th/XvdvCKU4uXnVrsdggApxb4vXecuLa/fPzZWrRjb0lPXL7xXWd3pz7FTEeHUoQDN7RTBQfe1A8/GUgUI0JKUZHRC0aiQiQ6g/QB1nk6ksx7nMHjQXaidQ54bB9NfW2uqrez8Ip3YGnX7DMN+93iPhkwK0uXJkerng20v6lV8H01HL/2ZH/cWlGKC+L4rAefNGF3HCYt0BgCGmh9KbMCfenZxrqNN73sZP6QZEnw2DN7eyNWZtxYwjevHXzz2gECfN8dJ/qwx5md7k13nXz82b0rMVJ5dm/5/D6d3pkdvO0lXDqnD6ys/oYvxguUF2NgUj/hMy4O5vB4ob3aUNf0WyPGHDMdQxr5gnPkjkNUD4WUOxaxTqIKf8Vv0rQL4+YAJlsXhimCf3NTz6j8yPZf93h6hOp5Cyaz/VnVPvoeioYbblWA2wRp1qOnq7GNs7vdm+8qaOM/Pbv3uYsvjEEbnAjgC8/sff7SXp5Pee3tJ17zkhpk/MrotaszHS1a2/G3ROpfIATo0PkGfGMjY7OO2+ocRPxjpq2kca/O7XEoEcamaa1OhYaBnQpYlz/jTU4NYdUbESAz6JmvCzhcYnArRCPt6VWaAGVCGdK1E/YlUPM2ZAqOp6efD4+zv/NE99C5YWrj23vLRy+88FwclmjSjSU99szeN64M1b3s1OK7XhrOm+wt6ZB3AJnpcKigA1wWt2MIC2+KOQAhEhqebCD4vceAFKXP2zJOeYrxPbjMpwRlDtPuzHRolBYKklLRlV7E3rT+ECubHjQ3PWOPdbvAgwqxSNX5CjajWc9R8clz4EGZsyFTeGjR8LFaNDDQu9azpzXS4q0HOFI7qEct0ZnkqHlxmN7gY86gnllz05cD2cflnhym/Vpd2eOy02hJEEGIl+zgd6aFFH9z+camQg5/d/3gcxde6K9vP9k9FK/V+OqVEAnNdMRIjoC0DIKEvtmIvUy6kQABujDG2tSxQTLm0nZMD5gJi8Yf80SuhuCKWsRJlyJ1RhjbTsJF1nerdyzZ3rBCLyeTq9LJ6vCIADge0pZ0JZ6KyvBII9pALlRjqTlpYAVwS9k7hxLhaNYaZfNjSy5UmcbbpWmRpQpd2feXb55a4GtvHz4V+fK39y5tdB+wJcBfXBwwx9kT3f1nFr5s7Q9pZzrSJC3thicFtH4Ztl0cWctRtOVHUaaZjjxVowtHrk9Jwz9ZPAlrGn5MnfvUutcFHCnIK1VU9lyq4rgZUOcIAdd4GFilDWxjfvG6Y9QR4HvvGNDG31y+cfnG5nvtPsGjF4YtwV55Zuc2b33oYe+qPtPhU96le93ZYmcoESDisOexuB3zWW/A2EnrTZBw3XR1M207VYPc0U292m8M93Fk52JW5e90T3d+c1TJKIOOwqDKp6Is/jzDyrVLHpuJcKDPfuybjqY2yLsJcU8yczcNt9CdVfFZV+maF+H4nrRu4+lrB5uNbSj60rN7/UWOpnCa4cb2kA+tk4cVTKGuX2u47Lq6wiqUYrMLOKYyK3sZVSLDM20XjffjR05JbJQmCDayuB/pn1I7mr+1Wkz7TmnAWl6btgHAgelPgBucJDIXhmEl3cmeJ6ViCYcLLBrc4b+ahrJSnujwJbsdACwJvnntcFdRPH9AT1/bBwAE+M54AelM20l9eGPDn3D3GkbEPPp4I0Ujo8gD1Rx52Za7eiNnEPPHmyPpqMx44xgQcu1dyyc7XNvKekkm1YQJqsVHsZxG6/ZhlONVR0lRnHEYUXP1jM0T3V57Hw4qh7e5ZPuBFIHyvSDeMGBWhVF4L6zDF6dOVnGcey0Nn3f5/FxaZtGkc7vdd57dzZuLHizhr5/bGzkR881rB3ef3ukQ7jzZ/e1zRfR/+o4f+4c/9KbP/j+f/ou/+Isp4s90BIjK0q4eCNCacypyINAQTEWgdHpyytWcT2mHN4jfsbDeH5LTyQ8IQTV4OdOWkddZJk1q1CfaxncVk9OHIzkbNnrjShhGZ9CmM1WqdgusxyEmON5T0Ibz5jZ0yhcCEvKDb5kkjVZr6h6bAevJrOKQM5PLP8BqDX340rSWonJa7Otv3z216ADghQP64rN733/niV15uvyig4fOnThYwp9fGgVZvvjM3vfdeQIAHjy7+8TlGz/4D177K//8v7/35Xch4g++/ns++MEPXrx4cfVHmunFphQsXLlfhpOHOKzioFTHmGjKCkq+JsR6pOObtu56BHSmF5He/e6ffvhtb2utFhhSzaz6cPPTn/4Pv/u7v7eyDNxKWeMdpbrFJ5Hlb1PVzxUqSmEWUjd7ouFzMsFYPXLMuOab2Ky4CcBBvdtDQeyiDgiKLCnIW3+1vDjIDNHTN5T0pnwtRq9+yTCv8dfeR7D93uT55+kdfPNd4UFriw5ed/vuV759446Ti5Md7BN8e2/5vHeQygtL2l/STocP3vPyn//5/+atP/Sm/K0BIt55550XLlwY/fXBTEeBKE8Xbn4+RXZ7zFGHot51nffde+/b3vbWt/zQW+67977XvvZ7AODxxx9/8snzn3300U9/6tNPnj8/qm5k/990FGJMcHimI0Xv/umffv8v/o/r66UfestbEOCjGnOMU+5hP1zXVW4WX4GssJ4MPPQyHI2w0mgb9YiTGmETx9MPsyq9Dim6Ks+FYIoJQ0JbToyLnQDLp0hSe9locLqkftGbjvKy2C46AihcE52ZuRKd2kEAuLa/tPGNjn26MpJu2+neyI5+vf82AIAvf/uGPTj2Mpz4b//xj/34j/+4HcDL5ZKIZsCxVSQA+UHqx1iS6mFSBDEKpLMkPcYOoAPqAJbeAL3v3nvf856ff9e73gkgvph93ete97rXve7tb3/4A+//xX/37/79v/7X/9uTTz2VuPJwsngk1HOwkZswlvoGSWgjN5rvz810dIiIHn772zailBDx4YcfNoADALRZkTB7rCtKJU4gOLsc0nxKqTaMLrLUAEnUu7FTuwqKICBQH8VA7tSzR0OSZeUEhcNcicGHenMuZnP7cIRVhTPPTOk5OVT0As3NqDSZC1sMZS9UZbmqnkp3nRz2w/jGVWetaP08+vH00Lnd++TGG//wLT/wWx/6FRdtQIqbzbQtZNdFUb+f1dhuibmUTUKZDVmFVgc//La3/eEf/tt/8k/ehejtgg79fAy+613v/MM//LcPP/y2MZIVJFUVfgQZICXL24DHPAyOFm3yfVT0vUNtOCB5jp08cAvHhaLpvzaDEZQXaEdxED5F5T5FVQIRXPDsqXRrAGCzG39FQvcVKgCxOaKIpwVicfGNSXTXqaFJr3jrPe8+7W/PtQLdc2bn9AIB4KHveOB//9X3//r7/4f77n75HMM4XtRwaeQkQjj+2tUgIEJndOA73/kTv/3bv3X27NkxTM6ePfvbv/Wb73znT4S1TLo903Enok3OgBHYMPc6hOrKc1pZ1dMpMjzrj4fRHESoYyN1uVXzmxtaNJoZe+LXH4mDrEaOWoZhnsQFjJlzhIdwc7jj9KIrQh0yve7ul771H/3jf/qOH2vijDnCsV2EpEbT4D9QCdUKioKZ4/ozJcjBRxC+7W1v/dCv/atJEBYRf+1f/cvLl5/71Kc+7WcYz2sKSeBVoxndHBE6JI0kJ479KtrzkSaDCwucKcMajwat3DMxdX4OjCrc+uUc9iOWpgATTaT/7Jvf2twTqB6YEvHjaoipXalf+7hOsRFl1OON6966zibt7e194QtfAIDr16//5V/+ZT3zD//wD//Wh//nn/7xfzRHNW4RIuITrv70aqZ6uIOn9oHRYboXhsVO9957z//0oWloY+CM+KFf+5f33XeflzRU7cq/MmW9v0l/eaZjR1G0UI2FygoGw6yWYURX3ExvdZYQAAWzsvwHQgoJ3UxvdEOAw3l3ivS6CDdCVX9wfwFHRRxRtor5glUgUymzufRC7bT6iHZ2dk6dOvXVr33twoUL586di7I99NBDH/zgB3/2Z3/2tjNnVhJzpiNFbnfTKLkYVB8EbAB0si1H6b3v/fmRMymWzp49+973/Lxmzv4m2hjUX2F+faZjSZ7mL/etH1/3dUdSMC0yoVearJvotnk4k7wrK1WrWKL2mRg+DOXfcISjBjcCqgdqqGQJM1QW/tTXEW0c2OVKrgYbdtUPNum67ru/+7ufOn/+6tWrDzzwgM3wspe97Gd+5md+4Rd+4YEHHpgDG8eCpvVBikfEmIiojQGwNV/5nHq699573vXOd04STNG73vUTbpDjcEj5KquvZZnplqG1egjGCGbk+oGNEHkCgA/ufWd/0rzSeKo07vqAY9xIrwCCiVNDcSWr9CEpvZ+wAkVHprk7c3D6+te/ftttt+3u7l66dEklveMd7/jlX/7lH/mRH5mhxi1CSmVQnvBgGXC0ga0OTQ7a6e1vf3iqqJYefvhhMU+PgMNKkc0TBXBqpluVhG9fD4QHazUaU5aNAEY1xFFJVMZwE0EXzx8vBxC0a/AGrBc6GUcbiXCMrNc89UZqPpI6ZhG067dvLCvHt16/fv3SpUtveMMbXvnKV37961/P9x966KEPfehD73jHO87Mcyi3Fg0qgS1TOAR7nZZWZODy5je/eX1Q+5a3/KDHZMRKu2k0g++ZVqegI/pTHm508BBodXM+hu+qsySTyeW/iY2/Mvu0TgPN0Se5crRRoH7nsLx/F+mNAvoYctpxuV+on5BgfjWEmGpV63lycbX9F2M+rG2mtDs7AtB6CvfMonvuhr+M4/OX9r73jhOnFg7/U6dO/cAP/AAAnDlz5o1vfCMAnD59+j3vec9DDz00RzWOKWFl4OfNu1LsFAlgCdD1HZ9SOhtvqfM7bg2pf00CAiwA9gnuu3cDsyH33nMvH8t51iagSjs0FKOXXNaUzXTrEAlrpJcIsZ/iFA5vJZHuU5xDLh6spcLBjIWTHQVPoLwwFennosKBVB5ZCSFbwJFLcdOZIoJ616/MAdh9Xns++kDZ8dw4mHcak9Tn3/RXKjJmSu6lpyPKnelKgkYGhw5f/WQR7jhZa9jHntnLZ8rX6ad+6qdmtHHcado0JJWBPq1XtHMjACAR9TuXr0mve91rm1VvyodjjsYh1jLTtpM1kE1aofPUi4wbtDUeaC5axcd+hhJonFG3WiINtPnPYjN5yHFj3DLmcv02B9BIF9CtYORceIUoLQvtz6av0NX9dh9YLpfL5XJGG7ckYfTDmUVMXXeNjlK8qW6T/c11dZxaN1BTzHAePzNthDZryFYVIPzgNgYi5UYJb9TkkGko/q2YdTUV5DbXIQIOQ/U4ZyVGJIpXSO0SL1kJ9mQUNy+1Tp+4fhCeEKuovlUHERHR7/3e7z366KNriDPTsaLUaZGGzo4uAplIyK8Q4PHHH1+PIYBksj6Ur5B8/hld3Lo08t1PGi3RKqR1SFm6lbusK0kPSlBnYVM8Mq0uxviHVUtD7Hxuf+cwAMfK6oXUVZtLFOJgokAIQVRBHYZqVu7Ss+lI+tPeKg1OByMCXdeuXfuN3/iNX/3VX/3Wt761mjwzHQ/iIb2VN+pRw4FRf0Y1AQAiPvnkkytWwOibiQkCH3jUGo6TKHt72dNYH37NdBxIOZNywcFhL/Fp9sBKBt/hpcovY3G9rVb1YpU1Bsnkp+ONv1HAkdeNhO/SVzwqA9lbpVAlgzhJ0xHNhHqsnGzrI4/LCHr62rBW9J7WsSmX95xYCAHcWNL1A7pBAIiLxWKxWDz++OPve9/7/uAP/uDq1WsrijXTcSDM/d+sWnB0UJims+U467Cq69E/++z6O09/VjIxY60xTTSe3JIz6JhpJE0PaTsGdUptk5Oxke4mR2NKrz1oCi+9lPoyjyaEw8OZUjH1rrVohbWLwHFemcqOohUZhF5cj5ZpGcedpxqA48L1AZosCf7++sF/vPDCoxde+I8XXvj8pb3Hntn7wqW9zzx5+TPnv/35v7+2j4udnZ0/+qM/+umf+7k/+ZNPriviTNtMBLiEjR57BQB5aRQiAnzqkUfWZ/jJTz7SMwQzquru2iQi9p+qZ8YcM1Wo2ic1NefsmK/dXLS0ese0MyVRHdG6hcFj4f438PyNEVQ3j/zhIwkPcQ0HanCUb+vfRXtm7VSdKLHMSOa2uKRnenN00NeuDAfT1w+jv7JPl64ffP7S3ucuvvC1K3oRKRERLRG7G4CPXbz2ub+/evX63v7zz//mb/7mL/7i+7/whcZJKzNtIY1GEa1cK088IxAiPnX+/Mc/8YlxJXz6+Mc/8eT58wPakEvWSjhlomwtmldvzATCJGxe3R9iHxsvbJQzWo3hCe2bwnjKdZokKjWjGdw04OCfN6/4bkaWDB+1UZiiHOTDlVXoYjpI5RWtWZW/ubIf7QN248bw3SwiInavvm335M5id3d3Z2fni1/84gc+8IFf//XfuHr16pqizrQN5IRwrdl28k2gMuw6hA67/+V3fufy5cur8Xruued+53f+V4+7E+1w70ylOZgxE6dshUzXQpHBoRcXtjbFG80CHIOvr1elcBHWiADOZgFHCcz0p99m856CLf3OP8iiDmVdBgHbYwAFQlULNzgo8cI4+sOhHERBQL4TUa498SfFfGXqtzBHgH9w++5qHA729/P1XSe7cycWXdft7Ozs7u6eOLG7WCweeeSRn/u5/+4T63miMx0lirqevrnExUG/XR7L04+v/gf7TtbRCXk4lIGDBEBIw/jbQXzq/FPv/8AvrbaS4/0f+KUnn/omdgO86L+oQTZUsYxvPsSzqDb8geA90RJQHp8bIrOZbg3KdqagjV6vc7sTda8x3HlpKmZlXHEsW2a5zJG57JySVUQ5cehso4cAqOdL+k/TiafnLSD4iOL7ofHnYtdYEQ8H8cKQQ8/q8KZUVv2cP7Up6ns8Udy0GV3VBTyk26T1QMcze8MW5qd3unOtPTks7R+UXUpPL+CeUx0AIGLXdYvFYmdn98SJ3RMndp9//vl/82/+j/e8572f+9zn1hJ3pi2jVcxozasj7LE2Qn/eCXZd98gjn/rAL03GHB/4wC898sgjiB32tIKgY0m5ITPNxLzGKHkEB0s3Je6xusEUQrfYRI1wc4bSIQCOquCtqZCxTWf5hHEe76aTR6PfdfvYXz07nNP23ed2T3TTuO3fKPuQPnibmJfp1fhisdPDjnPnzl66dPG9733vhz/84fPnz68p80xbQv1BbuiBcxjTdWs5CLoOd7pFh/ixj33ivf/sn4+cW3nuuefe+95/9rGPfwJBgI0RcdY1CcU/M83k07qd0AbOp1Uwwd9tVNTftrwwD7e1BxyfQ1C2cbK6KUSHuvEXotPAJQjhtkkFSfS/GnPA5F7mbJq9EqOOWibRjSX9TTob9g13npjEkJbDF7PfccaBKr0277ru9OnTJ06cOHHiRNd1f/7nf/6TP/mTv//7v3/t2vzp7DEnGv7nkkLuFX8vnOEGAERYdF3XdZ985JF3vuu//tjHPl4X6eMf/8SP/8S7/uSTj/RdM+9KtiFyVau9O0OOmWJnEsDV/1OobsYjm6YLR5W2QAJRkAudKzcXhizG1N96ujrM6dMWd7/ila1qViS+WiLPIOk8/nVRmqopMc3NoS015BYLRLxK0fKXRYYMD7zq/uDJNF144eCGt7/o8wd0ssMzOx0A3Htm58L1ZX130UEqov39GwCwQLj/dIgIH/9Pj7/i7rt7tPHss8/edddd3/jGN86fP/+Zz3zm9OnTr3nNa3jmP/3TP33mmWfGRLi/8c0nZ8V95AkJqAPga5IStihrGhrQXHT4/h8E6A9cQ+hwSQAdIsDly5f/5JOPfOxjH//mk0/u7e298MLey19+FwB86UuPf/7zf/F//f7//S/+xa987GOfuHLluR6j9PMpgIAIXX9qYlUJ1ERz7hQ26uzc6JP4uTcfWXrJS1/6oz/6IxuZefvo//m7n//8FxDLaV6ebh+ueWdav27Mfxq5mnhlEClmF/bwYTIUoBtCH/bJsF9EkteR1CXGcdmsbHXJ1z8tNq6dKk2sk8a/9RRGLstb5INalGIZ6Ns2FjIpInVmp7u2758N+7dX9hcd3n6iA4A33Hniics3nvX2+xLCpFnzB28L0AbCFx97bLlcAgwGp+u63d3dxWKxu7t78eLF973vfd///d//4Q9/+P77B8x04cKFKQ8005EmGoCFr1dSlhXYFl2EAB3iEqBb7AAsiZbnn3zyIx/5yEc+8tGUEQH7M5YJAbsOEReYZlOGPEwT1zyrlYjYf+zeTNtBfc/56Ec/SkT/1X/5dpVambzg9jhff/KRT330o7/bdZgXZoLxJ5sSrdN/KgF7rGYw2YfM9QyqavfaFa22kGvceoIYgowKkBwa4ICEOaj4Ic3WpwTWyEMkJDLUmNhWVm9FF6Ths5rV0O7LT3V5Fy9LT1y+8eqX7Lz81AIAvuvs7o0lff5S7ajY5fIAABYIJ4OVH+fOnl0uC2rJMyw97Ogv/uzP/uytb33ru9/97re//e2f/exnL1y4sLu74vcyMx05wmHnL0LIew2lURMUABgTEM4jFQE7hA5wCdh1HREQIhEBEeXx13UIVNaHoj73DRvjffxoa3gItUpmOqrUd5qPfOSjA4otU/B6obIT3RIzFAgAO4tFNVLS6B6H3nva9d8MMhh9LVGYxfQfLzsdOfkwAcdhUY8Oai8QDcgwYKL6/if2vtOLxlKYr13Zv7y3fPDsLgDsdvjmu05+6/mDr1/ddzMvD5YAcLd/wD19+Stf+aG3vMUReVhMutjZ2ek3RF8ul3/8x3/8qU996lWvetWJEycmPM9M20CD7hjw9WS0XIfgCSsg9Npi2IMU2EcrPdhhEUZ3yVbBQ0nSQ6F52mTIXQ+9AAAOeElEQVQrCbFbLPpNDhHkRpooIIUsJX92Q1zNUZhjAgzjRo4P2QvbjJXCMMN07jxDD/ejRADuLUDwvOsjqvU5HC7g4E5TT/x9RC/BRi+sg2MzMM7tLpSLey04WXd3CLsdRlt49fTM3vJzF154/R0nTi0QAO4+vbj79OLKjeU3r+5f3RddaUkHAHCXWWZKRH/1V1+sS9KHOvLfnZ2dfuuORQP+z7R9JHsbwohAwoSeTdAhIBECEt+9Jiu+fi4PsfXZLHk/XSlGajPMueVkCjqZZjrClDaiXSRTOpjd/MMCDp6E7GePNhD9EAhU+1bVLy15qjtk9BXQZMthJAzlHDfKMEnigbTKUG1KXXfBJzz0IUc4gr1C8qxH0D/68FrJAKb3NJVoX3PfBVQ6ASEiEuYuQqh5Tu03951ZfPWKH7HItAR47Jm9Mzv4+tuHeMNLdrvX3n4CAJYEe0t69oXltf3lNdpJ2WXx5cFyuey69odF+aPEvFfYoe+JMNNNpGG8ICzZtAXXz5UTheqURgFBv/qsvxYBRRo6EuaM7hjNxfsEwlAtReFzmyQSljQEdlKxeT5l+wgRE4jt1wOl++kvDT0cKelqdnO47pcoWzvDEInY0so1F9Xegxlx+HAE+920nNQyBOLiLIsowqQV5YyoQ0jDDZPkzcIoycDr4ycdcfEU1MOM76VbDyyVJ/LAksp8iIADnUhEplUiwBWHZjL3av9aAajedWrxzav7+kAUj67t06MXXnjpLr76Jbun0hH2HcKpBb7yzAJgAbB77dq1Pbm29PHHv/TQQw9NEolHOyYVnGlbiPyOvI6jJWjQ6ZM9N0f1HyrNUHrbCYfvmtJPniR9xmaAfFq9GylO7HqNuiphhObGGoa5O0OwombYBJYfeByaKSoyouo9EP+0VM9gQhcTy4e5VtnS+bW3T1gn8dwNeuyZvUcvvPA3l29cubHcl9Mx+/siWHL27Etv3LgxXSIAgDmwcVwp7+odYI5VSA9PZ+yO6k6943RIPW+cep9pW6gyy+Z77fUMtsuOGAyU4wQ1GRscVs8QDWQTTVhRDILyQazhHmoRpzUwal4Cc9+lQ4xw9C8wB7NyWGaMqmhmy5MyQT5KSk83JLGg3Gbp1AIfOrf75W9PQwaX9paXUjCjF+n69Wuvf0n5QOXcubObk3GmY0GDbiQAWAJ0qUeriKnt4/GkBqJRGSSnRXiEOuuo6Y5XeYDR5PAgUI7MTFtP1m7pRHblOvQb0eoukxomatPY0EYlwqEk4Xwxmzo9E5InlEzJ0VVU7k1pjVL8cIPtCEIvSBHJu5lFc2IMbvF2/X6SX/uadHa3+46XrI7h8jxZ6iH0+ONfmkMUMwWElNRMMBiI9XNnHzCWI2vU/B8hUNqzS9YwxtoLT2gTEVkjM5d4pi0n/Q7J69UbedeeUXdqN0TB/Sj/9CyuKFMIofYlGG/P1WqJS00wpkf6s1i7FIgHJ5ij5WPSEetH0DbWmjD5rlOL23a7Lz3T2t4rpkUf3UA499KzDzzwAAAg4oMPPnjmzJkHH3ywxx8PPvggAJw8ebJfn3H33XcDwP3337+zs4OIr371q/tJmZMnT165cmWNp5npSBMNEY5mrjAMWKeCPmTuSTOh0tuK8o7VyBsGLzMdDao692M8f011Nc5TFXdTmY7xGbYN8VrSt6G7G0cUQ0zOdEgXYvih9glseu+uWMH4dYq7RhYON8JRHhlNc2RRgh8jGPeFovBXq6CuMXYTJ9PpBb7prpP3nVm0s3q0WCwA4OxLzyLi7u7utWvXiOjZZ589derUyZMnz5w5AwDXr1+/5557dnd3H330UUQ8ODj44he/+PKXv/yJJ5748pe/fPfddz///PN33nnnnXfeuaFnmulIEbF/PAUS5F+BsIzfaRPJ6EdBNhCPSG7GHNo4RhS/TA1I42hezKC9wiAqvnYn20wvjSxXlbvOlU+lr+cedXss6eKH/v3CWnGweklvVdoEzRpLthHkcc+ZnTffdfJ7zu3efWoR7Rnq0mKxc/bs2a5DALh+/Xr/pUmPQjKAeNWrXpUyLwCAiA4ODvqLnZ0dANjb25vnYo439Whjg0BZch4IXVC/+Z41jeMc5ziOtMpS/ZE9h4Lr9Wlkx61UuiYH6XA40IoAQOwa5lUYcMeWgC0TrTPg977hjYc4fPNiBBpmGFRklR8JoQoBpA+0BSeeZzizIVrtkQ6y0uuJKBdHoPTNH8kqEOBH/vP/bPLzbj/9v5/5/+Zp8SNPpTsj0AJoAbBgQTo7fxFFmE1OBABKCz4IcAlwg+CAcjSlX8GRzocKgrFdOrANi0hZYAiG+6gp5iXAEqBfdT930+NBmHqdVcJ8Qi8nVfxMb2ZcczCpAGbPLjb1gBTv6JUlrzwam+Bw0tEr7opXnoQlIBtuQHmzD8qyAQIBLomWBMS33TCk7CxvvXisFfndPPbxbYRjo+iDklDDi/HryIpLAyJKpSUVNFdrwJKT2F9RvPQYW2R2omY6spR1CgDgEnGpPzJJ5t50b8tIjh8CubwUy7cqmFgjDdbBZ+wNyHKPoiwgs0iRmD5EaGzTNNN2kbDZzTcbdR1Mo4JMdmt35GRDbXy4aeUmit4ZkOMSD72ZVe/YRCkeGhOZB2RQC+Vy1O8XrOU3OwQ6j9F4IWT+ully0lHcEmqCNjHaq4owfM4RdhsvxUwz3VSSCJ5cF2lD9WABG1Tujio4SaBRhqal2We6JWhMHzji6juBhMZECdlbAUV81H2spo6xhS6sQZOtv2GlukmAIxCI4ThPP62tpUJoObL8TDMdcWLeG7ag9UqE/dbR4RA22WsR743QPGpvBeJx6DXeeAOjRtN4KLOEhpgAatv2T5C8PrIqcZ24tpClerrx1ZnoEY/11Cindoc+fPnUkKm+dZO4mvM4+bsLtBlnhljNMdNMR5OUzvBjoVRVlxPqkZOY69t8MtejZJwjHMeSuHsZ4dpDgNKr8xstDDbwCoBrwpqAwFAOlTiGlh22aEodOukqOgAl5CEZ3wgFkhfgsGUbbWO5K+iK8i7/F3Wi92ummY4wDeAiKZWqCpvEloAoLQZp+5r9p7Ao9aUec6tQ1gDzqDyWtFbcmeevuLJNqLwSnF2rQ9rFJc0KFDyPv0Tsh8xwqtxIKSdpidVUys1bwzEuKFQoCnblVNuI7Saw0NF7FXPAY6YjTd48ahoR6CH4tXq0t61QNXdYX32iGUE4DmRHedO0zHQMaMy0XUQm5j+5z7D8a3axRnFUtaXalQDoJ5WhwueeBO9SP3n/GEqIXq3VihpwRHTHoZsBOIag0vTX50aJTHIlB6QgcHlz9UDITDNtB5lw3Grjf0xN2H93h2NnUw5pKJGLQWbabmJWLXiv1XV4uq9hcF2pesVkQxO75TT2h9DnJzz+SNA2JtuL8JVKrY+sxM5nQA6YEBfetNesy2baOuJT4JslNjLyXEk4a+PRikLNqGKmCVTvK62eNKmnbWoR6IYZVMUaMxuwqeHW5NOVzUIOj4phF58CD4oybSuiZE3+1LDMgufI/KgvboRHHgeO2gBLUCvtTyI07KhHm2mmF50Q++/slwQkQQJh3nhnDZVC1AF1OUwZRywRyQ0UK3a8hMcKK6HmGYgcI5Jb5qcflZB/HwhJEwYI/YJI9HpMPoIk6JG+FyqKg428sMx1x7kRDsSArbwOY/g5Ws/HDztMgACHBRxLVnoYvNEQZc2aHn/Iboe63+Q8NbCfXVDsUMY1Rxtj7pe7k1Zn6NI+VzHD5bVPv1n4LUXL5cpHzs304hBfd6aU9abGMNdudR3Kqo0MBw87jsT02dfA+fyUY0nG2QvzjEmwfMhcuAsUeEJraqaNJ0ZQZR6pzZNFGzPoKj8nMnMpXD41in3wcF3A7RAGdkvDRO+wvVQjbgwyP6szgkKYK1euhnyPKV2/fv3FFmGmaYRQttdZebFUlX2qBdmPWtzQEVBFMkYEuZ1nGDmRPNO2U7R6wCSvM5Xin9sijfZaiH2kcHFPdoJ8dYbWusXux9hHmzTQGi8OAMoajhc1UpkjX0F0q7HPuG1W2/puiMdM0ZSCBPDVr35tnPjHh5566ukXW4SZRtK4SYdNxQRQT2s2cvtzJSvSPI1yHGl0b8q5BU12uUH3yJuBJ6byXGXADLEEDchHBPYbTFdIZi6Fn6WDCOxtlopNryXXSwdwBGDM9l9BDhtky/Tc1avf+ta3moyPDV29du3vvvX3L7YUM40kHWElABomHfhMbpR/UkUEQ4SjD244wEaEQEZQZao+yl8qstXPtK2kX2OzC1WWTqzQJeKVCE1ma2ZYt/8ixoiejZDKQJskgVmhsqL8+SuVw5j8dShSSpWJt/QL3WwsM4/4qtTWdFTgCH75ib9++um/C+o8VnT9+vXHHvsrAJjD1dtDXkemYRmdTFvrnRZjj5lxy30KqJWBPGgxY4vjT6tZsDGzbOOXNlScz5tAIx/fgIxauSCNT8OWWyy///j1VM6sItPi7rtfAQDDaQklErPxFifuAdn1LwquecEMVEUgddO+OC/i8Jf7EZk1QXrHtizppWeeuXTxmVOnTp08eRLjfd22l65de/4b33zyK088QXRIr36mwyPdkTuAjg2jYMBN5484TDiSr01yhAOrgWE7nF0HFYt3MagkKk6BoyVm2kISaNLVzGqhg379Hruow48pa4sHXXlFXD1mxmRMBuTDrUxe8LGF7qwKe7pwxiHjgLj2MTKGkGMH0oQLHv6WHCj7kG2OofUMhMMhtRQik0FxLMA2MeyP1Q5kELWiyIBXrl394l99CaD/gtfvNr1CjianerQTJreKDxnidAQARFc8RPEpchxfqg/JmY4SBSOaYDg5VgLjTbxTIkBEQEQqI0pWsl41YWh9Dm9sO/ndpUarxTtGMm8Xd6snpiIbiwqH7CH/ERnaj5/AvVNxqoDqwYY61YxFjWmj8f9/P+kPtEG7Wq0AAAAASUVORK5CYII=)
![Screenshot_20230720-211417[1].png](data:image/png;base64,iVBORw0KGgoAAAANSUhEUgAAAtAAAAWgCAIAAAD4sOOEAAABDWVYSWZNTQAqAAAACAAFAQAAAwAAAAEC0AAAAQEAAwAAAAEFoAAAATEAAgAAACQAAABKh2kABAAAAAEAAABuARIAAwAAAAEAAAAAAAAAAEFuZHJvaWQgU1AzMTE1LVN1bm1pLTIwMjIwODMwMTIyNDU0AAAEkAMAAgAAABQAAACkkpEAAgAAAAQwNjAAkBEAAgAAAAcAAAC4kggABAAAAAEAAAAAAAAAADIwMjM6MDc6MjAgMjE6MTQ6MTcAKzAyOjAwAAADAQAAAwAAAAEC0AAAATEAAgAAACQAAADpAQEAAwAAAAEFoAAAAAAAAEFuZHJvaWQgU1AzMTE1LVN1bm1pLTIwMjIwODMwMTIyNDU0AKQjtUQAAAABc1JHQgCuzhzpAAAAA3NCSVQICAjb4U/gAAAgAElEQVR4nOzdd3zU9f0H8Pfn+/3evuyETBKSsMJIBEQExUkAbVVA26qA2van4OhytnZpW+1wVNtacbZVtHYo2moVQUVRQJQVRlgJSVjZ8/Z3fH5/fJMvxyWEy/gGEl7Phw/6ve99113v8n3dZ7I5xYsIAAAAwEzCqb4AAAAAGPoQOAAAAMB0CBwAAABgOgQOAAAAMB0CBwAAAJgOgQMAAABMh8ABAAAApkPgAAAAANNJp/oCBj2bzVpYVHDttVemZwzTVC36HUVRbPN4P/l4w3vvflxf32jeFQIAwKlSWFTwu0fuD19z7z0Pl2wrPVXXcwohcPRVSkrS/AVz7Q7bG6+/GwgEo9/R4bBPmjzhggvPbWpqeeftD827QgAAgFMOgaOv4uNj8/Ky//XPt1//97s93beurnHhonl5eTmSJCqKasblAQDAwCuePbO4eCYRudzOiKeWLF3o9fiIaNWqtaveX3sKLu4UMTFw6HUNSUkJoZBcXlZZUXEomr0yMlKPHKnp3Rmj3zc9YxgRaapWU1Pfu3MZ0tKHBYPBsrKqXuzbUN9UW9PgcNpThiUdPVLbxysBAIDeyc/Pyc0dnpqWYqzxen1lZZXbS3b37oBLb13kch0XNR595NnVq9YWFhX87Offd+c7iSgvP+ekgaNHd9KJE8dmZKSGZHnP7rIT3Q1Hj8kbOXJEwB/YtGl7S0tbD19Wn5gSOGw265JbF1188XSHw26sPFB+8MUX//HFxm1d7pKQEDer+Pzzzjt79Ji8y+fe2KPT9XTfhYvmL75hARF5PN5rFizt0bk6czkdqqp52ry92DcYCgWCQafDnpaWgsABADDACosK5s2fU1hY4O5UDmFYt27Tus82rV7Vs6IIPW2sWrW2prqeiMrLKtet20REJdtKH3/02ennTSkuntnNSamHd9LLLr/4uuuuHJaarD/knG8v2b3s6eXl5cf9GP7JT7973vlnM8aIyOPx/fmplz784LMeva6+6P/AIUniQw/fO2HimIj1uXnDf/rT7/7yF3/44ott4RtfcOG5F1407ayzxtts1p6eqBf7jhiRdc3XLu/RibqXnjEsEAju31/Ri32bm1sbG5vz8rJHjBi+ZfPOfrwqAADoxqzimYsWz09NTdbvviUlu7eXlHJO+h06Ly+biPLzswuLCmbMmDJ9+uRFi+evXrV2+csrenSWVe+vDW8fmpqaXFNTv27dJo/Xp1e4nEiP7qQLrr7s5luu01+IjjFWWFTw0K/vveeuhw4dOqqvvO76q86fObWtzbPmow1p6SlTpxYtWbqwZFup0Wth1qzzV6/+tEcvsEf6P3Bcd/1V+ntUX9f4l7/8c/OmHZmZaTcvuW7MmHyrzbr4hgXG2+RyOZ9/8XcJCXG9OEuv911666LwtNh3VpvV7w/0bl+v1+dp81okKaLkDQAATJKamnzn3TcXFhYwxsrLq95csVKv1+CcG9us++xLItJv4dOnTy6ePXP6jCmLFi+YPn3K4489V1ZW2Yvzxsa6U9NSoqzHj/5OmpAQt2jxfMaYqqqvvvLWf/+zKjk58eZbrp80eXxCQty3/u8bv3jgCX3LadPOIqJXX3lzxRsriejpZQ/n5g0/55yi//3vIyK69rorb/rm18aMzX/qT3/rxauLRv+Pw3HhRdOJiHP+xz/89YPVnzU1tezYsec3v/5zKBgiopGjRhg3V0kS9cRQX9e48r2Pe1SZ1Lt9v3rFpWdNGk/Hf7D6KCsz7fCh6t7t6/P6PR5vYlLCxMLIGAsAAGbQ61Dqahvuu+fh22/9yfsrP+Gc6zeF1NTkiYVjJxaOzc/PISJ9/bp1m37x4JM33XBnScnu/JE5d91zS3hZQvRuuPGa6DeO/k566azznE4HEa1d+8Ury1e0tnrKy6se+tUfW1s9RHT2lIlut0vfMiExjogOHGhvBVJdXUtEKcOSiCgjI/War33F7w+8846JXSb7uYTDarVkZqYSUWur5/PPtxjrjx6pra1tyBqeLgiC2+30en1EpCjqhx+uW/vJ5+vXbSail1954kSHzc7OeOAXd6akJL355soXnnutR/sakpMTFy1eQERbNu8sGDfSbrf19dUSEVFMjHvXrn1ExBhzu53Dh2f4fP7KysP6xzcxMT45JbGutqG11aOqqn4ZiUnx9XWNjY3NnHO/L6Cp6rBhyf1yMQAA0L1nn3m1vLxq/brNHo+XiFxu56xZ5884b0phYUHElttLdq9bt2n9uk01NfXV1XX33fPwrOLz16/b3IufrLFxMV+94tJPPvk8mo17dCcdOSpXf/bLL0qMLT0e7549ZVOnFllt1vHjR+sH8XkDRBQXG6Nv43A6iMjr9RPRLUsXut3OV195q+LAwZ6+tOj1c+DQNO3OH/yCiEJBOeKpmFg3Efl8fqNAyev1/e43T0dz2PPOn5qRkUpEl1wyQw8c0e9rWLJ0YXx8rN8feGbZ8if+8ECP9u2Gy+1saGgiIqfLcdM3v37+zKmapt31g18ePVrLOb/73iW5I4Y3Nbc88fjze/ceyMxKu+GGq4vOGrd1y84Vb6zcs6fM6/MrqpoW1jQaAADMwzk3+oYsWrxg3vzZLpfTaMlhbKY34JhYOHbJ0oWrV326bNlyr8fX016s+u9MIvr2t78Rvr6i4lBNTV1qatd/+Xt0J01JTtQXDh8+Gr5lXV17y4yMzGH6wr59B3Lzhl/z9cvb2jwZmWnjx49WVXXH9t0XXzJj2rSzKioOvfpKz1qo9FQ/Bw5FUUt37e+8/oorZ8XFxRDRtq27enHYrVt3XuO93OVybuvt6Gznzzzn/JlTiej1f78bZQfdKLW1ei688NyjR2tTU5NdbufvH3/e6XQsuXXhv//1v6KigsqKQ6veX5uUlDBh4lh3jHvq1MLq6rr1Ty8fPjx9YuGY2Dj3hIljAoHg+vWb+/GSAADgpJ7686/yR+YQ0epVn656/5OSTj1g8/Kzi4tnFs+eWTx75vQZk2+64S69UCR69XWNRJSWljJn7oXh61tb2la8sXLprYu63KtHd1KjtF4vqzAEOwaidDrbK19e+tvrkyaPHzUq9+Hf3KeveeftDw8ePHr/j+/QNO3ZZ141eziogRj4KzMrbeGi+UQky8q///2/XhyhdNf+b954V2JifO+ygsvl/L+br2WMlZVVLn/5jV4coRv//Mfb3/q/r3/nuzdpKv/ssy+3bN6RnJL4rW99/c67bnY6Ha++8ubWLTtzc4dfv3DeVfOKJUn697/e2bplJ+f8sssuuvLKYlXVNmzY/O67a/r3qgAAoHuPP/bcklsXPf7oszU19V3WkpTtrywvq1r+8opFi+eXl1f1NG14PL76+iYiuvPuW/Q1+hjn99z9UC+G9zjRnVSUxPal41+C8YqsVou+UF/f+IPv/eKqebOHD08PBkNbtux879013/nuN4elJq9atXbzpu09vaSeMj1wuFzO+++/Iz4+lohWvPHezh17e3ec1laP3gSmF7717W+kpaUoivrssld6d4Ru7N1Xvru0bPz40Y89uuzokdpgMFRbU//gA09kDU+vra0/crimpaVt9+6yp576W0ZGqtfjq6w83Nrq2bxpe21t/UUXTc/ITN1dWnbo4NGTnwkAAPpPWVnlffc8bDQXnVU8s7BobGpqitvtLCurLC+rWr9+c8m2Uo/H+8yyV3rRbuPNFe+pqpqeMaywcKyxsqWlTU8b8xfMif5Q/XUnra9vfOH514yHEyaMmTP3goaGpuef/XvvDtgj5gYOSRLv/8kdepnVF19se/GFf5h6ui4VFRXMmXsBEa187+Ne18h0Qw4pHo8vGArt3LFXr66TZWXfvgMHDx4JBkP6Z9Tn8x8oP3j4UI2qqvo2bW3evXsOZGdnxsS6/YGApvVg1jcAAOgXnHOX23nnXTfPmDElvO9JUdG4oqJx8+bP2V6y+5llr/SuH6zH4yOi5qbWqxcsKSos+NkD3yeie+9+iIgSEuJO1ICjsz7eSbuJSrcsXShJ0kt/e51z/u3/u3bU6Fwi2rf3wL/++Xavf+F3w9zAcc+9S6dMmUhEe/ce+M3Dfzb1XF2SJHHJrYskSWpqbFm58mN9LBfq6F3NGNPXVFUd7mPdFefHGgfpOk/kFgqFwh+qqqoqKvVfB10AAOgpr8fn8/p9Pv+bK1auW7epvKyKOvrHLl68wB3j6vUMGDNmTPnfOx/qAzV5vD4iOlB+sLLyMBGl9qSjQPd3UkVW9AVBOG6cCyM/BYMh6sq11105enTu5s07Plj96e+f/Pmojt4uZ5017qxJ437wvQf7vUmHiYHjO9/95oUXnUtEVZWHH3zg93oHngF2+Vcu0SNFQmLcH/74YMSzLpfzz8seIqJF138PE8QDAJyZli1b/syyV7xen1EYUF1dV11dt3rVpy6Xs6dNNwyFRQVjC0aGjzT664f/pC8Y7SpO6qR3Ul/HyJMxMe7w9cYQlz6fnzoxBt54dtkr8xfMHTUqt6am7re/WSYwdu8Pbx01KvfKq2a/8XqPZyTtXv8P/KW74cZrvvLVS4iopqbugZ//vqG+yaQTda+nw6UDAMCZxuvxeTxePW3MKp551bzZ+nrOea/Thm7J0oWzimcSUUJC3N495VVVR+x224O/vHPJ0oXR7B7NnbS2owAmZ0Rm+HpjXpWDVUc676UPvPHG6+9WVBzSyzbWfLRh1869O3bs+fjjDUQ0enRu9C8zSqaUcCy4+rLrrr+SiBobm3/xwJO9nv2179Z+srHL9/r+H99htVl9Pr8+mEdr64DOmAcAAKeh/Pycu+6+mTEmCMKKN97rlwOmpSUTkdVqWb58BRFd87XLp02bFM2+Ud5Jd+/eP6v4fCKaNm3S2//9QF+ZmBg/dmw+EXm9vp07I1uYXnTx9GnTzjpQfvDvr75FHWUhRjMAfTDT/hobM1z/B47i2TO/9e1vMMY0TVv1/toxY/PHjM0P36CtzbP2k409OmbnkUajpBeLdV6vcU5EmqZt2LCl87MAAHAGqq6p83r9jFF5r1qJduPgwaO7S/e7XM558+dGs330d9JV769duGh+QkLc2VMLb71t8bvvromPi7npm1/TxzvfsH5zRBsOSRK/+a2vaZr23LPtA2/U1TcSUU5OewFJZmaasbJ/9X/g+OoVl0qSSESCIHzj2is6b1BRcaingaPzSKNDg9VqsVpR6QMAcFrwenxfu3op9et8W/qkJ7tL9xPR/AVzup+S3hD9nTQYDL3w3Gvfv/PbkiRdNW+2UR9EREeP1r744j8jdlQU9blnX8vNzdq8eYe+5uOP1s+efcGFF51rs1lVVZs+Y7KiqJ+siWoU9h7p/zYcjHozq033tm7dqbeUMaNfax+pqtra2iaKgj4AXPQcDntScoLFKvm8XbToAQCAgWdM5NZfZpw3Re+7kJeXHWXxBvXwTrp69acPP/TUgfKDxpXLsrJu3aYf3febLpt9fLp248svHRsDc9u20pdfej0YDE2fMeX8mVMVRV3+8hvbt/d4aLKTYnOKux5a9XQTG+vu9UijprLZrJOnTLj5lus/WP3Z9u27ZTly6PsuiYI4PDvjvPPOPlpd+9qr/9FnYwEAgKFh0eIFixbPNx6WbCstLIqcHG75yyv6d/Dr7JzMrKx0OSTv3VveownYiSguLmbCxDFEtGvnvqamln68KsOgCRyns4SEuGu+dvnEwoLGhqaIntAnonHudDqaGpvff/+TTV+aPqAsAADAqTUQc6kMeS0tbf9756Ok5MTx40elpCRFs4vH4y0vq9qwYcv2kj1mXx4AAMAphxIOAAAAMJ1ZA38BAAAAGBA4AAAAwHQIHAAAAGA6BA4AAAAwHQIHAAAAmA6BAwAAAEyHwAEAAACmQ+AAAAAA0yFwAAAAgOkQOAAAAMB0CBwAAABgOgQOAAAAMB0CBwAAAJgOgQMAAABMh8ABAAAApkPgAAAAANMhcAAAAIDpEDgAAADAdAgcAAAAYDoEDgAAADAdAgcAAACYDoEDAAAATIfAAQAAAKZD4AAAAADTIXAAAACA6RA4AAAAwHQIHAAAAGA6BA4AAAAwHQIHAAAAmA6BAwAAAEyHwAEAAACmQ+AAAAAA0yFwAAAAgOkQOAAAAMB0CBwAAABgOgQOAAAAMB0CBwAAAJgOgQMAAABMJ53qCwAAAID+lJefPX36lMKisURMX1NTU7d+3abtJbs9Ht+puio2p3jRqTo3AAAA9KPCwoKFi+YVFhUwxiKe4py8Xu+KN1a+9ebKUxI7xJH5hQN/ViIqLCoonj2zrLxKDsmn5AIAAACGkiVLF37nuzelpQ/rnDaIiDGyWq1FRQVTzi7cs7usqallgC/v1JRwFM+eedfdtxDR+nWbHnzgiYG/ACCia772laysNH35s8++/GLjtmieOn3cdvsNVqtFX/77q2/V1NSf2usBADiFfvbz70+fMSU8aWwv2V1WVun1+iYWFuTnZ7tcTuMpj8d73z2/LiurHMgrPAVtOIy0QUSr3l878BcQjeTkxBG5WfqyIitbt+46tddjhnOmnVVYOFZfrqmpD08V3Tx1+phVfL7T6dCX//fOhwgcAHDGWrJ0YXjaeGX5ihUrVno9Ps45EREjRmxi4di77r4lNTWZiNxu128f+dFNN9zl8XgH7CIHOnCEp43HHn123bpNA3wBUTpn2lnf/d439WWPx3vNgqWn9noAAAC6VFhYMG/+HD1teL2+++759f79FcdtwYkTL9lWevutP1ly68Li4plE5Ha7fvrz791378PEB+g6BzRwRKSN07Z44zT01Ssutdms+vJHH65vbGw+tdcDAACniUWL5xuNNrpIG2E8Hu9jjzybmppcWFhAREVFBYWFBSXbSgfmOgcucCBt9MXiG66Oi4vRl3ft2ofAAQAARJSXnz2xowb8leUrukkbhscefe6vf3tMzyjFs2cOWOAYoIG/kDYAAAD63YwZU4zijRUrVkazS0113erVn+rL06dP6bJLixkGInAgbQAAAJhBrxwhou0lu71Rj66x/rNNenNSt9uZl5dt0rVFML1K5cxJG3l52dk5mTabta62oaSkVFHU7rdPTIwfWzAyLi4mFAo11Dft2LHnpLtEacKEMcOGJdnsttbWtt27yxrqm/rlsAOpp2/mwJ8uNTU5Ny87Pj7W7wscPVqzd+8BU6+wG/34XvX6kyNJYmFhQUpKUiAQrKw6XHHgoHk7mvfFARjUysoq2/ukRKGmpp6I6+OQut3Ok27fL8wNHEba8Hp9y55ePmTSxpv/eV6SJCJqaGi8cfGdl1x63jeu/Wp2dqZRMNXS0vbO2x+89LfXu9z9wgvPnX/13NGjcwXhWAmT3x/YvHnHa6/+Z9++Y7eul17+fWJSAhFJkmisfPSxn+gfqqf//NI7b39orB+RO/za666cOrUwvLM153zf3gNvvfX+B6s/64+X3rXYWPerr/3JeHj1/FuCwVD4BlPPKfr5Az/Ql+vqGr55413GU318M7s0ceLYn/78e0an2fKyyh/98Lder69fTjereOZV84rz8rJF8dj/KXV1DZ+u/eKV5W+G9zG74spZS5a2j3PzxcatEUPOZGWlP/3Mw/p5n3zihYhvx6LF86+97ip9+YPVn/7+8edNeq+o55+cf/zrz/qW1Udrb7/tJ4tvuLp49kyjjRHnvLLi0KuvvvXJx5/314666L84AGcg/U9clAayN6zBxMARnjbuvfvhAR5gxFSSJOkJwO123bJk4YKr50ZsEBcXc/3CeampyY/87pmIp26+5boFV1/Wuc7M4bCfd97ZkydP+NMf/2r8iRclMTxqtK/suM+F/9m9dNZ5t91+Q/gNQ8cYGz0m7557lxYVjXv8sed6/FKjwxgLv87wC9OJgmBsEPGK+vJmdmnEiKwf3n9bbKxbf1hTU/fwQ38yvop9OZ0kiT/80e3nz5za+aQpKUnzF8ydcd6UXzz4ZNn+9o/6xs+33nrbYv3dGDlqRMQuMy84x2Jp/wJOnVoUETjGjM033qjtJbv7fvEn0otPjsXSfhkJiXG/evieiRPHRuw4Inf4j+6/PSMj9bW//6dfdqQefnEAzkB5eTnRb5yammJMszJgzGrDMYTTRjiXy9n5j77h0lnnT51aFL7myquKr77mcuOPpsfjrThwsKamTtM0fY3DYf/e9741dmx+jy5j8pSJ3/v+t417hqZpdXUNtTX1qnqsqHn2nAuuve7KHh12gPX0zexSUnLCT3763aSkBP1hS0vbr37xx+rqun453X0/vC0ibSiKEv4wNTXlF7+8Sx9Xh4hqauqrKg/ryykpSSNGZIVvPGnSeGN5wsQxEefKzW2vVQ2F5A0btvT94rvUx0+Oy+WMCA0GxtjiGxZMPafry+jpjiZ9cQCGAGPMw7y84dE3/8zLzza2LSurMuPCOjOlhGPprYvmzZ9DQz1tGL78ouTNN1eW7tqflpZy8SUzrpo32/jlevGlM7744tgwnQuuvsxYXvX+2j8/9ZLfHyCiyZMn3Hn3LcnJCURktVmvve7KB37+eyL61k1367+P//rS40bJ8913/kp/S2W5fRqaG2+62hjk+0D5wSefeGH37jIiGjEi6657bhk1Kld/6itfvaTzD8fTTfRvZmcOh/2nP/te1vB0/aHfH/jtb57uvqQ9+tPNveyimRecYzz8eM2G119/d++e8sTE+LmXXfS1r3/F4bATUVJSwh3fvemnP35U32xX6f4RucP15UmTJ1RUHNKXXS7n6DF5xtESE+MnT5m4edN2/WF2Tqb+YSCi8rLKExV+9uW90vXLJ2ft2o3v/PeDPXvKU9NSZs++4IorZ+mXIYri4huu7maY2uh37OkXB+DMsX7dplnFMxmj1LSUiYVjo+zjOn/+HH2hvLyqR3UxfdH/JRxnWtpYs2bDT378yJdflHi9vrKyyuef+/uq9z8xns3JyTSWM7PS0tJS9OW2Ns+TT7yg/9Ekos2bd7yyfIWx5diCkfpCMBjy+wPGZjpVU/WVelu52Fj36NHtty7O+SO/W6bfM4ioouLQY48+Z/xaTUlJGj06t/9eev+L/s3s0v0/vsP4jasoyh+e/ItxC+/76RYsmBu+468ffmrvnnIiamxsfvWVN5984kWjudbZZxcWFrW3G9+yeYexV/jv7/PPn2q328KPf+65k4zl8MKPHTv29v3iu9Qvn5z/vfPhQ7/849atu/z+QMWBg88+80r4J3nUqBHjxo/u4469+OIAnDlKSkp9HYnhzrtudrtdJ91l3vw5w1Lbv1NvrlgZfVPTPur/Eo55Hblp2dPLh3zaIKLlL70RsWbb1tLLv3KJvmy0JCCi8BsMY4LFYglvXb9h/eaMjFR9ObxA+6RUVfv1w0/py4qilpcfVzhWceBgQ0PzsGFJ+sPUtJRT2J/ipKJ/Mzv7wZ3/Z5TDc85feP61jz5c11+nm3L2xOyOW3gwGPrLC/+I2HHNR+svv/xiPWcwxmbPvkD/nfH5hi1+f0Av/MjPzwk/oL6gKKrerMHIKEQ0JiyafPllSR8v/kT65ZPz9n8/iFjz73+9c9W82QkJcUTEGJs+Y/KunV1kpuh3NOmLAzA0eDy+FStWLlo8n4jS0lKWLL3+sUe7a66Xl5+9ZOlCvT6ltqZ+3WcDN8FI/weON1es1DPHkqWLysuqhnzmULXIv3FtbR5j2Wq1GssHq454vT69vtztdv7qoXtefvmNrVt26s82NbW88PxrvbgAr9d3olb9ukAgaCzbwq7nNBT9mxnhoounz5l7ofHwn/94e8UbJx8AJ/rTFRWNM5ZLd+3rcqK49es3GaHBKA8IheR9ew/o6zOz0pKTE+vrG4lo/IT2n++r3v/ksssvJqKcnMzs7IyqqiNElJ/f3oCjpaXN+IT0+uJPxKRPjqKoX35Zok/WQEQjcrK63/6kO5r0xQEYMt5c8d6MGZPz8nOIqHj2BcNSUx5/7LmartquzZs/Z8nSheEDhQ3uyduWPb3c4/EtWjzf7Xb+9pH777tn6NeqRNBOUDwVCsmr3l9rlACNnzD6N7/9YX1d4/79Fbt27ft07RdHjtT05bxxcTHFs2cWnTUuMzMtNtZttVr19h+iOEDjyZrhRG9mBONdJaI9e8r+8uI/+/d0xm9oIjLaYUTYGVb3kZySaCzv2LHXKPk4e2rhe++umTx5gt6sVZaVl19649xzJyckxjHGzjt/atWrb8XGujMz25uh7N69v+8Xf1L9/sk5cvjYJzk+IbaPO5r9xQEY7Dwe32OPPve7R+/Xc3lRUcFf//bY6lVr163bVFvT4PF4h6Um5+dlz1swNzU1Jbxd6cJF80q2lQ7YPdqURqPLX36jpqburrtvOWMzx4k8/9zfbTbr7DkXGF1bk1MSk1MSz50++cabrtm1a9+bK1Z+9umXvTjyV6+4dNHiBfHxPfjjPpSEd8QdPTrvoounr/lofT8e3+lyGMstLW1dbnM47GbpcNgdDrve1GDj51uuX9g+okZBwcj33l1z7vTJ+sN9+w40NjaXlJReeNG5RDRp0vi/v/rW5CkTwzrE7unHV9ElMz45eimOzmG3931H8744AENDWVnlvXc/bGQOxljx7AtmFV9A7VPBdt1/RZ+k/r57fj0w92izfvuuen/tY48+S0R65givvT6TKYr65BMv3v/D325Yvzm8vJqIRFGcOHHsT3763R/df7vRcSBK8xfMuf2OG417hsfjLSnZvfaTjWs+Wr/mo/XhJe1nAsbYkiULjcYH/XPMsA7rJ2pgZXTRjHi4e3dZXV2Dvjxy5AgiKuyYaUlvUvr551v1h2PH5rvdrnHjRhknWr/e3OpVkz45vW6CdqIdTfriAAwlZWWVNy6+s6TkWC8Vxoi1O7ZZbU39M8teMXqm6JljYO7RJg78pQ9kZJRzPLNs6Iw02kfbtpVu21YaG+uePmPK+PGjR4/Jy8lpHyySMXbhRee2tKEwPmIAACAASURBVLT9+amXojxaXFzMosULjA/Uf95a9cLzr4UP9Pns87+NiTl5E8LBbsf2PZmZaQmJcUSUkBj3ne990+ib2nfh3cZO1B4zvNolEAiG/1+we3dZSkoSEWXnZOblZeeMyCIizvnatV8Q0WeffuG94waXy2m1Wc+fOTV/ZPs3/9Cho4cPVffXS+jMvE9OSliNkj8Q6GbLHu3Yv18cgKHH4/Hee8/DhYUFxbNnzpgxJWJAv/LyqjdXrFz32SaPx1uyrdQoDhmwcg5zhzYPzxz6OGDIHIbWVs/K9z5e+d7HRDR6TN7td9wwZkx734SLLp4e/d/NCy6cZnyq9u07cEr+4A5Yr6oT2bVr389/9vi0aWfdc99S/Q40dWrR1ddc9vq/3+2X49fUHGt+lZ3ddY/Tgo6SCTq+aoCISraVzpx5DhFZLNL1C+fpV3iw6og+dUgwGNq1c5/exebsswuN8cFKd/WgAUcvmPfJSU8fZiw3Nbb074799cUBGJo4lWwrLdlW+jhjeXnZxjwpZWVVXq/P+FsdUQUzMJnD9OaERt0KEd119y3Fs2eafcbT1m233/C7R3+s/3fWWePCn9q7p/yXD/5BltuHrYyNdYf/XO5eevqxLcPb3A2k1lZPeI9EY6DPAbPs6eVer+/DD9d9FNZ0Y9HiBcbQVX1kDC5OROMnjNa7bkaY3tEyg4j276sIf2rduk3G+zN9Rvtm28LG5/nyi/a+r+ecU2SEgBP1T+kvJn1yJEk8e2qh8fBEbWyj39GkLw7A0MY5Lyur1MsFt20r9Xi8Eb8M9cwxkHUrA9F/AZlDFx8fW1g4Vv/vnGmTIp5tbm4JHyc7oqI6vH1AxLgunB97yhhk03DRxdMzMwfiT3Br67H6/nOmnRXxrOn/p3d8kZb9+WVjIHOHw/7d73+z82Q0vbBhwxajK4TDYb/xpmsiNjj33EmTJh8brWv16k/Dn22ob6rsGOPcaPa4ft2x9hlr1qwPhWQistrae5+GgqH16zf3/cq70S+fnNlzLohYc8WVxYmJ8R2n4J+u3djHHfvyxQGAbgxw5higDpPIHES0Zs0GI2Be/pWLF1x9mdHGLTbWfeddN+vDQxHR0aO1jY3N4ft6vX5j+YorZmXnZGZlpadnDCMiY6owIsrPz/n+D76dlJxARBkZqbfetviuu28Jn9Q0vLdF/6o4cOyH7HXXXzl/wZyEhLi4uJjzZ57zm9/96Lzzu5jwzAytrZ6nn3rZKE4YNSr3W9++tl+O/J+3VhnLc+ZeeNfdt2RnZxCRw2Gfv2DOXffcYvSUKdlWuunLyBFOd+3cF/6wvr5pc9ggpC0tbXv2lIVvsG9/RcQIs/2uXz45V82bfeddN+ujorlczuuuvyo8je3ate9EA81Fv2NfvjgA0L2BzBzmtuEIZ7TnMP4909pzrPvsy/XrN8+YMYWI7HbbLUuuv+76K2uq60VRHJaaFN66J/zepqusOJiVlaYvnzPtLL0I4R+v/fcvL/7zk08+v37hPOMX6tzLLpoz98JgMBQxcrYumgEoe+fDDz8zfuLHxLiXLF10y5KF0c8k1I8+/3zL//730RVXzNIfXnlV8ebN2406i157c8XKKVMm6i0tGGPFs2cWz57p9wesVkv4jbm11fOnP/618+6bN+/46hWXGg93bN8ducGmHeHzmUUEFDP0yyeHMTZ7zgWz51zg9wdsNmt4/2RFUV/+2+snOnv0O/bliwMAJzVg7TkGdEgolHM88ttlW7fuMh7GxLhHjhqRmzfc+KPJOX/rzfdXvPFexI7vvP2hUVEdQe8xGN6DkTFm3DO8Xp/eMlGXE/Wwjz216v21n3123EAI4WkjyvmE+svzz/69srK9xEWSxNvvuLFfktbDD/0pIrg4HPbwtNHU2PKLB57QRwuNsPHzLeFdXTZ2dIU1fLxmQ3jFWTRTr/VRv3xyDh5sf7EOhz08NHDO//LiP8I/7X3ZsddfHACIRudyjiW3Lur36esHegzKiMyh/2o5c/j9gR/e++u/vPjPQ4eqI9rvqKq6c+feX/3yD0//+eXOO27evOPJ379QX990/C7t96ft23ffc/fDX35REt5yU1XVrVt3/fhHv/s4bPjqceNHkWl++eCT//rnOxGDN7S0tP3rn+/85MePDOQ8F8Fg6E9/+JveKoKI0tOH3XbHjX0/rN8f+MmPH3nqT3+rqDgU8X9fS0vbe++uueOOn+7Y0fVQXYqi7uuoI/D5/BHhjIiOHKkp75gkuqmpZWAiWt8/OY/87pm3//uBz+cPX1lVefjXDz/VfRehHu3Y6y8OAEQpPHOUl1f98sEnqL97H7I5xYv6+ZBRKJ49s71WZdXaxx55duAv4HSQlZU+anRuTIxL07TGxpadO/acaAhLgySJU6YUpqWlyLJ8+HD1tk73pKTkhMLCgthYt8fj3bljb3VXY+mbzWq1TJo0YVhqkqqo1TX13c/XOnhlZaXnj8yJi4sJBkI1NXXd/JQfFHr0yXnjzWedzvYmHbct/XF5eZXNZp08ZUJycmIoKFdWHjJmne2vHcP14osDAFHKz89ZcuuiXz74RFtb/8+xcmoCBxEVFhUUFhasWPGe1+M7+dYAcNronBvM3hEABg6jfi/b0A1co9EI+sgkp+rsAAAA0AXTxnEcxPOIAgAAwGCBwAEAAACmQ+AAAAAA052yNhwAMEh52rzGkCFKT3o793pHABgCTlkvFQAAADhzoEoFAAAATIfAAQAAAKZD4AAAAADTIXAAAACA6RA4AAAAwHQIHAAAAGA6BA4AAAAwHQIHAAAAmA6BAwAAAEyHwAEAAACmQ+AAAAAA0yFwAAAAgOkQOAAAAMB0CBwAAABgOgQOAAAAMB0CBwAAAJgOgQMAAABMh8ABAAAApkPgAAAAANMhcAAAAIDpEDgAAADAdAgcAAAAYDoEDgAAADAdAgcAAACYDoEDAAAATIfAAQAAAKZD4AAAAADTscOHD5/qawAAAIAhjnHOT/U1AAAAwBCHKhUAAAAwHQIHAAAAmA6BAwAAAEyHwAEAAACmQ+AAAAAA0yFwAAAAgOkQOAAAAMB0CBwAAABgOgQOAAAAMB0CBwAAAJgOgQMAAABMh8ABAAAApkPgAAAAANMhcAAAAIDpEDgAAADAdAgcAAAAYDoEDgAAADAdAgcAAACYDoEDAAAATIfAAQAAAKZD4AAAAADTIXAAAACA6RA4AAAAwHQIHAAAAGA6BA4AAAAwnXSqLwAATl+c8/AF46GBMWb8G74AABABgQMAjqOnCk3TuKZxVeWqwhWFK4qmyFxVSdOoI3YwQSBRFCwWEiVBkpgkMVFigiAIAiF8AMDxEDgAgCgsZ2iKooZCWsCntbWprS3c06b5vDzg03w+LRggRW7PHILABJFsNtHpJodDcLoEt1uIjRfdMYLTJdpsgigxQWCMIXkAACFwAADpOUNV1VBI9XmVpka1vkatrdZqqtW6GrWliQf8WiDAQyFSFNJUzjVqL8BgJIrMZmdWK7PbhZg4MTlVGJYqDkuX0tKlxGTR7RatNlGSEDsAAIED4IzWETWCckuLXFutHqpU9u2R95eqTfU8ECBFJc75cW03OBFRRGMOjTMiTsREkaxWMS7ekj/GMmacmJNnSc+0xCeINrsoSXpVCwCcmVjnVmAAcCbgnKuKIvt9alubfOSQvHenXLpDrijTWlu5pjBixBgxOv6vBDd2Pv5YRJwb/3HiJDDR6ZKycy3jCi1jJliyR1jiEySnC7ED4IyFwAFwxtGjhhLwy40N8sFKuWyvsq9UrjygeVq5qraXVRy/vbForDr+iB1r9M4sRIw455wEQXS5xPThltEFljHjrSPyLckpFpdbtFhQwwJwpkHgADizaJqmhIJyS7N8sDJUukPeV6ocOqi2NnNFJk3TO7l2bMs76k/C/0p0VaWiP4rIJXqBB2MkiszltqRnWUYXWMcVWfNHW5KSJZtNFEWzXiQAnH7QhgPgTME51zRNDgRC1YflvaWh0u2hsr1aYz0PBnlk1OjAjhVq9ARr/4cx4pwrCrW0yH6/1lCvHD2i1FbbxhdZs7KtbrcgCCjqADhDoIQD4Iygtw2VfT65qjz45frQzhKlploL+LiitN/weeeiC31N5/G++MlKOMJ3D/tXEJjNLg5LsxRMtE2d4SiYYImJFUURrToAzgQo4QAY+jRNUxUl2NoSKtsT3LA2tG2T2tykh4BjxQuMdUoMvSzf6IJ+cE3jfp9cWa7W12oNddzrsU08y5aQJFmtyBwAQx4CB8AQp2maIsuh5sZg6Y7gpx8Fd5Vofi9j7FgFSvfFnIxY56LQLtLJyTBGenMQztW21sDmz7WWZs3bRpPO4SmpFocDmQNgaEPgABjKNE1T5FCoqSm4qyTwyWp5/24KBhg7pbd2xhhjXFHk8r2kqSTL/OxzKS3TYrcjcwAMYQgcAEOWXrYRbGwMlm4Prv1A3rdbC/hP9UW1Y4xxWZYryrm2imsaTZvJ0jNQtwIwhCFwAAxNnHNVVUOetuCenYE178v79/Bg4FRfVCRNDslVFfTJh8zhZA47JSZbMEQHwBCFHxMAQ5OqqiGfL7h/T+Dj1fLeXZrfR5wfG6ErWoyop7v05OCceCgoV5YH1rwf3L1T8XlVVUXXOYAhCYEDYAhSVVUOBAIVZf5PPgpu36r6/PqUKB2ZI2xT4+7exW2e62N/ddEFtp8ygT6lGw8FQ3t2BT9cGSjdGfJ6NU3rl4MDwGkFVSoAQ42maXIoGKw+GtiwNrhpver3MUEgTR+JSy+zYMS7GOXr1NDbkMpyYNPn5I5hLpeQP4o5nGjMATDEIHAADCmcc1lRPG0t3r075R3btNaW9uE+O0bVYPr/sq7KOTqXW0RfkNG3Mg/GmBYMyKUlwfQMITaOpWVYbTY05gAYShA4AIYUzrkvFChvPNxYsSOx5nCcqjFRiBzPixFx4ozpeYJ1HSuiXtmDUHLipxhjgqA21IW2bxHTMsWYGFGSJAl/oACGDnyfAYYOzrksy3X+lrUtByrkI+eK8lmqJhEjgRgjzogxzgWBSG860ZMyifCp5zvWdEy/ojcspWP/Ru57guXIh4wHZKXiQGjbJikr2+J0i6KIQg6AIQOBA2Do0DTNG/LvazmyrqX8gCskJtsz67ypqiowsb1KhTF2bAb5jinWdF3NoqIflFRV41xjAlmtmsXCBUZEXFO5GtKUAKkyMWJM1FtjdHU046BhhzXO07FHe41PsFE+sIMOFEjJw0SLBZkDYMhA4AAYIjjnsiI3+T0lTVX7W6vr7XxbVkx+jcdd43UyEkSBiJHKSGCcMUaMBH0uFaYHgMi7Oudc45xzbrXyxGRKSZPSM6XUdOZ2k8VCRFxVtJAn5DmktlRw30EeqCfVzxgxoT12ML0ghZHAOrqjtGOMERmbsY7ko69gqug4bLVt1+SxqhKD6WQBhgwEDoAhQlVVfzB4oLX68/p9TQGPQrwq2fF5bnxWUyBbVmwkiYLAGJFGTCBixDViRFzoiBrtIYGIiDRNI+JOF0vPknJHWvJGWTKHWxIThZhYQbKQ0D44B9cUNdSq+OvUtkqtaZfWUsq9FUxpZoyTnhQYMcaYwBjj7cuMMcZJYIzx9k2E9vWCoIcVIiFI9p2BYJEcShMlC7qrAAwNCBwAQ4GmaYqiNPpbv2go391yWOGqQOS1iTuHx4yo98aUNSXIitUiiYwJgkCcEzG9bIN1VGpwzohxxok0TbNaWcZwS8EE67giW06OlJDMrTZFIU+IB7xcVogTSSLZrRaH1Wl1pglJo3naZLW1Qmnaxhs3c+9epnnb80R7ziDGBCaQXgQiCEzUg4jA9CKMjlxCRESMOD+q+beHAhMUq0sQBGQOgCEAgQNgKOCcB+TQYW/j+oZ9rbK/vZaE8wa3ZUtOXE69397gJyKbJAr6M4zrlRlcMyo/9DG+uGaziQUTbNNm2kYXWFJSNcna5GfVtVp1M2/yUouf/DJxIptEMXae4KTUOEqPtyQ406SkRObOUWPHqLVrqHEjV5upPUoQCYwJTBSYIDJBIEHPGULH0+0XQB3tOxjjqjVUGgweUeQUCYUcAEMCAgfAoKdPm+IJ+cu81TtbDmqcU/ts8BQShIpk5/bMmIyWgKCojBiTSCSBCYxzfnyDTUZc4w6HWDjFeelc+6gCweFsC9CBatp1hO+vYXVtzBekkEqKSkQkML2Qgye7eV4KH59BI1OtCa40wZYoOFJVawyv/5hpTaLAJFEQJCYKTNQrTYwiDc7a63HCmncYNTuifESSyzQ5V7U60XQUYAhA4AAY9DjnsipX+5o2NpS3hPwSE47dnRm1OC07hseOqfY4az2kKESiTSRR7ylLXG+vyYkzrmk2u1Q4JXb+tdacXFEUalrok720sZwdaaagTFxr35r0gghOXKa2AKtrZftraGsVP3sEv3As5SbZKG4Ms8SS1Wpt+cBCLYIoddSbdFwTdQSi8MhjLLVnDsUeKvEGJ6q2RI4Z3QAGPwQOgEGPcx5SlMO+xo0N+zvmZzOagHJFpINJ9m3DY9NbAyl+JaRwRmQlLgoCZ4wYccYZI261SQUTnZfOtebkkiCW1WoflbKNB6ihjTSu142EjYZ+rFstaZwCCh1sZK0BqvdQ8ThekCEIjgxKnStIPsGzTuR+xoTjesMYo3e0048VdlBiRKLk2yM4j2pqnqY5UKsCMNghcAAMbnp9SkvQV+mtrwu0ikwwxrYwxuLy2MSdWe7R1W1xh1tFTiFVJeJWTqIg6L1UOCcxc7h92vn2UQWSKJbV8re3sa1V1OpnnKj7ez1jJDLSNGrxsU0V3BNkqsYnZjHBmaMoFwhKgxDYzvS2qSy8bIPCMocxIkj4gkCaV1KPKkqbqmIQMIBBD4EDYNBTNbUx0FbprZM1pcu7siqwIwn27ZmxWY3+4a1BTSKFuF7iIOr9VGJiLGMn2saOExzO6hb+YSlt09MGJ6HTyOddjlAqMNI4+UJs9xHukJjLxnNTLKIzXw1OEtSjTK0/1gXlWBpixxVzhDXgMBYk+ZAiN3IttU9vEACcBhA4AAY3zrmsKo3B1ipvvdaRBbjR7YOIiBiRzyrtHB47os6X5AnFKqoqtfdWIRIEYmJ6pm1CoZSS2hakT/bSxgPU4me8qxllw9NG5ylaOCd/iJUc4vEu5rbz1NgE1TVBCO4Tfc3EtONGNm1vLsqPr1uh407JBCZXk9KkajLndpRwAAxqqBYFGNw457KqNga9DcG2iPU64vpUbXQkwbYpN64qwcFVjVRN0zRF1WRZ0STJkjfKmpOrStbyWtpYzhra2ss2WOS5wpY7XQkjfVBRaguyzZVUeoQCioVsWapjnCbEEOktQehYe5BjQ42xY0+1H6t9G8a9gtbK1aCmaf35rgHAgEPgABjcOOchVW6T/T41xHmX1R2ciDPOg5JQmhmzJTu2TRKYqnGNq6omK4oWG2fJHy0lJbf5WekROtLc3kqUU/t/1DF3W/gRI8/Q8b/6VLR1bWz7Yar3cC7FqvZ81ZJKjJEgkCBQ+/hfHQ8FgQQ9Xgid2qYygYeY2kJqQNO0rl8cAAwSCBwAgxjnXNO0kKp41WBIU4xWouFZwSBovNFt+TI/Yc8wl6pxpmqkaVxRWUqaJTObW2zVzbyshgXlyJqUiBt9N2lDxxgpGlXUs8ONpGgSs6ap1mzORP3JY4UcJ3txRESazNRWrgVO/l4AwOkNgQNgcOOcBxW5LeQPqUr3WzJOgsYPJjs25iXUOCWuqlzVuCBYMoZLSUmyQtXNvLatfY6VPl8VNXrZkWYKhIhJsZotWyPrCWav7/Y4pJDm52oIVSoAgx0CB8Dgpjca9SiBkKboj8PrPyJKO0SN9IqVHZmxXkHgikqS1ZKeIcbGBUK8yUu+IPHjx8jornijcykKEXWUXwRkqveQJ0RcsHExkZO9d6+PNJlzFfUpAIMdAgfA4MY5VzQlpCoq145vZ8Ejw0JHf9TaONu27LhD8TaVa0ySRHeMYLEEQtTip5AacfDjH3ZzGZ3WqBr5QhSSOTGRpDguOqMu4TgWZBgR55qmqSjhABjsEDgABj2Vc0VTta4bjPLj/iPOOPdbxf3p7h2ZMW0WgZggSBYSBFmhgNw+T4qx67HlEzfd6JI+mJiikqpxIkaCg5it6xE8ToITab3aEQBOLwgcAIMb55w41zhvn38tMmLo/WKP34Px+hjrjuFxVfE2hXXs2DHAF4+mT0q3JR/Hdm8/t160IvS8CUfHK+S8/ZUCwKCFwAEwBJyky0dk+OAUlISyVNeOzNhWkXM5RBq3iGSVSBBOEiZOKjwViAKJejdZLhMP9a4xKo8ckBQABiUEDoDBjTEmMGZhohD9bZkRZ9TksmzJTahyCCGPlxTFZqUYO0nHF0OctGwjYhsjbXAigZHdQlYLI1JJ9TLNHzmoaDQ4IxJ6syMAnGYQOAAGPYsg2EVJ6sl8qoxIE9j+rNgNGY7axmre3OywsAQnOay8f+7tnGwSJbjJaSWmqUxpZtzfq8MQJ5GYyBjD0OYAgxoCB8DgxhizCJJbsluZpcvxvk64I1FQEj7Pj/+CmtuaGmwCHxZLyW5OjDTe6TgnKNvouniDExHFu3hGPDmtxFWvoFYLFIquoCJyuDJOFiJMFQsw6CFwAAxujDGLIDpFm0UUjZU8iv+IiBGrTnR87A7s8dczNZSRwHKTySKSFtkKNPKkneNHRIdcQaDsRJ6VQJLISW4Qg5WMy1EEjsgzacyiMCcxKwIHwGCHwAEwuOklHC7RZmUSD5+z7cSMbRjniiRutwc3BI82BNoSXTQ+k1JjOCPSTjBAepclKOFn00tHEl18QialxjJB8wvBSlE5TOykeaOLa9bIqrFYEjBVLMCgh8ABMIgxxgRBsEnWeIszTnSE35P5iYUfQSTWICgbfIf3eGqIKaPSaEouj3Ny6ogO7Uc7cWVNRNkGcXJa+cQsGp9JDqvG5FoxuEdQmyiKxNGZRjZVcJOAEg6AQQ+BA2BwY4xZRSnJFpNujxNYj7/RjEjl2m5v9cbG8rpAa4KTLhxDhVnktOhDXxCduFFI5HAdnIjIIvL8VLpwDM+IJ4H7KVAuBPcyLXiyvq1djpFOKosnMV6UbIIgIHMADGoIHACDG2NMFMUEmyvDniD2qvuowISGoGdD3d7tzQeDmpybRMXj+Jh0clg4EZ1oSPGIShuNE+ckCXx4Es0axydkkihw2X+U+0pE+Qix7luynuBZxmSWSlICEySkDYDBTjrVFwAAfcIYkyQp3ubOtic5mCVIcvv6KMKHXmfCiFRN3d5ctfLwlnRHwoT4rIIMpnHukFjJQd4WZKS1V4YYN/3IUc814kROKx+ZSpeO4+fmkSRSi69RadmU6N8pcD8jIYr56CNpmhgSh5EUK0kIHACDHgIHwKAnCILDYst0Jo52p21sORBlx9jwIc8ZY22y7+OanbEWR7zl0uGu5AlZ5LTxeBdtqaTaNqZoxHl7hGH6CXj7v8RIECjRxQuz+AVjaHwmSSKr9zVXHN2QGvo8Tarv9ahdQUpRLBlWi0sU0S0WYNBD4AAY3PR2o3arLdOVNDk2Z2vbwZCmUBdTqHRzCGLEOKf6QNs7hzYJTLw6+9yRsWl5KWKMjfJT+PbDvKKeNXpZQCbVmEmNkSCQTaR4F89O5BOyaEImZcQTMe1AS/36ig3xgc9GxR62MoURO0HxRrddaYh52ChuSZUku9CTMc0A4PSEwAEw6AmCIElSot09zp2RbU8o99d3PXNsJ8dtxJjGeU2gdUXV5y2yb27GpInxw5NiYmaMFEel8cON/FAzb/CQL0SKSsRJFMluoQQnZSZQVgKlxjGbRWsNefc0HvzowKZgy9Zr0mqSpKBIJ53ppesLkykuII622BItVitajAIMAQgcAIOe3ozDbXfmxaROisk5EmzxqaEelHCEHYdzXhtsfffw5sPeppmpY85JHpUXMywz0ZUVL04MkS/IAzKXNSIiUSCbxFxWctqZwLTWkHd/Q+3mmn3rDm2va9y3ONM/2hWwM97LaVCY6OPZ3JojWWNEUUQJB8AQgMABMBSIomiz2Ya54yfF5GxqragMNCi9msydMSYSawn519fvrvDWlDRVTknKm5CQPdyVnGRzJ9tEibU3p+Ccq1wNaGqt33vIU7+zoerLmr1ba/c1ttZ9NZlflKLFi7LA+YmLN054eZyYwt1+cbRoT7Ha7JKEP1MAQwG+yQCDnt6MQ5KkGLtrTGz6uOb0OtnTqgR6Prd8O4ExlWtV3vqjvqaN9fuyXSlj4jJHx6Sn2mMTbG6nZGNEflVuDnnrfK37m4+UNlSVtxyt8zapSqjAIV6ZIaVbvVKv0gYRcWbx8QzZkme3x1gsFtSnAAwNCBwAQ4EeOOw2e1pM4lkxOXt9tX4tJGtqlLt3HgqdEROIFK5W+1uq/S2bG8sdos0t2d0Wu1OyMUZ+JdQm+z1+n8/vCyky1zSB81SLeEmSNDk+YOHKCSpTTpKBOAkKxfiFkYI93WpzokMswJCBwAEwRIiiaLVaE5wx4xOyCjyHGmRPg+btRUsOA2OMERMYcc41zttkf5vs5/5j2YQRJ1kjTRMY44y5GCuMES5L05LFk44resJzaszupyzZOsZqT7bZbOgQCzBkIHAADBGCIFgsFqfDmR0zbGp87tFgs1cN+jW5+4ncosKIERP1phvGSn1gc845Y5xIZCzbxi5OovHuoEhdjk568svgJAYpxSeOZY5sm8OF5qIAQwm+zABDhyAINpstyR1XmJBzdsyIFMnd60G3DBFlJCzsv/Zp7BlxTjGMJsWw8xKUeDEUtm3PyBTjY/mKrcDmTLahuSjA0ILAATB06C05nA7n8NhhUxPyJrgyHczS66PxbkYP02ed5cQ1fYFn24QLEvlIZ0hqHwidRR7sZDQSfJTpl8YLjiyb3aU3F+31xQPA6QbfZ4AhRRAEIS/btAAAIABJREFUq9Ua63KPScy6MGnsWHuqwHsx7lZUA5VyTdP/iSU2PV48O16JEeWuj3cyGievltbGirhztMMVb7VakTYAhhiUWAIMKfrksXa7PTk2Yao8sinkaVb8VaEmmau97iUb7liDkI6Z6wWicS5xVrKabQuKFD7SV7RTunAmBnhiM5uqOItcrmF2uwPFGwBDD77SAEONKIoWi8Vut6fFJp2fMvby5InZtgQL69OXvaOFaMdjjbjWXhKSKAqXJFNhTNDBuizeOPn1hrT4FpokO862uTMcDqQNgKEJJRwAQ5DeRdblcg1XUy9SxoVUdXXTroNyU0hTenG0rrq5cCLONSKNJseLFycFUyxBgahHDUU5cU5iiMc384l++1SrO8vlcttsNoy9ATAkIXAADEH67Cp2uz1W0/LUjEs0lTH+YdPuilCjzNXoO8p2tyEnIp5qES9L0UY6/FZSw5+I6uAkhiihmSb4bOdY3CNc7ji73Y60ATBUIXAADE16jxWHw5HA+WjiEhOsTFrVuGt/sE6mk4xAetJAwjlxjdsZuyhenBHvjROUjsYb0acNIaAltVCRz3q2NSbPHZvkdDpRmQIwhCFwAAxZ7UOBOZ2MMYEJdtHqluzv1+/Y4T8c4F1njqjKPvS6EEY5VuHKYUqOzW9hGou6QSon4lz0aumNNCVkn2SLGe6KiXc4MIo5wBCHwAEwlOmZQ1+WBNEmWWJFe0KDc6f/aIPiDXFV6/k4pJy4QJQksgviaVqc30WqEO0xmEaizF0eLbNNKJLthfaYDLc7xmgoisABMIQhcAAMcYwxPXPoPWZtoiVGcmS0lG/zHKwINLZpQZWrPQsdnOyMFzhobpIyzOIX1PbxRk+2k6BwW4AneSnPJ43T7KOcMakul8tutyNtAJwJEDgAhjjGmJE5BEEQRdEqWYY54oY3J37RUrHHX10jtwW4HH1RB+M8WaSZ8XxyjF/UFCJ24mnoiYg0YhqXZO728kwfGyXbxgqO4TGuBIfTabPZLBaLfoX98FIB4DSGwAFwRtBHIBVFURRFSZIcVluSPWaEI6WkuXJb26F9wZpa1SNravfRgYg453bGJzrp4vhQohCgbocx5UQaF0Kay6uleyk3aBnN7Fl2V4rTFWu32/XrQStRgDMEAgfAmULvK8sY08s57DZ7nMOd6Uqc2DZ8d9uRbd6qUl91teJROs31Gj7MOedalsQuS9TGOPwi73JW2PbqFVVlQS3Wy7PaKC8kjmC2NKsz2eGI0Qs2JEnC1PMAZxQEDoAzi36b10cGs9lsLodzmDs+Pz59ctuIck/Nbu/REt/hfb46HwsREzrPwOZm7KI4dl6sP1YIEafjSkQYceKaRrIsBtmwNjXXS7mqdbhgS7HaY+wOl8PRXoeCgg2AMxCLfgggABgyOOeapqmqKstyKBQKBoNen7fN723wtx7yNlb6Gw4Hmw8FG6qDrT4eCpIa4orKucp5oZ2+ky5fFNvqYjJxRsQ4CRoXFS4p3CbzOFkYFtCSQkKqJqUI1kSbI9Zqc+gVKBaLRZIktA8FODMhcACcufTYoSiKoiiyLAeDwWAo6A8E2kL+Jn9bfbCtIdjWqvibVX+L7POrIUXTihx8Vnwg3RIUOCcSOBM5s6jkUplbIRcXY7kYz6RY0eKWrHar1aYXaeilGqhDATiTIXAAnOk0TeOcq6qqKIpe5qGHD1lVAnIoIAf9aiggh0KaompqnMgTRNXCNNbeOUUQRAsJVibYmWgTJasoWS0Wq9VqlTroOQN1KABnOAQOACAi4pzrBR56mYeqqsaCvqyHkvC/GHp3Vr0Jajh9VHV9AV1eAUCHwAEAxzGSh7Gg5wyDsaURJvTMoYcP41/kDAAIh8ABACcRzV8JxAsA6B4CBwAAAJgOzbgAAADAdAgcAAAAYDoEDgAAADAdAgcAAACYDoEDAAAATIfAAQAAAKZD4AAAAADTIXAAAACA6RA4AAAAwHQIHAAAAGA6BA4AAAAwHQIHAAAAmA6BAwAAAEyHwAEAAACmQ+AAAAAA0yFwAAAAgOkQOAAAAMB0CBwAAABgOgQOAAAAMB0CBwAAAJgOgQMAAABMh8ABAAAApkPgAAAAANNJp/oCAKDf/GvFu6qq6svXzJsrSfiCA8DpgnHOT/U1AEDXgsHQ7r1ldfWNra0em80aFxszMj8nLTXlRNvPLP6GPxDUlz9d9Q+73TZQVwoAcBL4AQRwOqquqXvx5X+/9/7HPn8g4qnRI0fctOiaSy+eIQqoEgWAQQN/sABOO/9buWbB9be98dbKzmmDiPbur7j/gUd/9LNHvF7fwF8bAEDvoIQD4PTy+pvv/fqxZeFrLBYpbViKzx9oaGwyVn748XpFUR556IeiKA74NQIA9BgCB8BpZFfpvt/+/hnj4dmT/5+9+4yP4jr3APxulbSr3ntDDRBFiN57M724YIMbdmzHjmt8k1znhiS+6Y7jxMQl2MbGGIONMWB67wIkAeq997LS9tXW+2FgWVZt20jC9//89GE1O3Pm3TOzM+/OnHNm1AvPPDpyRBJz96Rd0vHD0TNbP9phNJqI6Pyl69/sO/LwumWDFi4AgM1wSwVgqDAajW//ZSuTTBDR3FlT3n/nN6NTU8xtNQL8/R7fsObnrzxrXuTDbV8pFLixAgD3AVzhABgqMrNzS8qqmNdisegXrz/XY7/WVcsW7P3+aFlFNREplKrLV7MXzpveR7GSDmlLa5vBYAwM8AsJDrQxGI2mq7a+0WQyRUWEeXi4W72rVmuaW9pkcqWHh1uAv5+/n4+NxZpDam1t1xsM/n6+oSGBHA7H8l2dTt/Y1NIplbu7CyPCQ8UiDxsDbmxqkStUYpF7YKC/j7eXXSEBANuQcAAMFUdOnDe/XrdqcW9ncYGAP3fWFCbhIKKrmTd7SzgKiso+3PbV5avZ5ilJiXEvbH50+tTxVnOu2fBCa2s7Efn4eB/Y89E3+4589MkumVxBRD9/5ZmH1j5wt8zC0h1ff3/u4jWtVmeeOHJ44tpVi5cunNU9QzKXHBUV/tWn7169fnPb53tu3Cq4G1JC7E+e3jBr+kQiUipVn3+1b9+BYx2dMuZdLpe7ZOGs557eEBbaa2fg6tqG7V/uPXn6orlLMJfLGT9u9KZHVk+eOLa3pQBggPG2bNky2DEAABHRX979WKlSM69/+uyjYaHBvc3J4XLqG5rDQoPDQoO9vbyYszURfbbjW73+9sBfoaHBb/zqDzV1jZYLtks6j5487+vrPXJ4ouX0z3d+J5XJ9XqDSq0WCAT/2Lq9S6tl3poxdQIzs8lk+s9nu9/6/bsVlbUGg9Fy8dY2ybmL165n586cNsHD3b3Hkru6tDq9/nd/er+pudUqpOOnLoSHBfv4eD39wi/OXriquZM3MCstLas6fPzsnBmTfXx6uGhx4NDJl17/bXFJhfmDE5HJRPUNzYePn9VouiaOH2N1BQUABgUG/gIYElpa25euedr87/EDn9t7n4LuHfirD1wuZ//ujy2vGSxd83RLa3uPM//y9efWrlpMRP/ZvvujT3ZZviXycLfquJuUGPfJ1j9a3oLpo2RLHu5uYaHBFVW1vc0wecLY9/++xWridweO/+Gv/7acIhaLrHoLv/nqsw+uWdpvAADANtxSARgSmPsXDD6f50C20d2mDavXrlwUGhIkkysuXsn667sfM/mB0Wg6dfbSYw+v6m1BLpczZdK4mKhwg8EYER5KRDl5xZbZxvObN6xavjDA37dLq824euOP73zY1t5BRCWllR9+suvVF5/ssVg+n/ez559YMHeav79vR4f0+KmL/9j6mdFoJCK1pquiqtbD3e3nrzwzc/pEsUjU1Nz61Z4D3+w7wiybcf1mfUMTEwyjtLzqLxY9ep7fvGHd6iU+3l4qtebkmUtv/3krU/K/Pvh87qwpgQF+TlQkALgAEg6AIcHyd7m3l6fzBb78whMbH7mdUvj5+ixfMlelVP/1vf8wU/IKSntbMD4u+q9v/1dMdITlxG2f7za/fuHZx57auI557SYUzpoxKSw0+LHNrzMn+F3fHHxk/bIex1//zS9/tmThLOZ1YIDfhgeXS2WyTz7/xjzDb996Ze6sKczrqMiwN199tri0MieviJlSUlZlmXBs/3Kv+TbKpg2rn378Qea1yMN9xdJ5bW2Sf/9nJxGpNV3HTl549KEVfdQVAAwAdIsFGBIs22C65KFr61YttpqSNnaE+XVLa1tvC2755UtW2UZdfdPljNstT/18vR/pNvJHUmLcquULmNdGo/HkmUs9ljx10jirKRPGjTa/jomOmD1jkuW7HA5n4vi7M0gknXdfd0iPnbzAvPZwd3tq43qrklcuW2B+ffrclR7jAYCBhIQDYEhwecPG7gV6ikXm13K5srcFLa8iMPILS8yv58+d3r2XLBHNnzPN/PpaVo6NQXp63g0pJCiA2+3pMF6eYvNry/YiBYV3r9BMmTTOshxGgL9vdGQY8zo3v9jcBhYABgtuqQAMCUKhwPyatbPj3RTEYDT2MZ+V6poG8+vhycN6nCchPsb8uqy82uaA+k2z7s5g2cK9rqHJ8vX/3tt0lGFOUIxGo1QqDw4KsDEqAGADEg6AIcHq8oPRaOz+c3+wSGVy82tfH+8e5/HxvtvupK1dYjAaWX2YrUx2t41tSWllSWll3/Or7vQ3BoDBMlSOaAD/z/n63u2WYjQaW9s6+ph5gFleWuj1zs+9b7A98IVWp+t/JgtG9P8HGGy4wgEwJPj7+URHhpnH6SqvrA4J7vUWwLWsnL+9t415nRAf/Yctb7Aam+Uw4VKpvMd55Bbdev39fNm+PGN5QWj9mqWL58/oe/6wnnrNAMBAQsIBMFRMmjDWnHBcupLVvU+H2c1bBRWVNczrsaOHsx1YZMTdZqTmp71YsRyzK3FYLMsRkWWDjK4u7ZhRrFcCADgJt1QAhgrzGBVEtO/gcWYore60Ot0PR06b/50yMY3twFJHJJlfnzh9scfbGWfPZ5hfp6elsh3SSIuQTp29bNnKxJJdbWMBgFVIOACGilEjk9PG3B4qQ6vV/f7P72t6Gqf80y++aWhqYV4HBfpPnsD688lioiPMOURrm+S7/cesZqiuqTcPCUr3dpFlK6So8HFjRzKvlUrVPz/43Ngtt1AqVS+9tuXU2ctsBwMAtkDCATBUcDicX73xvLl/7KUrWU+98IsTpy82NLbIFcqW1vZrmbd+teVv27bvMS/y8gtP9DgqhsttvjOOJxH9/V+f7tx9QK5QEpHBaLyWlfPKm2/rdHrm3bUrF1vegmHPc08/Yn69/4eTb/3u3YrKGqZ9q1KlPn3uysbNr1/LyvmvX//F8oIQAAwWtOEAGELiYqPe/vVrv/jNX5nf6yWllb/8zd96m3n9mqWLF8wcmMAmpI/e+MiqHbu+JyKj0fju+5+++/6nAf5+coXCcozU6MiwF5/bODAhjRub+uxTD3/86dfMv8dPXTh+6oLIw93d3U3SIbWcUygUDkxIANAHXOEAGFrmzp7yj7+8FeDfz8PGnn3y4Td+9nTf87jWi89t2vDgPU8kaZd0WGYbicNiP3jvbcuxQdn2zBMP/fTZxyynqNQay2xD5OH+p9/9fOG86QMWEgD0Blc4AIacqZPGfbvz/W/2HTly7GxldZ3lW36+3nNmTVm/eskA9ASxwuNyX3vpqdkzJu7Y9f2ljGzLNhNxMZFrVy1evXyhm9uAXkvgcDhPblw3bUr6l7u+P3M+Q23R5MXNTbhkwawnHls7MPd3AKBfHBPGwwEYwppb2iQdUqVS5eHh7uPtFR4WPBRGIFUoVA1NzXK50s1NGODvFxY6+KNcdGm19fVNUpnCaDT6+HhFhoe6u7sNdlAAcBcSDgAAAGDd4P9UAgAAgB89JBwAAADAOiQcAAAAwDokHAAAAMA6JBwAAADAOiQcAAAAwDokHAAAAMA6JBwAAADAOiQcAAAAwDokHAAAAMA6JBwAAADAOiQcAAAAwDokHAAAAMA6JBwAAADAOiQcAAAAwDokHAAAAMA6JBwAAADAOiQcAAAAwDokHAAAAMA6/mAHAPD/jlarMxqNPb7l7u7W21IGo1HbpfXwcLdxLW3tEplMIRAIQoIDhUKBjUsZjcbmlnaVSiUQCIKDAnqLx2A0Nje3qtUakUgUEhzA5fb808XG0iwxlcPj8QSC/o9OJpOprb1DJlcI+PyQ4EA3N6HVu11d2r5LEAj4PB6v3xUBgPOQcAAMtK/27G9obOnxrTdf/Qmff8/5r6m5NetGXlVNnVQq93B3e/Wlp/stv6yi+sSpix2dUuZfHo87amTK/DnT+k47jCbT+YvXMrNztFodM4XD4SQlxi2aP9NTLLKcM+PajUsZWeZzuVgsWjB32oiURMdKsyTp6Ny2fY9erx83duTiBbP6/piFRWWnz1+RSuXMv1wud0RKwvy500V3cjK1WvOPrZ/1XcjsmZOnThrX9zwA4BJIOAAGmkKhIiKhUMAhjtVbnHsnXLySeeHSdZPJxOFwPD3FAX6+/RZeUlq5d/9Rk8kUHRkeFRmmUmsKi8pu5hS0tUs2PrKaw7Feo9n3B48XFZdzudzEhNgAP1+FUlVUUlFcUtHa2v7kxvXmiwfnL167eCWTw+EkJ8b7+XrXNTTV1Tft/+Ekh8MdnjzM3tKsHD52Vq/X9/sZiSgnt+iHo6eJKDwsOCoiTKlSF5VU5BWUNLe0PfHYOubqCI/Hi42J7K2E2roGg8EYFOBvy+oAwHlIOAAGlMlkUqpURPTic5vc3fq6xZBx7cb5i9c4HM6k8WPGjxvt4+NlS+HHTp43mUyTJ4ydO3sqM3HKxLTPdnxTV9+Um188OjWlxwWLisuLisv5fP6jD62MCA+5veAkyfYvv5V0SK9n50yfMp6IJJLOy1eziWjd6iWJw2KZ2c5duHopI+voiXPD4qKZiyg2lmYl+2Z+TW1Dv5+RiIxG46lzl4koPS110fyZzMSpkyWf7fi2tU2SfTNv0oSxROTmJtzw4IoeS2hobN7+5V5/P5+EYTG2rBEAnIdGowADSqXWGAxGgYDfd7bR0SE9d/EqEa1ctmDenGm2ZBtEVF1bL1co3YTCWTMmmSf6+nqPS0slovzC0t4WzMkvJqK00SPM+QERBQX6jxk1nIiqq+uZKTdzC41GY1xslDnbIKKZ0ycGBwWo1Zrc/GK7SrMkVyjPnL8iFAoS4vvPAJpb2tRqDRHNnjHZPDEw4E75NT2Ub+XK1RtENCF9dB+XfADAtZBwAAwouVxBRN5enn3Pdi3rlsFgHDUyeURKgu2FM01DIsJDrBpCxsVEEVFTc2tvC8pkcoGAHxkZZjU9wN+PiPQGA/NvY2MLEcXFRlnOw+FwmAYc1TV1dpVm6eiJc11d2tkzJnt6ivv7lNSl1RKRu5ub1a0ZH28v87t9kEg6S8oqPTzcR6cO73ddAOAquKUCMKAUShURMadVnU6nUKpEHh7d2zSUlVcT0YT00cwiGk2Xt5dnv51NZDI5Efn4eFtN9/P1JiK1WqPT6QSCHgrZ/MRDPRYolcmJyN/fh/lXrdEQUfdWn4GBfkQk6ZDaVZpZQVFZaVlVZERoelrqkePnevlwdzGJi6arSy5XeFmkbq1tEiIKDPDre/GM6zdNJtPY0SNs6QgDAK6C7xvAgFIolESkUqk/2/FtY1MLEXE4nIjwkHmzp0aEh96eR6mSyuTu7m5Kpeo/n33NnEeJKDYmcuG8GX2cUJkuIcJu51HBnUxF06XtMeHokU6nzy8sIaJRI5OZKcxtILlCaTWnUCAgIpVaY1dpDLVGc+L0RR6Pt3TRHBtvcHh5ilOS4otKKg4fO7t6xSImDyurqM4rKOHxeOPHje5jWaVSlVdQzOPxmGQOAAYMEg6AASWXK4motU3C5/OCAv0NBqOko7Ouvmnn7v0PrVsWExVBRM3NrURkMBj2fHeYz+clDIsVCgRVNXVV1XVf7tr3+KNr/fysLxIwDMzdim6nbS7n9s1Tg76H2xm9OX3uslyujImOiI2+3dcjJCSwpq6hrKxqysQ0yzlv9/I1mewqjXHi9CWlUjVj2oR+r0xYemDxXKVKXV5Zs/XjHSHBgWq1prmlTSgQLFsyNyiwr44n17Ju6fWGUSOT++idCwBsQMIBMKDCQoPiYqPEYtHCudOZgbDaJZ3f7jvcLun84cjp5595jMvhMJcKdDp9VETYmlWLxSIPIurq0u7cvb+pufXU2cvrVi/psfC+Tvh2ysktyrqR5+YmXLZkrnli6ojk61k5tfWNJaWVSYlxzMSy8qqLVzKJiN/7HYoeSyOiisqavPzioED/qZPT7QpPKBSMSEmob2hWqzVV1bfbjoSFBYeFBfexlFaru3GzgIiYbiwAMJCQcAAMqIRhsQkWXTyIKMDfd/nSedu/3CuVyqur6+Jio5guGB4e7uvXLjV3ZnFzE86ZNWXXngNlFdUaTZcto3b2wLY+GZXVdUdOnOVyuauWL2RaYjLCQoPGjBp+K7dw7/6jSQlx3t6eLS3t1bX1Pt5eUpmcSYxsL02n0x05fo7D4SxdNJvXy1ilvTl+6kLWjTwfH6/ZMyaHhgSpVOqbuQW5ecWff7l344bVfr49XwHKvpmn6eqKjYkMDgqwa3UA4Dz0UgEYfOFhIcwpkGnVYSITEQUHBlh1nY2LiXRzExqNxsZe+pvweTwi6j5uunmKLQ04mppb935/xGAwLpw3Y1hctNW7SxbNnpg+msvlFpdWXM/KqW9smjRh7OSJY4nIt1tj1b5LO3M+QyqTp6elmhuv2KiuvjHrRp5QKNi0Yc3I4YkB/r5RkWHLl8wbN3akQqk6fvJCj0sZjcbM7FwimjR+jF2rAwCXwBUOgCHB18e7pbVdo+kiIg93dyLS6XXdZ/PyFHd1aZnZumN6u5hHEzfTdN2e303Y8xCfZp2dst17D2m1ulnTJ44bO7L7DFwOZ/7c6dOnTmhtkxiNxpCQQHc3t8PHzhJReFiI7aU1NrVk3cgjorr6ph1f7TNPl3RKiaiktLK1VcIX8B9Zv7x7DIXF5USUOCzW694+tBPSx2TfzC+vrNFqdd179OTll8jkisAAv2E2DPUBAC6HhANg4KjVmszsXB6f1/35HUqVmu5kDAH+vkQkkUiZQc0tZ2N61Xr0cj+FuZUg6ei0mi6RdBKRl6fY6kEtVlRqzdffHlQqVRPGjZ7W02CgZu7ublF3htno6tKWlFVyOJzEe28V9V1aS2u7yWSiXkYHUShVCqWqt26rSqWKiLrfwTHnHwqF0t/fehj4q5k3iWgiLm8ADBIkHAADRyAQXL6aZTAYkxLiLDtlqNWaltY2IgoNCSKi8LAQkchDpVKXllWZ22YSUX1Ds0bTxeVyw0J7bhoZGRFKRI1NLWq1xvK5suUVNUTUd4NKnU63+9sfJB3S1BFJ8+dOs/ETmUym46cvqFTqlKR4X9+7t1T6LW1UasrI4Undpx89cS4nr2js6BEL583orZMs08Gk5U5vYbPmljYi4nA44m49UErLq1rbJCKRh1WnXAAYMGjDATBw+HxeUkIcER07eV6nu33jw2QynTx7SafTe3t5MoN4cjgcphvF0ZPnmYsTRKTT6U6euUREw5OHmQcKKywuzysoMd3pjxoeFhIY4KfXG46fumC8M7GpufVmbgERjRpx91xrtaDRaNy7/1hjU0tCfMyyJXNtGQ/DZDLV1Td9/e0PuXnFnmLRwnkzzW/ZUhqXw+Hzed3/mCfdc7kcPp9nHi/VKtrkpGFEVFVdZzlYu1qjOXX2EhHFREd0H0jtytVsIho3diQeRg8wWHCFA2BAzZ09tba+qbqm/oP/7IyJjhAKhTW19e2STi6Xu2ThLO6dzhoTx4+prKqtqq7b9vmexGGxAgG/oqpWoVB6eYrnzbl9waC2rnHfgWNEJBQKmDyGiJYsnL3rmwP5haXNLW3RUeEqtaasvFqv1ycmxCYnxfe24OWM7IrKGiKSyRWf7/yue9jJiXHmnqt5BSUXLl2TK1TMk12DAv1XLV/o6Xn3ooJdpfWre7RRkWHpaalZN/L2/3AiMzs3KNBf09VVXVOvVmtEHu6L5s2wKqG+oamuvonP549PG2XjSgHA5ZBwAAwoH2+vJzeuO3XmcnFpufkHenBQwLzZUy2fUcLjctevXnru4tXsm/mFxWVExOFwhsXHLJo/wzxilaenSCDgm0wmyyezREWGPfrQqpNnLtY3NLe1dxCRm1A4fmKa5ePcui/IPMCWiFpa23sMOyQ40PxapVJ3SuUikUdUZFhyYtyYUcOtLhvYVVq/evyYi+bPDAkOvHL1Rn1DU31DExHxeLwRKQlzZk2x7HnLYB7VNnJ4oqiXjrsAMAA4pj4HBwQAluh0+nZJh9Fo9PLy9Or9iWUGg6GjU6rTGfx8vbuPvdHVpTWRqccHzyqUKqlULhDwAwL8uo9y0ceC/erelJVtfUQrk8nlCiWfzw/w9+u7SSwADC4kHAAAAMA6NBoFAAAA1iHhAAAAANYh4QAAAADWIeEAAAAA1iHhAAAAANYh4QAAAADWIeEAAAAA1iHhAAAAANYh4QAAAADWIeEAAAAA1iHhAAAAANYh4QAAAADWIeEAAAAA1iHhAAAAANYh4QAAAADWIeEAAAAA1iHhAAAAANYh4QAAAADWIeEAAAAA1iHhAAAAANYh4QAAAADWIeEAAAAA1iHhAAAAANYh4QAAAADWIeEAAAAA1iHhAAAAANYh4QAAAADWIeEAAAAA1iHhAAAAANbxGxoaBjsGAAAA+JHju7uLBzsGAAAA+JHDLRUAAABgHRIOAAAAYB0SDgAAAGAdEg4AAABgHRIOAAAAYB0SDgAAAGAdEg4AAABgHRIOAAAAYB0SDgAAAGAdEg4AAABgHRIOAAAAYB0SDgAAAGAdEg4AAABgHRIOAAAAYB0SDgAAAGAdEg4AAABgHRIOAACUeOa2AAAgAElEQVQAYB1fo1EOdgwAAADwI8cxmUyDHQMAAAD8yOGWCgAAALAOCQcAAACwDgkHAAAAsA4JBwAAALAOCQcAAACwDgkHAAAAsA4JBwAAALAOCQcAAACwDgkHAAAAsA4JBwAAALAOCQcAAACwDgkHAAAAsA4JBwAAALAOCQcAAACwDgkHAAAAsA4JBwAAALAOCQcAAACwDgkHAAAAsA4JBwAAALAOCQcAAACwDgkHAAAAsA4JBwAAALAOCQcAAACwDgkHAAAAsA4JBwAAALAOCQcAAACwDgkHAAAAsI4/2AEAAAD8eCklVHKBCs9Q4RmqyxmcGCJH08j5lDyTUmaTh8/gxEDEMZlMg7VuAACAHydJLZ39mHIOU3X2YIbB5RMRGfV3p8RNpFGLadZm8o8a4FiQcAAAALiOpI6+fo2ufzM4a48aQ4nTKGYchSZTSAJ5eBMRqWXUXEZNxVSdTWWXqOYWEdGEB+nhvw1k2oGEAwAAwEXO/Ye+eoW0qkFY9dgVNH4Npa8hd6++ZtPIKWsfZX1HN/aTUEQb/kGznhmYAJFwAAAAOM2goy9eoPPbBmHVwybTjKdo+hPEE9i6iFFPF7bTxU+p7ArN3Eyb/m3Hso5CwgEAAOActYz+/SDlHRuEVU9/gha9TpGpjixbn09H36GLn9GoJfTiXhJ6uDq4eyDhAAAAcIJaSu8spvKMQVj1otdp6ZvkHex4CfIWOvwXOvoOJUylN46Tm9h1wVlDwgEAAOAok4n+NJtKzg/Cqhe+Qg/99XY/FGcYDbT753T8XUqZTW+eJg7HFcH1AAN/AQAAOOrbXw5OtjH5EVr8hguyDSLi8mjJGzR5AxWdpf2/dUGBvRhaVziKSyoMRmNggF9wUEDfE4cISYf0xq381jaJt5dnetqokOAhF6FdtDpdWXk1EUVHhnt6igY7HACAoa2pmH49hvRdA73eqNH0xH8ofqIry6y8Tp9tpsZi+nMpS31leVu2bGGjXCtKpaquoUkqlfv6evcx24YnX/lqz8HgoMDRqcl9TxwKfjhy+oVXf3P0xPnLV7PPnM9IT0uNjY4Y7KCc0tbesf6xF/cdPD51clpYaP83BSsqa65n54aGBAqFrDdvBgAYcj56jJqKB2G9S/+LJqxzcZl+EaTVUM5haq2gSQ+7uHAiGrChzb/65uBHn+wior07t8bc52dlxq3cwi1/+CcRhYcGz545SSAQREWEDnZQA0qj6Xry+V8olaoH1yx989VnBzscAICBVXOT8o4PwnqTZ9K0jayUPG0T3fiebhyg5lIKSXR58QORcOj1+n0Hbm+VY6cuPPskK6nTAPvuwHEiCg8L2fnp3708WWzWy4aq6roPP9lFRK//7OmgQH/HCuHyuB7ubkqlSiRitycVAMBQdOZDosFok5C+hjwDWSnZM4DS11DxeTr6Dj3+ocuLH4hGo5nZeS2t7czrfQeO63T6vue/L+QVlBDR4gUz77tsg4jkCuXJM5dOnrmk0Th+61EoEOz89O+ffvCn555+xIWxAQDcB7RqurxjENYbEENpK1ksP20lBUTT5S/ZGCx1IBKOw8fOENFDax/w8fFqbZNk3sgdgJWyTaFQEZG/36A9dm8oCPD3G52awufjmcMA8P9M3rHBGb88cRoFxrJYfmAsJU4nrZKNu0Wsnyo6OqXHT18komVL5gqFgh27vv/hyOkpE9NcVX59Q1N+YamkQyrycI+NiRyRkmB5/pN0SOsbmoho5PBELvee7KqopFyn0ycnxQsF9zR4LK+oVqk1Af6+4WEh3Ven0XSVllcRkU6nI6KGxubc/GIiCg4KCAkO1Op0xSUVRBQfFy0UCK5n59TUNsRER1h93r5jJqKuLm1JWSURJSXGuQmFFZU1BUVlCqXK38933NiRgQF+zGwGg+FmTmFNXYO2SxcaGjQ+LVUs7qdrSUlpZZdWW1FZe/vfsspOqczd3S1xWGz3mRubWm/lFnZ0Sn28vcaMSokIt26kUlBUZjAYgoMCu3fPkcrkN3MKm5pbyUTBwQGjU5MD/P36js3hxfutT/NWi4+Nsqqi7ntIvxvRaDSWVVSXllXJ5AqxWJSUEJucGM/pped6c0tbbn5xW3uHp1iUkjxsWFx0b3MCwP0k/+TgrDdm3ECsIuMrKjpL41a5tmDWE44z5zL0ekN8XHRKUrzJaNyx6/sTpy+9/rPNzl8bkHRI3/3Xp0dOnLOcGB0V/qs3nh8/btSdeTqffO6/iOibHf+Ki73bz6ejU7rpmTeMRtP772yZPHGsebrRaHz2Z29JpfLfvfVKjwlHQ1MLUyDjqz0Hv9pzkIh+9vzjmzas7uiQMu++88dfffrFN/mFpUQ0d9YU87nKlpiJqKW1nSln29Y/7ty9/8z5uwPYcbnc11566uF1y3Lyirf84b2a2gbzW95enr//9avTpqT3UWlv/f7disoa87//9eu/ENHo1JRPP/iT5Wxarf4fWz/78uv9lhOf2rju+WcetTxfvvLm7yUd0ldffOrRh1aYJ5pMpt17D239aIfa4n4Nn8974rG1mx9/sN/LIXYtbmN9Nre0MfX5xX/+NiIlwXLmzOzcX235GxFdOf0tk3D0vRErq2rf/su/b+UWWhaSNmbE//zipajIMMuJKrXmXx98vnf/MaPRaJ44bUr6W2/+1OF2MwAwVNTnDc56w4cP0Cpqbrq8YNYTjn0HjxPRygfmczic4SkJ8bFRFVW1p85eXr96iTPFSmXyn776m9LyKjc34bLFc+Njo6Ry+YlTFyur61549Tfv/PGXM6ZOIKL42KjQkKCm5tabuYWWCce1zFtGo4mILmVkWSYcFVW1UqmciNLTeh6X3tvLc9OG1US0e++hri7t+HGjmBNYSlK85Wxv//n9jk6Zj49XZHhowJ0LEjbGbOm1X/6vTqtbuWx+WEhwS1v70ePnVGrN397bJlcoP9vxrVAgWL1iYXBQQG1d49ET52Vyxc/f+tPuz/9pdeaztGzxnE6prK1Ncvj4OSJavXyhl5e4+wAnf3zng/qG5onjx4xJTVEoVSdOX2xr7/h0x7dxsVFLFs7qc8vQV3sOvPv+Z0Q0dfK49LGpRHTl2o3M7Nxt2/eoVJrXXnrKVYs7UJ926b4R6xuannv5f9olHZ5i0YoH5oeFBjU0thw4fOrGrYJnX/rv7R/9JST4dksulVrz01d/k5tfLPJwX71iUXhYcFNz6/4fTl66kvXKm29/+sGf3NyEzsQGAIOsrWpw1huSNECrYOEDsptwFJWUFxaXE9GcmZOJiMPhrHhg3j+2bt938Pi6VYudubb83r8/Ly2v8vP1/vhf/2vOJB5/dM3bf9p65MS537z93u4v/hkU6M/lcufMnLzrm4PXs3JWL19oXvzcxWvMixOnL77y4pO8O3dbcvKKiWh48jDzmcNKYIDfz55/nIh+OHK6q0s7e8akh9ct6z6bQql6+39eWzB3Go/Hszdmy3J8fby3/v23YaFBzL9Pb3pw4+bXJB3Sjz7ZFR0Z9sF7b5vvZTy+YfVjm1/XanXHTl7Y/MSDvdUbky3l5hczCcemDat7zE5aWtv/9odfzp4xifl38xMPbtz8RkNj876Dx/tOOBQK1daPvySiJx5b++JPbnfc2vjIqvc/3PHFrn1f7TmwbtXi6KhwlyzuQH3apftG/Nt729olHTHRER/9823zja0ND6545sVfNTW3bv34y9+99QozcetHO3LziwP8/T759x8j7/SXXrNi0WObXy8urfj+hxMPrX3A4cAAYPBJmwZhpRwuebI/vCSzClWnywtmt9Ho0RPniWjyhLHhYbdHkZo7awoRlZRWMomIY2pqGw4cOklELz23yfK6hZtQ+OZrz/r4eMnkir37jzITJ08YS0SXMrLNvWNUas3ZC1e9vT1HDE9sa+8osogkMzuXiGZNn+RwbIwXf7Jx8YKZltmGXTGbvfz84+Zsg4hCggPMJ6pXX3rKsuXEsPgYJj8oKCp1MngievEnm8zZBhH5eHsxV6Ry8oosbxB0V9/QpNXqiGje7KnmiVwu94mNa0OCA4ODAiqral2yuGP1aRerjVhaXnXhciYR/fL158zZBhGFhQa99uJTRHT0xHmmKXFzS/vuvYeI6PWfPR1pMTpLVGTYw+seIKJv9x1xJjAAGHwDP7ooEZmMJLajMZyDmFXoNC4vmMWEQ6PpOnD4FBEtXTzbPDE8LGTi+DF0JxdxzOWr2UQkFovmzZlm9ZaXp5i5knHk+O37+mNHD+fzeUqlqrSskpmSfSNPq9XNmz11yYKZRHQpI4uZbjAYMq7dICImQmcMTx7mTMxm3QdmNbfcHDPK+k4ec1WmUyp3PO47hifHW00JDQkkIr3eoO6zJ6054Mt3apXh7eV5aO+2w999MmtGX8mc7Ys7Vp92sdqIGdduEpG/n8+4sSOt5hyXNvLhdcseXLNUpVYT0flL14hIKBTMmm498PC0yelEVFldZ+4oDgD3Jb7b4Ky3S3n/roLFhOPy1WyZTCEQ8KdPGW85fdniOUR04NBJtdrBBKqkrIqIUpLixT0NOTVqZDIR1Tc0d3RKiUgsFjHN/W7kFDAzXLySSUQzpk6YOjmdiE6evsRML6+okckV3l6e3dMF59kVcx8Egtt3waw61xAR0+ZRbzA4HWyP6729ur6vcIQEBy5bMoeIPtj21XMv/3rfweMVlTV9L+LY4q6qT9uVV1YT0ejUFKvuTkTk6+P9xsub33h5M9MahrkMExIUeOL0xR+OnLb8yyu4ff2puaXNVYEBwCDwGaShpSU1/c/jklWw8AFZbMNx8PApIpo+Zbxeb5B03D3uj0hJ4HK5CqXqUkbW/G4/T23R2Skli9/6Vsz9X2RypZ+vDxPDhcuZV6/fevShlXq9/sSZSwIBPz0tVSzySEqMKymtrKqui42JvJlbSESzZkwyn9RdyN6Y71///fOfxsdGb9+5NzM7l7lFFRjg98DiOauXL4y0YfR3Gxcf+Prs7JQTka9PXw8DYrS1dxBRbX0jM/h9jxzOtgFgSAiMpfbqQVhvWw2FsdxRpa2GiNgY7YOthKOpuZW54X3mfIZlr05LBw6fcizhYPpG6rS6Ht/t6tLeno13+5fo+PTRRHQt65ZKrSkprZRK5fPnTGN+GS+cO72ktDLj+s3YmEjm9DZ1ksvGCHEm5vuXQMDftGH12pWLMm/kXc/KuZyRVVPX+PnO73bu3v/zl59Zu2qxSxYf+Prk83lEZLDhAhIzRktSYtyC3ndvW56NBwBDV0QqFTt109ZB9bk0ahHrqyCi6LH9zWc3thKOE3fuUzCH6e70esPljOyGxuYeh7voW4C/LxHV1DX0+G5DUwvzwsf79o/RmKjw6KjwmtqG/IKSa1m3iMh8c33alPT3P9px+tyVtSsXMw040tNG9VSqs+yN+X4nFotmTZ84a/pEenlzZVXtB9u+On3uyh/f+XB48rARw/t/JlC/iw98ffr7+9Kdqxd98/X1IaIAP98nN7r6cY4AMESMnE+ntw7Cequy+p/HJasY1c+PQwew8nvaaDTuO3CMiDZtWJ1xZm/3v/PHv/bx8SKi46cuOlB+6ogkIiosLu+x5R3TuG948jBPz7tjSjL9crNu5jFrnDThdu6WEB8THRWefTP/UkaWSq0ZO3o4S6OVOxDz/Sj7Vv7xUxezbtwzJE5cbNSW/37ZUywioozMWy5Z3K76NDdA0esdf47PiOQEIsrJL9bqrC+rKBSqnbsP7Nx9gLl1mJIYT0SZN3JlcoXDqwOAIS11EQkH40FaFdeouYzF8pvLqOI6CUX3TcJxK7eopq6RiHq7YyIUCJYvmUtE3x04brC5RaHZtCnpbm5Co9H43YFjVm9VVdcdP3WBiFY8MN9yOtM5ds/ew/UNzRPTR5uzCg6Hs2jeDCL657+3kys6xLowZvaYxx2xvTmnjS5cuv6rLX9763d/typZ5OHu7e1FRGTq6+GKti9uV336+XpzuRzmLauZs2/aOlzgtCnpXC5XqVSdPHPJ6q3LV7Pfff/TrR/vcBMKiGjGtPFcLken03+150D3ck6fu+LCpqwAMDiEHjRhMC5htlZQzmEWy885TK3lNHUjG2WzknAcPn6WiOJjo/ro7rFw7nQiamhsvnEz397yfX28f/LUI0T06RffHDp6xnxyqqlt+NVv32FW/cDiOZaLjBqZ7OYmZH5xzpk1xfKt6VPHExGTIU1IZ+V+imMxs8fzzhNumXG7XWjx/JlE1Nom+es//mP+fW8wGHZ/e6ihsZl66s3r2OJ21aeHh3v62FFE9NmOvRV3RvKQyuQfbNv57fe2jtURFOj/2EMriejPf//4msV1mmuZt/70zodE9Mj65cyDWsLDQh57aBURbdu+Z+fuA+YBYNRqzWc7vn3zrT+/+NpvbWkLAgBD2vL/JhqMRyNlf8/WsGPSJsr+nohDS37ORvGub8MhVygPHztLRCsemNfHWKLDUxLiYiIrq+sOHTtr+dgLG214cHlFVc0PR8785n/f+2DbV0kJsZ1SeU5eEREFBfr/6fdvijzcLed3d3ebMXUC89t08oR72sIMTx4WHBTQ0toe4O+XlBBnbyTsxcyeiIjQqIiw2vrG/3n7Hzt2fS8We2zb+keXlJycFP/qi0+9+/6n3+w7sv/QSSbPKyuvZm58rF6xsLcx4x1Y3K763PzEg9ezc2rrGx/c+FJ8XDQR1dTW6/WG8LAQJpWxxeYnH8orLMm+mf/Cq7+JiY5g6rC6pp6IZkwd/8wTD5nn/MnmR+obm0+dvfzu+59u//LbkcOTtFptflGZUqkSi0WvvfSU5aBwAHBfCkmk9NWU9d1Ar7foDF3dRQtfdX3JV3dR0RlKX0PBrh8bgthIOM5fvMb0EWCaTfSGw+GseGD+e//efvTEuVd++oQPc8HcZnw+/9e/eGnc2NTtX+6tqW1oam4lIuaZGk8/vr77w0GIaNqU9JNnLiUnxlsN5s3lchfPn/nFrn1zZk7qPsSCCzkQM0t4XO7/bnl9yx/+WVFZU1pe1cdY4w549KEV0VFh27bvyS8sNbfGiI4Me/zRtcuWznXh4nbVZ3pa6j//9j/v/POT6pp65vF1fr7ejz+6Zlh8zEuv/9bGjybycP/HX3795dfff/Pd4eqaeibVCAzwe+KxtetWLbZ8sJybUPiHLa8fPJz2xa59NbUNzNAvXC5n6aLZT29aHxMdYeMaAWBI2/APunVoEEYdvbyDhk2mYVP6n9N25Vfo8g7iu9GG91xZrAWOqc976kOfyWRqbmnrlMrchMKw0GB390Ea/c0eQyRmg8FQ19CsUWtCQ4PsTfhsIemQtrVLDAajv59PcFCAvY/OsX1x2+vTaDQ2NLbI5ApPsSgiIpTnaH5pMBgaGlsUSpVY5BEZEdp3ntrc0tbZKXN3dwsM8GPuuQDAj8f3W2i/rT9aXGnSw7ThPfJ2UQd7WQt99TJd/ZpW/55WvOWaMru57xMOAACAQWMy0V/mUtHZQVj1oldp7R9I4PS9eK2a9v43HX+XkmbSL86SE89V7dt9P8wUAADAoOFw6KV9lDC1/zld7ti7tPctUvY/OFBflBL67i06/i4Nm0yvHGAv2yBc4QAAAHCWRkH/fpByB+NB0DOeogU/oyiHnjlac5NO/pMufEapi+in35K7p6uDuwcSDgAAAFfY/hM69/EgrDd+Es16hmY+bd9S57bRuY+p8jrN/SltfJ+dyO6BhAMAAMBFzv2HvnqFtKqBXi+HS2kradxKGrucxP59zalop5sH6cZ+yt5PQg/a9G+a9vgAxYiEAwAAwGUktfT1G3R9z+CsPSKVkmdQ7AQKT6HQZPLwISJSS6mpmBoKqTKTSs5TfT4R0YT19PDfyT9ywEJDwgEAAOBqklo6+zHlHKbq7MEO5V5xE2nUYpq1mfyjBnjNSDgAAABYo5RQ4RkqvUQFp6guZ3BiiBxNI+dT8kxKmX37msdgQMIBAAAArMM4HAAAAMA6JBwAAADAOiQcAAAAwDokHAAAAMA6JBwAAADAOiQcAAAAwDokHAAAAMA6JBwAAADAOiQcAAAAwDokHAAAAMA6JBwAAADAOiQcAAAAwDokHAAAAMA6JBwAAADAOiQcAAAAwDokHAAAAMA6JBwAAADAOiQcAAAAwDokHAAAAMA6JBwAAADAOiQcAAAAwDokHAAAAMA6JBwAAADAOiQcAAAAwDokHAAAAMA6JBwAAADAOiQcAAAAwDq+y0tsaGhweZkAAAAwkMLDw11bIMdkMrm2RAAAAAAruKUCAAAArEPCAQAAAKxDwgEAAACsQ8IBAAAArEPCAQAAAKxDwgEAAACsQ8IBAAAArEPCAQAAAKxDwgEAAACsQ8IBAAAArEPCAQAAAKxDwgEAAACsQ8IBAAAArEPCAQAAAKxDwgEAAACsQ8IBAAAArEPCAQAAAKxDwgEAAACsQ8IBAAAArEPCAQAAAKxDwgEAAACsQ8IBAAAArEPCAQAAAKxDwgEAAACsQ8IBAAAArEPCAQAAAKxDwgEAAACsQ8IBAAAArEPCAQAAAKxDwgEAAACs47u8xK4urclk4nK5QqGgxxkMBoNOpyciNzchh8NxeQDOyM0rOnjkdGCA37NPPcJG+U3NrQI+PyDAj43CBwvblfbj0NLavm37biL6xevPcbn2JfqoYSDndiG22biLDuWPcL/IKyg5cOjkfXo0cH3CcSkjK+PaDT6f/8Izj3l6irrPcODQycLich9vr+c2b+DxeC4PYMiqb2j+fOdeLpf73OYNvj7egx0OAADAwHF9jjltcrpI5KHX6y9lZHZ/t7mlraikgohmz5z8/yrbICKBgM/lcvl8Hp/n+jwPoEcZ1258vvO7y1ezBzsQABcbxH27t1Xj69Y31yccbm7CaZPTiehmToFUKrd699zFayaTKTQkaERKgstXPcQFBwW89PzjL/5kU48XfgDY0CmV1Tc0dXbKBjsQABcbxH27t1Xj69Y3Vu6ipael+vn6GAzGC5evW06vb2guK68iormzpwy11hsDQyzycHd3G+woAAAABhor1/a5XO6cWZO/238sr6BkyqRxAf6+zPRzF68SUUJ8TGx0pHlmg8FwPSunpKxSKpXzeLygIP8xo4YnJcRZFlhRWZN5Iy/Az2fenGmW0zOzcyuqauNjo8aPG0VENbUNGddvBvj7pqelnj53paGhOTwseM3Kxb3F2dEhvZiRWVfXqNcb/P1908aM7G1Og9F4K6cwv6CkUyoTCAThYcGTJowNCQ5k3i0oKs0rKA0JDpg1fZLlUkql6tCxsxwOrXxggVAokErlx05dIKL1q5dY5lsqtebq9RuVVXUKpUrA54WFhkwcPzo8LMSuGPrQLum8lnmrrr5Rpda4CQUR4aETx4+xXJCpt9DgwGlT0q9l3ioqqZDLFR4e7sPiY6ZPGW/V+Nf2SrNUVVN3LTMnMiJ0zKjhlzOyKqtqNZouLy/PlORhE8eP4d3bfKzfT9r3hq6srsu6kdvc0qbXG7w8xXGxkZMnpHl4uN+zChv2Oruqpd9Ktp3tNdz3Sn84clql1rS2thNRZVXtnu8O83jctRZfB4djtnGP6m0DObAnV1bVXs/ODQsNSk8bdeVqdmVVrUqlFotFw5OHTZqYxuNym1varl6/Wd/QrNPrfX28RqemjB09wqoQ2ze6qyK38chg4/GtO7t2UWe+VrbvKmq15nJGVkVVrVqt8fQUpyQNmzRhTL93z+2t2H73bVu2dW8c+1q56utm4+nACrMLcYhmTp/o2GFnYLDVmCAlaVhkRGhdfdOFS9dWLV9IRNU19VXVdRwOZ+7sKebZFErVrj0HWtskROQpFqnVmtKyqtKyqlGpycsWzzWflTul8rLyKmVosNVaWlrby8qrPMW371DI5Iqy8qrWVq/8wlKFQklEXl7i3iKsq2/6+puDWp2OiNyEwprahuqa+qBA/+5zqtSab/cdrqtvIiKRyEMtV0g6OguKytatXpIQH0NEAf5+ZeVVVdV1UyaOs/ySF5VUlJVXRUaEMhO7tFrmAo/JZDJ/tLb2jp279yuVKiISi0UyuaKjU1ZYXLZ4wUzLM02/MfSmqKT8wKFTer2ez+eLxR5SmULSUZxfWLpq2YKU5GGW9SaTySura+sbmvl8vtFoVChVrW2Smtr6TY+u5d6J1vZKsyKXKcrKqzo7pZnZuQqFUigQ6A0GhVLV2NRSWVX70Lpl5pzDlk/ax4a+nJF19sJVIhII+AKBoKm5tam5Na+gZOMjq80NdW3c62yvFlsq2Ua213C/K62qqZPLlSaTiYikMrlMruDzebYv3hvb96geN5BjezJToETSeTOnQC5XCoUCnU6vUKqaW9pq65tGp6YcOHTCYDAKhQKtVqdQKOvqm1rbJAvmTjeXYNdGd1XkNh4ZbDy+9VYttuyiznytbN9VNJquT3d8I5XK+Xw+kUmhVDU1t5ZXVm94cEUfOYcDFdv3vm3jtu6Rw18rl3zdbDwdWKmta9y7/6hOp581tLMNYi/hIKK5s6Z+8dV3hcXlUye3BwcFMJc3xowaHhhw++hpMpm+23+0tU0SFhq88oH5/v6+JpOppKzyh8Onc/OK/X19pk0Z78B6pTK5p1i0aP7MsNCg3vZynU6//4cTWp0uMiJ0+dJ5fr4+Op3uWmbO+UvXus984IcTdfVNEeEhK5bO9/PzMRgMFy5nXs7I+uHI6ec3P+rmJgwJDgwK9G9tk5RVVI1ISTQvWFxaQUQjhyd2L5NhNBr3HTimVKri46IfWDzHy1NsMBqvZGSfv3Tt2MkLEeGhwUEBNsbQY/kymfzg4VN6vX761PHTJqfzeDytVnf0xLm8gpIjJ84lJsRa1k9La7uXl/iR9ctjYyJNJtPNnMKjJ841NLaUlVUlJcbZW2k9amvvCA8LeWT98qBAf4PBcONWwYnTF6uq665n3po8Mc3eT9p9Q7e2Sc5dvHvzNBEAACAASURBVEZESxbOYr6f7ZJOZh87evzcw+uXk/17Xb/VYlcl9832GrZlpS/+ZBMRHT1xLvtm/tjRI5Yumm3X4j1GaNeCPX4THduTGZKOzrjYqMceXuXn66PXGy5fzbp4ObO8orqisiYuJnLpotne3l6arq5zF65m3cjLzM6dPDHNy1PswEZ3VeQOHxns0u8ualfwVp/dri2uUKr8/Xw2bVgdGRFmMpmKist/OHq6tq7xyrUb03s/mDtQsX3s286cVpz5Wjn/dbP9dGCpqbl1z3eHdDr9pPFjHDtjDiQWe0JHRoSmJMWbTKZzF6+WV1TX1TcJBPyZ0yaaZygurairb+Lz+Q+uWerv70tEHA4nOTF+/txpRHT5arZao3FgvTwed8NDK9LTUsPDQnpL9/ILS6QyuUDAX796qZ+vDxEJBIJpU9InpI+2mrO8orqiqtbd3W3d6qV+fj5ExOPxZs+YFBTor1Kp8wtLmNlGDk8iosKicvOCao2mpraBx+OO6P2wUlBU1tom8fISr125mDky8rjc6VPHj0hJMBqN2Tfz7Yqhu/qGZh9vr8SE2JnTJjL7tFAoWLxgFpfLVas1Tc2tljPz+bxH1q+Ii43icDhcLnfc2JEx0RFEVFffaG+l9cbDw/3h9cuY3+s8Hm/8uFHpaalElHkjl/llYNcn7b6hq6rrTCZTSHCg+ddAgL/vovkziaiyus5gMJD9e12/1WJXJffN9hp2cqUOL27Xgt03kMN7MkPk4b525WKmZvh83sxpEyPCQ4jIw8N9zcrF3t5eROTu5rZw3gyRyMNkMtXV3d5G9m50F0bu2JHBLv3uos58reza4gIB/5H1KyIjwoiIw+EMT0mYOmkcEWXdyDOaTD0G7+Qu0Z0zpxUXfpcdKNbG04GltvaOr7852NWlHZ2aYnU/bmhid+iVOTOn8Hjc0rKqoyfOE9Gk8WMtO2gUFpUR0cjhieJ7rxmmjkwWi0U6nb6svNqBlfr5+pgvovSmvKKGiFKShlnd2g/plkLmF5Yyc4pFHpbTh6ckEFFVTT3z76jUZA6HU15Zo9PpmCklpZVGozE+NtrD3Z16ceeHTpJAcM+lprQxI5MS40R3YrMxhu6GpyQ8+9Qj61cvtZwoFAqYi7Qq9T1fPF8f78B7RyQL8PeznM32SuuNWOTh7nZPm9nxaaOISCZTSDqkZOcn7b6hmcCkMrlcoTRPjIoMe+PlZ17/2Wbmq27vXtdvtdhVyX2zvYadXKnDi9u1YPcN5PCezPD0FFu1SwgKDCCimKgIy+kcDsfXx4uIlCo1M8Xeje7CyB07Mtil313Uma+VXVvcx9vLx8fLcsroUcOJSKlUMY0bunNyl+jOmdOKC7/LDhRr4+nATCaT79pzQKXWpCTFP7B4jmOxDTB2B4Tw8/NJGzMyMztXKpOLxSLzZXNGc0sbETG/USzxuNzQkKDyiurmlrZRI5PZCKxd0kFEoSFB/c7J3AiUyxXnLly1nN4m6SAic/cnL09xdFR4dU19afnta6fFJRVElDoiqa/CWyVEFBpifRkmJjqC+Y1iVwy96erSlpRWNDS1KJUqvcFId3ZxUy+/Ocx4PC4RGY1G5l/bK812/v6+bm7Cri6tRNIZ4O/r5CdNSojz8/Xu6JR9/Mmu5KT42JjI2JhIT7HI8mzk/F5nVS0MhyvZkr017ORKHV7c4QWd3L7dMdvC6gBNRBzOPdvI+Y3ucOSOHRmcZLWLOl/tDm9xL0+xSOShUqklks4erze7fJdwflu75LvsQLE2ng4YOr1+z3eH5Qqlv5/PymUL7pden6yPQDVj6oQbt/INBuPkCWOtfp1ourRE5OXl2X0pby9PInLsloottFod9dmk1EylUhNReWVNeWVNb+UwUkckVdfUFxaXj0hJ1Gp1VTV1bkKh+R5qj7q0WiJyc+uno6ztMXSXX1h67OR5jaaLw+GIRB4e7m7U7WRpI9srzS6eYlFXl5apCmc+KREJhYLHH1t36UrmzZyCnLyinLwiIoqKDJs6adywO63P2NjrXFXJdtWwkyt1eHFn1uvk9nWY8xvdmcgdODK4lpPV7uSe5ikWqVRq5gvu8ti6c3Jbu/CAaW+xNp4OGOYxriQd0rKK6uTEeCcjHBisJxweHu58Ht9g0HbfA5hGvBpNV/elmIlCQc9PY3Ees+qurp6/A5Y4XA4RTZ2cHh0Z1v1dgUWEw5MTjp28UF5Ro9PpSsur9HrDiNTEvhsM8nk8ItLr9a6KwUpDY/OBQyeJaM6sKePGjDQ3v3r/oy9kMkXfK+0hWpsrzS5MgUzhDn9SM5GH+4K50+fOmlJdU19ZXVdRWVNb17i77tDMaROnTx1PLOx1Lqxk22vYyZU6vLiT63V++zrG+Y3uTOQOHBlcy5ngnd+9NV1dRMTn93yucfku4cy2du0B095ibTwdmIWHhUSGh1zLyjl05ExocJDVzayhaTDH2Pbz9ZHJFO3tHd3fYq4t+/re7sfI5br4epG3t5ekQyrp6Ox3Ti9PT5lMweNx4+Oi+55TKBQkJcQWFJWVllcVl5STDVdNfX28pTJ5R4fUarrJZDKZTMThML3abI/Bys2cQpPJNCo1ecq9N7McY3ul2U6r1TE32n28vciJT2qFx+PFx0XHx0XPmz2V6Sh78Urm+HGj3N3dbN/rbOTCSra9hp1cqcOLO7leV21fezm/0Z2JvN8jg8uPb1acCd7JLa7XGxQKFd25uuDa2HrkzLZ27QHT3mJtPB0wxGLRw+uXCYXCxqbW2vrGfQePb9qweug/D28w42P2sNz8YqsGzI1NLS2t7USUEHf7MribUEh3Lr5Z0jh6zyU6KpyICorKrG7LqboVGBsdQUS5ecWGblfVurchYo4juXnF5ZU1Xp7i7jferAuPiSSikrJKq+nXs3L+9M6H33x32IEYLDFtJ6368Wu1Om2XI9euba+03jD9RCzlFRSbTCahUMD0+HL4kzK2f7n33X99cjOnwHLipAljichoNMrkCrJnr7ORCyvZ9hq2Z6U9nMwcjtnJD+vk9nWY8xvdycj7PjK4/PhmxZng7driKrVGr7/nO15YXGY0GgUCflhozy2TnKvYHvZtZ7a1k1+r3qbbWKyNpwOGh7ubu5sbl8NZtWKhyMO9obH59LkrvYQ0hAxmwpE2eoRI5CGVyc+ezzAfYTVdXUyXlpSkePNj3JlmdFKZnBk4i5FXUFJcar1tbDRm1HA+ny+Vyi9eufuEucamlstXsqzmTE8bJRQIOqWyk6cvWp4Gsm/mb/3oi6LicsuZ4+NjRCKP8soanU4/IiWh34Y8Y8eMcBMK6+qbMrNzzRMlHZ0Z124QkflxM3bFYMnP15uI8gtLFUoVM0WhVH2z7zBzkdPq0NAv2yutNx2dsssZdx9rJJcrmKccpY5IZq4wO/xJGWGhQWpNV2Z2rtriUFVaVkVEPB6XuYhi+15nIxdWsu01bPtKmQaVMpncscVd+2Gd3L4Oc36jOxl530cGlx/fXBi8XVtcpVIfPHzK/LtCoVRdvHydiEakJPZ2c8SZ2Hrct53Z1k5+rXqbbmOxNp4OrHh5ipcvnUdE1zJvlVrsP0PTYN5ScXd3W7F03rffH8m4dqO8ojoyIkyn11dU1qhUan8/38ULZpnn9PPziY+Nqqiq/WbfkZjoCA9399a29rb2Dj6fZ+9Zk+HlKZ47a8rxUxcuXLpeXFIRFOgvVyhr6xq7DzLj6SlatnTu9wdPZN3Iq6isZZLQ+oamltZ2kcjDaghILoczIiWB2V1SbehfIxZ5LJw/4+DhU8dPXcgrKAkJDlCq1OUVNQaDISUp3nzd1a4YLE1IH52bVyyTKT7ctjMsNNhoMDY2txiNJmZARuWdvd/lldYbHo979kJGYXFZeFiIVqstq6ju6tJ6eYpnTJvg5CdlzJg6oay8uqW1fevHO+LjokUeHpKOzuqaeiKaPDGNidP2vc5GLqxk22vY9pUygyJXVNV+tecAn8dbt2Ypl8NxOGYnP6yT29dhzm90JyPv+8jg8uObC4O3a4uLRB7FpRXvf9QQGRFqMpqqa+q7tFpPsWjWjEm9le9MbD3u285saye/Vr1Nt7FYG08H3Q2Lj5k8MS3j2o0fDp96+vEHmQFphibeli1b2F7HlavZBoMhJXlY973Hz88nNiaqXdLBDEHd0tpuMlHqiKRVyxeI7u2WPWxYTGentK29o1Mqa2uX6PT68eNGRYSH1tU3hYYEJSbEElFLa3txaYVI5JGe1vOjByyFh4V4eooaGls6pbLWNolcoRyRkjBz+sT8ghKrEgID/GOiIyQdnS2t7Uycak1XUmLcupWLmZFqLIlEHjdzCoIC/WdOn2j1llKlZgZvmT51vPknTkhwYEhwYHNLG1N4u6TT3d1t+pT0BfNmWP4MsisGMw9397jYyIbGZplcIZXKZXJFYID/yuUL1GpNe3uHUCgYnpzQR71VVNY0NDYHBwUkJ8XbW2lWWlraSsoqA/x9F86fUVpeVV1T39omMRgMURFha1ct9rH4htjySXsLWCAQjEhJlMnlbe2S1lZJY1NLp1Tm5SWePWMyMwARw8a9zsZqsbGSe9z63dlYwzaulIgCAvxkMkVzS1unVCbpkE6fMp7D4di+uBUn9ygbt293zS1tpWVVYrFo3NhUy+nlFdWNTS0hwYFWnT5u5RbK5Yr4uOiI8FBmipMb3eHIzfo4MpBtx7fuu5Dt31yHv1a2bvGWtpKyyriYqHmzp1ZV19fVN7VLOg0GQ2RE6NpVS3zvtGfs8VvgcMX2uG+TPacVK05+rXqbbnuxtpwOetxMMdERVTV1kg5pQ1PLqJHJQ7aXLMfJvsWuolKppTI5l8v19/Pt3qv+7mxqTUdHJ5/PDwzwc0kzb6PR2NbeYTAY/Px83PvtnqrWSKUyHo/n4+1l+896G8lkcrlCJRQKAgL8uL3vLo7F0CmVKZUqsUhkb4vIHtlVaYzcvKKDR04HBvg9+9QjRCSRdKo1Gm9vL2ZAvR45U9s6nV7S0anT6cUijz6OWTbudTZyYSXbXsM2rlShVMnlCh8fb6vhgxyO2fkPy+q3qa/1Or3R2Yvc5ce3HlfhWPB2bfGODqlKrfH29uzjC+6q2Hrbt8mJbe3k18r5r5uNp4P7zlBJOODHzSrhAACA/2+Gei8aAAAA+BFAwgEAAACsQ8IBA0EgFHh7e3rac0MXAAB+TNCGAwAAAFiHKxwAAADAOiQcAAAAwDokHAAAAMC6wRzaHABgAKjVmnZJp1Ao8PfzZR5fDgADj5WE434Z5SmvoOTAoZNDP87/zzSaLst/ORyOQChw4dB7Tc2tAj7f3ge2DYCW1vZt23cT0S9ef4556nT3KTSE4x8itFrdkeNnzQ/gXblswcjhiYMdlK1sP0BhN4D7Aq5wwNBlNBr//q9Puk/38fEaFhczdVKak48pqm9o/nznXi6X+9zmDb4+Lhj0fYDd7/EPgMPHzhQUlXG53LjYKHc3N38bHnpy38FuAPcLJBxwHwjw9xUKbz9bQa5QSqXy7Jt5+YUljz60knm0t2MEAj6Xy+XzeXweK1+EjGs3iksrExNiLR8d50Jsx3+/U6rUBUVlRLR21eLEYbGDHU5fnNlVsBvA/QI7KNwHFs2fyTy3mtHU3PrdgWOdnbLjpy5s2rDG4WKDgwJeev5xHpfr7m7TI+js1SmV1Tc0sffUdbbjv9+1tUmISCDgD/Fsg5zbVbAbwP0CvVTg/hMaEjR35hQiqqtv0mp1zhQlFnnc14fp+z1+Vun0eiJys+2Bxvc17AZwX2D3CodarbmckVVRVatWazw9xSlJw/6PvTsLbus68Px/iI0EQHAVJVLcKYqkJEqydmu3JcuWFduyY7sTx+mkpie9pKqn56H7YeatH+dlqv9V06nqpJKe7qQz7tiJnci2JFuWYlmyVoraKO4kwH0HiYVYiO3/cC2EIkjwAuAhZev7KT/I4F3OPefcgx/uumfXVuW1yzdv3bP29K8uyH/m4J7Zs/T0DlxvuGvQ60++9FxazLWB3dbehttN+bnZR5/dP/vzhsb73ba+qorSnds3CyF6+wav3bxTuHrV/r07bjTcbW3vdrncRmPGuqryA3t3Ggz6OGVWVpEmxKEDu9esXpXQokKh0M1b99o7rQ6HS6vVFhTkbd28oaa6MjpBV3fPrTsPVuXnHjm8N/phOBL5/alPhBCvvvLC7Mshz39+ZcI+tXvHloryklS2SAgxYZ+60XC3f2DI4/WlG/TFawt379y6ZvWq6AS23v4bDfdKigu3bt5w5dotq63P5/NbLJl1tet279yqfXiJosrJFNae/lu374+MjgeDIUumubKi5Old24wxr5BOTl5ejvIPn89nMOiT604Oh+uT85eEEG++9qLy14TqOc4GfnTmgsfrGxubEEJYbX3vvn9aq9W8fvJ4dN5FW0SNFMtvt09dvnZrYGAoGArl5+Vu27KxpKTozKcXsyzm48cOx1nv49+dhobHLl256fF4hRA+n+/d908LIaqryrY/Va9UUX5ezo5t9RcuXh0cHFlbtPrbD5tm0V1YCGG19d1svF9UWLBj2+ar1xuttj6Px2s2mzbUrtuze5tWoxkZHb9+887A4EggGMzJtmypr3tqy8aFKnPRrqKU6nrD3da2Lrd7OrY1Y7tBEjWW0FxqaimhsXre5vB4fddv3rba+t3THr1OW1S4ZvfOLWuL1swpcCgcvnuv5UFz+5TDqdfr1xat3rPrKfW7kvqhYwm3+oklMXD4fP5//dV7DodLp9MJEXFPe4ZHxrqsPd/7s1e0Wm2WJbOzy2br6du7e1t6uiE6192m1s4u24ba6tivByHElMPV2WWbLlw95/PRsYnOLlum2aT8r9Pl7uyyOZ0ua0/fwOCITqcLh8Puac/YuL23b+AHb7++0G0Off1Dv/vD2UAgePjAbqXLql+Ue9rzzrunxsbtQohMs8nr9XV02jo6bZvra186fkTZnOxsS2eXzdbTf/jAbiV4CSF6+wZa27uFEH39g+WlxcqHoVDo1u2mYDD4/JEDqWyREKK1vevUx+eDwaBOpzObjQ6n2z7Z9qCl49WXjtXVrlOmcTndnV22qSlHQ+N9t3vaoNcHQyH3tGdoeNRq6/vOGy8po7/KyYQQV67d+vzSdSGEXq/T6/XDI2PDI2NNze1//tZrS3Jd2/DwmBDCoNdnWjKFEMl1J//MTGeXTQgRiUSUCdTXc/wNtPX2u1zTyp0RDqfL6XLPvhtTTYuokUr5+weG3nnvw0AgKIRINxh6egdsPf0V5SW2nv74V1Z+LbqTx+Pp6u5R/h0MhpR/Z2dlRqtobMzyoKXD7Z4WQlgsX73iR80uHF2C3T51516zyzVtMOgDgaB72jMyOt43MLylvu7Ux+dCobDBoJ+ZCbjd0/0Dw2Pj9mNHDsxbn/G7ihAiEAj+6p0PBodGF2rN2G6QRI2pn0tlLSU0Vsc2x/jE5K9/84fpaY8Qwmw2OV3uySlnS1vn8WOHtm3d9KeG9vp++8Hp/oFhIYTJZPS63PbJqebWzjdee7G6qnyhzZxN5dCxtFv9xJIYONzTnrzc7B9877WS4qJIJNLa1vXR2Qt9/UNXb9w+sHdndXWFMSPd6/O3d1o3b6pVZglHIsrQsCS3ro2OTVgs5rfefLmivCQSidy513L23MXBodHOTlvN+srY6YdHxt59/+NAILhn59b9e3cmtKhIJPL+H86OjduLClef/NZzeXk5kUikvdP60ekL95va8nKylQWuys/LzrY4HK6+gaGKsq8uSmjvsH71j3ZrNHD0Dw4Hg8H8vJycnCz1xYjldLo+PH0+GAwe2Ldz/9M7tFrtzEzg7LmLTc3tZ85dXF9dEc09Qojxicm1RWveevPlglV5oVDo9t3mcxcu23r6bzbcfXr3NvWTjY3bL16+IYR48fnDyugwYZ9S6ufspxe/++bLCbbkXFZb3/mLV4QQT+/Zpoy5S9udFq3nRTfwb//6B0KIs+cuNt558NSWjSdeeCa68IRaJDmLlj8YDP3ho88CgWBJceHLLx7Nzc0OBII3Gu588eXN+Ev+unSndVXl//MfftzZ3fPu7z7OzDT/3Y9/OGcCh9OVaTa98NyhosICpcwqd+Eo++RUZUXp97/7am5OdjAYunL91uUrDV3dPd3W3srykhMvPJOVZfH5/RcvXb91u6mh8f7Tu7dZ5nt5YZyuEi1qOBJOaK9PbgdUM1eitaTSnOYIh8MfnPpketpTVVn2rePPWjLNoXD46rXGL7688clnl4rXFq4uyFdmPPXRuf6B4eK1a1458VxubnYoFLp0peHKtVsfnbnw4x+9PTtALETN0CFpq59AEq/h0Ot1b735SklxkRAiLS1tQ121cgH2rdtN4UhEq9HU1qwTQrS0dUVn6esb9Hp9Genp66rKUi+ATqd9681XKitK09LSNBrN9qc2lZcVCyH6B4ZiJx6fmPzP9z70+2e21NfNORqmZlFtHd39A8M6ne7Pvn1COdqflpZWu77quSP7hRBXrjd6fT5lynWV5UIIq60/uvCOTpvRmKHTaTu6bNEPe3oGhBDrKh+ph4S2SDEwOJKdZVlfXXFo/1fHVAwG/fFjhzUajdfrGx4Zmz2x0Zjx3TdfUq5c02q1O7dv3rGtXgjRcPv+7Jf8LTqZrac/EomsWb0q+lskPy/nhecOCSGsPf2hUGih0i7kzKcXf/Hv7/7i39/9+b/95v/7yf9Vfpof2r/7wMP9fGm706L1nMoGJtQiyVm0/M2tHQ6nS6fTvfHqi7m52UIIvV63f+/O2Tkg9cI/tt1JCKHVar73nVd2bKtfW7RGOZapfhdWmIwZr588npuTrVT4of27i9euUTbn2yePKzdsZ6SnP3/0oMlkjEQi/f0L7qTxJbHXJ1djauZKtJZUmtMcza2dY+N2i8X8+snjSkrTajQH9u3cWFcdDocb7zxQ5urq7um29WVkpL/x2gmlG2u12mcO7ilYlefxeB+0tKtatYqhQ9JWP4EkBo7sLEt29iOPSdiyeYMQYnrao5ywrN9YI4Sw9fT5/TPKBG0d3UKImvWVqf/IE0LkZGetevRJOPl5uUIIj3du53A6Xe+8e8rj9dXVVH3r+LNJLKqltVMIsWnDevOjB83qN9WazaZAINjZ9dUB3uqqMiFET++A8r/DI2MOp2v9uory0uIph3N0bEL5vLdvUAix7tGr69VvUdSGuuq/+ou33nztxOwPDQa9cnBvzoxmkzHj0Svsdm7bLIRwOt32SYf6yZQzvg6ny+Wejk5TWlL0D//9L//+736URONOTjlGRsdHRsdHxyaUE/NCCJd7evYVo0vYnRat51Q2MKEWSc6i5e+29gohatdXmkzG2ZMteub7m9GdhBC5Odmr8h+5JUT9LqzIzDTPuSamYFW+EKK8tHj252lpaTnZFiHE9MN+m6gk9vrkakzNXInWkkpzmkPZczdtqNHrHzkGv23rppr1laaHF5Q8aOkQQtTVrDM/2o031FULIWwPx9hFLTp0SNrqJ9Cy3hZryTSbTEaPx2u3T61ZvaqsdK1yfiF6LEv5iS/vUYBarUYIEQ6HZ38YCAbfff+0yz2dl5t98qVj857sX3RRI6PjQgjlJ84jk2k0hWsKurp7RkbHlW2sKC/V6XTDI2N+/0x6uiHas71eX5e1t62je3VBfigUGhweMRj0ZaVrk9iiWH7/THtH9+Dw6PS0JxgKi4ej1ewfmvPKy8tJTzf4/TN2+1T+w+s0F52sproyNydrcsr5s1+8U1tTVVFeUlFekmk2LXpx60LeevNl5VedEMLnnxkZGTv/+ZXbdx/Y7VNvf/ek8rnU7jSnnlPfwKRbZEnKr3yRFxYm+QiTr3t3mpf6XXghSiXP+Y4UQqSlqdpJ1Vt0r0+uxtTMlXotqTE2ZhdCFK6ZG3/Ly4qj44AQQrmiwuVyX7x0ffZk4/ZJIcTUlFPl6hYdOpZnq58Ey/0cjkyzyePx+me+CpKb6tZfud7Y0ta1eVPtyOi4w+Eym02zn7iwDBwOl/IP+6Sjs7undn1VEgvx+WeEEBZLZuyfsiyZQojoMTedTltWurbb2mvr7a9dX9XRadPrdVUVZYFA4IzmYken7eC+XX0DQ8FgqKa6bM6F+sl50NLxyWdf+Hz+tLQ0k8lozEgXiQx/mWaT3z8TbTI1kxkM+h9+/40vrzbcudd8r6n1XlOrEKK0pGjfnu3r1F3JNYdyMFn5t8mYUVlR+p03XvqXn/+6p2+gq7snusxl604pbmCKLZI65ZecJXOe7rqob0B3mpf6Xfjxl1yNqZlreWpJafdF72dWDnZ2WXu7rL2xf03ohvn4Q8c3qW+srOUOHD6/Xwih03213s2baq9cb7Ta+vz+GeXaybqaKpXHGJbQ2qI1JWvX3Lh17+MzfyxcXTDnTJAayoXlc178oVA+NOj/9CthXWVZt7XX1tNfuLpgdGyiZn2lTqfV6bSlxUU9fQMul/urCziW4kKWwaGRUx9/JoR49vDe7Vs3Ra+i+uef/tLpdKtZgvLltOgrr+ZMZjJmHDty4MjhvT29A9ae/m5rb1//0G/6Pz60f/eBfUtwgZUl01y4pqCvf6i3fyg6Gi5nd0p6A1NvkdQpzeT3z9Nd4/umdieR4C78+Euuxhada3lqSafVCiGCwWD8ydI0aUKIfU/vKCspiv2rPpGSxB86vmF9YwUt64O/gsGQ2+0RD1OhECI/P7dwTUEoFGrvtLZ3WsViB8A1mqX/8jCbTd9986Ujz+4vLS7y+f0ffPhpEr81lWvHJiYmY/80YZ8UQsy+2WR9dYUQwtbT39rRJYSofXgnt3LNeVuHVbmAo3opHo94515LJBKp31Qz56YvlWZmAsq55+y4by1ZaDKtVltVWXb0mX1/+V++q9zmfvlqw7z7bRKUYx6BwJ9+xyTanVKXxAam2CJLQtkBJ2ddSKHSN7g7VTrjNwAAIABJREFUJbQLf10kV2Nx5lJfS6mM1cotuLH9MxKJhMPh8MMzd8ohOq1WU1VZFvtf6XwpZCHxh47l2eongcTA4fH6gsFHLoduaesMh8N6va5o1snjTRvXCyFu3ro3MjqenWVR7mpZSLrBIB4eSZvNl8IRLWNGekZ6uiYt7dVXnjcZMwaHRi5cvJroQqoqy4QQ9x+0hR89jT00PKpcB1pd+acjmTnZWfl5ORP2qbv3WjQazfqHgUN5jEFza8fg8Ojqgvx5b6JLlHL915z7v2dmAjP+eY43xl6+3tTcFolEDAZ99D40NZP923/87p/+zy/u3GuePc2eXU8JIcLhsNO1BL/jPQ/viZhzKUBC3SlpqjdwntEnoRaRpLR0rRCipa1rzlUXsXvWHN/U7iQS3IUlWMovquRqTM1c6msplbFaOZehfPHPdvPWvf/1v//lvfdPfzVZWbEQ4n5TWyjmJ2ISF1/HGTqWZ6ufBDIDh8f74enz0dHEPe25fOWmEGJj3frZB7vqN9RoNBrly2PDYk89Ut7U5XC6OmfdQdrU3N7WMbdrJsGSaX75xFEhxI2Gu7PvUFVj25aNJpPR4XR9/sW16CDu8/vPnvtCCFFXUzXnzdHKWYDxicnS4qLoM4ktmea1RWv6B4ZDoVBV5RKcTxFC5OZkCSEetHS4pz3KJ+5pz3sfnFbObc1JhJNTzivXGqP/63K5r1xvFELUb6ydfWX7opMVFRZ4ff6GxvveWbt9R6dNCKHVaqI/W1vaupqa25O4THJiYvK3H5z2+2fSDYYNtdWz/5RQd0qayg1Urh90Ol2z502oRSTZUl+n1+scTtflqw3RD4dHxpQ9NI7HuTulKNFdeGnN21WSllyNqZlLfS2lMlY/tXVjusHQPzDc0Hg/+qF9curajdtCiI11X+3yO7ZtNuj1Uw7nZxcuzx5GGu88+MlPf9n68DbXji7b2XMX7ze1xl9pnKFjebb6SSDxGg6TydjW0f3PPx0sKS6MhCM9vQP+mZlMs+nwo0+QNZtN5WXFVlufEGLTxpr4y8zNza6qKO229b33wZnysmJjRsbY+MT4xKROp12SkXpdVfnTu7ddu3H7o9Pn/+sP/0z9288zMtJfOXH0t78/c+3G7a7unpLiokAw2G3t9Xi8ebk5sQ+Krq4qv9FwVzw8vRJVs75ycGhEmSD1zRFC7Nqx5X5Tm9Pp/pef/7qocHU4FB4aGQ2HI8pjEKcffm0otFrN55eutbR1ri1aMzMz09nd4/fPWDLNB/fvSmiyg/t2dXb1jI5N/ORnv6qqLDMZjfbJKeVO4KcfHorv6x/64NQnQgiDQT/n8cCxPjxzXv/wuh+vz68MiDqd7pVvPTfnxs6EulPS1GygEEJ5DHO3re//vXtKp9W+8e0TmrS0hFpEkkyz6dlDez89f+nSlzfb2rsLVuW53Z7e/sFFbzF9bLtT6hLdhZfWvF0l6aUlV2Nq5lJfS6mM1WaT8fnnDn54+vyn5y81NbevWZ0/7fF2dfeGQqG6mqr6h/t1ZqbppRNHfv/huVu3m7qtfcpxkYHB4dGxCZPJGH0T3uDgSOOdBzMzgc31dfFWuvDQsTxb/SSQGDhK1hZu27rx0/OX29q7v/qkuPBbx4/EPt61fmON1daXn5ej5gH4J18+duaTz1vbu209/UIIvV63e+dWjUajhN/UPXNwT//AUP/A8O8/Ovf9776qfsaqyrK3v/Pq+c+/VJ5kLITQ6XRb6uuOHN4750tRCFFWujbdYPDPzNTVPHJTzIbadZ9/cS0jI70kkROQceTmZH/vO698fPaPo2MTytixuiD/2NEDDY3329q7+waGdu3YMnviA/t2Xrh49fbdrx6tU1pc9K3jz865zX3RyUwm4w/ffv3chUvtndbo7wyLxbx39/boqwQyM016vS4SiWTNd+33HC7Xnx4MoNNpc3OyKytK9+zcmjvfQ7gT6k7JUbOBQojamqot9XX3mlqVvioiEZGWllCLyLNz+2atVnPx0vXRsYnRsQmNRrOhtrqsdO3ZcxfjHN5/bLvTkkhoF15a83aVpJeWXI2pnEt9LaUyVm/eVJtuMPzxi6uDQyPKbzCjMWPPzp1792yffRl4Xc26t79j+uMXV/sHhienHEIIjUZTW1N17Nn90Z+LygkXNTdRxxk6lmerv/HSJN33P9vkpMPj9WVlZS50UcKV642ff3Ht4L5dc376xOHx+iYnp3Q63ar83CV5StgS8ni8DqdLo9Hk5ebE3pS/UqYczulpj9lkmvfat/tNrR+eubAqP/ev/uItIYTdPuX1+bKyLHOaTOVkUYFA0D45FQgEzSZjbDjw+2ciIpKx1C/zTKI7JS3+Birc0x6Xy52dnWV69A1Y8VtkeYTD4fGJyVAolJubnZGefv3mnfOfXykqXP1f/vyN+DM+ht1pCa3ULrxQV0lacjWmci6VtZTiWO10ulxuj8Ggz8/PjXPUx+P1ORxOrVabnWWZcwjnvQ9Od3Tajh87tP2p+vjrUjN0LM9Wf1Mtx76Um5sdp9dGIhHl7FpCNxSYjBkmY+ESFE4Ck8ko+/dQEnKys9S/NS1v4YcyJTSZXq+Lc5hBxj0ayXWnpMXfQEWm2TTvS5sSapElN2GfMhkzjMaM2ddvdtv6hIrnjYrHsjstoZXahRfqKklLrsZUzqWyllIcq7OyLGpObZuMGfOmtGmP12rrNxj0G+qqY/86m8qhY3m2+ptqhX9/RyKRL6/emrBPVZSXqByVgIXQnVTy+f3/+d6Her3uxeefUe4eDIVCX3x5QzmBPfttnMDXWnNLRzAYfOG5Q8aMeAeNGDqWx4oFjkgk8q+/fM/lnvZ4vDqd7sjhvStVEnwD0J0SkpGevr66oqHx/q/e+cBiMWekp09OOYPBYFpa2tFn9hUl+8hz4HGza8eWkuLCopj3xUcxdCynlTzCMTo2EYlEcnKyXjx2WLmbCCtFb9BnZWVmLvbkD5WTrQi6U0KeP3qwdn1V450H/QNDE/apjIz0qsrSPTufSuhxSQv5BnQnfGPESRsKho5lsxwXjS4kFAp5ff6lPWeJJxbdCUASGDqWzUoGDgAA8IRY1nepAACAJxOBAwAASPe4PJYKwNeC1+ubsE8ZDPq83JxF3zIPAFEEjoQ1Nbef+viz6OMRAdmGR8b0Ol30BVFzHtC5kNGxiZ//22+EEP/j7/9Go1mCY5kzM4Ezn37e3NqpXPh18qVjy/N0tceEymrHN5vsbjBnZ/+GIXAAj7WBwZF///XvNBrN3/zoeyv4ZFIhxOlP/tjc2qnRaCorSjPS0/NkPlwceAI9Pju7JASOeK7duN3WYV1fXbFvz/av+1rwNaXX6zQajU6n1WlXcm+d9nibWzuFEK+/enz9uooVLAlWCiOVbI/Jzi7PN3OrlsqUwzkwOBx9zfHXei34mlpdkP/ffvxDrUaTkbHEb7lLyPi4XQih1+tIG08sRirZHpOdXR4CB/C4Mz8G7wIMBINCiPSlfrUvgNkeh51dHomBY8I+daPhbv/AkMfrSzfoi9cW7t65NfYlhHb71OVrtwYGhoKhUH5e7rYtG0tKis58ejHLYj5+7LAQordv8NrNO/l5OTu21V+4eHVwcGRt0epvnzyuzB4Kh+/ea3nQ3D7lcOr1+rVFq/fseip2LSoni/rozAWP1zc2NiGEsNr63n3/tFaref3hSr9aZih0veFua1uX2z1tNGasqyo/sHenwaBXXwlq1qK4eeuetad/dUH+Mwf3zP68p3fgesNdg15/8qXn0tLSlFLdvHWvvdPqcLi0Wm1BQd7WzRtqqitnz9Vt7W243ZSfm3302f2zP29ovN9t66uqKN25ffNCNbPoRom4TZZoQ8RfmvoFWnv6b92+PzI6HgyGLJnmyoqSp3dtMz58vaStt/9Gw72S4sKtmzdcuXbLauvz+fwWS2Zd7brdO7dqH73iUk0NK2UuXL1q/94dNxrutrZ3u1zuhTpJ/LI5HK5Pzl8SQrz52otpj76e2+v1Xbl2q9vW5/X6MjPNdTXr9uzauui7sBNtgqHhsUtXbno8XiGEz+d79/3TQojqqrLoy77VV8hCjRhLZR+LX8Pq95pYk5OOy9ca+vuHgsFQXl5OnBfaLVpUq63vZuP9osKCHds2X73eaLX1eTxes9m0oXbdnt3btBrNyOj49Zt3BgZHAsFgTrZlS33dU1s2JroWxaLDqWLJx0M1fWCOFRnTEu2H6rtB/Cptbu1oau5Yszr/8IFHNnZ62vPxJ5+npYmT3zpmMOgX2tk9Xt/1m7ettn73tEev0xYVrtm9c8vaojUJleFxICtwtLZ3nfr4fDAY1Ol0ZrPR4XTbJ9setHS8+tKxutp10cn6B4beee/DQCAohEg3GHp6B2w9/RXlJbae/uglaU6Xu7PLNjZmedDS4XZPCyEslq9evuDx+n77wen+gWEhhMlk9Lrc9smp5tbON157sbqqPLoWlZPNZuvtd7mmlavxHU6X0+WecwdgIBD81TsfDA6N6nS6cDjsnvaMjdt7+wZ+8PbrmocdZdFKWHQtUVmWzM4um62nb+/ubbPf6n63qbWzy7ahtlrpne5pzzvvnhobtwshMs0mr9fX0Wnr6LRtrq996fiRaA+ecrg6u2zTMa8YGB2b6OyyxX/Er5qWXajJkmiIOEtTv8Ar1259fum6EEKv1+n1+uGRseGRsabm9j9/6zXlyiyX093ZZZuacjQ03ne7pw16fTAUck97hoZHrba+77zxUjRzqKxhpcxOp8va0zcwOBKnkyxaNv/MTGeXTQgRiURmj0E+n/9ff/Wew+HS6XRCRNzTnuGRsS5rz/f+7JU4mSOJJvB4PF3dPcq/g8GQ8u/srMwkKmTeRoylvo/Fr2GVe02s/oHh/3zvw5lAQAiRbjD09g329A7MeypBfVHt9qk795pdrmmDQR8IBN3TnpHR8b6B4S31dac+PhcKhQ0G/cxMwO2e7h8YHhu3HztyIKG1CHXDqZAwHqrsA3OsyJiWUD9U3w0WrdL8vNzOLputp3/v7u2zf2+0tnd3dtlKiguVD+fd2ccnJn/9mz9MT3uEEGazyelyT045W9o6jx87NDsAJTe6LjMpgcPpdH14+nwwGDywb+f+p3dotdqZmcDZcxebmtvPnLu4vrpCGRCDwdAfPvosEAiWFBe+/OLR3NzsQCB4o+HOF1/ejF2mw+nKNJteeO5QUWFBdDw99dG5/oHh4rVrXjnxXG5udigUunSl4cq1Wx+dufDjH70d7cQqJ5vtb//6B0KIs+cuNt558NSWjSdeeCa2POFI+K03X64oL4lEInfutZw9d3FwaLSz01azvlJlJSy6lqjq6gpjRrrX52/vtG7eVKt8GI5ElNFfuTsxEom8/4ezY+P2osLVJ7/1XF5eTiQSae+0fnT6wv2mtryc7P17dybQivNR2bLRKprTZEk0RJylqVzg2Lj94uUbQogXnz+s7J8T9imlos5+evG7b74cXcX4xOTaojVvvflywaq8UCh0+27zuQuXbT39NxvuPr17WxI1PDo2YbGY43QS9WWL5Z725OVm/+B7r5UUF0Uikda2ro/OXujrH7p64/aBhRs6iSZYV1X+P//hx53dPe/+7uPMTPPf/fiH0T8lWiHzNuIcCfWx+DWsZq+JFQgE//DRuZlAoKS48OUTR3NzsgOBwI2Ge198eSOVotonpyorSr//3Vdzc7KDwdCV67cuX2no6u7ptvZWlpeceOGZrCyLz++/eOn6rdtNDY33n969zZJpVr8W9cPp0o6HSQ87KzimqemH6ruBUFGla1avKliVNzZu7+y2baz7U8dr6+gWC3dFIUQ4HP7g1CfT056qyrJvHX/WkmkOhcNXrzV+8eWNTz67VLy2cHVBvsoyJFFRS07Kk0YHBkeysyzrqysO7d+tNKfBoD9+7LBGo/F6fcMjY8pkza0dDqdLp9O98eqLubnZQgi9Xrd/705lcJ9Dq9V87zuv7NhWv7ZojXKMqKu7p9vWl5GR/sZrJ5TZtVrtMwf3FKzK83i8D1ralRlVTpYonU771puvVFaUpqWlaTSa7U9tKi8rFkL0DwwlVAkqaTWa2pp1QoiWtq7oh319g16vLyM9fV1VmRCiraO7f2BYp9P92bdP5OXlCCHS0tJq11c9d2S/EOLK9Uavz5fcxkYltFFzmizFhki6A9h6+iORyJrVq6K/BvLzcl547pAQwtrTHwqFoqswGjO+++ZLyi8YrVa7c/vmHdvqhRANt+8rv+0SreFFO4n6ssXS63VvvflKSXGRUowNddXKvQO3bjeFF3hB0pLvC4lWSGwjxkqoj8WvYTV7TawHLe0Op0uv17352oncHGVc0u/fu2PXji2pFNVkzHj95HFlgTqd9tD+3cVr1wghjMaMb588npVlEUJkpKc/f/SgyWSMRCL9/YmNJCqH0xXvA1ErOKap6Yfqu4HKKt20oUYI0dL6p431+ny9fYNarWbjwoGjubVzbNxusZhfP3lcCaBajebAvp0b66rD4XDjnQcJlWHFSQkcG+qq/+ov3nrztROzPzQY9MpxLY/3qy7Sbe0VQtSurzQ9epnMvD0gNyd7Vf4jx7IetHQIIepq1s25ymZDXbUQwtY7kNBkicrJzlr16LNZ8vNyxaytU1kJ6tVvrBFC2Hr6/P4Z5RMlHdesr1SGoZbWTiHEpg3rzY+eE6nfVGs2mwKBYGdXT6IrnSOhjZrTZCk2RNIdQLkYwuF0udzT0WlKS4r+4b//5d//3Y9m/74xm4wZj14UuXPbZiGE0+m2TzpE4jW8aCdRX7ZY2VmW7GzL7E+2bN4ghJie9ijn2mMt+b6QaIXENmKshPrYojW86F4Tq6u7VwhRV7MuehmNYs3Dn5LJFTUz0zzn2p2CVflCiPLS4tmfp6Wl5WRbhBDTHm9Ca1E5nK54H3hkmhUa09T0Q/XdQGWVbq6vTUtL67L2BgIB5ZP2Dms4HK6qKDNmZIgFPDwEUqPXP3I6YtvWTTXrK00Pyybpa27JSbxo1O+fae/oHhwenZ72BENh8XDfiL6fVhnECwsLklu+clbP5XJfvHR99ufj9kkhxNSUM6HJUqfVaoQQ4XB49oeLVoJ6ZaVrs7MtDocregSyo8smZh2OGxkdF0IoP5seKZhGU7imoKu7Z2R0PHroMhXJbdSSN4TKBdZUV+bmZE1OOX/2i3dqa6oqyksqyksyzaY5o/+88vJy0tMNfv+M3T6Vn5eTeg3P6SSplC2WJdNsMhk9Hq/dPjVval/yJpDX5ZLecebU8KJ7TawJ+6QQonCN2nEpxaLO+SIRQqSlJTOSqBxOH6s+8PiMabHUdwOVVWrJNJeVru3pHejo+uqsSlt7t3iYuhZc+JhdCFG4Zu7uXF5WrBzMS6gMK05W4HjQ0vHJZ1/4fP60tDSTyWjMSBfz7UJCCEtmZnKrUC6b77L2dll7Y/86MxNIaDIZ1FRCQjbVrb9yvbGlrWvzptqR0XGHw2U2myrKS5S/+pT6tMxTn1mWTCFE6qdURAobteQNoXKBBoP+h99/48urDXfuNd9rar3X1CqEKC0p2rdn+zoV11Jlmk1+/4x/ZkZIqOEUyzZvaT0er1LaWEveBJK63NLuOPH3mlhKPcS5llBeUVNZi8rh9HHrA4/DmDYv9d1AfZXWb6zp6R1oaevaWLd+ZiZg6+1PNxiUy7kWouzLi96OvoJfcwmREjgGh0ZOffyZEOLZw3u3b90UvVzln3/6S6fT/ad167RCCL/fn9xa0jRpQoh9T+8oKymK/ater09osiWnshISsnlT7ZXrjVZbn98/095hFULU1VRFL2ZW6tPnm6c+lQ8NKW9sKhu15A2hfoEmY8axIweOHN7b0ztg7envtvb29Q/9pv/jQ/t3H9i3yEVnyjiu1K2MGk6lbPMUw+8XQuh08+/XS94EMipkyXec+HtNrIfj0vyhTWpRU1mLyuH0cesDKz6mLUR9N1BfpRtqqz/57FJXd28gEOjosgWDoY316+OfOdV9dUVwcKnKsLKkBI4791oikcjm+tq9813+GZVlyRwbt09OOpJbiyUz0+l0a7Waqsr5L/5KaLIlp7ISEpKfn1u4pmB4ZKy909reaRWPHhnOzcl2Ot0TE5OxMyqHB3Nyvno4v0az4GgbXyobteQNkegCtVptVWVZVWXZ0Wf2KTejXr7asHP75jgP9ZuZCSin0rOzLCKRGk5UEmWLFQyG3G6PePjjL9aSN4GMClnyHSf+XhMrK8tin3TYJ6eWv6iprEXlcPq49YEVH9MWor4bqK9Sg0FfU13R3NrZ0WVra+8Si51PEULkZGc5nK7YZo1EIpFIRKSlKTfYr9TXXKKkXDSqXAE353EOMzOBGf8jB3ZKS9cKIVrauuac7PQ8vFoqvoqyYiHE/aa2UMwBzNmXa6mcbAHJd2KVlZDoWjZtXC+EuHnr3sjoeHaWRblJQaF0tfsP2ubcpDA0PDo6NiGEqK786ih9usEg5qtn32LHJxPZqLlSa4jkF/hv//G7f/o/v7hzr3n2BHt2PSWECIfDTteffiPG3hXS1NwWiUQMBr1y75n6GlZJfdlieby+YPCRAre0dYbDYb1eV7TAifwlb4IlrxCRWh9bSJy9JlZZ6VohRPSluFGemL1DRlFjLe1wuuTjYep9YGXHtIWo7wYJVamSMO43tXVZey2Z5tnXYcxLObukRLHZbt6697/+97+89/7pJMqwgqQEjtycLCHEg5YO97RH+cQ97Xnvg9PK8d7oKLmlvk6v1zmcrstXG6LzDo+MXb4yz3M4Yu3Yttmg1085nJ9duDy7TzTeefCTn/6y9eGtVionm5dyPZfT6VJTnjlUVkKia6nfUKPRaJR74TbMeuaPEGLblo0mk9HhdH3+xbXolvr8/rPnvhBC1NVURV95rFwJ5XC6lIfMKJqa29s65nbrpDcqVioNkcoCiwoLvD5/Q+N976wdr6PTJoTQajXKoQvF5JTzyrXG6P+6XO4r1xuFEPUba5XDnuprWCX1ZYvl8Xg/PH0+GpLc0x5lx9lYt36hI6hL3gRLXiEitT62kDh7TaytmzfodDqH45FxaWh49MrVW8tQ1FhLO5wu+XiYeh9Y2TFtIeq7QUJVWlVVbjIZu6y9gUBwY92Cj56LemrrxnSDoX9guKHxfvRD++TUtRu3hRAb66qTKMMKknJKZdeOLfeb2pxO97/8/NdFhavDofDQyGg4HFEepTf9cLfJNJuePbT30/OXLn15s629u2BVntvt6e0fXPTZzF/Nnml66cSR33947tbtpm5rn5IEBwaHR8cmTCZj9HlwKiebl/Ls2G5b3/9795ROq33j2yc0i/WPRCsh0bWYzabysmKrrU8IsenRw3EZGemvnDj629+fuXbjdld3T0lxUSAY7Lb2ejzevNyc2Q82zs3Nrqoo7bb1vffBmfKyYmNGxtj4xPjEpE6njT9Kqt+oWKk0RCoLPLhvV2dXz+jYxE9+9quqyjKT0WifnOrpHRBCPP3oIw61Ws3nl661tHWuLVozMzPT2d3j989YMs0H9+9KtIZVUl+2WCaTsa2j+59/OlhSXBgJR3p6B/wzM5lm0+FHHxSdRI2pt+QVIlLrYwuJs9fEsmSajxx+ZFxyuaf7+odim0NGUWMt7XC65ONh6n1gZce0hajvBglVqSYtbWNdtZIe6lXcX2M2GZ9/7uCHp89/ev5SU3P7mtX50x5vV3dvKBSqq6mKnpFZ8l1bEu0//uM/LvlCjRkZlRUlg0MjTpfb4XA5Xe5V+XknXz7m9fomJiYNBv2G2q9y2dqiNZmZpsHBkSmHa2zc7nJPb6it3rZ1U2d3j9FoVJ5+Pzo20dbRbTIZd2yb+4KPVfl55WXF9smp0bEJ5ZnQXp+/Zn3lGyeP5856lK/KyWLl5+c6ne6R0fEph9M+6Tiwd2daWtpC5em29g4OjawuyK+tqUqoEuZdS/wabu+w5uflxH615OZmV5SXTtgnlc0cHZuIRET9xppXXz425+78devKp6Yc4xOTUw7n+IQ9EAzu3L65eG1h/8Bw4ZqC9dUV865X5UYtVEXJNUSKHUCv12+sW+90ucYn7GNj9qHh0SmH02IxP3Pw6ehbtkdHx9s7rfl5Oc8/d7Cjy9bTOzA2bg+FQqXFRa+/enz2kQaVNayyk6gp27THqzze58C+rzqGUtrK8tKjz+yz9Qz0DwxP2KdCoVBJceHrr76Y8/DhHLEzJt0EQgj7pONBS4fBYFDO+CxVhcRKsY/NqeHZFtprYn01Lg2NTjmcyri0sa760IHdD5rbZ69RZVFHRsc7Om1msyn69hlFV3fP0PDomtWr5tyncPd+i8vlrqosK15bqH4tQt1wKpZ6PBSJDDtxLM+Ypr4fCtXdINEqNZmMd+41F6zKO3Rg95w/zbvPrlm9as3qVSOj48rCJ+xTGRnpB/buOHb04OxviqSbdTmlJfFACPWmHM7paY/ZZIp/3VA4HB6fmAyFQrm52Rnp6ddv3jn/+ZWiwtX/5c/fULkij9fncDi1Wm12liXO70KVk83hnva4XO7s7CyTccHHs8ShshLUr+XK9cbPv7h2cN+u6C/vWB6P1+F0aTSavNyc2Bv9/zSZ1zc5OaXT6Vbl56o8sKRQuVFx1ptEQ6S4wEAgaJ+cCgSCZpNxzh54v6n1wzMXVuXn/tVfvCWEsNunvD5fVpZFebTf/GtUV8MqxSnboiYnHR6vLysrM05pYy19EyxphYiU+9gcavaaOeaMS8tW1BTXon44XfLxMOk+8DiMaQtR3w2EhN1qNqfT5XJ7DAZ9fn5unKPgUsuQIrmvp8/JzlJeQLWQCfuUyZhhNGasnvX4tm5bn1jgeaMLMRkz1KQBlZPNkWk2xX+fWXyLVkJCa4lEIvebWsViV9qbTEY1vy1MxgyTsXDRyWKp3Ki4600mvaWyQL1ep7JTKQ9RXmSN6mpYJfVx7H64AAAgAElEQVRli5Wbm53EL5ilb4IlrRCRch+bTeVeM4dGo1kd81jJeS1hUVNZS6LD6ZKPh8n1gcdkTFuI+m4gJOxWs2VlWbLiXte1DGVIkdzAEZ/P7//P9z7U63UvPv9MaUmRECIUCn3x5Q3lZF6cFwE/sSKRyJdXb03YpyrKS9R8KQJ4Qvaar+lw+oS0DhQrGTgy0tPXV1c0NN7/1TsfWCzmjPT0ySlnMBhMS0s7+sy+hW7tezJFIpF//eV7Lve0x+PV6XRHDu9d6RIBj7snaq/52g2nT1TrQLGSgUMI8fzRg7XrqxrvPOgfGFKuhamqLN2z86nS+R6X9oQbHZuIRCI5OVkvHjus/kUPUENv0GdlZWYmcg0EvhaeqL3mazecPlGtAyH7olEsoVAo5PX5U7maBHjSsNc8zmidJw2BAwAASCflSaMAAACzETgAAIB0K3zR6JPJ6/VN2KcMBn1ebo7yEmTga4GuCyBpX5vAMTo28fN/+40Q4n/8/d9oNF/XAzMzM4Ezn34efQPhyZeOqX8S0ZynYT6GmprbT3382eNcwidW6rtPKl13ZS15txweGdPrdEm8lw54wn1tAsc3w+lP/tjc2qnRaCorSjPS0/Mem0fcA/HRdRUDgyP//uvfaTSav/nR95bh6aLANwmBY/lMe7zNrZ1CiNdfPb5+XcVyrvrajdttHdb11RXRV4I9bgtcwbU8sdRX7wp23YQsQ4fR63UajUan0+q0DJ5AYthnls/4uF0Iodfrln/InnI4BwaHl/AlxUu+wBVcyxNLffWuYNdNyDJ0mNUF+f/txz/UajQZGYu8xwvAHASO5RMIBoUQ6Yu9bxB43NB1ZzMv6TvqgCeHxMARCoVu3rrX3ml1OFxarbagIG/r5g011ZWzp+ntG7x2805+Xs6ObfUXLl4dHBxZW7T62yePL+1aFNae/lu374+MjgeDIUumubKi5Old24yPvlVPzTRJlGFoeOzSlZsej1cI4fP53n3/tBCiuqps+1P1Cy1zctJx+VpDf/9QMBjKy8uJ8+6lCfvUjYa7/QNDHq8v3aAvXlu4e+fW6MshPzpzweP1jY1NCCGstr533z+t1Wpen1XD8WePtegClQq53nC3ta3L7Z42GjPWVZUf2LvTYNAvYbFns9r6bjbeLyos2LFt89XrjVZbn8fjNZtNG2rX7dm9TavRjIyOX795Z2BwJBAM5mRbttTXPbVlY0LVePPWPWtP/+qC/GcO7pk9V0/vwPWGuwa9/uRLz6XFvDA6fvcOhcN377U8aG6fcjj1ev3aotV7dj0VW/Px+2S3tbfhdlN+bvbRZ/fPnquh8X63ra+qonTn9s2xNaa+euN03Thbp2avXJJWS2iL1HTLRRvF4XB9cv6SEOLN115UWlz9IJZQY6kZi1R2IeAxIStwuKc977x7amzcLoTINJu8Xl9Hp62j07a5vval40eiQ7PT5e7sso2NWR60dLjd00IIiyWB91moXIsQ4sq1W59fui6E0Ot1er1+eGRseGSsqbn9z996LXrll5ppkiuDx+Pp6u5Rpg8GQ8q/s7MyF1pm/8Dwf7734UwgIIRINxh6+wZ7egfmPVDc2t516uPzwWBQp9OZzUaH022fbHvQ0vHqS8fqatcJIWy9/S7XtHJngcPpcrrcs+9mXHT2WPEXKIQIBIK/eueDwaFRnU4XDofd056xcXtv38AP3n5d87BFUiz2HEovstun7txrdrmmDQZ9IBB0T3tGRsf7Boa31Ned+vhcKBQ2GPQzMwG3e7p/YHhs3H7syAH19ZBlyezsstl6+vbu3paebojOeLeptbPLtqG2OjZtiLjd2+P1/faD0/0Dw0IIk8nodbntk1PNrZ1vvPZidVV5dAmL9skph6uzyzZduHrOqkfHJjq7bAs9NFp99cbpugttXUL7fiqtltAWqemWahrFPzPT2WUTQkQiEWVb1A9i6htLzViksgsBjw8pgSMSibz/h7Nj4/aiwtUnv/VcXl5OJBJp77R+dPrC/aa2vJzs/Xt3zp7e4XRlmk0vPHeoqLBAq1V7c7/6tYyN2y9eviGEePH5w8qhggn7lDLv2U8vfvfNl1VOk3QZ1lWV/89/+HFnd8+7v/s4M9P8dz/+YZztCgSCf/jo3EwgUFJc+PKJo7k52YFA4EbDvS++vDFnSqfT9eHp88Fg8MC+nfuf3qHVamdmAmfPXWxqbj9z7uL66gqtVvu3f/0DIcTZcxcb7zx4asvGEy88k9DsscWLs0CFw+kKR8JvvflyRXlJJBK5c6/l7LmLg0OjnZ22mvWVqRd7IfbJqcqK0u9/99XcnOxgMHTl+q3LVxq6unu6rb2V5SUnXngmK8vi8/svXrp+63ZTQ+P9p3dvs2SaVZanurrCmJHu9fnbO62bN9UqawxHIsoXcPwbROft3qc+Otc/MFy8ds0rJ57Lzc0OhUKXrjRcuXbrozMXfvyjt5VMk1yfVEN99S7adedsXaL7ftKtlugWLdothbpGWUhyg9i8VLZ7KqUFVoSUB1q0dXT3DwzrdLo/+/aJvLwcIURaWlrt+qrnjuwXQly53uj1+WZPr9VqvvedV3Zsq19btEb98UD1a7H19EcikTWrV0VPTOTn5bzw3CEhhLWnPxQKqZwm9S1V40FLu8Pp0ut1b752IjcnWwih1+v3792xa8eWOVMODI5kZ1nWV1cc2r9bGeMMBv3xY4c1Go3X6xseGYu/ohRnX4hOp33rzVcqK0rT0tI0Gs32pzaVlxULIfoHhqSu12TMeP3kcaXGdDrtof27i9euEUIYjRnfPnk8K8sihMhIT3/+6EGTyRiJRPr7EyiPVqOprVknhGhp64qusa9v0Ov1ZaSnr6sqi1Ow2O7d1d3TbevLyEh/47UTubnZQgitVvvMwT0Fq/I8Hu+DlnZlxuT65DKbs3WJ7hFJt1qiFu2WKhtFZT0kV0iFmnZPsbTAipByhKOltVMIsWnDevOjR3TrN9V+fun69LSns6sn+jNRCJGbk70qP+ELy9WvRTnx6XC6XO7p6M+j0pKif/jvfymEUL5j1EyT+paq0dXdK4Soq1k353ztmoL8OVNuqKveUFc950ODQZ9pNjldbo93kayT4uwLycnOWvXoM5Hy83J7egeiC5S03sxM85zz8QWr8gcGR8pLi2d/npaWlpNt8Xi80x5vQuWp31hz516zrafP759Rfj62dXQLIWrWV8b/RRvbvR+0dAgh6mrWzbn8cENd9djlG7beAeXinuT65DKbs3WJ7hFJt1qiFu2WKhtlIckNYvNS0+4plhZYEVICx8jouBBC+aUym1ajKVxT0NXdMzI6nujXcCprqamuzM3Jmpxy/uwX79TWVFWUl1SUl2SaTbNHNDXTLM+WTtgnhRCFawpUTu/3z7R3dA8Oj05Pe4KhsBBCGUNVvgc4xdnV0Go1QohwOLwi69Xr53bytLRkylNWujY72+JwuKJnVTq6bGKx8ynzUq5vcLncFy9dn/35uH1SCDE15VT+N7k+ubJS3yMSarVUzOmWKhtlGahp98entIB6UgKHzz8jhLBY5rkoMsuSKYRI4kRDKmsxGPQ//P4bX15tuHOv+V5T672mViFEaUnRvj3b1z28ukrNNKmUQb2ZmYBQffHsg5aOTz77wufzp6WlmUxGY0a6SGRQTnH2pK3UelMsz6a69VeuN7a0dW3eVDsyOu5wuMxmU0V5SaKrU2766LL2dll7Y/+qdACRbJ9cWcuz78ugslGWgZp2f3xKC6gnJXAo14f7fP7YPykfGvRL8BMtobWYjBnHjhw4cnhvT++Atae/29rb1z/0m/6PD+3ffWDfTvXTpFKGhLbL759ZdMrBoZFTH38mhHj28N7tWzdFLxP755/+0ul0y549aSu13tTLs3lT7ZXrjVZbn98/095hFULU1VTNe39KfGmaNCHEvqd3lJUUxf5Vn2C/fawsz74vg/pGWQaLtvtjVVpAJSmBIzcn2+l0T0xMxv5JOV+Qk7ME7yBIYi1arbaqsqyqsuzoM/uUG88uX23YuX3z7IcGqpkmlTIsKivLYp902CenFp3yzr2WSCSyub527+5tia4l9dmTtlLrXYj68uTn5xauKRgeGWvvtLZ3WkVS51OEEJbMTKfTrdVqqirjXW0aFadPajQJxx2plmfflyHRRklCoo0Vp92XobTAkpNyl4qyD9x/0BZ+9Hz80PDo6NiEEKK6cgkOCKtfy7/9x+/+6f/84s695tmT7dn1lBAiHA47XW6V06RSBvXKStcKIaKv5YzyxByLdrmnhRBznrUwMxOY8cceUJ1npEtk9ljJf8+lWOwll1A9bNq4Xghx89a9kdHx7CxLSfE8vy8XVVFWLIS439QWijlrM/uaWTV9Mt1gEA8PsM/mU3XmYumrd3n2/YUlv0UqGyUVKhtLTbsvQ2mBJSclcGzbstFkMjqcrs+/uBb91vT5/WfPfSGEqKupWpI3O6tfS1Fhgdfnb2i87521K3Z02oQQWq0mO8uicprl2dKtmzfodDqHw3X5akP0w6Hh0StXb82ZMjcnSwjxoKXDPe1RPnFPe9774LTP7xdCBIN/um1SuQTP6XQlN3useReoUorFXnIJ1UP9hhqNRqPcK7thgWejLWrHts0GvX7K4fzswuXZsbLxzoOf/PSXrQ/vvFXTJ5WLix1Ol/I0KkVTc3tbh3XRYsio3uXZ9xeSyhapbJRUqGwsNe2uvrQtbV1Nze1LeC02kDQpp1QyMtJfOXH0t78/c+3G7a7unpLiokAw2G3t9Xi8ebk5x48dXua1HNy3q7OrZ3Rs4ic/+1VVZZnJaLRPTvX0Dgghnn744Eg10yzPlloyzUcO7/30/KVLX95sa+8uWJXnck/39Q/FlmHXji33m9qcTve//PzXRYWrw6Hw0MhoOBxRHs44/fDrUwixtmiNEKLb1vf/3j2l02rf+PYJTVqa+tljzbtAlRuYYrFVrkW9hOrBbDaVlxVbbX1CiE0ba5JbY2am6aUTR37/4blbt5u6rX3KZacDg8OjYxMmkzH6SFk1fTI3N7uqorTb1vfeB2fKy4qNGRlj4xPjE5M6nTZ+ZBRyqnd59v2FpLJFKhslFSobS027qyxtX//QB6c+EUIYDPp5X/gALCdZjzavqix7+zuvnv/8S+WBxEIInU63pb7uyOG9pqV79ZHKtZhMxh++/fq5C5faO63R7G+xmPfu3h59eYGaaZZtS3du36zVai5evjE6NjE6NqHRaDbWVddvqv3Nbz+aPVluTvb3vvPKx2f/ODo2oYxHqwvyjx090NB4v629u29gKPqssNqaqi31dfeaWm09/UIIEYmItDT1s8ead4Eqty7FYidSkUtcHkX9xhqrrS8/LyeV5zvV1ax7+zumP35xtX9geHLKIYTQaDS1NVXHnt2f9fBwmso+efLlY2c++by1vVupJb1et3vnVo1Gc+3G7fhlkFS9y7PvzyvFLVLTKClS01gq211NaTMzTXq9LhKJZM133xCwzNJkH2rzeLwOp0uj0eTl5sTeW7/MawkEgvbJqUAgaDYZlcfzJTdNKmVQLxwOj09MhkKh3NzsjLgv6pxyOKenPWaTKf4Vee5pj8vlzs7OMj36SDGVs6tfoEopFnvJqSzPleuNn39x7eC+XQf370p9pR6vz+FwarXa7CzLQgfS1PRJj9c3OTml0+lW5ecm9EwwedW7PPt+rNS3SE2jpEJlY6kci+KX1u+fiYhI/AEEWB7SAwfwTRKJRH72r+9M2Kf+5r9+T3l0NwBADSkXjQLfSJFI5MurtybsUxXlJaQNAEjI8h3nBL6+IpHIv/7yPZd72uPx6nS6I4f3rnSJAOBrhsABqDI6NhGJRHJysl48dlj9m24AAAqu4QBUCYVCXp9/zvPBAAAqETgAAIB0XDQKAACkI3AAAADpCBwAAEA6AgcAAJCOwAEAAKQjcAAAAOkIHAAAQDoCBwAAkI7AAQAApCNwAAAA6QgcAABAOgIHAACQjsABAACkI3AAAADpCBwAAEA6AgcAAJCOwAEAAKQjcAAAAOkIHAAAQDoCBwAAkI7AAQAApCNwAAAA6QgcAABAOgIHAACQTjc4OLjSZQAAAN9wuowM80qXAQAAfMNxSgUAAEhH4AAAANIROAAAgHQEDgAAIB2BAwAASEfgAAAA0hE4AACAdAQOAAAgHYEDAABIR+AAAADSETgAAIB0BA4AACAdgQMAAEhH4AAAANIROAAAgHQEDgAAIB2BAwAASEfgAAAA0hE4AACAdAQOAAAgHYEDAABIR+AAAADSETgAAIB0BA4AACAdgQMAAEhH4AAAANIROAAAgHQEDgAAIB2BAwAASEfgAAAA0hE4AACAdAQOAAAgHYEDAABIR+AAAADSETgAAIB0BA4AACAdgQMAAEhH4AAAANIROAAAgHQEDgAAIB2BAwAASEfgAAAA0hE4AACAdAQOAAAgHYEDAABIR+AAAADSETgAAIB0BA4AACAdgQMAAEhH4AAAANIROAAAgHQEDgAAIB2BAwAASEfgAAAA0hE4AACAdAQOAAAgHYEDAABIR+AAAADSETgAAIB0BA4AACAdgQMAAEhH4AAAANIROAAAgHQEDgAAIB2BAwAASEfgAAAA0hE4AACAdAQOAAAgHYEDAABIR+AAAADSETgAAIB0BA4AACAdgQMAAEhH4AAAANIROAAAgHQEDgAAIB2BAwAASEfgAAAA0hE4AACAdAQOAAAgHYEDAABIR+AAAADSETgAAIB0BA4AACAdgQMAAEhH4AAAANIROAAAgHQEDgAAIB2BAwAASEfgAAAA0hE4AACAdAQOAAAgHYEDAABIR+AAAADSETgAAIB0BA4AACAdgQMAAEhH4AAAANIROAAAgHQEDgAAIB2BAwAASEfgAAAA0hE4AACAdAQOAAAgHYEDAABIR+AAAADSETgAAIB0BA4AACAdgQMAAEhH4AAAANIROAAAgHQEDgAAIB2BAwAASEfgAAAA0hE4AACAdAQOAAAgHYEDAABIR+AAAADSETgAAIB0BA4AACAdgQMAAEhH4AAAANIROAAAgHQEDgAAIB2BAwAASEfgAAAA0hE4AACAdAQOAAAgHYEDAABIR+AAAADSETgAAIB0BA4AACAdgQMAAEhH4AAAANIROAAAgHQEDgAAIB2BAwAASEfgAAAA0hE4AACAdAQOAAAgHYEDAABIR+AAAADSETgAAIB0BA4AACAdgQMAAEhH4AAAANIROAAAgHQEDgAAIB2BAwAASEfgAAAA0hE4AACAdAQOAAAgHYEDAABIR+AAAADSETgAAIB0BA4AACAdgQMAAEhH4AAAANIROAAAgHQEDgAAIB2BAwAASEfgAAAA0hE4AACAdAQOAAAgHYEDAABIR+AAAADSETgAAIB0BA4AACAdgQMAAEhH4AAAANIROAAAgHQEDgAAIB2BAwAASEfgAAAA0hE4AACAdAQOAAAgHYEDAABIR+AAAADSETgAAIB0BA4AACAdgQMAAEhH4AAAANIROAAAgHQEDgAAIB2BAwAASEfgAAAA0hE4AACAdAQOAAAgHYEDAABIR+AAAADSETgAAIB0BA4AACAdgQMAAEhH4AAAANIROAAAgHQEDgAAIB2BAwAASEfgAAAA0hE4AACAdAQOAAAgHYEDAABIR+AAAADSETgAAIB0BA4AACAdgQMAAEhH4AAAANIROAAAgHQEDgAAIB2BAwAASEfgAAAA0hE4AACAdAQOAAAgHYEDAABIR+AAAADSETgAAIB0BA4AACAdgQMAAEhH4AAAANIROAAAgHQEDgAAIB2BAwAASEfgAAAA0hE4AACAdAQOAAAgHYEDAABIR+AAAADSETgAAIB0BA4AACAdgQMAAEhH4AAAANIROAAAgHQEDgAAIB2BAwAASEfgAAAA0hE4AACAdAQOAAAgHYEDAABIR+AAAADSETgAAIB0BA4AACAdgQMAAEhH4AAAANIROAAAgHQEDgAAIB2BAwAASEfgAAAA0hE4AACAdAQOAAAgHYEDAABIR+AAAADSETgAAIB0BA4AACAdgQMAAEhH4AAAANIROAAAgHQEDgAAIB2BAwAASEfgAAAA0hE4AACAdAQOAAAgHYEDAABIR+AAAADSETgAAIB0BA4AACAdgQMAAEhH4AAAANIROAAAgHQEDgAAIB2BAwAASEfgAAAA0hE4AACAdAQOAAAgHYEDAABIR+AAAADSETgAAIB0BA4AACAdgQMAAEhH4AAAANIROAAAgHQEDgAAIB2BAwAASEfgAAAA0hE4AACAdAQOAAAgHYEDAABIR+AAAADSETgAAIB0BA4AACAdgQMAAEhH4AAAANIROAAAgHQEDgAAIB2BAwAASEfgAAAA0hE4AACAdAQOAAAgHYEDAABIR+AAAADSETgAAIB0BA4AACAdgQMAAEhH4AAAANIROAAAgHQEDgAAIB2BAwAASEfgAAAA0hE4AACAdAQOAAAgHYEDAABIR+AAAADSETgAAIB0BA4AACAdgQMAAEhH4AAAANIROAAAgHQEDgAAIB2BAwAASEfgAAAA0hE4AACAdAQOAAAgHYEDAABIR+AAAADSETgAAIB0BA4AACAdgQMAAEhH4AAAANIROAAAgHQEDgAAIB2BAwAASEfgAAAA0hE4AACAdAQOAAAgHYEDAABIR+AAAADSETgAAIB0BA4AACAdgQMAAEhH4AAAANIROADg/2/vjn6iOvM4DnOSOl4AaWmCGMuwgqZqE3AT08KqbVxN2itJ6j+8m6ZWCIXsSrdCap3EGWJHU6GRMXG8OHtB0lB1G3X4OszZ57mcwJvfxQAfzjvnvECc4AAA4gQHABAnOACAOMEBAMQJDgAgTnAAAHGCAwCIExwAQJzgAADiBAcAECc4AIA4wQEAxAkOACBOcAAAcYIDAIgTHABAnOAAAOIEBwAQJzgAgDjBAQDECQ4AIE5wAABxggMAiBMcAECc4AAA4gQHABAnOACAOMEBAMQJDgAgTnAAAHGCAwCIExwAQJzgAADiBAcAECc4AIA4wQEAxAkOACBOcAAAcYIDAIgTHABAnOAAAOIEBwAQJzgAgDjBAQDECQ4AIE5wAABxggMAiBMcAECc4AAA4gQHABAnOACAOMEBAMQJDgAgTnAAAHGCAwCIExwAQJzgAADiBAcAECc4AIA4wQEAxAkOACBOcAAAcYIDAIgTHABAnOAAAOIEBwAQJzgAgDjBAQDECQ4AIE5wAABxggMAiBMcAECc4AAA4gQHABAnOACAOMEBAMQJDgAgTnAAAHGCAwCIExwAQJzgAADiBAcAECc4AIA4wQEAxAkOACBOcAAAcYIDAIgTHABAnOAAAOIEBwAQJzgAgDjBAQDECQ4AIE5wAABxggMAiBMcAECc4AAA4gQHABAnOACAOMEBAMQJDgAgTnAAAHGCAwCIExwAQJzgAADiBAcAECc4AIA4wQEAxAkOACBOcAAAcYIDAIgTHABAnOAAAOIEBwAQJzgAgDjBAQDECQ4AIE5wAABxggMAiBMcAECc4AAA4gQHABAnOACAOMEBAMQJDgAgTnAAAHGCAwCIExwAQJzgAADiBAcAECc4AIA4wQEAxAkOACBOcAAAcYIDAIgTHABAnOAAAOIEBwAQJzgAgDjBAQDECQ4AIE5wAABxggMAiBMcAECc4AAA4gQHABAnOACAOMEBAMQJDgAgTnAAAHGCAwCIExwAQJzgAADiBAcAECc4AIA4wQEAxAkOACBOcAAAcYIDAIgTHABAnOAAAOIEBwAQJzgAgDjBAQDECQ4AIE5wAABxggMAiBMcAECc4AAA4gQHABAnOACAOMEBAMQJDgAgTnAAAHGCAwCIExwAQJzgAADiBAcAECc4AIA4wQEAxAkOACBOcAAAcYIDAIgTHABAnOAAAOIEBwAQJzgAgDjBAQDECQ4AIE5wAABxggMAiBMcAECc4AAA4gQHABAnOACAOMEBAMQJDgAgTnAAAHGCAwCIExwAQJzgAADiBAcAECc4AIA4wQEAxAkOACBOcAAAcYIDAIgTHABAnOAAAOIEBwAQJzgAgDjBAQDECQ4AIE5wAABxggMAiBMcAECc4AAA4gQHABAnOACAOMEBAMQJDgAgTnAAAHGCAwCIExwAQJzgAADiBAcAECc4AIA4wQEAxAkOACBOcAAAcYIDAIgTHABAnOAAAOIEBwAQJzgAgDjBAQDECQ4AIE5wAABxggMAiBMcAECc4AAA4gQHABAnOACAOMEBAMQJDgAgTnAAAHGCAwCIExwAQJzgAADiBAcAECc4AIA4wQEAxAkOACBOcAAAcYIDAIgTHABAnOAAAOIEBwAQJzgAgDjBAQDECQ4AIE5wAABxggMAiBMcAECc4AAA4gQHABAnOACAOMEBAMQJDgAgTnAAAHGCAwCIExwAQJzgAADiBAcAECc4AIA4wQEAxAkOACBOcAAAcYIDAIgTHABAnOAAAOIEBwAQJzgAgDjBAQDECQ4AIE5wAABxggMAiBMcAECc4AAA4gQHABAnOACAOMEBAMQJDgAgTnAAAHGCAwCIExwAQJzgAADiBAcAECc4AIA4wQEAxAkOACBOcAAAcYIDAIgTHABAnOAAAOIEBwAQJzgAgDjBAQDECQ4AIE5wAABxggMAiBMcAECc4AAA4gQHABAnOACAOMEBAMQJDgAgTnAAAHGCAwCIExwAQJzgAADiBAcAECc4AIA4wQEAxAkOACBOcAAAcYIDAIgTHABAnOAAAOIEBwAQJzgAgDjBAQDECQ4AIE5wAABxggMAiBMcAECc4AAA4gQHABAnOACAOMEBAMQJDgAgTnAAAHGCAwCIExwAQJzgAADiBAcAECc4AIA4wQEAxAkOACBOcAAAcYIDAIgTHABAnOAAAOIEBwAQJzgAgDjBAQDECQ4AIE5wAABxggMAiBMcAECc4AAA4gQHAFEE+zcAAAV6SURBVBAnOACAOMEBAMQJDgAgTnAAAHGCAwCIExwAQJzgAADiBAcAECc4AIA4wQEAxAkOACBOcAAAce81m81+zwAAVJwrHABAXPHgwa/9ngEAqDhXOACAOMEBAMQJDgAgTnAAAHGCAwCIExwAQJzgAADiBAcAECc4AIA4wQEAxAkOACBOcAAAcYIDAIgTHABAnOAAAOIEBwAQJzgAgDjBAQDECQ4AIE5wAABxggMAiBMcAECc4AAA4gQHABD3Xr8HIGhj48dWq3nmzLl6farfswDwf01wVFO7/cvy8q1O50lZlo8eta9f/3pkZLTfQwH8webmnWbzfo+L1OtTZ86cO5B5iBIcVdPp7K6urmxtNcuy3HulLMtOpyM46EWns9tqNR8+bD958mRn53FRFO+/PzY6Onrs2MTkZH14eKTfAzJ4NjfvrK2t/P6b6q09etQuy/Ls2U8OZCpyBEd1dLvdzc076+v/6vcgVEqns7u+fvvevZ+KothfsTs7j3d2Hrda99fWVk6ePDU3d1528Eaazfu918bQ0FBZlltbzTNnzhVF0ftq5AiOimi1mmtrK53Obr8HoVJarebS0s3nz7tDQ0Ov/Nuw92KjcXdrqzk/f9GnhYD/RXAMvO3tx6urK3sXFfs9C5XSaPx869a3r/nF3e6zb7/95/z8pZmZU9GpgAElOAZYt9v94YfbGxv/6fcgVFCr1Xz92thTluXy8s0jR464zgG8THAMqkbj59XVlb1r3XCwOp3dpaWbb/GNZVkuL383NjbmQ8rACwTH4Gm3f1ldXfntt217KISsr99+65btdp+tr99eWLjoE3zAfoJjkOzdL9Bo3JUa5HQ6u/fu/dTLCo3G3dnZORc5gP0Ex8BYX//35uad58+7aoOoVqu5/w7Yt17EcxGA/QTHANj/2NB+z0L1tdsHcMdTu932XARgP8FxqHW73W+++YdbXnmXDuRpLk+fdnpfBKgSp8Ueamtr36sN3rHt7V8PySJAlQiOw05t8I7ZBwESBMehduHCpx995BlKvFMffPBh74uMjR3AIkCVCI5D7ciRI198ceXata8ci8U7cyBvtuFh98QCfyA4DruiKCYmji8u3pid/WutdrTf41B9x44d631XZXx83NYMsJ/gGAxFUczOnl9cvDE9fbrfs1BxB3ISiuNUgBcIjkFSq9UWFi5eu/bVxMTxfs9CZQ0Pj5w82dOJr9PTp20CAi8QHANmb4fl6tUvFxYu22EhZG7u/Fu/u2q1o7Ozc/ZTgBcIjoFUFMXMzKnFxRsff+xhjhy84eGR+fm3PH3ts8/+5hQV4GWCY4DVarULFz69fv1rOywcuHp9an7+0ps2x/z8JZ/eAF5JcAy2oihGRkavXv3y88//btecgzUzc+ry5SuvubdSqx29fPnKzMwpl9yAV3KWShUURVGvT01MHN/cvLO5eafbfdbviaiIen1qbGxsff12o3H3T75sevq08+iBPyc4qqNWq83Onp+enlld/X5r636/x6EiRkZGFxYuzs7OtVrNdrv99Onu9vbjoaGhsbEPh4dHx8fH6/Wp4eERFzZ4U5OT9YM6K+rEiUnvwMOvePDAGUtVU5blw4ftpaWbvx/7ubh4w3+f9O7lvw1+y9OLjY0ft7aaPS5y4sTk2bOfeCsefoKjssqybDTuNZv3p6dnpqb+0u9xAF6h9yscUmNQCI6KK8vSTyMAfeculYpTGwAcBoIDAIgTHABAnOAAAOIEBwAQJzgAgDjBAQDECQ4AIE5wAABxggMAiBMcAECc4AAA4gQHABAnOACAOMEBAMQJDgAgTnAAAHGCAwCIExwAQJzgAADiBAcAECc4AIA4wQEAxAkOACBOcAAAcYIDAIj7Lyi8oIvi29XbAAAAAElFTkSuQmCC)
- Enable all permissions for the application
![Screenshot_20230720-211459[1].png](data:image/png;base64,iVBORw0KGgoAAAANSUhEUgAAAtAAAAWgCAIAAAD4sOOEAAABDWVYSWZNTQAqAAAACAAFAQAAAwAAAAEC0AAAAQEAAwAAAAEFoAAAATEAAgAAACQAAABKh2kABAAAAAEAAABuARIAAwAAAAEAAAAAAAAAAEFuZHJvaWQgU1AzMTE1LVN1bm1pLTIwMjIwODMwMTIyNDU0AAAEkAMAAgAAABQAAACkkpEAAgAAAAQ2NjUAkBEAAgAAAAcAAAC4kggABAAAAAEAAAAAAAAAADIwMjM6MDc6MjAgMjE6MTQ6NTkAKzAyOjAwAAADAQAAAwAAAAEC0AAAATEAAgAAACQAAADpAQEAAwAAAAEFoAAAAAAAAEFuZHJvaWQgU1AzMTE1LVN1bm1pLTIwMjIwODMwMTIyNDU0AJPhCb4AAAABc1JHQgCuzhzpAAAAA3NCSVQICAjb4U/gAAAgAElEQVR4nOzdd3wTR9oH8FlVS7Kau00zxTaYYkzvpiUYCJAQEkiD9E46F0IupCd3AdJ7QnIh4d70AwIJCYReQ7NNMTYYdxt3NUtW3fePgY2QJVmSLcuG3/eTz72r3dnRs5Jf5tHszCwziMcnAAAAAMHEC3UAAAAAcPlDwgEAAABBh4QDAAAAgg4JBwAAAAQdEg4AAAAIOiQcAAAAEHRIOAAAACDokHAAAABA0CHhAAAACJZhGRnZdpvzf8MyMkIdVGgg4QAAAICgY7C0OQAAQNuas2jRrIULCSEKlTJl8GDnQ3lZWTqNlhDyy5o167/6KjTxhQISDgAAuNKlDE5LHjgoITGR22PQavOysg7v2hVYhXvr68KVSuc9z91x54Y1a4ZlZLz9809ylYoQotdoxkVGea8nTCodnpERnZBgbmrKy846e+Kkl8JDJ4zv1ruPpanpxKFDJWfPui3Tf/iwfulDTAbDvi1bGmpq/LysVgl9wiEQClPSBmUuWKBQq70UYx2OiuKS/33xRU1FRQDvkpiSkjxoUHlR4clDhwOL84NNG8dlZj4y59qdGzcGVsMz77274MEH335m2ZdvvOEpQkLIga1bdQ0NbmsYlpERERPTqNPt/f33wGIAAADOsIyMWx59ZHhGBs0A3Nq2fv32des3rFnjV83ZdhshZMOaNRVFRYSQvKzsbevX00OT58yZdO2c2QsXEkLS+AJPNYRJpUveXDXjppuk4eHczvyc4+8uW7b7t99cCl9/9913L3smoUcP+tLhcBzZtfuNJx7Pz85xLrbqh++nXHcdwzCEEL1G8/ojj25au9av62oNj5fabsKVyruWLh1z9dUSmcxLMZZlNbW1UXGx7z+33FN77MWkOXMee/21jd988+yi2wOPNZhohISQ959b/tlrrzUvIJPLV/3wvSoysjg/f3a/1HYPEADg8jF74cL7lz+XkJhIW9/DO3cd2bWTZdm87BxCSEraIEJIyuDBwzMyJs+ZM2n27PuXP7dhzZqPX3rZr3dZ/5+vDu/cyb1MSEysKCratn69TqOhCYcnAqHwo19/HTJ+nMv+5EEDV/3w/RPzbtizeTO387bHH39yxRv0Qigejzd8YsbHv/1256TJRXl5dOc9y5ZNnTtXW1//27ffdu3Va1xm5j/eXHV4586qsjJaYNZtt/3y9dd+XaBfQp9wSKTSsdOmNZlMry9+xEsxqVw+7557pt1wQ9m5wjVvvtlu4bW/zPnz3SYc195xhyoysv3jAQC4nCQkJr60+vNhGRkMw+Rn56x99106kIJlWa7MtnXrCCG0CZ80e/bs2xdNmj37geefnzR79vK7787Lyg7gfVWRkQk9etAOjxbd++wymm1UlZW9++w/92/Z0iM56ck3VgwYMVwskTzwwgtcwhEZG/vA8ucYhrHbbJ+88up3H34Y07XLkytWjJoyJTI29tHXX3t87vW05ISZMwkhn77y6jfvvEMI+eHYseRBA8dNn/7TZ58RQu5+5pnFr7w8YMRw721xa4Q+4SAMEyaV1tfUeB87I5ZITAbD0nffufb2288cP75/y5Z2C7A9mU2mPgP6j7n66n1//OFyaMZNN7Esa7NaQxIYAMDl4ZZHFg/LyKgsKVl+512Hd+50zjMSEhMTuncnhOh12rysbHpo2/r12zdsSEhMfGn16mEZE1754ssbhw51PstHD7304u/f/+Bj4cz58wkhLMu+8uBDuzZtIoTUVVUtvfXWn7KzxBJJ6pD0cKXSoNUSQq659VaZQkEI2fLTT5+8/DIhRFNXt2T+gl/yTqsiI8defbVCraa3BaLiYgkhZ44fp29RXlSYPGhgfPduhJDuffrc/tSTRoPhx08/9fe6fNcBEg7fWJqadm7a1Dd98Lx771305BNnT54MbDCHFwKhcNGTT6aPGxsRHV1fU7Pnt83ffvCBSxm+QLD4lZeHjp8gloQV5ef/Z+VKl1T3quuvv+a2W2O7dNFrtfu3bF3z5pt+pQiHdu4cl5l53V13uiQcg0aN7D98WM6Bg30G9Pc95ruWLk0ZnPbOM8umzp07fsYMiUxWdq7gyxUrTh/L8v2qw6TSe5Y9M2xChlAsOpeb+5+VK+fedZdILH7lwYd8uWoaw9dvvTX3rrtS0tJ+/e//0eQaACAkVj75VH52zvYNG2gzLFepZt122+Rr5zRfHuPwzl3b16/fvmFDRVFReWHh3VOmzF64cPuGDQFkG6qoqBvvv9/HhEMcFtatTx9CiKa2lmYbVGlBQWVJSWJKCo/PV6jVNOFIHTqEHt27+e+xfbqGhhOHDo3LzBRLJIPHjKGVGHR6GgktI5PLCSEGrY4Q8tSqlXKV6tNXXz1z/IS/l+a7TpNwsCyrra//8bPPUtIGp40efdtjj37w/Atmk6mt6o+Kj/9o06bktEHnS0vrqqrSRo0aP336xNmz7p+W6VxsyZurouPjK0tKwhWK1KFDx2VmPjxrVvb+A/To02+/ddPDD5saGyuKilOHDBkxaVL62DGLZ8/xPYy8rKzeqanjMjMjY2Prqqq4/fPuvZdhmE1r1z61aqXvMQ8ZP25cZmZC9x6pQ4eUFxUpVKoBw4eNnzHjnqlTTx4+4ksN4rCwz7ZsGTRqZJPReL60dNLs2eOnT+cLBE1GI5dweL9qGsPA4cMTEhNZlj1x6JBf3wsAQNtiWZbrUH/g+eU3L14sV6m4kRxcsb6D04ZPzBiWMWHJm6s2rFmz4okn9RqNv7NY7XYb3Xj8X6877z978mRFUZHzpJhLz7LfPmECIaSpWRtHb6w36nTcrZnYLl3pRvGZfOeS50tL6Ub3Pn3oxskjh5MGDlj05BPa+vruSUlpo0fbrNYju3dNv+mm8TNmnDl+4pOXX/Hr6vzVIRb+YlnWl4TRYbeXnDn7xRtv6DWaq+bNGz9jhr9v4eVdHnh+edKggT9+9tm0xJ43jxx13cBB53JzR02ZctW8ec41WC2Wm0eNmpXSd1J8wn/ff1+uUj362oU/ozl33LHgoYdOHzs2b3D69Wlp03v3yTlwcPyMGbMujgzyHgM9JBCJ/vjhB4lMNvfuu7lDMrl8wsyZtefPr/vyS75AwNXgY8yRcbF3Tp48K6Xv1T0S/1y3Thoeft1dd/lYw51P/2PgyBGnjhyZ3S91Tmr/6b37/LVjR7hSycXg41UzPN5j180dJpG++Y+nff/WAACC59tDf9333HNyleqXr7++e8rUwQLh3VOmcP+Ni4yaP2zY2nffNWi1sxcu3HQm3/tUShf0n76qsnJCSJeePefcfrvzP/6a2tqv33nHU3Ngs1qz9x/I3n/ApQd9/oMPKiMjWZY9uH07tzNMKqHvpddqnQubGhvpfqlcTvd89MKL50tLU4cO/Xjzb8vee1ckFv+8enXh6bzFr7zssNtXLlkS7Fv2HSLh8J3FbM49dsyg0ykjIlKHpLdhzUd273n/ueWfvvIqfVlbWUnnHSUNHOBc7OOXXuZmGb399FJNbe3gsWNo/njDvfcyDPPvxx8vLywkhOgaGujYz2k33uB7GCKx+IdPPrWYzdPn38jtpMNFt61bJxSLeby/vzIfY/7g+Rey9u4jhJibmjau+ZoQ0rVXLx9rmHLdXELIB8ufp8OYdQ0Nz91xp3PHko9X/eELL27fsMFmtTYZjb5/GgAAwfP8Pfcc3rlrZlLy8jvvOrRjB9vM6WNZK598akafpLXvvrtqyT/8nSCp12jov5wvfv453fP5n1uzbNZhEyYEEG2P5OT7/vksIcRiNjvPnBAIRRe2Lk1fHA4H3RCHielGVVnZovETvlyxYscvv/z+/fcv3nf/qw89/Ohrryb06LHpv/89EPyRkZ3mlgolkcmmXHddZGxsdXl5265F8evatYSQbr17X3PbbXFdu0pk0qQBAwghQpHIuVijTsdtm5uaThw+PC4zc8DIkSVnz/YdnKZraOjSs1eXnheac4ZhHHY7153lC5FYXFpQ8Nf27eMyM8dlZtJxyNMXLLDbbD98+qn80mVkfIxZ7/T/JHXVVYQQsTjMxxp6JCfVV1c7z79qMhq5v2NCiI9Xra2r8/1DAABoB3lZ2fdMnUq7GRISE6+59dbhEzMSevSQq1R52dl52dk7NvxyeOdOXUPDyiefCmDcxjfvvGO32br17j0s4+8Mo6Gmhi4mdusjfkwGCVcq/732m4iYGFrtsT17/Q2Gqiore+eZZdzLIePHXXvHHTUVFW89vTSwCv3SmRIOgVDYb0j6LYsfZhhmzVvvcCMn2oRCrV72/nuT5swRicV6jcZsMnlfF4Sqr64mhKgiI3okJwuEQoVa/cqXX7iUcV6zpUW0pV//1ZpxmZnX3nnHns2b6XDRwzt35WfnJKaktD5m32uIjI0VikQNNbWeTm+rqwYACAmWZeUq1YuffzZpzhzndSyGT5w4fOLEWx555PDOXSufejKwebD0HkddVdX4qOjhGRlv/vQjIeTuqVMJIVFxcZ4GcDQnEApXfPt/fdPTCSF7Nm9+d9mzfoXhJVV6csUKoUj0wQsvsg7Ho6+/1n/YMELIycOHv1q5ShOEX4mdJuFgGCY6Pv6upUtjunTZ/N13W378oW3vNj39ztuZ8+f//sMPHz7/QnF+PiHkwReev/ef//R+Fm1WzU1mh91OCKkoLn5r6TMuZaxNTb6HQf/it/zwQ8nLL42dNi0qPv76e+5hGGbj2rWEEB6PcS4cWMy+19Co17MsGyaVeDq9ra4aACBU9BqNXqtt1OnWvvvu9g0baG6RkJg4dMKE+5c/p1SrK4tLAqt50uw5P336mdFgIIToNBpCSH7O8YKTpwghCYk9fK/n1a/+M/qqqwghJw8fXnrLrS5HrRYz3eDxL1k3nLv/bja5/9f4rqVL+w8btn/r1o1ff71mz+7UoUPp/hGTJo2cPHnhuPFtPqSj0yQcUrl87t13DR0//vSxrK/ffluv0bRt/aOmTGkyGp9duMivj7h77z6EkOK8vNKCAoNWGxkTc3TXLufZJQHb8uOPdy1deuP9902cNau6vHzTN9+0Vcy+19BkNNZWVkYnJMR06VJdXt68QJtfNQBA+1v55FOrnlqi12i4zoDywsLywsJf1qyRq1QBrG1NDZ+YMXDkSOeVRpfecjPdEF28r92iZz94f9qNNxJCzp069fj18wyXjgwlhDTqDXRDGRHhvJ/rZjbo9c2rpQtvNOr1q5566tZHH00dOrSiqGjZokU8Hu/Vr75KHTp0wUMPffP22z4G6aPQDxp1OBza+nplRMTzn3/2/OefveDhv39++MGcRYu09fVr3nqLZohty2a1CkUibjSlQq0eMy2TXOxy4Ey9fi63PXbatKRBA6vKyujf08Ft28QSyYMvvuBc/qlVK/sPHxZAPD9++pnZZFr4+OPKiIgtP/3kNiHwMWYvWqzh6J49IrH41kf/vtc4/aabwqRS7mXbXjUAQPvTazS6hgaabcxauPCmxYvpfpZlA842qCWrVtIpe5FxcScOHT6Xe1oik727ft0SpwUOvHjwxRduuO8+QkhFUdFjc693+8OvsqSYbvRKvWSVpvgePejQ18JTblrMJ1auCFcqv3n77bMnTvYbks6y7Obvvsvau+/o7j2/f/89IaT/sKF+XmvLQt/DYdDp/vfFF9fdeee1ixZ5KeZwOCqLi79++52A1xhlWbZfevor//nSZf+6L/9zeOfOA3/+OXvhwvc2rN+1aZNAKBw3fXp89+4sy8oujtOk39z0BQui4uOz9+1TRkRkLlhACFn77nu0wPvLl6eNHn3dnXdGxMYe3r5DIpNNnD2r/7BhVouFe2Kc92FHzkcrS0r2btkyadYsq8Xy/ScXln5jL51C7GPMztW67GmxhtVvvDE2M/PmxYuju3Q5dyq3e5/eV11/vXOoLV51ixOSAQA6iOTBaS9+/hnDMHwer5VLFNJ/9JLT0hJ6dCeEiMXij196iRCy8InH6ZoOLf6reOtjj939zDMsy9ZUVj42b56np7/mHDh4za23EkLGz5zxw8cf052R8fEDhw8nhBi02qz9+11OyZw/f8KMGfk5xz977XVCiEQuJ4QYDY30qNlkYlk2zM8Rgb4IfcJhMhi++/iTk4ePSL1eHu0IObp3r6mxMeD36pWa2ivV9bFnx/buO7xz5xtPPCkND5987bU3L15MCDlx6PDPn69++OWXevft51z49UcevWvp06OmTCGENBmN/1m5kpueVJh7evGcOUtWrpowY8bEa64hhGhqaz968aVPXwlwKZV1q7+YNGvWoR07ii8+eseFjzF70WIN+VnZz91+x5K33sy88UZCiKmx8f8++GD+Aw9wNbT5VQMAhEpFUbFBq2UY5nRWVsul/VGYd/r4wb9kSuUtvk1Omb1w4aOvvUon/W38+uuBw0cMHD7CuYCuvn7LTz8RQn75+uv7nvtnZGzsuGnTnn77rZ9Wr1ZHRj388st0vfOdGze6LEYgEArpwhtv/eMftO+czt3t3f9C49g9KYkQUn3xiW5tKPSPp+9QImJjkwcOrK06f9br8q5pY8dIpbLcrCxNTU3zo/GJib1SUnSahjPHT7TDshM+xtzKGtLHjRWHSU4dOSKWSn8vPFecn3/dgIHOBdr5qgEAgoHeUG59p+wxq4VurH333ZVPPkW373vun/cvX+5cLF0ocj2TEELI13v3Dhgx3Ev9Z0+cvCH9wmJU19x66/JPPnZZEIEQUnbu3J2Tp9Q0uxEzde7cpIEDPnrxJfpyWEbGR7/9yuPzd27aZLdaJ82ezbLsfdOmHd29p+Xr9AcSDvBGGRl5//Ln3nlmGZdDPPTSi3c/88wfP/749E03hzY2AIAOi0s4KoqKHps370x2TlLaoNVbt8pVKudiHhOOffsGeB0J55xwEEImzZlz//LlSQMH0ITJYjbv+f33VU8tqSgs9CXaO59++u5nltJlEZqMxs9f/9fqf/3LlxP90jYJB+7PX67m3nXXPz/8oLSgYNu6dQadvv/QIRnXXGNqbLwvM5M+jQUAAJq7/7l/3vfcc9zLQzt3Dc9wXWD0k5df/rhNH1/Sq1/fxOQUS1PTyaNHG9x1wHuhjo4eMnYsISRr//7msw59nYngVYAJBzKMK8f8Bx646aEHuyclMQzDsmzu0aPvLnvWeSV/AAC4ogSWf/iRcCDJuJJ16907rmvX8uJi7hGFAAAAvicfLSccyDMAAADAuxYzD2/TYpFqAAAAgC9ozuAl7XCfcCDVAAAAAH95STtcEw6kGgAAANAabtMOgcthAAAAgNZzSTt4znsBAAAA2hCXYAiQagAAAEDw0Ewj9I+nBwAAgMueIJIJJOdAvwgAAMCVKbCVRv17PD3yDAAAgCsclwz4lXn4mnAg1QAAAABnLS725azlhAOpBgAAAHjiY9oRlKXNkaMAAAB0XgGM0ghwaXPiZ9KADAMAAOCy4dKs+55/sJ4Lu0k4fM8ekGcAAABc9vwaJeqpqyPAZ6n4m2oElpoENvEGAADgyhTs1tb3UaLNuzoELod9f7/AjvoFPSgAAADB5ra19ZJVeLlv4qWYfw9v81IGyQEAAMBlw/ttFB+7OpxzDoFLva2Jqa3K404KAABAa7RhU+vXYhtuT6fnCkjr7qR4Orc9MxgAAADwi5em1lOXRvP9ft1b8fVpsc2L+ZV/AAAAQKfg6WaK264O33MOn5Y2bzHbCNLcFgAAAAge77mC28yjeYbhY84RyNLmrNejhJDUESPGXDMzbdzY7ikp6uhohhfIA2kBAACgfbAOR0NNTUleXvaevfs2bjr111+XHCWEOGUVgeUcTAZf6C0Cr3uaHx01PfOWJU8NnjChpfcFAACADipr1661K1Ye+G2zy37Gw7anPZcc9ZJwtHjfxCX5WPLhB3Puvcfr2wEAAEDnsP7Tz1Y8+JBfSYaXnMNjwuE923BJNRRq1Ws//YiODQAAgMtJ1q5dy66fp2vQeEk7fMw53Cccvt9JodvvbduajmwDAADgsnNs167Fk6cSz/dTfLy3wk/k8V12+bty+ZIPP5g4d67XkwAAAKBTiu/RIzIubt+mXz31ZLhNL5rvdJ0/4u/qXqOnZ2LcBgAAwGVszr33jJ6e6ddSn813tjxh1e3NFPbi9s1LnmqxBgAAAOjUaHPPXpoJEHfbnlyScPi7MFfqiBEYugEAAHDZS58wIXXECL9OcUkqWujh8J6/jL1mpl/vDQAAAJ1U80bfr06OvxMOf2emEEIGjRvbUv0AAABwOeAa/RbTA7d7/F503PnkHikp/p4OAAAAnZFzox/Aw9F4ns5ssS6WsOroaP/fEQAAADofdXQ021J24CWdCPCxavQt8VQ2AACAKwRt9FvMOTyhJ7fA7RwYAAAAuGL5nhvQAv6twwEAAADgwu91OAAAAACCgefXWuYXj6LXAwAA4ArlPQ3wlFeghwMAAACCzo+EA90aAAAAwPErMXCTcCCxAAAAgIC5TSR8fZaK0wbrpToAAAC4XHlJBvx4lgoAAABAkAS80igAAABccQJOANDDAQAAAEHnmnD49Wx7AAAAAMp7CoEeDgAAAAg6JBwAAAAQdAK/SneWRc21On15RRUhRCwS9u7Vo62qNVssBedK6Hbf5F48HtI1AAC4QrGEZQjje3n/Eo62xbJsYXEZ3Y6PjZZIwtqq5uzjp59Y+iohJLVf0ppPV7RVtXV1moX3PEW392z5LixM3FY1U01N5rPnis9X1VgsVplU0q1bQmL3LiFPa/74c3f28dMjhqVljBsR2kgAAKDzCmXCYbPZb7xtMd1e/eHraQP7hTCY0GpsNH619ufvf/7V0Gh03t+9W8J9dy6YNnVCqAI7nV+w7IVVhJDvftq04ftPEuJjQxUJAAB0aoEkHJ3jtkrnUV1T9/CTL54rLGl+qKS04tkX3zxx6swTi+9kGD96rtqKw/H3t223O9o/AAAA6GhY4s+tlItC2cMB1Cv//oBmG5Iw8R23zRs8qJ9cHl5dXffLb9u2bt9LCPm/H35J6pM4e8aU9o8ttW+f55c9kp2TO2rE4G5d49s/AAAAuDwg4QixgnPF+w4epduvvfjU+DHD6XZS78Sxo4eueFv13U+bCCEffbZ25rSJfD6//SOcNX3yrOmT2/99AQDgctL5Eo6mJvOJU/klZZVNTWaFXJaS3Cupd6L3U+rqG44cO1nfoJGHy/r3S0rs0dVTybLy88dP5ml1eqlU0rtn977JvXxv42vrGnJOnK6pqScMiY6K6N8vOTYmssWzSsoq6YZYLBozaqjL0QXzrqEJR01tfVFxmcuMG+/RarX6krIKQohCHt6je5fCotJjObkCPu/qKeNraus1Wh0hRKVUuPRbaHX6ktIKQgifx0vtl2S2WPLPFNJD/fsluYxgdTgceWcKC84V6w2NMpk0qXdiSlJPT6NcW/PZAgBAZ+dTwtFBBm2wLLt+49b3Plmj1eqd9w8bMnDZUw9075bg9qwf1/325ntfWCxWbs+sGVOefvxelzkm9Q3at9774rctO513Jif1XL704b7Jvb0HZrFaP/78v998u97h+HuUA4/HXDdr2iMPLJTJpF7O5Rpds9mi1xtUSoXz0YT4mNdeuDAvRqX6+5Av0WafuDBVZ8rEMelpqSvf+ZzuHzUiPft47guvvUsI6d8v6atLZ/H88uufb3/wH0LI5IzRb7zydF2d5o77n6aHXCbmnMw98+qKD7l0hBo0IOW5px/umdjNeWdrPlsAAOjgfBzS0ZlWkvhizQ+vvPEBzTZEIqH6YgN8+Ojxex5+trauofkpp/PO/mvVJ87ZBiHkl1//fG3lR857ausa7nl4mUuLSAjJP1N4/yPPFZeUew/s9RUfrfnv/2i2ERmhVijCCSEOB/vT+s1Lnv2XzWbzcm7f5F7c9kuvv6fTG5yP8vn8q6eMo/9FRqgDi/bQ0Rwu2yCE8Pm8cWOG0X6Ik7lnzlfVOBfeuecvunHV5LFewj51+uz9j/zTJdsghOScyLvrwWecY2jlZwsAAJeHTpNwFBaVfvT5f+n2C8se2b3luy2/rPnuq3foRM26+oYf1/3W/CyHg+3Zo+t7q57/ff2X//u/j26/9Xq6/9ffdxzNPskVe/nf79OWLyWp1+cfvP7nxq//7z9vjxs9jBBiaDSuem+1l8BOnMr/5bdthBCFPHzNpyt+X//ltk3ffPT2S2KxiBDy15Gc7bsOeDk9Jjrytpuupdu79h66dsH9n3757dlzxSzrsV/J32h1OgMhZPSI9Dtuu37hTdeFicUqpWLShFH06F9HcriSdfWaY9mnCCEikXD0iCGeArBabS+9/p6pyUwIuWb6pB++fm/br9+s+XTF4EH9CCE6vWHF258FHC0AAFyWOk3CUVRSntovKbVf0rxrM6+ZPpnP4xFCevfqcfeiG2iBQ0eONz9LKgl7b9Xzo0ekR0aou3WNf/i+2yZnjKaHNv62nW5kH8/du/8ILfzWv58dPKifUilP6p342otP0U6UfQeOFl1coKy50/kFdGPaVRNS+yXR7eFDB82fO5Nu0ybci4fuvfWW+XPotk5n+PSLbxcsevTG2xZ/tfbn6po6l8KBRfuvl5a8t+r5h+697ZEHF9FbPNOmjKeHdu89xBU7cuwE3bhq8rjwcI93gvYdOHL2XDEhpHu3hGeXPNQzsZtCHp7aL+mNV5aGy6SEkAOHsirP1wQcLQAAXH46TcIxacKoNZ+uWPPpiqVP3u+8v0tCHN2or9c0PysxsVtcbLTznpmZk+jGvgNH6Mae/YcvHJo+OSb672GeUknY1Mnj6HbOyTxPgUmlErpx5OjxBo2W2//Ig4sO7153ePe6fzx+r/dLEwgEjz98x+oPXx8xdBC3s7C47L2P18y+8d6PPl/b1GTm9gcQbXKfxKmTXO+PjBwxmPbB7N53qPHiamP7Dl74TKZOGuMl4D37LxSbcfVEofDvYUARauXsmVNpXlhX3yceehwAACAASURBVBBYtAAAcFnyadAo02HGjTocjty8gpwTp0vLKhuNJpvNVl9/oY23O3xaliq5T0+6UVvXoDc0ysNluacvdFHodPof/nfJfZmaix0MZeXnPVU4ani6Qh6u0xvOFZXOufG+q6aMG5o+YGBqir+rVqQN7Pfh2y/lnyncumPfr7/voEMrbDb76q9+OHQk550Vy+XhMkJIANEKhMLmbyeTSq6eMv6XX/+02exHsk5OGDvcarXt2HWQECKTSYcPGdT8FM6p02fpRkpyT5dDTyy+0/llKz9bAADo+HxcBKwzTYstKi576V/v55w43ZpKlEo5t200NsnDZfUNF7pGft+6+/etu92e1XjpiuPOItTK99984ZV/v59/tshoalq/cev6jVsJIf1Set984+yrp4zza/JnclLP5KSe9991U9bx3P9+t2HH7oOEkJwTee9++NWz/3iQENLKaJ1dNXnsL7/+SQjZd+DIhLHDT5zKpwurZ06d4P0xMVxHjsucmubaMFoAAOjUOk3CUVevuXfxs/UNWkLIkMH9Z1w9MTY2SiwS5p8tcp6C0SKLxcJt83gMIcR2ccXu2JgoT1NYlQq52/1Uat8+X69+c8/eQ9t3H9ix6yBttnPzCp57+a3f/tj5xitP+/uYNx6PNySt/5C0/h9++s0XX/9ICFm/acvD992mVMpbHy1naPoAhSJcpzP8uWPfksfuOXDoGN0/xev9FEKI4GIK1eJi520YLQAAdGqdJuHYsGkrzTYyxo1449Wl/ECfoarR6LhtepMiKkJFVxa//dbrb7huemDV8nm8jPEjM8aPtP3DdvZc8bYd+/+z9meHw7Hv4NH1G7fOnzfT7Vksyz70xAuEZQkh999986ABfV0KzJ83kyYcDgdbWl6pVMrbJFpKLBLNuHritz9ubNDoTuae3b7rICEkQq1MH5Tq/cTo6MiK89WEEDpQw4s2jBYAADq1TjNolBs3kDF+pO/Zht1md9mTlZNLN/r06kE7Hgb0T6F7du891HwyqpfpqdS3P25c+92Gtd9t0Or0hBCBQNA3ufeD9976wN030wLHcjzOUmEYpqam7q8jOX8dyXFbjGFcr7SV0bqYPPHCnJ1vvl1HM4MZ0y4ZB+pW2sXE6GjWSZdDX639+dkXVz374qozBUVtHi0AAHRenSbh4J6V6jyL0mazbdy8w8tZeWfOcU8qIYRYrNafN/xOt7mFKKZOvHAHYd/Bo5u37HI+XavTP/b0K84rVTT3+9bdb73/xVvvf3HwULbz/sjIC+t0CQXe2m/u0fNfffMzN8OW87+L0fJ4PDoKtZXRukgb0JdOHtm2cz/dw00b9mLixY/uty07abcTVV5xfvVX39PhGgq5vM2jBQCAzquj3FL55tv1Lg0SZ8lj9/B4vKGDB9BG8Ztv1wmFgkH9+2q0up83/JF9/EKPhcZpSqqzJ5a+umDeNf37JZmazOs3bqU9JUKhYNbFh68mJ/W8bvbV/9vwByHk+Vffzj6eO3pEOp/PLygs+e6nTdU1dX8dzv72q3d7eFg6/ca5M46fzCOEvPLv97U6/dDB/fl8/un8gvc++ooWGDVisJcLXzDvmm079+WfLdLpDbfe9eTUSWPT01LVKqVGq9uz7zCXLc2/fiYd69DKaF3w+fxrMifRuzaEkIS4mAGpyS2eNbB/8sTxI3fsPqjTGe5/5J+3LpgTFRVRUlrx1dqfjaYmQsjsmVPpc2TaNloAAOi8OkrC4WU5zqceu4cQMmvmlI2bt+XmFTgc7OqvfuCOxsZEVVXXEkKMpiad3qCQhzufm5zUs7S04ptv17vU+eQjdyXEx3AvH3/4ztra+t37Djsc7I/rNv+4brNz4Xtun++lRZw2dXxWTu5P6zcbTU3/fvMTl6OTJozKvGqCp3MJIeHh0g/ffmnZ8yvpb/2t2/fSR9I7mzB2+AP33NIm0TY3KWM0l3DMzJzk6dFrzhiGWfrk/cUl5YXFZeeKSl/61/vORwcP6vf4w3cEKVoAAOikOs0tFakk7P03X5g7ZxrXIgqFgvnXz/z681XhF6c/cOMzOONGD/v0/dfSBvbj9iTExbyy/Il5114ygFEqCXvjlaXLljzY89IHyY4YlvbR2y/dufAGL4HxeLynn7j3hWWP9Lr0iWVdEmKXPHbPay881eK0WJVS8f6bL6x6fdmEscMFgksKpw3s9/Jzj6947RmpJKxNom2ub3KvHt270O2J40f6eFZUpPrzD16/7aZrnTM8tUrx8H23ffDmi3Q0bjCiBQCAToqZwL9kVSjW6zZLWOf9+2yXPBStfTQ2GssrqxiGSYiL8f4gVmdV1XUNGo1MKu2SEOv9R3x1TZ1GoxMIBZERKn9nbNbU1jc0aB2sQ61SxkRHcuNOfNfUZK6prdcbGsPEopjoKC/ri7c+2jZhtdrOV9UYGo0yqaRLlzjv43lDHi0AALTGGMGFnIG58L8MuXThL0/bpDMmHAAAABASrUk4Os0tFQAAAOi8kHAAAABA0CHhAAAAgKBDwgEAAABBh4QDAAAAgg4JBwAAAAQdEg4AAAAIOiQcAAAAEHRIOAAAACDokHAAAABA0CHhAAAAgKBDwgEAAABBh4QDAAAAgg4JBwAAAAQdEg4AAAAIOiQcAAAAEHSCUL2xTqfX6Q1eCiiVCnm4rN3i6dSMpqb6+ga5PFypkAdWw4ZNW0+cyr9z4Q1xsdGB1bB3/+Gde/6aPXPqgNTkwGqg6LWoVUqZTNqaegAAoEMJWcJxJOvE/oPHvBTIGDdi7Ohhbf6+9Q0aPp8fcMPcMZ0rLNmwaevI4YOnTBwT6lhaa/fev44cO9G/X9Kca64KdSwAANBmQpZw9O+XHBvz94/pjb/9yefzp189kdsTEx0ZjPf9ZPX/RUao7r3zpmBUDq1kt9tP5Z4hhOSdKTSbLWKxKNQRAQBA2whZwhETHemcUmzavI3P56f27ROqeKAjOJ1/ztRk7pnYrbCo9MSp/KHpA0IdEQAAtI2QJRw+Yln2xKn8ouIynd6gkIenJPVKTurJHT1+Mq+ismrShNHZx3MLi0qtNltsTNSo4enh4W5u/+/YdcBssbAs29ho/H3rLoVCPnpEOne0uKT8+Mk8rVYvEgsTu3dNT+svEPC9BOalvI9RlVecz8rJ1Wh0EmlYcp+e/fslMQzjXEPG+JHnCkty8wrMZktUpHr0yCGtGdTi/ZOkHA7HkWPHCwpLrVZrbHTkyBHpLu/oJebmrFbbkWPHKyqrzBarWqVMT0uNjYnyHmTOidMCAX/2jCkfr/5vzonTLglHix+sX38PAADQnjp0wmG1Wr/9YWNpeWWEWimXhxcUlhw/mZfaN+naWRfu7tPfwaVllQ0abYRaZWg0FpeUn8w9c/st1yuVrqM0yiuqTE1NhBCrzVZaVhkV2cQd2rHrwL6DR8UiUUxMZG1tw5mzRVk5p26eP0cmlbgNzHt5X6Lad/Dojl0HxGJRVGRESUn56byCouKya6ZPdr6u+gZtcUl5VKTaaGoqKi47cSr/7kU3KgIafdLiJ0n98uufWp0+Qq1qajIXl5SfyD1z+y3Xq1QKX2J20Wg0rVn7U4NGFx0VIRIJc07kHss+edXkccOGDPQUpF5vKCouS0nqKZNJ+yb3zj6eW1NbHx0VwRVo8YP16+8BAADaU4dOOPYdPFpaXjl29NCMcSMJIVar9Ztv1586fWbYkIFdu8RxxcLCxIvvXxQWJmZZ9o8/dx85duLPHXvnzsl0qe2WBXMIIa+v/EilVNx9+3xu/9mCon0Hj3btEjf/+mvooIFDR3K2bNuz6bdtN14/s3lUPpb3ElVhUemOXQe6d0uYd930MLHYbrd///OvOSdO909N7tmjK1eDTqe/766b1Coly7K//bEzK+dU1vHcCWNHBO+T5PP5D95zG+0P2Lv/yM49B7ds33PDdTN8j5mz/8CRBo1uysQxI4cPJoTU12u++u/P23buG9A/OUwsdhtk1vFclmUH9E8hhAzsn5J9PDc759TUyeNcirX4dfv49wAAAO2pQ6/Dkdi966zpk0ePGEJfCoXCfn37EEKqa2qdi03OGB0WJiaEMAwzOWNMWJg4/2yRxWL18V32/3WMEHL1lPHcEMXhQwclxMecPVdcU1sfcHkvUdEaZk6bRJtePp8/acIoQsjxk3nObzRt6gS1SklrSE9LJYTU1Wl8vCgXPn6SV00Zx919GDNqiDxcdragmHYL+RgzR6PTE0J6dO9CX0ZEqK6eMn5o+kCr5+/l+Mk8qSSsT68ehJDu3RJUSsWJ3DMOh8OlWItfdyv/HgAAIBh8SjjYYEfhQY/uXQYO6OtwOIqKy3JOnD589HhVVQ0hxGazOxfj8f6+CqFQ0LNHV4fDUV1T58tbOByOisoqtUrpsv5ESnJvQkhxSXnA5b1EVVpWKZNJtTp9UXEZ/c/UZObxeNXVlzT/tNWkJGFhhBCbzebLRTXn4ycpFv09K4RhmB49urIsW13tR8ycXondCCHrN27JPp6rNzQSQvr3S5oycYxcHu62fHFJuUaj69e3D/e59e+XZDSazpwtcinZ4tfdmr8HAADwl49JQoe+pWK32//csS/7eK7VapNKJSKh0GKxtHgWbdKazGZf3qKpyWy3OxQK11ZQpVQQQhobja0s3zwqk6nJbrc3Nhr/+/0GlzJmcwtXF3DmF9gnGS6TEkJMTU0BxDxk8ABCyL4DRzdt3k4IiYmOHDSg79D0AXy++6G42SdOE0Lk8vBzhSUX3j1cRgjJPp6bktzLS5Atft1+/T0AAECQdOiEY/uuA4ePHh+aPmDC2BESSRgh5GjWyc1bdno/izaBnho2FwKBgBDSvL/dbDYTQoRC18/H3/LNo6LTOiIjVDMzJ7mU4fOD9XUE9knSyxQIBIHFPGTwgPS0/ueragqLSvPOFG7dvjf/TOHN82c790Bwb5SXX0AI2bHrgMuhc0WlhkZjuOdVR1v8uv36ewAAgCDp0AlHXv45kUh49ZTxXuZeNkc7zyNUSl8Ki0RChTy8rq7BYrGKREJuf0VlNSEkOsp18TF/yzePKixMLJGE6fWNsTHRXhKUthXYJ1lTU0cIUfsfM713IxaLuyTExsfFxMfFjBk19LsfNxYUlpRXVHXrGu9S/mRuvtVqGzwo1WWmblFR6V9HcnKOnx4zaoin92rx6/br7wEAAIKkQw8a5fF4drvd1HShM9xut5/OL2he7HxVDbddXnG+8nx1VKTa0zRIPp9vt18ycCG1X5LFaj18NIfbo9cbTubmS6WSXj27Na/Bx/Jeouqb3Ntite47eMS52v1/HdPq9G5jbj0fP0m6yidVXVNXWl6pVikjI1R+x8ww/9vwx3c/bnTuCqLTa83ubm3knMgjhIwZNaRPrx7O/40ZPYzH4x0/edq5cItft19/DwAA0D58+oXNhGjcaN+UXvsPHlv77boBqcl2h+Pkqfy6eg1pdj9+85ZdNTX1XbvEafWGA38dI4R4mTuqVilq6xp27D4YFammjxkbO2ro6fyCnXv+0hsau3dNMDQa/zqcbbXarsmc7LYf3sfyXqLKGDeioLB47/4jBoOxd8/uVqs152RecUm5gM8fPnRQwB9XaVnFnzv2uewcPLBfZKTax0/y0NEcrc7QM7Gr0dhEM6qM8YHEzGOYkSMG79rz11drfxo8KFUmk1aerz6WfUoul3HzVjh1dQ3lFee7dYmn42CcSSVhvRK7nT1XXFpWyfWLtPh1+/X3AAAAreRjz7kgYtZM55mHLMu6bHN7uJfOZYJqwriRZrP1WPbJ7bsOEEISe3QdM2roL7/+WVVVe2mxEVnZpw4dzSGEiETCqyaP65vS21OdkyaMWvfLln0HjkSolTThEItFt9103eY/dh7NOnnk2AlCiFIhnzt7mqdKfCzvJSqpVLLo5rmbt+zKOXE6+3guIUQeLpuZOSltYL/APyxCKiqr6Z0dZz26d4mMVPv4SV5/7fQ/t+/NzTtLY546aWxq36TAYh43ehiPYQ4cytqybQ/d06dXj6mTxwqFQpeStLaBA1Lc1jOwf8rZc8XZx3O5hKPFr9uvvwcAAPCd8qqpdINhGHqPnrtT7/LSZZvH4zE33HCDS0rhvO0p26D/u2GD65yFYLBabRqtTiIJaz5y0Pmh6vUNGpvNHqFWeV+SnBBisVi1Or1CHu7ybLAms1mr1YtFIm5tTe88lfc9KrPZotHqxGKRQiHn+TO6IjBePklnDRqt1Wprk5gdLNvQoHU4HCqlvHmq4a8WP9jA/h4AAMBHs2fPJk65he85B8MwAoFA4Cnh8CXnaAdCocB5fWtPItQqHysUiYRuKwwTi8Ni3C+C6ZYv5b1HJRaLWny8SBvy8ZNUex1f6VfMPIahQ0DaXItft+9/DwAA4CNurqWXbMNjwsHn813ukrAsS0s4JxahyjYAAACgg6BrQ7jNOZz/l0skKFpSQP9P85spnrgUBgAAgCtEi6mGl34OZtGiRaRZkuHc5+Glh+Pbb78N+sV5ZbVa7XaHSCxqhwEQvuuYUV0GWvxg8ckDAATVggULiNe0gzTLNrhDApe9NJPwZXmojtDPIRS2fiRi2+uYUV0GWvxg8ckDAASbc57hKeFwuxH4wl9+rVkJAAAAnV1rmn4Bl5h0hB4LAAAA6LDcDtTw3sPBvXS9pYLMAwAAANzyPeFonn94vKXiqdsEd1IAAACucAEkCR364W0AAABweUDCAQAAAEHna8KBOykAAADgwvf04O+Ew8sMWk9lMLwUAADgCuGyUleLSYJLmZZ7OLxMdNHpdAHHDQAAAJ2ITqdrcY0vL1pIOLwPQ62oqPA9UAAAAOi8aKMf8CTWSxIOT6mKp1ry8vJ8jBIAAAA6NU+NvqecwWW/37NUnM8/duyYv6cDAABAZ+Tc6AcwlaTlhb/criNGtwsKCnJzc/19SwAAAOhccnNzCwoK3Dx03sOojuZcEw5fchbnMps2bfInYAAAAOh8nJt7f1MFyqdbKs2zGO5/s7Kytm3b5nPAAAAA0Mn8+eef9H4KtxyGp7sfXvB8mUfrtgD3v1988QVurAAAAFyWcnNzV69eTS5mG6wTl5Lel+jwb9Co27oYhnnnnXeQcwAAAFxmTp06tWLFCvtFNpvN4XA4HA561G3a4Ql/yJAhzff6teooIcRqte7evVulUvXs2dOvKwEAAICOad2nny29ZlZddo4+97TuVK7+dK6ptMymb+SFhzMCAU0DeDwecXpUPfFwe4RhGP6QIUM8HXO7x8sSHVlZWefOnVOr1dHR0a26RAAAAAidY7t2vfnw4u/eeYcQwpCLDT1LWLPFUl9vLChgRCJRRARzKeI52yCECLgXnnpFnA/RbW6Py0tCSHZ2dnZ2du/evdPT05OTkxMSEhQKBR78BgAA0JGxDkdDTU1xXl7Onr17N246+ddB4pxqEEKI0wsHqz2aRVgiT+pDCOHx3IwH/fusi4cEXt7ebRbSPOf4O9yLhQsKCgoKCprvBwAAoOjtf7NeX7X5dzQTHY3HVMOJLjtbHBcbplSSiw09vb3iyd8Jhy/phctO4vTsOJc9LpV4icClPLpDAACuEA6Hw3C2ANlGB8G4zytc93IvWQfbWHBONDiN9nC0ODzDWw8HV9ptzkEIad7VwaUdxOeODWQYAABXoAs9HOerPLVzEHKeUg2O+fx5lh3kY3N/ScLhaSSHpw4Mt10d9JBz5gEAAOCMayPsjfpQxwKu3DbezXcyhDgMBi4raN7uu7wUuL1d4uadLh0o6lJd844NZBsAAOAdwzDEgf6Njs5L/sE6PPZtNE8+eG73ej/Z7YxZ5ykxnu7lAAAAUGgpOj7G594O1wLu8gr3Yzi89HMQp/4ML+ND3d5SwcggAACADs5LPuFLhugpj/S4Dof3lTmI17Sj+fvhPgsAADijjQhahc7Cx2/Ky7rk3qbFesk5nI/6Mi0Ff1QAAACdjl9dGl6yDdLiLJUWcw664XvmAQAAQOG3aIfla3+Gz9kGaT6Gw23OQVrKIVzKYPQGAABAZxFY3ud8VovZBnE7aNTLkqMtvLe7Zc49vTEAAADahs7I31kqlMdZKsRD0oD1QwEAoE2gpehcWjNFhRDi7TkrntZFx58IAADAlcPTghyuxbymBy08S6XFBTl8COCKYDQarVYrIUQikYhEotZXaLFYTCYTIUQoFEql0tZX2OYRetfm8QMAQHvyt2uhxc4Inx7eRnxYbIMrYLfbLRaL3W5nWZbH4wkEAqFQ6P2RtZcBo9HY0NBACElISGiT5txqtVZXVxNCVCpVmzTYjY2NGo2GtF2E3rV5/ABw+UGHefD40h/QVh++j7c+Wk44uOpISytt0CatsbHR5RCPx1MqlSqVSiDw9e0AAAAgYO2WyfmeNLo+vM2XepuXZ1m2pqaG/oBuzuFwNDQ06PX6uLi4K+HHbpun7B2/wg71dgAA0NEwDCMgvk15dTmNbnBn1dbW0myDYRi1Wi2VSoVCIcMwDofDbDbrdLrGxkabzVZRUdG1a9ewsLC2vhAAAADooC55eJu/OYdzFSaTiQ5fYBimS5cuLn0YIpEoPDy8vr6+rq7O4XBUV1d369bt8vvJ62Wptcu1wg71dgAA0P78mrrCc94VWNtgMBjoRkREhEwma/54eoZhIiIiJBIJIaSpqcloNAbwLgAAANARML5NlHVJBlpe2rxFZrOZbtCUwrkq522FQkHnSRqNxvDwcLdVsSxrtVodDged3uLj3Ba73W6z2eikGHorx/fgbTabzWbj8XieJm44HA6bzeZXSFwAVqvVbrczDNPKeTperiiwa+fG4nCftu/nBvAdeaqZq4phGD6fjzHFAFca9IB2Ln59W74ubU78XGPDlz8asVhM8wy3TZTNZmtoaNBqtXa7ne7h8/nh4eERERGeUgGWZfV6vUajoXkMxePxFAqFWq12exY31iQhIUEgENTU1HDdM8nJyS5XYTQaNRqNwWBwfkaMXC5Xq9Xeh6GwLKvVajUaDZeKMQyjVCojIyPbqk0N4Nqd2e12+mnbbDa6RyAQKJXKiIgILwlEAN+Rl6o0Go1Go+GqIoSIxWKVSqVQKC77SdQAcDlhBAJpbAz30mG1mqprPBXmh4WFRUZwL+1N5qa6uuDG1wqBLfblKSXw2P75nnYIhUK6YTAYZDKZp2ISiaRLly5uDxmNxvPnz9PGjwvU4XDodDqDwZCQkNB8bovdbj9//jydguuyHIhWq9XpdPHx8c37UViWdTgchBCz2Uzf0dNQg9ra2vr6+uaH9Hq9wWCIiYlRKpUuldNidru9oqKieWBardZoNHbt2pX7uFrk6TsL7Nq5whaLpa6ujiZD3Ol2u72+vr6xsbFLly5us6IAviNP8Tc1NVVWVtJVyJzLWCyW6upqvV4fHx+P3g6AK8Tl0MVhs0UOSRdHRdFXrMNRsfl3U1W127JRI4YpevfmXlbvP2DuwAmHv7z3PvCHDh3q/eQWey94PJ5OpyOEmM1mhmHCwsL86iUzmUzl5eU0D1CpVFFRUSqVKjw8nGEYs9nMsqzBYAgPD+fz+dwpLMtWVlbSFlcsFkdHR0dERKjVaplM5nA4aEtmMBjkcrnzWYQQo9HY1NREN+hNAZlMRufUyOVyrphGo6mtraXbKpWKVi6Xy3k8Hj29sbFRLBY7/6znajaZTBaLRSwWR0ZGqtXq8PBwoVBID9G7M85v5IXFYtHr9YSQsLAw5zQu4GtvbGzkrt1ut0ul0sjISJVKJZfLRSKRxWJhWdZut5vNZrlc7vINBvAdeYrfbreXl5fTOMPDw6OiouhnKxaLaVU2m81isSgUCl8+JQDo1BwOh/b4iVBH0QasOr28dy/6LyfDMEKFQn/mbPNiktiYqOHDuH9gTeerag8cbNdAg0A+oD+Px+Pz+S0mDD79jmw+D9aZVCpVKBQ056itrW1sbKQzY33pGLfb7VVVVbTa+Ph458ZYJpOJxeKamhq6jEdsbCx3yGAw0BZXJpPFx8dzbyQSiWQyWWVlpV6vpzcdIiMj3V4IIUSlUkVGRrq0yoQQq9VKsw2GYbp27eo8MEUqlUql0oqKCkJITU2N8zU6/+hXq9VRUVHcnvDwcJlMVlpaSiO32Wy+/Hz31PXSJtceGRnpfFQmk8nl8rKyMpvNZjQaGxsbnTtInL+jhIQE50NeviNP8ev1epptyOXy+Ph4br9UKqWfkt1ub2xsNJlMLkOCAAA6LNP584aCc/KkPvSlJDZWmZykzT/jUixy2DDm4j/arN1ed/hwu0YZND72Mvh3s7z5DBQqNjZWpVLRbZPJVFFRUVhYWF1d3djYSH8We6LT6SwWCyEkMjKy+U9/pVJJb0A4jzYghHDzXNyOOVCr1XSj+ZqnHJlMFh0d3TzboCHRmKOiopq3eeHh4fRmitVqpR0GzWt2zjYoiUTC3XGgzW3AWn/tcrncJRchhIhEoujoaLrtsoCb83fU/E6Np+/IE+5Da35PSiQSRURcuLXpPDYFAKDjqz1y1ObUKKgHp/EuvYGuTE4Ki4nmXuryzzTV1LZffB1AgHfKXYYOMAwTExMTHh5eV1dHmwq73U5HBdLxkgqFovlAS5ZlubbNbRc6XROd9jc0NTVxrV1sbKzzj2kX3CAJL027Uql0m5E5h+Tp3odcLtdqtYQQs9ncfOCCSqVyW7NYLKa5gvMwyQC0/to93a2gU5pZljUajVw3TMDfUYvcZqJyuZwmeRg3CgCdi91kajiWFT16FH0pkMkiBqfVHrrQh8ETCtWD07jCtsbGuqNHQxBlSPm3tLlbXPtKx0OYTCadTqfX62mLQlssjUbTfJqG1Wql7WJYWFjzoZS0WrFYTF/SsQW+xMO1VXRKqqeY3R6ij50jhNCBHW7PlUgkPXv2pG/kthK3O7moaH7W8mW0VKFbvly7pwrplBM68MJqtdLLd/6OPE1FafE7cn47iURC777V1NQIhUKXXAqcHQAAIABJREFUNFQoFPo+qBYAOrvLbFqs9nSevFcvSdyF34TKvn11Z85YNFpCSMTgNKHT77G6o8ccllb1dnc6DLe0OWmjZ80zDEMHOsTExNDRAFqtltbMTdPg2i2uB55l2ToPw3S5Mm47BuiYg6amJrriResvgXs7rhFtzsuiHe2pza+dENL8q+F6SliW5QbSNo+EbvjSeUOH+5hMJqvVWlxcLJFIwsPDw8LCwsLC0KsBAJ1d7aFDXWdMZ/h8QghPKIgcOrTyz20ipVLZty9XxlhWpj9bELoY2xuXVgqcd7VJo0XxeLzw8HA6DUGn09XW1tI5FBUVFd27d6dNC9epbjabuSUrPHFpzBwOR11dHTdzta1wIXXkxi9I106crpr7HFrzHXl6i65du9bV1TU0NLAsazKZ6D04usaJQqGQSqWX2Y8eALhyNNXUavPyVan96MvwHt1l3bspkpJ4wgutrcNqqz10JHQBtjePK416n40SGD6fTyet0AkIZrPZYDC4jAYQCAQtdqQ734txOBxlZWW0oRKJRAqFQiwW0zk5NPiSkpK2ir+jCdW1+/sdecHj8aKjo9VqtcFg4CbdsCyr0+l0Op1UKo2Nje0IfUgAAAGoO3pU1r0bdwMletRIodPSANrcU+aGhhCF1n7c/m5030K04U0WSiwWR0RE1NTUEEIaGxtpwsEFJJfLY2JivJ1/qfr6etriKpXKmJgYl94I7/NivGv+E7+jCd61E3cdPAF/Ry0SCAQqlUqlUjkcjqamJpPJpNFo6H2isrKy7t27Y+0vAOiMHBZr3dFjcRPG05fOQzcsWm3dsewQxdVOvHRRe7tx4GkSrLPa2tq8vLy8vLwWe/i54YHcsACuRWmxr94ZXU+ThhcdHd229z4CC6ndBPXaCSF0+itx+hza4QPh8Xh0FbLExEQ6RcVqtbpMzQUA6ET0ZwuMZWXN99cdPsK2bqJih+VLwuBTi+WlIq6bvcUGqfmvZ5FIRLeNRqPvq1PQx5XRt3a7kEZriEQiWqfJZPI0IoGuwE0X4W7bd29RUK/d4XBwq3dwdzQC+448sVgsDQ0NDQ0N3CNsnPH5fG6BELdrnAAAdBa1h1xzi8aSEkPx5Xa7n/HnUfMBLvzFvQG3NJZer/eec3CNGTcBhD5sjG43eL6nRZchb77fYrG43e9lzasW0VVDyMWno7ktYzAYaKvZhrec/NWaa6ezUpvjZjLLZDKuY6OV35ELh8NBczVP/WFtnkUBAISEOCqSufQfNKFSxXT+O8XMpf/5pVUXzzAMHZxBm6KKioq4uLjma2ERQujTU+m281INarWa3iPQaDT0YaEuJxoMhoqKCrFYnJCQQHtThEKhSCSiv7Y1Go3Lopl6vb6qqso523LZ5ta695SRqVQqjUZDZ4FKJBKXhSJMJlN9fT3DMHTVCucFvL3X7Mtbt1i+Ta7dYDDU1dVFXXzOEGWxWGpra2kBl7XLIiIidDodXU/Fx+/IU/x0+qvZbG5qaqIPfHGpSq/Xc4ks5qoAXPZ8/Wnc2fDFoqihQ1wuTqxSRg0ZXPtXaJYz9/L7uN2+gjbItqKioux2u06ns1qtpaWlUqmUPg+Mx+M5HA76EC+j0Ug/+oiICOf1wsVicVxc3Pnz5wkhVVVVJpNJoVBwS07RaQuEEJZlnccrREREVFVVEUJqa2vNZrNMJuPz+Tabjb6Rc2wOh8PfH80ikSgqKoo+H6SkpCQyMlIikQgEApvN1tjYyP00j42NDcnP8Ta59rq6OqPRqFKpaE+GyWRqaGigt5BkMpnLaqEikSg2Ntbf78gtOvSkrKyMEFJRUaFQKORyuXNVtFeJrl4a2OcDABBykcOGCtw9O13Zr5++4Jy5ru0XNWhRR0js2iDh4PF4cXFxIpGovr7e4XAYjUaXlo8TFRXFPSyDo1QqWZaljSjXejmTSqXx8fHObadSqaTrmRJC9Hq9y72PmJiYhoYG2g1gtVoDSAsiIiLo49rdrnbFMExcXJyPy562udZfe3x8fG1tLbcAhjOa/zX/yRHAd+SJTCaLi4ujT4NzWxWfz4+Pj8d6owDQSUliYxRJSdxLY1lZWEwMTyQihPAEgqgRI8p/2xy66EKpbe4nMQwTGRlJF5E0GAwuI/4EAoFCoaArRrg9XaVSSaXShoYGvV7vPFRTKBTSmZMuP51pky+RSOrr651HMsrl8oiICNppT+/UmEym5s9w8UV0dLRMJnMZ3sgwjEKhiIiICOEqEa2/dolE0r1794aGBq1Wy33afD6frj3vqZfC3+/IC6VSKRaLNRoNN2qEi0GhUKjVamQbANB5RY0YwY3ecFgs1fsPKJKTI9IG0T3ShHhlSrI2Lz90AYYMc++997Z5pTabzW63OxwOOtbB9/aDZVm6UDc9USAQtHiDjz79hGEYgUAQjJUb6MQQh8PB4/GEQmGHWoG0lddO137199IC+I5arIoQQv9OLtP7uQDgimVZlmVtNlvx12tDHUtbUg/oHzVyBPeyPiu77shRhs/vMfda4cUB+DajseR/6+2Xy1y8hAU30omTDMN4b0eCMmI24LafYRh/Ow+C3dnA5/M77NSJVl47j8fz8sgYTwL4jtqhKgCAkBPIZOqLPRmEEKtOV5+VTQhh7fa6o8fiJmZcKCaVRg0fWrV7b2iiDJ0O9HsdAACg84oaMYzvdCO77shRbikOfcE5Y0UFd0jep48kPq694ws1JBwAAACtJevWVd6zJ/fSWFauP1foXKD20GEu/2B4vOgRw9s1vg4ACQcAAECrMDxe1PDhhHsAqs1We9h1vQ1zbZ0u/wz3UhwVpU4b2H4hdgBIOAAAAFolIj1NpP57UURtfr7bxTbqjhy1OS0bETFwkFAe3rzY5QoJBwAAQOBEKqWqf3/upa2xse7IUbcl7WZzQ85x7iVPLIoaMcJtyctSp1/XHQAAIIQsGm3Bmm98LKw5eUpz8lRQ4+mw0MMBAAAAQYeEAwAAAIIOCQcAAAAEHRIOAAAACDokHAAAABB0rZqlcurUFTrUFgAAOKmpqaEOATqBViUcer2+reIAAACAy1irEo6RI0e2VRwAAABwGcMYDgAAAAg6JBwAAAAQdEg4AAAAIOiQcAAAAEDQIeEAAACAoEPCAQAAAEGHhAMAAACCDgkHAAAABB0SDgAACBmGx4Q6BAicX18fEg4AAAgZgVwR6hAgcHy5nGF8zTmQcAAAQHujrRSPxwvrkhDqWCBw4rg4hmHot9li5oGEAwAAQoA2VPKUZNxV6aQYHiNN6sPj8bicwzskHAAAEBoMw4jkctWwYaEOBAIhT08XKxS+31Jp1dNiAQAAAsMwDMuyPB5PkZJMCNEcPsw62FAHBT5heIw8PV2enMTn83k8no+dHEg4AAAgNGgTxefzFSnJYfFx+vz8popKu16PzKNjYngMXy4Xx8fLkvqI5HKabaCHAwAAOjqureLz+WEqlWjYMIfD4XA4QhsVeEeTDK5Xg9PiiUg4AAAgZLiGijZaPB6PEMKy6OHouLg5KS4bLULCAQAAoeTcXPnePw8h5+NsWA4SDgAACDHkGZ2Rv98aEg4AAOgQkHZc3rAOBwAAAAQdEg4AAAAIOiQcAAAAEHRIOAAAACDokHAAAABA0CHhAAAAgKBDwgEAAABBh4QDAAAAgg4JBwAAAAQdEg4AAAAIOiQcAAAAEHRIOAAAACDokHAAAABA0CHhAAAAgKBDwgEAAABBh4QDAAAAgg4JBwAAAAQdEg4AAAAIOiQcAAAAEHRIOAAAACDokHAAAABA0CHhAAAAgKBDwgEAAABBh4QDAAAAgg4JBwAAAAQdEg4AAAAIOiQcAAAAEHRIOAAAACDokHAAAABA0AlCHQAAhFhTU5NOpyOEhIWFKRSK1leo0+mampoIIQqFIiwsrPUVetfm8QNAMCDhAGgnLMtaLBa6LRaLWyxvtVodDgchRCAQ8Pn84AVmMpkKCwsJIfHx8W3SYGs0msrKSkJIcnJyOyQcbR4/AAQDEg6AdmI2m7Ozs+l27969o6KivJcvLi6uq6sjhCQnJ6vV6qDHBwAQTBjDARACJSUlXG8HAMCVAAkHQAhYrdbS0tJQRwEA0H6QcACERm1tbX19faijAABoJ0g4AEKmuLjYarWGOgoAgPaAQaMAISCXy/V6vcViKSsr69mzZ2uqcjgcFovFbrfzeDyhUCgQBOv/qa1WK504w+fzxWIxj+fHzxUuSD6fLxKJfDzX4XCYzWa73S4QCHw/yy2WZWlVDMPQ2gKuCgACg4QDIAR69Ohx8uRJlmWrq6vVarVKpQqgErPZXFlZWVdXZ7PZuJ0qlSomJqYNZ7WwLFtXV1dVVWUwGLidPB4vOjo6NjZWIpF4P91ms1VWVtbU1HB9OUKhMCYmJi4uzktuZLFYzp8/X11dbbfb6R4+nx8ZGRkfH+/vPFur1VpVVVVVVeX8KUkkkpiYmJiYmNYkMQDgFyQcACEglUq7du1Kx40WFRUNGDDA356J+vr6goICulCHM41Go9FooqKievbs2frW1GaznT17VqvVuux3OBxVVVXV1dV9+vSJiIjwdLrJZCotLTWZTM47rVZreXl5Q0NDSkqK254GnU5XUFDgMovHbrdXV1fX1tYmJycrlUof429sbMzPz28+IchkMhUXF9fX1yclJQmFQh9rA4DWQMIBEBpxcXH19fWNjY1ms7m8vPz/2bvz+Caqxf//J23a0pbSlUIXrLLvAiIKVwFZRLisIgqoFxULKKhc/QIqi3gBV+QjfK4oqIigUtkEBKWKKHBZy6KWFqQKFEoX6EL3LWl+f8zH85ubtCEkOW3V1/PRP6aTmclJMkneOdvExMQ4vu/Vq1dTUlK05bCwsNDQUC8vL7PZXFRUlJGRYTKZsrOzLRZLixYtDAaD0yWsqqqSacPPzy8iIsLX19fDw6O8vDwzMzM/P99isfz666+dO3euqdZBS1QBAQHh4eHe3t5VVVXFxcWZmZkmk6mkpOS3335r27atVQkLCwtPnz5tsViEEE2aNAkODjYajSaTKTc39/Lly1VVVSkpKR07dnSknsNkMsm0ERIS0rhxY+1ZKi4uvnTpktlsLiwsPHv2bOvWrV15lgA4iMAB1A0PD48bb7wxKSlJCJGZmRkcHOzgLJmVlZXaxJpCiObNmzdu3Fje1KhRo5CQkNOnT5eXl+fk5AQGBupvvV65ubla2ggMDGzVqpWc7dTX1zcwMPC3337LycmxWCxXrlxp1qxZTQeJioqKioqS3+hBQUGhoaHJycmVlZUFBQW5ubmhoaFyY5PJdPbsWS1ttGrVSl93EhgY6OPjc/HiRbPZnJ6e3rx582uWPzs7W6aNli1byjI0atQoODg4KSnJZDJdvXq1sLCQ+UmBWkD7JVBnGjZsGBUVpS2fP39e9lew78qVK9r3aHh4uG2eaNCggfwyvnTpkm2bi+NkS0pERITV3OoGg6Fp06ZWm9kKDQ2Njo62qj9o0KDBDTfcoC1fvnxZf9Ply5e1i7BERkbattQ0adJEa4KRz4B9stNJeHi4bRkiIiK05cLCwmseCoDrqOEA6lJERERubm5paWlpaWl6erqdqgKNxWLJysrSluVXvpVGjRoFBgbm5+eXl5cXFBQ41yNVCNGiRQstu1Tb4iAbNbSIUC197YVecHCwwWCwWCwFBQUVFRVajNC60GobhIeH2+7l6ekZHh6elpYmhCgqKrLTd8SKvruo1Lhx44CAACEEfTiA2kENB1CXPD09b7zxRm05PT1dPxKkWmVlZdqPe39/fzsjROSX8TUPaJ/BYKipf4Nc72DFjJ6np6eMQbJLaVlZWXl5uRDC39+/povb+fn5aQslJSXXvBctTwghLl68aPs8eHl5BQQEBAQE1MLl5QAIajiAOteoUaOmTZtmZmYKIc6fP9++fXs7o0u0r2QhRMOGDe0cU2YRO9UPjquoqCgoKCguLi4rKzObza4000h+fn55eXlCCDlcVj60qqoqrRqj2pJoC45MmBYWFpaTk1NYWFheXp6UlBQQEBAUFNSwYUN/f3+lV98FUC0CB1D3oqKi8vLyysvLi4uLMzIyZMcOW7I6wf4wWnmrizOZmkym9PR07Vrz7iW/8uUjkjmmtLT00qVL9nd3pFrF09OzdevW6enpmZmZFoulsLBQ665hMBhCQ0NDQ0MDAwMZnwLUGgIHUPeMRuONN974yy+/CCHS0tKCgoL8/f3t71IL35Rms/nMmTPal7SPj0/jxo39/Py8vLy0u66qqkpOTnbj3WmDU4QQ3t7e15wJ1MGOF0aj8YYbbtBGIF+9elXr32qxWLKzs7Ozsxs1anTTTTfRpALUDgIHUC9oM4RqvSZTU1Pbtm1b7WayYqDajpCSrABwpUdkRkaGljYaN2584403WjX0ONF1o9rd5SOSxw8ODpb9WtzC29u7adOmTZs21SbhKCgouHz5sjYu99SpUx06dGCmc6AW0GkUqC+io6O1b77CwkI5FMWK/Gq03xtU9sR0+ue7HDNiMBhuuOEGt08BLnt9ykgkFxzpEOocT0/PRo0aRUdHd+7cWetSWlFRYTU0F4AiBA6gvvDy8pLzjV68eLHa711fX1/ti7moqMhOh1CtP6YQ4ppNMzXRLtUmhPDx8XH7BeHMZrOcvUP2b/Xz89NijdbN08W7KC0tzczMzMzMvHr1qu2tRqNRdpRxcSAPAAcROIB6JCQkJCwsTAhhsVisLkGiMRgMco6Kmn6aFxUVaYHD29vb8cuO1EQbmWK7vtovcivZ2dnVrs/JydG6iAYGBso6G+2CcNqynW6qBQUFjrTmmM3m1NTU1NTU9PT0ajeQTTn0GwVqB4EDqF+aNWtmv+NFeHi4VuWQkZGRm5trdWtFRcXZs2e15aioKKebQry8vORkGNqQXb3c3Fx5L0LX39N2s7S0NKtbtSu6yceiv6lJkyba1792ZbhqD3j69OlTp05dc7ivnKeksLAwJyfHdgMZhpyuBAJwXeg0CtQv3t7eN9xww2+//WZng5tuukm7eFtKSkqTJk1CQkK8vLyqqqqKiorS09O1ySqCg4NduZCKwWCIiIg4f/68ECItLa2kpCQoKMhoNFZWVubk5BQUFOg3NpvNNTW7XLp0qaCgQLt4m8Vi0S4vp1VRBAYGBgcH6zf29fW98cYbtSvFnDt3rqCgICwsTMs92tVhtJRgsViu2cqjdT3RBv78+uuveXl5oaGh2qEqKiquXLmiZTVPT0+tSgmAagQOoN4JCwvLzc2V/TBshYSEtGjRQrvOWVZWlm0P05CQkObNm7vYWBAeHl5UVKR9x+fm5lrVpsTExGRmZmqdLcrLy6tNAC1atEhLS5MTYOj5+vpWW0KtzkPLHDk5ObaVE40aNWrRooUj3UqCgoKaN29+7tw5i8VS7aE8PT1btWrFsFigdhA4gPooJibGfmeFsLAwf3//zMzMnJwc/WYBAQFanYfrXRMMBkPz5s0DAgLS09P1vTiDg4MjIyMbNmxYWlqqNXwUFhZW2zAREBDQoUOHjIyMy5cv68fBhoeHR0ZG1hQawsPDAwICbB+aj49PkyZNmjRp4ng7kTZ3SFZWluw1oi9DkyZNappDHYDbGSZNmlTXZQDgvKqqqvLycrPZbDAYvLy8VEwpYbFYysvLTSaTwWDw9vZ2Ym6PqqqqsrKyqqoqDw8PHx8fB2cWlw9NCGE0Gn18fJxOUW48FADnUMMB/LF5eHjYuYqbWxgMBhfbHTw8POR1165rL3c9tFp4lgDYxygVAACgHIEDAAAoR+AAAADKETgAAIByBA4AAKAcgQMAAChH4AAAAMoROAAAgHIEDgAAoByBAwAAKEfgAAAAyhE4AACAcgQOAACgHIEDAAAoR+AAAADKETgAAIByBA4AAKAcgQMAAChH4AAAAMoROAAAgHIEDgAAoByBAwAAKEfgAAAAyhE4AACAcgQOAACgHIEDAAAoR+AAAADKETgAAIByBA4AAKAcgQMAAChH4AAAAMoROAAAgHIEDgAAoByBAwAAKEfgAAAAyhE4AACAcgQOAACgHIEDAAAoR+AAAADKETgAAIByBA4AAKAcgQMAAChH4AAAAMoROAAAgHIEDgAAoByBAwAAKEfgAAAAyhE4AACAcgQOAACgHIEDAAAoR+AAAADKETgAAIByBA4AAKAcgQMAAChH4AAAAMoROAAAgHIEDgAAoByBAwAAKEfgAAAAyhE4AACAcgQOAACgHIEDAAAoR+AAAADKETgAAIByBA4AAKAcgQMAAChH4AAAAMoROAAAgHIEDgAAoByBAwAAKEfgAAAAyhE4AACAcgQOAACgHIEDAAAoR+AAAADKETgAAIByBA4AAKAcgQMAAChH4AAAAMoROAAAgHIEDgAAoByBAwAAKEfgAAAAyhE4AACAcgQOAACgHIEDAAAoR+AAAADKETgAAIByBA4AAKAcgQMAAChH4AAAAMoROAAAgHIEDgAAoByBAwAAKEfgAAAAyhE4AACAcgQOAACgHIEDAAAoR+AAAADKETgAAIByBA4AAKAcgQMAAChH4AAAAMoROAAAgHIEDgAAoByBAwAAKEfgAAAAyhE4AACAcgQOAACgHIEDAAAoR+AAAADKETgAAIByBA4AAKAcgQMAAChH4AAAAMoROAAAgHIEDgAAoByBAwAAKEfgAAAAyhE4AACAcgQOAACgHIEDAAAoR+AAAADKETgAAIByBA4AAKAcgQMAAChH4AAAAMoROAAAgHIEDgAAoByBAwAAKEfgAAAAyhE4AACAcgQOAACgHIEDAAAoR+AAAADKETgAAIByBA4AAKAcgQMAAChH4AAAAMoROAAAgHIEDgAAoByBAwAAKEfgAAAAyhE4AACAcgQOAACgHIEDAAAoR+AAAADKETgAAIByBA4AAKAcgQMAAChH4AAAAMoROAAAgHIEDgAAoByBAwAAKEfgAAAAyhE4AACAcgQOAACgHIEDAAAoR+AAAADKETgAAIByBA4AAKAcgQMAAChH4AAAAMoROAAAgHIEDgAAoByBAwAAKEfgAAAAyhE4AACAcgQOAACgHIEDAAAoR+AAAADKETgAAIByBA4AAKAcgQMAAChH4AAAAMoROAAAgHIEDgAAoByBAwAAKEfgAAAAyhE4AACAcgQOAACgHIEDAAAoR+AAAADKETgAAIByBA4AAKAcgQMAAChH4AAAAMoROAAAgHIEDgAAoByBAwAAKEfgAAAAyhE4AACAcgQOAACgHIEDAAAoR+AAAADKETgAAIByxrouwP9v3Lhxt99+e4MGDeq6IAAA/LGVlZUdOnRo3bp1dV2Q/5/nLbfcUtdlEEKIcePG9e3b12isRwEIAIA/KKPReOONNwYEBJw8ebKuy/J/6kuTyu23317XRQAA4E+lXn231pfAQUsKAADuVa++W+tL4AAAAH9iBA4AAKAcgQMAAChH4AAAAMoROAAAgHIEDgAAoByBAwAAKEfgAAAAyhE4AACAcgQOAACgHIEDAAAoR+AAAADKETgAAIByBA4AAKAcgQMAAChH4AAAAMoROAAAgHIEDgAAoByBAwAAKEfgAAAAyhE4AACAcgQOAACgHIEDAAAoR+AAAADKETgAAIByBA4AAKAcgQMAAChH4AAAAMoROAAAgHIEDgAAoByBAwAAKEfgAAAAyhE4AACAcsa6LgCAeuF8fl5q/lUhLDVtcHN4RFAD39osEoA/EwIH8Ff3Y1b66E2fnLuaa3+zLk0iv3swNpjMAcApNKkAf2lXy0r7f/r+2au5FiHs/53ISu//6ft5ZaV1XWQAf0gEDuAv7ePE445nCDIHAKfRpAL8pV0tK62x10Z1TmSl37Jq2Y2BwUIYrrlxUIMGfW5o/sytf3O6eAD+NAgcAK7Puat5567mObjxll+StpxJ2v3gpGvHEwB/ajSpAFDIIsQPqWe3/pJU1wUBUMeo4QAghBCBPg26NIlw7zF/zMrILy/TFka26eDegwP4YyFwABBCiC5NIr5/cJIwuLPpo98nK3+4cFYIYWd6DwB/EQQOAL8zuDVuAIAOfTgAAIByBA4AAKAcgQMAAChH4AAAAMoROAAAgHIEDgAAoByBAwAAKEfgAAAAyhE4AACAcgQOAACgHIEDAAAoR+AAAADKETgAAIByBA4AAKAcl6cHIIQQ+eVley+cdfsx3XtAAH9cBA7gLy3Qp4FBCIsQP2Zl3PXJSvce3CLvpYGve48M4A+HJhXgL+2RzrcENmigLVvc/acJ9GnwSOdb6uoBAqgnCBzAX1pQA9/dD066MTBY0fFjAoO+f3BSMDUcwF8eTSrAX13XJpFnp866Wlb6Y1a6e4/cpUlkkE8Dg8Hg3sMC+CMicAAQBiGCG/jeFdOirgsC4E+LJhUAAKAcgQMAAChH4AAAAMoROAAAgHIEDgAAoByBAwAAKEfgAAAAyhE4AACAcgQOAACgHIEDAAAoR+AAAADKETgAAIByBA4AAKAcgQMAAChH4AAAAMoROAAAgHIEDgAAoByBAwAAKEfgAAAAyhE4AACAcgQOAACgHIEDAAAoR+AAAADKETgAAIByBA4AAKAcgQMAAChH4AAAAMoROAAAgHIEDgAAoByBAwAAKEfgAAAAyhE4AACAcgQOAACgHIEDAAAoR+AAAADKGeu6AHDSwYMHU1NTteVevXrdcMMNjtwEIURqaurBgwf1awYNGhQcHKzuHktKSrZt26Zf06VLl7Zt26q7RwCobwgc9UVeXl5xcbG2HB4e7u3tbX/73bt3f/jhh9ryxx9/rE8Vdm6qt8xmc0ZGhn6Nn59fSEiIivs6d+7ciy++qF9zyy23qA4cVvf4xhtv2A8ctk+IplGjRo0aNbKz45UrV8rLy61Wenp6RkREOFxeAHA/Akd98dxzz/3www/a8ttvvz18+PA6LU5tu3z5cu/evfVrJk6cOHv27LoqT52zfUI0Dz/88Msvv1x/lFDQAAAgAElEQVTTXmaz+f7775f1W1Lz5s137drl5iICwPWgD0e9cP78eZk2hBCbNm2qu7KgXtu+fXtZWVlNtyYlJdmmDdSmEydOHPpdRUVFXRcHqEeo4agX4uPj9f/u27fvt99+a9GiRV2VB/VWXl7e8ePHe/XqVe2t//nPf2q5PLAyf/78xMREbfnIkSNhYWF1Wx6g/qCGo+6Zzeb169dbrfzmm2/qpDCo//bu3VvteovFsmPHjlouDAA4iMBR9xISEs6dO2e1cv369ZWVlXVSHtRzX375pclksl1/5syZU6dO1X55AMARNKnUva+++kouP/vss0uWLBFCpKamHjly5G9/+5vSuy4tLb18+XJBQUGDBg3CwsKUjtSoBZWVlenp6YWFhUKIgICA6OhoT09Px3evqKhITU0tLy8PCgqKiIhwZN/CwsKcnJzCwsIGDRqEhISEhoY6X3qHZWRk/PTTT7fccovV+v379ztxNBefNCFETk7OlStXzGZz06ZNr/kMOHd3hYWFWVlZZWVlQUFBUVFRBoPhukro4stUVlZ28eLF8vLymJiYgICA69rXPre/AbOysvLy8ioqKho2bBgVFeXj4+PIXvn5+Tk5OUVFRX5+fpGRkX5+fur2Kisry8zMLCws9PPza9y4sf0hV5qKioq0tLSioiIvL6+goKCmTZs6cgI4txeUInDUsatXr8ouokOHDh07dqwWOIQQ27dvVxc4kpKS1q5d+/XXX2sf/ZpevXo98MADQ4YM0X8HHD9+PDY2VlueOHHik08+qT9OUVHRgAEDtMqYNWvWdOjQQX/rDz/88Nxzz2nLM2bMGDt2rKKHc/jw4Y0bN+7cuVMOLRZCBAYGjhw5cuzYsW3atLG/e2Vl5apVq5YvX56bm6utad68+T/+8Y+xY8dWOz65qqrqu+++27Rp0+7du/WVDbfeeuv9998/bNiwa45qdoLRaJT3tW/fPtvAoU+u+o1rcl1P2ueff/7GG2/IfwcMGPD6668fP358+fLlu3fvlusHDRo0ffr0ap9w516j33777b333tu+fbsc69u+ffunn366devWo0ePlpsFBwfbDsO53pdp7969//znP+W/LVq0WL9+fXx8/CuvvHLx4kUhxIIFCx588MFqyzlhwoSTJ08KIfLy8uTKgQMHenh4CCE+/PDDLl266Ld3/A3oiPz8/E2bNsXFxf36669ypa+v74gRIx5++OF27dpVu5fFYtm9e3dcXNx3330nV/r4+AwaNGjChAldu3Z1415CiNTU1NWrV2/btk0+RUajsX///hMmTLj99tur3SUlJWXNmjVbtmzRnzMxMTEPPPDAAw88UFM+c24v1AKaVOrY999/X1paqi0PHjw4LCxs6NCh2r9btmyR339uZLFYVqxYMWzYsPXr1+s/7IQQBw4ceOaZZx5//HH9h2a7du0qKiry8vLy8vIOHDhgdbTjx49fvnxZu9VqNi0hxI8//pj3u86dO7v9sQghysrK5s2bN27cuE2bNuk/X4QQ+fn5H3/88bBhw1atWmWxWOwcZM6cOQsXLtQ/22fPnp0/f/60adNsh4QUFhY++eSTkydP/uabb6y+1BMSEmbMmPHII49kZWW5/Mis9e/fXy5/+eWXZrNZf+v58+ePHz9e7ca2nHjSTCZTnk5aWtr69evvu+8+fdoQQsTHx993330//fSTi3en+e6774YOHbpp0yb9zCLJyclTpkx59dVX9eUpKSmx2teJl6mqqkp/zJSUlO++++6JJ57Q0oYQwk4OKCsr0/ayenTayqqqKrnyet+A13Tq1KkxY8YsXLhQnzaEEKWlpXFxcX//+98/++wz273Ky8tnzpwZGxurzw3a+m3bto0ePXrlypW2r4hzewkhtm3bds8993z88cf6h2YymeLj48ePH7906VLbvXbs2DFy5MhPP/3U6pxJTU1944037r333mobEJ3bC7WDwFHHZPWGr6+vNvRgyJAh2pry8nKrT3O3+OCDD15//XX9Gqv5tfbs2TNlyhQZg3x9feW314EDBwoKCvQb66vxbTu6HjlyRFto2rTpNasZnGCxWObMmfPJJ5/Y2cZkMi1cuHDjxo12tvnxxx+rXb9r167//d//1a+pqKh46qmn7HfpPXTo0KRJk4qKiuxs44Q+ffrI5XPnzll9bupfCH9//zvuuKOm47jlSTt+/Pjzzz9f7U3FxcXz5s2Tecjpuzt58uS0adNsJzHTfPvtt3YO6JaXKT8/32omGKPRDVXC1/sGtO/SpUsTJ06UUcPf379Xr1533nlnYGCg3GbOnDm2w5cWLVpkNfzeakDNa6+9tmHDBrfstXnz5unTp+tfSqu9li5davXqHzt27KmnnpJPQps2bYYPH967d29/f39tTWpqamxsbE5Ojut7odYQOOpSSkqKrDMYPny49hnRq1cvX19fbeWGDRvs/zS/XomJia+++qr8d/bs2UePHj169Ojp06dXrVoVExOjrU9ISHjvvffkZvqWndOnT8tls9m8c+dO+e/Ro0cvXbok/y0sLDx06JC2PGDAgOutJXbE3r17N2/erF/TunXryZMnjxw50mrL1157zfZHsCPef//98+fPy3/XrFlT0yARvcTERP0T6BYdO3aMjo6W/1r12NCPrB4+fLiXl1dNx3HLk1ZTDtAkJiYmJSW5cndms3nhwoX278UOd71Mly9f1v9r5xxet25dSkpKSkpKp06d5MqDBw9qK2VDg3NvQDvefffdzMxMbXnkyJE//PDDJ5988vHHH+/Zs+f++++Xm1kdbe/evTICRkZGvv/++8nJyUeOHPnxxx9feOEFudmrr76anZ3t4l4pKSlz587VP+QTJ04cOXLk5MmTS5culb1MXnvtNf1e77zzjlxesGDB9u3b33777dWrV8fHx8v2l/T09HXr1ukfl3N7odYQOOqS/hfYoEGDtIVGjRqNGDFCW05ISPjll1/ceI8rV66Uy3Pnzp04caL268rb27tv374rVqyQ7/+VK1fKDzJ9u6ycY0AIcerUKVnbrJFVGkIIfclraqN1kX62NCFEeHh4XFzcrFmzlixZsnDhQv1NeXl5NVVjCCG6dOmyefPmpKSkY8eOzZw5U3+TVuurLefn5+s/0YQQnTp12rJly8mTJ/fv3z916lT9TR999JH+A9R1JpNJnhhCiO3bt8swmpGRof8JO3DgQDu/j931pA0fPvz7778/derU3r17H3roIatbz5w548rdad9J+lubN2/++eefJycnHzt27PXXX7dT2aDiZdJ+A9i5Uw8PD09PT6tE4vk72V3RuTdgTUwmk6xvMBqNL730kuwP26hRoxdeeEF2cT1w4IC+LeODDz6Qy4sXL+7fv3+DBg20vWJjYydPnqzdlJ+fr3/5nNtr9erV8mycPn36xIkTtV9Wfn5+w4YNmzFjhnZTXl6efKMVFxfLI7Rv3378+PHyiY2MjNRXrenrgJ3bC7WJTqN1pqKiQk6/ERwc3KNHD3nT3XffHRcXpy3v3LnTXVf5SktLk/M0REdH23bhbN269cMPP6x9rJSXl+/atUv7ImnRokVMTIw2heXRo0cnTpyobS8rMIKDg7WPsz179owaNUpbKX/jiv+OLG7UrVu3qKgo+W9YWFhQUJC2bDsvuJ2P73nz5ml9+nx9fSdNmvTtt9+eOHFC3vrtt99qH6bff/99fn6+fsdFixZ17NhRCOHn5zd9+vTDhw8fPXpUu6m0tPTIkSOygcx1paWl/fr1k1+lSUlJv/76a6tWrcR/13YEBgb26NHDTkO1u560l156Set/Fx0dPX36dKtGE9k9wrm727Nnj9VNr7/+utZPtkGDBmPGjDl58uTatWurLZgbX6aYmJjZs2ffdtttAQEBrg9Td/oNWBODwSAvCujp6alvRhFCBAYG3nzzzTKJ5uTkaK/X2bNn5co2bdrcdtttVocdO3bsihUrtOXExMT77rvP6b3y8vJkdUJwcPBjjz1mtdfIkSNl7ty1a5fWJ1c/Q6vJZKqqqtInubZt2y5fvlw+arneub1QmwgcdebIkSOyemDUqFH6QWW33XZbSEiI1odx/fr1U6ZM0X5JuEifAIYOHSobbvQGDhwof8ccPnxY+7wzGAxy/d69e8vKyrTyyHb0WbNmaT8g4uPjCwsLtd9Vsg9j586dFV05bNiwYTXdZDt80aoTmZ5s4hVCeHh43HXXXfrAcfz48ZKSEj8/v2PHjun36tChg/Y1pvH09Lz55pvlN5kQ4uTJk24MHGVlZT169JDJTwjxn//8Rwsc+g4Nw4cP9/Pzs9N+5K4nTf9zPyQkxN/fX7+x7Bvh3N3pO8AKIbp06WI1KsfOOCA3vkyLFi2Sk7raaaVykNNvwJp4enpqJ0BN9INO5fexvhiDBw+2HSzarFmzt956S6s/k1Umru/Vr1+/hg0bWu0VEhLSoUMHbTNtMnhvb++goKBWrVqlpKQIIc6cObNo0aLY2Fj5GeLt7X3PPffYPljn9kJtInDUmS+//FIuDxgwQH+Tr6/vyJEjV61aJYTIzMw8dOhQ3759Xb9HfV+EmkbKtWzZUi7rfyX36NFD+xwsLS3VGqrT09MTEhKEEGFhYSNHjty4cePRo0fLy8uPHz/ep08fk8kkfw/169fP9cLbYbFYkpOT9+/fn5ycfOHCBW1ugGo3c/CAsildys3N9fPz0396CiGKioqsOhX+/PPP+n+vWSV+XUpKSjw9PUeOHLl06VJtzddff/3oo49mZ2frA4d2LtkJChq3P2ne3t76O7UaGHK9d5ecnKxfr6//uyY3vkyNGzd2/H6vyZU3oH2VlZXHjh07ePDgqVOnLl26lJeXp3V/sRoFo0lLS5PL1V5K2sPDQ9ZTunGvCxcuLFq0yHZHeSaUl5fn5+c3btzYYDBMmzbtmWee0davXr169erVPXv27NmzZ7du3bp06VLtnB/O7YXaROCoGzk5ObIuNCIiokuXLlajHPv166cFDiHE1q1b3RI49ANMZLW2Ff1PogsXLpjNZq36Ud8mkpSU1KlTJ9nEPmTIEG9v70GDBmm/Gvfv39+nT5+zZ8/KNuNbb73V9cLX5NKlSwsXLrS6GI2LbCcj0ioMrEZRpqam2r9S2tWrV91YKq0h/K677pKB4+jRo6mpqfqvz5CQkO7du4trBQ4VT5ob766iosKqTeS6vvjr9mWyw5U3oB0nTpxYsGCBnd42VvQpxPFJKZzbS/86JiQkaD9R7JA1c0OHDi0tLV20aJG834MHD2oD7wMCAsaMGTN+/PjmzZtb7e7cXqg1dBqtG7t375Y98DMyMtq3b9/qv+mrUrdu3er2eR0cnHRPbhYaGirrlrUqa9k/S2uJlyNZvvrqK7PZLH+h+vj4KJqBQwiRlZU1YcIEt39x1vTkXO9IV/3sC67TPos7dOig/xF84MAB/YwII0eO1Crq7RRV0ZPmxrtzcWRW3b5MDrreN2BNEhISHnroIZk22rVrN3HixBdeeGHu3Llz585t3769W4rh9F7X2/FF/u4yGAz3339/fHz8c88916xZM/02hYWFq1atuueeez788EOrU8W5vVBrqOGoAxaLxf60ELZkdypX6H881fSrTv87JioqSpsnUdO7d29tEO+ePXvy8/O1anwfHx+tcb1169YtW7b89ddf09PTk5OT5dRP/fr10/eQcK/ly5efPXtW/uvr6/vqq6/ecccdgYGBBQUFtnNxOsi2A4RWGRsREaF/fiIjI62mj7Ri2zTjCq2GQ2tVWbx4sbZy48aN+tYH2Xpl50tX0ZPmxrvz8fEJCAjQP9VXrlxx/B7r9mWyw8U3oK3Kyso5c+bIMSBvvfXWiBEj9LscO3bMqnFK/HfXGcdnGHNuL32njSlTpsixeDWx6uzVtGnTqVOnTp48+fTp0z///PORI0fi4+O1n2omk2nRokUhISG27TjO7YVaQOCoA6dPn75m1aKVDRs2jB8/3sVrAehncZCjFq3oLyNn9fNIq6sXQmRnZ8fFxWkfcwMHDtT6xnt4ePz973/XavsPHDggx02om529pKTEKrc9/vjjw4cP15btf1LbZ1ufpI1dbNWqlf558/Dw+J//+R/X+xI6SLaS9OnTRwYOfefW8PBw+f1t1SQhqXvS3Ht37dq10w+LPX78uMVicfD8r9uXyQ4X34C2EhMTtT6SQoj777/fwS9R/aAh/cQ5KvYKDw+Xy2VlZTfffLODO+oZjcaOHTt27Nhx/Pjxubm5S5YskXOnrlq1qqZH7dxeUIomlTqgnyzrH//4x8c1u+mmm7TNfv75Z/0EGM7R99XfsWOHfhSZpB+hbtX3okOHDnLcnRxgpu9cIme3XLt2rZz6sFu3bi4WuyZXrlyxmm1C/wCvi9UEU4cPH9b/27lzZ62Gwyo8paWlVVtTtX79+vT0dOdKYoecZL19+/bVdjkcOXKknMWhplEqbnzSHOH03cl0qzl69KhVV1A7V4qp25fJDhffgLb0X/z2h6vo6U+e+Ph42/aFwsLCu+66q0+fPn369HnppZdc2Ut/caXt27fXlIOterB98cUXi36XkZGhvykkJGTOnDlyotKkpCR5qju3F2oTgaO2lZWV6af+HTt27J0108dwfUxxTkxMjJyk/Ny5c1bzP4rfr64k/7UaO+Pj4yNr7GXFr35Gr86dOzdt2lQIIT/HIyMjHf8ctJKSkrKxZt99953t713ZjmM2m+3PpW3l1VdfPX36dFVVVXl5+ebNm62eavk83H333Vbd5V566aV33303PT3dbDaXlJT89NNP2gjhf/7zn26f2lx+xBsMBllJoKcfDVRTvwQ3PmmOcPrubHtJz549OykpyWw2FxYWfvHFF3KiGlt1+zLpRwtbfau5+Aa0pa8ish3ScubMmX379tnu1bJlSxllEhMTrUYgCyHi4+NTU1MvXrx48eJF2RPCub1iYmLkaZmdnb1s2TLbpFJcXDx16lR9V6ScnJwPf6cfwKzx8fHRt9LKJ9y5vVCbeNJr26FDh+QwvE6dOtm/wki/fv3kxWPXr18/bdo0F0d2TZ48Wb6xX375ZbPZPHz48ICAALPZfPz48ZdfflnW28fGxuprgDW9evX64osv5L+33357ZGSk/NfLy2vIkCFycI0QYuDAgU7PsbN37147s1P369fv3XffjYiI0P+UWb58+S+//BIVFZWQkGD7+WvnN/HBgweHDBni4+NT7VzasuE5JCTk2Wef1c/TbDKZ3nzzzTfffNNql4SEhHnz5r355puKphjq27ev1fU4IiIiHJldLSIiwl1PmiOcvruuXbvefvvtcmY5IURiYqKdKT306vZl0g+o+eKLLx577DGDweDh4aG9c118A1pp0aKFXN68eXP37t1HjRrl4+NTUlKya9euhQsX6nuEyKomg8EQGxsrW3Vnzpy5YMGC2267zdPTs6ioaPv27QsWLNBu8vHxufvuu13ZSwjx5JNPymqbjz76qLS09PHHH7/pppsMBkNJScnhw4eXLFmSlJT0zTffLFu2TLt0Zb9+/d544w3tZFi8eHF4eHiPHj208GoymT777DM57Khv375yRhbn9kJtInDUtq1bt8rlkSNH2m+WbteuXadOnbTGlNzc3P/85z/6d7ITunfv/swzz2g9LcrLy7Wu7DExMbm5ufrPpg4dOkybNs12d6uvtIEDB1pt0Lt3b33gsJ2O0I28vLxiY2P/9a9/6VdaXcRS75pXbKo2bTzyyCP6Sppx48YlJibKKWLtSElJKSgoUHQt7NatW8sTQzNq1ChHuim4/UlTdHeenp4vvvjimDFjnLucSh2+TF27dpWXLFi6dKn2Xnvvvfe0d66Lb0Arbdq0GTRokBwB9OKLL86bNy8iIsLqggMa/fH79+8/cuTILVu2CCHOnTv30EMP+fr6hoWFWe04e/Zs/ZQbzu3VrVu3559//rXXXtP+jYuLi4uL02aKs9pRhoDmzZv/85//1ALixYsXx40b1759+w4dOlRWVp48eVJ/UdwpU6bIZef2Qm2iSaVWZWVl6QOH/vqf1TIYDPprXGlvdRdNmzbN6rMsNTVV/2HUvXv3Dz74wHYWSCHETTfdpB+T2bNnT6sNunfvrq+3tD86wHUPPvjguHHjqr2pXbt2Vk3gVtdMl7p37257ITFNz549n332Wf0aDw+PhQsXWl2Pw9agQYPef/99RWlDCGEwGPTXVRFC3HXXXQ7u65YnzXFO313Hjh2XLVtWbdW3r6+vvnOArTp8mYYNG2Z1KVQrrrwBrRgMhvnz5+v7lppMJvkt3rJlS33Tm+xequ24cOHCwYMHyzWlpaVWX/9z5syxGhnn3F5CiNjYWH2FkxAiNzdXv2NISMjKlSv1v6YmTZokL84ihEhOTt6wYcOWLVtkbvDx8Xn77betZoRzbi/UGgJHrdq1a5dc7tGjhyNT0Ogb5nfu3Kmfuc85np6ezz777MaNG4cPHy77GGo6d+78yiuvrF27tkmTJtXuazAYZLty8+bNW7dubbWBn5+fnCW6W7duWpcOdby8vBYsWLB06VJ9jzaj0Thu3LiPPvrIqiP6gQMHqp0Aqm3btq+++uqsWbP0XzwREREzZsx4//33bSdjNhqNzz333I4dOx5++GF9J3zNkCFDVq5c+c4776h+7PoLkTRr1szxbOeWJ81xrtzdwIEDv/zyS62aXbr99tvXrVtnVdlmdSaLunuZIiMjV69ebXW1Qn1nC1fegLaaNGny6aefTps2TR9QAgICJk+evG7dutGjR8uVVhVLfn5+y5YtW7ZsmVVRjUbjiBEjtm7dqjUGWd2dc3sZDIZHH300Pj7+wQcftIp3gYGBjz322JYtW6w6rHh6es6aNWvNmjV33323VegMCAiYMGHCjh07bHsyObcXao1h0qRJdV0GIYSQV/1BbSoqKsrIyCgoKPDx8QkNDVV0xZNaYLFYtAmzvby8oqOjnfvNWlJScv78+bKyssDAwGbNmjnSyms2m9PS0goKCiorK4OCgsLCwmxnKa233PKk1c7d5eXlpaenl5eXh4WFadX148eP1/fw6NWrl50uqLX/MmkPNjs728vLKzw8vKZY48Y3YHl5+fnz5wsLC/39/WNiYq6rs1d2dvaVK1eKi4v9/f2jo6MdqVxxeq+Kioq0tLT8/PyqqqrAwMDo6OhrXiiqqKjo0qVLRUVFHh4e2nvTkdZD5/b6U9LX+tQtAgeAespsNv/73/9+5JFHrK6D+tNPP1lVjUyePHnWrFm1Wzrgj6H+BA6aVADUU3FxcUuXLr333ns3bdqUmppaUFCQmpq6devWp59+2mrLa3aHAlDnGKUCoD765ZdfXnnlFSHEuXPnZsyYYWfLwYMHKx0PBcAtqOEAUB/t2rXLapbSanXv3n3BggUuzvoPoBZQwwGgPnriiSe0MRE1zYcthHj88cenTp1q1cMDQP1E4ABQH3l4eDz66KPDhw//9ttv9+/fn5CQcPnyZSFESEhI9+7de/ToMWDAAP0EUwDqOQIHgPorNDR07NixY8eOFUKUlZV5eHgwKTXwB0XgAPDHcM0JGwDUZ3QaBQAAyhE4AACAcgQOAACgHIEDAAAoR+AAAADKMUqltm3cuNFkMmnLY8aM8fT0rNvyoCb6V2r06NF/vktN/ukfIBzEmYDawdVia9stt9ySl5enLScnJzPSr97Sv1InT568rut9/yHU9ACvXr26du3atLS0W265ZfTo0WTiP706P9Xr2ymXl5f3yy+/XLlypaKiIiAgICYmpmXLlnVeKqfVn6vFUsMB4L8sWbLkk08+EUJs2LDBz89v6NChdV0i/MnVn1Pu0qVLK1asiIuLk1U+mtatWz/55JPDhg3jqj2uIHD8JZw4caK8vFxb7tatG3M1wo6kpCS5fO7cuTosCf4i6skpd/To0djY2Gqv3XPmzJnp06cnJia++OKLZA6nETj+EubPn5+YmKgtHzlyJCwsrG7Lg/ps8ODBJ06cEEIYjcY77rijrouDP7/6cMpduXJlypQp+rQREREREhLyyy+/yNqODz/8sEuXLn//+9/rpIR/AgQOAP9l4sSJnTp1yszM7NChQ8uWLeu6OPjzqw+n3ObNm3Nzc7XlmJiY119//dZbbzUYDFevXn3zzTfXrVun3bRy5UoCh9MIHAD+i8FguO222+q6FPgLqQ+n3J49e+Tyv/71rx49emjLQUFBM2fO/Oqrr7TKj8TExKysrCZNmtRNKf/gCBxuY7FYMjIycnNzfXx8wsPDAwMDHd83Ly8vKyvLbDaHhYU5eCqXlpZevny5oKCgQYMGYWFhwcHBzhbcPUeuqKhIS0srKiry8vIKCgpq2rSpiy2dWVlZeXl5FRUVDRs2jIqK8vHxcXzf/Pz8rKysioqKkJCQiIiIa5akrKwsIyOjqKioUaNG0dHRbuyOnpeXd/nyZZPJFBoa2qRJE6uSmEym9PT0/Pz8Bg0aREVFOTg6oKysLDMzs7Cw0M/Pr3Hjxo0aNXJkFxUP0JXXyJaLp/T1vuhupO7NaEdZWdnFixeFENHR0b6+vo7v5fSZ4MSJ53b5+fk5OTlFRUV+fn6RkZFufMs0aNDg1ltv1ZY7d+6svykwMLBDhw4HDhzQ/s3LyyNwOIfA4aQRI0akpaUJIXr06PHOO+/s3LlzxYoVsp+E0WgcMmTI1KlTW7VqZf84p06deuedd7766iu55tZbb33qqafsNGQmJSWtXbv266+/LiwslCt79er1wAMPDBkyRP8JMmHChJMnTwoh5Jg3IcTAgQM9PDzE7+2Rzh1ZLyUlZc2aNVu2bCkuLpYrY2JiHnjggQceeMCJr41NmzbFxcX9+uuvcqWvr++IESMefvjhdu3aWW3fp0+foqIiIUSnTp1Wr159+vTpd9999+uvv5bNrp07d37qqaf69+9f09198MEHn3/+eXZ2tiz5pEmT7rvvvusqttCdEi1btpTo200AACAASURBVPz8888PHz68YsWKH374QW7QvXv3adOm9e7dWwhRXFy8Zs2adevWabsIIXx8fMaMGfPEE09ERETUdBepqamrV6/etm2bfEGNRmP//v0nTJhw++23u+sBvvnmm3FxcdrysmXL/va3v9ke87peo2u63hPPxRdd73//939Xr16tLY8YMWLevHlWG2RnZ99zzz0Wi0UIYTAYduzYof+yua6Sm0wm/e/4hIQE7Z0oXbhwYdSoUdryzTffvGrVKnmTPLvCwsJ27ty5YcOGt99+OzMzUwjx2muv3X///dd8pK6c6g6eeF9++eX8+fO15dGjR7/44otWx7FYLCNHjpTn/Pr161u0aCEcOOUsFsvu3bvj4uK+++47udLHx2fQoEETJkzo2rWriyUXQuifbVv6+QuYp8RpzMPhpAEDBpw9e1YI0apVqzvvvLPak9XHx+f999+3ig76Ie+LFy9+/vnnrcZfaV5//fUxY8ZYrbRYLCtXrnz99ddrKlWfPn2WLFkiv+MfeOCBhISEmjbeuHFjt27dnDuytGPHjpkzZ5aWlla7V0xMzPLlyx3/Bjp16tQzzzyj/xqzsnDhwvHjx+vXyOezVatW06ZNe+aZZ6rdcf78+f/4xz+sVl66dOnRRx+t9u5GjBixe/du+S3iyOQE8pQIDw+fOHHiq6++Wu1my5Ytu/XWWx9//HF9z3wpMjLys88+u+GGG2xv2rZt26xZs+RoIyvPPPPM008/bfWz3rkHuGjRog8//FBb/vjjj++88079jk68RnY4d+K58qJb+emnn+R3fHBw8P79+62mxtm5c+eTTz6pLQ8YMGDlypVOl7yysrJNmzby35SUFKtEkpqaetddd2nLvXr10kaKyrvWzi6j0fjCCy8sWLBA3vTGG29cMzS4cqo7fuLl5OT07NlT+0ALDw/ft2+f1Xfzr7/+evfdd2vLXbt23bhxo7aj/VOuvLx8zpw5mzZtqunRPf/887GxsbZ1Wk68ZapVVFR05513ak0qvr6+hw8fbtiw4TX3qj/qzzwcTG3uqpSUlJqicXl5+dSpUy9cuFDTvv/v//2/atOGEGL27NkZGRlWKz/44AOrD7iQkBD9v3v27JkyZUpNX/92OHfkY8eOPfXUU3JlmzZthg8f3rt3b39/f21NampqbGxsTk6OI2W4dOnSxIkT5Weiv79/r1697rzzTn3j1Jw5c/7zn/9Uu3tKSkpNXzxCiPnz52v1z1JZWdnUqVNr+uLcunWr/jfrdbl8+XJNaUMI8dJLLz3xxBPVpg0hRHp6+muvvWa7fvPmzdOnT9d/dFoNNVq6dOnGjRv1a1Q8QBdfI1suntLX+6Lb6tSpU+vWrbXlvLy8H3/80WqDvXv3ymV9b0F1b0b7TCaTPm0IIRxpMXT6TLiuEy80NHTIkCHa8uXLl7XqVT39758RI0Y42Oy1aNEiq7RhVYbXXnttw4YNrpTcvpUrV8rRK6NHj/5jpY16hcDhHs8///z+/ftTUlJOnDixdOlSeWYXFha+++67dnacPn36vn37UlJSjh07tnTpUvmZZTKZ9JWHQojExET919js2bOPHj169OjR06dPr1q1KiYmRlufkJDw3nvvacvr1q1LSUlJSUnp1KmT3PHgwYPaSlkP6cSRNe+8845cXrBgwfbt299+++3Vq1fHx8fL6sr09HTZwdu+d999V6siFkKMHDnyhx9++OSTTz7++OM9e/boa4ytymBl2rRpe/fuTUlJOX78+L///W/9R8zu3bv1W27YsOHnn3/Wln19fV955ZVjx46lpKQcOnRo/vz5RqNLrY2+vr4LFy48cuRISkrKkSNHFi5cKPs3aN9qwcHBb7/99vHjx8+cObNnzx79T5CdO3deunRJf7SUlJS5c+fKf2fPnn3ixIkjR46cPHly6dKl8sivvfaarC1X9ADd8hpJTp94Vhx/0W15eHjIGg4hxL59+/S3lpWVxcfHa8v6EZvuKrnTjEbj0KFDp06d+sQTT0RFRdnf2OkzwYkTb/DgwXL7gwcPWh3w+++/l8t9+vS59uMUYu/evbKmJzIy8v33309OTj5y5MiPP/74wgsvyM1effVV/cnv3FumWuvWrfv3v/+tLQcHB0+cONGRYqNaBA43eOONNyZNmhQREeHp6RkYGDhs2LAlS5bIWzdt2nTlypVqd3z55ZeffvrpqKgoT0/P4ODgYcOGzZgxQ94qe4RoZF2uEGLu3LkTJ07U0om3t3ffvn1XrFgh30UrV67UvhU8PDw8PT2tqm09fyd/XjhxZCFEcXGx7KDQvn378ePHyzuKjIx8/vnn5TGv+aEvhDCZTPJHjNFofOmll0JDQ7V/GzVq9MILLwQEBGj/HjhwQN8lRW/OnDnPPvus1hUuKChoyJAhM2fOlLfqn0+z2fzxxx/LfxcsWDB27Njg4GBPT8/w8PB//OMfS5cuvWaZ7XjrrbfGjx8fFhbm6ekZFhY2fvx4qx/iixcvHj58eFBQkNFobNas2cyZM7W+HZqUlBT9xqtXr5Y/lKdPnz5x4kStRsHPz09/zuTl5clvRxUP0C2vkZ5zJ54Vx1/0mvTr108uf/XVV2azWf77888/ywcyZMgQ+XjdUnKnde3a9dtvv122bNlzzz03Y8aMmrrvaFw5E5w48Xr16iUrOOPj47W+L3Iz+Ylxxx13yFhm3wcffCCXFy9e3L9/f63Nq1GjRrGxsTKp5+fn6/tLOVHyam3atGn27Nny3yVLljhYbFSLwOEGAwcOtFrzt7/9TdYfmEymo0ePVrujbcur7FQhhNB/TqWlpe3YsUNbjo6OHjt2rNWOrVu3fvjhh7Xl8vLyXbt2OVh4p49cUVEhtzGZTFVVVfq92rZtu/x3TzzxxDWLYTAYtm3bFh8fHx8fv3PnTqsxPoGBgTfffLP8t6Y2Gtuuc/q99M/nqVOntBZxIUTTpk1lPbB0zz33XNc4Iys9e/a0WtO9e3e53KlTp759++pvNRgM+l30DzAvL09WEQUHBz/22GNWRx45cqRclq+OigfoltdIctcp7fiLXpNWrVrJVyc1NTU5OVnepP+Nfs8997i35E7717/+5fjXntNngnMnXkBAwIgRI7TlxMTE8+fPy22OHz8uW5CHDRvmSOHPnj0rm+fatGljO3RW/+TLcOlcyW3t2rVL/wtw6dKlDtbKoCYEDiUMBsO9994r/z1z5kxNm1mtkT8OhBD6Oe/0Tf5Dhw6tdhScPvccPnzYwaI6feSgoCA5BufMmTOLFi3Sdzrx9va+53e2gcyWp6dnq981b97cdgP9SDZ91tGz6vMv/vv51DdU61+RUaNG2V5Cz2Aw2B7NFfp232oHbeo3KCkpkcv6F6hfv3627cchISEdOnTQlg8dOqQ9OSoeoFteI8ldp7TjL7od8jtSCCFHP1oslp07d2rLvr6+MhGqezM6KDo62vGNnT4TnDvxhBCyW6j478e+f/9+uWzVLbQm+jIMHjzY9l3TrFmzt956a/HixYsXL5Y1VU6XXC8tLU2fNv7nf/7HwZAEOxgWq4r+Q8G2+2dN9O8ofW2k/odCTYM+9DP0nTp1ysF7dPrIBoNBP0Bg9erVq1ev7tmzZ8+ePbt169alSxfnrjlZWVl57NixgwcPnjp16tKlS3l5eVq3L+e6cNbUKy0rK0su33TTTU4c2V0lqZb+pZdjCIUQFy5cWLRoke322hhRIUR5eXl+fn7jxo2VPkC3vEbqTmknZuCQY0OEEF999dWkSZMMBsNvv/32yy+/aCuHDRsmqwHUlVwFp88E5048IUSPHj3CwsK0vhG7d+/WKiFMJpNMb3fffXfTpk2vtwzVDt2y6oLjYsn1PvvsM/mTb/bs2fpICqcROFTR91wrKChw8Wj6IwQFBVW7jf735YULF8xmsyOz+rhy5KFDh5aWli5atEh+0xw8eFCrhQ4ICBgzZsz48eOr/SlckxMnTixYsMB2pIDbyY8bIYRsmK+f9BVdCQkJdsY5a7TaEXUP0F2vkbpT2gmRkZH9+/fXumknJiaeO3euefPmR44ckRvof7XXq5Jfk9NngnMnnhCiQYMGo0aNev/994UQu3btys3NDQkJSU5Ols1bjk8Nro+wjs/o43TJJYvFIvt2REdHP/jggw7eNewjcPzxOPgDzonfedd7ZIPBcP/99/fu3XvTpk3r16/XD0EsLCxctWrVmjVrZs2a9dhjjzly5ISEhEceeUR29WrXrl2vXr3Cw8O1XvSbNm3SN667SF+FUM+v/VhZWXld22t9HhU9QEWvkbpT2nFDhw6V48IOHjzYvHlzOaQiMDCwpo6Z9aHk9jl9Jjh34mkGDBigBQ4hREJCwqBBgw4dOqT96/Tl2RwvvCsl1xQVFcmL1vbu3du2HQrOIXCoou805/ocwPojXL16tdpt9L8GoqKiHGyhd/3ITZs2nTp16uTJk0+fPv3zzz8fOXIkPj5eq2M3mUyLFi0KCQmxrfa0UllZOWfOHPlN9tZbb40YMUJ/R8eOHXNj4NA36zo4TUhd0Rd1ypQpgwYNsr+9NlGpigfo3tdI3SntnN69exuNRq1X4zfffDNkyBCZP0aMGKFvH6xvJbfP6TPBuRNP07Vr12bNmmm/QPbt2zdo0CDZN3Po0KGO11XIcU/iv6dLVldyTWlpqez1L6dpgesIHKro2xHtTFbtIH2PkJq6oMpILoRo3759LR/ZaDR27NixY8eO48ePz83NXbJkyWeffabdtGrVqmsGjsTERDkW9P7777/m9i7SNyFfc26ouhUeHi6Xy8rK9EMw7FDxAN37Gqk7pZ2jjUv/4osvhBD79u3bsmWLvGnAgAH6LZ0ueZ3Uczh9Jjh34mmMRuO9996rDbj9+uuvH3vsMTlSTw72cYR+ihGryWnscKXk8gh2JjaF0xilooTFYtF/YLVt29bFA3bs2FEu79ixo9pu1frpLuRViNQd+Ysvvlj0O6tesSEhIXPmzJG9WJKSkmxbSa3oP02ueQEa1+lnmN66dattHazFYrEa6FtXZHd6IcT27dv17dN6VtXCKh6ge18jdae00/STVsmpdMLCwvRDmoULJTcajfqf7G6fhLRaTp8Jzp14kryQTV5enpzqw9/f33bEuB36PrlWs3poCgsL77rrrj59+vTp0+ell15yS8mhDoHDDfSTH2sSEhJkovfx8ZFXOnZaTEyMfAOfO3du8+bNVhto1yiS/1r9JtNPJmj13e/0kXNycj78ne1EIz4+PvrRidec11Jf52zbq//MmTNWU0C6qG3btrKmNDU11XYsvp3PqVoWExMjx/tlZ2cvW7bM9mO3uLh46tSp+qlpVTxA975GLp7SKvTq1UsORZFXIrz33nutmvBdKbk+qNlOby/HcbiR02eCcyee1L59exkXvvzyS21hxIgR+sh1TS1btpRxLTEx8fjx41YbxMfHp6amXrx48eLFi82aNXNLyaXCwsJrju7GdSFwuMHMmTM/++wzrdXWbDbv27dPP4Bbm9fP9XvRz3798ssvf/rpp/IeExISpk6dKj8iY2NjrUbq6wd9ffHFF4WFhUVFRTJ5OHfkfv36yRixePHiw4cPy3e1yWRau3Ztamqq9m/fvn29vb3tPzrtopGazZs3x8XFab1ASkpKtm3b9tBDD+kbxV3/aejp6fnoo4/Kf1988cUtW7YUFhZaLJbs7OzVq1c/99xzLt6FG8mLhwkhPvroo9mzZ589e1Z7tktKSr7//vuxY8d+8803sbGx27dv1zZT8QDd/hq5ckqr4Ofnp58SSlPtJWedLrl+6qoFCxYkJCRUVFRUVlb+9ttvr7/+up1LwTnNlTPBiRNP8vDwsH0yHZmSR89gMMTGxsp/Z86ceeDAAa1moqioKC4uTtZq+Pj46EcSuVJyIURlZeWMGTNuvvnmW2+9VUUK/MuiD4cbaBcznDNnTkxMTHZ2tv4q7cHBwe66Hm/37t2feeYZrXKyvLx87ty5c+fOjYmJyc3N1X/Qd+jQYdq0aVb7du3a9ZtvvtGWly5dqh3kvffe096izh25efPm//znP998800hxMWLF8eNG9e+ffsOHTpUVlaePHlSf6WoKVOmXPPRtWnTZtCgQXIo2osvvjhv3ryIiIhqW52dvqya3qhRozZv3qwNmcvPz3/22WeFED4+PjVdW7IOdevW7fnnn5cXdYuLi4uLiwsJCfH397d6fvTBzu0P0O2vkSuntCIDBw7UTwQeHR1d7aXPnS75kCFD5MWVkpOTH3jgAdlTVR2nzwTnTjypb9+++ivOhISEOFHX279//5EjR2ot1OfOnXvooYd8fX3DwsKsCjB79mz9RB0ulvzgwYNaH47CwsIXXnhhwIABLl5cCRpqONxANv2mpqbq04avr+8777zjeo9Radq0aVafX6mpqfoPuO7du3/wwQe2lZbDhg2zulKiW448adIk/U+95OTkDRs2bNmyRaYNHx+ft99+25FPGYPBMH/+fH3HQJPJJD8aWrZsOXz4cHmT1aVGnOPt7f32229bdUGXH8GDBw++3l9jSsXGxuovRiWEyM3N1X90hoSErFy5Uv8jz+0PUMVr5PQprUj37t31b9hRo0bV9E3jXMk7dOigv9SLEEKfNh5//HFXCl8TV84EJ048ST9nvBBi1KhR1c7Kap/BYFi4cKG+e01paalVaJgzZ47tVBmulFzfvaOioqKedOf6EyBwuMGCBQvefPNNqxmu/v73v2/ZssX+dZWul6en57PPPrtx48bhw4fLq0NpOnfu/Morr6xdu7ZJkya2O0ZGRq5evdqqMPomeeeO7OnpOWvWrDVr1tx9991Wn8sBAQETJkzYsWOH/kvIviZNmnz66afTpk3Tf0YHBARMnjx53bp1o0ePlivtt7w6LiIiIi4ubsqUKfprSURGRs6bN2/JkiXXNWWZagaD4dFHH42Pj3/wwQetWugCAwMfe+yxLVu22PZycPsDdPtr5PQprYi3t7f+ogT667pZcbrkU6ZMWb58udWgm86dOy9fvlx/ATz3cvpMcO7Ek/QTdFbbOOUIPz+/ZcuWLVu2zOoTzGg0jhgxYuvWrdXO9ONKyXv27KkFEaPR+PLLL1+zRRgOMrirwt9FK1asqOsiXJ8BAwbISyKdOHEiMDCwqqrqwoULubm53t7eERERquevLCoqysjIKCgo8PHxCQ0NdaQexWKxXLhwITs728vLKzw8vKbZhZ04srbXpUuXioqKPDw8AgMDmzVr5uXldX0P6Xfl5eXnz58vLCz09/ePiYlxbor061JSUnLhwoXi4uJGjRrddNNN9bz6tKKiIi0tLT8/v6qqKjAwMDo6+poTE7n9Aap4jZw78dxu3rx52vXQW7Zs+fXXXzsyQ6jTb8acnByj0RgaGnrNS8y7iytnghMnnttlZ2dfuXKluLjY398/OjrawXzmRMktFktWVpafn5/rsyjVOX09dN0icDjJNnDUbXkAuC4vL++OO+7QerzOmDHDkQsdA/Vc/QkcNKkAwP9Zv369HF+jv6IbANfV66pjAFCtvLy8uLg4Ly9v9+7dcmBq3759XZ+vD4AegQPAX9qxY8ceeughq5VPP/10nRQG+BOjSQUA/svs2bO7dOlS16UA/myo4XBSVFSUHIVRh5eCBOBG7dq1mzp16pAhQ+q6IMCfEIHDSfrpCAH8cfXq1evw4cNXr14NCAho3LixI+NgATiBwAHgr65x48b66w0BUIG2AAAAoByBAwAAKEfgAAAAyhE4AACAcgQOAACgHIEDAAAoR+AAAADKETgAAIByBA4AAKAcgQMAAChH4AAAAMoROAAAgHIEDgAAoByBAwAAKEfgAAAAyhE4AACAcgQOAACgHIEDAAAoR+AAAADKETgAAIByBA4AAKAcgQMAAChH4AAAAMoROAAAgHIEDgAAoByBAwAAKEfgAAAAyhE4AACAcgQOAACgHIEDAAAoR+AAAADKETgAAIByBA4AAKAcgQMAAChH4AAAAMoROAAAgHIEDgAAoByBAwAAKEfgAAAAyhE4AACAcgQOAACgHIEDAAAoZ6zrAvyf1NTUui4CAABQhRoOAACgXH2p4YiJianrIgAAAFWo4QAAAMoROAAAgHIEDgAAoByBAwAAKEfgAAAAyhE4AACAcgQOAACgHIEDAAAoR+AAAADKETgAAIByBA4AAKAcgQMAAChH4AAAAMoROAAAgHIEDgAAoByBAwAAKEfgAAAAyhE4AACAcgQOAACgHIEDAAAoR+AAAADKETgAAIByBA4AAKAcgQMAAChH4AAAAMoROAAAgHIEDgAAoByBAwAAKEfgAAAAyhE4AACAcgQOAACgHIEDAAAoR+AAAADKETgAAIByBA4AAKAcgQMAAChH4AAAAMoROAAAgHLGui4AAHeqNJtLTJVCCD+jl5enp+0Gpqqq4soKIYSXh6efl1dNx3FwM73c0pKUvJySyopwv4ZtQxt7elj/nqkwm0tNlUIIH09jA+N/ffiUmiorzGYPgyHA26faYnh7evoaHSoGgPqJwAH8qby4J37xob1CiLl39P9X74G2Gxy8lNp77QohxPBW7baOmVDTcRzcTHMiM/3FH3Z+e+5Xs6VKWxPm5z+5623P9+zTUBcgdp//dfDnHwkhHu3cfdXQ+/RHGL3pk69/+8XT4JH77LxGPg3k+s+Tf3po2+dCiBm3936j35BrPHgA9RhNKsCfR6XZvDbxuLb80U9HqyyWWrjTz5J+7LH63zvPnpFpQwiRXVK8aP/uXmvezSgqlCtvj7rBIIQQ4kjGRati77t4TghhtlTtT0vV33Qs85K20Cs6RtUDAFArCBzAn8fOs2eyiou05bTC/O/O/6r6Hg+kpT687XNTVZVBiMldb9vz0OSfH5/+2YixncKbCiESL2fet/kTU9X/BZGgBr4dGjcRQpzKvlxUUS4PcjQzraiiQlvec+Gs/vhH0v8vmtweeYPqxwJAKQIH8Oex+udjQgg/Ly+t18VHPx9VfY+Tv96s1aP8e9CI9waP6n3DTZ3Cm47r0OXQhKm3NI0SQhxIS9VKpbmz2U1CiCqL5Xhmuly5J/WcXN59/je5bKqqOpGVLoRoGRzatGGA6scCQCkCB/AnkV1S/GXKKSHEiNbth7dqL4TYfDrpalmpunvce+HcyStZQohbI6KfvKWn/iY/L69ldw/Xlt85dlCuly0jRzPS5Mrd/x97dx4fR5rf9/33VN9AAw0CIG4CvIfHDoccDmd3dmaP2VntWleUtSRbK1l6RS/LszmUyE5eivxSLNk5XlFkJb6UxFo7USwplqxV5Chea6WVZM+1M0vOcEgOhxyeQ5AgQdxXo+/uqid/FNAsdDdAAMSDPvB5v2a5jerq6qeru7q+/TxPPc+9j0UkFgqLyPvjo/Fsxl1+bXoylc+LyIsDe429CADbhMABNIjf++iDvGOLyI8fP/njx0+KSNYu/KuPPjD3jG5QEJGf+MSp8ns/PTA0FGsTkUsTD2fSKXfhi8uBo9iNI2sX3n5wV0R+/lOfVSKO1t95cNe96/z4Uih5cQ8dOIC6R+AAGsRvfnBeRHaFI1/ad/hL+w/tCkeKCw25PDnm3jjZ3VtxhZPdfe6Na9OT7o19be09zS3i6Zzx3sMHbjXGXz32zImuXvG0sLw/ttxjtJ/AAdQ9AgfQCC6OP7w08VBE/srRE0GfL+Tz/8iRp0XkvbEHV6cmDD3pbHqpvaYj0lRxhc5Is3ujWMMhIp8Z3Csiw/NzU6mkiLw+ckdE9sZ2HdzV8cV9B8VTceKGkrZw5Ghnl5lXAGD7EDiARvDbV5auhv2xY8+4N756fOnGb334fuXHPDF3FC8RCfoqj+hTHN2ruKaIvLTcIeP9sQey3Ev0e/YdEpEv7D0gIhfGRxeymZxtfzA5JiIvDgxZSpl5BQC2D4EDqHu55eE3eqMtnx3c5y783OD+3miLiPzW5Qt52zbxvMURSLOFQsUVijnDO1bpC8V+o+Oj6ULe7cDhBo7P7NnnU5aj9Xfu3/1wcjxn2+IJKADqGiONAnXvj29fd9ssnurY/fueXqKH23ePJRYnU4k/vXPzBw8d3fLnbQ8vtaRMphIVV3AbTbxrisjJrt6mQCCVz7/78P7Z0ZGcbSuRl4f2i0hLMPTJ/j3vPLj3xsidA7s63PVfGGAEDqAREDiAulccb+P1e3dev3en4gomAsfJ7t5/feOKiFwYH31l78GSe7XWF5bHCXXH+3IFfL5P9g2+du/jc6P33dKe7O7rbFrq7fHK3oPvPLj37+9+PJdJi4jfss707tnykgPYfjSpAPVtPLH4rds31l7nm7euTSYrV0I8iWLI+O0PL5QPo/7m/eHRxbiInO7pdy+ZKXppz14RmUwlfvvDCyLy5f2Hi3d9YeiAiFyceOgOk3qqu2+dU8cBqHHUcAD17XevXnInMfmll1755ZdeKbn3l9/8819557WC4/zeRx/83JkXt/apPz0w9GxP/4Xx0StTE//Td1//xU+/XLxrMZf9L/7s37i3/7PnXih9YP9SK8ndhTnxBBcR+VT/YMjnz9qF4fk5EfnMcpcUAPWOwAHUt99cbk/5sWMn/GUzwv/YsRO/8s5rIvJ/fvBeSeC4H18ozvTm9VzvgPcy1LVX+2ff+5df+K3/Pe/Y/83r3/5gYuynnn62PRL5aHry186+eWNmSkQ+O7jvpz7xbMlj3Vnc3CqRkM/vHdcr7Pd/Zs/ev1ieBYYROICGQeAA6lhxmI2nu3qOdXaXr3Ciq/f47u6rUxMfTo6/PzZ6ure/eNfFiYc/9c1vlD/kH37xB7yBY+3VTvf2/+EP/7W/8v/+y0yh8I1rl79x7bJ3nWd7+v/gKz/hK4tB7ixu7rDon9mzN+Jf0Wjyyt6DxcDxQj89RoEGQR8OoI791vK8aD9+7ORq6/zE8aW7/oWZATl+8NDRD//G3/rq8We8nS2GYm3/4+e//J2ffpDXTwAAIABJREFU+o+7mqMVH+XO4ibLF8R6vbz3gHtjb2xXX0urgSIDqAL16quvVrsMIiJf//rXq10EAE8kXcjfW5hL5vK7m5sHW9uqXRwAIiJf+9rXql2EJTSpANgaEX/gSAdjkAOojCYVAABgHIEDAAAYR+AAAADGETgAAIBxBA4AAGAcgQMAABhH4AAAAMYROAAAgHEEDgAAYByBAwAAGEfgAAAAxhE4AACAcQQOAABgHIEDAAAYR+AAAADGETgAAIBxBA4AAGAcgQMAABhH4AAAAMYROAAAgHEEDgAAYByBAwAAGEfgAAAAxhE4AACAcQQOAABgHIEDAAAYR+AAAADGETgAAIBxBA4AAGAcgQMAABhH4AAAAMYROAAAgHEEDgAAYByBAwAAGEfgAAAAxhE4AACAcf5qF2DJvXv3ql0EAABgCjUcAADAuFqp4RgaGqp2EQAAgCnUcAAAAOMIHAAAwDgCBwAAMI7AAQAAjCNwAAAA4wgcAADAOAIHAAAwjsABAACMI3AAAADjCBwAAMA4AgcAADCOwAEAAIwjcAAAAOMIHAAAwDgCBwAAMI7AAQAAjCNwAAAA4wgcAADAOAIHAAAwjsABAACMI3AAAADjCBwAAMA4AgcAADCOwAEAAIwjcAAAAOMIHAAAwDgCBwAAMI7AAQAAjCNwAAAA4wgcAADAOAIHAAAwjsABAACMI3AAAADjCBwAAMA4AgcAADCOwAEAAIwjcAAAAOMIHAAAwDh/tQsAwJSC4yTzueKfSiQaDFlKrXP9cj6losGQd82A5WsKBMrXTBfyOdsWkeZA0G9Zi7mso7WIRPyBoM9Xvn4ynys4joiE/f6Qj+8loAFxYAMN67uj9z77O1/3LrGUGmxt+/L+wz/73Auf2N3z2PVLPN3Vc/ln/qZ3zdZQ6KNX/6v+ltaSNX/mj//wd69eEpE/++pf/559h37+333r6xfPichXjz/zuz/01ZKVp1PJvf/br7oJ5t2f/tkzvQObeLEAahxNKsAO4mh9d2Hu6xfPnfjn/+gXX/+2W+vwJOLZ7M/9+b957Gq/9NIrYb9fRH7/o8u3ZqdL7v3H773tpo0fPvIJ0gbQqKjhABrf8317/s6LXxCR+Uz67MORf3H5/VQ+/yvvvLaYy/76l/6DNdYv0RoKlS/8w+tXvnnr2g8eOrpGAfpbWn/uzIu/+t03HK1/5Z3Xf/MHfqR413wm/U/Ovy0illL/w+e+tNGXBqBeEDiAxtfTHC0Ggp98+tn/8vnPvPK7//zewvz/ev6dL+07VJ4VvOuvx89++/97eWi/271jNf/1pz73GxfOLWQzv3Plwt/9zCtDsV3u8l8//048mxWR/+jE6SMdXRt4VQDqCk0qwI5zYFfHb37/j7q3/95bf/HkGxyJz//ym3++9jrtkaZfeOFzIlJwnF87+6a7cDGX/UfvfUdEgj7f3/3MF5+8JABqFoED2Im+sPfAkY7dInJhfPTewtymt/PFvQf3t7WLyD9+7+3zYw/WXvnnzrzU3RwVkf/j0nsPF+Mi8k/fPzubTovIf/7cpwdb2zZdDAC1j8AB7FCfHhhyb5wfG930RpoCgX/6vV8REUfrV7/1r91LW9dY+ZdfekVEsnbhH7z7Viqf/5/PvSkiraHQ337h85suA4C6QB8OYIfqjS5dyzqRXCy569/evh7+1b9TsvAHDx39g7/8E+Xb+dK+Qz9+/OTvXr10ceLhr59/5289/9IaT/ozJ5//X869dWd+9jcunAv6/FOppIj8/Kc+19nUvPlXAqAeUMMB7FDudaoiki7kS+5ytM7ahZL/cnZhtU39gy/+wK5wRER+6Y0/W7uBJujz/Xef/R4RSeZzv/LOayKyu6n5b5558QlfC4DaRw0HsEOl8ks5oykQLLnrVHdfeUXFntX7WHQ3R//+F77vb3zrD5P53H/6p3/0x3/1p9d43q8eP/n3z75xeXLc/fOXXnpl7ctbADQGAgewQ92Pz7s33I6cXntaYz/59LMb2tpff+a537ly4c2R4W99fOMb1y6vsaal1H/72e/5yv/zOyLSG2159dTzG3oiAHWKJhVgJ3K0fv3eHff28317nnyDSqnf+EtfCVg+Efm5P/vmXCa9xsruhS0iMtASY+YUYIcgcAA70R9cu/xgcUFEPtU/ONAS25JtHu3s+sUXXxaR8eTin3x8Y0u2CaBhEDiAHefs6Mh/8qd/5N7+e1s63NbffuHzT3Xs3sINAmgYVGYCje9+fOF3PrygReYy6TdHhv/o5lV32rZfeOFzX95/eLX1y5dHAoEfOfL0Gk8U9vt/4y995eV/+c+2quQAGgaBA2h8Fyce/tQ3v+FdErB8//3nvucXVhluq3x9V09zy9qBQ0Q+P7T/p088939dPr/ZwgJoTAQOYKdQIrsikX2x9i/vP/zqqeeL06dtuV975fu+efvadCppaPsA6pF69dVXq10GEZGvf/3r1S4CAACN5mtf+1q1i7CETqMAAMA4AgcAADCOwAEAAIwjcAAAAOMIHAAAwDgCBwAAMI7AAQAAjCNwAAAA4wgcAADAOAIHAAAwjsABAACMI3AAAADjCBwAAMA4AgcAADCOwAEAAIwjcAAAAOMIHAAAwDgCBwAAMI7AAQAAjCNwAAAA4wgcAADAOAIHAAAwjsABAACMI3AAAADjCBwAAMA4AgcAADCOwAEAAIwjcAAAAOMIHAAAwDgCBwAAMI7AAQAAjCNwAAAA4wgcAADAOAIHAAAwrlYCRyaTqXYRAABoKDV1bq2VwHH27NlqFwEAgIZSU+dW3+nTp6tdBhGRK1eutLS09PT0+P3+apcFAID6lslkvvOd7/ze7/1etQvyiHr11VerXQYAANDgaqVJBQAANDACBwAAMI7AAQAAjCNwAAAA4wgcAADAOAIHAAAwjsABAACMI3AAAADjCBwAAMA4AgcAADCOwAEAAIwjcAAAAOMIHAAAwDgCBwAAMI7AAQAAjCNwAAAA4wgcAADAOAIHAAAwjsABAACMI3AAAADjCBwAAMA4AgcAADCOwAEAAIwjcAAAAOMIHAAAwDgCBwAAMI7AAQAAjCNwAAAA4wgcAADAOAIHAAAwjsABAACMI3AAAADjCBwAAMA4AgcAADCOwAEAAIwjcAAAAOMIHAAAwDgCBwAAMI7AAQAAjCNwAAAA4wgcAADAOAIHAAAwjsABAACMI3AAAADjCBwAAMA4AgcAADCOwAEAAIwjcAAAAOMIHAAAwDgCBwAAMI7AAQAAjCNwAAAA4wgcAADAOAIHAAAwjsABAACMI3AAAADjCBwAAMA4AgcAADCOwAEAAIwjcAAAAOMIHAAAwDgCBwAAMI7AAQAAjCNwAAAA4wgcAADAOAIHAAAwjsABAACMI3AAAADjCBwAAMA4AgcAADCOwAEAAIwjcAAAAOMIHAAAwDgCBwAAMI7AAQAAjCNwAAAA4wgcAADAOAIHAAAwjsABAACMI3AAAADjCBwAAMA4AgcAADCOwAEAAIwjcAAAAOMIHAAAwDgCBwAAMI7AAQAAjCNwAAAA4wgcAADAOAIHAAAwjsABAACMI3AAAADjCBwAAMA4AgcAADCOwAEAAIwjcAAAAOMIHAAAwDgCBwAAMI7AAQAAjCNwAAAA4wgcAADAOAIHAAAwjsABAACMI3AAAADjCBwAAMA4AgcAADCOwAEAAIwjcAAAAOMIHAAAwDgCBwAAMI7AAQAAjCNwAAAA4wgcAADAOAIHAAAwjsABAACMI3AAAADjCBwAAMA4AgcAADCOwAEAAIwjcAAAAOMIHAAAwDgCBwAAMI7AAQAAjCNwAAAA4wgcAADAOAIHAAAwjsABAACMI3AAAADjCBwAAMA4AgcAADCOwAEAAIwjcAAAAOMIHAAAwDgCBwAAMI7AAQAAjCNwAAAA4wgcAADAOAIHAAAwjsABAACMI3AAAADjCBwAAMA4AgcAADCOwAEAAIwjcAAAAOMIHAAAwDgCBwAAMI7AAQAAjCNwAAAA4wgcAADAOAIHAAAwjsABAACMI3AAAADjCBwAAMA4AgcAADCOwAEAAIwjcAAAAOMIHAAAwDgCBwAAMI7AAQAAjCNwAAAA4wgcAADAOAIHAAAwjsABAACMI3AAAADjCBwAAMA4AgcAADCOwAEAAIwjcAAAAOMIHAAAwDgCBwAAMI7AAQAAjCNwAAAA4wgcAADAOAIHAAAwjsABAACMI3AAAADjCBwAAMA4AgcAADCOwAEAAIwjcAAAAOMIHAAAwDgCBwAAMI7AAQAAjCNwAAAA4wgcAADAOAIHAAAwjsABAACMI3AAAADjCBwAAMA4AgcAADCOwAEAAIwjcAAAAOMIHAAAwDgCBwAAMI7AAQAAjCNwAAAA4wgcAADAOAIHAAAwjsABAACMI3AAAADjCBwAAMA4AgcAADCOwAEAAIwjcAAAAOMIHAAAwDgCBwAAMI7AAQAAjCNwAAAA4wgcAADAOAIHAAAwjsABAACMI3AAAADjCBwAAMA4AgcAADCOwAEAAIwjcAAAAOMIHAAAwDgCBwAAMI7AAQAAjCNwAAAA4wgcAADAOAIHAAAwjsABAACMI3AAAADjCBwAAMA4AgcAADCOwAEAAIwjcAAAAOMIHAAAwDgCBwAAMI7AAQAAjCNwAAAA4wgcAADAOAIHAAAwjsABAACMI3AAAADjCBwAAMA4AgcAADCOwAEAAIwjcAAAAOMIHAAAwDgCBwAAMI7AAQAAjCNwAAAA4wgcAADAOAIHAAAwjsABAACMI3AAAADjCBwAAMA4AgcAADCOwAEAAIwjcAAAAOMIHAAAwDgCBwAAMI7AAQAAjCNwAAAA4wgcAADAOAIHAAAwjsABAACMI3AAAADjCBwAAMA4AgcAADCOwAEAAIwjcAAAAOMIHAAAwDgCBwAAMI7AAQAAjCNwAAAA4wgcAADAOAIHAAAwjsABAACMI3AAAADjCBwAAMA4AgcAADCOwAEAAIwjcAAAAOMIHAAAwDgCBwAAMI7AAQAAjCNwAAAA4wgcAADAOAIHAAAwjsABAACMI3AAAADjCBwAAMA4AgcAADCOwAEAAIwjcAAAAOMIHAAAwDgCBwAAMI7AAQAAjCNwAAAA4wgcAADAOAIHAAAwjsABAACMI3AAAADjCBwAAMA4AgcAADCOwAEAAIwjcAAAAOMIHAAAwDgCBwAAMI7AAQAAjCNwAAAA4wgcAADAOAIHAAAwjsABAACMI3AAAADjCBwAAMA4f7ULAKB2aa03+hCllImSAKh3BA4Aj5QkjE0EjhLkDwAuAgeAR8FiywNHEckD2OEIHMDOVTFnFG8vOvaCYy9qO+k4Ke1ktM6JzmvtiNYiSsQSFVAqKCqsVERZUctqUb6Y5WuxfO4WlFLlkYXkAexMBA5gJyqPGu6NWbsw4eSn7MKMU5Bkqmk+HltMNieTLcmML5OxslnJ58V2RGtRSnyWBAJOKGRHwrmm8EJz80hLc6qtVTc3dVj+Lp+/ywp0+PziSR7eG9V55QCqhMAB7Czu+d6bM7TWU07hfiH30MnbC/HOyZnOqdmB6VlJp9fekBRsKdhWOmPNLwREmkW63LsikUxn+8zu9htdHVastd8KDPiDXZa/PGQQO4Cdg8AB7BTlUSOjnTuF7HAhV5if73swfnR03Jpf2IJnSqfD90f77o/2iThtsbn+nrMDPf62tn3+4H5/KKyskqYWYgewExA4gB3Brcko3o479s185lYh23vvweF7o76JKUPPa80vdMwvdFy9YXfvHh3q/2Bo4KA/9FQg3Gr5vLGDzAE0PN/p06erXQYABnkrNrTWScf+IJd+LxOP3bh9+OyF2N0HVjK1DcWwkqnY6PjA3ftJp3C+JZQWiSkroJQ3ahA7gAZG4AAaWbFiw71xJZ95K5tovX778DvvN4+OS76w3QXKF5onpvrv3F/UzrlYRER2L1/S4iJzAI2KwAE0Jm/O0Fo/tPNv5ZLpe/c+8d0L0ZEHYtvVLJxtRyem+h+M3Q9Y15tDzcqKqhXTLBA7gMZD4AAaUEnauJBLXYnPHrrwYdeVGyqbq3bplqhsrv3BWEsieSkWSft9vb7A0nKlhMwBNBwCB9BovM0os3bhzWyiMHz36Nvv+Wfnq120CvwL8d67DybCgZvRcLvlj3iqOsgcQCMhcAANRXvcLeTeyCb2X7zSffma2E61i7Y622kbHQ/mcmc7Y1FlxcgcQCMicACNw5s2ruTTVxZmT75zIXJ/tNrlWpfQ7HzP9NwHHS12wN9lPbpin8wBNAYCB9AgvGnjfC71YGL86bff823JQF7bxUqmeh5O3GqLxiOhvuUuHULmABqC9fhVANQ8b9o4l0tOPbh//I2zalsG2NhaKpk6/sbZqQf3z+WS3hdV7XIBeFIEDqC+6ZXO5pJzIyNH3nq3yhe+PgnbPvLWu3MjI2dXZg5iB1DXCBxAHSu5/PV8LjX74P5Tb5+vdrm2wFNvn599cP98LuVNG2QOoH4ROIB6VZI2ruTTYxPjR9+5UO1ybZmj71wYmxi/kk+TOYAGQOAA6ljxTDxcyF5fmDt+7mIdt6SUs+3j5y5eX5gbLmRpVQHqHYEDqEvaM/XrrFP4bi75zHsf1GMv0bWpZOqZ9z74bi456xS8L7m6pQKwCQQOoP54G1NE5FwudfzSR/7J6WqXywj/5PTxSx+dy6Vk5SCq1S4XgI0hcAB1ydtRNDR8r/XWcLVLZFDrreHQ8L2SDqQA6guBA6gz3l/5o3ZueHF+36Wr1S6UcfsuXR1enB+1cyW1OwDqBYEDqCfFs6zjOCJyIZc+fvmG5PJVLdS2yOWPX75xMZeW5ddO5gDqC4EDqDPFE+3lXCp0/0Fk5EG1S7RNIiMPgvcfXF7uzFHt4gDYGAIHUDe8jSkJx75cyBy8eqvahdpWB6/eulzIJBybhhWg7hA4gDrjnmKvFjL7bw6r+GK1i7OtVHxx/83hq4WMUMkB1BsCB1AfvFOKLDiF29l07/WPq12oKui9/vHtbHrBKTDHClBf/NUuAIANu57PHrh9V7LZbX7ejlMn25895V0ye/HSzIWL21qIbPbA7bvXjx39ZIivL6CeUMMB1AFv742049y0s92371a7UFXTffvuTTubpicHUFcIHECtKxnS+3Yh23d3VFLpqhaqqlLpvrujtwtZKds5AGoWgQOoA96f8nfs7J57o9UuUZXtuTd6x84x0jlQRwgcQE0r+QU/YecL8wuByamqFqr6ApNThfmFCTsvVHIAdYLAAdQ6b/XGiJ3fMzpe7RLVhD2j4yN2nkoOoF4QOIDaVfLbXWt93863j05UtVC1on104r6dL0kbxA6gZhE4gDrg/o6fcWwdj/vmF6pdnJrgm1/Q8fisY3OVClAXCBxAjSpvKRhz8rsnZ6pXopqze3JmzHk0cR1tK0AtI3AAta54Hp10Cp3Ts9UuTg3pnJ6dcArkDKAuEDiAWlRy+nT/nHbsCIHDIzI9O+3YssruAlBTCBxA7fL+do87tkomVTpT7ULVEJXOqGQy7skcRA2gZhE4gJrjPWsWz6Nzjt28EK9eoWpU80J8zjPGeXE5yQOoNQQOoD4saHtXPFXtUtScXfHUgrarXQoAj0fgAGpUydgSi9qJJgkcpaLJVEI7wlAcQM0jcAC1peL5Umud1E4oReAoFUqlEtpZbadtf3kArIbAAdQu75BWGa396Wx1y1OD/OlsxjP0OyEDqFn+ahcAQAUl/R+11hnRVi63hU/RcerkRh8S6e0pXdLTs4ntzFy8tNGHrMbK5TKitdZKqeLCkj8B1AICB1BD1viBnhet8vnV7t2E9mdPPflGIr095SnksbYwcKh8Pi+r7jSSB1A7aFIB6oOttdhOtUtRe2zHphkFqAcEDqCmPbr4QkQ4s5bzVAoxDgdQywgcwJbZqn6L5bPSi4gSEVoHyi03mWztSKN0QQW2nN9xqKQFtljxROWeDZ+8G4HW2idKfJYUGORqJZ/lE7VGX411duNYLa+QOYCtQuAAtl7JGa54zlv7zLf2DGQBER0IqK0LHLMb77kZ6e2J9KzoIpoeH0+PjW9VkTZBBwKBkiUb6ShakjMYPQwwx89xBWy5pUYQpbw3iv9ursIjqJQTDPq2bvK2mQsXN/qQjmdPlQaOsfGZixdXv0zEOCcYDG5qfxZbTFbLHAC2FoEDMKWYNop/urc3FzsiogrhkG9hy4u5ERW/Lqr6FVIIhyKyscYUb9Tw5gy+DAGjaFIBTPFGjeKf3rPgaqfDiltrEpVpioSMlLSOZZoiTasEjoq0h5RlDqGGAzDGb9v0QQO2RnmYsCzLu7DigJjrrOpoUVYi2hTb6jLXu0S0qUWt62q7kpBRsUnF/QHmjSCMGwZsFf/Df/WNapcBaBy+SMQfCftbWvxtbYH2XYGuLjdSlCQPWUdVR4lWZY22NPebKni9mmtp7llH4KhYsVH803Ec93Z+cjI/O1eYmyskEoV0xk6njb8AYMdgaHNgK9nptJ1OZ2fn5N6IiPiaItEDB8IHD1jBoGVZlrV0aiwPH8W7VtMmViLWYq7kdSoRa2l73HhCbr1FsfbCmzkcVzabuf1x4uM7JAzAHAIHYJCdSi98eCVx61bs2WeDA/1uzrAsqzxtOI6zdj1Hi7J0U5OOhNXWXahS73Qk7DQ9pkmlpK2kyK3VcBwne/9+/MIlO8tMvIBZjDQKGGdnsrPvfDd+9lwhl3N/UZdX6cvq3RWLQaRD+VIdu7at2LUv1bGrczltrHFBSrGGw5s2HMcp5HLx756b++450gawDQgcwDZJjdyff+2NQipl27Zt296TnzzuEgm3I0iXsqY627e10LVtqrN9t/KVd7wtudjVu5O11u7+L6RS86+9nrp/vwrlBnYkAgewfXJzc/NvvGlns+45z/3NLZ4f4mtfk9mt/JNdHdtV2Dow2dXRo1ZtFy6vRnIcx93zdjY7/9obubn5bSwssNMROIBtlY8vxt8563gCR7GqXx43/FS7slRL1I61bmN5a5cda1Ut0fZVOnBUvA7FDRxOoRB/52w+kdje8gI7HYED2G7ZqansrVvOMlk5N+nalRx9yjfd171NBa1t033dfcq32r3lu7S4wzM3b2WnpravoABEhMABVMXiR9edZMrbsLJ25lDL9ij/SD+BQ0RkpL97j/JXHDlNrxzRq9hL1LZtJ5lKXLteheICOx6BA6gCbduZmzeLv7l1JeWPUkp1KZ8v1prbvdN7cuR2d/hirV3LNRwllxnLyrRRDByO42SuX9fM5wBUA+NwoKYVRM9rnag0P1hUVJtS/o3Mo1FTUnfvBo8escJhdwQOn2/p3Kk988pKpSln9yr/yFD/wamZapa+2kaG+vcuV29UrOEo7y7qDvCVGhmpRnkBUMOB2lYQmdZ62HHK/5vSulDt4j0J7ejCyEixeqOk66h4GlZKzqn7VeDBYJ+ORKpS7FqgI5EHg337VaC4pBjOpKzjrbdnbuHeiHaYmw2oDgIHUDXpj+94W1Vk5QAS5eu7ySOs1AHlf3hgcFvLWkseHhg8oPzhldUba9RzLGUO204ND297YQEsoUkFNS0oatCyenSFZBxUEqzb9hRXIZV2Zmetzk7HcYqzuxUbUFZ7lFLqsAp8+8BQ361hlc1tY3ll5uKlmYuXtvMZy+lQ8OMDQ1/2VG+suLesluhRB46ZWTvFVClA1RA4UNMskSZRTUoyojPLv/mDSsKyvinJa17hwajV3u7mDL3mZOjeLh2tytrnC44e3j/w4Y674GL08P59/mCrspRH+WrFKqJHM8HSewNmFERnRApb0VjXSF9u5QgcqF2OSFzrce3MaKfkh3xQpE1ZvcpqU0sHZ050TiQodVbtkRq5Hzh2VHw+94e4W89RvHe1/KGUOqICf3xob+/dB77FHTSAld0SvX1w7/dLYI2ZU8RTvfFomJNcLv1gdJtLi50gJXrEcSa26NonS6RLWUOW1VRX32PrtEMDRzAWaz10MLp/X6BlA/N95xcTCzeuL968XWAOa8MckXmtH2h7TuuKh3FOZFI709ppU2pI+ZqUjGhnzHF6lDVkWXWUObRt64lJvWfA26ry6F7Pn8WrVNwbUcs6bvtvHj149N0qt3Fsp5tHDx5X/qhliacvbXEXlfSA8XbgsB+OVewWs5O5R1aj/pjeNtN6y9KGiDgik9pp0jK0+qB29WsnBo5gLNb+7MmW/fs3+sBAS7Tj1Cl/pGnug8tkDnMKoh9q577zqFbDL9KkVFRUUElOS0J0SuuCiCMyq3VCFyxROdGOyLR2olr1rjnPe63JjIw09fcppdzrY4uT13uvjJWVl8u6N46pwLf7exMDE9EHY1V+DdsiMdCb7u89pgJSljYqjsPhlbl7tzqFrlUJ0aOO06RUv7LIHJuWE53R4oj4RdqUFX2yL56ElnntFEQyWnJK19EPp3XaiYEj1NEeat/kuEnK54vu35dbmF+4dmNrSwVXTvSIdkadpV8MUVEDlrXbO96GWlptSuuHjpMQnRMR0SISFBmwfN311gCanZyKLC7qWKykRaAkdri8mUMpdUIF3nv68KcmplU+X63ybw8dCHz49OHnVMDbb2O1MUaLt5fMz+cX4tta3NqWED3sONPaCWrxWdJXb4dM7XCWK4r8Ip1K9T7ZnhwXJ6Gl4Nlsg9mJgUP5fJbfJyKzFy/NXLy4/ke1HT/WfuKEPxJpPXiosJhI0iS81RyRSa0nHMf9xdBnWXtU5faRoKh+pXb71D3Hebhcn9mlrF5Vl9+d2Ru3ImdOF8+PxVSxWtqQ5Z/4vcq3Jxy9deLI4fc/rF7xt8OtE0f2hKN9y5PRr2dK+qLsx3eqUeQalRP90HGmtSMiQVnlah/AgHr8ct5Ser3/6YK9ePP24p07IhLu2h3dvz/QEq126RvNtHZGHcft+7nX8u1TvmLaSIi+re2LTuGWthPLp5agqAOW74DlC4qIyKx9y43PAAAgAElEQVTWs/XZTp8eHXXice8QVbKyacD7m957Qyl1UgXSgwNz+4eq+xKMmts/lB4cOFlWvVHk3VfuQx6NLhqP0120yK1BHNOOiERF7bWs3XUZ0VGX+KhtQCGdXrwznB4bF5GW/ftaDx1Svgbs11MtGdGzWqdEu/20u1fWVRS0LGo9r3Vi5QCjlkiXUl3KskRSome0zlQaB732ZW/c0ivHG5WVmcO7slrpWRW4/MyRbGd7FcptXraz/fIzR571pI2S6g1dNmaaV/rDq9Upd+1xRB4ut1cGRfpIG9hefNo2Jj02vnjnTiGdVj5fdN++6NDOHe1xy81rPae1iLQp1b1KS0pFQVHdympTyt3IfN1Wcuj4YsnJsny1khYWV7vyPSeBC6efdpoabbxzpyly4fTTz0mg3dOYUrx3tVaVYl2RMz29c2aiT4hOrP7hL0kbg5bvCTscABvFB27DEsPDi7duadsOtsWi+/eHOhrzZ+U2c0RSojOi/SLtymrd4GUmrUp1KMsvkhG9qHWhPis5Uh9eqTh/rKzsRlqxWWFI+Q80RS+dOSG+BjqofdalMycONEWHVs7Ttlolh5QNZ568+lF1Sr7tprVzzbGvaXu60oXkbtq459g5EUukz7K4OMWQYuPviLZzokVkVuurjn3RKYxrR5ZateyLTuGqY9dpE/Cm8ZHbMDubW7wz7PYYbR7ob9m/zxcKVrtQdS8lOqlFRJqU2tyIN02impQSkYxIpj6P4uzUlD36sHi+dBeWZA6vkiaGo+Lf3d5x+flT211uYy4/f2p3e8dR8Ze80pLVShqeitUb9th4fm6+CuXedtPaGdZOQuuE1sPaKc8cs9oZ085S2lCkDYOKjb9JvXSlSU50XOv55dZeRySlZV7ruHay9fnTaNP41G1GdmY2cedObmFB+Xwthw5F9++rdonqXkGLWy3RJKp5Uxefh5WERYlIQep4FtnFDy47uZy3hsNdXlLPUZFlWScl0NLddeVTjZA5rnzqVEt310kJuAOTVFSexh5VETk7pXqjmDbcP8szh3eFuhsZr1Hopf/tbDvxstgto0WWRoXg6H1SOdG5JzscreX4nNE6rXRbfb4pTi6XvXY9fOLpYoZwl6uyS2SL1Mrxr56T4PmenssvPHvi3Uti1+fF/D7r8vMnW7q7n1PBNeo2KnatLdYP5W/fLiQaf9B3b5hwv80LbuYQR0Q6lRXXenR5hU5l9W+kdxQ2oU2pU2rFibVHWT2ehs6wqCOW74jsxAsOqOHYjFBHe3T/vmBbTNt2/NbtxB2u8n9SjojjDt612Tlgg6JCDfFFmvz4jjM/770+VsouxFjtF7/rtAR2dXdfePGME6m/PqROJHLhxTO7urtPS+llKRWThzdtFLu/OAsLix9dq96L2CbetBEVdcTyHbV8UVGyXM9xV9v3tDO7nDb2KStaV4PwosEQODbMFwxG9+1rHhgQkdTo6OKdO/b2ThHekCwRS5SI5LTkKlU9+pVERbUpFRVVsV6uWEfiX2WFOpK4cNGxbW/vUanUh8OrWCPi3nhGAv27Os599kx9XSub7Ww/99kz/bs6nllOG8VXVHH9inUbdi63eO49afTueCVpwx1Ro1NZ+yzrUeZYHuCrVak+0kZtcDvIz2sd17rid10Dq/dv5iqI7t/XeviQ8vlyCwuLd4azM7PVLlEjCIoKKknpVcf0jYo6ZK1VCemI2CIi4lcSqPNK4/xCPHv9RvjYUb08hawst6pIpdlDitxmF8uyHMc5Kv6mcMvZl848/cG19uE6mJl9dt/gh88cfVb7h5RPeeaUWa16o6SvaLFOKHvlaiGZrOIL2QYV04Z7V6eyxJJhx0ksn8yiogaV1UHaqA050SOOM6adsKi9llVfEz89IQLHxkR6e1r27/dHItq2E3eGE3fvVbtEDSKoJKiViE5pndK6aeMHYUrr1NKMKipY/4dw4vqNQGeH6u52/yzJHLJ8GvZ27NBau1HDXd9xnCHxtWp18cTR6fbYocvXVL5Ge9PqgP/WiaOpgb7Pa/8uT9oo9mIpyVglLU3i6StaGJ9IDt+twmvYRmukDZc3c4RFBhjgq0btrOoNoUllQ3yRSMv+fZHeHhFZvDMcv3VL23a1C9UgwqIiSkQkJXpRKk9JvwZHlqaQFc/lKvVu/ty7diJZMvaolF2xUlxeUh/gnrN3KetlCUYGBs5+4cVEf++2v4jHS/T3nv3Ci5GBgZclWJI21Mr+sLIycrm8vTecdHrhvfNVeRXb5rFpw+W2rbQrVY/TGTY2S6RJSZtSrcoKNcQ31fpRw7FeyudrPXTQndQ+MzWVGL6TX2z8PvDbxhJpFRUVlRA9r/Uu0W0bqeSIaz2ntSMSFdUqDfL9qvOFxbPnWj//We+51luxUZ45ShQrPE5of1c4euW5E019XYev3/Yt1kSLg93SfPPIwVRfz7Pi7xHLm5NW6yha8cqUpY6iudzi2XO6oWfNXWfacHUqq11Zws/KGhMUNah8gzsraSzZiYFD27Zj2yLSfupk+6mTG324nU7Hb91O3mc6qC3WptQuSyUcPa/1hDhN675+Lyd6Ujvzy8Oi72qgNtH8wkL60gdNp59VShU7c7h02USyFbfgZg6lVI8jPRK81tf3Vl/3wdt3+2/fVdXr7KxDwdGDe28f3HtEfJ8Wvyy3Ga2dNh49fOXkdm7tRuLd93bEMF9aZN3zrhE1UFN2YuDIzsxmZ2aCsdgmHqtte/HOcJKuGwb4RbWLtaB0XOtx7ViOrGeEIu/sl8sDnDdO4BCR1L0RKxwOHz/m/mlZlreeQ1Z25qg4Vof7EPffo9o/pK0bB/e/tX/wwJ2RvjsjKp3ZzpejI+GH+wc/3j84aPm/rH1NatWEUZ4zpKyGY6klxbaT753PTEw21Btfids5Y0rrTqXollELisP/FESmtc7KEzWyL2oprNxsg1Ev+wLVLkMVBNtibvuIP7qBKeYLicTC9RvxW7cKqbS5su1wD7UzvDzjQ7uyhtacVyWu9T3tzOql+aj2Wr7+Bv0Wbj3xdOjQQWuZKrtQRS0Pu1l+pWg5EVnUzsfKHhan//7DwZGHoWnjF1tlO9tHBvtG9/TtE+uA9rWopd6gq+WMYndRVXZZivtnsaNo6tLlxMcfN3zaQG0a0fZwcSaCrWCJ7LWsIdWAI4Pt0MAhstnRQXdct+Lt5p1lSkTCorot1aWsJk/PDEckofWkOFPO0vQE7uyXjT1DROy508GhwTUyh6ti5hAR9yvR/be4MKOde+KMKEcvLu4Znegcm/THF7e22IXWlunervv93VZLyx5tDYkVViuSRLExpXyhtyKn+OrcG8W0kbl5K/7hFdIGqiUl+p7jTOqtyRyWSJeyhixrc1NK1bgdHDhQqxyRSe3cc5yUJ9+FRYWXD8CMloznrqioQcva3dBpQ0S0yK5PPR/o7y9mDllZAfBozVUyR3k9R/HfaXEeijOmHJVIdk3Ndk7PNs3OW5ns5orqhEOp9rbpzvbJ3e062twrVp+2OmVFSFqtMqO4cLX2FO9lKbm79+bfvyBMLoCqckQyTzw5gyuoJNwo3d7LEThQoxJa39fOtHbWGDvCL9KlrD0N+mugAqViZ54L7hkoyRxSdnpeO3OsdkNE5kRPiTOjnFnRvlS6Ob64azEZTaZDqXQgm7NyOZUvKMcRrUUpbVk64HeCwXwomG2KJJojcy3NydYWuynSLqpTW7vFcie18YaMNW6slja8XTeKaSNz/Xr86jUhbQB1gsCBmpYSPaWdaa0T+tHgHJZIVCm339xOiRrLtEjrJ46Hnzpcnjlk5Xl6nSGj5IZ4zu4J0QuiE0onRadFZ0RyIgUljmgtokQsUX4tQZGwSERUs6ioVjFRUSktz9pRQ1ZWeJS8ipJXtNRL9OIld4CvnfX2A/WMwIG64c477xdpsOtQNkqLNO/b23zqpOXzFTOHrH5l7Go1HBX/LD6k5Mb6laef8mBR8c/yHhvlr8JxHCefXzz3bnpsXEgbQF3ZiZfFok41wKxsWyU5fNfJZKKffF4CAVnZubI8dqwWRErW0SsHE9tE1PA+XcW0IWsGDlkl32jPFbB2Nht/+53c7Nzmygaginz71pwQC0CtcU/dhUSiMDkZ6O0VX+Xeo94/K4YAedzpX61UvqRotQG7SpY/dj62EiW9RO1Ecv6NN/PxuHc/AKgXNKkAdcmtCvBFIrHnzwR2d6pVZnIv+XO1JhUpa1XxLixfXq48zXj/XCPiVH51nudduiDlwYP4xUtObmnkctIGUHcIHEC9Wp43VqKHDjUdP2b5/Wrl9Krl1HJbyWr/VrxR+ryeGWtXe5aKNzYaNVx2JpO4cCE9OvZo+xUfCaC2ETiAOlZMBIHWltgnn/fFYt56jtVO6o8evmbgWON2ifLmm5Lba0cNb/cR8XTa0Frnx8fn3zvveKZ9IW0AdYrAAdS3RynAUi1PHY489ZQVCBSrOlxrJ48tvESl5OkqBg7tmfClYgvOUsVGNpe8fDm1ct4i0gZQvwgcQN3znrR9kUjryWeC/X3eTpqyvmtVyrtxrHHZyGrbXK22Q9a8+GVF/1Dbzg4PL3503cmuGOqUtAHUNQIH0AhKTuPh7q7oqZO+aLTYwqJXmc5+7WqMJxmH47FKNr7UOfT+g8TVq4VkqnSzGy0HgBpD4AAaRHk0iD51OHLooBUOb6iFxajyBFPsHJobfbh45WphscLscaQNoAEQOICGUno+t6zmvUORQwd9LS3lg15sbfIo9v0s9tUoPstqTTOu/Mxs4oMPKg7nRdQAGka9Bo5Aa4uI2OmMk88/4abaTz7TcfrZfCJx9/f/4MkL1jzQ3/flL4nIx7/9fz952Wrf+ivc3TNHXrTa8WOTm1bxTQn39jQdPhTYvVt5Jmgt4Q0KyjP2aHlnz0fPtfGRSYs5QxcKudHR1J3h3MxsxTUb4FNSvlMa4EU1GEekIFqLWCJ+qV7t3w5Ql0NFW4HA3h/9ERGZePOt+K3b1S7OjpYSPf5oVrVVRUV1KysvekQ7lsigsnx88Rrj7tmSU11mbDwzNu5viUYG94QGBipWeJR3F13jilmv9aQN75hjhXg8MzycuntP51edDLgxPh93tF2+MCyqSVSrEo6C6sqLntM6IY8+vn6RmFixKjY6NrS6DByoHT6R6MovzaRoLRIR5R0zP+jOUS5iiVgiiu9Z81Sln9eFxcTi1WuLV6/5Y61Ng4OhgX6ruXk943FtjnckU8dx7Hg8Pz2TGRnJzsyu8TSN9+FoElWsULJFMqIzohe09CgrXNsvNyE6qXWzqGjDnYLdH0taJCTKfYMKohdFz4iT1qpHWYZecAPv0scicOCJhEWFVx4297RdEOlQKlT2TeoXNaR8qhHPKLWpYlWHq7AQj394RT684o9Gg7s7Ax0dgfZ2qyVaPves93qWNZpUpKwixJ0BxZ6bz8/M5Kans1PTTj6vPAVbrcCNp33l4WCLntU6LnpCO3uUr0LjVs0oaEmIDjbcO5MXPaEdLdIpVuzRp1rtEj2mdUr0vNa7zASCRt2l60HgwLaq5e/WRlWxqqOokEgUEgk9fFdErIA/1NkZ6OjwNTdZ4YjVFPE1N1fsB1rCcZaa1bTWYtuFmZn87Fx2cio7NeUtxtpfsTvnC9gnqkOplLYLImnRzTvopdeKOa0dkTZRsZWpwieqQ8lDrefEiUlNZ8F61PiBI9Lb03bsWKij3RcMOYV8dnZu4dq15P0H5WsGY63tJ0+Gu7usQNDOZlKjo7MXLtqeMZVFxAoGdj39iebBQX9Tk7bt3Nzc/EeVt1ai9dDB1sOHAq2tyuezM5nM5OTcB5dzC/Ete531wBY9p7WIdC5XMGdFL2odEtWs1KLWKdG2iF/ErW9UIgXRcS0Z0Y5IQKRFqaayb2ctkhKd1DonYomERbWqFf1Sc6LjWgdERZXMa8mIDot0eMqQ0Doj4j5Fk6ioUg32RbNGVceKFfKFzNh4emzce5cvEvFHm61w2BcOWcHQUqc6rXU+7+TzTj6vCwUnn9e5vFNw/7RLNrvO4u0olkiTqLjogl7x+tf5YQ6LavIcMgGRZqWayzo8apGk6KTWeRElEhZpVqqkEWe1o2NOa1u0O/JaSrSttfIcNVLPB44telG0iMQq1WFERPlFCiIZ0e63jfs1FShLJ0nRaa0jSnkj4xq75bG7dD3v15Z8Z1ZLgweOtuPHOs88p3w+bdt2NuuLRJr3NDf39029e37+6lXvmpY/0P993+vGCFHKFw4FY7FId8/on/xJMXMEY7HeL7wcbN8lIk42Z4UDTQMDTX19k989u3D9xhrF2P3Cp9qOHRURbdu6YAdjsWAs1rxnz8M//4vM5NQaD2wwWmRBtIh0Li+xRRZER0QWtM6K9ovYIlmRpOisVs1KjWvHESkuT2i9sgpUHJEp7SREi0hQVE50WvSClj5lFSux3WcJiyxqyYoWz2Uyi1pPiiMifhFLVFJ0UnRcq16lGq9D32Njh3e1IjudttPp9T/FhvZao+3iJ7P+D3NeZH75kHGWD41WUZ2engeOyIR2UqKVSFBUQfS8yLzW7WJ5GwtWOzpSorPLH5as6KyIT6Rj+VF1feC4p/ywqNUul+tWlhvjXAWRBdFRkVhJVtOyINqnVfPy4rV3y9q7dEPv15N8Z1ZRIweOcGenmzYWrt+YOX/ezub8zU3dL73YNDDQ8ezJxdu3vLUXvnCokEyO//vXF4eHlc/XdvRIx3OnQx3tHadPT77zXXed7s9+Jti+Kzc3P/n2O+mJCV8o2Pn8mdbDhzufey714EE+kaxYjKb+fjdtzF68NHPhoohEenu6P/NSoKVl9yc/ef+b/9b8nqh1adGtonqV5ROlRRJaT4qzIDqudYuodqXc5Qtaz4gzI06Lp6pzRjsJ0VFRncurLWo9Jc6k1gMrexxkRIdE9SgruHyeK4ieEkeJ9CjL/RFgi57UOiV6Vsvu2jhEt1zxVa3zMlYTe6Ex9+xGOCIp0SIS8OyL9X+YU6KjonqU5RflVopMaCcuOiK62Il7Wjspz9ZEJCN6Qjuz4vi11bLy411+dPQrS0TmtZ4RZ9fKc169HzgFLSISXH2FzfXkfexuWWOXygbfryf5zqyiWiiDKZGe7kI6nR6fmHz7HTdbFJKpie+8LVpbwWCkr8+7srbtsX/32uLwsHt77srVhRs3RSS6f5/y+0UkduSpcNduJ58fe+219MSEiNjZ3MRbb+cXF61QsPWpp1YrRlNfj4jkFuJu2hCR9Nj4zPsXRCS8u9MXWuNjv1MERXUuXyirRFqUcr80AyuXtykVFKVFvL8S4qIDIrs9q7Uq1SQqJzq18pRqifQo1SwqsPzLJiuiRZrkUZWj27guIouy8TG9643aeIVE3T1jbbJFT2mnIBISFVneHxv6MAdFdSnLv7xas6gOsURkYfljmxG9KNrn2ZqIhEXtVpaIzIpT8vEuPzrWUO8HjtvhaMtPfk+yWzb6fm36O7O6GrmGY+7K1bkrV0sWFpIpO5v1hcO+cHjF8nQ6M7WidSN+81bbsaO+UKiptyd5/0F0aFBEUg/HcnPz3tVSD0ZjR4+Eu7pWK4ady4mIvykS6mjPLg9wlBi+Ozy+lFo2/wobhb/sJBQUJaKbytqkgyK55e8LEUlqEZEWKR3EKioqJTqjpdnz+PIaVPdROdGO59snKGq/8slOOi9utM5j09vfsWa19i3v3bxIVrQWCYrq8dRbbOjDXH7IRJVMa8mItkX7RLlbi5VtLSLKbazJiI54trFG+0K5ej9wlj/nW1zSJ9ktG32/Nv2dWV2NHDhcgZZoy4EDoY52KxRSliUiViAg6xhvIDsz42RzVigYjMWS9x/4W1pFxB8Jd7/04ortt7aKiL+5abXtLN7+uO3YMX9T08APfH/64Vh6ciJ1/0F2dq6QrNwEA1k+lh77EyQnWkRs0fGVp8q86OV/13qXw6IiotKi72u7VaywkpAoqx6+MQ0p73K4JdtBqmxftolqXznSwxN+mH2iAiJ5kYKIb/kXbajsEUokIpITyWmJbPZ9qvcDZ7mcj9mlG/Uku+XJ3691fmdWV4MHjl1Pf6L91Ek3YdjZrDvW+PqHNrKzWSsUdB/utn2Eu7oqVmZY/lX3ZCGZGv3Wn7Y/ezI6ONg8uKd5cI8891x2Znbh+vW1u5risdxRKhdEVzw5PjbUu62ti1rPizMrjmhRIlFRsUqDiOxA7IKt0q+s4rgLi1pPi5Mr271P+GEWkYCovCyN++teKeSrtJpflMg6hgdeXb0fOO5Zect/9D/JbjH6ftWORg4c0aGhzjPPicj8lavzV68WO3Xu//Ef80Ui69mCFfCLiGPbIuK2wcVv3sxMTpav6aw+QrOI5BYWxl97wxcKRfcOhnt6It3doY72rhc/HWpvL/ZIxSa4B/Fuscp/Gcj6zpeWSEypVvHlRGe0pEQvil7UuktKe2kBm6Y8Pz1blVrQkhKdXDkCx5N/mG3PmmucU72rbVpdHzh+JaIls/oKadGOSFAksMH9tOndYvr9qhGNHDhaDh0UpZL3H0yde3cTD/eFw75QSETctg87k/FFItpxFm7c2lx57Gx24cYt9+HuhbKxpw7PXbmSj1eYjxvr4X58lcgT/q5ytxBSEhPlXtg2LU5UfI1xkKOmKJF2sSbEmdW6yVPd+oQfZr3cKOP+Sg6KZNzLMco25rbR+Lfiw12nB05IRERyovOiyyOFFpnUTkGkT1nulbEbfTmb2C3b835VXY23+DwRfyQsInZmxRAC/uZm5a8wQa4vECzpRhp76rBYlrbt9NiYiLgDZjQPDlrB0ocHY7E1ijH0w1858JN/rePUSe/CWfeKFcsKtrau+wWhlNuLKl6pB/h6aiAntDOi7ZL2dXfwHEfEro1+3Wg8zUqFROVEL3o+uRv6MJevkxKtRfzLo2hE1NLWSlbLi06KViLhsi2sX70fOD5RLe7ernTtSFp0QcTyJD/3/8orsZ2Vr/RJdovR96t2NHLgyCcSItI8MBBq3+UuCbXv6v3iF9yGEuVb0V5mhYI9L3/OrdJw14wdOyoiqdHRQiotIvPXrulCwd/U1P3SS97Hdpw+NfiVH2o7fny1YuTm5q1goOXgwWDsUbZoOXhQRMRxcvPzqz0QjxVVyi+SEb2w8osjKfq+tjOP++ILicqLLOgV7aPZ5Ymqa3/8ItQpJdKulIjMilM8D23ow5xeGVZs0fNai0hMljqiNosKiirZmhaZXVptvdekLJ9rVzx7Axw4u5SyROZFl2SOvOgZrUWk3XPBiDt0QcYzbJeIpEUvbGq3VNylW/V+1bj6blLpfP5Mx+lny5fPXry0cOPmwkfXmgcHfZHIwA/+QG5+XllWsK1NiTiFguX3l9RnONlcU0/P0I/+cG52TpSEOjstv9/OZN0BM0QkOzM7ff793c+fie7bu7drd2ZqWkRC7bsCra1ONpednV2tkDMXLoR7ugOtLXv+wx/KTE45uaw/Gg13dopI/Nbt1YYLw3pYIt3KGtPOjDgpvXT5e1p0SnRQ1GM/3K1KJbVKib6v7ahYPpH88pjHHWJqrkhAlkdrSIle0NKuRDb4YbZEJsVJahUW5YgkxMmLhES1qkdntS6lxrSeFielVUSUI5IUnRMdEbVr3UOQB5WIlrho0Y5anpSgAQ6cgKgeZY1rZ0qcuFYRESXKrU7QIi2ePSkiPlGtouKiR7XTIspaHhnFt9zBwrXO3VJxl27V+1Xj6jtwlISGIisYFJH0xOTE6290Pn8m0NrqnuDz8cWZCxdjTx2O9PaEOju9D8nOzS7e/rj91MlIb8/SktnZqbPnsrNzxXXmr35kp9O7njkRam+PNjeLiGidHhuffve9zPT0aoXMzS88/PafdT5/pqmnp6mv111oZzLxmzen33v/SV4+RCQsql9Zc1onRadFi4gl0iaqbR1DLFsivcqa0zouzvxyvXVI1K6VkyMAJuxSKqX1vDitsjSE1/o/zGFRbUrNaj2z/LltEdWxciqT0PLWEsvjhvlE2sWKbWTGk4iodrHmxIl7JiVojAMnImpAWfNaJ5bmN9EiEhIVW56UxKtTWZZ2FkTHRYtov0inWEpkytPetc7dUnGXyha9XzVOveyr0KGhwYS7dvubm+1kMr2OiUsi3d2+SDi/mMjOzKy2TjAWC7bFtG3n5ufXX0Xhi0TCnR2W319Ipd2xSrGF3FZSJeIrG/rmsfRyDWe9VAijsa3xYU6LfqidJlG9yvr/27tj5yS6NQ7A7PUrPiks3BTO3FCKMzZsi6VbSuUMKYXSvyH4LyRt0pLCJiW0SeMMUDgjtDijDYUFtFCYO3sLHCc3+nkjsMJunqdN8uZN5iT8OGfPOYVC4T/fjpkKfrqj8v9W+61+7hVuvvLl4w/n9j/FLX+Ttyn4T7/S23+XLLoTgQMgH24EDsgQQxYASJ3AAQCkTuAAyIzg20VrkD3GLUBm/F0I/p23Rwm5K8xwAACpEzgAgNQJHABA6gQOACB1AgcAkDqBAwBIncABAKRO4AAAUidwAACpEzgAAAAAAAAAAAAAAAAAAAAAAAAAAAAAAAAAAAAAAAAAAAAAAAAAAAAAAAAAAAAAAAAAAAAAAAAAAAAA2BX3tt0AKYrj+OXLl4vF4suXL9vuBYA7Ldh2A6SiXC43Go0wDIMgSJLkzZs30+l0200B/I84jiuVyppFRqPRxcXFRvohVX9tuwE2LAzDer0eRVEQfEuTQRCEYShwsI4wDCuVSrlc3tvb29/fLxQKk8lkOp1+/PhxOBzOZrNtN0j2xHFcr9e//6daWblcLhQKMsfuEzjyo1gsPn/+vFarrf8HDN+FYVir1arVaqFQuD60SqVSqVSKoqher/f7/W63K3bwW66/L1pHEARRFF1eXiZJsn410iNw5ESlUjk4OFiuoWy7F/KjUqk0m81isfhPn7Acb8+ePYuiqN1uD4fDPyFD4UIAAAMrSURBVNgdkCUCR+aVSqV6vV4ul0UNNqtarTYajVuOq2Kx+Pr167Ozs16vl3ZjQBYJHBlWLBZfvHgRx7GowcZVKpXbp42lIAhevXo1n8/NcwA/EjiyqlqtHhwc/GKuG1YWhmGz2VwhyAZB0Gg0ls+TptEYkF0CR/aUy+WDg4P9/X0TG6SkVqutnGWLxWKtVmu3257gA64TOLLk+34BUYP0hGG43JOysmq12u12TXIA1wkcmVGr1eI4toZC2qIoWr9IpVJxLgJwncCRAdePDd12L+TfRnY8PXnyxLkIwHUCx05bbjW05ZU/KQzD9Ys8fPhw/SJAnvxr2w3wKw7Y4M9bnly+plKptH4RIE8Ejl0nbQCQAwLHTjs/Px+NRtvugrtlMpnsSBEgTwSOnTafz09OTo6OjlyLxR+zkcFmxAI3CBy7LkmS8XjcarW63e5isdh2O+TfeDxef3fJRooAeSJwZEOSJJ1O5/DwsN/vb7sXcm4jN6G4TgW4QeDIkvl83m63j46OxuPxtnsht2az2WAwWKfCYDCwpALcIHBkzHKF5fj4uN1uW2EhJZ1OZz6fr/a1i8Wi0+lYTwFuEDgyKUmSXq93eHjo9GjSMJvNVr59rd1uu0UF+JHAkWHz+fz8/LzVallhYeOGw+HZ2dnvZo52u+3pDeCnBI5sS5JkOp0eHx+fnJxYNWezer3e6enpLddWFovF6elpv9+3mAL8lLtU8iBJkuFwOB6P4ziO4/j+/fvb7oicGA6Hk8mkVqv9+sL6wWDQ6XSspAC/cG/bDbAxX79+HY/H79+/39vbe/To0fUP9ft98x+sZj6fj0aj5RC6urq6urp68OBBoVCYTCafP39+9+7d27dv+/3+yg+ZcmcVi8WnT59u5PaGy8vLT58+rV+HVLmnI4eCIHj8+HGz2fx+7Wer1fLuk/X9+NpgAYV1xHEcRdGaRUaj0cXFhaG4+wSO3AqCoFqtRlHU7/c/fPiw7XYAfmL9GQ5RA3aCy2YBAAAAAAAAAAAAAAAAAAAAAAAAAAAAAAAAAAAAAAAAAAAAAAAAAAAAAAAAAAAAAAAAAAAAAAAAgM35L/lKdNWrIFgRAAAAAElFTkSuQmCC)
- Device is unregistered: "Network Access Denied"
![Screenshot_20230720-211518[1].png](data:image/png;base64,iVBORw0KGgoAAAANSUhEUgAAAtAAAAWgCAIAAAD4sOOEAAABDWVYSWZNTQAqAAAACAAFAQAAAwAAAAEC0AAAAQEAAwAAAAEFoAAAATEAAgAAACQAAABKh2kABAAAAAEAAABuARIAAwAAAAEAAAAAAAAAAEFuZHJvaWQgU1AzMTE1LVN1bm1pLTIwMjIwODMwMTIyNDU0AAAEkAMAAgAAABQAAACkkpEAAgAAAAQ0OTMAkBEAAgAAAAcAAAC4kggABAAAAAEAAAAAAAAAADIwMjM6MDc6MjAgMjE6MTU6MTgAKzAyOjAwAAADAQAAAwAAAAEC0AAAATEAAgAAACQAAADpAQEAAwAAAAEFoAAAAAAAAEFuZHJvaWQgU1AzMTE1LVN1bm1pLTIwMjIwODMwMTIyNDU0ACsa1yUAAAABc1JHQgCuzhzpAAAAA3NCSVQICAjb4U/gAAAgAElEQVR4nOzdaZxcVYH//3Nr7arqWrq7el/SWboTkhASksCImBBglJEREEdcARVkdFRAcf8pKqLOCKI4/3HUEZfgMojOCOiIg+yymI0ESEiH7L0v1V1bV3Vt9/4fXLhTqV5SXV2nqjt83i8fVN2+y7lVmPOts11ljcksAAAAZDKVuwAAAODUR+AAAADSETgAAIB0BA4AACAdgQMAAEhH4AAAANIROAAAgHQEDgAAIJ2l3AXA7FQ4nRs3b77ms59tWbpEzWTyP9BssYTHxv7061//949/MtjTI6+EAADDhs2b73rk4ewt15x/wY7HHy9XecqIwLHANLS2vufGG5yVrru//Z34+Hj+B7rc7rMvvOBNV1wRGBy69wc/kFdCAAAmI3AsMNV1tcvXrPnJbbdvveOO2R470N39j1/8wvIz1lis1nQqJaN4AAAhxKVXX/2Wq64SQnh83pw/ffqOb4WDISHEA1u33vezn5WhcGUiMXDojf+1TU2JiYmuPbsPvrg3n6Pali07fvBgYVec4djWpUunO2qotzcxMVHYFUuvZfGSiVisa/fuAo4d6uvtP37c6XY3trV1HzpU9LIBwAK1fO0ZnaevaWpvN7ZEQ6Gu3bt3PPFEYSf89LfvqPSeEDW++P4P3L9164bNm7/zX79d7vMJIVasPeOkgWNWNen6TW9oXbosOTHx4vbt09WGqzZuOG3dmfFo9OmHHhobHp7lbc2JlMBR4XR+6o5vvfld73JWVhobDzz/wnc///kn//jHKQ+pqa+/5Kqrzr/sstUbN6yz2Wd1uZMe23nGmnt37Zru8KvOPXfPM8/O6oqT+RsbN1988WlnrrPaZyp8PBp94g//89xTT82qNySby+NJp9Ph4FgBx07E4xOxmMvtbm5vJ3AAwIbNm99zw/UbN292+3zT7fPIffc9+rv77t+6dVZn1tPG/Vu39h09KoTo2r3nkfvuE0LsePzxmz9wzZbLLr3kqqtmuKiYZU36tmuvvfbzn2tatEh/q6rqziee/OYnPn5gz/PZu33r3l9f8Na3KooihIgEg9+4/oY//OIXs7qvuVCK/rRYi9X6Hw89dOYbzp38p0Q8/ol/ePtfHnwwe+c3XXHFRe+44qwtWyqcTn3jGea8YlD+x55/6aXf/q/fTneeogSOt1177XtvuL6to8Nitc6wW2JiYt+OnXf9y79se+SRwppVPv3tOzZuPu/tZ55ZwLGNixa9/1OfXL7mjD//13/d/Z3vFHAGADg1XHLVVR+6+YtN7e167bvj8Sd2PvG4pmlde54XQiw/Y40QYvnatRs3b670ejVN6zt69P6tW79/y1fzPP+eTFpMGh/a1N6u5w9jJOl09d2satIrP/7xm277pn4j2QKDgx/Ycv7Rri797Qc///mPfvWW0OjoH//zP1uWLDn3oouCIyNXrN9gTCN4y5VXPnD33XneYAGK38Jx3f/7vP4ZDfb0fPf/feGZhx5a1Nlx0zdvW33WRrvD8eEvf9n4mCq93vtf2ldTX1/AVWZ1bENbm/7if3/zm6P79+f8daC7CFM2Tjtz3aLOzvu3bn3uL0/NsNvZF17wugsvfNsHrx0Z6H9p13MFXMjucMSi0cIKGQ2FwmNjFput0usp7AwAsNA1tbffctePNmzerCjKgT3P/+K739X7NTRNM/Z55He/E0LoVfiWSy655H1Xb7nkkg9/6UtbLrnk5muv7dq9p4Dr+mpqmhYt0gPHSeVfk9bU13/45i8qipJJp39w69fu+d736lqab7rttr+54IKa+vobvvH1j1/+Nn3PTRdfLIT44a1f+/mddwoh7n3uuc41p5/7d3/32//4DyHEtZ/73Mdu/erqszZ+42PXF3B3+Sh+4LjoHe8QQmiadus/feSJP/xBCBEYHPzse9/72z277Q7HyjPXVXq90VBICGG12fTEMNjT88xDD533lrf4/P48rzKrY2ubGvUXf/zVf+r/GRWd1W43Wyy7n3p65g65/Xt2e6ur173+9W+64orgSKD/+PHZXmhRR+fRlw8UVshoKBQeC9Y1Na7ftKmwMwDAQvee6z+2YfPm/uPHb/7ANTsefzw7ZzS1tze1tQkhIuFQ1+49+p8eue++R++/v6m9/Za77tqwedOtP/7JFevXZx+Vp4/c8pU//frePHfOvyb9+/e+1+XxCCEe+u1vf/DVrwohgoHAp97xzge69vtqal7/xjd6qqrCY2NCCH9DvRDi5Rde0C/Re/RI55rTG9tahRBty5a975M3xaLR3/zwh7O9r/wVeeEve0VF67JlQojgyIj+Gem6Dx3SK1eT2eypqtI3ppLJP/zylze+9fI3Lmr/0rUfnIjHpzvtktNWPNC1f3ts/OP/8s+zPVYIUdvY+GoxChyOWiwHX9z733f9eKin96J3vOOsLVscLtdsz+Ctrh7p7xdCmEwmb3X12nNet2z1KpPple/R39i4auMGf0OD2fJKlKxvaVm1cYO/sVEIoWnaeCSSTqcbX23yAYDXmttv+uSXrrn2Hes3bH/sMU3T3D7fuz/2sR89/Ofd6dT/HHz5R488/KNHHr5nx47d6dSPHn74Pddf39Termla75Ej115wwc0fuOaaCy4oIG34/P4rPvShPHeeVU26cv0rPexPPfgnY8/w2NiL27cLIewOx9pzztE3RsMRvST6W5fbLYSIhsJCiE9+63a3z/fzO+98+YUXZ3tr+StyC0cmk3nfpk1CiMkJwFdTI4QYD4eNBqVoKPT5K6/K57QXvPXytmXLhBAXv/vd3/7MZ2d1rBCiuq5OCJFJp4/s72pfvry5vX1sZHjfzmmHkcqTSaefffjhJStXXvGP1132/vf3HTu26y9/yaTT+Z/B7fMO9/ULIVwez8du/eqFl1+uqur7Nm3uOXxYVdVbf/qTjtWrRweHvnzdB/fu2Lmos/MjX/nyxvPO++sjj/z8zjtf3LZ9PBxOp1ItixdLu0UAmNc0TTOaoj/8pZvf/bGPuX0+YySHsduKtWdsPG/zhs2bPnXHt+7fuvW2T9wUCQZnO4s1k3nln/eP//M3srcf3Lu37+jR7EkxJx41i5q0vrlFf3HsxMbvge5u/YVeewoh9u3a2bnm9Pd98qbw6GhbR8fac87JpNM7n3zize9616aLLz744t4ffPXWWd3dbBU5cKRTqSkHYL7zn/5JT1XbHnusgNNue/SRaOimSq+3sMOra2uFEOl0+t5dO5esXKlvHO7r+8W//n8/+eY3CzjhXERDof/55S/bli19w5vf/KYr3j7Y0zOracChQOBNV1zRfehQU3u72+f78gevc3k8n7rjWz+7/Vsbztt8aO/e+3/6s7rm5jPfsMlTVX3u313Ue+TIo/fdv3jF8vVv2FRV4z/zDedOjMcee+ABeTcIAAvCPTu2r1i3TgjxwN133/fTn01e/XP52jMuueqqS6+++tKrr95yySUXd3TqfRP5G+zpFUI0L1582fvfn709ODLy8zu/++lvT72c0qxqUofrlTkTkVAoe+eJWEx/oXe4CCG+96Uv/80FF6xcv/77f3pl/Me9P/jBkf1d3/zVr9RM5vZPflL2+kylWPhrUWfnP37xC0KIZCLxs299q4Az7Hnm2Ys7Ov2NDXku5pGjqrZWCGGvqDDShhCitqnpxm983VPlu/Nzny/gnHPRc/hw39GjiqIsXnFadV3trALHj795243f+PoXvvdvmUzmkd/97tmHH65vabnh61/7yl0/qvR4fnDr17Y9+mjH6tXXfeEL7/7oR6w2209v/9ZfH3lE07TLr73mnR/5p0w6/fjvf//bH/1I3t0BwIJw87XXfvqOb998zTV9R49O2Uuy/7ndXbv3fP+Wr37o5i8e2PP8bNNGJBjUJ4Dcctdd+hZ9Zso1W84vYHmP6WpSi9X2yqsTb0FVVf2FveKVxRoGe3quOvcN7/roRxavWJGIx5/988P/ddddX/jevzUtWnT/1q3PPPTQbIs0W9IDR6XX+81f/kLv1Pj5nXfOPIljBsFAIBgIFHbs/t27KxwOIcRPbrv9uaf+Ut/Seun7rj73oouEEFfeeOMffvGLwnJMwdb8zdkrN2zQNG3300/1HZvduNF9O3e+sG3b2nPO+eIHruk5fHgiFus/duzGyy9v71ze3338+MsHx0ZGnt+27RvXf6x16bJIMHj4pZeCgcAzDz3Uf/zYRe94R1tHx/PP/vVoV4HDTgHglNG1e8+1rw7IaGpvf8uVV248b3PTokVun69rz56uPXseve/+HY8/Hh4bu+0TNxUwbuPnd96ZSadbly7dsPn/xumPDQ/raeO9N8xiMkixatLBnp7vfPZzxtsz33DuZe9//3Bf3x2f/kxhJ5wVuYHDYrXefs9/6m1Wf3nwwdK3JehuuOytQghjpK4Qz/7vvff+9PHH1537eqvN9vfvfW/2FyCbv7Hxze9+99rXve6pP/3pT/feq48AzV8ykQiPjSXi8eeeekof/JFMJPbt3HVkf9dELKb/X2I8HD7w/AvHXj6YTqX0fUKjoy9u37HktJXemppYNDqrp74BwKlKHzR6y10/2nLppdnrWGw877yN5533nuuv3/H4E7fd9InC5sFGgiEhRGBw8Nwa/8bNm/XloK654AIhhL+hYboBHJPNsSadISp98vbbrTbbv33py5qq3vjP31i1YYMQYu+OHT+97faCf+HPQG7g+PrWn73ub/9WCLF3x47PvPs9Uq91UjmtYQ/ec8+6c18vhFia1c8im9Vme9Pb37757/++98iR//nlr47u7zJavWZF07ScoaaTly5NnDjaKJNOp1MpMfuQDgCnsEgwGAmFxsPhX3z3u4/cd5+eLZra2zds2vShL93srarqn2U7tGHLpZf+5oc/1FdOCgeDQogDz79waO8+IURT+6L8zzNzTZpKJvQXJvMJy3gasxcT8akXmbz2c59btWHDM3/+8wN33333U39ZuX69vv2sLVvOPv/8K19/btGHdBR5Wmy2L3zv3950xRVCiMP79t14+duiJ45nKTtjDQyHq3LmPYvorC1b3nTFFRaL5YG7f7776aeTiUTJLg0AmNJtn7jp75Yu+/ev3LL/ud2apumTYO/72c/evHTZNRdcMNuhG4aN520+/eyzs7d85t3v0l/Y7BV5nuSkNel45JWlIL3V1dnbjQXRo+Hw5NPqC2+MRyK333TTlTfeuHL9+r6jR6/etOn9553Xf/z4yvXr3/XRj+ZZwvzJauH4yC1fefs//qMQou/o0RveevlQb6+kC53U26699vy3XiaEeGDr3Q/ec4+xvaG1VX8xHpniy5iteDSaTCQue//71021Eq1h6WkrF3V2/OnXv378978PjY7O/boAgDmKBIPG60uuuqrS6/3lv/6rEELTtILThu7Td3zr53d+9/6tW/0NDS9u33H4pf0Ol+ubv/plfXNzPofnU5P2Hz+mv1i6ctXOJ540tje++lyVIy+9NPkofeGNH3z1qwdf3HvdF74ghHjwnnt2P/W0EOJPv/71+z75yVUb1s/uVvMgJXBc+fGPf/DznxdCDPf33/i2txX89NeiMFss+vhQRVGyA8eWSy/RXxT25NUczzz05+VnrF191ka9m2Y6sWj00fvv/++f/KSANUYBAFItX3vGLT++S1EUs9lclAdOLV+7Vu89sVdUfP+WW4QQV9/0CX2J8ZPKsyZ9/tm/vuXKK4UQm/7+4l9///v6Rn9j45qzzhJCREOh555+OueQv3vnOzddfPGB51/44de+Ll5tC4lFX+mX17vjC1iX8qSKHzguvfrqG7/xdUVR1Ezmga1bTz/r7NPPOqFNKTw6+r+/+c2szrnktBV3/u53Da2tv/zXf9UX/srfg/fc85GvfNnn95/zxjd+8fv/fv/PfmYymy973/v+5sILhRDjkch///gnszrhlHY++WQ0HGpobbOe7OFtB154vvvgIdnTnQEAs9V39Fg0FFIUZX8xfohmO9K1//ln/1rp9b73hhvy2T//mvT+rVs/dPMXa+rrz73oos/e+Z3f/uhHVf7aj916q778xmMPPGAsyKGzWK3Xf+1WNZO541Of0msife7u0lWvDGds6+gwNhZX8QPHFR/6kP7EVJPZ/IHPTDHT5uCLe2cbOCavNJq/8NjY7Z/81M0/+L7Nbv+HD37wHz74QeNPmqb9+1duKUpjQzQUym7Lmp9sFRV2h6PcpQCAeSoSDL7BXytmnNkxW/oz6J9/9q9CiPfecP3Mj6Q35F+TTsRi3/7MZ7/0wx9YbbZ3ffSj2WMveg4fvvPz/y/nwHQqdcenP9Nx+upn/vxnfcuD/3nPZe9735uuuKLC6cyk01suuSSdSv3p178u5G5nJGHQ6KQn5M7dtkcf0UfKFLbS6AN33339JZc+95ensqeDHj948Ksf/qe7v/3tYhWyNNKpVDAQMFss+mpm+XNWVtY3N9ns9qKMWQGAU5I+aLSIJzz/0ks7z1gjhOg8Y02ezRtCzK4mfeDuuz/9rncfeP4Fo+TJROKR++677o1vmnLYx0O//e33vvwV4+32xx773pe/kojHt1xyyYWXX55KJv/9K7fI+AmtrDGZT77XPOCrqSl4pVFDfUvLaevWmUym7sOHpD6iRp4Kp/N1F174idu++fuf/2LnE08YE6JmZrZYFi9fccHlb+05fPg/vv6N4b4+2eUEgNeyD3/p5g/dfLPxdvtjj288b3POPt+/5ZZ//8otRbzokpWntXcuT05M7N25c2x4eFbHVtXWnnnuuUKI3U8/HRgcLGKpDAsmcMDgb2i4+qZPrN+0abi/P2fi9XQ0VXW5PYHBgd/95KdP/+//yi4hAAA5SvEsFRTX6PDwvT/8j7rm5rXnnGNM7p1ZeGysa8/zj93/wM4n5/tAEwDAKYkWDgAAIJ3ElUYBAAB0BA4AACAdgQMAAEhH4AAAANIROAAAgHQEDgAAIB2BAwAASGepUcgcAABALtIGAACQjsABAACkI3AAAADpCBwAAEA6AgcAAJCOwAEAAKQjcAAAAOkIHAAAQDoCBwAAkI7AAQAApCNwAAAA6QgcAABAOgIHAACQjsABAACkI3AAAADpCBwAAEA6AgcAAJCOwAEAAKQjcAAAAOkIHAAAQDoCBwAAkI7AAQAApCNwAAAA6QgcAABAOgIHAACQjsABAACkI3AAAADpCBwAAEA6AgcAAJCOwAEAAKSzlLsAAADMCyar1erx2Lwei9Np9Xon75AKhdLxWDIUTowESl+8hY7AAQCvIXZ/TbkuPW8raZvX42ptdTQ2mJ3OmffM/vQysVh8YGD8eE8yFJJcwFOEssVsLePlnc3Njvo6c0WFyWbV0plMMpEYHYv396fHY0U4eVNjfGBQU9W5n6pY17J5vRbXSf6DzqZl1Pjg4NyKNq2Zy1xRV2uyFJhHtUwmPjg0h6IBkKX10reU69Ld9z1QrktPyeJ0uFpbXW2tRs5QZnO49uqLTCw2frxnvLs7HStCzVUyaaFZZnfHc1WeFg6z3V615nRPZ4e5omLyXzVVjff1jT7/Qrx/oICTOxrqPcuWOVtbLE7n4V/8KjMxMefyFu1a1evWupcuyf/86VjsyK/umVsZc+VZ5vo3nGvz+Qq7RCoaPXrPvXMoIwBZSlrDzFcWp8O7fLmzrVV/W9hnYhxldjo9Kzo9Kzpjx7tDXQfmf+wIadqoUFUhTEJUC5NXKdF/FGUIHI662vot51krK6fbQTGZnC0tjsbG0d17RnfvyfO0Np/X09HhamstuJrMX8HXMjsckop0UqX8fABgfjJZrb7Vq1xtraJ42cs4j7Ot1dnWGjvePfbiXjWVKtLpiyyiaSPilYZtVYgRoVqEyVWSIFrqwOGor29644Umm+2keypmc836M7V0euzFvTPsZnY4PB3LKhctqqj1C8kxbe7XspQ8cJTy8wGA+cy9ZLFnxXKT1Srpn0L9tM62VkdjQ6jrQOTQYTnXmZPI//UFvSKkaa6S1A4lDRzmior6zW/IJ20Yqtetix47lopEc7YrZrNn2ZLK9nZHQ4NS6FCDPBXxWmbHFF1IMpTy85ksFQqX+IoA8hTqOlDuIpSByWqtXrfW0dgg5HcqKUIIq9W3epW9pmb0ud3zrakjNSlwTN4iSUmroup1Z1jd7hM2qWrkyNHo0aPp8XGr2+3p7HA2N2f/3WSz+lavGn7mrzmnajx/i+vV7jfZinUtxWw22+3ZWxKjo5mJxAyHqIkCB6DMvczRY8ctw8P57Gnz+irqarO3hPbvn8ulAcgT2t9V7iKUh83rFaUawqJfxeabYmJt2TmEktPI4SjVwJ7SBQ7FYvEsW5azcWTnrrHnX9BfTwyPRA4faX7T3zpbWrL3cTQ0THE2s1lSOeVdy1bly+nUCOx6bvzY8aKcPMfcyxzYsTPPPdsuuyT7bXIsGD16bI5XB4AiUlOpkW3b615/jrBaSlO7qun0yF+3z7fmDSGEXzHFtUz61bcWIfxKiZYALd1Ko5WL2nI6UyaGh420YRiZVM/NMLw0WyaRKNlXW9i1bG5PzpZUCWdvS/p8XIva7DUnTOsPv/xy0a8CAHOUDIXGXnyxZJcbe+HF+bk+h0mIVsXsFya3UPzC1KqYS5YDStfCUeH352yJdfdM3i0RGM1MJMwV/9f1YLLOtFJIOhqNDQzEjndHjx1vvfQt9urqWZXK2dxUc+aZNp9XTadjPb0j27ZnEtP2cczxWpZKV/ZbLZNJBgv5z7GUZT4p38qV2W8zExOv2QZbAPPc+PFum9dbuWSx7EaOyOEj493dki9SOJMQXkUp/RTp0gUOU4U9Z0syPPXQQjWdMov/23nKlamSoWAyFIoePVrYWh06m9fTuGWLyW4TQphsNk9nh8lq6X/kMRnXEkJYTlzDrrAFQkpc5pk56uucjSd0eEUOH5mHTYgAoBt74UWrx2P318irbBOB0bEXXyzVQMyFpHSBY+gvTw8//Wz2lilrJrPdljN3dMpFVCYPIy1A5eLFes1tcLZOMdCyKNcSQuQsmpuOx/UXFqfDWlmpqmo6Ep2hrUJX4jLPzLd6VfaoFC2TCe3bV4LrAkDBRrZtbzhvs9npkJE50vH48LZtpI0plS5waJmMlsmcdDfvaaflDHiUt/y+yZp7+yaTyWS1SvqNbnGeEKS0TKbu9a9zNjdnz9xJR6PxoaHgi3snhkemPEmJyzwDm8/rOjHrjPf0JpkQCyw0Nq/Ht3p1cc8ZfHHv/BzBIGQOIH1loGhyvrfyJoU2qmkJodmFUqUo9lNvlko+TDard8XynI3hgwclXW68p69q9Wph+r8RMxMjAXk1t7nihMDhqK931Nfn7GOprHRXVla2t4f2vTT8122TT1LiMs+gavXqnGgYeonZsMDCo1itRX+i2+SfRvOKPoC0et3a4p523g4UzZYUWrf2ykCFtNDGNa1FMZUmc5Rulko+al/3NxbXCSMr4wOD48dlDb2J9/eP7Nylpl6ZH5QcHRt65hlJ1xJCTPngmCkpJpNv9ar6TedO/lOJyzwdi9NRubg9e8vEyEist7f0JQFQFEpR/zf/jR/vjh4+UsSuj1DXgfk8UNQwouXe9NikLZLMoxDqW3VazkIdajo9sn271IuOPf9CuKvL7q/NJCakPjrZZLWaJw2bnZmno2NicGjysoAlK/MMfKtW5UxyDh9gNiyAhaSIA0jjA4Ohrq4FMXRj8rqiiVNypdEZuNpa/Rs25Gwc2/P8xFBei13ORSaRLMFPc4vTkYpGs9cUURPJyJHDiZGRTDJlcTqdTU2u1paclcGq1pw+5TrEpSnzdBSLxd1xQjRMj4+HX5PrJQOnAC2VSgQCxW2YMFph57miDCBNhsOBXc8tiLQhhLALJX1iWV9bYzgcDfUNmzblPPIjevRY/o+Knf+SofDRe+61eT3OlpaKulqzzT70zDOpcMTYIbh3n3d5Z93rz8nOHFaPp3Jxe/TI0TKUeHq+laflzCSKHDo85exlAPNfMhQeeurpIp90gdS+cx9AqqbTo7vm3QNTZlClKOMn9qFUncKPp89R4fc3nr8lZ6pnIhAYfPLJchVJnmQonAztE9M8/jbUdcDZ0lzZ3p690dHQMN8Ch3d5Z/ZbNZ0O7nupXIUBUAQLJB/IkAyFAs895z9rY2GHB3btnv8DRbPZhdKimMbKMUulzINGbVW+xgvPN+csvBGN9j/y6PyfWSRD5GDu44ztVVVlKcl0vMs7rJ4T1mgfP348PT5ervIAwBzF+wfCXQcKCF2hrgPxgf7iF0gyu1AaFNMixdxQqvkpunIGDqu7sunCC3KmpWTi8b6HH8nua3hNiQ/kLgya0/ZTdp4VK3K2hPay2BeAhS20v2tiYGBWmWMBDRSdJ8oWOCxOR9OFF+b8Vs4kEv2PPFqumRfzgZrOHWllspS/28vgamvNeSZOfGAwLn9gLwDIFti1OxUO55kfFtZA0XmiPJWZ2W5r/NsLbdUndBaoyeTAo4/HBwbLUiTZ7P4aU9ZqXaqqTpmrbD5fzpbJEaSMfKtW5mwJdfGoNgCnAjWVGt21O58BpAtuoGgOVYjIq2M43EqpHk5flsChWCyNF1yQ80NZTaUHnnjiFF45qnHLednNOZqqHvnlrzKJZM5uFf7cp7kW9ow3GSrqap2NjdlbUuFw5OChcpUHQAnkDBLPNuWk/QUtzwGkC26gaDZViG4to/+QjQgtqImSPaG+1IFDMZkaz9/iOPERo1o6PfTkX8aPLYA12gqWjsWyA4diMlW2t0/+v2vlkiU5W+ZPB1PV6atzlgmRt+o8gHnCM+lxE4bQgQOnXp+CPoDUs7xzukaOBTpQ1DCkqdnN5mkhRjS1riTNHKUOHPWbN7laW7K3aJnM0NPPRI4cKXFJdM7mppozz7T5vGo6HevpHdm2/aTPay1MfHDI0XBCzKpetzbW3589PNa9eLHzxH2EEOPHj5erzNlsXk/Oo9rUZMfMfl4AACAASURBVDK0j4enAKe+BbFUeRGF9nfZvJ6KhobJN34KDBSdvK5o/JRcabT+Da93L1mcszGTSHg6OzydHTMcqKlq7x//VPTy2Lyexi2vLAFistk8nR0mq6X/kceKfiEhRPjAAd+qldkjQC0uV9ull0SPHE2GQpqqVdT5Kxctyn4qmxAi3j8QHxwqV5mzVZ1+es6j2qJHj5Yg6ABA6QV27a479xyrx5OdOU6NgaLWSSuNWk7JlUY9nVP0BVqcTovTOfOBklaxrFy8OGfSqfPEH/FFlApHgi++WL32hIcTmmw2z/T9o1o6Hdi5K2djKctsMDtyH9UmVJXFvgCcqiYPIF3oA0UNXkWJn7jSqO+1s9JoGU1+gLLJZDJZrZL+kwrsfM7idM3clpNtdPee+GDunJ0Sl1lXtXplzqPaYn39icCovCsCmCeGZ1j1fIH/1p9ZzgDSBT1QNJtLKH5hGhWqKoRJiGphcp2SLRzzzXhPX9Xq1dm9GBMjAak19+CTf0mFw1VrTs+pv3NomUxg13Njz78w+U+lL7NiNrtPfIqvECK4n9EbwGvCxLwZt156xgDS8AIfKJrDqyheYU4LrWSdKbrXdOCI9/eP7NxVvXat3myQHB0beuYZ2Rcd3fN85MgR36pVle2LJvclqYlkrL9vdPee6doPSl9m38rTcsqZHB0bP5Y7lBUATj2h/V3pWGy8u/vUa84pcdoQQihbzNYSX3K+Mdttdn9tJjFR+gmoFbV+u99vrrALTWQSiVQ4kudKJGUsMwAABSBwAAAA6cr8tFgAAPBaQOAAAADSETgAAIB0BA4AACAdgQMAAEhH4AAAANIROAAAgHQEDgAAIB2BAwAASEfgAAAA0hE4AACAdAQOAAAgHYEDAABIR+AAAADSETgAAIB0BA4AACAdgQMAAEhH4AAAANIROAAAgHQEDgAAIB2BAwAASEfgAAAA0hE4AACAdAQOAAAgHYEDAABIR+AAAADSETgAAIB0BA4AACAdgQMAAEhH4AAAANJZqi+7RNO0chcDAACcshRFsVit1nIXAwAAnOIsVquVFg4AACCPoigWs9k8OXAoilKWAgEAgIVuylxhURSFeAEAAIplylxhMZmYqAIAAOSy0LwBAABko3kDAABIRwsHAACQjsABAACko0sFAABIR+AAAADSETgAAIB0BA4AACAdgQMAAEhH4AAAANIROAAAgHQEDgAAIB2BAwAASEfgAAAA0hE4AACAdJZyFwAAgFdomlbuIuDkCnsKG4EDAFB+etQgcCwImqbpmWNWyYPAAQAoJyNqqKqqaRqZY55TFEVRFJPJlL0lnwMJHACAstEThqqqyUgkvL9rorcvHQlrKpljPlJMisXtqWhqqlzeaXNXms1mIYSiKEaDx8wIHACA8jDSRmh/19j27eSMeU5TtVQolAqFol37vRvWe5cvN5lMJpOJFg4AwHynp43Rv24rd0EwC5qqBbftEJrwLO8UQujdKyeNHUyLBQCUgd68kYxExrZvL3dZUIjQzp2JcNgYeXPSwTcEDgBAeaiqGt7fRU/KAqWpWvTAy3rgyGd/AgcAoAz038QTvX3lLggKl+jvz39uEYEDAFBqxlTYdCRc7rKgcJlIxEgbdKkAAOYv+lMWtFl9fQQOAAAgHYEDAABIR+AAAADSETgAAIB0BA4AACAdgQMAAEhH4AAAANIROAAAgHQEDgAAIB2Ppy+OWCyWSqWEEA6Hw2azzf2EyWQyHo8LIaxWq9PpnPsJi17CmRW9/ACABa34gSOdTieTyUwmo2mayWSyWCw2m81kOsWbUsbHx0dHR4UQzc3NxQocAwMDQoiqqqqiVNjRaHRsbEwUr4QzK3r5AQALWjEDx/j4+NjY2Pj4eM52k8nk8/l8Pp/Vai3i5QAAwEJRnMChadrw8LD+A3oyVVVHR0fD4XBjYyM/dgEAeA0qTuAw0oaiKFVVVS6Xy2q1KoqiqmoikQiFQuPj4+l0ure3t7W1taKioigXBQAAC0URAkc8HjfSRktLS04bhs1mq6ysDAQCgUBAVdXBwcG2tjZFUeZ+XQAAsFAUYSxnNBrVX1RXV0/ZY6IoSk1NjcPhEEJMTExMHuQBAABObUVo4UgkEvoLPVJMSVEUj8ejz5OMxWKVlZVT7qZpWiqVUlVVn96S59yWTCaTTqf1STF6V07+hU+n0+l02mQyTTdxQ1XVdDo92yLpUqlUJpNRFMVqtUqapzOXe8/+tPM/trDvaOZTKYpiNpstFiZpA8Apqwj/xGuals9udrtdzxlTVlHpdHpsbCwUCmUyGX2L2WyurKysrq6eLgpomhaJRILBoJ5jdCaTyePxVFVVTXnUyMhIMBgUQjQ1NVksluHhYaN5prOzM6fGjcViwWAwGo0aN6goitvtrqqqmnkYiqZpoVAoGAwaUUxRFK/XW1NTU6w6tYB7z5bJZPRPO51O61ssFovX662urp4hQBTwHc1wqmAwGAwGjVMJIex2u8/n83g8p/wkagCnEsVicTbUG2/VVCo+ODTdzuaKigp/jfE2M5GYGBmRW755owj1n81mi8ViQohoNOpyuabbzeFwNDc3T/mnWCzW399vVH66TCYTCoUikUhzc/PknppMJtPf3z+5d0ZV1WAwGAqFmpqaJrejaJqm13CJRCLnijlpY2RkJBAITD48HA5HIpH6+nqv1zvlvWQymd7e3pyCaZoWDAbHx8dbW1vnPje4sHs3JJPJkZERIwzp0ul0IBCIRqMtLS1TpqICvqPpTExM9PX16auQZUskEoODg+FwWI+DeZ4NAMpLS6dr1p9p9/tfeauqvX98MD4wOOXO/rM3epYtM94OPf0MgWMWKisr9WaDYDBotVqrqqpm1bAfj8d7enr0VoSqqqrKykqTyZTJZCKRSCgUUlW1t7d30aJF2b+hNU0zaly73a7/wjaZTKlUSl8IRNO0vr6+9vb26X55Dw0NCSFMJpPL5bJYLNm/s/UbMdKGvm6VxWJRVVVfO0vTtIGBAf3H/ZRnVlVV/7Fus9lUVZ2YmBgdHdW7D4aHh5uamvL/cCab+70PDw8LIZxOp9frtVgsmqZNTEyMjY1lMhk9h7W0tOR8gwV8R9PJZDJG2nC73R6PR/9sE4lEIBDIZDLxeHxgYKClpWUunxIAlNLwth3NF71RMZmEEIrJVLNhfc/v/2fybo6GeveSJcbb+MBg6KX9pStluRUhcLhcLo/HEw6HhRB6J4U+MzafhvFMJjMwMKDXZE1NTW63O/u0NptteHhYX8ajoaHB+FMkEtFrXJfL1dTUZFzIZrO5XK6+vr5IJKK3RvhfjZyT+Xw+v99vNptztuuxQEw16cbpdDocjr6+PiHE0NCQ0+mcfI+qqlZVVdXW1hp1dmVlpdPp7O7u1kueTqfn8vO9KPdeU1OT/VeXy+V2u7u7u9PpdCwWi0aj2V9EYd/RdMLhsJE2srOX0+l0uVzHjx/PZDLj4+OxWIwlWwAsFPH+/sjBQ57ODv2to77eu7wz1HUgZzf/hg3Kq/9oa5nMyLZtJS1luRWns7yhocHn8+mv4/F4X1/f4cOHBwcHo9GoqqozHBgKhZLJpBCipqYmuybTGYuTZo82EELoPThCiCnHHFRXV+svZpgO43K56urqJqcN/Vp6mf1+/+Q6z+12650pqVQqe/xE9pmz04bO6XQap9Lvt2Bzv3e32z05i9hsttraWv213l5lKOw7ms7ExIT+YnKflM1mM8o/5WcLAPPWyI6d6ax/uKrXnmE6sQPdu7yzor7OeBvqOjAx/FrpTNEVp6dcUZT6+np9vQ29qshkMvqoQH28pNfrnTzQUh/ZoL+eckiEyWTyer0jIyNCiHg8btR2DQ0NM/yYNgZJTB4lYPB6vVP2+2QXyePxTHms2+0OhUJCiEQiMXnMis/nm/LMdrtdzwo53TezNfd7n+6+KisrFUXRNC0WixnNMAV/Ryc1ZRL1eDz6XKcpsyAAzFuZeHz0ud1157xOf2uprKxet3Zk23b9rclqrV57hrFzOhoN7NxZhlKWVTGnA7hcrtbW1tbWVq/Xa/z41musY8eODQwM5PwCTqVSer1YUVEx3VBKu92uv8gZ5DgDo76foWqfbpSJ/tg5IYQ+bmPKfRwOx+LFixcvXjxdzT2l7A8k/6NmK597n47JZDJGpRjNMEX/joy508PDw0Zrh8FisTgcjtI8zxYAiiv00v7ssaLeFStsvld+p1WvW2vJGvY3snOXmpz2Z+GpqshzARRF0bsP6urqYrHY+Ph4KBTSq9hQKBSLxVpaWoy6xPgVrmnayDTDdI2MMmUNqo85mJiY0Fe8mHtdblzOqEQnm2HRjlIq+r0LIYz7Mj6HuX9HOfThPvF4PJVKHTt2zOFwVFZWVlRUVFRUMBsWwEI3sm1by8VvVsxmIYTJaqnZsKH/zw/bvF7vihXGPrGensjBQ+UrY9nImnyo/1yurKz0+/3hcHhkZERV1VQq1dfX19bWplctRqN6IpE46Y/jnMpMVdVAIKA/Eb6IjCLN58pP0r2LrLs2Poe5fEfTXaKlpSUQCOjzfeLxuN4Hp69x4vF4nE4nK98DWKAmhkdCXQd8K0/T31YuanO1tXo6O03WV2pbNZUe2bajfAUsJ+mrHZjNZn1maXd3tz7xMhqN5nRGWCyWk65Okd3BoapqT0+PXlHZbDaPx2O3281ms15RaZp2/PhxCbcyL5Tr3mf7Hc3AZDLV1tZWVVVFo9FoNKqPb9Vn1oTDYafTWV9fPx/akACgAIGdO11trdZXO1BqX/c31qzRfqGX9iWmebL6Ka9EyyvpK0bo003Hx8f1wGH8kHW73XV1dTMdf6LR0VG9xvV6vXV1dTmtETPPi5nZ5J/48428exdTNfAU/B2dlMVi8fl8Pp9PX6okHo8Hg0G9n6inp6etrY21vwAsRGoyFdi5q2HzJv2tNWvoRjIUCuzaXaZyld9cOw5GRka6urq6urpO2sJvzFIxhgUYNUr+A0LFqwuHCyEURamtrS1u30dhRSoZqfcussaKGp9DCT4Qk8nkdDpramra29v1IaWpVCpnai4ALCCRg4diPT2Ttwe279DmNlFxQZtrjWU0s5+0Qpr861lfIlMIEYvFZpjGmUN/XJl+6aJPnrTZbPo54/H4dCMSksnk0NDQ0NBQJBIp7tVPSuq9q6pqrN5h9GgU9h1NJ5lMjo2NjY2NGY+wyWY2m2tqXnnEwOQJLACwgIxsy80W48ePR4+dst39+Zhr4DBmOUYikZkzh1GZGRNA9IeN6a/Hpu/TisViU/YUJJPJKbfPsObVSemrhohXn4425T76Auf6mMeCLzRHc7l3fU3YySKRiH5Ofbl3feMcv6McqqrqWW269jCW3wBwarD7a5QT/0Gzen3Ka7uneK6Bw2azVVVVCSE0Tevt7TXWwcyhPz1Vf529NpTx4JWxsbEpW9Gj0WhPT093d3d2R4zRrDK5CoxEIgMDA8bbAjKBsSbYlAtFxONx/TErZrN5hifVSVKUe49EIpMnuCaTSX2EjZi0wFcB39F07Ha7Hjfj8fiUec4IQzM/jxcA5jOz3Vaz/sycjTavp+bMtWUpzzxRhLTl9/szmYz+jIzu7m6n0+l2u/WmeFVVk8lkJBLJXpA7uy6x2Wz19fV6NTk4OBiPxz0ej16nplIpfdqCEELTtOzxCtXV1YODg0II/amnLpfLbDan0+nsC+lUVZ3tj2abzeb3+/Xngxw/frympsbhcFgslnQ6PT4+bvw0r6+vL8vP8aLceyAQiMViPp9Pb8mIx+P6w9uEEC6XK+ehdIV9R1PSh5709PQIIfr6+jwej9vtzj6VnkL01UsL+3wAoOxqNqy3TPWL1HvaaZFDhxOB4i9qsCAUIXCYTKaGhgabzTY6OqqqaiwWm66dw+/3Gw/LMHi9Xk3T9ErUqL2yOZ3OxsbG7LrT6/XG43F9z0gkkvNbua6ubmxsTP+1nUqlCogF1dXVmUxGf8Tr5MYARVEaGhryX8O7uOZ+742NjSMjI8YCGNnsdntDQ8PkZTAK+I6m43K5GhoaBgcHjXmwOTuYzebGxsaTTsEFgPnJUV/n6egw3sZ6eirq6kw2mxDCZLH4zzqr948Plq905VS0Z6nU1NToi0hGo9GcngiLxeLxePQVI6Y83OfzOZ3OsbGxSCSSPVTTarXqMydzfjrrVb7D4RgdHc1uxne73XoLSiKR0GdzxOPxwhrna2trXS5XzvBGRVE8Ho/+RPgCzlkUc793h8PR1tY2NjYWCoWMT9tsNnu93pqamulaKWb7Hc3A6/Xa7fZgMGiMGjHK4PF4qqqqSBsAFi7/WWcZozfUZHLomWc9nZ3VZ6zRtzibGqd8kOxrgXLdddcV/aTpdDqTyaiqqiiK2WzOv/7QNE1fqFs/0GKxnHTRSf3pJ4qiWCwWGSs36BNDVFU1mUxWq3VerUA6x3vX136d7a0V8B2d9FRCCP2/E9YYBV4jNE3TNC2dTh+7+xflLksxVa1e5T/7LOPt6O49gZ27FLN50eWXWV8dgJ+OxY7/932ZU2UuXtM7r9AnTiqKMnM9ImXEbMF1v6Ios208kN3YYDab5+3UiTneu8lkmuGRMdMp4DsqwakAoOwsLlfVqy0ZQohUODy6e48QQstkArueazhv8yu7OZ3+jesHn3yqPKUsn3n0ex0AgIXLf9YGc1ZHdmDnLmMpjsihw7G+PuNP7mXLHI0NpS5fuRE4AACYK1dri3vxYuNtrKc3cvhI9g4jWcuMKiZT7VkbS1q+eYDAAQDAnCgmk3/jRvHqKDQtnR7ZkftI2MRIIHzgZeOt3e+vOuP00hVxHiBwAAAwJ9XrzrBV+Yy3oQMHplxsI7BzVzpr2Yjq09dY3ZWTdztVETgAACiczef1rVplvE2Pjwd27ppyz0wiMfb8C8Zbk93mP+usKfc8Jb2m13UHAGCOksHQoa0/z3Pn4N59wb37pJZn3qKFAwAASEfgAAAA0hE4AACAdAQOAAAgHYEDAABIN6dZKvv2vUaH2gIADCtXrix3EbAAzClwRCKRYpUDAACcwuYUOM4+++xilQMAAJzCGMMBAACkI3AAAADpCBwAAEA6AgcAAJCOwAEAAKQjcAAAAOkIHAAAQDoCBwAAkI7AAQAoG8WklLsIKNysvj4CBwCgbCxuT7mLgMKZ3W5FyTdzEDgAAKWm11Imk6miuancZUHh7A0NiqLo3+ZJkweBAwBQBnpF5V7eSa/KAqWYFGfHMpPJZGSOmRE4AADloSiKze32bdhQ7oKgEO516+weT/5dKnN6WiwAAIVRFEXTNJPJ5FneKYQI7tihqVq5C4W8KCbFvW6du7PDbDabTKY8GzkIHACA8tCrKLPZ7FneWdHYEDlwYKKvPxOJkDzmJ8WkmN1ue2Ojq2OZze3W0wYtHACA+c6oq8xmc4XPZ9uwQVVVVVXLWyrMTA8ZRquG4aQHEjgAAGVjVFR6pWUymYQQmkYLx/xlzEnJeXFSBA4AQDllV1f5t8+j7PKcDWsgcAAAyoycsRDN9lsjcAAA5gVix6mNdTgAAIB0BA4AACAdgQMAAEhH4AAAANIROAAAgHQEDgAAIB2BAwAASEfgAAAA0hE4AACAdAQOAAAgHYEDAABIR+AAAADSETgAAIB0BA4AACAdgQMAAEhH4AAAANIROAAAgHQEDgAAIB2BAwAASEfgAAAA0hE4AACAdAQOAAAgHYEDAABIR+AAAADSETgAAIB0BA4AACAdgQMAAEhH4AAAANIROAAAgHSWchcAQJlNTEyEw2EhREVFhcfjmfsJw+HwxMSEEMLj8VRUVMz9hDMrevkByEDgAEpE07RkMqm/ttvtJ90/lUqpqiqEsFgsZrNZXsHi8fiRI0eEEI2NjUWpsIPBYH9/vxCis7OzBIGj6OUHIAOBAyiRRCKxZ88e/fXSpUv9fv/M+x87diwQCAghOjs7q6qqpJcPAGRiDAdQBsePHzdaOwDgtYDAAZRBKpXq7u4udykAoHQIHEB5jIyMjI6OlrsUAFAiBA6gbI4dO5ZKpcpdCgAoBQaNAmXgdrsjkUgymezp6Vm8ePFcTqWqajKZzGQyJpPJarVaLLL+T51KpfSJM2az2W63m0yz+LliFNJsNttstjyPVVU1kUhkMhmLxZL/UVPSNE0/laIo+tkKPhWAwhA4gDJYtGjR3r17NU0bGhqqqqry+XwFnCSRSPT39wcCgXQ6bWz0+Xx1dXVFnNWiaVogEBgcHIxGo8ZGk8lUW1tbX1/vcDhmPjydTvf39w8PDxttOVarta6urqGhYYZslEwmBwYGhoaGMpmMvsVsNtfU1DQ2Ns52nm0qlRocHBwcHMz+lBwOR11dXV1d3VxCDIBZIXAAZeB0OltaWvRxo0ePHl29evVsWyZGR0cPHTqkL9SRLRgMBoNBv9+/ePHiudem6XT64MGDoVAoZ7uqqoODg0NDQ8uWLauurp7u8Hg83t3dHY/HszemUqne3t6xsbHly5dP2dIQDocPHTqUM4snk8kMDQ2NjIx0dnZ6vd48yz8+Pn7gwIHJE4Li8fixY8dGR0c7OjqsVmueZwMwFwQOoDwaGhpGR0fHx8cTiURvb++iRYvyPzYYDL788sv6a7/fX1NTY7VaM5lMNBrt7+9Pp9MjIyOapi1dulRRlIJLqKqqkTacTmdjY6PD4TCZTIlEYmBgIBQKaZp28ODBNWvWTNfqoCcqt9tdV1dns9lUVR0fHx8YGEin07FY7NChQytWrMgpYSQS2b9/v6ZpQoj6+vqqqiqLxZJOp0dHR4eGhlRVffnll1evXp1PO0c6nTbSRnV1dW1trf4pjY+P9/b2ZjKZSCRy+PDhzs7OuXxKAPJE4ADKw2Qytbe37927VwgxMDBQVVWV5yqZqVRKX1hTCLFkyZLa2lrjTx6Pp7q6ev/+/YlEIhAIeL3e7L/O1ujoqJ42vF5vR0eHsdqpw+Hwer2HDh0KBAKapg0PD7e2tk53kubm5ubmZqNG9/l8NTU1+/btS6VS4XB4dHS0pqbG2DmdTh8+fFhPGx0dHdltJ16v1263d3d3ZzKZvr6+JUuWnLT8IyMjRtpYtmyZUQaPx1NVVbV37950Oh0MBiORCOuTAiVA/yVQNpWVlc3Nzfrro0ePGuMVZjY8PKzXo3V1dZPzREVFhVEZ9/b2Tu5zyZ/Rk9LY2JiztrqiKA0NDTm7TVZTU9PS0pLTflBRUdHW1qa/Hhoayv7T0NCQ/hCWpqamyT019fX1eheM8QnMzBh0UldXN7kMjY2N+utIJHLSUwGYO1o4gHJqbGwcHR2Nx+PxeLyvr2+GpgKdpmmDg4P6a6PKz+HxeLxebygUSiQS4XC4sBGpQoilS5fq2WXKHgejU0OPCFPKbr3IVlVVpSiKpmnhcDiZTOoxQh9Cq+9QV1c3+Siz2VxXV9fT0yOEiEajM4wdyZE9XNRQW1vrdruFEIzhAEqDFg6gnMxmc3t7u/66r68veybIlCYmJvQf9y6Xa4YZIkZlfNITzkxRlOnGNxjb82yYyWY2m40YZAwpnZiYSCQSQgiXyzXdw+2cTqf+IhaLnfQqep4QQnR3d0/+HKxWq9vtdrvdJXi8HABBCwdQdh6Pp6GhYWBgQAhx9OjRlStXzjC7RK+ShRCVlZUznNPIIjM0P+QvmUyGw+Hx8fGJiYlMJjOXbhqD0+kcGxsTQhjTZY1bU1VVb8aYsiT6i3wWTPP7/YFAIBKJJBKJvXv3ut1un89XWVnpcrmkPn0XwJQIHED5NTc3j42NJRKJ8fHx/v5+Y2DHZEZzwszTaI2/znEl03Q63dfXpz9rvriMKt+4IyPHxOPx3t7emQ/Pp1nFbDZ3dnb29fUNDAxomhaJRPThGoqi1NTU1NTUeL1e5qcAJUPgAMrPYrG0t7d3dXUJIXp6enw+n8vlmvmQEtSUmUzmwIEDeiVtt9tra2udTqfVatUvrarqvn37ing5fXKKEMJms510JdA8B15YLJa2tjZ9BnIwGNTHt2qaNjIyMjIy4vF4Fi9eTJcKUBoEDmBe0FcI1UdNHjt2bMWKFVPuZjQMTDkQ0mA0AMxlRGR/f7+eNmpra9vb23M6egoYujHl4cYdGeevqqoyxrUUhc1ma2hoaGho0BfhCIfDQ0ND+rzcl156adWqVax0DpQAg0aB+aKlpUWv+SKRiDEVJYdRNc48GtQYiVnwz3djzoiiKG1tbUVfAtwY9WlEIuNFPgNCC2M2mz0eT0tLy5o1a/QhpclkMmdqLgBJCBzAfGG1Wo31Rru7u6esdx0Oh14xR6PRGQaE6uMxhRAn7ZqZjv6oNiGE3W4v+gPhMpmMsXqHMb7V6XTqsUYf5jnHS8Tj8YGBgYGBgWAwOPmvFovFGCgzx4k8APJE4ADmkerqar/fL4TQNC3nESQ6RVGMNSqm+2kejUb1wGGz2fJ/7Mh09Jkpk7dPWZHnGBkZmXJ7IBDQh4h6vV6jzUZ/IJz+eoZhquFwOJ/enEwmc+zYsWPHjvX19U25g9GVw7hRoDQIHMD80traOvPAi7q6Or3Job+/f3R0NOevyWTy8OHD+uvm5uaCu0KsVquxGIY+ZTfb6OiocRWRNd5z8m49PT05f9Wf6GbcS/af6uvr9epffzLclCfcv3//Sy+9dNLpvsY6JZFIJBAITN7BCEMFNwIBmBUGjQLzi81ma2trO3To0Aw7LF68WH9428svv1xfX19dXW21WlVVjUajfX19+mIVVVVVc3mQiqIojY2NR48eFUL09PTEYjGfz2exWFKpVCAQCIfD2TtnMpnpul16e3vD4bD+8DZN0/THy+lNFF6vt6qqKntnh8PR3t6uPynmyJEj4XDY7/fruUd/OoyeEjRNO2kvjz70RJ/4c/DgwbGxsZqaGv1UyWRyeHhYz2pms1lvUgIgG4EDmHf8fv/o6KgxDmOy6urqpUuX6s85GxwcnDzCtLq6ffVEHQAAIABJREFUesmSJXPsLKirq4tGo3odPzo6mtOasmjRooGBAX2wRSKRmDIBLF26tKenx1gAI5vD4ZiyhHqbh545AoHA5MYJj8ezdOnSfIaV+Hy+JUuWHDlyRNO0KU9lNps7OjqYFguUBoEDmI8WLVo082AFv9/vcrkGBgYCgUD2bm63W2/zmPvQBEVRlixZ4na7+/r6skdxVlVVNTU1VVZWxuNxveMjEolM2THhdrtXrVrV398/NDSUPQ+2rq6uqalputBQV1fndrsn35rdbq+vr6+vr8+/n0hfO2RwcNAYNZJdhvr6+unWUAdQdMp1111X7jIAKJyqqolEIpPJKIpitVplLCmhaVoikUin04qi2Gy2Atb2UFV1YmJCVVWTyWS32/NcWdy4NSGExWKx2+0Fp6gingpAYWjhABY2k8k0w1PcikJRlDn2O5hMJuO5a7M6qli3VoJPCcDMmKUCAACkI3AAAADpCBwAAEA6AgcAAJCOwAEAAKQjcAAAAOkIHAAAQDoCBwAAkI7AAQAApCNwAAAA6QgcAABAOgIHAACQjsABAACkI3AAAADpCBwAAEA6AgcAAJCOwAEAAKQjcAAAAOkIHAAAQDoCBwAAkI7AAQAApCNwAAAA6QgcAABAOgIHAACQjsABAACkI3AAAADpCBwAAEA6AgcAAJCOwAEAAKQjcAAAAOkIHAAAQDoCBwAAkI7AAQAApCNwAAAA6QgcAABAOgIHAACQjsABAACkI3AAAADpCBwAAEA6AgcAAJCOwAEAAKQjcAAAAOkIHAAAQDoCBwAAkI7AAQAApCNwAAAA6QgcAABAOgIHAACQjsABAACkI3AAAADpCBwAAEA6AgcAAJCOwAEAAKQjcAAAAOkIHAAAQDoCBwAAkI7AAQAApCNwAAAA6QgcAABAOgIHAACQjsABAACkI3AAAADpCBwAAEA6AgcAAJCOwAEAAKQjcAAAAOkIHAAAQDoCBwAAkI7AAQAApCNwAAAA6QgcAABAOgIHAACQjsABAACkI3AAAADpCBwAAEA6AgcAAJCOwAEAAKQjcAAAAOkIHAAAQDoCBwAAkI7AAQAApCNwAAAA6QgcAABAOgIHAACQjsABAACkI3AAAADpCBwAAEA6AgcAAJCOwAEAAKQjcAAAAOkIHAAAQDoCBwAAkI7AAQAApCNwAAAA6QgcAABAOgIHAACQjsABAACkI3AAAADpCBwAAEA6AgcAAJCOwAEAAKQjcAAAAOkIHAAAQDoCBwAAkI7AAQAApCNwAAAA6QgcAABAOgIHAACQjsABAACkI3AAAADpCBwAAEA6AgcAAJCOwAEAAKQjcAAAAOkIHAAAQDoCBwAAkI7AAQAApCNwAAAA6QgcAABAOgIHAACQjsABAACkI3AAAADpCBwAAEA6AgcAAJCOwAEAAKQjcAAAAOkIHAAAQDoCBwAAkI7AAQAApCNwAAAA6QgcAABAOgIHAACQjsABAACkI3AAAADpCBwAAEA6AgcAAJCOwAEAAKQjcAAAAOkIHAAAQDoCBwAAkI7AAQAApCNwAAAA6QgcAABAOgIHAACQjsABAACkI3AAAADpCBwAAEA6AgcAAJCOwAEAAKQjcAAAAOkIHAAAQDoCBwAAkI7AAQAApCNwAAAA6QgcAABAOgIHAACQjsABAACkI3AAAADpCBwAAEA6AgcAAJCOwAEAAKQjcAAAAOkIHAAAQDoCBwAAkI7AAQAApCNwAAAA6QgcAABAOgIHAACQjsABAACkI3AAAADpCBwAAEA6AgcAAJCOwAEAAKQjcAAAAOkIHAAAQDoCBwAAkI7AAQAApCNwAAAA6QgcAABAOgIHAACQjsABAACkI3AAAADpCBwAAEA6AgcAAJCOwAEAAKQjcAAAAOkIHAAAQDoCBwAAkI7AAQAApCNwAAAA6QgcAABAOgIHAACQjsABAACkI3AAAADpCBwAAEA6AgcAAJCOwAEAAKQjcAAAAOkIHAAAQDoCBwAAkI7AAQAApCNwAAAA6QgcAABAOgIHAACQjsABAACkI3AAAADpCBwAAEA6AgcAAJCOwAEAAKQjcAAAAOkIHAAAQDoCBwAAkI7AAQAApCNwAAAA6QgcAABAOgIHAACQjsABAACkI3AAAADpCBwAAEA6AgcAAJCOwAEAAKQjcAAAAOkIHAAAQDoCBwAAkI7AAQAApCNwAAAA6QgcAABAOgIHAACQjsABAACkI3AAAADpCBwAAEA6AgcAAJCOwAEAAKQjcAAAAOkIHAAAQDoCBwAAkI7AAQAApCNwAAAA6QgcAABAOgIHAACQjsABAACkI3AAAADpCBwAAEA6AgcAAJCOwAEAAKQjcAAAAOkIHAAAQDoCBwAAkI7AAQAApCNwAAAA6QgcAABAOgIHAACQjsABAMD/z96dx0VVLn4cf9hkUcQFdxRxQzMzczcz65pmWvfaaplLamhdrVtXQ0tKzTS18le5680VrkuLmksmZpmpKYpC7onigqAEKqvIML8/njzNnRmGM8M8M4if9x+9DmeemfPMnMnznWc7UI7AAQAAlPN2dwXMGY1Gp7yOh4eHU14HAADXK39XQ7cFDmd9lO56fQAAyr7iroauDyIuDRyEAAAAygLTK7JrwocrAoeenEEWAQDA6fSECe0SrDR5qA0cRA0AANxIXmR1Jgm7CttLVeAgagAAUEaYXXBtRwpFscP5gcN2jCjuUcIHAABOZzU3GI3GEvOE02OHMwNHiaHBagFFEaTsTAQCAMAupf8Rrl0Ei8sNejKHjac7wGmBw7FPRz5LRfMGTSYAgDuW2SSUUuYGnenENuesNOrAiA2j0agubQAAAEm7zlpeiB14EYeVtoWjNA0bxT2dCAIAQCmZtkloTRRmbRWunMNSqsChPxnoGUn64osvdunSxc/PrzRVAgAA+fn5u3fvXrlypbgVEWzEBXtjh2OZw6tt27YOPE0/nWNCX3zxxYcfftjbu8zd2wUAgNuOt7d3WFhYYGBgQkKCaT7QtosLDXrChGOBw/ExHI6ttKEN3TAr06VLF4drAgAALMlrq+WV1wZ1y2g5GDj0zIC1q9L0pAAA4FyW11adl2bH1rmwzZHAUfp6MCwUAAAXKC49lJgqnH4pd860WJ01cOw9AwCAUnLgUuvcq7PdgcPhQGR1PIe9RwcAAPYyveA6cUiHXddxZ7Zw6DwwOQMAANcr5dJZpWRf4LC3u8RGMZYZBQDAveyd4WHXQ2acP4YDAACUNWa/802jhmt+/NsROBwOOMXdNoXmDQAAlNLfhuHEMZpWOaGFQ2cVzUasmG6TPAAAUK2UM11LebHWGzicPtKEkAEAgGsU9zvfWRNI9TyrtC0cpcwNxA4AANQx60YoZcIozVVb4aBR/ct8ETsAAFBKf5+DoouyrsBR3LEdrr3ttAUAAJyoxJ/6+jOHA5FAcsW0WIcrBwAAnEWbMeqWqaNKAof+BgwyBwAA6ti12IbS/gfHA4fDt4EhZAAA4DJOjxGOvUjJgcPe17Wx3ob436jl4jXOAACAVFwTQGnSie3y7l/anLQBAIAipsHC6qANl12FHQwcesaBsuoXAABuZ+/gUD2Xcgeu425u4WBUBwAALlBiU4dqqgJHcat+WW6TNgAAUMq5ozEc48zAQR8KAAC3ET0//p11BXddlwqZAwAAF7MxXdTFlC/8ZfVPhm4AAOAatsdtFNfI4eqFv1RnAjIHAAAupu7ia+OVHWnhKE1FSxxMCgAAnEXd4Ax7n+60LhVCAwAAZZDpSAbHfvY75RKvfNBoiWuGkFQAACgLlF6RnR849FeXqAEAQJnl3Mu0G1YaJWcAAOBerr8Wuyhw2H5jRBAAAJRy+4XY/XeLBQAAilguwlGuFv66kxVm5xRm57i7FgAAWOHGLoUycbfY8uT0yujTK6PdXQsAAErmyquwSwNHuV/1K+t00rl16899sy4vNc3ddQEAQIgyc51VGzgs32QZeduKnFywSBiNQogjn8wS5fqdAgDKJXWXacZwOM3l3XsyEhLkdubhhMt79ri3PgAA2ODiJgACh9NozRtW/wQA4E5G4HCOpJXReWn/M24jLzXt9MoYd9UHAIAyhcDhBHlpaefWrbdszzi/bv3N7Gy3VAkAgDLFPYGjnA0dTVoZczPLSrC4mZ19cv5C19cHAAAb3HIVpoWjtDITElK2xRb3aMq22IzDCa6sDwAAZRCBo7SSVv7X9uDQpOgYRo8CAO5w3u6uwO0tZVusNhW2OJmHE1K2xdbt+YhrqgS7FBYWnjx5Um5Xq1atdu3a7q0PoLl58+apU6fkdvXq1WvVquXe+gClROBwXGF2js65r0nRMTW6dPapVMkFtRJCFBQUFBUVyW0/Pz8bJfPz8+WGl5eXj4+P8pqVPVlZWX379pXbkZGRI0aMcOKLGwyGmzdvym3bJwKmTL/AkoeHh6+vr7vqYyk9PX3r1q1eXl69evWqWrWqoqNcu3ZN+3K+/fbbw4cPV3QgwDUIHI47t26dzkkoealp575Z13jgi6qrJI0fP/6bb76R2wsWLHjkEeuNK7m5uXfffbfcfuaZZ6ZPn+6a6t05Zs+e/emnn8rtLVu2hIeHu7c+twvTL7AmMDCwYcOG7dq169y5c7du3SpUqOCWugkhjEbjyJEjDx48KIT47rvvli5d6q6aALcX94zh8PDwcMtxnSgvLS1ppR2DM5JWxrjlBitTp069du2aCw6Um5v78y3nzp1zwRHLuIKCgrVr12p/fvfdd26sTDmQlZWVmJi4ZMmSiIiIp556ateuXe6qSV5enkwbQojdu3cbDAZ31QS4vagNHOUgWBTn5IJF9k4rOrlgoetHjyYnJ8+bN88FB8rIyBh8y+7du11wxDJuz549KSkp2p9r1qy5ceOGG+tTnhw5cmTQoEHLli1zy9EDAgJefPHP1sphw4Z5eXm5pRpAadi4Oqu7cJfQpeLh4VHO1sxwisyExMu77b5VyuXdezISEqu1vkdFlWxYuHBhr1692rRp4+Lj3uG+/fZb0z8vXbq0Z8+e7t27u6k6t6v4+PiAgAAhRE5OzsWLF3fs2DFv3ry8vDwhxKRJk6pWrfrEE0+4vlaTJk0aMGCAp6dnkyZNXH90oCyzkVeYFuuIIx87eDNYd91gZcqUKfy8dqUrV65s2LBBbtetW1dumEUQ6OFzS5UqVVq2bDlq1KivvvoqJCREPvrOO+8kJye7vlYeHh7h4eFNmzYtx424uBO4+Avs0kGj8r3d7k0m575Zb3bbFMmvZs26j/QQt07fpW2xeWmXzcpknT59bt36Bv3+obqSZuLj42NiYl566SV7n1hQUHDw4MHExMSMjAw/P7969eq1b98+NDTUtMzevXvz8/PT09O1PSdPnvzxxx+FEM2bNy8qKtLmnXbs2NHf39/0uT///LPBYPDx8bn//vtN9+fl5f36669yu1mzZto1W8rNzT106NCRI0cyMzN9fHxq167dpk2b8PBwy/95CgoKtP6d8PDw2rVr79+/f9++fTdu3Ojdu/ddd91l++3Ltya3w8LCzN64Ddu3by8sLBRCBAcHR0VFvfLKK0KIb7/9NjIysmbNmrafm5GRsX///jNnzly9etXPzy80NLRDhw716tVzVnk959SUwWA4cODAkSNH0tPTjUZj1apVW7Ro0a5du+Lm3dhb3l7NmzefOnXqoEGDhBA5OTnR0dFvv/22w28zNzd33759cvvuu+8ODg5OT0/fvXv3mTNn8vPza9eu3blz52bNmpk9S/tiVK5c+b777nP46Bqj0Xj48OEDBw6kp6f7+/vfddddXbt2tedTAW4DjgSOO7mfpTA7J2lltNVWCv/atRoPHCBuXfMyE36zDBxCiNMro+s80sNlU2Tvu+8+OcDto48+euihhxo2bKj/ub/++uuUKVOOHDlitn/w4MH//ve/K916CzNnzoyPjzctsHTpUjl0f9GiRXXr1h06dKjcv2bNmnbt2mnFLly4MHjwYLm9d+9e0yvxkSNHtGdt3rzZNHB8//3306ZNs/xd26tXr3Hjxpn9m56Tk6O9zqxZsxITE7/44gv5Z1hYmO3AER0dHRUVJbcfeOAB/UNhjEbjl19+Kbf79ev34IMPystYYWFhbGzsCy+8UNwTDQbD0qVL/+///i8nJ8d0v7e398svvzx69Giza7a95YXuc6pJTEycMGFCYmKi2f6QkJCoqCjLCVD2lndM165du3btKseNrlixYvTo0YGBgaYF9L/Na9euad+QJUuWXLly5YMPPjAbZx0RETF27FjTsRrad75nz57z5883O4q9H/Iff/wxceLETZs2me4MDw+PjIy09SkA7mZvAwldKvY5vTK6lPdj+zOyuMo777zj7e0thMjLy/vwww/Nljew4dtvvx04cKDlP5pCiGXLlr355psFBQV6XqdZs2Z16tSR22bXIe2Xpdm2EOK3336TG3Xr1m3atKm2f/ny5SNHjrTair5169aBAwdqCyVZmjdvnpY2REn/q3z//fda2mjVqtWsWbPkSAI9jh49qs1i6NGjh5+fX79+/eSfa9asKS6sG43GDz744IMPPjBLD0KIwsLCefPmmX3m9pYX9p/TxMTEF1980TI9CCEuXLgwYsSIdevWlaZ8aTz22GNy48aNG0ePHjV9yOGv7pw5c9566y3LWV0LFy6Mjtb7/6y9R8/NzR09erRZ2hBCnDhxQjaMAeUGgcMOWaeTzq1bX/rXOffNepdNkQ0PD3/jjTfk9vfff79582Y9z0pMTHzrrbdkp0BoaOiMGTO++uqrpUuXPv3007JAbGzsmjVr5HZUVFRMTIy24IQQ4uWXX46JiYmJiWndurWXl1ePHj3k/ri4ONOj7Ny50+q2EML0gq39sty/f//EiRPldv369adOnbp27dqVK1dqCyJduHBhzJgxubm5Vt+U7Nnx9vYODw8PDw+XOcyquLg47UMLDQ2dM2dOtWrViitsSZsBW79+fTlWV/tln5CQoGUpy2dpKzp06dJlzpw5X3755dy5czt16qQVWLVqlcPl7TqnQgij0Thx4sSsrCwhRN26dRcsWLB79+5ffvllzpw5WoJ87733rly54lj5UjKNob///rvDb9NUXFxczZo1x48fv3z58vnz5/fv3197aMGCBdoabjY4cPRly5bt3btXboeHh3/44YcrV678/PPP//a3vzHuCuUMC3/ZwYlDPo98MqvdjA+d8lIlGjx48KZNm+SvwGnTpnXu3Ll69eo2yhuNxk8++UT+YxcYGLhs2bIGDRrIh7p27VpQUCCHQ86fP/+ZZ57x9fW99957hRAXLlzQXiEsLEy77AkhOnXqtGLFCiHEzp07CwoK5JJNWVlZW7du1cps3bp14sSJshWhsLDw559/1p4rN4qKirSlyWrXrh0dHa2NHOzSpUuTJk3GjRsnhEhMTPz666+1WYtmRo8ePWTIENtLQ546derVV1+V8yCqVq06b9487UB65Ofna8tvPPnkkzLW3HvvvfXr1z9//rwQ4rvvvmvVqpXZswoLC2fNmiW327dvv3jxYq035KGHHho2bJgcibJw4cIBAwZ4eXnZW97ecyqEOHv2rNZTFhkZqWWmOnXq+Pj4RERECCGysrL27t37+OOPO1C+lKpUqaJtX716VW448DZN1a5d+7///a/WK9ezZ8+AgADZKnbp0qWzZ8+aphxLDhw9Ozt74cI/byjdpEmT6OhoLdo++uijU6dOXbJkiWOfD1AG0cKh1+Xde0q8bYp+mYcTHJhY65iAgIAJEybI7UuXLn322We2y584ceKnn36S26+99pr2j6YQwtPTUxt1kZKSkqDvA5GJRAiRk5OjdXkcPHhQ/tNcsWJFIURWVtahQ4fkQ6dPn9aatbXnHj58WGv2GDp0qFkIeOqpp7SRfUuWLLHabfH3v//9jTfesJ02Ll26NHLkSDkA1tfXd+7cuc2bN9fzHjW//PLL5ct/jt15+OGH5Ya3t/eTTz4pt1evXm3ZBhMXF6f9TB80aJDp2AtfX1+taT0lJeXs2bMOlHfgnJr21JiNkOjYsePEW7QTYW/5UjIdfXz9+nW5Ucqv7tChQ83GAD344IPatumwaKscOPr+/fu1r/rQoUNNG9K8vLxYyxzlDIFDL6fPaHXlOmCdOnXSfvSvWLFCa8K16vDhw9q22eQRIYTp+twnTpzQc/Q6depoq4BoHQra5JF///vfZnu0Lvk2bdpod1PT4ogQomfPnmaH8PLyeu655+T2mTNn5FXWTMuWLW3XMzs7e+zYsWfOnJF/zpo1q2PHjrafYkmbDRseHm56xL/97W9yIyMjw3KVTNPrn+VBW7VqNeMWmc/sLe/AOa1Xr57W6/TRRx8dOHBAW1IzMDBw0C3ambW3vBNpw3FK+dW1XC7dNDnJRi8bHDj6sWPHtJ2m4Ua6M29vhHKMLhVdklZGW50KWxp5qWmnV8Y0HjjAuS9bnNdffz02NjY1NVUIMWXKlOK6sYUQpguTL1y40PJfPV9fX9k4ob8//qGHHpLt7fHx8c8995zBYNiyZYsQolmzZv379587d256evqWLVvefPNNT09P7R9urYVACKENFPX19bU65zMsLEzbvnTpkumfOi1evFjrNe/bt++jjz5q7yukpqZqi23069fP0/OvQH/XXXe1aNFCXmDWr19vlplkb4sQIigoKDg42OxlK1eurA0CcKy8A+e0atWq//znP+XQnKNHjz7zzDP169fv3r17u3bt2rVrpw3L0NhbvpRMG1QqV67s8Nu0zXRkcYlT8xw4+qVLl+SGv78/dypGuUfgKFleWtq5detVtEacX7e+Qb+/u2aKbPXq1cePH//6668LIY4ePbp8+XK5koElrYFaCGF7WoHl/IjiaLNhd+7caTAYjh07Jsd8PPbYY35+fn369Fm2bNmZM2dOnjzZvHlzrQHAdA6t1k/fuHFjq4tJ16hRQ9t27PYxpmP0Nm7cOGDAAHtbOGJjY7XtBg0amE2Z6dChgwwcW7ZsuXjxomls0j5z03Z4GxwuL+w5p6NGjQoKCvr444/lzvPnz69YsUIOx+nTp8/QoUPNmivsLV8aGRkZ2nZQUJDcUPHV1c+Bo8sxtkKIsLAw1hBDuUfgKFnSypibWSVPhc1Pu5wUHSNurfyVf7nkFpGb2dkn5y9sOebN0lZRnz59+mzcuHHbtm1CiE8++cR0XKcp06mztkc86L+LxD333OPv75+Xl5eampqcnKz16ciW5wcffFDeF2Pv3r1BQUFJSUlCCH9/f9PBldrvxeIuFaZxwSlt0W+//faXX36p/+bjRqPR9G5tr776qo3C27ZtGzJkiPan1hmhrTNmm73lHTunXl5eQ4YM6du375YtW7Zs2WLaE7dp06ZNmzaNHz/+5Zdfdrh8aRw/flzb1obvqPjq6ufA0bU2sBL7a4BygMBRgsyExJRtsSWXEyIvLe30CrsX2EjZFlvnkR6uucGKp6fnuHHjdu3alZeXV1hYOHXqVKvFTMf/b9++3fRPhwUEBDz00ENyUu6RI0dk6KlZs6aMFG3btpVxJDY2VvvJ/vDDD5sufaHNrElOTs7Pz7dc0sq0kdzhOg8fPvy+++6TWeHMmTPTp0+fNm2azp+eCQkJVpegsGr16tUDBw7ULjza9enMmTMGg6HEy6G95UtzToODgwcOHDhw4MDMzMwjR478+OOP0dHRMt5NmzatQ4cOrVu3Lk15BxQVFWn3r/f19dUWcFPx1dXPgaObnsebN28yaAPlG4NGS2DXPegdPES08kNowsLCtEGaZqtiaBo3bqxtmy2pVBraMLqvvvpq//79QojHHntMDtMLDAzs1auXEGL37t3aoEuzYXems0Ws1kqbw2L2FvT7xz/+ERkZ+eijjw4Y8OfAmjVr1mzcuFHn001vQN+uXbv21mi/xU+cOGE6DFYbUVhYWCgbeExlZ2d/d4ucK2FveQfOaVpa2oULFy5cuKDNzqhatWrXrl0nTJjwn//8RyumDfW1t3xpbN68WRs2+9JLL8mBsULZV1cnB45u+hSdQ7CB2xeBw5aUbbFOnApbnMzDCTobUZxiwIAB2lxTq0xHTsydO1eba6AxGAxbt261MYbO8ilCCO2WE9oaX926ddMefeihh+SGFjjMblHRvn17bVv7davJzMyMiYmR2w8//LD+fhBT4eHhsqng3//+tzbmdOLEidoITRtyc3O1cbhdu3Zds2bNamsWLFigPUUOm5Xatm2rbWtrkGj27dv36i3Z2dkOlHfgnE6bNq1bt27dunUbMWKEWeHOnTtbDpuwt7zD9u/fry0CGxgYaLpUfOm/uqXhwNFN/080/T5IbrkvHaAOgaNYhdk5Lru5a1J0TClXTNfP19dXW5bDqgYNGmj/iO/evXv69OmmwyZSU1MjIyNfeeWVTz75xLTT2rSP47fffrP8N71JkyamazD4+vqaXjXNBpSEhISYtVLUq1dPa3iIjo7+6quvtENkZWVNmjRJq6Tp2AjHVKlSZcqUKXI7MzPz3XfflWtH2vDzzz9nZmbKbRs3TA8NDX3ggQfk9tq1a7Uxg40aNerTp4/cnjNnjulqpKdOnfrggw/k9r333isXirC3vAPnVGthio+PNx0MK4Q4dOiQNiy3fv36jpXXKfeWtLS0/fv3T5ky5bnnntNebfr06aZfKse+us7iwNFbtGjRoUMHub1o0aIffvhBK3/8+HGrN6UDbl+M4SjWuXXr7AoBVVu1ajvzQ623P+6tcZkJenv081LTzn2zrvFA6+tjOt199903fPjwxYsXF1fgX//61549e+SKFIsXL96wYUO3bt0qV658/vz5HTt2yKvvV1999cILL2jTHatXrx4SEiLnnqxevfrUqVM1a9Z84okntMmlco1zbTXuXr16mS5yUKNGje7du8t7zAohHnnkEctxCa+//vqOHTtSUlKEEGPHjl2xYkWbNm2R6PCdAAAgAElEQVTy8/N37NihrbU1YMAAp9xms3Pnzq+88oq8YdtPP/20bNmyYcOG2Si/fv1fa95rkcKqxx9/XLZJZGVl/fTTT3379pX733jjjR9++CEvLy8zM/OJJ57429/+1qBBg5SUFO3Gs0KIyMhIbUCJveXtPad9+vRZvny5vCdIRERE375927dvX6FChd9//11bMT04OFhbt97e8jpp12Mz3t7eU6ZMsZy67MBX14nsPbqHh8eYMWOeffZZIURhYeHw4cPbtWvXuHHjS5cumS32D5QDBA7r8tLS7B694SE8hBB/DTC0b5Jb0sqYuo884l+7ll3Pctirr766devW4joLgoODFy9ePGrUKDmN8/Lly9rtT6VmzZp98sknpv9ke3h4vPTSS++//778U46oMF1IQwjRsWNHLXBofSianj17aoHD6nzU4ODgJUuWREREyKbmhIQEs/Ui//GPf7zzzju23rY9/vnPf+7atUuOA50+fXqHDh0slySXLly4oA3g6N27d61atk6iaUfS119/rQWORo0aLViwYMSIEXLCwvbt202f5e/vP3PmTNOPxd7y9p7TgICA2bNnR0REyMm9GzduNBvOEhQU9Nlnn2n3+LW3fGl06NBh7Nixpi1kDr9N53Lg6O3atZNrsMo/4+LitMFVffr0OXz4sOlNA4DbGl0q1p1csEhRR6/Ng7pu7dEqVarYvjaHhYWtWrUqKipKG+cohYaGjh8/ftWqVZb3dh80aFBkZKRpu4Xpylfif3usLX+5du7cWdsubiJD06ZNv/7663/9619mLfPt27efPXv2zJkzLWevOCwgIGDKlClyAmphYeHbb7+dXUyLl5x0I/Xu3dv2y9asWVMr8+OPP2oLmwohunbtunnz5gEDBph+hr6+vs8+++y6deu0+6M6XN7ecxoaGrpq1ao333yzbt26pvurVq06fPjwTZs2mXWE2VteP29v77CwsK5du7722msxMTHR0dFW04Zjb9O5HPsf54svvrjnnr+mqtWsWXPcuHEzZ850YP06oMzykDdVssHqdddyp7bH7CH5p+mj2h6NEEL/3Z9dIDMhMe6tcfZe+6ve06rdjA+1Fo64seMy7R9w2nbGh66ZIquf0WhMTU2VAxSqVatWo0YN25Mwc3Jyzp49azQaq1WrVqdOHUXLGRkMhpSUlGvXrnl7ewcHB1uutnlby8/Pv3TpUlZWlp+fX0hIiOn0YKeUt/ecFhUVyU+7qKiocuXKpquYO6W8Iva+Tfce3Wg0Xrx4MTMz09/fv0GDBpbrrAOOkUOLPG7RtsWttXS1f6XN/jTdabnf6p7idv75EIHD0q7BQ/NSU+19ln+tWnV7/tU/nbIt1oF70Ac2btRpzueCNQcBAM5QdgIHYzjMnftmvWO3TXFs4S8zWaeTzq1b36DfP0r5OgAAlCmM4fgfhdk5rlyGy6qkla6bIgsAgGsQOP7H6ZXRN28tjeAuN7Ozk1aWoQ4mAABKj8DxF9md4e5aCFGKbh0AAMomAsdfXLauqB5HP55VdioDAEApETj+dHn3HhfcNkW/jMMJl/fscXctAABwDmap/Mm/Vq2206e5uxb/w6dSJXdXAQAA5yBw/CmwcSN3VwEAgHKLLhUAAKAcgQMAAChH4AAAAMoROAAAgHIEDgAAoByBAwAAKEfgAAAAyhE4AACAcgQOAACgHIEDAAAoR+AAAADKETgAAIByBA4AAKAcgQMAAChH4AAAAMoROAAAgHIEDgAAoByBAwAAKEfgAAAAyhE4AACAcgQOAACgHIEDAAAoR+AAAADKETgAAIByBA4AAKAcgQMAAChH4AAAAMp5u7sCUKigoOD3338XQjRo0KBSpUruro6L3JnvWiftw6lfv35gYKC7qwPgDkILhxBC3Lx5MykpKSkpKScnp7gyKSkpSUlJqamprqxYKWVmZvbt27dv374nT5505XGTkpK2bduWm5vryoNq/vjjD7e869uC9pU4ceKEu+tyW5L/Dly6dMndFQFuPwQOIYRIT0/v0aNHjx49Dh48WFyZyZMn9+jRY9asWa6s2O0oPz+/f//+I0aMmDNnjrvrAjjZlClTevToMXPmTHdXBLj90KVSHiQnJ8+dO1cIMXbs2ODgYPdWxtPTs2LFiunp6f7+/u6tibuUqdMB5/L29hZCeHl5ubsiwO2HwFEeZGVlrV27VggxevRod9dFVKhQ4csvv7x48WLLli3dXRf3KFOnA87l6ekpbsUOAHbhfxs4X/Xq1atXr+7uWgDORwsH4DACh+MKCgrksMSmTZv6+vqmpqYeOnQoMzMzKCiodevW9erVs/qswsLC33777ezZs7m5uZUrV27evHmTJk3MyuTn58upBI0aNQoICDB9KDMz8+LFi0KIli1benh4nDx5sqCg4PTp0/LREydOXL161dfXt2nTppaH1llDIcTFixePHDmSkZEREBDQsGHDli1bmv0Lq733Ro0a+fj47N+//9y5cw0bNuzUqZMQ4tixYwaDoUaNGrVq1ZLlk5OTs7KybHyYzZs3N/vVmJaWlpiYmJ6eXqlSpebNmzdu3NjDw8PyiQUFBfHx8efPn/f09GzYsOE999xj4yhW34Jdp892xWycDrMTZ/qCx48fLywsbNasWYUKFUz3nz59Oi8vr1q1anXr1jXdX8qzY5XBYDh27JgQwtvbu3nz5iV+enq+xhqj0fj777+fPHny+vXrlSpVatq0aXh4uNWzqb+k0P0NuX79+qFDh1JTU41GY61atVq1alVcGtZTUn7Usp0DgF0IHI7LzMx84oknhBBbtmz57rvvPv30U9NHx4wZ88orr5j9C7h3795JkyaZTRDo3bt3VFRU7dq1tT1paWnylTdu3HjXXXeZFt6/f//IkSOFECdOnPDx8Rk/fnx8fLz26MsvvyyE6Nat29KlS02fVVBQ8H//93+fffZZiTXMzMz8+OOPY2JiTHe2atUqKiqqXbt2lu99yZIlixYt2r17txDiqaeekpe0kSNHnj9//v333x8wYIAsv3Dhwv/+978WH+FfDhw4ULVqVbmdm5v7+eefL1269MaNG1qBvn37vvvuu2ZDIn777bdx48YdPXpU29OuXbt//vOfNg5k+Rb0n74SK2bjdPzxxx/ycNu3bw8LCzOrRmFhYUxMjGkgKCoqGjx4cEpKyuzZs7XA4ZSzY6moqGjGjBmLFi3y9/f/4osvSvzodH6NpTNnzkyePPmnn34y3dm9e/fJkyeHhIQ4VlLnN8RoNK5evXrmzJmZmZnaTn9//9dee2348OGmKU1/SVo4AIcROJwgKioqLi6uV69e9957b3Z29saNG5OTkz/66KNGjRo9+uijWrGdO3cOHz68sLCwQ4cOjz76aKVKlU6dOrV8+fItW7ZcuHBh9erVfn5+9h7673//+4MPPnjlypXo6GghxNChQytXrlyzZk2zYu+///6xY8dKrOG1a9dGjBgRFxcXFBT07LPPNmrU6Nq1a5s3b05ISBg4cOCiRYu6du1q+d4vXLhQt27dhg0b1qhRo7h6NmvWrF+/fmY7DQbDhg0bhBAhISG+vr5yZ25u7siRI3ft2lWtWrWIiIh69epdunRp9erVGzduvHz58rJly7SSSUlJQ4YMycjIqFq1ar9+/erUqZOSkrJu3bpXX33Vrs9Q5+nTUzEbp6Nx48ZNmzY9derUoUOHTAPHvn37CgsLhRC//PKLaSBISkpKSUkRQrRt21buUXR2jEbj559/vmjRIiHE7NmzO3bsaPvjsutrfPHixaFDhyYnJ9esWfPZZ5+V52j16tU//vjj4MGDY2JitDYw/SX1f0NiYmKioqKEEH369JGB7JdffomNjZ0+fXpOTs6bb76p1VN/SRk1CByAAwgcTnDs2LEvvviie/fu8s/hw4f379//xIkTX375pXbFys/PnzBhQmFh4UsvvfT2229r/2A9/PDDzz//fGJi4o4dO3r37m3voQcNGiSE+O233+QVbsiQIWa/BaVz586VWEMhxKeffhoXFxcSErJs2TLtojhkyJDJkyfHxMS89dZbGzZsMGtjyMzMnDt37iOPPGL7n+DBgwdb7ly+fLkMHDNmzNB6jubMmbNr167Q0NAVK1Zo7+Wpp5568skn9+3bt379+meffVbunDp1akZGRlhY2LJly7SSL7/88muvvRYXF2frU/tfek6fzorZOB0eHh49e/Y8derUvn37TLPXjz/+KDc2btz4r3/9S/sYExIShBCdOnXSLrSKzs6iRYtk686nn3760EMP2f6s7P0az5w5Mzk5uVWrVv/5z3+0ug0YMGDw4MGnTp2aM2fO5MmT7S2p8xuSnZ09Y8YMIcSbb745atQoWWzQoEGfffbZp59+Onv27KeffrpBgwZ2lRR0qQClwP82TjBu3DjtciWECAoKeuGFF4QQe/bsMRqNcmdmZmaPHj2GDBkyZMgQ03/9O3bs2KFDByGEab+AW2p47tw52REzZswY05/gFSpUiIyMrFu3bmpq6ldffWX5yo8++qgDP/ji4+OnTJkihIiMjNR+2aelpc2bN08I8fbbb5smp5CQkKFDhwohtN6E48eP//DDD0KIN954w7Rk7dq13333XbtqoufD0V8xG+Tb3L59u2zSEELk5uZu3ry5Tp06Xbp0SU5OPn78uFZYZqaHH35Y/qno7ERHR3/44YdCiA8++ODxxx8v8S3Y9TU+deqUDJRRUVGmSah27dqRkZFCiLVr12ZnZ9tVUv+JuHjxohw21KNHD62Yh4fH0KFDmzRp0qhRo6SkJHtLiluBg1kqgAMIHE7QokULsz116tQRQuTl5eXl5Wl73n333Xfffbd+/fpmheWPp+vXr7u3hrKnPzg42PSfXSkwMLB///5CCHlVsP3KemRmZo4dO7awsLBnz57Dhw/X9v/888/ycN26dTN7SpcuXYQQCQkJV65cEULIJdqCgoIsf5TbO0FGz4ejv2I2tGnTxt/fPz09XRv9cPDgwaysrMcee6xPnz5CiF9++UXuNxgMsuVD6+BQcXa+/fZb2Y8QGRn5/PPP2668ZNfXeO/evUKI+vXra71Cmvvuu+/VV18dNmyY/IT1l9R/IqpUqSL3a5+qFBgY+P3338fGxmopU39JQQsHUArkdCW0H0AGg8HsoczMzAMHDpw9e/batWvyl25iYqIQQvsx7a4aynkNrVu3NpsXI8nZH8eOHcvMzNRGdzrGYDBMnDgxKSmpfv36kydPNv2hfObMGSFE/fr1t23bZvYs7UqWlpZWo0YNWbJly5YVK1YsTWWssvxw9FfMxssGBAQ88sgjGzZsOHTokFykZNeuXUKIbt26yav1d999FxERIYQ4ffp0ampq7dq1tcTg9LOzZ88euTrZ888/Lw9qFz1fYznTqm3btpaTR6pUqTJmzBgHSuo/EbVq1Ro4cOCKFSs++OCDX3/9tXfv3q1bt27YsKFlVtBfUhA4gFIgcLhOfn7+vHnzFi5caDq0vuzIyMgQQlj+cpWqVasmN65fv17KwLFixYpvv/1WCPHRRx+ZjW9NS0sTQhw9evS1114r7unyFi2yDdzqgBUV9FfMtgceeGDDhg179uwZMGCAwWDYuHFjxYoV27ZtGxAQ0L59+/379ycnJ4eGhh4+fFgI0atXLy36OP3saIv079q168qVK5YDjYuj/2t89epV07o5paRdJ2LChAmNGzdesGBBbGxsbGysECI0NPTJJ5/s16+f2TdHf0kGjQIOI3DYp7glAUpkNBrHjRu3YcOGkJCQUaNGtW3bNjg42MfHRwgRFRX1zTffOLWajpDXtoKCAquP5ufnmxZzWHx8/NSpU4UQ77zzTvv27c0elb+V27dvbzpa04zs75A/MYurrdPpr5htcgbEjh07cnNzT548mZKS8swzz8hGi969e+/fv3/Pnj2hoaH79u0TQtx///3aE1WcnWeeeWbfvn3Jycnvvffe7Nmz9VxE7foayxfUBqzYoL+kXSfCx8dn0KBBTz/9dFxc3L59+3766acjR47MmjVr/vz5kydPfuqpp7Sn6C8pv3i0cAAOIHAIIYR21w+tz96S/Ent8B294+PjZRf7okWLwsPDTR8qIwPQZHfA2bNnrT6q3R4zKCjI4UNkZGSMGTOmsLCwd+/eQ4YMsSwgf50HBwe/9NJLtl9KDtS4cOGCw5Wxi/6K2RYaGtqqVavExMSjR4/++uuvQghtDIqMF7GxsU8//fSOHTuEyYRYoeDsPPXUU1OmTElISHjmmWe2bt26ZMkS08E0xbHrayyHf5Y4tMWukg6ciICAgG7dunXr1m3MmDFnzpyZM2fO119/PXbs2ObNm5utvq+nZPv27SMjI1u1aqXz6AA05HQhhAgMDJQLFhV3Q/Pc3NxDhw6J4tu0SyQnIDRq1Mjsn2mrtBUn9fzmc5a7775bCHHgwIHLly9bPrpnzx4hRKdOnSpVquTY68uhG2fOnAkNDZ00aZLV39NyjcudO3faXpZUCNGsWTMhxKFDh/RcpUpPf8VKJEd9HjhwYPPmzcJkWGiTJk1atWr1ww8/7Nq1KyMjo3v37qadI04/O88995yPj0/btm3feecdIcTUqVP1zCW262ss16zbv3+/ZcNMdnZ2dHR0dHS0XGhLf0n9JyI+Pv77778/cOCA6c6wsLDJkyfL/iPZjGRXSSFE165dR4wYIQeoArALgUMIIby8vOQ0gZiYmPT0dMsC33zzjWz8sLE4tG1yMN3Fixfl7D5NWlqaHDloqkqVKvL3ouUvWjk7w4zW0WM5RlW/+++/Pygo6MaNG5b9O8nJyatWrRJCPPnkkw6//vLlyzdu3CiE+Oijj4q7h+oDDzzg7e2dk5NjdZbpjh07tIUgO3Xq5O3tXVhYuGnTJrNicgCEc+mvmCjpdHTu3FkIsWzZsmPHjvXs2VNLFR4eHo899pgQ4uOPPxYmLR+SurMzZMgQ2T0xduxYq19+U3Z9jbt27err65uenr59+3azh/bs2RMVFTVjxgy5SJf+kvpPxM6dO0eOHPnWW28VFRWZlgkICJCfuTa+VX9JAKVB4PjTwIEDAwMDU1NTR4wYcfDgQe2fnqysrKVLl06aNEkIMXjwYPnD2gGyDfbGjRszZsyQw+kNBsPu3buHDBki28NN5xP6+/vL683ChQu1NQCuXbs2f/78hQsXWr641tFz5MgRx6onhKhSpcobb7whhPj44483bdqkfQLnzp176623hBD33nuvvCI64MCBA9OmTRNCREVFWU591NStW1cuTD59+vTo6GitgScvL2/JkiXDhg175ZVX5FW8Ro0acm7FzJkzY2NjZW0NBsP3338/fvx4xyppg/6KiZJOx9133x0UFJSamir+d+EHIYRcKlQ+y2yAi7qz4+XlNWnSpPr16ycnJ0+cONF2ZrXraxwcHCyX4X/vvfdMGwn27dv33nvvCSGGDx8ux6/oL6n/RMgUdebMmZkzZ2rNIQaDYfXq1XJacuvWreVO/SWFEKdOnZo7d65s7wRglzIxeqAsaNCgweLFi0ePHh0fH//000/XrVu3cePGeXl5hw4dkv+oPfvss3INIsfcc889L7744sqVK1euXLlq1apGjRpdunQpKysrKCioXbt2cXFxch1rTURExLZt244ePdqjR482bdoIIY4fP56XlxceHm52DwshRL169e66666jR4+OGjWqXbt2lSpV0nNHDEsDBgw4ffr0ihUrRo8e3bRp0xYtWly9enXnzp1CiLCwsI8++sjqnEw95s2bJz/G999///3337csMGPGjKeffloI8corr1y8ePHLL7+MiopasGBBmzZtbty4cfDgwfT09ODg4LFjx2p9MTIa7t27NyIiIjQ0tF69emfPnk1JSenSpYtctcK59FfM9unw8/Pr2bOnvH+9WYNZixYt5DJToaGhltFW3dmpUaPGjBkznn/++c2bN7dt29bG8Ah7v8Yvv/xyYmLiDz/80L9//1atWjVs2PDs2bNyAu0TTzwh7zVjb0mdJyI8PPz999+XZWJiYjp06ODn53fs2DGZ4IcNG6YFX/0lhRAzZszYvn17SEiI/OQB6Efg+Ev79u3Xr1+/atWqtWvXpqSkaP909ujR44UXXnjwwQcdnqIiTZgwoX79+gsWLMjIyJCDRZ544onXXnvt4MGDcXFxcXFxf/zxh7ZoVdu2bVeuXDl9+vTExER5P7CQkJCIiIjGjRtrd0TTeHl5zZw5c8KECfHx8XFxcQ6PaPPy8nr33XfbtWu3ePHixMTEU6dOCSHknTuGDx9ue5EJ2/QPRqlQocK0adO6dOmyZMmSxMREOSzU29v7xRdfHDZsWGhoqFYyMDBw3rx5c+fOXblyZXJycnJyclBQ0KhRoyIiIh544IFr1645XNtSVqzE09G1a9e1a9d26NDBbMqlp6fn448//umnn/bq1ctyHoS6syOE6NixY2Rk5PTp06dNm3bPPffYaIWy62scEBDw2WefyYCSmJgoA0RoaOiIESOeeeYZ03E8+kvqPxEDBgwIDQ2dP3/+7t27tc6ali1bDh8+vG/fvqZvSn/Ju+++e/v27XJZVQB28ShxzR+r/ZeWO7U9Zg/JP00f1fZohBDy3hNlRFFRkfzd5u3tXatWLYdnplhVUFBw4cKFmzdv1qxZs8QlE4xGo1x3uWLFivXq1bM9cdFgMFy4cCE/P79OnTqVK1cuTSWNRmNaWtrVq1f9/Pxq167twF3lnEKrQ40aNWz8fM/KykpNTfX09Kxbt6424cjtFXPi6TBTFs6OXV9jIYTBYLh06VJ2dnZAQEBISIiNaaX6Swrd35DMzMz09HSDwVC1atWaNWva+OVQYkmj0ZiZmVmlShVmxuJ2Ie/V4HGLti1uDTjTvudmf5rutNxvdU9xO/98iMABAEB5VXYCByEdAAAoR+AAAADKETgAAIByBA4AAKAcgQMAAChH4AAAAMoROAAAgHIEDgAAoByBAwAAKEfgAAAAyhE4AACAcgQOAACgHIEDAAAoR+AAAADKETgAAIByBA4AAKAcgQMAAChH4AAAAMoROAAAgHIEDgAAoByBAwAAKEfgAAAAyhE4AACAcgQOAACgHIEDAAAoR+AAAADKETgAAIByBA4AAKAcgQMAAChH4AAAAMoROAAAgHIEDgAAoByBAwAAKEfgAAAAyhE4AACAcgQOAACgHIEDAAAoR+AAAADKETgAAIByBA4AAKAcgQMAAChH4AAAAMoROAAAgHIEDgAAoByBAwAAKEfgAAAAyhE4AACAcgQOAACgHIEDAAAoR+AAAADKETgAAIByBA4AAKAcgQMAAChH4AAAAMoROAAAgHIEDgAAoByBAwAAKEfgAAAAyhE4AACAcgQOAACgHIEDAAAoR+AAAADKETgAAIByBA4AAKAcgQMAAChH4AAAAMoROAAAgHIEDgAAoByBAwAAKEfgAAAAyhE4AACAcgQOAACgHIEDAAAoR+AAAADKETgAAIByBA4AAKAcgQMAAChH4AAAAMoROAAAgHIEDgAAoByBAwAAKEfgAAAAyhE4AACAcgQOAACgHIEDAAAoR+AAAADKETgAAIByBA4AAKAcgQMAAChH4AAAAMp5u7sCAACocvPa9exz5wx5eb7Vq1cKa+jhWezPbKPBUJibK4Tw9Pb28vc3e9SQn19086YQwsPT07tiRaV1Lq8IHACAcuja8RMJH0w7v36DDApCiIB69Zr/c2SzERHeAQGW5TMOH95y/4NCiEYDXuiyeIHpQ1mnk77r9tCNjAwhRKe5s5u8NFh99cshulQAAOXNhY2bN3XskvzlV1raEELkXrx48O2o7X2eyE9P1/9SBZlXf3y2v0wbLV5/jbThMAIHAKBcyYg/9FP/F4oKCjw8PVu++a/eu358IiG++5dranTqKIS4svfX3cMijAaDnpcqunnzl+EvXzt6TAgR0rdPm/cnKq15+UaXCgCgXNn/xr9lnuiyeEHY8/3lzspNm9R5uPsP/Z5O+2lnyvfbkr9Z1/Dpp0p8qfgJ713c/J0QomqrVvcvXujp46O05uUbLRwAgPLjjwMHrvy6TwhR+6HuWtqQvPz92344VW6fnL+wxJc69Z8lxz77XAjhV6PGg2tifIIqK6jvHYTAAQAoPy7/skduhPV/1vLRave2DmoeLoS4/MvugqvXbLxO6k87973+hhDC08fnwTX/rdSwofPreochcAAAyo+rR47IjaC7WlgtUL1dW7mRlXS6uBfJSjqz8/kX/+yXWTRfDv5AKRE4AADlx430P+SGb5WqVgv4Vg+WG8W1cNzI+GPnCy8WZGYKIeo+0qPhc1ZaSuAAAgcAoPww5OfLDQ8f67MivHwrmJU0c3HL1szDCXI7ZVts2s6fnV3HOxSBAwBQfnjdWtSrqOCm1QKG/Btyw9tiOVFTWo/M7uEjbmRkOq+Cdy4CBwCg/PCtXk1u3PjjD6sFtFW/bMw6CXms92O7fgp9sp8QIuf8+bixkc6u5p2IwAEAKD+qtmolN67+dsTKw0Zj+r59crNyk6ZWX6Hava27LvvCy9+//ayP/GvVEkKcifnv2TVrlVT3TkLgAACUHzXv7yI3klZGG4uKzB5NP3Ag6/fTQohaD3bzqRxo9RWqtGzpXamSEMKvZs2Ocz+XO38d/Xp2crKqSt8ZCBwAgPKj2r2ta3V7QAhx5dd9JxcsMn2oMCfnwFvj5Xb4iJf1vFrIY72bRQwXQty8nrX3lVFFhYXOru8dhMABAChX2s/62MvPTwix/80xv456LW3nz5mHE5K/+vr7R3pf2bNXCFHvsUfr//0Jna/W5v3JgU0aCyFSd/x4fPZcddUu9wgcAIBypcpdLR765kvvShWFEKf+s2Rbr8c2dbr/5xcHZ8THCyFqdXugy6KFHp56L38+lQO7LPrzbvXxE97NOHRYUbXLPQIHAKC8qd39wccP7GsWMdx0oEZQ8/D2s0OBcsUAACAASURBVD5+eMM3vtWsrwlWnBqdOrYaHymEMBoMu18eUZiT4+Tq3hk8IiIibJcwGo16dmp7zB6Sf5o+qu3RCCGio6MdqT4AAMUz3LiRl3KpMC/Pt1pV/9q13V0dN3jhhReEEB63aNtyQ/uv5Z+mOy33W91T3E6J29MDAMotL1/fSmEN3V0LCEGXCgAAcAECBwAAUI7AAQAAlCNwAAAA5QgcAABAOQIHAABQjsABAACUI3AAAADlCBwAAEA5AgcAAFCOwAEAAJQjcAAAAOUIHAAAQDkCBwAAUI7AAQAAlCNwAAAA5QgcAABAOQIHAABQjsABAACUI3AAAADlCBwAAEA5AgcAAFCOwAEAAJQjcAAAAOUcCRxGo9Hp9QAAALcRe8OAS1s4SCoAANyZXN2lQuYAAKAscPEVuYTAQT4AAAA62YgNals4yCsAANxG1F243TNLhSACAIC7uOUqzLRYAACgHIEDAAAoR+AAAADKETgAAIByZSVwXL161d1VAACgXMnMzHR3Ff7i/sDh4eEhhFixYoW7KwIAQLkir63yOut23m45qoeHh5yTo23s3bvXaDQOHDiwatWqbqkSAADlRmZm5vLly/fu3Ws1bbglgrg6cGgJw9LevXtl7JB/yg2zP4W12cOs6gEAuBNYBgVtj9lGGWnVMOX+LhWN7U/H8jM1fUhSVTMAANynuMucjStjcQXceK10Q5eKbOSQ79l0w/RRy2Li1sek7RQWbRtkDgBAuWd6sbO6bXunu8KHe8ZwWNLihfZf8b8JwzSRyA3T5AEAwJ2juNYOs6hRpq6SagOH2YgNywEcZglDFNOwYdkQImjPAABAR9OF7e4YnftLrwwNGrXsZDFr6jDDWFEAwJ2puF4VYdHUYaOk1T3quLNLxbKjpLiQQX8KAACmdPaqWN3vFu5fh0Pusd1cYbUvRs8TAQAoT+ztCrHa/uEWLgocNnpSzIpp2zo7U9we2QAAcAv9HStWy+h8yFnctg5HiZ+CjQIsvAEAuGNZXgRLc0l1Gee3cJTYmGE5dUVYG71hud4GCQMAAD29J8WN5NDzOvoL2KWsDBq13FPctll51ZUEAKDsK3E1MBt7XMNpXSqlnNFb3AQe0/10owAAYMrs4lhcV4u912Kd++3iuhYOqy0WJe4UJj0spn9qSuy+cdobAABAPceuazZaMkqMIK65VpYQOKz2ZeicclIaxc2DtVoZpTUBAMCV7L2uWS3vgoujvcdV0sJh2UShsz3DNFVYTRjECwAAbNAze0VPt4vTL7juvD29njfJuA0AAPTQOVfWXVdVZ7Zw6OlqsTHfRM+4DdYVBQDAlJ55KKUZDeqsgKJq0GhxvSo2iukZt0FrBwAAxSlxXIXO5KHiauu6LhWdHShWn0jHCgAAxbFxoSw7nSwOtnDo7BnR+fTixo1aPsux2gIAcKex3Wjh+pU5FK7DYbWLpLgOFAZtAABQevYO6dA/4KOUSg4czl11w+FBGyQPAACKo39VDHVLftl+NcdbOBwbB6rnRViBAwCA0nC4K8SBEaY6KV/avMRmDBvBRdumeQMAANts5wA9YziU/rZ3xUqjJZaxMVDUtAAAAHCAAyNG3bPSqAONKo7N+mX6KwAAzmL1wqrnoqzz+q5nv8ZFd4u13W9S3HANelIAALBXKZsJFClt4LDRe6JzsVFRfJeKjfdv+6UAACgfnHK9K/3wDgcOakZv4HBscqztxTYsC8sNnUuH2VsZAABuO6W53tk1J6U0h9PzLCd0qdjOIraX/yruKaZ/0rECAIAepWz2sKshxF6uGMOhZ4Ev209XUi0AAO5Irp8TK+y6eVtpOnWsTj9hTgoAAK7k8OW49AM7nNbCYe/aG6Y75QZdJwAAqFDKuOCU1gH7Aoe9wzWslhE6bgZL+AAAoDRK02ihv5j+LGJ3C4dj01UsX0SwtCgAAO7grIusXa/j5EGjjo0GpT0DAADV7M0Zzv3x70jg0DOv1a4MQWcKAAAqOBwanNUjo3GwhcPpmcP0ibYL0BEDALijuP7C5/S0IZSuw2FX94q9LwsAwB3ClRc+dceyYx0OM04Z3QoAAMoIpVd2xwOH/kOywBcAAGWZ/iu1wxd0hXeLtSwpNxgWCgBAWeDKeSvOuXmbsCdGkDwAAHAjdbeEtcGlS5tbPsX0T/IHAAAqlDIruGFpc9tKuQgp4zwAAChrnHV1dudKowAAoMxy/0qjJSJ2AABw+1LR53D7LfwFAAAUUTe8QWHgkJiTAgBAGeeCYZTKA4eGO7QBAFCmuHK6husChykmxAIA4GLunQ3qnsBhhgmxAACUb6W6lwoAAIAeBA4AAKAcgQMAAChH4AAAAMoROAAAgHIEDgAAoByBAwAAKEfgAAAAyhE4AACAcgQOAACgHIEDAAAoR+AAAADKETgAAIByBA4AAKAcgQMAAChH4AAAAMoROAAAgHIEDgAAoByBAwAAKEfgAAAAyhE4AACAcgQOAACgHIEDAAAoR+AAAADKETgAAIByBA4AAKAcgQMAAChH4AAAAMoROAAAgHIEDgAAoByBAwAAKEfgAAAAyhE4AACAcgQOAACgHIEDAAAoR+AAAADKETgAAIByBA4AAKAcgQMAAChH4AAAAMoROAAAgHIEDgAAoByBAwAAKEfgAAAAyhE4AACAcgQOAACgHIEDAAAoR+AAAADKETgAAIByBA4AAKAcgQMAAChH4AAAAMoROAAAgHIEDgAAoByBAwAAKEfgAAAAyhE4AACAcgQOAACgHIEDAAAoR+AAAADKETgAAIByBA4AAKAcgQMAAChH4AAAAMoROAAAgHIEDgAAoByBAwAAKEfgAAAAyhE4AACAcgQOAACgHIEDAAAoR+AAAADKETgAAIByBA4AAKAcgQMAAChH4AAAAMoROAAAgHIEDgAAoByBAwAAKEfgAAAAyhE4AACAcgQOAACgHIEDAAAoR+AAAADKETgAAIByBA4AAKAcgQMAAChH4AAAAMoROAAAgHIEDgAAoByBAwAAKEfgAAAAyhE4AACAcgQOAACgHIEDAAAoR+AAAADKETgAAIByBA4AAKAcgQMAAChH4AAAAMoROAAAgHIEDgAAoByBAwAAKEfgAAAAyhE4AACAcgQOAACgHIEDAAAoR+AAAADKETgAAIByBA4AAKAcgQMAAChH4AAAAMoROAAAgHIEDgAAoByBAwAAKEfgAAAAyhE4AACAcgQOAACgHIEDAAAoR+AAAADKETgAAIByBA4AAKAcgQMAAChH4AAAAMoROAAAgHIEDgAAoByBAwAAKEfgAAAAyhE4AACAcgQOAACgHIEDAAAoR+AAAADKETgAAIByBA4AAKAcgQMAAChH4AAAAMoROAAAgHIEDgAAoByBAwAAKEfgAAAAyhE4AACAcgQOAACgHIEDAAAoR+AAAADKETgAAIByBA4AAKAcgQMAAChH4AAAAMoROAAAgHIEDgAAoByBAwAAKEfgAAAAyhE4AACAcgQOAACgHIEDAAAoR+AAAADKETgAAIByBA4AAKAcgQMAAChH4AAAAMoROAAAgHIEDgAAoByBAwAAKEfgAAAAyhE4AACAcgQOAACgHIEDAAAoR+AAAADKETgAAIByBA4AAKAcgQMAAChH4AAAAMoROAAAgHIEDgAAoByBAwAAKEfgAAAAyhE4AACAcgQOAACgHIEDAAAoR+AAAADKETgAAIByBA4AAKAcgQMAAChH4AAAAMoROAAAgHIEDgAAoByBAwAAKEfgAAAAyhE4AACAcgQOAACgHIEDAAAoR+AAAADKETgAAIByBA4AAKAcgQMAAChH4AAAAMoROAAAgHIEDgAAoByBAwAAKEfgAAAAyhE4AACAcgQOAACgHIEDAAAoR+AAAADKETgAAIByBA4AAKAcgQMAAChH4AAAAMoROAAAgHIEDgAAoByBAwAAKEfgAAAAyhE4AACAcgQOAACgHIEDAAAoR+AAAADKETgAAIByBA4AAKAcgQMAAChH4AAAAMoROAAAgHIEDgAAoByBAwAAKEfgAAAAyhE4AACAcgQOAACgHIEDAAAoR+AAAADKETgAAIByBA4AAKAcgQMAAChH4AAAAMoROAAAgHIEDgAAoByBAwAAKEfgAAAAyhE4AACAcgQOAACgHIEDAAAoR+AAAADKETgAAIByBA4AAKAcgQMAAChH4AAAAMoROAAAgHIEDgAAoByBAwAAKEfgAAAAyhE4AACAcgQOAACgHIEDAAAoR+AAAADKETgAAIByBA4AAKAcgQMAAChH4AAAAMoROAAAgHIEDgAAoByBAwAAKEfgAAAAyhE4AACAcgQOAACgHIEDAAAoR+AAAADKETgAAIByBA4AAKAcgQMAAChH4AAAAMoROAAAgHIEDgAAoByBAwAAKEfgAAAAyhE4AACAcgQOAACgHIEDAAAoR+AAAADKETgAAIByBA4AAKAcgQMAAChH4AAAAMoROAAAgHIEDgAAoByBAwAAKEfgAAAAyhE4AACAcgQOAACgHIEDAAAoR+AAAADKETgAAIByBA4AAKAcgQMAAChH4AAAAMoROAAAgHIEDgAAoByBAwAAKEfgAAAAyhE4AACAcgQOAACgHIEDAAAoR+AAAADKETgAAIByBA4AAKAcgQMAAChH4AAAAMoROAAAgHIEDgAAoByBAwAAKEfgAAAAyhE4AACAcgQOAACgHIEDAAAoR+AAAADKETgAAIByBA4AAKAcgQMAAChH4AAAAMoROAAAgHIEDgAAoByBAwAAKEfgAAAAyhE4AACAcgQOAACgHIEDAAAoR+AAAADKebu7AgDKLqPRaO9TPDw8VNQEwO2OwAHgL2YJw4HAYYb8AUAicAD4K1g4PXBoSB7AHY7AAdy5rOYMbTuryHCtyJBlNOQUFeUai/KNxgJhvGk0FgmjUQgPITyFh4+HRwXh4efh4e/hWcnTM9DDK8jTK9DTS76Ch4eHZWQheQB3JgIHcCeyjBpyI8NQmFZ084qh8I+iQpGTG3D1elBWTsWcnMCcfK/8fM8bN8TNm8JQJIxG4eEhvDyFj0+Rr6/B368gwO9axYrnAivmVqlsrBhQ3dO7ppd3TU+f6l7ewiR5mG64550DcBMCB3Bnkdd705xhNBqvFBWeLyxIKbppuHY9+PIfwVcyQtIzRF6e7RcShQZRaPDMy/e8es1HiIpC1JQP+fvnB1f7o0a1EzWrewZVrufpE+Jdoaant2XIIHYAdw4CB3CnsIwa+caipMIbZwoLCq9erXshtcXFVM+r15xwpLw8v/MX656/WFeIoipBmfVq7w2p7V2lSph3hUbevn4enmZdLcQO4E5A4ADuCLIlQ9u+XmQ4eTP/VOGNOskXmiVf9Eq7oui4nlevVb96rfqRE4ZaNS6G1jscGtLE2zfcx6+yp5dp7CBzAOWeV9u2bd1dBwAKmTZsGI3GnCLD4YK8/fnXg0783mzvwaCzFzxzcl1QDc+c3KCLqSFnz+cUFcYF+uYJEeTh6ePhYRo1iB1AOUbgAMozrWFDbvx2M//nG9mVj//ebPeBihdTxc1CV1foZmHFtCv1ks5nGYt+DfIXQtS4NaVFInMA5RWBAyifTHOG0WhMMdz8uSAnLzn57j0HK527IAwGd1bOYKiUdqXehUvnfTyPV/St6OFZyeN/brNA7ADKHwIHUA6ZpY2DBbm/Xc9oejCx5m8nPG4UuLt2f/K48f/t3dl3HNedJ/jvjcgdCSSYCWIHuFMiWRJBSZRN213TNudMnRlzTk9Xj3TmzJkp6bH+Bqv+BfvVfqXPnDoz7Uepl+pu26VSi4skkyBFihRAESQIEPuW+xb3Nw+BTAZyAbFnRuL7OTKdSGQGbkbG8o17b9ybj07NtCdTo5FgxmP2md7155UCMwdRy2HgIGo1zmaUZav4L7lkceLZuS+/9iyvNrpoNXjW4n3PpuYC3rFwIGp4go6qDmYOolbCwEHUUsThWTH/eS558u6DnvuPYOlGF60+S3dOz/ry+VtdkbAyIswcRK2IgYOodTjTxoNC5sHa8siNO8EX040u15b4l1d7F1fuxdotr6fbeHXHPjMHUWtg4CBqEc608U0+PTU3+9aXX5t7MpDXQTFS6d6Xc+Od4XjQ31/q0gFmDqKWYLz+JUTU9Jxp43Y+tTD14sLnt9SBDLCxt1QqfeHzWwtTL27nU84P1ehyEdFuMXAQuZtsdCufWpmcfPOLrxp84+tuWNabX3y1Mjl5a2PmYOwgcjUGDiIXq7j99Zt8ennqxRtfftPocu2BN778ZnnqxTf5tDNtMHMQuRcDB5FbVaSNB4XMzNzsuRt3Gl2uPXPuxp2ZudkHhQwzB1ELYOAgcrHymXiimHu8tnLh9l0Xt6RUs6wLt+8+XluZKObYqkLkdgwcRK4kjqlfl3XxZj518et7buwlujmVSl/8+t7NfGpZF50fubGlIqIdYOAgch9nYwqA2/n0hdHvPPOLjS7XvvDML14Y/e52Po2Ng6g2ulxEtD0MHESu5Owo6p943jE+0egS7aOO8Qn/xPOKDqRE5C4MHEQu47zKn7byE4nVE6MPG12ofXdi9OFEYnXaylfU7hCRWzBwELlJ+SyrtQZwJ5+5cP975AsNLdSByBcu3P/+bj6D0mdn5iByFwYOIpcpn2jv59P+F1PByalGl+iABCenfC+m7pc6czS6OES0PQwcRK7hbExJaut+MXv64XijC3WgTj8cv1/MJrXFhhUi12HgIHIZ+xT7sJg9OTah4olGF+dAqXji5NjEw2IWrOQgchsGDiJ3cE4psqaLT3KZvsc/NLpQDdD3+IcnucyaLnKOFSJ38TS6AES0bY8LuVNPniGXO+C/G7s0En3nkvOZ5bujS3fuHmghcrlTT549Pn/uR34evojchDUcRC7g7L2R0XrMyvU8edboQjVMz5NnY1Yuw54cRK7CwEHU7CqG9H5SzPU/m0Y609BCNVQ60/9s+kkxh6qVQ0RNi4GDyAWcl/JPrdzQ8+lGl6jBhp5PP7XyHOmcyEUYOIiaWsUV/JxVKK6ueecXGlqoxvPOLxRX1+asAljJQeQSDBxEzc5ZvTFpFYamZxtdoqYwND07aRVYyUHkFgwcRM2r4tpdRF5Yhej0XEML1Syi03MvrEJF2mDsIGpaDBxELmBfxy9pS+Jxc3Wt0cVpCubqmsTjy9riXSpErsDAQdSkqlsKZnTh6PxS40rUdI7OL83oVxPXsW2FqJkxcBA1u/J5dF4XuxaXG12cJtK1uDyni8wZRK7AwEHUjCpOn/aPi9oKMnA4BBeXF7WFOquLiJoKAwdR83Jeu8e1pVIplck2ulBNRGWyKpWKOzIHowZR02LgIGo6zrNm+Ty6oq22tXjjCtWk2tbiK44xzsvPM3kQNRsGDiJ3WBPrSDzd6FI0nSPx9JpYjS4FEb0eAwdRk6oYWyIhOpxi4KgUTqWTosGhOIiaHgMHUXOpeb4UkZRof5qBo5I/nU6KrrfSDr48RFQPAwdR83IOaZUV8WRyjS1PE/JkclnH0O8MGURNy9PoAhBRDRX9H0UkCzHy+T38E7FLI9t9S7Cvt/KZ3t4dLGfp7uh231KPkc9nISKilCo/WfEjETUDBg6iJrLJBXoBogqFer/dgeg7l3a/kGBfb3UKea09DByqUCig7kpj8iBqHmxSIXIHSwSWbnQpmo+lLTajELkBAwdRU3t18wUAnlmrOSqFOA4HUTNj4CDaM3vVb7F6VnoACgBbB6qVmkz2dqRRdkEl2nMerVlJS7THyicq+2y4+24EImJCwTRQ5CBXG5mGCbVJX40tduOol1eYOYj2CgMH0d6rOMOVz3mbn/k2n4HMC4jXq/YucCxvv+dmsK832Luhi2hmdjYzM7tXRdoB8Xq9Fc9sp6NoRc7g6GFE+8fD/Ypoz603gijlfFD+d2cVHj6ltM9n7t3kbUt37m73LbF3LlUGjpnZpbt3698msu+0z+fb0fost5jUyxxEtLcYOIj2SzltlH+0H+8sdgShigG/ubbnxdyOmoeLhh5CigF/ENtrTHFGDWfO4MGQaF+xSYVovzijRvlH51mw3umw5tJCUNlQ0L8vJXWxbCgYqhM4ahIHVGUOsIaDaN94LIt90Ij2RnWYMAzD+WTNATG3WNXRroxkOBTZ6zK7XTIcaldbutuuImTUbFKxL8CcEYTjhhHtFc/L//ffN7oMRK3DDAY9wYCnvd3T2emNHvF2d9uRoiJ5YAtVHRU6lDHd3jawXwV3q5X2tt4tBI6aFRvlH7XW9uPC/HxheaW4slJMJouZrJXJ7PsHIDo0OLQ50V6yMhkrk8ktr+D5JAAzFAyfOhU4fcrw+QzDMIz1U2N1+Cj/qp5OGMlI+/6V3KWSkfbO140nZNdblGsvnJlD23K57JMfkj88ZcIg2j8MHET7yEpn1r59kBwfj7zzjm9wwM4ZhmFUpw2t9eb1HO3KkFBIggG1dzequJ0EAzr0miaViraSMrtWQ2ude/EifmfUynEmXqL9xZFGifadlc0t37gZv3W7mM/bV9TVVfqo312xHERiykzHjhxYsZtfOnakq5Q2NrkhpVzD4UwbWutiPh+/eXvl5m2mDaIDwMBBdEDSky9W//x5MZ22LMuyLOfJD6+7RcLuCNKtjIWu6IEWurktdEWPKrO6423Fza7OlSwi9vovptOrf/7n9IsXDSg30aHEwEF0cPIrK6uf/4uVy9nnPPuaG44L8c3vyexRnvnu2EEV1gXmu2O9qm67cHU1ktbaXvNWLrf658/zK6sHWFiiw46Bg+hAFeKJ+I1b2hE4ylX9eN3wU1FlqPawFek4wPI2LyvSodrD0TodOGreh2IHDl0sxm/cKiSTB1teosOOgYPooOUWFnLj47oEG+cm3bySo1+Zi/09B1TQ5rbY39OvzHq/rV6l5RWeHRvPLSwcXEGJCAADB1FDJL57rFNpZ8PK5plDlQwpz+QAAwcATA70DClPzZHTZOOIXuVeopZl6VQ6+ehxA4pLdOgxcBA1gFhWdmysfM0ttVS/SynVrUwz0pE/eth7cuSPxsxIR3ephqPiNmNsTBvlwKG1zj5+LJzPgagROA4HNbUiZFUkWWt+sDBUp1Ke7cyj0VTSz575zr1pBAL2CBymuX7uFMe8sqg15exx5Zk8NnB6YamRpW+0yWMDx0vVGzVrOKq7i9oDfKUnJxtRXiJiDQc1tyKwKDKhdfV/CyLFRhdvN0RLcXKyXL1R0XUUjoaVinPqSeWdGu6XYLAhxW4GEgxODfefVN7yM+VwhqqOt86eucXnk6I5NxtRYzBwEDVM5oenzlYVbBxAovr1dvIIKHVKeV6eGj7QsjaTl6eGTylPYGP1xib1HOuZw7LSExMHXlgiWscmFWpqPqhhw+iVGsnYp+BzbXuKrZjO6OVlo6tLa12e3a3cgFLvXUqps8r7T6eO9Y9PqFz+AMuLpbujS3dHD/IvVhO/74dTx/7GUb2x4bdVtUSvOnAsLVtpTpVC1DAMHNTUDCAEFVLIQrKla36fQgBbm5K86RWnpo1o1M4Zsulk6M4uHR3KOGH6ps+eHPz20N1wMX325AmPr0MZyqH6ZeUqolczwbL3Bu2PIiQLFPeisa6VDm7VGDioeWkgLjIrekl0xYW8D+hURp8yOtX6zpmH5AEfXFbtkZ584T1/DqZpX4jb9Rzl39bLH0qpN5X3P5w53vdsykwcogGsrPbwk9PHfwnvJjOnwFG98WqYk3w+MzV9wKWlwyANmdR6bo/ufTKAbmUcM4yQq45jW3RIA4cvEuk4czp88oS3fRvzfRcSybXvHyfGnhQ5h/U+08CqyJRYKyI1d+M8MC96UXSnUseUGVKYFD2jda8yjhmGizKHWJbMzcvQoLNV5dVvHT+W71KxH4QN44LlGTt3+txXDW7jOEhj505fUJ6wYcDRl7a8iip6wDg7cFgvZ2p2iznM7D2rVS+mD8yi7FnaAKCBedEhwbH6g9q512EMHL5IJPrOSPvJk9t9o7c9HLt0yRMMrdy7z8yxf4qQl6Jf6Fe1Gh4gpFQYyqeQFyQhaZEioIFlkaQUDag8RAOLosOi+jad573ZZCcnQwP9Sin7/tjy5PXOO2Ox8XZZ+8F55f2ngb7k4Fx4aqbBn+FAJAf7MgN955UXVWmj5jgcTtlnzxpT6GaVhExrHVJqQBnMHDuWh2QFGvAAncoI7+7AkxSsii4CWUFeiYsunLboMAYOfyzqj+5w3CRlmuGTJ/Jrq2uPvt/bUpEtD5kUPa3XrxjCUIOGcdQ53oZaf9mCyEutk5A8AAgAHzBomD1uawDNzS8EEwmJRCpaBCpih82ZOZRSbyvv12+d/fHcoioUGlX+gyFe77dvnX1PeZ39NuqNMVp+vG51tbAWP9DiNrckZELrRdE+gWmg3227TPPQpYoiD9ClVN/u1uQsdFJQdCy2xRzGwKFM0/CYAJbvji7dvbv1d3VeOB99+21PMNhx+kwxkUyxSXivaWBeZE5r+4qh3zCGVO32ER/UgFJHTfVc65el+sxuZfQpVx47c9+PBy+/Wz4/llNFvbSB0iV+nzKHAuHxt988+5dvG1f8gzD+9ptDgXB/aTL6rUxJX5b74Wkjityk8pCXWi+KBuBDnbt9iPaBGw/Oe0q2+p8UrcTYk8TTpwAC3UfDJ09628ONLn2rWRQ9rbXd9/O4YZ5QZjltJCFPxLqri+NiJUunFh/UKcM8ZZg+AMCyyLI72+kz09M6HncOUYWNTQPOa3rnA6XUiPJmhgdXTh5r7EfYVysnj2WGB0eqqjfKnOvKfsur0UXjcXYXLbNrEGdEAwhDHTeMo66M6ORK3NS2oZjJJJ5OZGZmAbSfPNFx5owyW7BfT6NkIcsiaYjdT7tnY11FUZAQWRVJbhxg1AC6lepWhgGkIUsi2VrjoDe/3PfjsnG8UWzMHM4Xq43eUd77F9/MdUUbUO79l+uK3r/4235vrgAAIABJREFU5juOtFFRvSFVY6Y5Zb592JhyNx8NvCy1V/qAfqYNOljc2rYnMzObePq0mMko0wyfOBE+dnhHe9xzqyIrIgA6leqp05JSkw+qRxmdStkLWXVtJYfEExUny+qXVbSw2KLKfA/eO+++pUOtNt65DgXvvPvWe/BGHY0p5d/Wa1Up1xXpxcXDMxN9EpKsv/FXpI1hw9xlhwOi7eIGt23JiYnE+LhYlq8zEj550h9rzcvKA6aBNCQL8QBRZXRs8zaTDqViyvAAWUhCpOjOSo70tw9qzh+Ljd1IazYrHFOeU6Hw6OW3YbbQTm0ao5ffPhUKH9s4T1u9Sg5UDWeeevhdY0p+4BZFP9LWI7EWa91IbqeN59rKAwbQbxi8OWWflBt/J8XKQwAsizzU1l1dnBWN9VYt664uPtSWS5uAd4yb3LZZuXzi6YTdY7RtcKD95AnT72t0oVwvDUkJAISU2tmINyGokFIAskDWnXtxbmHBmn5ZPl/aT1ZkDqeKJoZz8ByNxu6/f+mgy71v7r9/6Wg0dg6eik9a8bKKhqdy9YY1M1tYWW1AuQ/cougJ0UmRpMiE6OrMsSx6RvR62lBMG/uo3PibkvU7TfKQuMhqqbVXA2nBqkhcdM6dl0Y7xq1uJ3JLy8mnT/Nra8o028+cCZ880egSuV5RYFdLhKDadnTzeUAhAAWgCBfPIpu4d1/n884aDvv5inqOmgzDGIG3vaf7wY9bIXM8+PGl9p7uEXjtgUlqqk5jr6qI9GGp3iinDfvH6szhfIHrRsZrFbL+v8PtMN4Wu2cEWB8VgnvvbuUh+d3tjkYpPmdFMko63fml6Hw+9+hx4O23yhnCfl5V3SJbpjaOf/UefN/09t6/8s7bX43CcufN/KZx//2R9p6e95Rvk7qNml1ry/VDhSdPisnWH/TdGSbso3nRzhzQALqUEReZLr2gSxkD2+kdRTvQqdQlteHE2quMXkdDZwDqTcN8E4fxhgPWcOyEPxYNnzzh64yIZcXHnySf8i7/3dKAtgfv2ukcsD4of0scSFM/PNWrq877Y1F1I0a9K37bu/Ae6em589PLOui+PqQ6GLzz08tHenreReVtKTWThzNtlLu/6LW1xHePGvchDogzbYSh3jTMc4YZhkKpnuOZWM9FL5fSxgllhF01CC+1GAaObTN9vvCJE22DgwDS09OJp0+tg50ivCUZgAEFIC/I16p69CiEoTqVCkPVrJcr15F46rzARZJ37mrLcvYeRa0+HE7lGhH7wUV4B47Ebv/1ZXfdK5vrit7+68sDR2IXS2mj/Ilqvr5m3YaVzyduf41W745XkTbsETW6lHHCMF5ljtIAXx1K9TNtNAe7g/yqSFyk5rGuhbn9yNwA4ZMnOs6eUaaZX1tLPJ3ILS03ukStwAflU0hL3TF9w1BnjM0qITVgAQA8Cl6XVxoX1uK5x98Hzp+T0hSyKLWqoNbsIWV2s4thGFrrc/CEAu23fnb5rXuPohMumJl9+cTwtxfPvSOeY8pUjjll6lVvVPQVLdcJ5R48LKZSDfwgB6Bm2rB/1aUMGJjQOlk6mYWhhpURY9poDnnIpNYzogNQxw3DXRM/7RIDx/YE+3rbT570BINiWcmnE8lnzxtdohbhU/CJAiQtkhYJbX8nTIuk12dUUT7378LJx997u2Kqp8f+sSJzoHQadnbsEBE7ativ11ofg9kh6u7b5xajkTP3H6lCk/amFa9n/O1z6cH+fy2eI460Ue7FUpGxKlqa4OgrWpydS008a8BnOECbpA2bM3MEgEEO8NWkDlf1Btiksi1mMNh+8kSwrxdA4ulEfHxcLKvRhWoRAaigAoA0JIHaU9JvQmN9Clk4bldxu9XbX1nJVMXYo6i6Y6X8fEV9gH3OPqKMn8MXHBy89YufJgf6DvxDvF5yoO/WL34aHBz8OXwVaUNt7A+LjZHL5uy9oTOZta+/acinODCvTRs2u20lqpQbpzNsbQYQUuhUqkMZ/pY4Um0dazi2Splmx5nT9qT22YWF5MTTQqL1+8AfGAPogApDJSGrIkcgndup5IiLrIhoIAzVgRY5vkqhmLh1u+Nf/7XzXOus2KjOHBXKFR5vi6c7EH7w3tuh/u6zj5+YiaZocbDa28bePJ3u730Hnl4YzpxUr6NozTtT1juK5vOJW7elpWfN3WLasHUpI6oM8LKyyfighpU5fLiSxrrDGDjEsrRlAYheGoleGtnu261MJj7+JPWC00HtsU6ljhgqqWVVZA46tOX79/KQedGrpWHRj7RQm2hhbS0zei/07jtKqXJnDptUTSRbcwl25lBK9Wr0wveov/+L/p7TT54NPHmmGtfZWfy+6dPHn5w+/ibMn8CDUpvR5mnj1ds3Tm5n124kv/r6UAzzJcCW511j1KCmchgDR25pObe05ItEdvBesazE04kUu27sAw9UFMaakrjIrGhDYysjFDlnvywNcN46gQNA+vmkEQgELpy3fzQMw1nPgY2dOWqO1WG/xf73nHiOifH96ZNfnBw+9XSy/+mkymQP8uNIMPDy5PAPJ4eHDc/fiBlSdRNGdc5AVQ3HekuKZaW+/iY7N99SX3wtdueMBZEupdgtoxmUh/8pAosiOeyqkT0hKG5cbItRPze9jS5DA/g6I3b7iCe8jSnmi8nk2uPv4+PjxXRm/8p2yL0UPVGa8SGqjGObzqsSF3kuelnW56M6bpgDLXoU7nj7Lf+Z00aJqrpRRZWG3ay+U7QagIToH5Q1AT3w4uXw5Ev/4r7fbJXrik4O908P9Z+AcUrMdrXeG7Rezih3F1VVt6XYP5Y7iqZH7yd/+KHl0wY1p0mxJsozEewFAzhuGMdUC44MdkgDB7DT0UEPXbfig+acZQpAAKrHUN3KCDl6ZmggKTIPvaDXpyewZ79s7RkiIu+96zs2vEnmsNXMHADsQ6L9b/nJrOjn0JNKSyIxND3XNTPviSf2ttjFjvbFvu4XAz1Ge/uQGMdgBNSGJFFuTKl+0lmRU/509oNy2siOjce/fcC0QY2ShjzXel72JnMYQLcyjhnGzqaUanKHOHBQs9LAvOjnWqcd+S4AFSjtgFlB1vGrMNSwYRxt6bQBQIAjP37fOzBQzhzYWAHw6pV1Mkd1PUf530Xol9AzSqtkqnthuWtxObS8amRzOyuqDvjT0c7Fruj80aiE2/pg9IvRhQ0hqV5lRvnJeu0pzttS8s+er/7lDji5ADWUBrK7npzB5lMItEq392oMHNSkkiIvRC+K3mTsCA/QrYyhFr0aqEGpyOX3fEODFZkDVafnzTNHvQcAViAL0EtKL0PMdKYtnjiSSIVTGX86483ljXxeFYpKa4hAKTEM8Xq0z1fw+3KhYLItuNLelupot0LBKFSXGEdh2JPaOEPGJg/qpQ1n141y2sg+fhx/+AhMG0QuwcBBTS0NWRC9KJKUV4NzGEBYKbvf3GGJGiUCdPzVhcAbZ6szBzaep7cYMioewHF2T0LWIEklKUgGkgXyQFFBQwRQgAHlEfiAABCEaoMKi4pAhVFZns2jBjZWeFR8iopPtN5L9O6oPcDX4fr6idyMgYNcw5533gO02H0o2yVA24njbZdGDNMsZw7UvzO2Xg1HzR/Lb6l4sHXV6ac6WNT8sbrHRvWn0FrrQiFx+6vMzCyYNohc5TDeFksu1QKzsu2V1MQznc2Gf/Q+vF5s7FxZHTvqBZGK18jGwcR2EDWcf65m2sCmgQN18o047oC1crn4lzfyyys7KxsRNZB5YtMJsYio2din7mIyWZyf9/b1wazde9T5Y80QgNed/tVG1c+U1Ruwq+L5187HVqGil6iVTK1+/i+FeNy5HojILdikQuRKdlWAGQxG3r/sPdql6szkXvFjvSYVVLWqOJ+sfr5adZpx/rhJxKn96Rx/d/2GlKmp+N1RnV8fuZxpg8h1GDiI3Ko0byzCZ86ELpw3PB61cXrVaqrUVlLv35oPKv+uY8baen+l5oPtRg2blc0m79zJTM+8Wn7NdxJRc2PgIHKxciLwdrRHfvS+GYk46znqndRfvX3TwLHJ4wrVzTcVjzePGs7uI3B02hCRwuzs6tffaMe0L0wbRC7FwEHkbq9SgKHa3zgbfOMNw+stV3XYNk8ee3iLSsWfqxk4xDHhS80WnPWKjVw+df9+euO8RUwbRO7FwEHkes6TthkMdoxc9A30OztpYmv3qlR349jktpF6y6xX24FNb37Z0D/UsnITE4nvHuvchqFOmTaIXI2Bg6gVVJzGAz3d4UsjZjhcbmGROtPZb16NsZtxOF6rYuHrnUNfTCUfPiym0pWL3W45iKjJMHAQtYjqaBB+42zwzGkjENhWC8u+qk4w5c6h+emXiQcPi4kas8cxbRC1AAYOopZSeT43jLbjx4JnTpvt7dWDXuxt8ij3/Sz31Sj/lXpNM7bC0nLy3r2aw3kxahC1DLcGDm9HOwArk9WFwi4XFR25GHv3nUIy+ez/+8PuC9Y2OND/N/8TgB9+///svmzNb+sV7vaZowBRh35s8v1W80sJ9PWGzp7xHj2qHBO0VnAGBeUYe7S6s+erv7X9kUnLOUOKxfz0dPrpRH5pueYrW2ArqV4pLfChWowGihABDMCDxtX+HQKuHCra8HqPf/C/A5j7ly/i408aXZxDLQ2ZfTWrWl1hqB5lFCCTog1gWBkmD7z7xl6zFae67MxsdmbW0x4ODg/5BwdrVnhUdxfd5I5Zp62kDeeYY8V4PDsxkX72XAp1JwNuje3jqVjVTwagQlAdCtwLGqsAWRFJ4tXm6wEiMCINbHRsaa4MHNQ8TCC88aCZgggQhHKOme+z5ygHDMAAFI+z+0/VurwuJpKJh48SDx95Ih2h4WH/4IDR1raV8bh2xjmSqdbaiscLi0vZycnc0vImf6b1No4QVLlCyQKykCxkTdCrjEBzf9wkJCXSBhVuuVOwfbEkgB/K/oKKkARkCTojqlcZ+/SBW3iVvhYDB+1KACqwcbd5LlYRiCnlrzqSeqCOKVO14hmlOdWs6rAV1+Lxbx/g2weecNh3tMsbi3mjUaM9XD33rPN+lk2aVFBVEWLPgGKtrBaWlvKLi7mFRV0oKEfB6hW49UQ37g4WZFkkDpkTPaTMGo1bTaMoSEJ8LffNFCBzogXoghF5tVWrI5AZkTRkVeTI/gSCVl2lW8HAQQeqmY+trapmVUdZMZksJpMy8QyA4fX4u7q8sZjZFjICQSMUNNvaavYDraD1erOaiMCyiktLheWV3PxCbmHBWYzND7GH5wBsQsWUSotVBDKQtkP00ZvFiogGOqEiG1OFCRVTeCmyAh1BU2dBN2r9wBHs6+08f94fi5o+vy4Wcssra48epV5MVb/SF+mIjowEeroNr8/KZdPT08t37lqOMZUBGD7vkbf+qm142BMKiWXlV1ZWv6u9tAodZ053nD3j7ehQpmlls9n5+ZV79/Nr8T37nG5gQVZEAHSVKphzkISIH6pNqYRIGmIBHsCub1RAERIXZCEa8ALtSoWqjs4CpCEpkTxgAAGoDrWhX2oeEhfxQoUVVgVZSACIOcqQFMkC9p8IQYWVarEDzSZVHRteUChmZ2YzM7POX5nBoCfcZgQCZsBv+PzrnepEpFDQhYIuFKRY1IWC5Au6aP9oVSx2i8U7VAwgBBWHFGXD59/ixhyACjl2GS/QplRbVYdHAVKQlEgBUEAAaFOqohGn3t6xImJB7JHX0hBLRDn2Grh5x7EgCQiASK06jCCUBygCWYh9tLEPU96qdJKCZESCSjkj4yar5bWrdCvf154cMxulxQNH54XzXZffU6YplmXlcmYw2DbU1jbQv/DVN6sPHzpfaXi8A//L/2zHCChlBvy+SCTY0zv9n/5TOXP4IpG+X/zcFz0CQOfyRsAbGhwM9ffP37y19vj7TYpx9MqPO8+fAyCWJUXLF4n4IpG2oaGX//W/ZecXNnljixFgDQKgq/SMBaxBgsCaSA7iASwgB6QgOVFtSs2K1kD5+aTIxipQaGBBdBICwAeVh2Qga4J+ZZQrse2/EgASghwEjttkEiLz0AA8gAGVgqQgcVF9SrVeh77Xxg7ny8qsTMbKZLb+J7a11lptFe/O1jfmArBa2mV0adfogOpy9DzQwJzoNEQBPqgiZBVYFYnCcDYW1Ns70pBcaWPJQXKACcRK73L1jmOf8gNQ9W6X61GGHeNsRWANEgYiFVlNsAYxRbWVnt58tWy+Srf1fe3mmNlArRw4Al1ddtpYe/z90jffWLm8py3U87OfhgYHY++MJJ6MO2svzIC/mErN/umfExMTyjQ7z70Ze+9dfywae/fd+Rs37df0/PW/8kWP5FdW57+8kZmbM/2+rvcvd5w92/Xee+mpqUIyVbMYoYEBO20s3x1dunMXQLCvt+df/czb3n70Rz968eln+78mml0G0gHVpwwTSoCkyDz0GiQu0g4VVcp+fk1kCXoJut1R1bkkOgkJQ3WVXpYQWYCeFxnc2OMgC/FD9SrDVzrPFSEL0AroVYZ9EWBB5kXSkGXB0ebYRfdc+VNt8TbW/VgLrblmt0MDaQgAr2NdbH1jTkPCUL3K8EDZlSJzouOQIKTciXtRdNqxNABZyJzoZWiPGO0bN+/qvWNAGQBWRZagj2w857l9xykKAPjqv2BnPXlfu1o2WaXY5ve1m2NmAzVDGfZLsLenmMlkZufmv7xhZ4tiKj3337+EiOHzBfv7nS8Wy5r5458TExP245UHD9e+HwMQPnlCeTwAIm++Eeg+qguFmT//OTM3B8DK5ee++LKQSBh+X8cbb9QrRqi/F0B+LW6nDQCZmdmlv9wBEDjaZfo32ewPCx9UV+lGWQW0K2UfNL0bn+9UygclgPMqIQ7xAkcdL+tQKgSVh6Q3nlINoFepNihv6comBwgQwqsqR7txHUAC2x/T223U9iskXPcXm5MFWRBdBPxQwdL62NbG7IPqVoan9LI2qBgMAGulzTYLSUBMx9IABKCOKgPAMnTF5l29d2zC7TuO3eFoz09+u1kt2/2+dnzMbKxWruFYefBw5cHDiieLqbSVy5mBgBkIbHg+k8kubGjdiI+Nd54/Z/r9ob7e1Iup8LFhAOmXM/mVVefL0lPTkXNvBrq76xXDyucBeEJBfyyaKw1wlJx4NjG7nlp2/glbhafqJOSDAiRU1SbtA/Kl4wWAlABAOyoHsQpDpSFZQZvj/dU1qPa78hDtOPr4oE4qE4fpvLjdOo8dL//QWhYxS2u3AOQgAvigeh31FtvamKt3mbDCoiALsSAmlL20SNXSglB2Y00WEnQsY5P2hWpu33FK2/kel3Q3q2W739eOj5mN1cqBw+ZtD7efOuWPRQ2/XxkGAMPrxRbGG8gtLelc3vD7fJFI6sWUp70DgCcY6PnZTzcsv6MDgKctVG85iSc/dJ4/7wmFBq/9MvNyJjM/l34xlVteKaZqN8EQSvvSay9B8hAAFiS+8VRZgJT+3exbDkAFoTKQF2J1wAgo+KEMNxwx90l1l8M9WQ6lq9ZlJ1R040gPu9yYTSgvUACKgFm6ovVXvUMBQSAP5AXBnX5Pbt9xSuV8zSrdrt2slt1/X1s8ZjZWiweOI2/9VfTSiJ0wrFzOHmt860MbWbmc4ffZb7fbPgLd3TUrMwxP3TVZTKWn/+N/jr4zEh4ebhseahsewnvv5ZaW1x4/3ryrKb2WPUrlGqTmyfG1od5ubU2IrEIvQ0OggDBUpNYgIocQV8FeGVBGedyFhMgidL5q9e5yYwbghSpgfdxf+04hs9bLPFDAFoYHrs/tO459Vt7zi/7drJZ9/b6aRysHjvCxY12X3wOw+uDh6sOH5U6dJ//P/8MMBreyBMPrAaAtC4DdBhcfG8vOz1e/UtcfoRlAfm1t9s+fm35/+PhwoLc32NPjj0W7f/oTfzRa7pFKO2DvxEdhVF8ZYGvnSwOIKNUBMw/JCtKQBCQh0o3KXlpEO6Ycl54dSq0J0pDUxhE4dr8xW45XbnJOdb5sx1y943gUIMjWf0EGogEf4N3metrxatnv76tJtHLgaD9zGkqlXkwt3P5qB283AwHT7wdgt31Y2awZDIrWa9+P76w8Vi639v24/Xb7RtnIG2dXHjwoxGvMx01bYW++CtjldZW9BL9CBMq+sW0ROgyzNXZyaioKiMKYg14WCTmqW3e5MUupUca+SvYBWft2jKqF2W00nr3YuF264/gBAHlIAVIdKQSYF10E+pVh3xm73Y+zg9VyMN9XwzV5i8+ueIIBAFZ2wxACnrY25akxQa7p9VV0I428cRaGIZaVmZkBYA+Y0TY8bPgq3+6LRDYpxrF/929P/d//V+zSiPPJZfuOFcPwdXRs+QNRJbsXVbxWD/Ct1EDOiZ4Uq6J93R48RwNWc/TrptbTppQfKg9JOLbcbW3M1a9JQwTwlEbRCKr1pVW8rABJQRQQqFrC1rl9xzGh2u21XevekQykCBiO5Gf/X3Ultt74SXezWvb1+2oerRw4CskkgLbBQX/0iP2MP3qk73/8hd1QoswN7WWG39f78//BrtKwXxk5fw5Aenq6mM4AWH30SIpFTyjU87OfOd8be/fS8L/9N50XLtQrRn5l1fB520+f9kVeZYv206cBQOv86mq9N9JrhZXyAFnI2sYDRwryQqzs6w58fqgCsCYb2kdzpYmqm3/8InIpBUSVArAMXT4PbWtjzmwMKxZkVQRABOsdUdugfFAVSxNgef1lW70npXSu3fDXW2DHOaKUAaxCKjJHAbIkAiDquGHEHrog6xi2C0AGsraj1VJzle7V99Xk3N2k0vX+5di771Q/v3x3dO37sbXvHrUND5vB4OD/ei2/uqoMw9fZqQBdLBoeT0V9hs7lQ729xz74d/nlFSj4u7oMj8fK5uwBMwDklpYXv/nL0fcvh08cP959NLuwCMAfPeLt6NC5fG55uV4hl+7cCfT2eDvah/63f5OdX9D5nCccDnR1AYiPP6k3XBhthQH0KGNG9BJ0WtZvf89A0hAf1Gs37g6lUqLSkBdihWGYQKE05nEM+zVXJBFKozWkIWuCqAK2uTEbwDx0SlQASgNJ6ALgh+pQr85q3UrNiCxCp0UFoTSQguQhQagjWx6C3KcAQRwC0ao0KUEL7DheqF5lzIpegI6LCgIKyq5OEKDdsSYBmFAdUHHItOh2KKM0MopZ6mBh2+JqqblK9+r7anLuDhwVoaHM8PkAZObm5/758673L3s7OuwTfCGeWLpzN/LG2WBfr7+ry/mW3Mpy4skP0Usjwb7e9WeWlxdu3c4tr5Rfs/rwOyuTOXLxbX80Gm5rAwCRzMzs4ldfZxcX6xUyv7r28p/+S9f7l0O9vaH+PvtJK5uNj40tfv2X3Xx8AhCAGlDGikgKkoEAMIBOqM4tDLFsAH3KWBGJQ6+W6q39UEc2To5AtB+OKJUWWYXuwPoQXlvfmANQnUotiyyVttt2qNjGqUz8paUlS+OGmUAURmQ7M54EoaIwVqDjjkkJWmPHCUINKmNVJLk+v4kA8ENFSpOSOHUpwxC9BolDAPEAXTAUsOBo79riaqm5SrFH31eTUz83a3RoaDGB7qOetjYrlcpsYeKSYE+PGQwUEsnc0lK91/giEV9nRCwrv7q69SoKMxgMdMUMj6eYzthjldIesltJFWBWDX3zWlKq4XRLhTC1tk025gzkpegQVJ8yAFjrw0ypmndUvnZp2yqPicozX2vsOFv/FFtck1tZYL1VuvW/4kaHInAQEbWGisBB5CLcZImIiGjfMXAQERHRvmPgICJyDbU+0RqR+3C7JSJyjQDUQKt1JaTDgjUcREREtO8YOIiIiGjfMXAQERHRvmPgICIion3HwEFERET7joGDiIiI9h0DBxEREe07Bg4iIiLadwwcREREtO8YOIiIiIiIiIiIiIiIiIiIiIiIiIiIiIiIiIiIiIiIiIiIiIiIiIiIiIiIiIiIiIiIiIiIiIiIiIiIiIiIiIiIiIiIiIiIiIiIiIiIiIiIiIiIiIiIiIiIiIiIiIiIiIiIiIiIiIiIiIiIiIiIiIiIiIiIiIiIqFmYjS4A7aOrV6/+7d/+bSaTmZ2dbXRZiIjoUFONLgDti7Nnz3700UexWEwpJSL/8A//sLi42OhCERFtcPXq1YsXL+5yIffu3fvjH/+4J+WhfeVpdAFoj8VisQ8++GBkZESp9TSplIrFYgwctBuxWOzixYtnz57t6uoaHBwEMDU1tbi4OD4+Pjo6urS01OgCkvtcvXr1gw8+KB+pduzs2bMAmDmaHwNH6wiFQr/4xS+uXbu2+x2YqCwWi127du3KlSsAnJvW0NDQ0NDQyMjIBx98cPPmzc8++4yxg7bFeV20G0qpkZGRP/3pTyKy+6XR/mHgaBEXL1788MMP7TaURpeFWsfFixc//vjjUChU7wX29vaTn/xkZGTk+vXro6OjB1g6InITBg7XGxoa+uCDD86ePcuoQXvrypUrH3300Ra3q1Ao9Pd///e///3vb9y4sd8FIyI3YuBwsVAo9Mtf/vLq1auMGrTnLl68uPW0YVNK/d3f/V06nWY9BxFVY+BwqytXrnz44Yeb1HUT7VgsFvv44493EGSVUh999JHdn3Q/CkZE7sXA4T5nz5798MMPBwcHWbFB++TatWs7zrKhUOjatWvXr19nDz4icmLgcJPy/QKMGrR/YrGYfU/Kjl25cuWzzz5jJQcROTFwuMa1a9euXr3KNhTabyMjI7tfyMWLFzkuAhE5MXC4gHPY0EaXhVrfntzx9MYbb3BcBCJyYuBoavathrzllQ5SLBbb/UKi0ejuF0JErcRodAFoMxxggw6ePXL5Lg0NDe1+IUTUShg4mh3TBhERtQAGjqb2hz/84d69e40uBR0uU1NTTbIQImolDBxNLZ1O//a3v/31r3/NabHowOzJxsYtlogqMHA0OxEZGxv75JNPPvvss0wm0+imMvuQAAACUUlEQVTiUOsbGxvb/d0le7IQImolDBzuICKffvrpr371q5s3bza6LNTi9mQmFE6nQkQVGDjcJJ1OX79+/de//vXY2Fijy0Ita2lp6datW7tZwq1bt9ikQkQVGDhcxm5h+c1vfnP9+nW2sNA++fTTT9Pp9M7em8lkPv30U7anEFEFBg5XEpEbN2786le/4ujRtB+WlpZ2PPva9evXOYsKEVVj4HCxdDr9hz/84ZNPPmELC+250dHR3//+99vNHNevX2fvDSKqiYHD3URkcXHxN7/5zW9/+1u2mtPeunHjxu9+97sttq1kMpnf/e53N2/eZGMKEdXEuVRagYiMjo6OjY1dvXr16tWrwWCw0SWiFjE6Ojo1NXXt2rXNJ6y/devWp59+ypYUItqE2egC0J4pFApjY2PffPNNV1dXb2+v81c3b95k/QftTDqdvnfvnr0JFYvFYrHY0dEBYGpqamJi4osvvvjHf/zHmzdv7riTKR1aoVDo/PnzezJ7w5/+9KenT5/ufjm0rzhPRwtSSp05c+bjjz8uT/v5ySef8OqTdq/63MAGFNqNq1evjoyM7HIh9+7d++Mf/8hNsfkxcLQspdSVK1dGRkZu3rx59+7dRheHiKiG3ddwMGoQNQVONktERERERERERERERERERERERERERERERERERERERERERERERERERERERERERERERERERERERERERERERERERERERERERERERERERERERERERERERERERERERERERERERERERERERERERERERERERER75/8HAZj/lpTIhQwAAAAASUVORK5CYII=)
![Screenshot_20230720-211336[1].png](https://book.traxpire.cloud/uploads/images/gallery/2023-07/tvjj0nV2Grtrc2jE-screenshot-20230720-2113361.png)
![Screenshot_20230720-211344[1].png](https://book.traxpire.cloud/uploads/images/gallery/2023-07/NJZy8VxqGQeStthR-screenshot-20230720-2113441.png)
![Screenshot_20230720-211352[1].png](https://book.traxpire.cloud/uploads/images/gallery/2023-07/I0H9mArg2604Ngn2-screenshot-20230720-2113521.png)
![Screenshot_20230720-211407[1].png](https://book.traxpire.cloud/uploads/images/gallery/2023-07/X56QIHV7eBquzS2d-screenshot-20230720-2114071.png)
![Screenshot_20230720-211417[1].png](https://book.traxpire.cloud/uploads/images/gallery/2023-07/CyNduyHYqnOimIPh-screenshot-20230720-2114171.png)
![Screenshot_20230720-211459[1].png](https://book.traxpire.cloud/uploads/images/gallery/2023-07/oMZAtTjngkny37A5-screenshot-20230720-2114591.png)
Device registration
If the device has internet connectivity, it will attempt to connect to the server set in the "Settings" menu to verify the registration. If the device is not registered or does not have a valid registration, an error message will be displayed.
The device needs to be assigned to the restaurant through the website, in the "Devices" menu section.
The device ID can be found in the 3 dot's "Information" menu. (see the last screenshot's 3rd row)
![Screenshot_20230720-211518[1].png](https://book.traxpire.cloud/uploads/images/gallery/2023-07/lkyKVwBsIXGOqCV3-screenshot-20230720-2115181.png)
![Screenshot_20230720-212605[1].png](https://book.traxpire.cloud/uploads/images/gallery/2023-07/BxbPS3YuBnuMFJZk-screenshot-20230720-2126051.png)
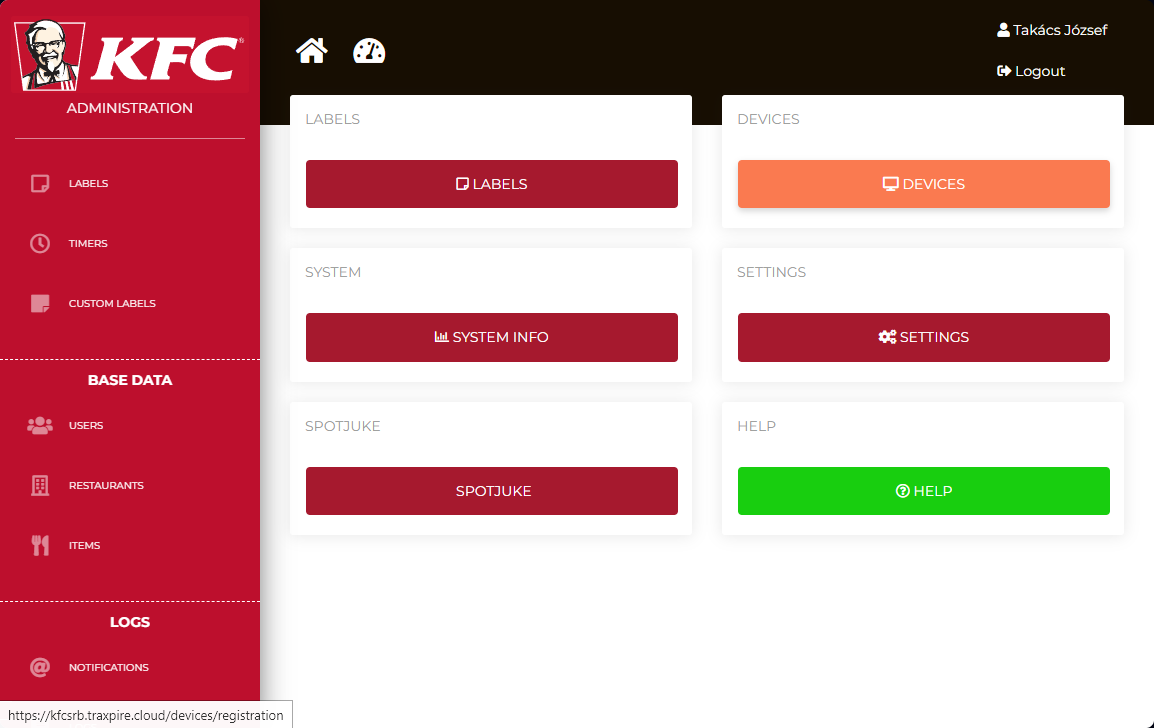
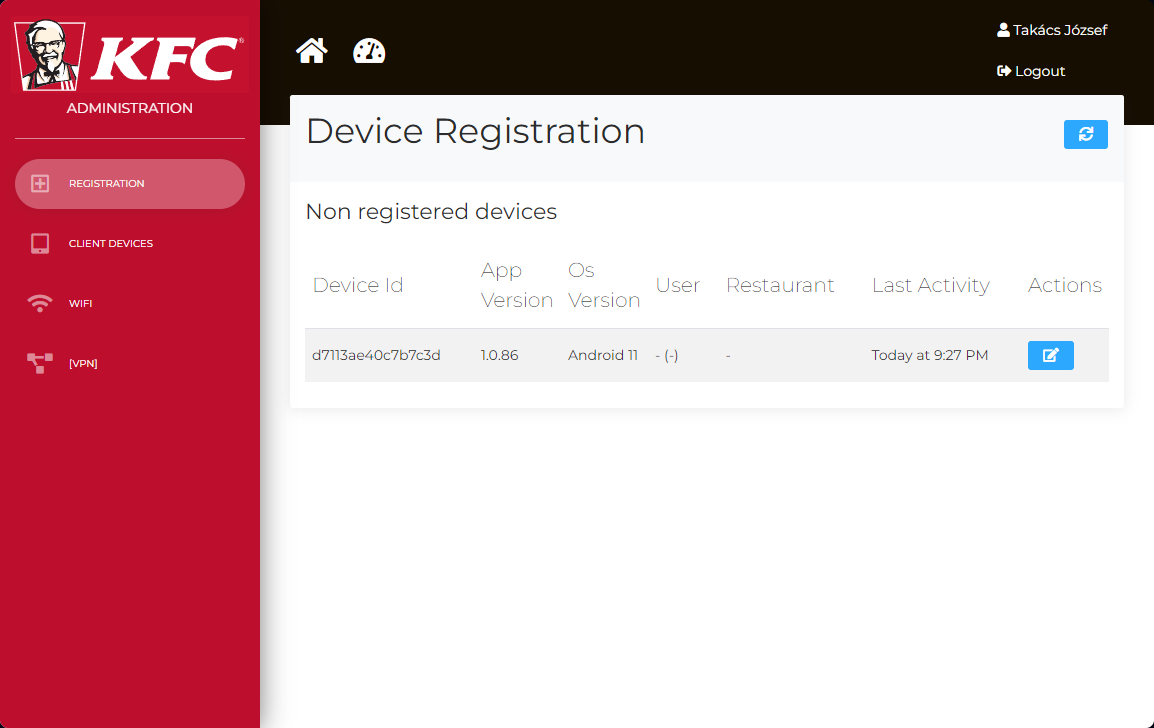

![Screenshot_20230720-213006[1].png](https://book.traxpire.cloud/uploads/images/gallery/2023-07/nj7ovQeE1QcRwuMV-screenshot-20230720-2130061.png)
Setting printers
In the case of network printing, the program checks every minute if the printer is accessible. If it is not, it will attempt to rediscover it. It is recommended to use a static DHCP server because the connection is based on IP address, which may change if network devices are restarted.
Sunmi V2s
Brand: sunmi
Sunmi Label Height: 25
Further settings do not have an impact in this case.
![IMG_20230720_214406[1].jpg](https://book.traxpire.cloud/uploads/images/gallery/2023-07/4FTSMW9o2m4mKEAL-img-20230720-2144061.jpg)
Brother QL-___
WiFi/Ethernet
Printer setup: books/devices/page/brother-ql-w-series-wifi-setup
Brand: Brother
Interface: Net
Paper Type: W62 (DK-22205)
- Press "Search and select printers"
- Wait for 1-3 seconds
- Select the printer
![Screenshot_20230720-214614[1].png](https://book.traxpire.cloud/uploads/images/gallery/2023-07/cf1tG5gmTyoMsFUi-screenshot-20230720-2146141.png)
![Screenshot_20230720-215205[1].png](https://book.traxpire.cloud/uploads/images/gallery/2023-07/W4REH7WtcogkJHPd-screenshot-20230720-2152051.png)
Bluetooth
Brand: Brother
Interface: Bluetooth
Paper Type: W62 (DK-22205)
- Pair the printer via Bluetooth
- Press "Search and select printers"
- Enable Bluetooth connection
- Wait for 1-3 seconds
- Select the printer
![Screenshot_20230720-215806[1].png](https://book.traxpire.cloud/uploads/images/gallery/2023-07/7GWtWiTTuIhJuuZb-screenshot-20230720-2158061.png)
![Screenshot_20230720-215817[1].png](https://book.traxpire.cloud/uploads/images/gallery/2023-07/HExLvfwfPdFd5C6D-screenshot-20230720-2158171.png)
![Screenshot_20230720-215837[1].png](https://book.traxpire.cloud/uploads/images/gallery/2023-07/LYvwHscdlgxvZs87-screenshot-20230720-2158371.png)
![Screenshot_20230720-215845[1].png](https://book.traxpire.cloud/uploads/images/gallery/2023-07/d055o6T8vrVvESwV-screenshot-20230720-2158451.png)
Application screens
![Screenshot_20230720-221041[1].png](https://book.traxpire.cloud/uploads/images/gallery/2023-07/NF35l1X9lIEBXruM-screenshot-20230720-2210411.png)
Main controls
Header:
- Current device time
- Category filter
- Network connection state (solid white means "OK", flashing white means "Searching for server")
- "3 dot" menü
- Printer status (Jumps to printer settings)
- Do full sync (full server sync NOW)
- Information (registration info)
- Settings
- Check for Update (forced check for new app version)
- About
Labels
List of printed or saved labels. At the end of the line, the green indicator signifies successful server synchronization.
Clicking on the line allows you to reprint or delete the item.
The items are displayed in order of expiration, showing the ones that will expire first at the top.
After the expiration of the item - during opening hours and 30 minutes prior to it - the device emits an audible alert at maximum volume and marks the row with red background color. The alert will continue to repeat until the item is deleted.
If a product doesn't have an expiration date set on server, it is considered a durable item. In such cases, the user can freely set the expiration date. If none of the durable items appear in the "Labels" list, the application will eventually notify the user with a pop-up window.
Timers
There are automatically recurring countdowns that cannot be stopped. To delete them, you need to press and hold the name of the timer for more than 10 seconds. Expired countdowns emit an audible alert at maximum volume, using a different tone compared to the label sound.
Reports
Here is a list of items that do not appear on the "Labels" screen. (In the future, this menu option will be removed.)
Custom
It contains features used in specific Hungarian markets.
"Donation" - provides guidelines for handling and using donated meat-based items.
"Custom" - allows for custom, two-line labels. For example, it can be used to mark waste products. The labels printed here are not logged.